Lesson Files | Lessons > Lesson_06 > 06Photo Portfolio.key |
Time | This lesson takes approximately 45 minutes to complete. |
Goals | Add comments and presenter notes to a presentation Index a presentation with Spotlight Customize the presenter’s view Rehearse the presentation Give a presentation with a portable computer Control Keynote with an iPhone or iPod touch Create a self-running slideshow Run a presentation as a kiosk |
The whole point of building a presentation is to actually give it to a living, breathing, and sometimes stress-inducing audience. One of the best things you can do to improve a presentation is to rehearse it in advance.
A rehearsal is when the fine-tuning happens: you may decide to reorganize a section, move slides around, or skip slides to get your presentation audience-ready. You can insert notes about the presentation, adding comments to a slide to help remind yourself of changes or to flag points for other team members. You can also use speaker notes to help keep you on track during the presentation.

In this lesson, we’ll use a photographer’s portfolio to practice rehearsing, modifying, and delivering a presentation to suit our intended audience—in this case, a group of other photo enthusiasts.
In earlier lessons, we used the navigator and outline views to build a presentation. For this exercise, we’ll use a versatile view called light table view, which is great for organizing and reordering your slides—particularly if your show contains a lot of images, charts, or other graphical objects.
Because light table view displays thumbnails of your slides, you can usually see most of your presentation in one glance. This makes it easy to delete, skip, duplicate, or move slides, and get them into exactly the right order for a compelling presentation.
In the Lesson_06 folder, open 06Photo Portfolio.key.
In the toolbar, click the View button and choose Light Table.

Click the button in the lower left corner, and from the thumbnails menu, choose Large to make it easier to see your slides.

Note that the slides are numbered to help you see the flow of the presentation.
Let’s change the order of the slides to improve the presentation’s flow. Slide 9 is a nice detail shot, but slide 10 would probably make a better introduction to this section, because showing multiple photos would allow you to talk about the country where the photos were taken. Let’s reorder the two slides.
Click slide 10 to select it.
Drag slide 10 to go before slide 9.

Press Command-S to save your document.
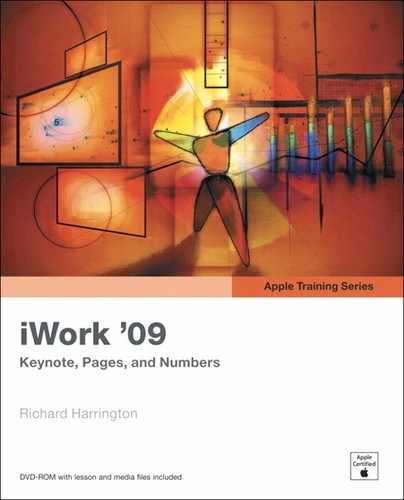
To add notes or reminders to a presentation while you work on it, you can add comments, which look and act like sticky notes. Comments appear while you’re editing your slides, but are invisible when you present the slideshow.
Double-click slide 7 to return to navigator view.
In the toolbar, click the Comment button to add a comment to the slide.
A virtual sticky note is added to the slide.
Click inside the note and type: Find a stronger image to use here. Format the text using the format bar to make it larger.
Drag the note so it is located over the left photo.

To make the note stand out even more, you can change its color.
Choose a red color for the note.

Press Command-S to save your presentation.
Keynote lets you include presenter notes (also called speaker notes) to prompt you as you speak. During your presentation, you can see the notes for each slide on your Mac’s display; the audience won’t be able to see your notes.
Presenter notes are incredibly handy. They can be used to jog your memory about an important talking point or to add that useful nugget that you want to mention but which would clutter up your slide with too much information.
You can also use notes to mark which member of your presentation team should speak when, or to add time-check markers so you stay within your speaking time. Well-planned presenter notes can add that extra bit of professionalism and confidence to your presentation.
Let’s try adding a presenter note to a slide.

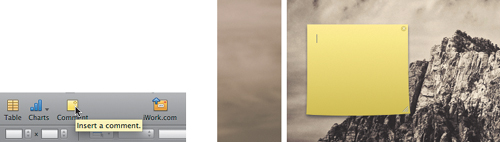
The presenter notes you’ve prepared are now part of your Keynote project. On some occasions you may want to create printed copies of your slides and presenter notes to refer to during your speech. Printed copies are also great to use for rehearsing if a portable computer is not available.
Choose File > Print. Open the Printer pop-up menu to display the Print options.
From the Print options, choose Slides with Notes. This option prints a single slide per page, with your speaker notes printed below each slide.
Note
To print multiple slides per page with notes, select Handout. (See “Printing Handouts,” in Lesson 7 for more information.)
Click Print if you want to send the document to your printer, or press the Esc key to exit the window without printing.
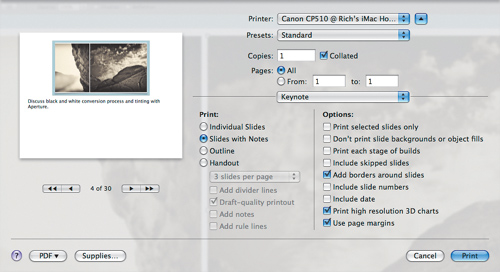
Starting with Mac OS X v10.4 Tiger, Apple has made it easier and more efficient to search the contents of your hard drive. Using Spotlight, you can enter keywords to search a constantly updated index of your system. The more metadata you add to a document, the more accurate your index will be.
Keynote lets you index your presentation files for easy searching later. You can add your name, the title of your presentation, keywords, and comments to a Keynote presentation.

The next time you search with Spotlight, your presentation will be easier to find.
Practicing a presentation allows you to work out timing and flow issues, as well as grow more comfortable with your slides.
When giving a Keynote presentation, you have the option of using a presenter display. This is a specialized display that can include a timer, speaker notes, and other useful information, such as the next slide.
Many presenters choose to view the presenter display on a computer screen while they send the full slideshow to the connected projector. You can practice your presentation and simulate the presenter display even without a projector connected to your Mac.
Choose Keynote > Preferences to open the Preferences window.
Click the Presenter Display icon to open the Presenter Display pane.

Choose any of the options that you find useful:
Alternate Display—Show the presenter’s view on a portable or second computer monitor (not the projector).
Show: Current Slide—Display the active slide.
Show: Next Slide—Show the next build or slide in the presentation.
Show: Notes—Display any speaker notes that you may have added.
Show: Clock—Show the current time.
Show: Timer—Count down from a specific time (if you have a limit) or show how much time has passed since the start of your presentation.
Show: Ready to Advance indicator—Show bar to indicate when you can continue to the next slide. A green bar means the next build or animation is loaded and ready for playback. A red bar means you should wait before clicking.
Close the Preferences window.
In the slide navigator, choose slide 1.
Choose Play > Rehearse Slideshow.

You can now rehearse your presentation with much more information at a glance: your notes, the time, the remaining time, and which slide comes next.
Press the Spacebar to advance the presentation from slide to slide.
When you’re finished, press the Esc key to exit the rehearsal.
Tip
In the presenter display, dots indicate how many builds you have on a slide. Initially, all of the dots are blue to indicate that the animation builds are present. As you click and animate each build, the blue dots become empty circles. Be sure to enable the Ready to Advance indicator so you’ll know when an animation is ready for playback.
You will probably be giving your Keynote presentation using a portable computer. Using a portable, you can easily rehearse the presentation at home or elsewhere, as well as make last-minute changes.
Depending on your Mac portable model, the steps for connecting an external monitor will vary. Here’s a general guide to connecting a portable computer to a projector for your presentation.
Close your portable so that the Mac goes to sleep.
Determine whether the projector requires a VGA connector or a DVI connector.

VGA connector

DVI connector
Note
Different Mac portable computers have various connector options. You might have to use a video adapter to connect to your presentation display, so it’s a good idea to carry a both a VGA and a DVI converter in your portable computer bag. You can purchase the correct adapter from an Apple Store or an authorized Mac reseller.
If necessary, connect the Mini DisplayPort, DVI to VGA, or Mini-DVI to DVI adapter to your portable.
Connect the display cable from the projector to your Mac portable.
Open your Mac portable and wait a moment to allow your Mac to detect the display. If your Mac desktop appears on the projector, you can skip to step 8.
If the portable does not communicate with the projector (in other words, if your computer’s desktop does not appear on the projector), you may have to manually configure your Mac to detect the display using the following steps:
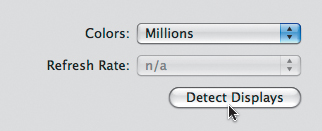
To force the portable to detect the display, click the Apple menu and choose System Preferences. Then choose Displays.

Click the Detect Displays button.
Your Mac should detect the display and choose the appropriate settings, and your Mac desktop should be displayed by the projector.
Select the monitor resolution that matches your slideshow resolution.
You can check your slide size in the Document inspector.
If the exact resolution is not available, choose the closest size.
Return to Keynote.
Choose Keynote > Preferences.
Click Slideshow and select the “Present on secondary display” radio button.
Select “Scale slides up to fit display.”
Keynote scales the slides to automatically fill as much of the screen as possible on the target display.
Click Presenter Display and select the “Use alternate display to view presenter information” checkbox.

The presenter display will show useful information about your presentation that can be viewed on your portable computer screen while the audience sees the show on the projector or second monitor without that information.
Close the Preferences window.
Click Play and test your slideshow.
It’s very common to switch gears during a presentation. For instance, you may want to switch to another application to show off a document or to access a file at the Finder level. Keynote offers several ways to pause or navigate a presentation:
To pause a presentation and display the current slide, press the F key (as in freeze). To resume the presentation, press the F key or Spacebar.
To pause the presentation and display a black screen, press the B key or click the Black button at the top of the presenter display.
To resume the presentation, press the B key or Spacebar.
To pause the presentation and display a white screen, press the W key. To resume the presentation, press the W key or Spacebar.
To pause the presentation and hide Keynote, press the H key. To resume the presentation, click the Keynote icon in the Dock.
To skip to a specific slide, you can either type its number or click the Slides button in the presenter display to display an interactive preview of all slides.
To see a list of keyboard shortcuts you can use while you’re giving a presentation, press the Help, ? (question mark), or / (forward slash) key during the presentation. Your audience may see your “cheat sheet” as well, so use this shortcut sparingly.
Using a remote control to run your presentation lets you move away from the computer while you speak. This can make for a more dynamic presentation, as it allows you to interact with and engage your audience.
One way to take precise control of a presentation is by using the Keynote Remote application for iPhones and iPod touch devices.
Note
Keynote fully supports several third-party remotes as well as the Apple Remote. A unique advantage of the Keynote Remote application is its significant range, because the application controls your computer over a Wi-Fi network. Additionally, you can see the upcoming slides on your iPod touch or iPhone screen.
Before you can control your computer, you will have to pair the remote with your computer. This requires that both your computer and iPod touch or iPhone are on the same network.
From the iTunes App Store, purchase, download, and install the Keynote Remote application.
To pair the remote with Keynote, choose Keynote > Preferences.
Click Remote.
Select “Enable iPhone and iPod touch Remotes.”

Make sure your iPhone or iPod touch is on the same Wi-Fi network as your computer.
Open the Keynote Remote application on your iPod touch or iPhone.

Tap the Link to Keynote button.

Choose New Keynote Link.
Keynote Remote displays a four-digit code that is required to link the devices.
Your remote device appears in the Remote Preferences window on your portable. Click the Link button.
Enter the four-digit code.
Once the code is accepted, the window closes.
Close the Remote Preferences window.
If no wireless network is available, you can create a computer-to-computer network to pair Keynote Remote with your portable computer.
On your Mac portable, open System Preferences.
Choose Network.
Choose AirPort. From the Network Name pop-up menu, choose Create Network.
Enter a name for the network and leave Channel set to Automatic.
Select the box next to Require Password and assign a password.
Re-enter the password in the Verify field.
Choose a Security method. (40-bit WEP is the most compatible choice.)
Click OK when you are ready to begin the network.
Your iPhone or iPod touch can join this new network like any other network.

When finished, choose to join the new AirPort network on your iPhone or iPod touch.
When your portable and iPod or iPhone are on the same network, the Keynote Remote application offers two ways to control your presentation.
In the Keynote Remote settings window, choose from the Orientation options.
Portrait—The portrait view allows you to see presenter notes and view the current slide only.
Landscape—The landscape view shows you the current and next slides.

Portrait orientation
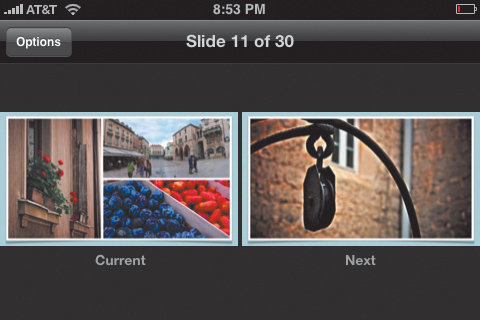
Landscape orientation
On your iPod touch or iPhone, tap Done to close the settings window.
Tap Play Slideshow to view the presentation.
To advance slides, swipe your finger across the screen from right to left (to go backward, swipe left to right). To scroll through lengthy presenter notes, flick up or down in the presenter notes portion of the display.
The spinning gear indicator means the slide is loading. If a slide has several graphics or complex animation, it may take a few seconds to load.
When finished with a presentation, you can press the Esc key on your computer.
You’ve unplugged yourself from the computer while presenting. Being free to move about the room makes it easier to connect with your audience and deliver a more dynamic presentation.
Keynote ’09 makes it easy to create a self-running slideshow with narration. This is great for making an auto-play presentation for an event, exhibition, classroom, or trade show kiosk.
It also works well if you want to record a presentation for later delivery. For example, some people prefer to record their timings for each slide, so they don’t have to click to advance slides during the presentation. This type of presenting style works well for shorter presentations that are repeated multiple times, because it keeps your presentation consistently paced each time you give it.
Keynote can record not only your narration of each slide but also the duration of time each slide or animation is displayed as you give the presentation. To record your voice, you can use your Mac’s built-in microphone or an external mic.
Note
Not all Macs have built-in microphones. You’ll find a microphone on any computer with a built-in iSight camera. To hook up an external audio source, see Apple’s technical article 304741, “Mac 101: Audio Attachments” (http://support.apple.com/kb/HT2508).
Make sure the internal or external microphone is properly connected and functioning.
Open System Preferences.
Click the Sound button and then click the Input tab to configure settings as necessary.
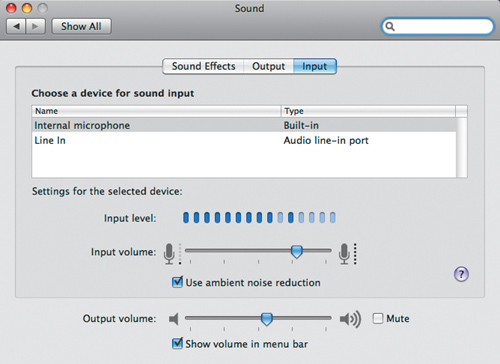
You can select a device and adjust the input volume.
Click slide 1 to choose it.
A recorded slideshow will always play back from the first slide that has audio.
When you are ready to begin, choose Play > Record Slideshow.

The presentation immediately goes into play mode and opens in full screen. All of the standard controls for navigating your slideshow are available.
Press the Spacebar to advance slides as necessary, and speak clearly into the microphone. Just talk about the slides—this is just for practice, so don’t worry about what you’re saying.
You’ll notice a red light in the upper left corner of the screen, which indicates that recording is active. The levels meter helps you monitor the volume of your recording.
Press the F key (freeze) to pause recording.
This is handy if you want to catch your breath, clear your throat, get a drink of water, or organize your thoughts for the next section of your show.
Press any key to resume recording. When you’re finished, press the Esc key to stop playback.
Your recording is automatically stored as part of your presentation. Be sure to save the file to permanently capture the audio.
Your presentation is now ready to use. When you play the slideshow, it will automatically use your timing and recorded audio.
A kiosk-style presentation is designed for instances when you want a self-running slideshow that allows viewers to navigate and view slides, but doesn’t let them exit the presentation. It usually runs on a computer without supervision—for example, in a museum, school, or retail environment.
You may want to make just a few modifications to control the kiosk presentation playback experience.
Open the Document inspector and click the Document button.
Select the “Restart show if idle for” checkbox and set the time to 5 m (minutes).
If you want, select the “Require password to exit show” checkbox.
Choose Keynote > Preferences and click the General button. Ensure that both the “Copy audio and movies into document” and “Copy theme images into document” checkboxes are selected under Saving.
These selections store all of the required resources (other than fonts) in the project file, so it will work on another computer.

Close the Preferences window.
Choose File > Save to save your presentation.
Click the Play button to view your presentation. When you are done exploring, press the Esc key. (If you required a password, you must enter the username and password for the computer you are on.)
Tip
You can also run any presentation as a kiosk. Just be sure to set the timing for each transition or build, then select the Document inspector and choose “Automatically play upon open” and “Loop Slideshow” from the Document inspector.
Your presentation is complete and you’re now ready to play it on any system with Keynote installed.