Chapter 23. RCP Everywhere
Up to now, Hyperbola has been contained within a single plug-in and has been designed to run as a stand-alone desktop application. In this chapter we look at restructuring Hyperbola to run in many different environments: on PDAs, in kiosks, or plugged into the Eclipse IDE. In addition, we talk about how to set up your development process to simplify supporting multiple product configurations from one code base. In this chapter we
• Explain why multiple product configurations are interesting in the real world
• Detail the factoring of Hyperbola into multiple product configurations
• Examine how Hyperbola’s code is layered to be reusable across multiple configurations
• Provide rules to help refactor your own products
• Outline tips and tricks for designing platforms from your products
• Detail how to identify RCP-friendly plug-ins
23.1 Sample Code
The sample code for this chapter is different from the other samples in this book. Whereas the other samples are either part of the Part II tutorial or derived from it, the code for this chapter is a completely refactored Hyperbola that includes many more features that were not added in the tutorial chapters. The other versions of Hyperbola were pedagogical in nature and left out many details needed to make a real product, such as exception handling and nifty features. This Hyperbola contains it all—it’s dynamic-enabled and -aware, has more UI features, and, more important, is split into several plug-ins to support making it run everywhere.
23.2 The Scenario
Imagine a scenario where Hyperbola has been deployed in a hospital. Before Hyperbola, staff used e-mail to communicate with units when trying to admit a patient and secure a bed. The hospital has 425 beds and things are pretty hectic. From time to time, registration personnel lost track of requests and patients were forgotten. With Hyperbola installed, front-desk staff can use instant messaging to contact the admitting and bed control departments. Messages appear on all desktops so anyone from the admitting team can respond immediately and confirm the allocation.
During the first few months, Hyperbola became immensely popular and provided a real alternative to e-mail. It was a success and other departments quickly started to see the value of the technology in their own workflows. It was so popular, in fact, that the hospital expanded its requirements—it wanted Hyperbola to run everywhere.
Doctors wanted to use PDAs to contact other doctors, nurses, and lab technicians as they made their rounds. Patients would be able to chat with family and other patients from their in-room touch screen kiosks or from kiosks in the ER and waiting rooms. The research centers and labs wanted to be hooked in. And, of course, the IT department wanted to have Hyperbola extend its developers’ Eclipse IDE.
23.2.1 About the Scenario
The scenario painted here is not real but was inspired by a news article about St. Rita’s Medical Center (http://stritas.org), describing its use of instant messaging in much the way we initially set out this scenario.
Hospitals are diverse environments employing medical professionals, IT staff (i.e., developers and technicians), administrators, and management personnel. Quite by chance we have heard of imaging technicians using Eclipse as an IDE, medical researchers using Eclipse to conduct and manage trials, and administrators using it to track patients. The initial scenario was extended to include these use cases. That having been said, all the Hyperbola configurations described here are very real and run on the 3.5.1 version of Eclipse.
The instant messaging scenarios and Eclipse RCP are even more compelling when you realize that XMPP (the basis of Hyperbola messaging) is extremely extensible and Hyperbola, via Eclipse, exposes this. Hyperbola becomes a platform for collaboration among everyone in the enterprise—videoconferencing, records exchange, lab collaboration—there is no limit.
Even if you are not interested in such a diverse set of runtime environments and functionality, your product may have evaluation, “lite,” and enterprise configurations. It may need to stand alone as well as extend other products. The design philosophies for setting up and managing these configurations are similar.
23.3 Product Configurations
There are two types of Eclipse product configurations: stand-alone and extension. The hospital scenario requires both. Stand-alone products are “traditional” RCP applications and have been the focus of this book. Hyperbola’s typical configuration is as a stand-alone application. It has its own entry point (i.e., an IApplication and an application extension point), a WorkbenchAdvisor, a product extension, and other product-level branding such as a splash screen and a customized launcher. This type of product is used at the nursing station, on administrator desktops and kiosks, and in PDAs.
By contrast, an extension product is one intended to extend an existing stand-alone product. As such, extension products do not have an application entry point or the same degree of customization typically associated with a stand-alone product—extension products do not have their own WorkbenchAdvisors. This configuration is used for the hospital’s developers and other tool-based workers who are already using another Eclipse-based product such as the Eclipse IDE.
One of the selling points of Hyperbola in this scenario is that Hyperbola can simply be integrated with other Eclipse-based applications as the hospital’s needs expand.
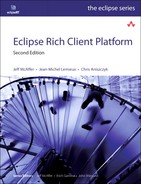
Figure 23-1 shows how common groups of plug-ins, called framework plug-ins, are used in combination with product-specific plug-ins to build both extension and stand-alone product configurations. The various configurations share a common set of framework plug-ins and optionally add their own customization plug-ins to the mix. Most of the functionality of the product lives in the framework plug-ins and is reused in all product configurations. The trick is deciding what to include in the framework plug-ins and what to put in the product configurations.
Figure 23-1 A product with several product configurations
Supporting a wide range of product configurations is a very powerful advantage—it gives your product more exposure and provides users with access to your product when and where they need it. This sounds great on paper, but in reality, creating a fully configurable product suite is easiest if you make it an explicit design objective. As in any software system, if reuse is not a concern, the code will not be reusable.
The essence of promoting reuse is the ability to split Hyperbola into several configurations that run in different environments but share as much code as possible. This section looks at restructuring Hyperbola as several plug-ins. We detail what goes in each plug-in, plug-in naming conventions, and implications for building and packaging. The rest of the chapter then builds on this refactoring and describes and compares Hyperbola configurations for the different execution environments.
23.3.1 Restructuring Hyperbola
The best way to understand the restructuring of Hyperbola is to contrast the prototype structure built in Part II with the multiconfiguration structure developed here. Figure 23-2 shows the Hyperbola plug-in structure in the prototype. The product information is embedded in the monolithic Hyperbola plug-in that includes the advisors, the product description, and the basic messaging infrastructure. This is a natural organization that is easy to understand—perfect for a prototype.
Figure 23-2 Hyperbola that supports one product configuration

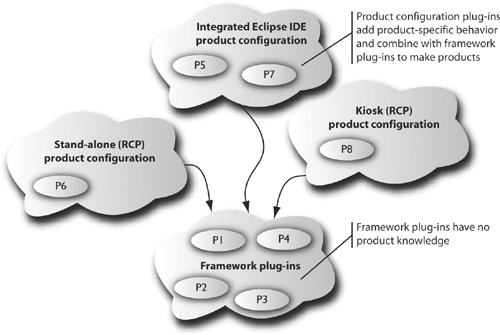
Figure 23-3 shows Hyperbola after being restructured to support multiple configurations. The figure shows framework plug-ins and product configurations. The framework plug-ins contain the Hyperbola application logic, Contacts view, and chat editor, with all product-specific files and code removed.
Figure 23-3 Hyperbola that supports multiple product configurations
Product configurations pull together the product-specific and common parts of Hyperbola to run in a particular environment. They typically include some number of product plug-ins that coordinate and position the various elements defined in the framework. The configurations also include features that capture the complete set of required plug-ins.
The key point here is that the UI components and actions are implemented once and then reused in different product configurations. The benefits cannot be overestimated. As the rest of this chapter highlights, this approach clarifies the structure of the system and enables the use of your function in vastly different scenarios. The amount of code specific to individual configurations is kept to a minimum and sometimes is completely eliminated.
23.3.2 Hyperbola Projects
There are three basic configurations of Hyperbola at the root of the four execution environments in the hospital scenario:
Workbench—a stand-alone product that includes the UI Workbench
JFace—a stand-alone product that relies only on JFace
IDE—an extension product that plugs into an existing Eclipse IDE
These configurations can be tweaked and parameterized to fit all the use cases outlined previously. For example, both the desktop and kiosk requirements can be met using the Workbench configuration. Before digging into that, let’s look at the basic configurations. Figure 23-4 shows the Hyperbola feature and plug-in projects needed to support all of the hospital’s requirements.
Figure 23-4 Hyperbola projects with support for multiple product configurations

23.3.3 Project Naming
This list looks daunting at first but makes sense once you understand the naming convention. The word product is used in a name to identify plug-ins that adapt infrastructure pieces to product configurations (e.g., the org.eclipsercp.hyperbola.product.workbench plug-in contributes the actions and views for Hyperbola as a regular RCP stand-alone application).
As we mentioned in Section 14.3, “Defining Features,” and Chapter 21, “Installing and Updating with p2,” the word feature is used to distinguish feature projects from all others. Again, the challenge here is that the feature and plug-in namespaces are separate, so technically you can have plug-ins and features with the same name. This, of course, would be very confusing, not to mention the difficulty of managing plug-in project names in the workspace.
Finally, the framework or infrastructure plug-in names have unqualified names that reflect their functional content (e.g., org.eclipsercp.hyperbola.ui contains a generic UI function for Hyperbola).
This naming convention may not suit your environment, but it has been useful in the development of Hyperbola and in helping explain the structures in this book.
23.3.4 Why So Many Projects?
You may still be asking why there are so many projects. The short answer is that each exists because either there is a need for reuse of that function or there is a corresponding product configuration defined by that project. This leads to our first rule:
Rule 1: Top-level feature—Have a top-level feature and plug-in for every product configuration.
Following this rule allows you to describe the complete set of plug-ins required for each product configuration in a form that is clear, complete, and understood by various parts of the Eclipse tooling. There are several other benefits to this approach:
• Simply exporting the feature is one way to package the configuration.
• The feature or root plug-in also serves as an anchor point for creating product definitions (.product files).
• Features are required if you plan to use the Eclipse Update Manager in your deployments.
• Features are also required if you want to use PDE’s automated build mechanisms.
• A top-level plug-in serves as the home for the feature branding content.
Underneath these top-level structures, Hyperbola’s feature set is factored into as many reusable features as needed. Don’t go overboard or there will be one feature for every plug-in. Remember, features are lists of plug-ins to build or deploy together—they are an abstraction to help you structure and manage your world. If you have 100 plug-ins that always go together, one feature should suffice. On the other hand, if you want to manage only handfuls of plug-ins at a time, use more features.
Go back now and look at the list of projects in Figure 23-4 and compare it to the structure shown in Figure 23-3—there is a project in the list for every element in the structure diagram. This is a simple and straightforward approach.
23.4 Hyperbola Product Configurations
Now that we have covered some of the organizational strategies that help with the management of product configurations, let’s take a more detailed look at the configurations needed for Hyperbola in the hospital scenario. The configurations shown in Figure 23-3 are reviewed in subsequent sections.
Just to recap, the product as a whole is defined by a product configuration that contains the following elements:
• One or more product definitions (assuming a stand-alone scenario).
• UI contributions such as action placement. These may be done in code or declaratively in the plugin.xml, depending on the situation.
• A list of plug-ins to include in the configuration. This is optionally specified using one or more features. Using features as outlined in Chapter 14, “Adding Software Management,” is highly recommended.
• Product-level branding, such as launcher icons, window images, and splash screens.
• A product configuration definition (.product) file that serves as an anchor point for all of the above.
Each product configuration should have a clear definition of where these elements are coming from and what they contain. Given that you have a top-level feature for every product configuration, it is reasonable to put your product definition files in the corresponding feature. In fact, if you do that, the product definition will identify exactly one feature in its list of contents—its containing feature. This is a convenient correspondence that helps keep things simple.
23.4.1 The JFace Configuration
As the name implies, the UI of this configuration is based solely on JFace. It does not include the UI Workbench. The primary motivator for this configuration is footprint—a smaller footprint decreases both download speed and space on disk. Remember that “on disk” means “in memory” on many PDA devices.
This Hyperbola configuration nets out to about 3MB total (excluding the JRE). This is clearly a reasonable size for a download as well as for a footprint on a PDA or desktop. Since the Eclipse RCP plug-ins require only the CDC Foundation class libraries, a JRE capable of running this is only about 6MB. So Hyperbola, complete and ready to run, is under 10MB—still quite a reasonable download. It gets even better when you consider that most of the bulk is reusable components such as the VM, SWT, JFace, and OSGi, which may already be on the machine or device.
Figure 23-5 shows the content of the org.eclipsercp.hyperbola.product.jface plug-in. Its plugin.xml contributes both product and application extensions. The product defines some branding for Windows, Linux, and so on, while the application simply opens a Hyperbola window.
Figure 23-5 JFace product plug-in contents

The Hyperbola window defines its own layout that contains just a ContactsViewer and populates the menu bar and context menus with actions. Both the ContactsViewer and the needed actions are the same ones used in the other configurations. They are defined in the org.eclipsercp.hyperbola.ui framework plug-in and are simply composed here.
The other component of the configuration is the feature that gathers the relevant plug-ins. The feature is shown here. Notice that it includes the Hyperbola base feature (all the bits of Hyperbola that are common) and picks and chooses only those plug-ins from the Eclipse RCP base feature that are needed for this scenario. Notice that the splash screen is in a separate plug-in as some configurations such as the PDA do not need one.

This feature also contains a product configuration file that captures all the relevant information from launcher name and icons to product feature set and splash screen.
23.4.2 The PDA Configuration
PDAs are characterized by their reduced footprint and screen real-estate requirements. The obvious choice here is to deploy the JFace configuration discussed previously to the handheld device. It is a reasonable size and runs well on the reduced SWT drops available for Pocket PCs. The main changes needed are to update the JFace configuration feature to include the new SWT fragment and supply a new application that sets up the JFace window screen dimensions appropriately.
Of course, there is also work to be done in adapting Hyperbola’s UI to the metaphors and practices native to the device. In some cases this may mean reducing functionality or changing the use of wizards or dialogs. The code samples supplied provide some of the initial structure needed but do not fully integrate Hyperbola into the Pocket PC world.
23.4.3 The Extension Configuration (IDE)
Integrating Hyperbola into an existing product such as the Eclipse IDE turns out to be relatively simple. Figure 23-6 shows that the IDE configuration consists entirely of static markup—no code is required. Everything needed is already defined, according to the rules set out in this chapter, in the base Hyperbola UI-related plug-ins.
Figure 23-6 IDE product plug-in contents

The plugin.xml contributes and positions numerous actions and various views, perspectives, preference pages, and wizards, all using extensions. The plug-in does not contribute an application or product definition as it is destined to extend an existing IDE-based product.
Note
The extension contributions used here are specific to the IDE product. For example, the menubarPath value used for action contributions may differ from product to product. This is what makes this example so interesting. The integration is done entirely in static markup that places actions and other contributions in the context of the base product. Adapting to a different product may mean defining some additional markup.
The feature definition for this configuration simply lists the Hyperbola base feature of the relevant Hyperbola plug-ins. The standard Eclipse plug-ins are required but are assumed to be there as part of the RCP feature in the base product.

Since this configuration is an extension product, it does not need a product configuration file—the branding and launcher information contained in the configuration file is not relevant here. The feature itself is sufficient to enable exporting or building the product configuration. Notice also that the feature requires the RCP base feature rather than including it; that is, the RCP feature is assumed to be present.
23.4.4 The Workbench Configuration
The stand-alone Workbench configuration is the most complex of the three configurations. It gathers together a more diverse set of plug-ins and more attention is paid to branding. It’s very close to the Hyperbola you developed in Part II—it has all the telltale signs of a typical RCP application such as Workbench advisors, its own application, and branding.
Figure 23-7 shows the content of the product plug-in. Notice that the bulk of the classes are advisors that define the product’s look and feel, action placement, and such. Like the other configurations, any required UI elements such as actions and views are defined in the generic, product-independent framework plug-ins and merely identified and positioned here. This version of Hyperbola also supports nonrectangular windows, so there is a set of advisors for that.
Figure 23-7 Hyperbola Workbench product plug-in

Since this is a stand-alone configuration, the plug-in contributes product and application extensions and defines an application class as the main entry point. The plug-in also contributes Intro extensions and content (e.g., introContent.xml and the css folder) to help first-time users.
The top-level feature shown below includes the org.eclipse.rcp feature—the base set of plug-ins that constitute the base Eclipse RCP—and the org.eclipsercp.hyperbola.feature.base feature. It also identifies several additional plug-ins, including the splash screen and MUC support.

The feature project contains a product configuration file that captures the relevant product information, including the launcher name and icons, product feature set, and splash screen. This product configuration is largely the same as that of the JFace configuration but with different product/application settings.
23.4.5 A Hyperbola Kiosk
Using Eclipse as a base for kiosk systems is attractive. It is modular, updatable, and highly customizable. The sample code for the chapter contains a generic kiosk mechanism for Eclipse. This mechanism is not specific to Hyperbola; that is, the hospital scenario does not call for a chat kiosk but rather a kiosk that has chat capabilities. The actual patient or emergency room kiosk may well have many more facilities, from specifying food preferences and ordering movies to checking waiting times.
Note
Kiosk or “restricted desktop” mode is not part of Eclipse. We have developed the simple structure outlined but leave the code for locking down the desktop and restricting users to product developers. Different OSs and window systems have varying levels of support for locked-down modes, and this is beyond the scope of our work here.
Hyperbola in the kiosk scenario is interesting because it is not stand-alone; the kiosk infrastructure is the base product. Yet we still want Hyperbola’s window branding to show through—Hyperbola must still supply the various advisors. To get this effect, the stand-alone Workbench configuration is wrapped in an adapter that supplies its unique window and action bar advisors.
Figure 23-8 shows the content of the Hyperbola kiosk adapter plug-in. As per the kiosk mode setup, the adapter contributes the Hyperbola perspective to the kiosk desktop and identifies the window advisor to use for Hyperbola windows. This way, whenever the user runs Hyperbola from the kiosk desktop, he or she is just opening a Hyperbola perspective, which in turn is branded using the supplied advisors. This is an important point. The different products installed on the kiosk desktop can all be branded differently.
Figure 23-8 Kiosk adapter plug-in

The advisors supplied here are subclasses of the originals found in the Workbench product configuration, but they have been tweaked to present a slightly different look and set of actions. Of course, some care must be taken with the actions made available. For example, the regular Hyperbola ExitAction exits the Workbench, and thus Eclipse, and thus the entire kiosk mechanism. Such dangerous actions are simply trimmed out of the Hyperbola menus by the HyperbolaKioskActionBarAdvisor.
23.5 Code Structure
Now that you have seen the general structure of Hyperbola, let’s look at how classes, images, views, editors, viewers, and extension points are split among plug-ins. The ability to build multiple configurations of Hyperbola hinges on the plug-in dependencies being crafted to allow reuse across the different product configurations. You do not want to write actions or dialogs twice!
Dependency management is perhaps one of the biggest challenges when designing componentized systems. Developing Hyperbola as one monolithic tower of functionality was initially practical, but the approach does not scale well—deployment options are limited and code reuse is inhibited. On the other hand, Hyperbola as a set of loosely coupled and smaller plug-ins is much more flexible.
Factoring Hyperbola into a set of interdependent plug-ins is a step in the right direction but is really only the beginning of the journey. Exercising good API hygiene and rigorous dependency management improves coding efficiency by minimizing ripple effects and increases the ability to reuse plug-ins in different application configurations. This leads to the most important rule to remember:
Rule 2: Manage dependencies—Minimize and layer plug-in dependencies.
Developers need to be conscious of the interdependencies they are establishing. Dragging 20MB of code into your system just to get one small bit of functionality does not make sense—but it happens.
23.5.1 Hyperbola Layering
Let’s start with a quick overview of the functionality included in each of the refactored Hyperbola framework plug-ins. The significant difference between this structure and the Hyperbola in the rest of the book is the refactoring of Hyperbola into core and UI plug-ins. The UI plug-ins are further factored into JFace- and Workbench-related plug-ins. Otherwise, the remainder of the refactoring involves moving all the contributions into the product configurations.
org.eclipsercp.hyperbola—This plug-in contains the data model and XMPP protocol operations that do not require UIs. This is the core messaging infrastructure that enables the use of Hyperbola messaging in a wide range of environments, all the way down to being embedded in medical instruments.
org.eclipsercp.hyperbola.ui—This plug-in contains all the base UI features that do not require the Workbench. This includes the actions, ContactsViewer, ChatViewer, preference pages, images, and wizards. This plug-in contains most of the interesting code needed to implement a Hyperbola UI and is based on JFace. In the Part II Hyperbola, the ContactsView and ChatEditor contained both the container and viewer logic. This made it hard to show a chat in a window or view. In this version of Hyperbola, we split the basic UI constructs from their placement in the UI. This provides more flexibility in placing different UI elements (e.g., in dialogs, windows, views, or editors).
org.eclipsercp.hyperbola.ui.workbench—This plug-in wraps the basic UI pieces from the Hyperbola UI plug-in. This includes a ContactsView wrapper for the ContactsViewer and a ChatEditor wrapper for the ChatViewer. Both of these are contributed via the Workbench extension points. This plug-in defines these UI elements but does not place them in the Workbench—that is left to a product plug-in. This plug-in does, however, contribute a set of command definitions for the actions that are defined by the base UI plug-in. This enables Workbench key bindings. The only extensions defined in this plug-in are to declare the views, editors, and commands.
The remainder of this section explains some guidelines that were used to arrive at this structure that you can use in your own products.
23.5.2 Workbench Contributions
When you contribute to various Workbench extensions, such as action sets, preference pages, perspective extensions, views, and editor actions, they must be contributed to a specific product. In general, you cannot write a plug-in that integrates tightly with the IDE and then expect to integrate it unchanged with a random RCP-based application.
The issue is not mechanical but rather practical—the UI context for the plug-in is different. Menu bar paths may be different, the integration points may disappear, and your plug-in needs to adapt. Figure 23-9 illustrates this situation. The plug-in on the left may physically load and run if dropped into the product’s plugins directory, but it is pure luck if its menus, toolbars, and views appear correctly.
Figure 23-9 Plug-ins need to know their integration partners

To develop UI plug-ins that can be used in different applications, you must separate the implementation of UI elements from their contributions.
Rule 3: Framework plug-ins—Minimize Workbench contributions in framework plug-ins.
The goal is to define as much as possible, in generic terms, without committing to the details of how the UI component is placed or contributed. Leave that to the product plug-ins.
What happens when you don’t follow this rule? Figure 23-10 shows what happens when you add the org.eclipse.ui.editors and org.eclipse.ui.externaltools plug-ins to the Hyperbola Workbench product configuration. Of course, if you are adding the plug-ins, you likely want to use their functionality, but you may want to present it differently. For example, these plug-ins are designed to be used in Eclipse IDE-based products and they place their actions accordingly. This is not a bug in the plug-ins but rather a choice that was made by the plug-in designers.
Figure 23-10 Hyperbola running with a non-framework plug-in

23.5.3 Commands and Actions
In Hyperbola, most actions and commands are defined in the org.eclipsercp.hyperbola.ui plug-in and implement IAction. IAction is used because it is part of JFace—the action definitions do not needlessly drag the Workbench into product configurations. This supports the desire to run Hyperbola on PDAs and smaller environments. Another common layering technique is to define operations—essentially non-UI actions that perform work on your data model. You can then wrap one or more operations into appropriate actions that appear in the UI. This has the bonus of further decoupling behavior from how it is modeled in the UI. Another strategy is simply to use commands as discussed in Chapter 18 if you have no desire to use actions. Commands already provide the necessary decoupling required to work in a variety of environments. Command definitions can exist in the org.eclipsercp.hyperbola.core plug-in, and the UI-specific definitions like key bindings can exist in the org.eclipsercp.hyperbola.ui plug-in.
23.5.4 Key Bindings
Because of differences in the key binding support in SWT and the Workbench, key bindings are left to the product configuration using the actions. In the case of a configuration running without the Workbench, accelerators are set on the action itself using SWT accelerators.
addContactAction = new AddContactAction(shell, session);
addContactAction.setAccelerator(SWT.CTRL | 'N'),
When running with the Workbench, commands are created for each action and then used to add key bindings, as shown in the following snippet. Notice that the same Action class is used, but instead of being initialized with an accelerator, the action’s ID is registered with the Workbench, as discussed in Chapter 12, “Adding Key Bindings.”
addContactAction = new AddContactAction(shell, session);
register(addContactAction);
When designing for multiple products, you often have to define multiple sets of key bindings, one for each product. For example, with Hyperbola, the stand-alone configuration defines its own key configuration, but when Hyperbola is used to extend the IDE, it has to define key bindings in the context of the IDE to increase integration and avoid key binding collisions.
23.5.5 Views and Editors
As we have seen, to enable maximum flexibility in building applications without the Workbench, most of the UI elements are created using only JFace primitives. At first this is a bit shocking—people often think, “I’m implementing a view” or “I’m implementing an editor.” Rather, we have focused on implementing the basic UI elements that match the domain problems, and then we have looked at views and editors as containers for these elements. Once again, there is a separation between the UI elements and how or where they are presented—you design the UI components separately from the containers and then plug them together as needed.
Put another way, you should build the core UI elements based on your application’s data models and user interactions and then use a decoupling pattern, such as Inversion of Control (IoC),1 to enable the use of these elements in different scenarios.
1. IoC is a design pattern that helps teams avoid the dependency hell that results when an application grows into a large pseudo platform without taking care to adequately decouple logic. One well-known synonym for IoC is DIP—Dependency Inversion Principle (http://en.wikipedia.org/wiki/Dependency_injection).
Rule 4: UI decoupling—Decouple UI components from their container.
In Hyperbola, the ContactsViewer and ChatViewer UI components are built on a few base concepts, such as XMPP sessions and SWT composites. In Workbench-based configurations these base UI components are used to build views and editors, whereas in JFace-based configurations they are simply added to the top-level shells as appropriate.
23.5.6 Wizards, Preferences, and Property Pages
Hyperbola’s wizards, preference pages, and property pages follow the same pattern as actions—they are defined using only JFace and then contributed by the product configurations. When these pages are used in Workbench configurations, they are adapted to implement the appropriate Workbench interface (e.g., IWorkbenchWizard, IWorkbenchPreferencePage, and IWorkbenchPropertyPage). Adapting a JFace component to be compatible with a Workbench extension is extremely easy. You just wrap the JFace component with the appropriate Workbench interface and implement the one or two Workbench-specific operations.
In JFace configurations these pages are simply placed in the relevant wizard or preference page dialogs. Note that property pages are really just preference pages shown for a specific object. This allows you to arrange the pages differently in different product configurations, for example, keeping all preference pages flat in one, not organized in another, or grouped into a main category in another.
23.5.7 Optional Dependencies
Instead of layering dependencies by splitting plug-ins, you can layer dependencies within the same plug-in using optional dependencies.
Rule 5: Optional dependencies—Use optional dependencies for intra-plug-in layering.
This capability was outlined in Chapter 21. Hyperbola does not use optional features, but the EMF core plug-in contains a good example of how this works and where to use it. In the EMF core plug-in, all the code related to the Eclipse Resources plug-in is collected into one package. The EMF core model is designed around an abstract data model that accommodates both java.io.File and org.eclipse.core.resources.IResource data objects. The dependency on the plug-in org.eclipse.core.resources is then marked as optional, as shown below. Since the bulk of the EMF code is isolated from the Resources API, EMF continues to run even if the Resources plug-in is not installed—EMF clients are never able to pass in or expect back Resources objects.

This approach allows the same EMF plug-in to be used in both stand-alone RCP configurations and Eclipse IDE-based configurations. It also helps prevent a combinatorial explosion of plug-ins in each layer of your system. The disadvantage of layering within a plug-in is that unused code may be shipped with an application. In this case EMF’s Resources support is not separable and must be shipped with all EMF systems.
23.5.8 Icons and Images
When we first started breaking up Hyperbola, we found that images were being duplicated in several places. In addition to being a waste of disk space, this approach is very hard to manage—we were always forgetting to update images here or there and were still finding old images months after the refactoring.
The alternative is to treat images like code and share them. In the refactored world, all Hyperbola images are in org.eclipsercp.hyperbola.ui and are simply used by other plug-ins. Image sharing in code is done by exposing an ImageRegistry on a common plug-in and using it from clients. For example, the pattern shown here occurs in several places in Eclipse itself:
Hyperbola.getDefault().getSharedImages().getImage(IMG_ONLINE);
URLs can be used to share images in declarative files and extension definitions. For example, the following URL indicates that the image at icons/pub/chat.gif in the org.eclipsercp.hyperbola.ui plug-in should be used as the icon for the editor:

Tip
Just like sharing code, sharing images should be done only though API; that is, if a plug-in exposes its images as API, you can use them. If not, you should not. Uncontrolled reaching into other plug-ins and using images (or any file, for that matter) exposes you to more change than you might like.
23.6 Designing a Platform
Not only has Hyperbola been refactored to run in many configurations, it has also turned into a platform for messaging clients. The progression from a simple product to a platform involves pushing functionality down into framework plug-ins. The focus shifts from shipping one specific product to understanding what functionality is generic and how other products can be built around that functionality. That is the nature of the platform.
To build a platform, you should first consider the rules outlined in this chapter. Your plug-ins need to be framework plug-ins to have a platform. Given a set of framework plug-ins, you should look for ways to add extensibility.
One way is to use standard coding techniques and APIs. Section 27.5, “Services,” introduces the OSGi notion of services as a further means of making a system extensible. Throughout this book you have been using Eclipse’s extension registry mechanism, as discussed in Section 2.5.3, “Extension Registry.”
This section covers the use of extension points to allow other plug-ins to customize or extend your framework plug-ins. To recap, the advantages of extensions and extension points are the following:
• They are declarative. Declarative extensions can be filtered, checked, and composed. This improves UI scalability and enables various approaches for presenting, scoping, and filtering contributions.
• They promote lazy loading of code. Plug-ins contributing extensions can have a presence in the system without requiring their code to be loaded.
• They can be added and removed at runtime. As you saw in Chapter 22, “Dynamic Plug-ins,” this means that plug-ins can be added and removed after the application has started.
• The mechanism can be used to contribute code and/or data.
23.6.1 Extension Points
By now you are familiar with contributing extensions to the extension points defined by the Eclipse platform, but you have not actually written one of your own. Adding an extension point involves first declaring the extension point in a plug-in and describing it to other plug-ins. The plug-in is then coded to use contributed extensions as set out in the description.
Creating an extension point declaration is done using the Add... button on the Extension Points page of the relevant plug-in editor. Figure 23-11 shows an example of declaring the iqProviders extension point in the org.eclipsercp.hyperbola plug-in. The Extension Point Schema file location field is filled in automatically. Schemas are used to describe the expected structure of extensions contributed to an extension point. They describe everything from the set of tags and attributes to the kinds of values placed in the attributes. See Platform Plug-in Development Guide > Tasks > Creating an extension point schema in the online Help for details on schemas and using the schema editor.
Figure 23-11 New extension point declaration

Once the extension point has been defined, various plug-ins can contribute extensions that conform to the schema. The snippet below shows the XML markup for an iqProviders extension. Typically, developers use the facilities on the plug-in editor’s Extensions page to define and manage their extensions.

As you saw earlier, the Eclipse Runtime maintains a registry that connects extensions and extension points. The org.eclipsercp.hyperbola plug-in can access extensions contributed to its iqProviders extension point by accessing this extension registry, as shown in the snippet below. The extension point’s fully qualified ID is used to get a set of configuration elements.

Configuration elements are object representations of the XML elements under the <extension> tag in the plugin.xml files; for example, the <provider> markup in the preceding example surfaces as a configuration element. Accessing the registry as shown returns a list of the top-level configuration elements across all extensions in the given extension point. This is convenient where the identity of the extensions and the number of configuration elements per extension are not important.
The iqProviders extension point requires extensions to identify a class that implements an IQProvider interface. The details are not particularly important. The key point is that the Hyperbola plug-in is allowing other plug-ins to contribute code that is used to extend the capabilities of Hyperbola—in this case, to handle different messaging protocols.
The preceding snippet scans the set of configuration elements and when it finds an applicable one, it instantiates the class identified in the extension by calling createExecutableExtension(String). The result object is then used according to the contract of IQProvider.
23.6.2 Extension Factories
In the previous example the class to instantiate was given as a fully qualified class in the className attribute of the extension. This requires the identified class to implement a public zero-argument constructor and restricts the initialization that can be done on the resultant object. Another approach is to use an extension factory to create or discover the desired object. Factories are useful as they allow more complex discovery and initialization. For example, executable extensions can be discovered using OSGi service lookup or Web service discovery. Factories hide these implementation details from the extension point.
If the class identified in an extension implements IExecutableExtensionFactory, the factory class is instantiated and the instance is given the information in the related configuration element. It then uses this information to determine what kind of object to return. For example, the snippet below from Section 17.3, “Standard Workbench Actions,” shows the UI’s ExtensionFactory being used to create a progress view. Note that the UI’s extension factory is free to decide how it creates the requested progress view. The Javadoc for IExecutableExtension and the individual factories details the acceptable syntax of the data following the factory name in the markup.

23.6.3 Named and Anonymous Extensions
Extension IDs are, in some cases, optional. For example, the provider extension discussed previously did not have an id attribute. Extensions to the Runtime’s applications extension point, however, do require IDs, as shown in the snippet below. Both anonymous and named extensions are prevalent in Eclipse.

The choice of whether or not to have named extensions is completely up to the plug-in defining the extension point. In the case of the Runtime’s applications extension point, the ID is required because the Runtime is given an application ID to run by the user or the product. It needs to find the extension that matches that ID, instantiate the associated class, and run it. Having a system-managed ID is convenient.
In the case of most UI extension points and those in Hyperbola, extensions are treated anonymously. Anonymous extensions allow many contributions, each in its own configuration element, in one extension. This is sometimes simpler and clearer for developers.
The benefit of having IDs on extensions is that you can call the optimized IExtensionRegistry method, getExtension(String, String), to fetch a specific extension as opposed to having to traverse or remember the extensions yourself. For example, the HyperbolaProviderManager code snippet in the previous section repeatedly iterates over all contributed configuration elements to find the appropriate provider, whereas the Runtime can simply access the registry and directly look up the required application extension.
23.7 RCP-Friendly Plug-ins
A common question is how to tell if a plug-in is RCP-friendly. We use the term friendly as a synonym of what we’ve also been calling framework plug-ins. These are plug-ins that are designed to work in any product. Most people ask this question when they are building an RCP product and want to use someone else’s plug-ins. The simple answer is that if a plug-in manages its dependencies and uses optional dependencies appropriately, it is a framework plug-in and is RCP-friendly.
Unfortunately, Eclipse does not include markup to quickly identify plug-ins that have these characteristics. The easiest way for you to tell if a plug-in follows Rule 2 (Manage dependencies) and Rule 3 (UI decoupling) is to look for the following:
• Open the plugin.xml for the plug-in you are examining and look at the set of plug-ins it requires. If it requires a product, for example, the Eclipse IDE, it is not a framework plug-in.
• Next, look at its extensions for specific references to toolbar or menu paths, preference pages, or other contributions that place elements in the UI. In general, views and editors are acceptable since they do not appear in the UI unless they are explicitly placed. See Section 23.5.3.
A common misconception is that depending on plug-ins from outside the RCP base, for example, the Resources plug-in, means you are not RCP-friendly. This is not necessarily true. If the prerequisite plug-in’s dependencies follow the rules, it is RCP-friendly. The org.eclipse.core.resources plug-in is in fact RCP-friendly.
23.8 Summary
After reading this chapter, you should have a solid base on which to build your own set of product configurations. Even though Hyperbola is a relatively small example, the hospital scenario shows how it can be expanded to have a real impact across enterprises.
By following our rules, we ended up with something that is extremely flexible. These rules can be applied to any size product:
Rule 1: Top-level feature—Have a top-level feature for every product configuration.
Rule 2: Manage dependencies—Minimize and layer plug-in dependencies.
Rule 3: Framework plug-ins—Minimize Workbench contributions in framework plug-ins.
Rule 4: UI decoupling—Decouple UI components from their containers.
Rule 5: Optional dependencies—Use optional dependencies for intra-plug-in layering.
Emboldened readers are now able to build and deploy applications in a vast array of scenarios, from integration into existing products (e.g., IDEs) to field-force PDAs and customer kiosks.
23.9 Pointers
• The OSGi and Equinox book contains more in-depth information about OSGi and using Eclipse in a variety of environments: McAffer, Jeff, Paul VanderLei, and Simon Archer. OSGi and Equinox: Creating Highly Modular Java Systems (Addison-Wesley, 2010), ISBN 0321585712.