
Chapter 12. Adding Key Bindings
All applications have actions that are initiated from the keyboard more often than from a toolbar or menu. Power users especially expect quick access to common actions using the keyboard. The Workbench includes an extremely flexible framework to manage actions and key bindings. This includes having locale- or function-grouped key binding configurations and key bindings that apply to only certain parts of the application.
You can add key bindings for all Hyperbola actions since there aren’t that many. In general, however, you have to carefully select the actions to bind to key sequences. One rule of thumb comes from the observation that toolbars also contain frequently used actions. As such, consider providing key bindings for all of your toolbar items. Note also that actions often show up in various menus, so you can show their related key sequences there.
In this chapter we show you how to
• Define key bindings for all the Hyperbola application’s actions
• Show key bindings in menus
• Add key bindings for the reused Quit and About Workbench actions
• Use key binding configurations to scope bindings
• Add the Keys preference page to Hyperbola
12.1 Defining Commands
To assign a key binding to an action, you first have to create a command. Commands are the declarative components of an action and are independent of the implementation. They can be categorized and assigned key bindings. In Chapter 18, “Commands,” we will cover them in more depth.
Tip
Why is it important to separate a command from an action implementation? A good example is when you need to provide key bindings for standard actions such as copy, cut, and paste. The implementation of these operations depends on the context, so the command must be separate from the implementation. A key binding can be defined for the command that applies regardless of the underlying implementation.
To start, let’s add a key binding for the Add Contact action. Open the Hyperbola plug-in editor and create an org.eclipse.ui.commands extension. Once you’ve created a commands extension, take a look at the extension point description using the Open extension point description link in the Extension Details section. This gives you a good description of what the extension point does and, in the case of commands, the meaning of the fields for a commands extension. Notice that there are several different elements for a commands extension, such as commands, categories, and key bindings. In brief, a commands extension provides one-stop shopping for all your command needs.
It’s good practice to group related commands together using categories. This helps users navigate the list of commands when managing key bindings. Start by creating a category, as shown in Figure 12-1. Click on the commands extension and from the context menu select New > category.
Figure 12-1 Category element details

Once the category is defined, create a command for the Add Contact action, as shown in Figure 12-2. Again, click on the commands extension and select New > command.
Figure 12-2 Command element details

For the id, use the value defined in AddContactAction.ID. This is the unique identifier for this command. You should always have a constant for the command ID since it is needed to programmatically associate an action with a command. The name is a human-readable form that is displayed in a preference or configuration dialog. This name is not shown in menus and so it does not need a menu accelerator (e.g., “&” character). Last, the categoryId references the command category you just defined. The category element is deprecated and can be left empty. For simplicity, we will leave the other properties empty.
The next step is to add an org.eclipse.ui.bindings extension, add key bindings, and assign them to the proper command via the commandId attribute. Click on the org.eclipse.ui.bindings extension, and from the context menu select New > key.
The key details are shown in Figure 12-3. The most interesting part of the key element is the sequence, in this case, M1+A. M1 in the sequence stands for “Meta 1.”
Figure 12-3 Key binding element details
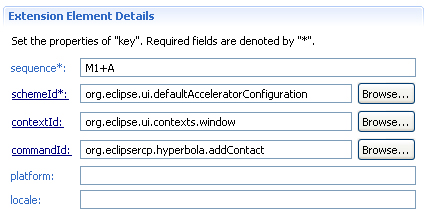
This is the platform-independent way of talking about the “Command” key on the Mac and the “Ctrl” key just about everywhere else. Similarly, M2 is “Shift” and M3 is “Alt.”
The commandId defines the ID for the command to which this key binding applies. The schemeId is used to identify the scheme in which this key binding lives. The org.eclipse.ui.defaultAcceleratorConfiguration is the default scheme created by the Workbench and is also the default active configuration. For now, the default scheme is fine. We discuss how to use an alternate scheme in Section 12.4, “Key Schemes.”
Now that you have defined the required extension elements, you must link the AddContactAction to its associated command. This is done by assigning the command ID to the action using the IAction method setActionDefinitionId(String). Update AddContactAction’s constructor, as shown in the following code snippet:

actionDefinitionId versus ID
A common point of confusion is that the ID defined on an IAction is not the same as the action’s command ID. The ID is used exclusively for supporting retargetable actions, while the actionDefinitionId is used to associate actions with commands. To reduce the complexity in your application, we recommend that you simply set both to the same value. It makes your life easier if you consider them to be the same and use a common constant for both.
Once the action is associated with the command ID, the action has to be registered with the Workbench. This tells the Workbench to call the action when the user inputs the key sequence. Hyperbola’s actions are created in ApplicationActionBarAdvisor. Each action is registered by calling ActionBarAdvisor.register(IAction).
You might recall that actions are registered to ensure that they are properly deleted. Registering an action using ActionBarAdvisor.register(IAction) also registers the action’s key binding. The following code snippet shows the register(IAction) method supplied by the Workbench. If you are already calling the method, no further effort is required. If not, change the code either to call register(IAction) or to call registerGlobalAction(IAction) directly.

Just to be sure, go back to ApplicationActionBarAdvisor.makeActions(IWorkbenchWindow) and confirm that the actions are being registered. When the action definition ID is set in the AddContactAction constructor and the action is registered with the Workbench, the action can participate in the key binding mechanism. This is a useful pattern to use for all your actions.

12.2 Checkpoint
At this point everything is in place to have the Add Contact action run when the user inputs the Ctrl+A key sequence. Run Hyperbola now, try typing Ctrl+A, then look at the Hyperbola menu and notice that the key binding is displayed at the right of the menu, as shown in Figure 12-4.
Figure 12-4 Add Contact action with key binding in menu

12.3 Adding Key Bindings for Workbench Actions
Remember back when you added the Exit and About actions? They are defined by the Workbench, and in the ApplicationActionBarAdvisor class you simply created the actions and added them to the Hyperbola menu. Let’s add some key bindings for them: Ctrl+Q to exit and Ctrl+Shift+F1 to launch the About dialog.
Normally you would create a key binding for the actions as we did previously. But these are reusable actions from the Workbench and they likely already have commands. Unfortunately, the only way to find out if a command exists is by looking at the action’s implementation to determine if the IAction method setActionDefinitionId(String) is being called. If it is, you don’t need to define a new command. If a command is not defined, or you cannot tell, you must define one.
The following code snippets are what you would find if you browsed starting in the ActionBarAdvisor method makeActions(), then to the org.eclipse.ui.actions.ActionFactory, and finally into the QuitAction’s constructor. Here you can see that the command ID for the Quit action is org.eclipse.ui.file.exit. Use this command ID to create a key binding for the action.
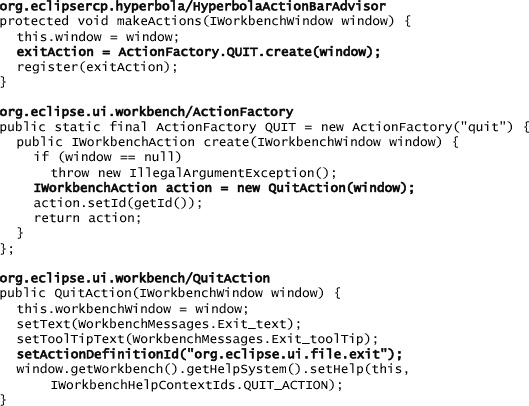
After following through the code and finding the command ID, add a key binding for the Quit action and ensure that the ActionBarAdvisor method register(IAction) is called. The steps are the same as you used previously to register the Add Contact action.
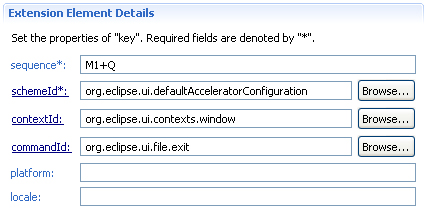
Now that the Quit action has a key binding, as shown in Figure 12-5, rerun the same steps to add a key binding for the About action.
Figure 12-5 Key binding element details for existing Workbench actions
12.4 Key Schemes
You’ve seen that when defining a key binding, it must be assigned to a key scheme, and the binding is enabled only when the given scheme is active. The Workbench defines a scheme called org.eclipse.ui.defaultAcceleratorConfiguration, which is used as the scheme for all commands defined in the Workbench. It is also the default scheme used when the Workbench starts.
When defining key bindings in your RCP application, you have the choice of assigning them to this default key scheme with the caveat that there may be conflicts with existing bindings. An alternative is to define another key scheme using the org.eclipse.ui.bindings extension point and assigning all your key bindings to this scheme. You can even define key bindings to commands provided by the Workbench and assign them into this new scheme. The following example assigns the Add Contact command to the M1+B key instead of to M1+A, which was its value in the default key scheme:

The new scheme, called org.eclipsercp.hyperbola.keyConfig, is not enabled by default. To enable it, you must add an entry to your plug-in customization file as follows (see Section 13.4, “Adding Help Content,” for how to create a preference customization file):
org.eclipse.ui/KEY_CONFIGURATION_ID= org.eclipsercp.hyperbola.keyConfig
Alternatively, you can use the Keys preference page explained in the next section to switch between registered key schemes.
12.5 Keys Preference Page
The Workbench ships with a preference page that allows users to configure key sequences and toggle the active scheme. This preference page is called the Keys preference page. You can see it in action in the IDE by opening Window > Preferences... > General > Keys. The preference page shows all the commands in the selected scheme along with their bindings.
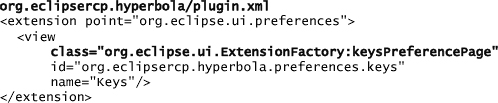
You can add this preference page to your application by defining an org.eclipse.ui.preferences extension with a special syntax. The Workbench includes an extension factory that provides access to these pages via a set of identifiers. An extension factory, or IExecutableExtensionFactory, is a parameterized executable extension that can create classes based on the parameters defined in the extension definition. This is useful for hiding implementation classes. The identifiers are used in preferences extensions as shown below. Notice that the markup is the same as for a regular preference extension, but instead of specifying the preference page’s implementation class directly, org.eclipse.ui.ExtensionFactory is used and the Keys preference page identifier, keysPreferencePage, is given as a parameter.
If you provide the Keys preference page in your application, you must define your own scheme, as defined in Section 12.4, because this preference page shows all the commands defined by the Workbench, even those that are not used in your application. Having a specific configuration will trim this list down to only those defined by your application. See Section 17.3, “Standard Workbench Actions,” for more reusable preference pages and actions, and Section 11.3.2, “Adding the Action,” for details on how to add the action to open the preferences page.
12.6 Summary
Key bindings are an essential part of your application’s usability. You’ve seen that command IDs are the key to linking actions to key bindings. Many steps are required to link actions to key bindings. From the basic pattern you can see that it all comes down to everyone agreeing on the common currency—command IDs.
Always start by creating a set of constants for each of your actions. In Hyperbola they are added as static fields on each action. Then create associated commands for each using the IDs you’ve already defined, and add the key bindings that reference the commands. The final step is to associate an action with a command so that when a key sequence is pressed, the Workbench knows which action to run. A good rule of thumb is to configure each action in its constructor with its associated command ID by calling IAction.setDefinitionId(String). Then register the action in the ActionBarAdvisor by calling register(IAction), or if the action is defined within a view or editor, call IActionBars.setGlobalActionHandler(String, IAction).
12.7 Pointers
• Eclipse Help > Platform Plug-in Developer Guide > Advanced workbench concepts > Workbench key bindings.
• There is a deep dive on commands in Chapter 18.