
Chapter 25. Testing
Despite the best efforts of software engineers, bugs occur in even the most carefully crafted applications. And so an entire subset of the software industry has arisen from the need for testing.
Hyperbola needs testing, too. Until now in the development of Hyperbola, we have not paid much attention to testing given that we have written no test cases. Many software developers embrace the notion of writing test cases first (or at least early). While we count ourselves among them, it’s worth noting that we have chosen to take a tutorial-based approach to building Hyperbola as opposed to a test-driven approach. This is because while taking a test-driven approach is a good development practice, it is not necessarily the best way to learn or teach. Now that you have a basic understanding of creating RCP applications, we can learn to test Hyperbola. In particular, we will go over
• General issues around testing Hyperbola that can be applied to any RCP application
• How to run tests using Eclipse
• Implementing a unit test for one piece of Hyperbola using JUnit
• Implementing a user interface unit test for Hyperbola using SWTBot
25.1 Making Hyperbola Testable
Before we launch into implementing automated tests for Hyperbola, let’s discuss some of the practices that enable the creation of clean test cases. These points relate to all kinds of software development.
POJOs—The most important practice to make sure your code is testable is to write your domain logic as pure POJOs. Allowing specific dependencies to leak into your domain logic makes writing and running simple JUnit tests significantly more difficult.
Dependency injection—Decoupling and allowing elements to be reused enable alternative implementations. This allows for mock objects to be used with ease and follows the programming mantra of “Don’t call us, we’ll call you.”
There are other practices out there that can make your code more testable, but we’ll leave that for you as a topic of exploration. From our experiences, the principles we outlined go a long way to ensure that your code can be tested, regardless of the framework you use.
25.2 Unit Testing Hyperbola
25.2.1 Test Strategy
Let’s start by writing a simple test for the ConnectionDetails in the Hyperbola model. We want to verify that we are able to construct the object and that it has valid values. Our testing will use JUnit, which conveniently resides in the target platform. We’ll show only enough JUnit as necessary to get the tests running.
25.2.2 Writing the Test Case
It makes sense to put the test code in a separate project from the Hyperbola model code that it tests. Notice that the ConnectionDetails class itself is not visible to other projects since it isn’t exported by the org.eclipsercp.hyperbola plug-in. To accomplish this, we will create a fragment project.
Follow these steps to create the fragment project that will contain the new test:
• Select File > New > Project > Plug-in Development > Fragment Project to create a fragment project called org.eclipsercp.hyperbola.tests.
• On the last page of the wizard select org.eclipsercp.hyperbola as the host.
• Open the manifest editor on the fragment bundle and turn to the Dependencies tab. Add the following plug-ins to the Required Plug-ins section:
org.junit.
• Create a ContactGroupTestCase class in a package called org.eclipsercp.hyperbola.tests with junit.framework.TestCase as its superclass. Use the following snippet to complete the class:
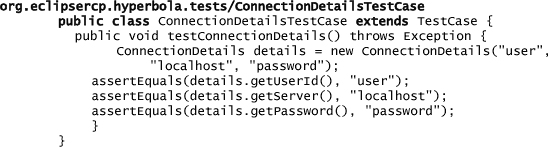
25.2.3 Running the Test Case
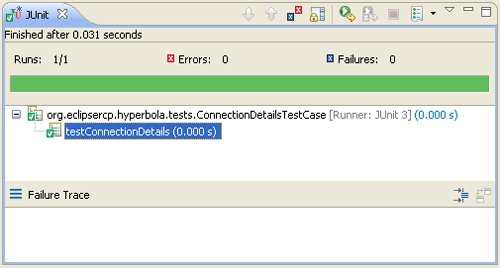
Once the ConnectionDetailsTestCase is written, it’s easy to run: From the context menu on the test case class, select Run As > JUnit Test, and the results will be shown in the JUnit view. The view should show a solid green bar, as seen in Figure 25-1, indicating that the test case passed.
Figure 25-1 Successful run in the JUnit test view
25.3 User Interface Testing Hyperbola
Testing user interfaces can be a daunting task for any application, especially without a framework. For RCP applications you have a few commercial and open-source options when it comes to testing user interfaces. For the purposes of simplicity and accessibility, we will use the SWTBot framework (which is freely available at eclipse.org) to test the user interface of Hyperbola.
25.3.1 SWTBot
SWTBot is an open-source user interface and functional testing tool for SWT and Eclipse-based applications. SWTBot provides APIs that are simple to exercise and hide the complexities involved with SWT and Eclipse. To take advantage of SWTBot, we have to install it into our IDE and target platform. SWTBot is available from its update site: http://download.eclipse.org/technology/swtbot/galileo/dev-build/update-site.
25.3.2 Test Strategy
To get an idea of how SWTBot works, let’s start by writing a user interface test case that opens up the Preferences dialog, selects the automatic login preference, and verifies that the preference is actually enabled. We’ll show only enough of SWTBot to get the tests running. SWTBot is very extensive when it comes to user interface testing, and we encourage you to explore the SWTBot documentation to learn more.
25.3.3 Writing the Test Case
Follow these steps to create the fragment project that will contain the new test:
• Select File > New > Project > Plug-in Development > Plug-in Project to create a plug-in project called org.eclipsercp.hyperbola.tests.ui. Click Finish.
• Open the manifest editor on the fragment bundle and turn to the Dependencies tab.
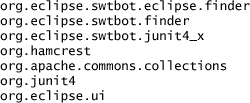
• Add the following bundles to the Required Plug-ins section:
• Create a HyperbolaPreferenceDialogTestCase class in a package called org.eclipsercp.hyperbola.tests.ui with junit.framework.TestCase as its superclass. Use the following snippet to complete the class:
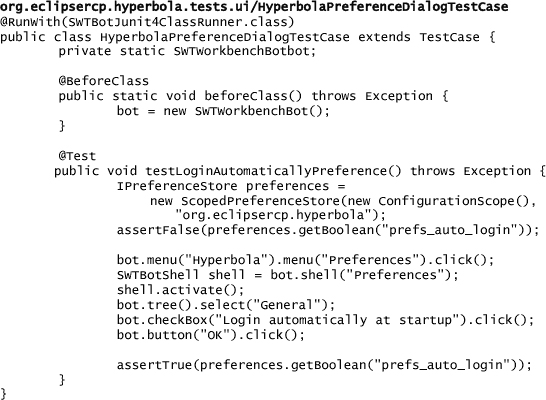
The test creates an SWTWorkbenchBot object that allows for convenient inspection of SWT widgets. The first three lines of the testLoginAutomaticallyPreference method verify that the automatic login preference is disabled by accessing the preference store for the org.eclipsercp.hyperbola plug-in. The next four lines use the SWTWorkbenchBot to open the Preferences dialog in Hyperbola and select the General preference page. The next two lines click the automatically login check box to apply the preference and close the Preferences dialog. Finally, we verify that the preference was set via the Hyperbola preference store.
Notice that the amount of code we had to write for testing the user interface was fairly trivial because of the SWTWorkbenchBot class. The only complicated code had to deal with verifying that the preference was properly set. For all intents and purposes, user interface tests can be written quickly.
25.3.4 Running the Test Case
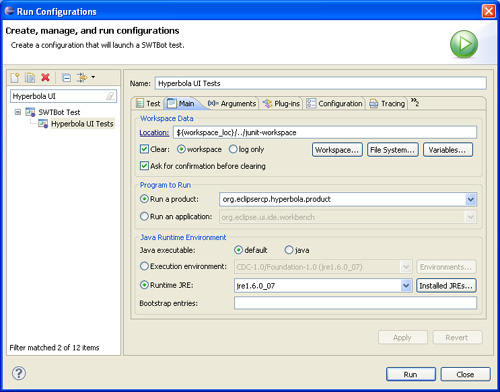
Once the HyperbolaPreferenceDialogTestCase is written, it’s easy to run: From the Workbench select Run > Run Configurations... and create a new SWTBot Test launch configuration as seen in Figure 25-2. Ensure that the product being executed is the org.eclipsercp.hyperbola.product and not the org.eclipse.sdk.ide product.
Figure 25-2 SWTBot launch configuration
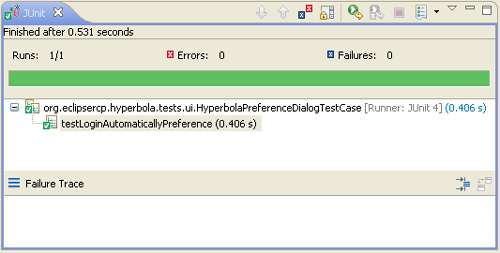
The results will be shown in the JUnit view. The view should show a solid green bar, as seen in Figure 25-3, indicating that the user interface test passed.
Figure 25-3 Successful SWTBot test run in the JUnit test view
25.4 Summary
In this chapter we finally got around to writing some tests for Hyperbola. We presented two mechanisms for testing: unit testing and user interface testing. Both are vitally important to the quality of the overall application. The tests in this chapter are certainly far from comprehensive and should be used as a learning exercise when you start writing tests for your own applications.
25.5 Pointers
• The SWTBot wiki (http://wiki.eclipse.org/SWTBot) should be your first stop when user interface testing Eclipse-based applications.
• For mock object frameworks, we highly recommend EasyMock (http://easymock.org) or Mockito (http://mockito.org).