Chapter 26. The Last Mile
We are now down to what telephone companies call “the last mile”—actually delivering the product to the end users. There are, of course, many different ways that you can deliver Hyperbola and other Eclipse-based products to end users. Here we cover some of these options and detail other issues related to installing and configuring Eclipse-based products on the user’s machine. In particular, we cover
• Delivery techniques such as archives, p2 installers, native installers, repositories, and JNLP
• Initializing an install before first use
• Setting up shared installs
26.1 Archives
The simplest and most widely supported delivery mechanism is using standard ZIP and TAR archive files. As you have seen, the Eclipse tooling directly supports the creation of these archives, from the workspace using either File > Export... > Eclipse product or File > Export... > Deployable plug-ins and fragments, or by using the automated build setup detailed in Chapter 24, “Building Hyperbola.” To these archives you can add the JRE and any additional files needed for the product.
Note
Including the JRE in your product distribution is a mixed blessing. On the one hand, it simplifies the install and reduces the chances of problems on the user’s machine. On the other hand, it greatly increases the size of the distribution and its footprint on disk.
You should weigh the installation scenarios and potential legal requirements carefully and determine what is best for your product. Of course, if you code your application to be independent of the JRE, you have more options.
The archives can be delivered over the Internet or on direct-read media. End users unpack the archive in some location on disk and run the provided executable. This is suitable for simple systems and reasonably knowledgeable users but has the following drawbacks:
• Not all OSs have the required archive-reading software installed by default.
• The OS cannot manage the install since it is just a set of files unpacked on disk. This makes uninstallation a manual process.
• There are no scripting capabilities, so setting up or querying for system settings and configuring the product during the install is cumbersome.
26.2 Native Installers
A common approach to installing end-user applications is through a native installer such as InstallShield, NSIS, RPM, and such. The great thing about Eclipse is that it is just a set of files written to a location on the target machine—no special registry keys or other hooks are required. As such, you can use any of these installers to deliver your Eclipse-based applications.
All of the installers function by delivering a set of files to the user’s machine. They vary in how the files are delivered and their mechanisms, if any, for querying the user as to what he or she wants installed and configuring the installed files by running scripts.
Native installers let users install applications so that they are tightly integrated with the underlying OS. So, if your Windows version needs to create registry keys or hook system menus, a native installer can help. Similarly, on Linux installs, RPMs can be registered in the RPM database.
Because of the wide variation in setup and capabilities, a native installer tutorial is beyond the scope of this book—you should choose the technologies that best suit your environment and meet the needs of your users.
26.3 p2 Installer
There is also a small, separate installer you can use to install Eclipse or your application, the p2 installer. The p2 installer is basically the director application we saw in Section 21.6, “Installation Management,” with a bit of infrastructure for feeding the command line in various ways. As a result, the installer can do anything that p2 can do. Users download and run the installer via JNLP, manually or via some other custom means.
Using the Equinox p2 installer to download and install your application offers several benefits over doing so manually:
• It supports multithreading and mirroring, allowing for fast downloads.
• It uses Pack200 compression, cutting required bandwidth in half.
• It automatically picks the best possible mirror and can dynamically switch mirrors in case of failure.
• It supports code signature validation to ensure that the download is from a trusted source.
You can get the Equinox installer from the Provisioning section of the Equinox download page; see http://download.eclipse.org/equinox. Note that the p2 installer is purposely simple. It was designed specifically to ask only the absolute minimum of questions. The code for the installer is very simple and can be easily adapted to your specific needs.
26.4 Java Web Start (JNLP)
Java Web Start, also known as JNLP, is a mechanism whereby applications are stored on a Web server and exposed to users as links on a Web page. When the user clicks on a link, the browser uses its JNLP content type handler to read the JNLP manifest and download, install, and launch the described Java resources.
26.4.1 How Java Web Start Works
Without turning this into a Java Web Start tutorial, the following is a brief introduction to the technology and its use with Eclipse.
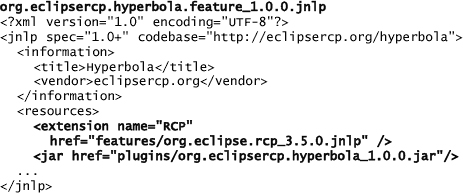
A Web Start application is described by one or more .jnlp files. These are XML manifests that describe the application itself (e.g., its name, location, description) and the set of JARs that make up the application. JNLP manifest files can also include, or be extended by, other JNLP manifest files. The following is the top-level Hyperbola JNLP manifest file with the interesting parts highlighted:

This file and the referenced resources are placed on a Web server, and the manifest file is linked to from any number of Web pages. When the user clicks the link, the browser sees that it is a JNLP manifest file and invokes the Java Web Start infrastructure to handle the content. This is much like the way browsers handle Flash or PDF content. Depending on the browser configuration, the Web Start support and JRE may be dynamically downloaded and installed into the browser on first use.
After downloading and caching the JARs and extensions described in the JNLP manifest file, the Web Start handler starts Java and the requested application. While this process is kicked off via your browser, the resultant application is not run in the browser. Once a Java Web Start application is installed, the JARs and manifests need not be downloaded again. The second time the link is selected, the cached files are used. In some scenarios the application can be configured to run directly from the user’s desktop.
An additional point of interest is the Equinox launcher JAR included in the manifest. Notice that the <application-desc> tag identifies the WebStartMain rather than the standard Eclipse Main class as the entry point.
Top-level JNLP manifest files essentially play the role of hyperbola.exe, hyperbola.ini, and the config.ini in standard Eclipse deployments. They define command-line arguments, some VM arguments, and the splash screen and set various system properties.
26.4.2 Hyperbola and Java Web Start
To illustrate how Web Start works in practice, let’s set up Hyperbola to run via Web Start. Look back at the JNLP manifest and notice the <extension> tag. The JNLP manifest file listed there extends the current file. The snippet below shows the key elements of the extension file. Notice that it lists some plug-in JARs and it, too, has an extension—the structure is recursive.
This structure looks remarkably like Eclipse features—some amount of identification and location information followed by a list of included plug-ins and nested lists. In general, the structure of JNLP manifest files is completely under your control. Eclipse maps features to JNLP manifest files as a matter of convenience and to enable tooling reuse.
For example, PDE takes advantage of this correlation and allows you to augment software sites with JNLP information as the features are built. This is convenient since software sites are already on the Web and already have the plug-ins needed. This approach has the added benefit that you do not have to change mind-sets or build two parallel configurations. The tooling does not, however, generate the top-level JNLP manifest file described previously—you have to do that.
To build the JNLP-enabled update site, first create a feature to describe the Web Start version of Hyperbola. This time, name the feature hyperbola.jnlp.feature. Once that is created, add org.eclipsercp.hyperbola.feature to the Included Features list, and on the build.properties page remove the bin.includes line altogether. Add in a root declaration, as shown below. It should be the only line in the file.
root=rootfiles
In the case of building an update site, declared root files get copied to the root of the site. In the Web Start case, we want the Equinox launcher JAR and the top-level JNLP manifest file to be at the root.
Create a rootfiles directory at the root of the hyperbola.jnlp.feature project and copy in the Equinox launcher JAR from your target. Use File > New > File to create a text file called hyperbola.jnlp in the rootfiles directory. This is the top-level JNLP manifest file. Fill it in with the content shown earlier. For simplicity, set the codebase attribute to file:/c:/site—you can change that later when you deploy to a real site.
When you are done, the hyperbola.jnlp.feature project should look like Figure 26-1. As usual, you can get a preconfigured setup from the sample code for this chapter.
Figure 26-1 Hyperbola JNLP feature

26.4.3 JAR Signing
Eclipse must run with all-permissions since it creates class loaders, reads and writes files, and performs other protected operations. To run a Java Web Start application with all-permissions, all JARs must be signed. Signing makes the JARs a bit bigger but otherwise does not affect their normal use. The PDE Export wizard allows you to sign JARs as they are exported or added to a build output.
Before you can sign a JAR, you must have a keystore set up. To do this for production scenarios, you should acquire the appropriate certificates from a trusted certificate authority. If you use your own self-signed key, your users will get warnings that the JAR signatures cannot be authenticated.
For testing, you can set up a simple keystore using the keytool program included with typical JDKs, as shown below. For more options, see the keytool documentation.
keytool –genkey –alias <alias> –keypass <password>
Note
Eclipse uses the jarsigner application typically found in the bin directory of a JDK. As such, you must be running with a JDK or have jarsigner on the system’s program path to sign JARs.
Once you’ve set up the keystore, sign the Equinox launcher JAR you added to the hyperbola.jnlp.feature project using the command below. The <alias> is an arbitrary string of your choosing.
jarsigner.exe <location of equinox launcher.jar> <alias>
26.4.4 Exporting for Java Web Start
Now you are ready to export Hyperbola for Web Start. Open the File > Export... > Deployable features wizard and select the hyperbola.jnlp.feature. Ensure that the Package as individual JAR archives check box is checked, and for this example set the export location to c:site. Select the JAR Signing tab shown in Figure 26-2.
Figure 26-2 Hyperbola JAR signing options

Fill in your JAR signing information and then switch to the Java Web Start tab as shown in Figure 26-3.
Figure 26-3 Hyperbola Java Web Start options

Ensure that the Site URL is the same as you put in your top-level hyperbola.jnlp manifest file. Note that by default, keytool creates the keystore in your home directory in a file called .keystore.
Click Finish, and PDE builds and signs the features and plug-ins included in Hyperbola. Note that signing JARs is costly, so expect your exports to take a little longer.
Tip
Web Start mechanisms only handle JARs. It is recommended that all plug-ins being used in Web Start deployments be structured to have “.” on their classpath and have all their code at the root of the JAR; that is, they should be structured as normal JAR’d plug-ins.
Test the Web Start version of Hyperbola by double-clicking on the hyperbola.jnlp manifest file. Depending on your OS, you may have to launch it via a Web browser. You should be able to just enter the following URL:
file:/c:/site/hyperbola.jnlp
or, if that doesn’t work, create the simple HTML file shown next and click on the link:
![]()
26.4.5 Building JNLP Manifests
The PDE Build automated build infrastructure can also be configured to generate JNLP manifest files. Go back to the setup you had in Chapter 24, add the following to the builder’s build.properties, and build the hyperbola.jnlp.feature. You might want to set the output format to be -folder to build the required software site directly.

Note
If you do not want to code your password in the properties file, it can be supplied on the command line using a -D VM argument (e.g., -Dsign.storepass=<password>).
26.4.6 Java Web Start and p2
Each time the user starts a Web Start application, the Web Start infrastructure checks to see if the application has been changed. If it notices updated manifests or JARs, it replaces the local copies with the newer versions—Web Start manages the install. As such, there is no particular need to use the p2 technology in Web Start configurations. WebStartMain automatically discovers and installs downloaded plug-ins based on the classpath used to start the Java Web Start JVM.
It is possible, however, to use the Equinox p2 mechanism in concert with Web Start. Once the Web Start–based application is running (and assuming it includes the p2 infrastructure), users can use p2 to add functions, as outlined in Chapter 14. Newly acquired features and plug-ins are downloaded to a local site of their choosing and installed into Eclipse. These features and plug-ins are managed on the client by p2—Web Start does not install new versions for you even if they are added to the Web Start download site.
26.5 Initializing the Install
Eclipse manages a number of caches to improve performance. Typically, these are written to the configuration area of the application. The caches are simply read during subsequent sessions—they are rewritten only if something in the install changes; that is, on its second invocation, Eclipse generally does not write anything to disk. This is a great performance optimization for subsequent invocations, but it requires both some writable storage and somewhat more time for the first run.
To alleviate this, you can initialize an install after laying down all of its files on disk. Initializing tells Eclipse to build any structures and caches that it needs and results in the user’s first run of the product being faster. The standard initialization process starts Eclipse normally, but just before running product code, it exits. To initialize Hyperbola, run with the -initialize option as follows:
hyperbola –initialize
To reinitialize Hyperbola, execute the line below. This discards any previously computed caches and then initializes the install as normal.
hyperbola –clean –initialize
26.6 Preinitialized Configurations
Initializing an install is also useful when setting up Hyperbola to run off a read-only medium such as a CD. In this scenario you want to do the first run of Hyperbola before burning the CD and include all the preinitialized caches on the CD. Depending on the application, this can eliminate the need for writable media altogether.
The trick here is to initialize everything needed to run Hyperbola. The built-in initialization you get with -initialize treats only the internal Eclipse caches. To initialize Hyperbola, you can easily write a special application that initializes the Hyperbola state and then run the application when Hyperbola is installed, as shown here:
hyperbola –application org.eclipsercp.hyperbola.initializer
Data required by other plug-ins is more difficult. The most common problem is files that need to be extracted from plug-in JARs before they can be used. For example, native libraries, HTML files, and the like all need to be extracted from their containing plug-in JARs before being used.
The infrastructure around these files does the extraction on demand at runtime. For example, when a library is opened, the class loader triggers the extraction of the library and then opens the extracted copy. Similarly, the About information is extracted before being viewed with a Web browser. To fully preinitialize Hyperbola, then, you have to touch all of these files and ensure that they are extracted and cached so that you can burn them onto the CD.
Fortunately, all you have to do is call FileLocator.resolve(URL) for each file or directory that needs to be extracted. The hard part then is identifying all of these files. Eclipse does not have direct support for this, but the Eclipse Platform Core team does supply an initializer application on their home page. See the Core page on http://eclipse.org/platform. See also Eclipse Bug 90535 for more details.
26.7 Multiuser Install Scenarios
In UNIX and enterprise environments, it is often useful to share one install of Hyperbola among many users. Rather than having a copy of Hyperbola on each end-user machine, Hyperbola is installed on a central server and simply instantiated by each user.
Some of the advantages of this approach are
• Reduced management cost since there is only one install to manage
• Increased control over what plug-ins people are running since the configuration can be protected by file system permissions
• Better integration into the native environment; for example, shared application installs are the norm in the UNIX world
Some issues to consider are
• How to update shared configurations while users are using them
• How to manage data stored by an instance in the configuration area
• Additional complexity in the initial setup
Note
This section manipulates the location of the Eclipse configuration and instance areas to get various sharing and separation effects. Please refer to Chapter 27, “OSGi,” for details on how to use and control these areas.
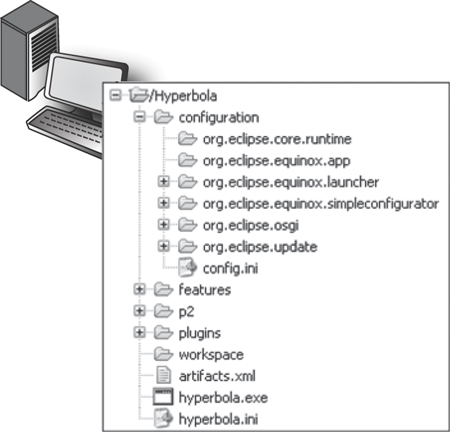
By default, Eclipse expects to have or create a configuration area inside the install directory (e.g., /Hyperbola/configuration), as shown in Figure 26-4.
Figure 26-4 Independent installs
Hyperbola does not need a workspace in the classic Eclipse sense, but it does use an instance area to store information such as the window layout. The instance location should be set in the relevant config.ini. Section 27.9, “Data Areas,” discusses this in detail, but in this example the config.ini might contain the following:
[email protected]/hyperbola
26.7.1 Shared Installs
The independent install approach works well for stand-alone installs on individual machines where users have global privileges. In shared scenarios, however, you typically want to protect the install by marking it read-only.
When Eclipse runs in a read-only install, it notices that the default configuration location (i.e., the install area) is not writable and looks for an alternative. Unless you use -configuration, the configuration area is placed under the user’s home directory, as shown in Figure 26-5.

Note
If you change the location of the configuration folder using the –configuration flag, be warned that the parent folder must also be writable as Eclipse writes some configuration information there, too. For example, running Hyperbola with -configuration ~me/hyperbola/configuration will add a number of files to the ~me/hyperbola directory.
Here, Hyperbola is installed on the server and locked. Various clients access the installed files and run. Since the server does not have a configuration, each client does its own initialization and builds its own configuration. Notice that this essentially splits the setup on the right of Figure 26-5. The server install is the same as the Hyperbola directory and the clients are the same as the ~me directory. The configurations on the clients are distinct and must be updated independently. In effect, the installed files are being shared, but not the configurations.
The location of the configuration area in this scenario is controlled by the shared config.ini on the server. It includes the following line to set the configuration location, as shown in the figures:
[email protected]/hyperbola/configuration
26.7.2 Bundle Pooling
Sharing plug-ins among multiple RCP applications can save both disk space and download time since each plug-in has to be retrieved and installed only once. Sharing plug-ins in a central location is known as bundle pooling. A bundle-pooled scenario is shown in Figure 26-6. Here the server contains some plug-in install sites (e.g., /Common/plugins) and a p2 agent. The p2 agent is responsible for managing the different installs that use the plug-ins in this bundle pool. The figure shows a variety of clients using the same set of plug-ins.
Figure 26-6 Multiple (shared) configurations

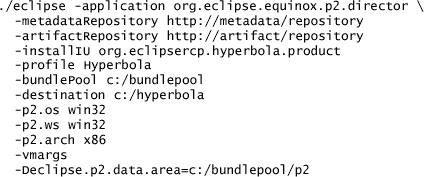
Setting up a bundle pool cannot be done by simply “unzipping” an RCP app. Instead, the RCP app must be “installed” using the director application. The director application specifies the install, the bundle pool, and the agent location. The following snippet shows how to install Hyperbola with a bundle pool from a p2 repository. Refer to Chapter 24, “Building Hyperbola,” for a description of how to build Hyperbola and create a p2 repository.
If you install other configurations of Hyperbola, or any RCP app for that matter, you can use the same bundle pool location. If a plug-in already exists in the bundle pool, it will be reused.
Note
When reusing a bundle pool, you must use the same eclipse.p2.data area. This is because p2 manages all the plug-ins in the bundle pool and removes them when they are no longer used.
26.8 Summary
Deployment is a critical step in the overall process of making and delivering an RCP application to your users. Eclipse installs are relatively simple structures of files, and they can be delivered using a wide variety of mechanisms from simple archives to native installers or network-based installs such as Java Web Start. Enterprise users can set up shared installs that offer varying amounts of sharing and flexibility. So Eclipse not only helps you build your RCP products, but it helps you deliver them, too.
Each of the approaches described has benefits and drawbacks. These mostly revolve around the issues of separating users and ease of managing configurations. As an RCP application writer, you should allow for these installation scenarios and thus give your users the option of how to install your product.
26.9 Pointers
The reference section of the standard Eclipse plug-in developer Help (Help > Platform Plug-in Developer Guide > Reference > Other reference information) contains details of the system properties, file formats, and other structures discussed in this chapter.