Lesson 11. Markers, Stories, and Connections
Lessons > lesson11 > 11_Chapter_Stories_start
Media
Media > Blackbox folder
Time
This lesson takes approximately 45 minutes to complete.
Goals
Create chapter markers in Final Cut Pro
Export chapter markers in a QuickTime movie
Create, import, and work with markers in DVD Studio Pro
Create stories
Establish connections between buttons and targets
Chapter markers are essential to the DVD viewing experience. They provide a convenient method for moving around a video track on a DVD, especially one containing long-form content, such as feature films and documentaries. With chapter markers, users can jump from one point to the next, either using the chapter buttons on their remote controls or through specific menu options defined by the DVD author. (That’s you.) For instance, you can create a single video track with chapter markers and allow users to access different portions of the track using a menu with buttons linked to those chapter markers. In fact, the DVD-Video specification allows each video track to have up to 99 chapter markers.
You can also use chapter markers to create stories. Stories are like playlists in an iTunes library, which allow you to play all or just some of your chapters, in any order without taking up any additional space.
Final Cut Pro is one of the most convenient and powerful applications for creating markers. In this lesson, you will work with Final Cut Pro to create chapter markers, so you can then create three distinct stories in DVD Studio Pro for the BlackBox commercial reel. You will also learn about encoding in DVD Studio Pro and how to use connections to author your DVD.
Working with Chapter Markers
A major dilemma in the chapter marker creation process, when using DVD Studio Pro, derives from the issue of not being able to create markers exactly where you want them. In DVD Studio Pro, you can only place chapter markers on an I-frame, which occurs at the beginning of a GOP (group of pictures), typically every 15 frames. If the frame you want to place a chapter marker on happens to fall between I-frames, you will have to settle for the nearest one, which can make for some awkward jumps in the DVD if you need a chapter to start precisely—before a fade-up, for example, and not in the middle of one.
To circumvent this issue, you can always add your chapter markers in Final Cut Pro or Compressor before you encode your video. Using this method, you can force an I-frame onto whichever frame you choose and create a new GOP.
Lesson 9 covered adding chapter markers in Compressor; this lesson will concentrate on a Final Cut Pro workflow.
Creating Markers in Final Cut Pro
Since most video used in DVD Studio Pro projects originates from an editing application, such as Final Cut Pro, it is often easiest to add your chapter markers in that editing application before exporting the video. In this lesson, you will learn how to add markers in Final Cut Pro that can be used to set chapter markers for your DVD. This simplifies the process because your markers are automatically imported into DVD Studio Pro with the clip. Also, the tools you are accustomed to using in Final Cut Pro are often quicker and easier for precisely placing markers in a video track.
Types of Markers in Final Cut Pro
In Final Cut Pro, you can add three types of markers to a clip or sequence: chapter markers, compression markers (see Lesson 9), and scoring markers. You generate these markers by creating a simple marker and then adding a specific tag to the marker in the Edit Marker dialog. These markers can then be exported with the video and audio of the clip sequence and read by another application, such as Compressor, DVD Studio Pro, or Soundtrack Pro.
Chapter markers in Final Cut Pro are identical to those in DVD Studio Pro, except for one major difference. Chapter markers in DVD Studio Pro can occur only on I-frames, whereas chapter markers in Final Cut Pro (or Compressor) can be placed on any frame. To place a marker on the exact frame you want, instead of the nearest I-frame, you must force an I-frame when compressing to MPEG-2 in Final Cut Pro.
Forcing an I-frame has other applications besides adding chapter markers. I-frames are the least compressed frames of a GOP, and placing them on important edit points (particularly those that occur on transitions or contain a lot of motion) ensures that they maintain the highest quality when encoded to MPEG-2.
Scoring markers, like chapter markers, can be embedded in video and read by another application, such as Soundtrack Pro, which is included with Final Cut Studio. Scoring markers can mark important moments in a movie, for instance when music needs to be particularly loud or soft or when you need a certain tempo or feeling.
Creating Chapter Markers in Final Cut Pro for DVD Studio Pro
In this exercise, you are going to create five chapter markers in Final Cut Pro that are then going to be used to create three stories in the Commercials section of the BlackBox DVD.
Stories use chapter markers to mark a specific section of a video track (such as a chapter’s beginning and end). Because you are going to create a story in a later exercise, in this exercise you’ll preselect a start and end point for each chapter or section that you’ll use in the story, so that it will play properly. A chapter in a story starts at one chapter marker and plays until the next chapter marker (the end marker) is reached.
- Open Final Cut Pro by clicking its icon in the Dock.
If you haven’t added it to the Dock, locate the Final Cut Pro icon in the Applications folder on your hard drive and drag it to the Dock.
- In Final Cut Pro, choose File > Import > Files.
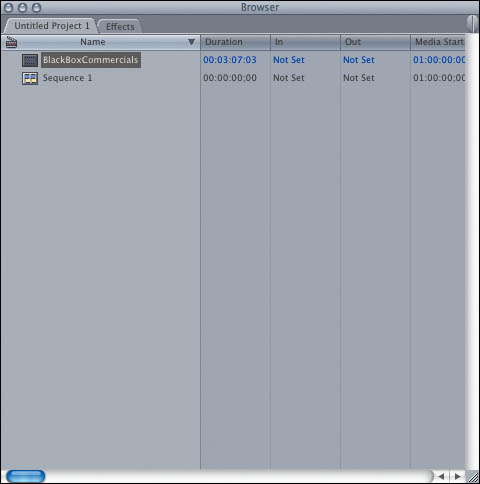
- Select Media > Blackbox > Commercials > BlackBoxCommercials.mov, and click Choose to bring it into Final Cut Pro.
The video BlackBoxCommercials now appears in the Browser.
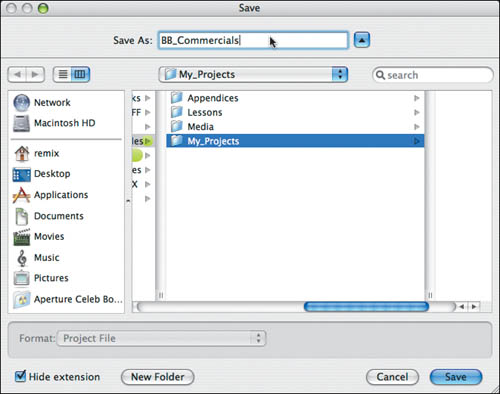
- Choose File > Save Project As, name your project BB_Commercials, and save your project to the My_Projects folder.
- Drag the BlackBoxCommercials clip to the Canvas and choose Overwrite from the Edit Overlay options.
Your clip has now been added to the Timeline.
- With your Timeline selected, press Home and navigate to 01:00:31;00 by typing 31. (31 period), into the Timecode Duration field in the upper-left corner of the Timeline and pressing Return.
Entering a timecode moves the playhead to an exact location.
Note
There are several methods for moving the playhead in Final Cut Pro. You can scrub it across the Timeline by using the mouse; use the J, K, and L keys to move forward and backward through the video; or press the Left Arrow and Right Arrow keys to precisely position the playhead one frame at a time. If you know the exact timecode at which you want to place the marker, however, entering the timecode value is the fastest method.
- After you locate the point for your first marker (between the first and second commercial), press the M key twice.
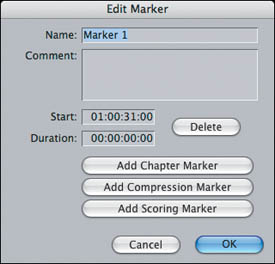
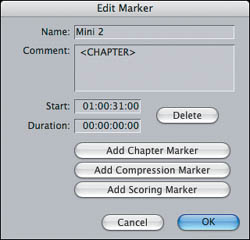
The first M automatically places a marker at this particular timecode, and the second M brings up the Edit Marker dialog, where you can choose more options for the marker you are placing.
- Type Mini 2 into the Name field of the Edit Marker dialog to name the marker.
Note
You could keep the default names of the markers (Marker 1, Marker 2, and so on), but these headings won’t tell you anything about the contents of the video at that point. Using a more precise name is often better, because you can easily refer to these names when you build your stories. Also, if you were to place a new marker between existing markers (for example, a new marker between Marker 1 and Marker 2), it would appear to be out of order, because markers are numbered in the order they were created, not by their relative positions in the Timeline.
- In the Edit Marker dialog, click the Add Chapter Marker button.
This button automatically adds a text tag in the Comment field, which, once exported, will inform any other QuickTime-aware application to set both a compression marker and a chapter marker for this frame. Without this step, you’ll have no chapter markers in your track.
- When you are finished editing your marker, click OK.
- Repeat steps 6 through 10 to create the following additional chapter markers and names in your BlackBoxCommercials video clip:
01:01:02:00 Honda 1
01:01:33:00 Honda 2
01:02:04:00 Jaguar 1
01:02:35:00 Jaguar 2
Make sure you click the Add Chapter Marker button for each marker you create.
Note
You might be asking why you didn’t create a marker for the first Mini commercial in the reel. It’s because a marker is automatically added to the beginning of a track in DVD Studio Pro as part of the DVD-Video specification. This default marker cannot be moved, but it can be renamed (which you’ll do when you go back to DVD Studio Pro).
- Practice navigating between your markers by holding down the Shift key and pressing the Down Arrow key to move to the next marker or the Up Arrow key to move to the previous marker.
You can also press M once when your playhead is parked on a marker to bring up the Edit Marker dialog to make any changes.
Now that your chapter markers are placed in your track, it’s time to mark your track and export the movie for use in your DVD project.
- With the Timeline selected, press Home and then press I to mark the In point of your sequence.
- In the Current Timecode field in the upper-left corner of the Timeline, type 30803 and press Return.
This positions your playhead exactly one second past the end of your sequence.
- Press O to set the Out point of your sequence.
The reason you place your Out point beyond the end of your sequence is to avoid problems with the GOP-based compression of MPEG-2. Because your movie is compressed using groups of pictures as opposed to individual frames, you can have problems with fades and transitions being cut off unless you give them a little extra space.
You are now ready to export your movie.
- Choose File > Export > QuickTime Movie when you are ready to export your video.
Note
You can also export a sequence by choosing File > Export > Using Compressor. The advantage of this workflow is that all of your original source footage (video, graphics, and so on) will be used in the compression process, regardless of your sequence settings. This can create a considerably better MPEG-2 encode for your DVD. This is above and beyond the advantage of the control you have encoding your files using Compressor. Is there a downside? Yes—speed.
For this exercise, you are creating a QuickTime movie that will be imported directly into DVD Studio Pro and will be encoded using the Encoding Preferences in DVD Studio Pro.
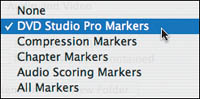
- Name your movie BB_Comm_Markers and then choose DVD Studio Pro Markers from the Markers pop-up at the bottom of the Export dialog.
This ensures that the tags placed on your markers in the Timeline will be embedded in the resulting QuickTime file.
- Make sure that the Make Movie Self-Contained checkbox is not selected.
The Make Movie Self-Contained option is important to understand. When it is selected, the resulting QuickTime file will have all video frames and audio samples packed into a new, large file, which is perfect for loading onto a FireWire drive and handing over to a collaborator or a client. These QuickTime files are called self-contained, simply because they contain all the content needed for playback within themselves. When the option is not selected, the QuickTime file is called a reference movie. These movies are much smaller and contain links to the proper video files, but they become relatively useless when moved to another computer, because the links they contain will be broken.
The simple rule for deciding whether to make a movie self-contained is this: If it’s staying on this machine, don’t select Make Movie Self-Contained. If it’s leaving the machine, select it.
- Choose your save location as Media > Blackbox > Movies. Click Save.
Your movie is now ready to import into your DVD Studio Pro project.
You may get a dialog asking if you want to replace the asset you are saving. Choose Replace if it shows up.


Setting Encoding Preferences
When importing assets that have not already been encoded, DVD Studio Pro will use its Encoding Preferences to compress those assets. These preferences are also used any time you use the Palette to design menus for your DVDs.
In this section, you’ll access and change the Encoding Preferences in DVD Studio Pro.
- In the Assets tab, select the Movies folder, click the Import button, and navigate to Media > Blackbox > Movies.
- Select BB_Comm_Markers.mov and click Import.
The asset you created in the last exercise, the commercials reel with chapter markers, will be imported into the Movies folder.
- Choose DVD Studio Pro > Preferences and then select Encoding to access the DVD Studio Pro Encoding Preferences.
- In the Encoding pane, select the MPEG-2 SD tab.
This tab is where you set preferences for encoding any standard definition assets that are not pre-encoded before they are brought into DVD Studio Pro. These settings are also used any time you create menus using the Palette.
- Change the Mode to Two Pass VBR (variable bit rate). By default it is set to One Pass VBR.
- Change the Bit Rate to 6.0 and the Motion Estimation to Best, and leave Method set to “Encode on build.” Click Apply and then click OK.
You have now changed your default settings, which will be applied to any existing and imported assets that are not pre-encoded when you build your project. This includes the BB_Comm_Markers.mov file you just imported.
Note
Although it is important to set your Encoding Preferences in DVD Studio Pro for any assets that are not pre-encoded, Compressor gives you far more control over the encoding process.
Additionally, DVD Studio Pro cannot generate AC-3 audio files, which could present problems when creating menus for your DVD. All DVD Studio Pro menus must have the exact same audio format and settings to be compliant with the DVD specification. Therefore, it is usually best to pre-encode all of your assets prior to importing them into DVD Studio Pro.


Using Stories as Playlists
Creating a story provides an easy way to rearrange the playback of track segments defined by your chapter markers. Chapter markers in stories may be thought of as aliases that point to the original material—in this case, points in a video track. These markers can be placed in any order you want. Buttons may link to these stories and activate a series of chapter markers.
You can create up to 98 stories for each track in a DVD project. With stories, you can create several different versions of a movie or video program without creating additional video tracks that take up valuable space on a disc.
Whether you want to allow viewers to see the “director’s cut” of your movie, create a version of a track that skips some objectionable content, access only a couple of a track’s segments, or use a short piece of the track as a preview, stories will do the job without creating so much as a kilobyte of new media. In this way, stories function as a playlist.
In the next exercise, you will build three stories that will play three separate sections of the BlackBox commercials track. These stories will link directly from the Client Spots menu of your DVD, which has been prebuilt for this exercise.
Note
You can include up to 99 tracks, slideshows, and stories in a single project. This number represents the total number of tracks, stories, and slideshows combined.
Creating and Working with Stories
The BlackBox commercials reel contains six spots for three different clients. There are two Mini spots, two Honda spots, and two Jaguar spots. Although you would want the viewer to be able play all of the spots one after the other, it would also be nice to allow them to just watch spots for a particular car manufacturer. By using stories, you can do this easily.
The DVD Studio project you will be working with contains two additional menus that have been built for the Commercials section of the DVD. There is a main menu that will allow the viewer to watch the entire commercial reel (a Play All) and a submenu that will allow the viewer to watch client spots based on the car manufacturer. Each menu was built using the same process that you learned in Lesson 10 by using a background movie and an overlay file.
In this exercise, you’ll create three stories from the commercials track that you worked with in the last exercise. You’ll then link to your stories from a submenu for the client spots in the Commercials section of your DVD. The first thing you’ll need to do is import the track that will be used to create your stories.
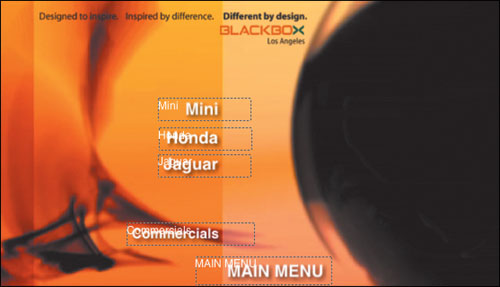
- In the Graphical view, select the Commercials Main Menu so that it loads into the Menu Editor. You will see that there are three buttons on the menu: PLAY ALL, Client Spots, and MAIN MENU.
The Client Spots and MAIN MENU buttons have already been targeted to the appropriate menus on the DVD. It’s now time to add the Commercials reel to the DVD.
- From the Assets tab, drag BB_Comm_Markers.mov to the Menu Editor and over the PLAY ALL button. From the Drop palette, choose Create Track, Connect to Track.
This action creates a new track in your project and also targets the PLAY ALL button to link directly to the track.
- In the Graphical view, click the Zoom to Fit button so that you can see the new track. Reposition it so you can see its relationship to the Commercials Main Menu of the DVD.
- In the Graphical view, select the Client Spots submenu.
This menu will be used to access the three stories you are about to create. None of the buttons have been linked to anything. You will link them using the Connections tab in the next exercise.
- In the Graphical view, select the BB_Comm_Markers track. In the toolbar, click Add Story.
- Click Add Story two more times to create Story 2 and Story 3.
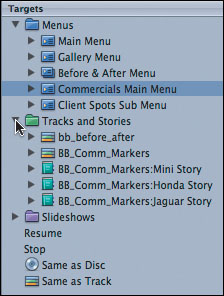
- In the Graphical view, reposition your three stories under the Client Spots submenu and then click the Zoom to Fit button.
Before you create your first story, you’ll make a change to your first chapter marker so that it is easy to keep track of things.
- In the Track tab, select the first marker (Start) in your track.
This default marker is always added to your tracks in DVD Studio Pro. It was not created in Final Cut Pro and cannot be moved. It can, however, be renamed.
- In the Marker Inspector, change the name of the marker to Mini 1.
This name now corresponds to the other markers in the track and will make it easy to create your stories.
- In the Graphical view, select the Story 1 tile and then click the Story tab.
You are now ready to create your first story, which will be based on your chapter markers. As mentioned earlier, stories can be created using any of the markers in your track, in any order, and can even be repeated more than once if you like.
The left side of the Story Editor contains all of the markers from the track you have selected (the source list). On the right side is the list where you can arrange these markers to create a story (the entry list).
In this exercise, you will create three stories that will be based on each particular client’s commercial spots. First up will be the Mini commercials.
- From the left column of the Story Editor, drag the Mini 1 track marker to the right column.
Mini 1 now becomes the first story marker in your story.
- Drag the Mini 2 track marker to the right column.
You have now completed your first story! For this exercise, you will create two more.
- In the Graphical view, select the Story 2 tile. In the Story Editor, drag the Honda 1 and Honda 2 track markers to the right column to create your second story.
- In the Graphical view, select the Story 3 tile. In the Story Editor, drag the Jaguar 1 and Jaguar 2 track markers to the right column to create your third and final story.
- In the Graphical view, triple-click the Story 1 text in the Story 1 tile to highlight the text. Rename the story Mini Story and press Return.
- Rename Story 2 Honda Story and Story 3 Jaguar Story.
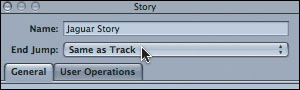
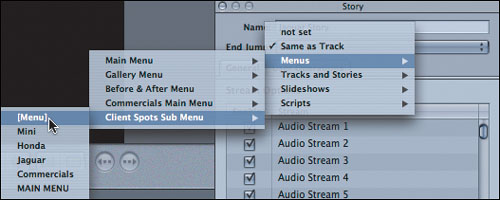
- Select the Jaguar Story. Notice in the Story Inspector that the End Jump for a story always defaults to “Same as Track.”
This default ensures that when the story is done playing it will jump back to wherever the main track is set to jump (in this case the Commercials menu). Although this may be preferable if your Play All and Story buttons are on the same menu, it will not be desirable if your viewers are accessing your stories from a submenu. In this case, you’ll need to change the End Jump for each of your stories.
- In the Story Inspector, change the End Jump to Menus > Client Spots Sub Menu > [Menu].
Now, when the story is done playing, it will jump back to the right menu.
- Repeat step 18 for both the Mini Story and Honda Story so that they also jump back to the correct menu when they have finished playing.
Note
You could also choose a specific button on your menu when setting your End Jump. For instance, when setting the End Jump for the Mini Story, you could choose Menus > Client Spots Sub Menu > Honda. This choice will not only ensure that you jump back to the correct menu, but it will also highlight the next button on the menu (because the viewer will have already played the Mini Story).
- In the Graphical view, right-click or Control-click any one of your three stories and choose Simulate Story from the shortcut menu. Close the Simulator after you have watched your story play.
At this point, almost everything has been completed in the project. As mentioned earlier, though, the Client Spots submenu contains buttons that have not been targeted to anything in the project. Now that you have created your stories, you’re ready to link everything up from this menu. You could manually target each button in the menu, but a faster way is to use the Connections tab to link everything up.


Establishing Connections
There are many ways to author a DVD using DVD Studio Pro. You can target buttons by using the Inspector, by right-clicking or Control-clicking, or by dragging and dropping. Depending on your particular project, and preferred workflow, you may use one or all of these options.
There is also another way to author your DVD: using the Connections tab.
By using this tab in DVD Studio Pro, you can author a part or all of a DVD project and make changes to any targets that have been made along the way.
In this exercise, you will target all of the buttons on the Client Spots submenu and complete the basic authoring for the entire DVD.
- In the Graphical view, click the gray background to make sure that no specific elements of your project are selected.
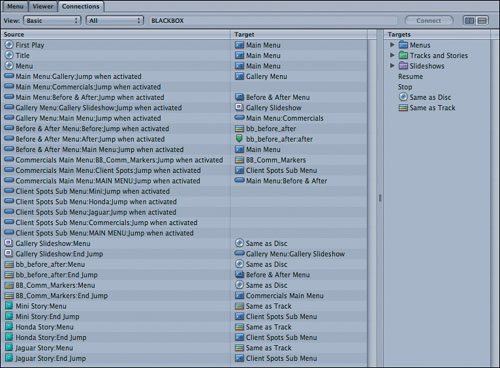
- Click the Connections tab and make sure that the first View pop-up menu is set to Basic and that the second pop-up menu is set to All.
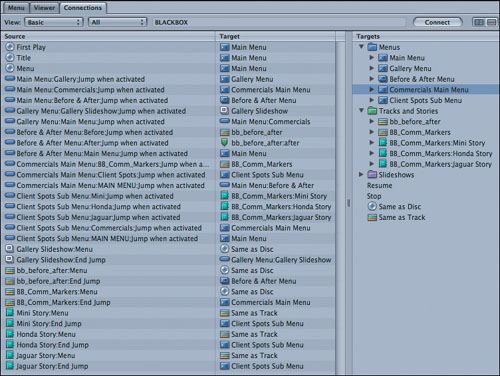
The Connections tab has two sections. The left section is divided into two columns. The first column, Source, lists the source links: menus, menu buttons, tracks, slideshows, and other items. The second column, Target, lists what the buttons or items are linked to. If there is nothing in the Target column, the source is not linked to anything.
In the right section is a third column, Targets, which lists the possible disc items (menus, tracks, slideshows, and stories) that are available to be set and used as targets.
The Connections tab offers you different views of the connections in your project. You can determine the level of detail you want to see by setting View to Basic, Standard, or Advanced. For our purposes, Basic will be sufficient.
In the Basic view, you will find all major jumps, such as the First Play action; jumps from buttons to menus and tracks; and end jumps from tracks to menus. By using Basic view to connect all project elements, you can make sure that your disc is not missing any major links.
The All setting shows all available Basic connections, whether they have targets or not. The Connected setting shows which links are connected, and Unconnected shows those links that do not currently have targets. Keep this set to All to view all available links for the moment.
- In the Target column (left section), locate the first instance where there is no target for a source item (the fifth row).
“Main Menu:Commercials:Jump when activated” has no target.
Based on the icon, it is easy to tell that the source is a button. Additionally, because you named your buttons, you know that the Commercials button from the Main Menu is not targeted to do anything when it is activated.
You can use the Targets column in the right section to link the button.
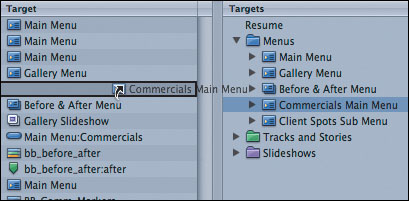
- In the Targets column (right section), click the Menus disclosure triangle to reveal all the available targets associated with menus in the project.
- From the Targets column, drag the Commercials Main Menu target to the empty space in the Target column (left section) for “Main Menu:Commercials:Jump when activated.”
You have now connected the Commercials button on the Main Menu so that it links to the Commercials menu when activated.


Finding the Unconnected Elements
Working with the Connections tab set to display only unconnected items is a good way to quickly check your disc for links that have not been established yet. In effect, it provides a “to-do” list. Items will disappear from the list as soon as they are connected to something. When the Source and Target columns are both empty, you have connected everything in your DVD.
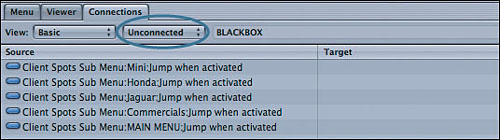
- Click the second View pop-up menu and choose Unconnected.
Now the Connections tab displays only the unconnected items. As you can see, all of the buttons on the Client Spots submenu need to be linked to their appropriate targets. Let’s go ahead and connect these items now.
- In the Targets column, in the right section, click the “Tracks and Stories” disclosure triangle to reveal all available targets associated with tracks and stories in the project.
- From the Targets column, drag the BB_Comm_Markers:Mini Story target to the top row of the Target column (left section).
Two things occur when you do this: Your Mini Story button on the Client Spots submenu of your DVD becomes targeted to the Mini Story you created, and that item disappears from the left pane because the story is no longer unconnected.
- From the Targets column (right section), drag the BB_Comm_Markers:Honda Story target to the top row of the Target column.
- From the Targets column, drag the BB_Comm_Markers:Jaguar Story target to the top row of the Target column.
All of your stories have now been linked up. Take a look at your Graphical view, and you can see that the connections have been made.
Now you can take care of the last two buttons in your menu.
- From the Menus folder in the Targets column, drag the Commercials Main Menu target to the top row of the Target column.
- From the Menus folder in the Targets column, drag the Main Menu target to the top row of the Target column.
Everything has now been linked up.
- Set the second View pop-up to All.
You can now see that your entire project is linked, and there are no empty targets.
Note
For more detailed information on the Connections tab, please refer to page 525 in the DVD Studio Pro User Manual.
- Simulate your disc to make sure that all links work properly.
- Save your work.


Now that your entire disc is authored, it is time to start looking at the little touches. When you simulated your project, you may have noticed that when you return to a menu, it always starts from the beginning as opposed to the loop point. You may have also noticed that when you click the Menu button when watching the Commercials reel, the DVD does not keep track of which menu you accessed the track from (Commercials menu or Client Spots menu).
Although the disc is very useable as is, the user experience can still be enhanced. In the next lesson, you’ll learn how scripting can add the extra touch that will make the overall DVD much more enjoyable to watch.
Lesson Review
1. What is the maximum number of chapter markers you can add to a single track?
2. Can you set frame-accurate chapter markers (on exact frames) inside DVD Studio Pro itself?
3. What is the process for setting chapter markers inside Final Cut Pro?
4. How many stories can you include in a project?
5. True or false: To create a story, you must first select the track the story will be assigned to and then add the story to the project.
6. Can a story play chapters from two different tracks?
7. What does the Connections tab do?
8. True or false: You can filter the Connections tab to show only the unconnected items in your project.
Answers
1. 99. Or, 98 new chapter markers in addition to the default chapter marker that gets placed at the first frame of each track. (This marker cannot be moved or altered.)
2. No. To set frame-accurate chapter markers, you must set them in Final Cut Pro (or Compressor), before encoding the MPEG-2 stream.
3. Park the playhead on the frame you want to tag with a marker, and press the M key twice to set a marker and open the Edit Marker dialog. Then, click the Add Chapter Marker button to turn the marker into a chapter marker.
4. That depends upon how many tracks and slideshows the project has. You can have a maximum of 99 tracks, slideshows, and stories in a single project.
5. True. DVD Studio Pro needs to know to which track the story belongs, so you must select the track first in either the Graphical or Outline view.
6. No. Stories can play only chapters from the track they are assigned to.
7. It allows you to quickly check and establish links between the different items in a project.
8. True. You can also filter the Connections tab to display only the connected items or to display all items (both connected and unconnected).