
Lesson 10. Designing Advanced Menus
Lessons > lesson10 > 10_Advanced_Menus_start
Media
Media > Blackbox folder
Time
This lesson takes approximately 60 minutes to complete.
Goals
Work with standard DVD menu assets
Apply simple and advanced DVD menu overlays
Create buttons for overlays
Choose highlight buttons states
Add motion backgrounds to a standard menu
Set a loop point to delay the display of button state overlays
Work with motion menus
Explore layered menus
DVD-Video is all about the menus. Without menus, you would have only a linear progression of video, not much more exciting than a standard VHS tape. Menus provide interactivity and make DVD-Video both memorable and engaging to watch. Although it is important to ensure that your video is encoded properly and looks good, menu design consumes the bulk of the effort that goes into making any professional DVD-Video.
The following pages build on menu creation concepts covered in previous lessons. You’ll start the lesson by learning the basics of menu design and dissecting a properly configured Photoshop document to see how a menu source asset is created.
In the next section, you’ll create a still menu using the Photoshop document, apply and work with a simple overlay to create your menu’s navigation, and add a video asset to give the menu more life. The section ends by creating a menu loop point.
The next section focuses on working with a premade motion menu and applying an advanced overlay. Once finished, you will have a thorough understanding of how to apply both types of overlays to your DVD menus.
In the final section, you’ll explore layered menus, which make it possible to turn on graphics outside a button’s hot spots. Layered menus provide an alternative to building menus using DVD Studio Pro.
Maintaining the Look of Menu Graphics
Creating graphics that maintain their visual appeal in video can be tricky. Common problems when transitioning from computer to video displays include the thinning or stretching of graphics, the flickering or bleeding of colors, and the unreadability of text.
The graphic requirements for a video display are not always explicit. For example, NTSC DVD-Video uses a frame dimension of 720 × 480 pixels (720 × 576 for PAL). But, that’s only half the story. When this 720 × 480–pixel video frame is displayed on a standard television, it is horizontally squeezed, which means it displays thinner on a TV than it does on a computer monitor. The reason? Computers and video display pixels differently.
Graphics applications use square pixels, whereas standard definition video uses rectangular pixels. When designing graphics for video or DVD menus, you need to account for these nonsquare pixels so that your artwork looks the way you intend it to. If you don’t, your images will appear stretched on your DVD. Circles will become ovals, and squares will become rectangles.
Fortunately, applications such as Photoshop, After Effects, and Motion all include presets that account for these differences and can preview your graphics as nonsquare pixels. For this reason, you should always begin your design process by creating documents using a preset. For 720 × 480 DVD menus, the NTSC DV preset is the one to use. Also, make sure you are previewing the correct aspect ratio so that you can see your design the way it will be viewed on a television.
The following are some additional suggestions for creating graphics that will look best on a television set or video monitor. Since video is restricted in its use of colors (graphics applications, such as Photoshop, have a much broader palette) and image resolution, you need to consider some basic design principles for motion design work before creating your menus and overlays:
• Avoid text that is smaller than 18 to 24 points, depending on the font.
• Use sans serif fonts whenever possible.
• Design your overlays without any soft or feathered edges.
• Make all of the lines in your graphics at least 3 pixels thick. Since most video still uses fields instead of progressive frames, thin lines will appear to flicker or buzz on an interlaced display.
• Be wary of any colors that are shifted toward the red end of the spectrum, since they tend to flicker, especially in thin graphics.
• Avoid heavily saturated colors (particularly bright red), which tend to bleed and look bad on a television screen.
• Because TV colors are not as rich, vibrant, or precise as computer colors, be wary of subtle shades of red and blue, which tend not to reproduce accurately.
• To avoid problems with bright colors interfering with the audio on older TV sets, keep your primary color levels (red, green, and blue) to a value of 235 or lower. You should also make sure your primary color values are 16 or above so that all colors are broadcast safe.
• Make sure you apply a broadcast safe filter to your graphics and video assets to make sure they stay within the broadcast safe range of 16 to 235 for RGB values.
Creating Standard Menus
Often a standard menu is first designed as a multilayer Photoshop document that contains all of the layers needed to create the background graphics, plus an additional single layer containing the overlay graphics. The background graphics include all imagery that sits behind the menu buttons, as well as the button elements in their normal, unselected state.
The overlay layer defines shapes that are “laid over” the background graphics of a menu to display when a viewer selects or activates menu buttons. An overlay can either be simple (containing one key color for its shapes) or advanced (containing up to four key colors).
Let’s examine a standard menu that was designed as a layered Photoshop file. It includes the background graphics and contains two overlay layers, to illustrate both types (simple and advanced).

- From this book’s companion files, open the DVD Studio Pro project named 10_Advanced_Menus_start.
This file is just a brand new DVD Studio Pro project with a default empty menu and track tile, but the Assets tab has been preloaded with all the media you’ll need.
- In the Graphical view, double-click the default Menu 1 tile to open it in the Menu Editor.
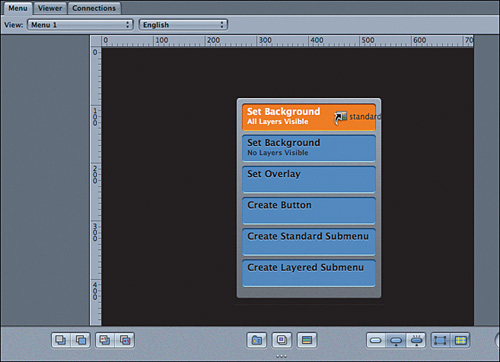
- From the Assets tab, in the Menus folder, drag the standardMenu.psd asset over the Menu Editor, but don’t release the mouse button.
The Drop palette appears.
- Choose Set Background, All Layers Visible.
The asset is now assigned to the menu.
If you take a close look, you’ll see that there are overlay layers in the PSD file that are currently enabled and displaying over the background graphics. These layers will be activated individually later on, so let’s turn them both off in the Inspector’s Background area.
- In the Graphical view, select the Menu 1 item.
The Inspector updates to display the menu’s properties.
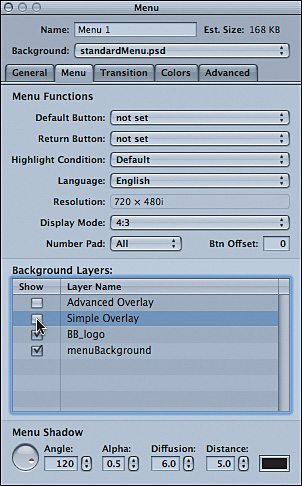
- In the Menu Inspector, select the Menu tab.
- In the Background Layers area, deselect the Advanced Overlay layer and then the Simple Overlay layer.
In the Menu Editor, the Photoshop document’s overlay layers are no longer displayed. Also take a look at the words “Gallery,” “Commercials,” and “Before & After” on the menu. These background button graphics (text titles), represent the normal state for the buttons in your menu. The normal state is how a button looks before a user has selected it. Since this state does not require an overlay to help define it, you can just incorporate the normal state of a button by making it a part of your background, as has been done in this menu.
- While you’re in the Menu Inspector, change the menu’s name to Main Menu.
This menu is well on its way to being finished. Next, you need to add the overlay layer to create the selected and activated button states.


Adding a Simple Overlay
In the last exercise, you took a look at the overlay layers in the standardMenu.psd Photoshop document, and you saw that the Simple Overlay layer contained three black squares.
In the following exercise, you will learn how to apply a simple overlay to your menu.
- Drag the standardMenu.psd item from the Assets container over the Menu Editor and wait for the Drop palette to appear.
- Choose Set Overlay.
In the Menu Inspector, near the bottom of the General tab is an Overlay File pop-up menu. This menu now shows that the standardMenu.psd asset is used as the overlay file. Directly under the Overlay File menu is an Overlay Layer pop-up menu. It currently says “menuBackground,” but this is not the correct overlay layer. By default, this menu displays the first, or lowest, layer in the Photoshop document. The Simple Overlay layer in this document is a couple of layers up, so you’ll need to select it from the Overlay Layer pop-up menu in the Inspector’s General tab.
- In the Inspector, click the General tab.
- From the Overlay Layer pop-up menu, choose the layer named Simple Overlay.


Creating Buttons for the Overlay
Now that your menu background and simple overlay are in place, you need to define the active button areas for your menu. This action will also reveal your overlay layer so you can map colors for your selected and activated button states. This exercise requires you to use the same techniques you used to create buttons in previous lessons.
- In the Menu Editor window, click the Show Button Selected State button.
Note
Make sure your Menu Editor window is wide enough to display the button state icons. If it is too narrow, these button state icons in the lower right of the window will disappear.
Keeping the selected state showing for your button overlays will help you to accurately draw and position your button selection areas in the next steps. You will notice the overlay graphic as you click each button while creating it in the Menu Editor. Since the overlay will help define the active area for your buttons, it must precisely match the positions of any buttons or graphics you have added to the background.
- In the Menu Editor, click and drag on the menu background to create buttons around each of the menu’s navigational choices.
- In the Inspector, name the buttons Gallery, Commercials and Before & After.
When drawing buttons in the Menu Editor, you are defining the active button area.
Note
Make sure the buttons you create are large enough to not only cover the overlay graphics, but the menu item titles as well. They are part of your buttons, and when users navigate a DVD menu using a mouse on a computer (as opposed to a remote control), it is important that your button’s hot spots are large enough.
- Resize the active area of each button by dragging a corner of the button outline to cover the overlay image and menu item title exactly. Then choose View > Display State > Composite, if necessary.

Choosing Highlights for Button States
After you have drawn and named your button areas, it is time to set the selected and activated highlights for each button. The highlights you will select use the overlay graphic as the basis for the area in which the colors show up.
- In the Menu Editor, click your menu’s background to open the Menu Inspector.
This action will deselect all buttons and enter the menu’s parameters into the Inspector. The title bar now displays “Menu.”
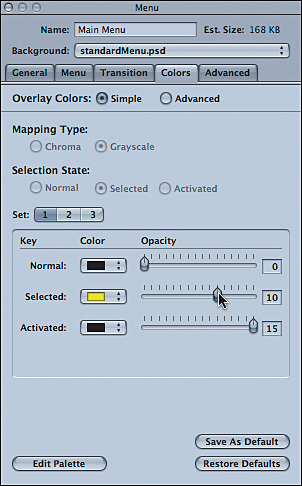
- In the Inspector, click the Colors tab.
- Make sure that the Overlay Colors option is set to Simple. If it’s not, click the Simple radio button.
Selecting this button will provide the highlight color choices only for simple overlays. Later in this lesson, you will learn how to use advanced overlays.
- Make sure that the Opacity slider for your normal button state is set to 0.
By specifying that your overlays are completely transparent, you are ensuring that graphics are always visible. Since your normal state buttons are part of the background image, this transparency is necessary.
- Choose a yellow color for your selected button state and verify that the Opacity is set to 10.
On the scale for Opacity settings, 15 is the maximum value and is considered 100 percent, or completely opaque. A setting of 10 will give you an Opacity value of approximately 66 percent, which should make your underlying button graphics easily visible, even with the overlay on top of them.
Remember, if the Opacity values are set too high, the overlay colors might appear too bright on a television set.
- Select an orange color for your activated button state, and set the Opacity slider to 10.
Although the activated state is not as crucial as the selected state (since the activated state just flashes briefly on the screen before the disc jumps to the item), it does help to provide additional feedback and a more consistent user experience.
- In the toolbar, click Simulate to see the selected and activated states of your buttons.
- Close the Simulator.
- Save your project.

Using Advanced Overlays with Grayscale Color Mapping
In this exercise, you’ll go deeper by working with the Advanced Overlay layer that contains three grayscale colors defined for our Photoshop overlay image. As you’ll see, grayscale mapping gives you lots of control over the look of your button states.
Those three grayscale colors are distinct shades of black—specifically, 100% black, 66% black, and 33% black. There’s also a fourth color in the overlay layer, which is white, that allows you to map a fourth color to your buttons. It is generally set to 0% opacity (transparent).
The shapes on the overlay layer exactly cover the black squares on the menu background.

The grayscale colors in the overlay image are called key colors. They literally provide a key that tells DVD Studio Pro how to create colored button states. However, DVD Studio Pro still needs to know what colors to map onto the overlay’s key colors. You will provide this information by configuring the key colors in the Menu Inspector’s Colors tab.
Tip
Grayscale color mapping is sometimes called luma mapping, because it’s actually the luminance, or brightness, of the grayscale colors that DVD Studio Pro reads.
When properly configured in DVD Studio Pro, the shapes from the overlay layer provide a template used to map colored button states over the menu background. A bit of practice will demonstrate exactly what’s going on. Let’s configure this overlay.
- In the Menu Editor, click your menu’s background to open the Menu Inspector.
- In the Inspector, click the General tab.
- From the Overlay Layer pop-up menu, choose Advanced Overlay.
- In the Menu Editor, select the Gallery button on your menu.
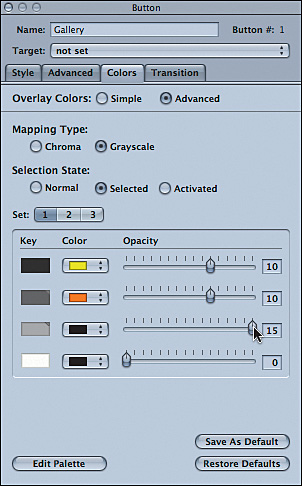
- In the Button Inspector, select the Colors tab.
- Set the Overlay Colors option to Advanced.
- Ensure that the Mapping Type is set to Grayscale.
The Inspector’s Key area updates to display a grayscale color key. All of the grayscale values used in the overlay layer have their own color and opacity settings.
Note
When you use grayscale mapping, you need a good monitor! If you are using a monitor with poor contrast reproduction, designing grayscale overlays is difficult because you will not see a noticeable difference between 100% black and 66% black. To solve this problem, you can use chroma (chrominance) mapping. Chroma mapping is available from the Colors tab’s Mapping Type area, and it works exactly the same way as grayscale mapping, except instead of using 100% black, 66% black, and 33% black in your overlay image, you use 100% black, 100% red, and 100% blue.
- Ensure that the Selection State is set to Selected.
You’ll configure the selected state colors first. After they are set, you will move on to configure the activated colors.
- Select different colors and opacity values for each of the grayscale values in the overlay, except for the 0% black (white) value.
- Click the buttons you created in the Menu Editor, and see how the selected button’s overlay changes to the chosen colors and opacity values.
- In the Inspector, set the Selection State to Activated.
Notice that enabling the Activated Selection State causes two things to happen in the Menu Editor. First, the selected button updates to display the activated colors. Second, the button state controls along the bottom of the Menu Editor change to visually reinforce that you are currently looking at the menu’s activated button states. As you can see, the Inspector’s Selection State area lets you cycle through the display of button states in the Menu Editor in exactly the same way as clicking the button state controls at the bottom of the Menu Editor.
- Select colors and opacity values for each of the activated state’s grayscale colors.
- Save your project.
- Simulate the menu and check out your handiwork.


Customizing Button Colors
The color palette in the Inspector’s Colors tab provides access to only 16 colors. That’s a pretty limited selection, and you may need to change the default colors to something a bit more appropriate for your menu design.
Fortunately, DVD Studio Pro gives you access to a full 16-bit color palette for your buttons. Use the following steps to choose any color you need to preserve the integrity of your presentation:

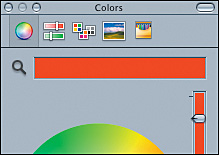
- At the bottom of the Colors tab, click the Edit Palette button.
The color palette drops down from the top of the Inspector.
- Click the red color swatch.
The Colors panel appears.
- From the Colors panel, in the color wheel, choose a color.
Tip
Use the magnifying glass in the Colors window to sample colors from anywhere on your screen, including the Menu Editor! This is a great trick when you need to match your button states to existing colors on the menu.
- Close the Colors panel.
The color palette updates with the new color.
- Click the color palette’s Close button.
The new color is now available from all of the Menu Inspector’s color swatches.


Saving New Default Colors
This project will use several menus by the time you’re done with it. To preserve the continuity of your display, each menu should use button states that are the same color. Although you could hand-configure each new menu to use the proper colors, there’s a more efficient way.
Using the Inspector’s Save As Default button, you can make the current color and opacity values the default color and opacity values for all newly created menus. (Menus that already exist in the project will not be changed to match the new colors.) When you create a new menu, you can simply use the new default, without having to specify overlay colors.
- In the lower-right corner of the Inspector’s Colors tab, click the Save As Default button.
The colors specified for the selected and activated button states are now saved as the default button state colors. This change is also reflected in DVD Studio Pro’s Preferences.
- Choose DVD Studio Pro > Preferences.
The Preferences window opens.
- Select the Colors pane and make sure the Show pop-up menu is set to Menu.
As you can see, the colors you selected in the Menu Inspector have now been saved as DVD Studio Pro’s default colors. If need be, you can also change the default colors, including the colors in the button state color palette, right here in the Preferences window.
- Click OK to close the Preferences window.
- In the Menu Editor, select a menu button.
- Use the button state controls at the bottom of the Menu Editor to preview your normal, selected, and activated button states.
The keyboard shortcut for toggling through button states is W.
Tip
Remember that if you can’t see the button state controls in the Menu Editor, your screen resolution might not have enough width. To fix this, make the Menu Editor wider, and the button state buttons will magically appear. You can also access the button state controls from the View menu.
You can then use the Selection State pop-up menu to preview your color preferences for your advanced menu overlays.
Presto! Colored buttons. As you can see, DVD Studio Pro is mapping colors onto the menu, based on the shapes in the overlay layer.


Adding a Motion Background
It may surprise you to learn that ultimately all menus are motion menus. DVD-Video is designed to display only MPEG video streams. Consequently, all other graphics that go into your project, including Photoshop documents used in still menus and slideshows, must be converted to the MPEG format. When DVD Studio Pro builds your project, it encodes still menus, such as the standard menu you’re working on, into MPEG stills. But, you can also use moving MPEG video in menus. This exercise shows you how to easily create a motion menu.
- In the Assets tab, open the Menus folder and locate the MotionMainMenu.mov asset.
- Double-click the MotionMainMenu.mov asset.
The movie opens in the Viewer and begins playing. It shows a sequence of fades that build the menu on the screen.
- In the Graphical tab, double-click the Main Menu tile to open it in the Menu Editor.
- From the Assets tab, drag the MotionMainMenu.mov file over to the Menu Editor, and choose Set Background from the Drop palette.
The video asset is assigned as the menu’s background. Note that the highlights you’ve created stick to the menu, so there’s no need to alter your highlights after adding the new background asset.
- In the lower-right corner of the Menu Editor, click the Motion button.
You’ve just created a motion menu. But there’s currently a bit of a problem. The button overlays appear before the buttons fade onto the screen. And, there’s no music!


Setting a Loop Point
The motion menu you’re working on has a 10-second intro that consists of the text button graphics fading onto the screen. Because the fade section acts as a transition into the menu, you need to ensure that the button overlays do not appear until after this transition has finished. In DVD Studio Pro, you can achieve this goal by setting a menu loop point.
As the name implies, the loop point setting tells the DVD player where to jump back to when the menu is set to loop. For example, at the end of this menu’s video clip, the DVD-Video player will refocus its laser back to the beginning of the menu and play it all over again. However, you do not want viewers to see the intro transition every time the menu loops, so setting a loop point ensures that the laser jumps back to the point defined as the loop point, instead of to the beginning of the menu.
- In the Menu Inspector, select the General tab.
At the top of the General tab are three display areas: one for the menu start, one for the menu loop point, and one for the menu end. You can use the Start and End settings to trim the beginning or end of the video used in your menu, but for the purpose at hand, you are going to adjust only the Loop Point setting.
- On the Loop Point setting, click the increment button.
As you click the increment button, a few things happen. First, the Menu Editor updates to display the video frame indicated by the Loop Point setting. This is important, because as you design motion menus, the Menu Editor, when not in motion, will always display the frame exactly at the loop point, not the beginning or end frames.
Second, the timecode setting to the left of the increment button jumps by 15 frames every time you click to increase the loop point position. All MPEG streams are divided into groups of pictures, and each group of pictures is typically 15 frames in duration. Furthermore, each group of pictures has a single I-frame that the loop point must latch on to. For this reason, you cannot create frame-accurate loop points inside DVD Studio Pro. Keep this in mind when designing your motion menus.
Tip
If you need to set a loop point that is frame-accurate, there’s a bit of extra work involved. First, open the source video asset in Final Cut Pro. Then, set a chapter or compression marker on exactly the frame on which you want the loop point to occur. Next, export an MPEG-2 stream directly from Final Cut Pro’s Timeline, either using the File > Export > Using QuickTime Conversion option, or the File > Export > Using Compressor option. When the file is encoded to MPEG-2, the frame you tagged with the chapter marker will become an I-frame. Back in DVD Studio Pro, you can then set the loop point to this I-frame, and your menu will loop back to exactly the frame you require.
- In the Loop Point timecode field, type 10. (10 period) and press Return.
The loop point jumps to the frame at timecode value 00:00:10:00.
- Set the General tab’s At End pop-up menu to Loop.
- In the Assets tab, open the Audio folder and locate the MainMenuMusic.aiff asset.
- Drag MainMenuMusic.aiff over to the Menu Editor and choose Set Audio from the Drop palette.
- Save your project.
- Simulate the menu.


Working with Motion Menus
In the past exercise, you swapped out the still background of your menu with a QuickTime movie to create a motion menu. This approach is one possible option, but a more typical workflow would be to design a motion menu in an application such as Motion and then import and use that as the background for your DVD menu. You would also create your menu’s overlay inside of Motion and export that as a still image, without having to create it separately in an application such as Photoshop.
In this exercise, you’ll apply a motion menu that was specifically built for this project and then apply a separate menu overlay file. This workflow is typical for the majority of commercial DVDs that are on the market.
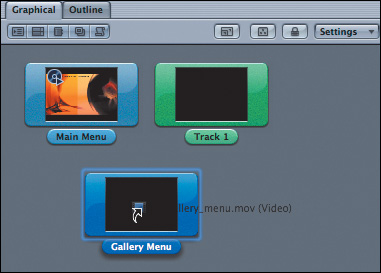
- In the toolbar, click Add Menu to create a new menu for your project.
- In the Inspector, rename the new menu Gallery Menu.
- In the Assets tab, inside the Menus folder, locate the bb_gallery_menu.mov asset.
- From the Assets tab, drag the bb_gallery_menu.mov file over the new Gallery Menu tile in the Graphical view and release it when the tile lights up.
Note
This action performs the same function as dragging an asset to the Menu Editor and choosing Set Background from the Drop palette.
The video asset has now been assigned as the menu’s background, and it’s time to apply an overlay so you can create the buttons that will be used for the new menu.
- In the Assets tab, double-click the galleryMenuOL.tif file to preview the overlay graphic file.
This image is now being displayed in the Viewer tab. As you can see, this simple overlay graphic is a black-and-white image, with the black pixels indicating the overlay area and the white pixels indicating transparency. When creating overlay files that are not part of a layered Photoshop document, this is what should be created.
- Click the Menu tab to get back to the menu.
- From the Menus folder in the Assets tab, drag galleryMenuOL.tif to the Menu Editor and choose Set Overlay from the Drop palette.
- In the Menu Editor, drag to create buttons for both View Gallery and Main Menu. Name the buttons View Gallery and Main Menu.
- In the Colors tab of the Inspector, select the Simple radio button for your Overlay Colors and select appropriate Selected and Activated colors for your menu.
Now that your menu has been designed, it’s time to add the gallery slideshow and link everything up.
- From the Assets tab, drag the Slideshow folder to the Graphical view to create a new slideshow.
- In the Inspector, rename the slideshow Gallery Slideshow.
- Option-drag the Gallery Slideshow tile to the View Gallery button in the Menu Editor and choose Connect to Slideshow from the Drop palette.
- In the Menu Editor, Control-click or right-click the Main Menu button and choose Target > Menus > Main Menu > [Menu] from the shortcut menu.
Your entire Gallery Menu has been authored and is ready to go. Now you need to make sure there’s music added and that the Gallery button on the Main Menu links to your new menu.
- In the Assets tab, find the Audio folder and locate the bb_gallery_menu.aiff asset.
- Drag bb_gallery_menu.aiff over to the Menu Editor and choose Set Audio from the Drop palette.
- In the Graphical view, select the Main Menu tile.
This action will load the menu into the Menu Editor.
- In the Menu Editor, Control-click or right-click the Gallery button and choose Target > Menus > Gallery Menu > [Menu] from the shortcut menu.
- Save your project.
Note
DVD Studio Pro can import native Motion projects that can be used for your DVD menus. There is no rendering necessary. The exercise you just completed used a pre-encoded asset exactly like the one that you created in Lesson 9, but you can also use native Motion projects, which allow you to travel between DVD Studio Pro and Motion to make changes that will automatically refresh inside of your DVD project.


Advantages of Layered Menus
In DVD Studio Pro, there are two types of menus: standard menus and layered menus. Up to this point, all the menus you’ve created have been standard menus.
Standard menus—a.k.a. overlay or highlight menus—are the preferred menu format for DVD-Video. Chances are your favorite Hollywood DVD uses this type of menu. Standard menus use a background image (or video) that includes the button graphics, and an overlay image (usually a simple overlay), that is a template for “stamping” button states onto the menu.
The advantages of standard menus are that they respond quickly to user input when the DVD-Video material is played on a computer, and they can have audio accompaniment, as well as moving video backgrounds. However, standard menu button states are limited to three colors and don’t allow you to enable graphics outside of the button’s hot spot.
The advantage of a layered menu is that you can “turn on” graphics outside of the button hot spot and use full 16-bit color in the design of your button states. However, layered menus cannot have audio or use video backgrounds, and they respond slowly to user input when played on a computer.
Layered menus use a specific layer of a Photoshop document for the menu background and for each button state. When a button is selected or activated, DVD Studio Pro enables the entire layer for that button state. This allows you to select a button that “turns on” graphics outside of the button’s hot spot. This feature is common to the Internet, where, for example, selecting a button causes information elsewhere on the Web page to update. Corporate DVD-Videos are often based on concepts gleaned from the Internet, and these presentations sometimes have an information area on the menu that updates as product pictures are selected. Layered menus provide this type of interactivity, whereas standard menus can’t.
Adding a Layered Menu
Follow these steps to add a layered menu to your project:
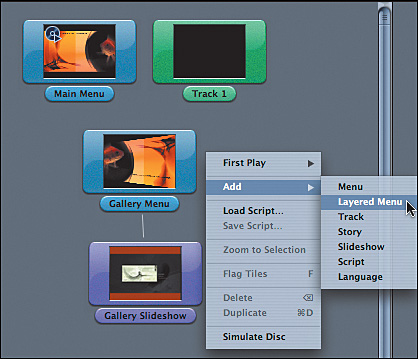
- Click the Graphical tab. Control-click or right-click in an empty space in the Graphical view and choose Add > Layered Menu from the shortcut menu.
A layered menu item is added to the Graphical view, and the Menu Editor updates to display the new menu, which is currently empty. In the Graphical view, there’s not much visual difference between the layered menu item and the standard menu item you created earlier. Layered menus are a darker shade of blue, but that’s all there is to visually differentiate the two. Don’t confuse them with standard menus, because you can’t make a layered menu in a standard menu item.
Note
In the Outline tab and in the toolbar, there is a bit of a visual difference between layered and standard menu icons. If you take a close look, you’ll see that standard menus have a single layer in the icon, whereas layered menus have two layers.
- From the Assets tab, inside the Menus folder, drag the layeredMenu.psd asset over to the Menu Editor and choose Set Background, No Layers Visible from the Drop palette.
Why choose this option? Because layered menus commonly have lots of layers used for button states but only one or two layers used for the background. It’s much easier to turn on one or two layers than to turn off dozens of button state layers. So when you add layered menu assets using the Menu Editor’s Drop palette, it’s easier to start with no layers visible.
- In the Inspector, rename the menu Before & After Menu.
- In the General tab’s Background area, enable the bottom two layers in the list: BB_logo and menuBackground.
- Drag out hot spots for all three of the menu’s buttons.
- Name the buttons Before, After, and Main Menu.


Creating Layered Menu Buttons
The trick to layered menus is in the way you assign layers to button states. Each individual button on the menu will use unique layers from the Photoshop document. Let’s start the process by configuring the Before button.
- In the Menu Editor, select the Before button.
The Inspector updates to display the button’s properties. Notice that in layered menus, the Button Inspector has a Layers tab, which isn’t there when you’re working with standard menus.
- In the Inspector, click the Layers tab.
The Layers tab is divided into four columns. There’s a column for the normal, selected, and activated states, and a final column displaying the layer names in the Photoshop document.
- In the Normal column, select the checkbox for the Before – Normal layer.
- Select the appropriate checkboxes for the Before button’s selected and activated states to finish this button.
- Repeat steps 1 through 4 to assign button states for the menu’s After and Main Menu buttons.
Now it’s time to link the Main Menu to this new menu you’ve just created.
- In the Graphical view, select the Main Menu tile to load it into the Menu Editor.
- In the Menu Editor, Control-click or right-click the Before & After button and choose Target > Menus > Before & After Menu > [Menu] from the shortcut menu.
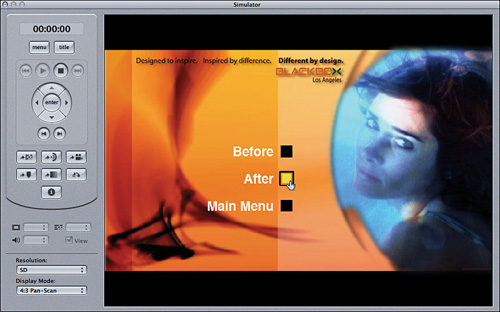
- Simulate the menus, and use the mouse to interact with the menu buttons.
The graphic on the right side of the screen updates as you select each new button, giving you a preview of the item the button targets.
- Save your project.
Note
Layered menus are unique to DVD Studio Pro but they are not part of the DVD-Video specification. When you build the project, DVD Studio Pro effectively makes a separate menu for each button state in the layered menu and uses auto actions to jump among this series of new, single-state menus. The reason you can’t have audio in layered menus is directly related to this fact—it’s because you can’t have a single audio stream stretch across multiple menus.
Layered menus tend to be slow to respond to viewer interaction. Every time the DVD-Video player’s laser has to refocus on a different project item, you will experience a short pause, sometimes up to a second or more. During this pause, the DVD-Video player is jumping through the series of menus that comprise the layered menu.


Linking Your Assets
Now that the Before & After menu has been completed, it’s time to create and link to the assets for the menu.
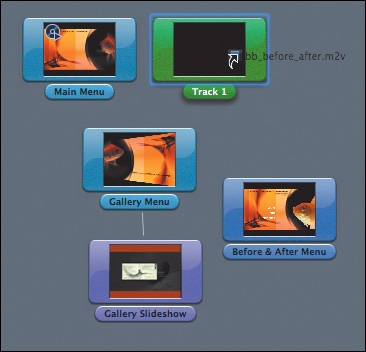
- In the Assets tab, open the Movies folder and drag bb_before_after.m2v to the default Track 1 tile in the Graphical view.
The default track is populated and now contains a video asset that is identical to the one that was encoded in Lesson 9. It contains both the before and after version of the clip, with a chapter marker between the two. The audio file automatically follows, as it has the same name.
- In the Graphical view, double-click the Before & After Menu tile so it loads into the Menu Editor.
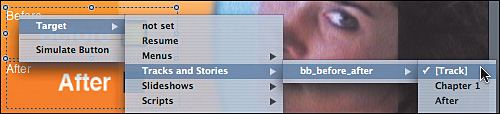
- In the Menu Editor, Control-click or right-click the Before button and choose Target > Tracks and Stories > bb_before_after > [Track] from the shortcut menu.
This action will target the root of the track and set it to play from the beginning through the end.
Note
If you wanted to play the track you are targeting and have it play only to the next marker in the track, you could use the stories feature in DVD Studio Pro (which you will learn about in the next lesson when working with the commercials part of the DVD). In this case, the track will start at the beginning and play to the end.
- Control-click or right-click the After button and choose Target > Tracks and Stories > bb_before_after > after from the shortcut menu.
This action will target the same track but will start playback right where the After chapter marker is located in the track.
- Control-click or right-click the Main Menu button and choose Target > Menus > Main Menu > [Menu] from the shortcut menu.
The only other thing that needs to happen is that you need to target the end jump for the track so that it returns to the Before and After menu after it plays.
- In the Graphical view, select the bb_before_after track.
- In the Inspector, set the End Jump to target Menus > Before & After Menu > [Menu].
- Save your project.
- Simulate your project so far.

Lesson Review
1. DVD Studio Pro lets you create two types of menus. What are they?
2. An advanced overlay can use three shades of black, which map to different colors and/or opacity values for your buttons in DVD Studio Pro. What are the types of shades of black?
3. The color palette in DVD Studio Pro lets you choose from how many different colors for your buttons?
4. Unless the Motion button is enabled, the Menu Editor always shows you which frame of a motion menu?
5. What are two advantages of layered menus?
6. What are two disadvantages of layered menus?
Answers
1. Standard overlay menus and (Photoshop) layered menus.
2. 100% black, 66% black, 33% black.
3. Sixteen, though you can edit the palette to make those 16 colors any colors you desire.
4. The frame directly under the loop point, as set in the Menu Inspector’s General tab.
5. Layered menus allow you to “turn on” graphics outside of the button hot spot and use full 16-bit color in the design of your button states.
6. Layered menus can be slow to respond to viewer interaction and cannot use audio or video assets.