Lesson 9. Encoding with Compressor
None
Media
Lessons > Media > Blackbox
Time
This lesson takes approximately 60 minutes to complete.
Goals
Understand bit budgeting and how to use it
Understand various encoding parameters
Import files into Compressor
Encode files with Compressor
Understand the difference between PCM and AC-3 audio
Work with markers in Compressor
Create a droplet
Now that you have performed the steps of authoring and building a simple DVD, it’s time to go to the next level. In the following five lessons, you will build a DVD demo reel for Blackbox Studio that will use some of the advanced features of DVD Studio Pro. You’ll learn how to create sophisticated menus, use movies to transition into and out of menus, build stories using markers, experiment with alternate angles, and use scripting for navigation.
This lesson shows you how to encode audiovisual assets using Compressor. For a complex project like Blackbox that has many assets, it’s better to acquire and encode your assets before you begin to author. Compressor, which is bundled with Final Cut Studio, offers more flexibility and a greater degree of control than does DVD Studio Pro’s built-in encoder. In Compressor, you can quickly encode one or more QuickTime files as MPEG-2 for your DVD project by using compression presets or fine-tuning compression settings to achieve optimal results.
Understanding Compression
Before you start encoding your video files in Compressor, let’s quickly review some important terminology and information.
Choosing Bit Rates
Bit rate is a measure of how many bits per second move through a phone line, Ethernet cable, or, for your purposes, a DVD player. The more bits per second of video there are, the more bits are available to carry color, luminance, and audio information, and the better the image and audio quality will be.
Variable Bit Rate and Constant Bit Rate
Variable bit rate (VBR) encoding allocates higher bit rates only to those portions of your video that need it the most. For example, a complex scene with lots of motion will get a higher bit rate to handle the extra information, whereas a static scene will use a lower bit rate. As a result, variable bit rate–encoded content maintains high quality, yet occupies less space than content created with constant bit rate (CBR) encoding, which applies the same bit rate to all content.
Two-pass VBR settings review the entire source media twice—once to analyze a file and a second time to encode it. These settings save more space on the disc by using the initial analysis to select the variable bit rate more intelligently. However, the disadvantage of two-pass VBR is that it takes longer to encode.
Average and Maximum Bit Rates
The overall performance of VBR compression is determined by setting the average bit rate (the average rate over time) and the maximum bit rate (the highest-allowable bit rate). The average bit rate and maximum bit rate settings should match the needs of your project. In general, you want to use the highest-quality encoding option your project will allow. For most projects, a setting of 5 or 6 Mbps should maintain excellent quality while creating manageable file sizes. A setting between 7 and 7.5 Mbps is typical for a maximum bit rate.
The highest maximum bit rate you should use for any DVD-Video project is 8 Mbps because some DVD players (such as DVD software players on laptop machines) may have difficulty reading data rates that are too fast.
In addition, if you use a high bit rate for your video, you may encounter more problems when building a disc. At times the bit rate may spike, or hit a high point slightly above the maximum value allowed by the DVD-Video format. When this occurs, your DVD disc will be rendered unreadable. For this reason, you should use more conservative bit rate values for your DVD projects.
Finally, there are bit rate limits imposed by the number of camera angles and audio streams used in your project. If you use five angles or fewer, you could encode with 8 Mbps, but it is not recommended. The maximum DVD bit rate for six to eight angles is 7.5 Mbps, and 7 Mbps for nine angles.
Understanding Group of Pictures
A group of pictures (GOP) setting defines the pattern of the three frame types that define the video structure of an MPEG video stream. Those three frame types are:
• Intra frames (I-frames)—I-frames are also known as reference frames, key frames, or compression frames, and they contain the complete image of the current frame. Chapter markers on a DVD track can be placed only on an I-frame.
• Predicted frames (P-frames)—P-frames are encoded from a predicted picture based on the closest preceding I- or P-frame.
• Bi-directional frames (B-frames)—B-frames are encoded based on interpolation from I- and P-frames.
As a general rule, you should use a GOP structure with an IBBP pattern, with Closed GOP selected and a GOP size of 15 frames. This format is preferred for most projects, particularly those with multiple angles, which require a closed GOP structure for smoothly switching between track layers. However, if you have to go down to a very low bit rate (such as 3 Mbps), the open GOP structure can help improve the video quality.
Choosing Audio Formats
Before creating a DVD, you should decide what audio format is appropriate for your project. The two primary choices are Pulse Code Modulation (PCM) and Dolby Digital (AC-3) audio:
• PCM audio—PCM is an uncompressed audio format that occupies more disc space than compressed audio, such as AC-3. Its primary file types are AIFF, WAV, and Sound Designer formats. The QuickTime MPEG Encoder (used by QuickTime Pro, Final Cut Pro, and DVD Studio Pro) automatically creates a PCM audio file when compressing a video file with an attached audio track.
• Dolby Digital audio—AC-3 audio is a compressed 48 kHz file that maintains excellent quality while significantly reducing the audio file size and bit rate. You might think of the difference between PCM and AC-3 as the difference between compact disc audio and an MP3 file. One format is significantly larger than the other, although the difference in quality can be negligible. AC-3 audio compression is desirable in larger projects in which audio file sizes can occupy considerable disc space and audio data must share limited bandwidth with video data. Another advantage of AC-3 is that it can contain up to 5.1 channels of audio in a single file. This multichannel ability makes it possible to deliver true surround sound mixes that come close to recreating the movie theater experience.
In addition to using separate formats for uncompressed audio and surround sound, DVD Studio Pro can utilize multiple audio streams within a single track. In fact, with DVD Studio Pro, you can use all eight audio streams allowed by the DVD specification.
Note
When preparing assets for your DVD, some key rules must be followed. One of the most important is that all menus within the same video title set (VTS) need to be encoded in the same audio format and bit rate. For more information, refer to “Using Multiple Audio Formats in Your Project” on page 80 of the DVD Studio Pro User Manual.
Applying Bit Budgeting
Bit budgeting is a strategy of calculating the final size of a disc based on the elements that are included in the project. It is important to be aware of your project’s final size, since you can fit only a limited amount of information on a single disc. This consideration is especially relevant for video encoding, due to the large amount of space that video occupies on a DVD. In fact, the majority of your DVD will be consumed by large MPEG-2 video files, which (despite their extreme compression ratios) can fill up a disc very quickly.
Understanding Disc Capacity
The stated capacity of a disc can be misleading. For example, a DVD-R disc can allegedly contain 4.7 GB of data, but the technically accurate amount, based on a binary number system, is a little less. Although you might think that 1 MB of information is equivalent to 1,000 kilobytes, it is actually equivalent to 1,024 kilobytes. This means that a 4.7 GB disc actually holds 4.37 GB of information, a significant discrepancy when you are working with large projects. A DVD-9 disc, which would seem to hold 8.54 GB of information, actually holds only 7.95 GB.
Note
For more information on audio encoding, bit budgeting, and MPEG-2 encoding, please see Appendix A, “Advanced Encoding.”
Importing a File into Compressor from Final Cut Pro
When you encoded the Swiss Tourism assets with DVD Studio Pro, you used the same encoding engine and encoder architecture that is used in Compressor. However, DVD Studio Pro lacks access to some of Compressor’s best features, such as batch encoding and adding professional filters.
By far the most popular and convenient method for using Compressor is to export directly into it from Final Cut Pro. For Final Cut Pro projects, this is also the most effective way to move a project to Compressor. It’s especially handy when you have finished editing a project and do not want to compress the file with QuickTime before encoding it with Compressor. You can open the edited sequence directly into Compressor without adding steps or compressing it a second time. This method saves hard drive space, maintains the quality of your original video, and yields the best results by using your original source material for the encoding process.
In this exercise, you’ll export a video file from Final Cut Pro to Compressor.
- Open Final Cut Pro by clicking its application icon in the Dock or in the Applications folder on your hard drive.
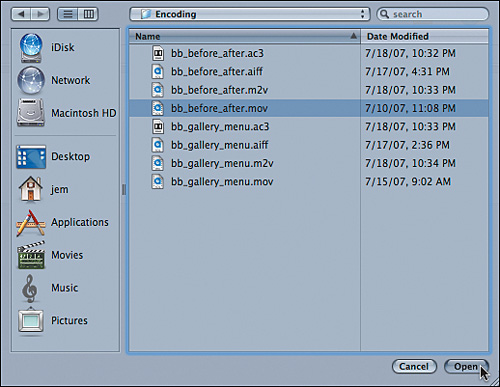
- Choose File > Import > Files, and from the import dialog navigate to the Blackbox > Encoding folder and select bb_before_after.mov. Click Choose to import.
- From the Browser, drag the bb_before_after.mov clip into the Timeline.
- Choose File > Save Project As, and save your project in the My_Projects folder on your hard drive as DVDSP.
- In the Browser, select the Sequence 1 sequence and choose File > Export > Using Compressor.
After you’ve exported your movie, Compressor automatically opens. Compressor’s Standard window layout displays the Batch window in the upper left. The Batch window is a list of jobs and their encoding settings—called targets. The Final Cut Pro sequence you exported appears in the Batch window as a Final Cut Pro icon.
The appearance of this icon indicates that the file has been successfully exported from Final Cut Pro to Compressor and is now ready to be assigned compression settings.


Applying Preset Settings
After your movie is imported into Compressor, you can begin the encoding process. For use on a DVD, QuickTime media must be converted and compressed using an MPEG-2 encoder. The DVD-Video specification requires that movie assets be split into their component video and audio parts, called elementary streams. When you encode a single QuickTime movie or Final Cut Pro sequence for DVD, you will output two files: one video and one audio. In DVD Studio Pro, you can link the files as a track during authoring, so the movie will play in sync.
Compressor simplifies the encoding process by offering a number of Apple presets that address the encoding needs of common distribution platforms. Compressor’s presets run the gamut of encoding options from faster (but lower-quality) CBR encoding to slower (but vastly superior) one-pass and two-pass VBR encoding. These presets allow you to quickly choose appropriate encoding settings based on the duration of your source media.
In the next exercise, you will apply an Apple preset. Later in this lesson, you will modify Apple presets to create your own presets, and you’ll create droplets, which will further simplify the compression process.
- In the Compressor Batch window, select the job you imported from Final Cut Pro, and then choose Target > New Target with Setting.
- In the drop-down dialog, select the DVD: Best Quality 90 minutes folder. Then click Add.
Compressor automatically assigns two presets to the file: a Dolby Digital Professional AC-3 preset and an MPEG-2 preset. (For more information on Dolby Digital files, see the “Encoding AC-3 Files” section in Appendix A.)
If you look at the MPEG-2 preset, you can see that this video stream will be encoded at 6.2 Mbps. Although a higher bit rate produces higher quality, the larger files that result may become too large to fit on your disc. Usually, to fit 90 minutes or more onto a single disc, the video must be compressed at a lower bit rate. Since the disc you currently are building has less than 90 minutes of video, you can safely use that 6.2 Mbps rate, or even higher, to encode this project’s video stream.
- Click the Dolby Digital target, and choose Target > Destination. From the submenu, select a location (such as your Movies folder) to save the output media.
Source is the default option, which places the encoded files in the same directory as your original media. However, this setting is not recommended, especially when exporting directly from Final Cut Pro because it places the encoded files on the root level of your hard drive. From the submenu, you can choose Desktop, your Movies folder, and other destination options.
- Select the MPEG-2 target and apply the same destination you used in step 3.
You have identified source media, a target compression setting for both elementary streams (audio and video), a target output destination, and an output filename. The batch is now ready to send to the encoder.
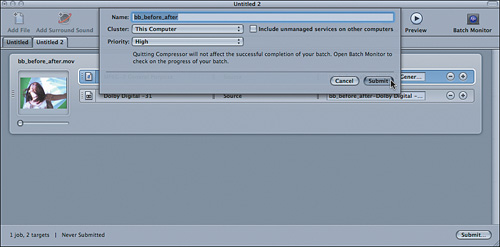
- In the Batch window, click Submit. In the drop-down dialog that appears, you can add a custom batch name by entering it into the Name field. Click Submit.
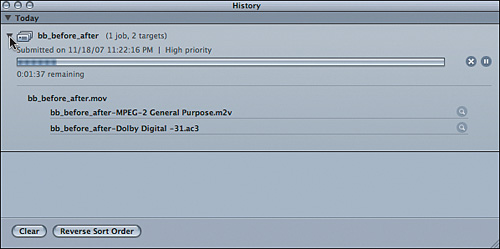
- Monitor the batch’s progress from the History window by clicking the disclosure triangle next to Today.


Creating Custom Settings
In addition to using the Apple presets already available in Compressor, you can create your own custom presets for encoding video and audio files. In this lesson, you’ll create a custom setting group with both MPEG-2 video and Dolby Digital (AC-3) audio presets.
Creating a Setting Group
- Open Compressor, if necessary.
- Choose File > New Batch.
- Open the Settings window by choosing Window > Settings.
- In the Settings window, click the “Create a new setting group” button.
- Select the Untitled folder that appears in the Custom folder. In the Inspector, change the name to My Custom Preset and press Return.
Now you can populate your settings groups with custom video and audio preset settings.


Creating Custom Presets
- In the Settings tab, click the “Create a new setting” pop-up menu and choose the MPEG-2 setting to create a new preset.
The new preset, named Untitled MPEG-2, appears in the My Custom Preset group.
- In the Custom folder, click the new custom preset to open it in the Inspector.
- In the Inspector, name your new preset MPEG-2 General Purpose.
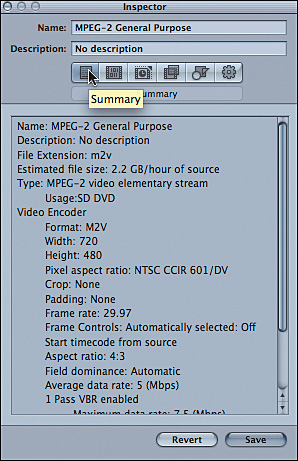
- In the Inspector, click the Summary tab to open the Summary pane.
The Summary pane lists the video and audio attributes of your preset. When the preset is applied to an asset in the Batch window, the Summary pane will provide information such as the original frame rate, frame size, and aspect ratio of the asset, as well as the compression settings that will be applied.
- Click the Encoder button.
The Encoder pane opens with the Video Format tab selected. A quick glance at this tab shows that all of the pop-up menus are active, and the automatic mode for each parameter is inactive. You can enable automatic mode so the video preset you’re creating can be applied to more than one type of source media.
- Click the Video Format automatic button (cog wheel) to activate automatic mode for the Video Format and Frame Rate parameters, and then click the automatic buttons for the Aspect Ratio and Field Dominance parameters.
The automatic buttons will darken to indicate they are active, and the pop-up menus for these parameters will dim. Now, when this setting is applied to source media, it will automatically choose the correct video format, frame rate, aspect ratio, and field dominance based on the source media.
- Click the Quality tab to access the compression settings for your preset.
- Set Mode to “Two pass VBR Best.” Type 4.5 in the Average Bit Rate field, and press Return. Leave the Maximum Bit Rate at 7.5.
These settings will create a good, general purpose preset that can be applied to a variety of media. However, it’s important to understand that a multitude of factors contribute to a successful encode of your video assets (not the least of which is the quality of your source media). This custom preset, like the Apple presets, is best used only as a starting point.
- Enter 4.5Mbps, 2-Pass VBR, Auto in the Description field.
- Click Save to commit the modifications.
Your custom MPEG-2 video preset has been saved. Now it’s time to create the custom audio setting for the group.
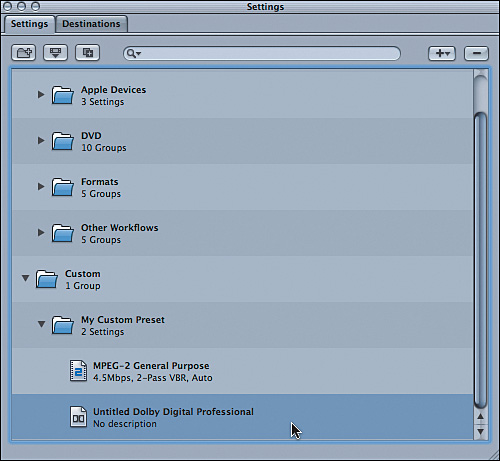
- In the Settings tab, click the “Create a new setting” pop-up menu and choose the Dolby Digital Professional setting to create a new preset.
The new preset, named Untitled Dolby Digital Professional, appears in the Custom settings group.
- In the Custom folder, click the new custom preset to open it into the Inspector.
- In the Inspector, name your new preset Dolby Digital -31.
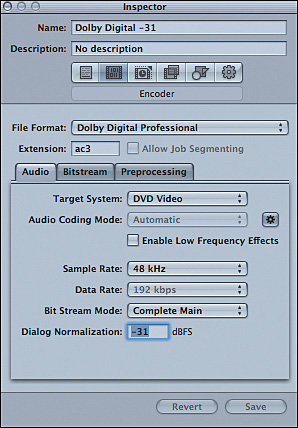
- In the Inspector, click the Encoder button and then click the Audio tab.
This preset will be used to encode a variety of source media, so you’ll need to activate automatic mode for the audio coding.
- Click the Audio Coding Mode automatic button.
The pop-up menu dims and displays Automatic.
Now you’ll make a couple of changes to ensure your source audio media levels are not changed when compressed to the Dolby Digital (AC-3) format.
- In the Dialog Normalization field, enter –31 and press Return.
The dialog normalization setting controls the overall volume of the audio stream. The levels of the source audio files you are encoding will determine the value you set for each file (so that audio levels are consistent for the entire DVD). If all audio file levels are the same and are correctly located, a dialog normalization value of –31 will pass your audio through unchanged.
- Click the Preprocessing tab and choose None from the Compression Preset pop-up menu.
This setting, along with the dialog normalization setting, will ensure that your original audio file’s levels are left unaltered during encoding.
- Click Save to save this custom preset.
Compressor saves the preset in the My Custom Preset folder.
More Info
Compressor is a powerful application that can encode and transcode to a multitude of audio and video formats and codecs. In addition to compressing media, it can apply filters, retime footage, upconvert and downconvert media, and much more. To learn about Compressor’s full capabilities, refer to Brian Gary’s Apple Pro Training Series: Compressor 3 Quick-Reference Guide (Peachpit Press).


Applying Custom Setting Groups
You can apply the My Custom Preset group that you created (or its individual presets), just as you would apply any of the stock Apple presets. In this exercise, you’ll import a movie into the Batch window and apply your custom preset group to the source media.
- With the Batch window selected, click the Add File button (or press Command-I) to import a file into the batch.
- In the dialog, navigate to the Media > Blackbox > Encoding folder and select bb_before_after.mov. Click Open to add the file to the batch.
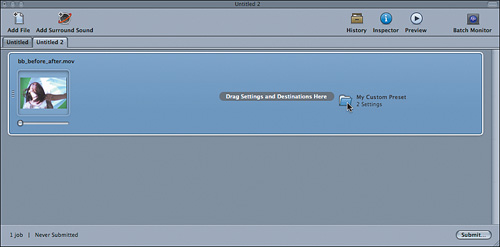
- From the Settings tab, drag the My Custom Preset folder to the jobs area of the Batch window.
This selection applies your entire custom preset group to the source media that you just added to the batch. Look at the MPEG-2 preset to make sure it was applied correctly.
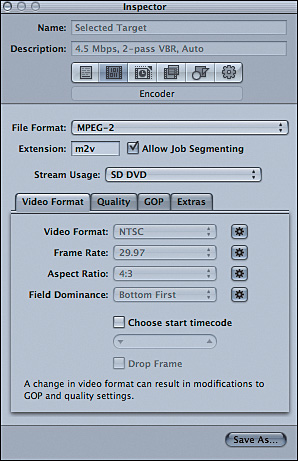
- In the Batch window, click the MPEG-2 General Purpose setting to load it into the Inspector.
Based on the source media attributes, Compressor has set the Video Format to NTSC, the Frame Rate to 29.97, and the Aspect Ratio to 4:3.

Setting Compression Markers in Compressor
You can insert chapter markers with frame accuracy in Compressor, just as you can in Final Cut Pro. Compressor’s advantage is that it allows you to insert two types of markers, compression markers and chapter markers, using the Preview window. This option is great for working with media that wasn’t created in Final Cut Pro, or for inserting markers that you forgot to add earlier.
Compression markers force an I-frame at an exact location in the MPEG stream. A compression marker, as its name implies, is meant to enhance compression by forcing the creation of an I-frame at any abrupt change in the scene. For example, if a sudden change occurs in the middle of a GOP, such as a cut or a quick fade, it’s very difficult for the encoder to use motion vectors and algorithms to encode that change. As a result, you might see a subtle breakup of your picture until the next I-frame comes along. By placing a compression marker at the beginning of that change, you force an I-frame and give the MPEG encoder a clean slate from which to start the new scene.
Creating Compression Markers
You’ll now create a compression marker directly in Compressor that you will later convert into a chapter marker.
Note
By default, Final Cut Pro places a compression marker at every edit point when you export directly to Compressor.
- In the Preview window, click the Play button to play the source media.
About halfway through the clip, notice the change to a keyed version and the change in music. This is where you’ll place a compression marker.
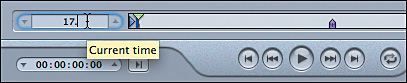
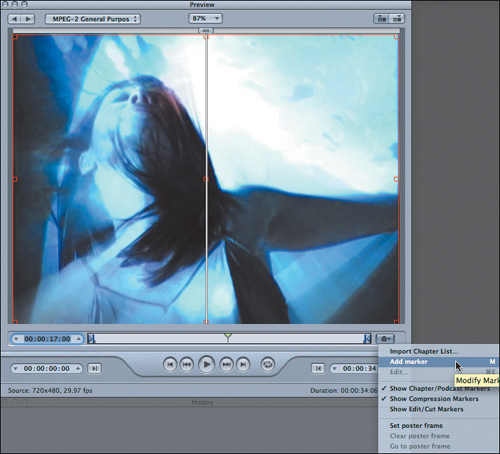
- Select the timecode in the Current time field, to the left of the timeline, and type 17. (17 period) and press Return.
This entry places the playhead on the exact frame where the clip changes.
- From the Modify Marker Settings pop-up menu, choose Add Marker.
A blue compression marker is added at the playhead’s current position. This demonstrates an important point: by default, all new markers added to the Preview window are compression markers.

Creating Chapter Markers
Chapter markers work the same way as compression markers but offer the option to name them. That marker name is encoded into the MPEG-2 stream and is visible inside DVD Studio Pro’s timeline-based Track Editor.
You transform a compression marker into a chapter marker by giving it a name. Since your playhead is currently parked over a compression marker, try transforming it.
- From the Preview window’s Marker pop-up menu, choose Edit.
A dialog drops down from the Preview window’s title bar.
- In the Type pop-up menu, choose Chapter. In the Name field, type After to set the name of the marker, and then click OK.
The compression marker transforms into a chapter marker.
Note
The GOP located before the compression/chapter marker will be shorter than your specified GOP size. Compressor caps off the shorter GOP with a P-frame and begins creating new GOPs from the frame tagged by the chapter marker. After the marker, the MPEG stream resumes creating GOPs with the specified size and structure.


Submitting Files for Encoding
The batch is almost ready to send to the encoder. You have source media and a target compression setting for both elementary streams (audio and video). All you have left to do is create a target output destination and an appropriate output filename.
By default, Compressor appends the preset’s name to output filenames. This can be useful if the output of multiple encoded files is contained in a single batch and you need to keep track of the applied settings. By appending the preset name, however, Compressor will create different filenames for the separate audio and video streams. In DVD Studio Pro, elementary streams with the same name before the file extension are treated as a linked pair, which is a very helpful shortcut when building tracks. However, audio and video streams with different names create more work in DVD Studio Pro. You have to drag the differently-named video and audio assets to menus and tracks to create a linked pair.
In this exercise, you’ll change the destination for your files and match the filenames for the video and audio assets that will be created.
- In the Batch window, Control-click (or right-click) Source for both the MPEG-2 General Purpose and Dolby Digital -31 setting and choose Destination > Desktop from the shortcut menu.
You can manually modify output filenames by selecting the target’s text field and typing a new name.
- Select the MPEG-2 General Purpose setting, triple-click the output filename, type bb_before_after.m2v, and press Return.
- Select the Dolby Digital -31 setting, triple-click the output filename, type bb_before_after.ac3, and press Return.
Your video and audio files now will have the same name after encoding and will automatically pair in DVD Studio Pro.
- In the Batch window, click Submit.
- In the drop-down dialog, you can add a custom batch name by entering it into the Name field. For this exercise, you’ll leave the name unchanged. Click Submit.
- Monitor the batch’s progress from the History window by clicking the disclosure triangle next to Today.


Creating a Compressor Droplet
Although presets make encoding easy, a Compressor droplet makes encoding even easier A droplet is an application that you can store as an icon on your Desktop or in your Dock. Using droplets, you can encode files without even opening Compressor.
Dragging a QuickTime file or even a group of files onto a Compressor droplet icon starts the encoding process in the background and processes the files according to the preset the droplet represents. Droplets help you quickly encode several files that use the same encoding settings and output destination.
Follow these steps to create a Compressor droplet:
- In Compressor, open the Settings window by choosing Window > Settings.
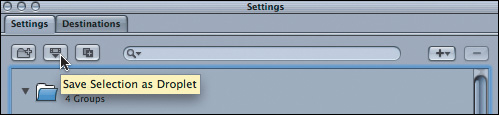
- In the Settings tab, navigate to Apple > DVD and select the DVD: Best Quality 90 minutes preset group.
- Click the “Save Selection as Droplet” button.
- From the Where pop-up menu in the Save dialog, choose Desktop as the destination for your droplet.
- From the “Choose Destination for Droplet results” pop-up menu, choose User’s Movies Folder.
- Click Save to create your new droplet.
You will see a droplet icon on your Desktop. To use the droplet, you can drag and drop a file onto the droplet icon.
- From the Media > Blackbox > Encoding folder, drag bb_gallery_menu.mov onto the droplet icon on your Desktop.
The Droplet window appears with the file listed.
- Click Submit, and your files are automatically encoded and placed into your Movies folder. You can even monitor the progress in Batch Monitor (which will open when you click Submit).


Congratulations! You are well on your way to mastering the art and science of encoding with Compressor.
Lesson Review
1. What’s the difference between variable bit rate (VBR) and constant bit rate (CBR) encoding?
2. What is the benefit of VBR versus CBR encoding?
3. True or false: You can use Compressor to directly encode MPEG-2 files from a Final Cut Pro Timeline.
5. True or false: You can create custom Compressor presets.
Answers
1. VBR encoding varies the data rate over time, depending on the nature of the video content. In CBR encoding, the data rate remains constant.
2. VBR encoding provides better picture quality at a lower average data rate, because scenes of higher visual complexity (action scenes, fast fades, or pans) receive a higher data rate than scenes with low visual complexity. VBR encoding usually achieves comparable or superior quality with smaller file sizes.
3. True. Doing so eliminates the need to render a movie and encode it separately. In addition, this workflow also has the benefit of placing I-frames at every cut point, thereby improving the quality of the encoded video.
4. A droplet is a Compressor target packaged into an icon that you can keep on your Desktop (or in any other folder).