
Now that you have successfully configured and synchronized your iPod, it’s time to...
Whoops. I meant to say “Apple TV,” not “iPod.”
And yet, the two interfaces are so familiar that you’d be forgiven for confusing the two. In fact, Apple is counting on the fact that you’ve probably used its best-selling music player, because then you already know how to use the Apple TV. Sure, there are differences (the Apple TV has no screen, it’s larger, and so on), but the goal is to make navigating the interface instantly familiar and easy to do. Because when you’re on the couch, you don’t want to operate a computer—you want to watch TV or listen to your music.
The main screen displays a list of top-level categories that lead to your media or to settings for the Apple TV (FIGURE 3.1).

A glossy, slightly glowing rectangle indicates which item is selected, and the icon to the left of the list also changes based on what’s selected. In addition to providing nice eye candy (tell me, isn’t the Settings icon the most beautiful gear icon you’ve ever seen?), the images help people with poor eyesight to see what’s selected.
Note
Speaking of eyesight, one improvement I’d like to see in a future Apple TV update is a way to make the text larger. Although my eyes are fine, and in most cases the onscreen text is very readable, I know people with failing vision who would appreciate the option to display extra-large letters.
The Apple Remote is quite a change from the heavily studded, multi-button remotes that come with most every other audio or video device (FIGURE 3.2). Instead of offering a button for every feature, its six buttons move you through the Apple TV interface, which controls every feature.
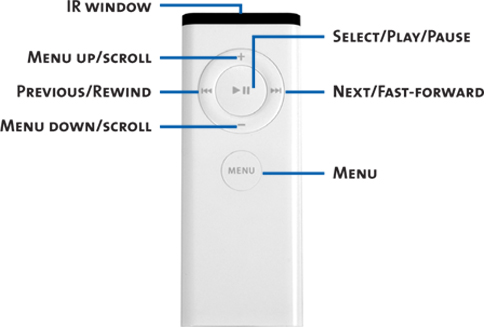
You’ve probably picked this up by now, but here’s how the remote works:
Press Menu Up/Scroll (+) and Menu Down/Scroll (–) to move the selection up or down in the list.
Press Select/Play/Pause to choose the item that’s selected. In the menu screens, doing so takes you to a submenu (such as the list of available movies after you choose Movies) (FIGURE 3.3).
Press Menu when you want to go back to a previous menu screen.
Press the Previous/Rewind and Next/Fast-Forward buttons to change songs or skip within a movie.

Tip
Press and hold the Menu button for a few seconds to return to the main screen from anywhere within the Apple TV navigation.
When you see a greater-than symbol (>) to the right of a list item, another screen of options is available. If you don’t see that, pressing Select/Play/Pause on the list item performs an action, such as playing back songs in Shuffle mode. Some list items display a setting in gray; choose the item to change the setting (for example, changing the HDMI brightness setting from High to Low).
Tip
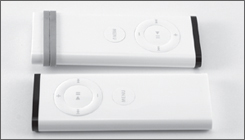
Now that Apple ships remotes with most of their new products, keeping track of them can be difficult. My low-tech-but-effective solution is to wrap a colored rubber band around one (FIGURE 3.4). That also keeps the remote from skidding across the table.
There’s an initial bit of interface confusion for people who aren’t accustomed to this iPod-style navigation. Onscreen, menus are arranged in lists, with a greater-than symbol (>) indicating more content to the right. The logical choice would be to press the right-facing Next/Fast-Forward button to get to the next screen, but that’s not the case. It’s a little nutty, and I see people make this “mistake” on the iPod all the time. But then again, Apple has sold 100 million iPods, so I think people get the hang of it pretty quickly.
Tip
Because it uses infrared light, the Apple Remote needs a line of sight to the Apple TV to work. However, that doesn’t always mean it has to be pointed directly at the Apple TV. Maybe I’m surrounded by a preponderance of shiny objects, but my remote seems to work no matter where I’m pointing it. Distance is also a factor: make sure you’re within 30 feet of the Apple TV.
If you own another Apple product that came with its own Apple remote, such as a recent Mac or an iPod Hi-Fi, and if that device is nearby, the Apple TV’s remote might be activating it. My wife kept getting perplexed when her MacBook (on the other side of the room, even) would suddenly kick into Apple’s Front Row software.
To remedy this infrared overlap, pair each remote to its respective device. On the Apple TV, do the following:
From the main screen, scroll down to Settings and press the Select/Play/Pause button. The Settings screen appears.
Scroll down to Pair Remote.
Press Select/Play/Pause. After a second or two, an icon of the remote appears with a lock symbol above it (FIGURE 3.5). The Apple TV now responds only to that remote.

The remote will, however, still affect the other devices, so you should pair them, too.
Position the Apple Remote near the infrared receiver of the computer or iPod Hi-Fi.
Press and hold the Menu and Next/Fast-Forward button for six seconds. On the Mac, the remote icon appears in the center of the screen with a lock symbol above it. On the iPod Hi-Fi, the status light will blink green several times. The remote is paired.
If you need to use a different remote, you can easily disassociate a paired remote. Go to the Settings screen on the Apple TV and choose Unpair Remote. The icon returns with a broken chain symbol.
To unpair a remote from a Mac, go to System Preferences and open the Security preferences pane. Click the Unpair button at the bottom of the window.
As you’ve seen, the Apple Remote is tiny—almost too tiny. I can imagine couches around the world subsisting on a steady diet of Apple Remotes. If yours gets lost somehow, or stops working altogether, you can buy a replacement from Apple for $30 or use one from another device. (Or, if you’ve been looking for a reason to buy a new Mac, think of it as buying a replacement remote that happens to come with a computer!) To make it work with your Apple TV that’s been paired with another remote, press and hold the Menu and Previous/Rewind buttons for six seconds. The original pairing is discarded, and you can then pair the new remote.
Tip
Third-party remote controls, such as Logitech’s Harmony remotes (www.logitech.com), can also be programmed to work with the Apple TV.
I’d like to go on about the rest of the interface’s complexities, but there aren’t any. We’ll cover scrolling through lists in the upcoming chapters.
There are, however, a few more interface elements I want to look at here that affect your general usage of the Apple TV, such as the screen saver and other options.
One downside to high-definition plasma televisions is that images can “burn in” if they remain static, leaving a ghostly impression. To prevent that, and to make the Apple TV more appealing to watch if it’s playing music or otherwise not doing something visual, the screen saver kicks in after a few minutes. Trust me, the screen saver can transfix family members just as much as a movie or slideshow.
To view the screen saver options, choose Settings from the main screen, and then choose Screen Saver (FIGURE 3.6).

Press the Select/Play/Pause button to choose a period of inactive time after which the screen saver starts: 2, 5, 10, 15, or 30 minutes, or Never to prevent it from activating at all.
Set this option to On to activate the screen saver while music is playing. If it’s set to Off, the Apple TV displays only the song’s album art and basic information (see Chapter 5).
Choose this item to see how the screen saver will appear, without waiting for the timer to kick in.
The next three settings determine which screen saver to play; a check mark to the left indicates which one is active.
Yep, it’s the Apple logo, all glossy and reflective and zipping across the screen in smooth little bursts. Choose this if you want the least amount of distraction (without turning off your television).
The Apple TV grabs the album art from your music collection and displays the images as if they were floating up to the sky. Every 30 seconds or so, the tableau spins on an axis to further ward off burn-in (FIGURE 3.7).

The default screen saver, Photos, acts just like Albums but with photos. A selection of flower photographs is built into the Apple TV, but you can use your own synced photos. (See Chapter 7 for more information on how to set up photo syncing and viewing slideshows.)
These items don’t fall into a neat category, and in fact, you may never need them. But, you never know. You can find these options on the Settings screen.
The About screen displays basic information about your Apple TV, broken out into a few general categories (FIGURE 3.8).

The first five items tell you the Apple TV’s name (as defined when you set up syncing), hard drive capacity and available disk space, serial number, and version of the software that’s running the show.
The next two items report on what connection to your TV is active and what resolution is being displayed. If you’re having trouble getting HDMI to work, for example, but component video is operating, you can check this information to see if the Apple TV is recognizing the HDMI cable. See Chapter 1 for more information.
The last items describe the state of the network. If you’re connected to a wireless network, the name of the network is displayed, along with the assigned IP address. The Wireless ID code is how the Apple TV’s hardware is identified on the network, while Signal Strength gives you an idea of whether it’s running into interference. If an Ethernet cable is plugged in, you see only the IP address and the Ethernet ID code.
If you’re not a fan of the subtle clicks and beeps that provide feedback while using the remote, select Sound Effects and press Select/Play/Pause to toggle the effects on or off.
The HDMI Brightness setting typically affects how bright the interface appears—on some televisions, the text may seem blindingly white and object glows seem a little radioactive. The High setting can also lend a bluish cast to the entire screen, washing out pure blacks such as in movies or in the Apple TV interface background. Press Select/Play/Pause on this setting to toggle between High and Low options.
Choose this option to make the Apple TV check for available software updates over the Internet.
Choose this option to change the language that’s used by the interface. Practice your French skills!
Oh, you knew this would be here, and most people probably won’t read it. But you’d be surprised at how entertaining the GNU license wording can be.
To get back to the factory default settings, go to this screen, which offers three options.
Cancel. This is the “what am I doing here?” option that takes you back to the Settings screen.
Reset Settings. Choosing this option rolls your settings back to the factory defaults while keeping your connection, network, and sync settings.
Factory Restore. This command wipes the Apple TV clean and takes you back to the state when you first unboxed the device. This is a good option for troubleshooting (see Chapter 10).