Let us ponder once again the words widescreen television. The Apple TV lets you watch movies and TV shows that are stored on your computer, but what else is on your hard disk that can be viewed on a widescreen TV? In front of visiting relatives, perhaps?
Maybe the 3,000 digital photos that document every last detail of your most recent vacation, the pictures of your kids at Halloween, or the zoo photos that keep your dogs and cats entranced for hours?
The old days of setting up the circular slide projector are over, replaced by glorious HD video that can display your photos at high resolution.
Photos is the only category on the Apple TV that doesn’t get its content directly from iTunes; instead, iTunes acts as a middleman, grabbing images from another program or a folder on disk and passing them along to the Apple TV.
The most important thing to note is that photos can only be synchronized to the Apple TV’s internal hard disk—they can’t stream from another computer. In fact, making it work requires manual intervention. After you’ve set up a sync relationship with a computer, the Photos option isn’t enabled by default. If you go to the Photos screen, you get an error message (FIGURE 7.1).

Note
I cover synchronizing and streaming in more detail in Chapter 8, but since syncing is the only way to get photos onto the Apple TV, I’m going to dip into the sync functionality in this chapter first.
On the Mac, iTunes recognizes iPhoto 4.0.3 or later and any version of Aperture. Under Windows, iTunes can retrieve photos from Adobe Photoshop Album or Adobe Photoshop Elements.
Tip
To choose collections under Windows, you need to be running Photoshop Album 2.0 or later, or Photoshop Elements 3.0 or later. Earlier versions will synchronize all photos in the programs’ libraries.
On either platform, you can also point iTunes to a folder on the hard disk containing images.
Once the Apple TV is synced with a computer, follow these steps to enable the Photos feature.
In iTunes, select the Apple TV in the Devices list. The Apple TV sync preferences are displayed.
Click the Photos tab (FIGURE 7.2).
From that pop-up menu, choose the software you use to manage your photos (FIGURE 7.3).
You can also use the Pictures (Mac) or My Pictures (Windows) folder as the photo source by selecting it from the pop-up menu. If you want to use a different folder, select Choose folder from the menu and locate it in the dialog that appears.
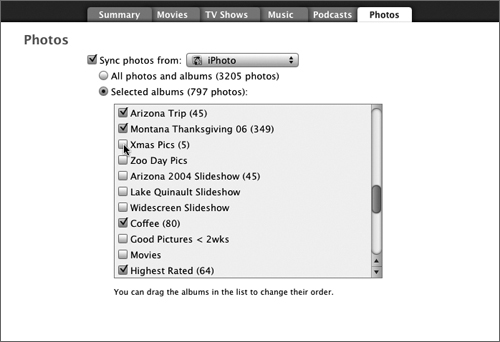
With a source selected, choose which photos to sync. By default, all photos are included (the first radio button), but you can also be more particular. Click the Selected albums button and then mark which albums to include in the list (FIGURE 7.4). iTunes sees folders within the Pictures or My Pictures folders as albums.
Click the Apply button to synchronize the Apple TV and transfer the photos.


Tip
After you’ve synced photos to the Apple TV, you can use them for the screen saver instead of album art or the floral pictures that are built in. From the main screen, go to Settings and choose Screen Saver. Then, enable the Photos option.
Note
One of my wishlist items for future Apple TV features is the capability to grab photos from the Internet, such as from an iPhoto-published photocast or an RSS feed from a photo-sharing site such as Flickr (www.flickr.com). This would enable parents, for example, to upload photos of their kids so that grandparents can view those pictures without having to do much more than turn on the television.
Some devices, such as TiVo units with TiVo Desktop, let you browse the library as if you were on the computer, selecting each image or folder of pictures. The Apple TV takes a more presentation-focused approach, figuring that if you want to go to the trouble of selecting each image or navigating a folder structure, you’d probably do it on the computer.
To start a slideshow, do the following:
From the Apple TV’s main screen, choose Photos.
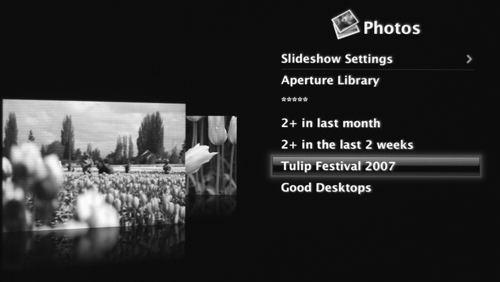
On the Photos screen, select an album name (FIGURE 7.5). A preview of images appears at left.
To view all photos, select the first item below Slideshow Settings, the name of which will depend on your photo source: Library, Pictures, or Aperture Library, for example.
Press Select/Play/Pause to start the slideshow.
The Apple TV displays each image for a few seconds, applies a transition, and then displays the next one. While the slideshow is running, you can control playback using the following actions:
On the Photos screen, choose Slideshow Settings to set variables that control how the slideshow plays.
Choose this option and then select the amount of time each photo appears onscreen: 2, 3, 5, 10, or 20 seconds. Press Menu to go back to the Slideshow Settings screen.
In addition to filling your television with photos, a slideshow can play music from your iTunes library. Choose a playlist on this screen.
Tip
Set up a playlist in iTunes that matches your photos (see Chapter 6). You don’t want to be viewing your Hawaii vacation photos and be interrupted by “Hazy Shade of Winter” by The Bangles or Vanilla Ice’s “Ice, Ice, Baby.” (Actually, I don’t want to know about the latter.)
When the last photo is shown, the slideshow starts over from the beginning. Press Select to toggle this option on and off.
When this option is turned on, pictures are displayed in random order. Press Select to toggle this option on and off.
If you enabled music playback under the Music setting, this option plays the songs in random order. Press Select to toggle the option on and off.
Ken Burns is a documentary filmmaker who popularized a video technique known as pan and zoom, where a still image is shown but the camera moves across it, zooms in or out, or both, to impart a sense of motion. The Ken Burns Effect adds some polish to the slideshow, but it can also cause some unexpected results, such as cutting off the tops of people’s heads to accommodate the zoom.
Unlike the effect’s implementation in iPhoto or iMovie on the Mac, you can’t control the specific start and end states that are applied to each photo. (But there is a workaround, which I cover later.) Press Select to toggle the effect on and off.
Choose the Transitions option to view a list of 12 effects to implement when moving from one photo to the next (FIGURE 7.6). Highlight the one you want and press Select to enable it (indicated by a checkmark next to the name). The Random option picks transitions randomly. You can also choose Off, which simply makes images display back to back with no transition.

Tip
Transitions can be pleasant or distracting. Dissolve, for example, is a subtle and professional effect that fades one image into the next. I also particularly like Fade Through Black, which evokes the sensation of watching a slideshow from an old slide projector. Others, such as Twirl, seem nifty but can quickly result in nausea. The best advice is to pick a transition that isn’t distracting and keeps the focus on the photos.
The medium may be new—digital photos on a widescreen TV—but slideshows can suffer from the same problems that have existed since the earliest photographers sat their family members down and said, “You want to see all my pictures?” Hours later, glassy-eyed, the family swears never to answer “yes” again.
Don’t let this happen to you. Some judicious photo selection will make your slideshows more enjoyable.
Just as iTunes can serve up Smart Playlists, iPhoto and Aperture on the Mac can create Smart Albums that populate automatically, according to criteria you specify. For example, you can create an album that includes only highly rated photos taken during the past month; the content, of course, would change as you add more photos to the library, but you wouldn’t need to edit the Smart Album. Or, an album might search the photos’ metadata to find a keyword or common term during a set period of time (such as “Emma” between January 1 and March 31). This approach saves you the trouble of scanning your library and locating the images manually.
Photoshop Elements under Windows doesn’t feature the same type of smart album, but you can perform a similar search and build a new collection with the results.
When you go to the Photos tab of the Apple TV’s settings in iTunes, the new album appears in the list of albums to sync.
To create a Smart Album in iPhoto, follow these steps:
Choose File > New Smart Album, or hold down the Option key and click the gear button (which is normally a plus-sign button for creating regular albums).
In the dialog that appears, type a name for the Smart Album.
Set the criteria to define the results using the pop-up menus (FIGURE 7.7).
Click OK to create the album. After the next sync, it will appear on the Apple TV’s Photos screen.

Aperture’s Smart Albums are created in a similar way to iPhoto’s:
Choose File > New Smart > Album, or click the Smart Album icon in the toolbar.
Name the new album that appears in the library.
In the attached HUD (heads-up display), enter the search criteria (FIGURE 7.8).
Click the HUD’s close box to hide it.

There are several ways of locating photos in Elements, such as the Find > By Details (Metadata) command. For this example, however, I’m setting up the same query as above in the Elements Organizer.
In the Tags pane, display the Favorites category and choose a rating.
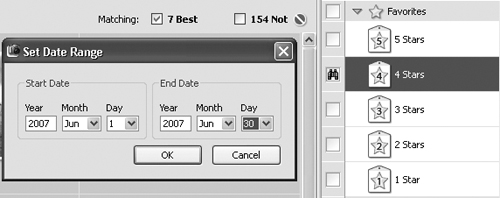
Choose Find > Set Date Range (or press Ctrl+Alt+F).
In the dialog that appears, enter start and end dates (FIGURE 7.9).
Click OK to view the results.
Switch to the Collections pane, click the New button, and choose New Collection.
Name the collection, and click OK.
Select the photos that are visible from your search, and drag them to the new collection.
For more control over how the slideshow plays, you can create one in iPhoto. The Apple TV recognizes iPhoto’s transitions, music, and customized Ken Burns Effect settings. When synchronized, the slideshow appears as another photo album on the Photos screen.
Here’s an overview of the steps for creating a slideshow in iPhoto:
Choose the photos you wish to include in the slideshow. (This is where a Smart Album would come in handy.)
Click the Slideshow button at the bottom of the screen. A new iPhoto slideshow is created.
Select a photo in the browser at the top of the screen to edit its settings.
Below the photo preview, customize how the photo will appear. Options include applying grayscale or sepia tone; choosing a transition and the speed at which it plays; using the Ken Burns Effect with custom start and end settings; adjusting the time the photo appears; and adding music.
Tip
iPhoto gets its music from your iTunes playlists, so make sure the same playlist is also synced to the Apple TV in the Music settings (see Chapter 8). If it’s not, and the songs aren’t available, then the iPhoto-defined music will not play.
Make sure the slideshow is selected in the Apple TV’s Photos settings in iTunes.
In other software, such as Photoshop Elements, there’s another way to create a slideshow that plays exactly as you want it to: output it as a movie. However, since Elements outputs movies as .wmv files, you need to convert to a format that Apple TV will accept using the Pro version of QuickTime Player (which costs $30), or a conversion utility such as River Past Video Cleaner ($30, www.riverpast.com) or AVS Video Tools ($40, www.avsmedia.com). For simplicity’s sake, here are the steps using QuickTime Player.
Create a slideshow in Elements using the Slide Show Editor.
Click the Output button.
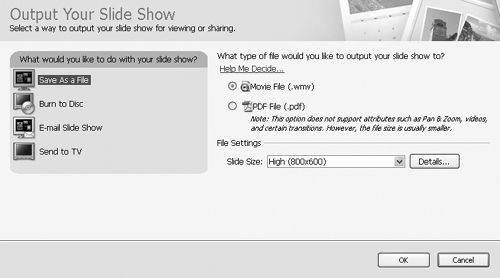
Select Save As a File and make sure Movie File (.wmv) is enabled (FIGURE 7.10).
Under File Settings, choose a Slide Size of High (800x600).
Click OK to give the slideshow a name, and then click Save to output it to disk.
In QuickTime Player, choose File > Open File (Ctrl+O) and locate the .wmv file that Elements exported.
Choose File > Export (Ctrl+E).
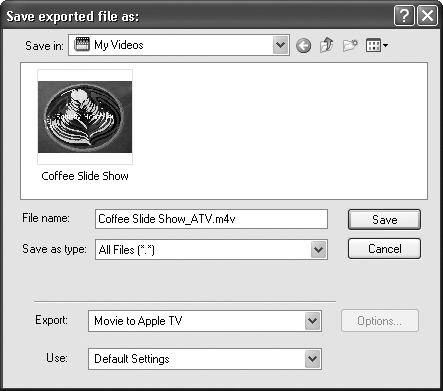
In the Export pop-up menu, choose Movie to Apple TV (FIGURE 7.11).
When the export is complete, add the .m4v file to iTunes.