8. Microsoft Windows
In this chapter, we get specific by starting with the Windows environment. Most of you have picked up this book and turned to this chapter because this is where most of your pain is, so we’ll start with things that you can do to Windows in general to improve your security posture. We’re not going to concern ourselves with anything prior to Windows 2000 because those early versions of Windows weren’t really capable of protecting themselves or the data on the system.
Microsoft has been much maligned over the years, but although much can be said of Microsoft, being stupid isn’t one of them. Microsoft has done a Herculean job of turning a huge organization into a huge security-aware organization in a fairly short time. As you’ll see in this chapter, we can do many things to improve the security posture of Windows while integrating it into our closed-loop process control (CLPC) environment.
Précis
The first thing we’re going to do is talk about checking our system for beasties. Before we can even begin to discuss improving our security, we need to know that our security hasn’t already been breached. We’ll cover some methods and tools that will help you assess the security posture of the endpoint. Included in that section is a lively discussion on rootkits and ways to detect them.
Microsoft breaks their security into three different modes, so that’s how we’re going to look at it. In the Microsoft world, there are systems that are connected to Active Directory, those that aren’t (considered stand-alone), and what Microsoft refers to as “an extremely high level of security in which application compatibility or usability may be constrained,” or specialized security—limited functionality (SSLF).
We walk through how to lock down the file system from a stand-alone endpoint’s perspective to what I consider the minimum level of security that a system should have. We then “crank on the screws” to further enhance our stand-alone endpoint’s security posture. Armed with the knowledge of what you can do to secure a Windows endpoint, we move to the methods and processes you should follow to generate a security policy and to lock down the enterprise.
Our stand-alone procedure makes the assumption that you’re the administrator of the system; our enterprise approach assumes that the end user is not the administrator.
The final level of security leverages our CLPC to ensure that the system stays secure.
Aside from the CLPC security function, Windows security has a number of different reference sources to quote from. Because I’m not trying to reinvent the wheel as far as securing Windows, I quote from a number of different sources. A great place to start, however, is with the Microsoft TechNet Threats and Countermeasures site, located at www.microsoft.com/technet/security/topics/serversecurity/tcg/tcgch00.mspx.
Special Points of Interest
Windows NT is probably the exception to the claims of early Windows insecurity made in the preceding section. Windows NT 4 actually got to be pretty well trusted after a while, but it took a basic change from the DOS file system to the NT File System (NTFS) and many years of trial and error to get a workable security profile for Windows NT.
The NTFS and years of beating on Windows NT worked to the advantage of those who were using the operating system. Yes, we whined mightily about security problems, but in the end, Windows NT security was quite workable.
I know that I said that starting with a clean image is really the best way to ensure that your entire population of endpoints is secure, but I also said that for some of us that isn’t practical. For that reason, we’re going to start off by checking the endpoint to see whether it’s infected or corrupt in any way. There’s no point in locking down a system that has a rootkit on it!
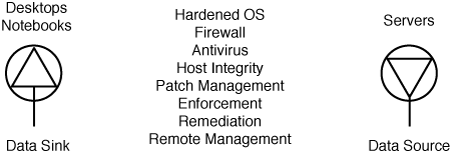
Chapter 3, “Something Is Missing,” discussed our iconology and nomenclature. Drawing on that for the purposes of this chapter, in our final security configuration we will be creating a protected endpoint. Not only is the endpoint secure, it’s also capable of assessing and remediating itself when it discovers that it no longer is secure or up-to-date. Figure 8-1 shows the symbol for a protected endpoint.
Figure 8-1. Protected endpoint iconology. User systems sink data, whereas server systems act as a source of data.
If you think that you might have a serious breach and want to involve law enforcement, stop right now! Changing any portion of the file system may render the endpoint useless as evidence. Many of the things that we’re going to do from this moment on have the potential to damage evidence; so, if you suspect that a crime has been committed, call your legal advisor (yes, I just said get a lawyer) and determine a plan of action.
Finally, another thing that I want you to be aware of as you read this chapter is the fundamental process associated with ensuring that a system is secure. If you have any questions about the trustworthiness of a system, you will have trust questions associated with your network. If the system can’t be trusted to start with, the role that it would play in a CLPC solution would be that of a potential hole. We end this chapter with a discussion on how Windows, and Windows tools, can play a role in our CLPC system.
A Word About Vista
The American Heritage Dictionary defines vista as two things: a distant view or prospect, especially one seen through an opening, as between rows of buildings or trees. Or, an awareness of a range of time, events, or subjects; a broad mental view: “the deep and sweeping vistas these pioneering critics opened up” (Arthur C. Danto).1 Only time will tell which definition is correct when referring to Microsoft Vista. Either it will be a narrow and distant prospect or it will be a broad and sweeping view. But, the future of Microsoft isn’t what we’re discussing here. As security professionals, we have real-world, deploy-it-today concerns. Vista is tomorrow.
On the security side, Vista supports memory randomization, technically referred to as Address Space Layout Randomization (ASLR). ASLR is a feature that should reduce the impact of malware by making it difficult to predict where system libraries are located. In addition, users are given more latitude to make some operational settings, such as setting a Wired Equivalent Privacy (WEP) key, without the need to be an administrator. Windows service hardening restricts services from doing things that they shouldn’t be doing, such as Remote Procedure Call (RPC) replacing system files.
However, on the downside, Vista seems to be a bit chattier as far as warnings are concerned. Between having discussions with Vista testers and my experience with Vista, my concern as a security administrator is that users would tend to “click through” the fairly content-free messages. I say “content free” because the information contained in the warning dialogs doesn’t contain information that would support effective troubleshooting of security-related issues.
As of this writing, Vista, and Microsoft, are still fighting the world with regard to features and functions. Some of the major security vendors have complained that Microsoft is preventing them from integrating with Vista in an effort to expand the Microsoft market share at their expense.2 I suspect, and this is just my opinion, that some of these complaints will wind up in court. This means that Vista is going to change, so detailing anything here would be pointless.
Vista does have some nice features, such as the Microsoft version of network access control (NAC), NAP or Network Access Protection. Be warned, however, this is a Microsoft-specific solution, with all that implies.
But, as of this writing, Vista hasn’t been deployed in large enterprises, and we don’t know what the true security posture of Vista is going to be in the real world. When we understand how enterprises are going to use Vista and we have grappled with the practical implications of deployment, I will be happy to add it as a separate chapter.
Initial Health Check
Before we start to crank down the security of our Windows endpoints, it’s a good idea to make sure that we still “own” the box. There’s no point in spending the time to secure an endpoint if all we’re going to do is secure it for the hacker who has already got rootkit running on it.
First, we’re going to look at the system the way a hacker would: through the eyes of a port scanner. This is pretty much just to see whether there is something obviously wrong and to make us a little more familiar with the system. Next, we’re going to see whether we still own the system: We’re going to check for rootkits. Then we’re going to look in a few of the places that hackers stash things such as hidden files, the Registry, alternate data streams, and services.
System Scan
A fairly simple thing to do is to look at the system the way a hacker would: from the outside. Because Trojan horse programs use the network to connect to the hacker, they sometimes leave a port open, and that can be detected.
A great tool that you can get to do this type of detection is called nmap.3 Nmap, short for Network Mapper, is a free program available in versions that will run on Linux, Windows, UNIX, FreeBSD, and MacOS, just to name a few. I have the Mac version, and I can attest to nmap’s speed and accuracy. I run nmap on my network segments to see whether any new endpoints have popped up while I wasn’t watching. The nice thing about nmap is that it tells me a great deal about the endpoint:
• IP address
• Operating system type (Windows, Linux, and so on)
• Port number (1–65,535)
• Transport type (TCP or UDP)
• Port state (open, closed, filtered)
• Service (SSH, FTP, HTTP, and so on)
• Version (if the service provides it)
• Uptime (time since last reboot)
This can be very useful information because things such as Trojan horses show up as additional network services. The downside is that the Trojan services tend to use legitimate service ports to hide behind. Therefore, if it looks like the SOCKS service is running on port 1080, you really need to check the endpoint to make sure that it really is SOCKS and not some Mydoom variant. If you check the process list or service list and SOCKS isn’t listed as running, you have a Trojan horse that is hiding behind that port. More on this in the following section on finding rootkits.
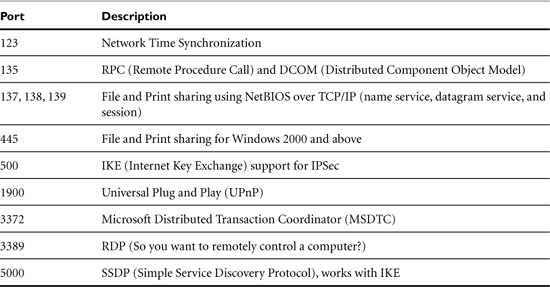
On Windows systems, you can usually expect to find a couple of ports operating that support standard Windows networking features such as file sharing and RPC. You may find some other services, such as Remote Desktop Protocol (RDP), that will definitely turn on a siren or two. Table 8-1 lists some common Windows services.
Table 8-1. Common Microsoft Windows Ports
Think of a scanner as the first step in identifying whether something is amiss on your endpoints from an external perspective. You still have to do the legwork.
Finding Rootkits
Rootkits are tools designed to allow hackers to keep the system that they have hacked. There are numerous methods, especially in userland, that hackers use to cover their trail. They’re hoping that with all the stuff that goes on in Windows, that a simple EXE or a tiny process isn’t going to be noticed. Rootkits take covering your tracks to a new level. They modify the system so that the services and applications that the hacker uses are protected from detection.
There are three basic types of rootkit: kernel, library, and application. Kernel rootkits modify the system kernel by adding a device driver or a loadable module. The method really depends on the target operating system. In our case, device drivers seem to be the vector of choice—specifically, VxDs (virtual external drivers).
Library rootkits typically modify a library by patching, hooking, or replacing a system call. By intercepting system calls, rootkits can do things such as tell Windows Explorer not to display the directory that contains the rootkit or to not list the process in the Task Manager.
Application rootkits use similar methods but target the somewhat easier-to-modify applications.
But rootkits aren’t perfect. We actually have a great deal of the information that we need to determine whether a rootkit is running on our system. The problem is that the information being provided to us is under the control of the rootkit, so we have to have an external source to compare against.
One method is to compare the results of the external scan with the information provided by internal tools such as netstat. Netstat can provide a great deal of information on connections, routing tables, sockets in use, and which applications are using them (netstat –b). However, if there is a back door on the system, netstat may not report it, and the extra open port would become obvious in the scan. You might have to connect a sniffer to the system, capture lots of packets, and sort though them looking for anomalous traffic.
You can pull the disk out of the system and examine it using a known good system.
Another method to discover rootkits is through the use of a third-party tool such as F-Secure’s Blacklight4 or Rootkit Revealer5 from Sysinternals.6 Another tool, RKDetect, uses the Windows Management Instrumentation, or WMI, and the Windows Services Manager to query the system. RKDetect compares the results and reports the differences. This is similar to the manual process described in the previous paragraph.
Now comes the hard part. You’ve come to the conclusion that the system has been rooted and you want to fix it. You’re mad, and you want to cut the bleeping hackers off. You want to beat the hackers at their own game, prove that you’re as smart as they are, and find all their code and rip it out.
Don’t bother.
By the time you spend the time to detect the rootkit and install the tools to detect all the bits, you’ve spent the time that you could have used to re-image the system. It’s a critical resource, you say? All the more reason to make sure that you can trust it, and you can’t trust a system after it’s been rooted.
For those who are determined to “fix” the system, there are some things that can be tried, but they all have their drawbacks.
Some tools purport to identify and remove rootkits. RKdetector runs on the local machine and attempts to identify hidden processes.7 After hidden processes are identified, RKdetector tries to kill the processes. RKdetector has an internal MD5 database of rootkits and other hacker tools. Another tool, unhackme, has a free evaluation download but will require $19.95 after that expires.8 I haven’t used these tools, but there are reports that both of them suffer from false negatives, so be careful when you use them.
There is a manual method, but it only works if you know what rootkit has been installed on your system. By using the Windows Recovery Console, and the knowledge you gained from your scans and netstat, you may, and I repeat may, be able to remove a rootkit.9 The basic steps are as follows:
- Insert the Windows operating system installation CD.
- Boot. (You may have to modify your BIOS to boot from CD/DVD.)
- Choose R to enter the Recovery Console.
- Choose the Windows installation you want to clean from the list.
- Enter the Administrator password.
The Recovery Console enables you to list services that can be enabled or disabled. This is where the tricky part comes in: You have to know the name of the service you want to disable. Hopefully, the research you did earlier has provided you with the correct name. After the service has been stopped, you can reboot and finish removing the rootkit. Make sure you take good notes just in case something quits working so that you can go back and start it up again.
I’ve left off version numbers because they change so often. Furthermore, other tools are available, but I didn’t want to write a book about rootkits.
One last note about removing rootkits: Of all the scenarios that remind me of weapons development, rootkits and rootkit detectors have all the characteristics of a traditional arms race. Unlike worms and viruses, rootkits have a human intellect constantly tweaking and refining their methods. If it were I, and I detected or even suspected that a rootkit was on my endpoint, I’d re-image it in a minute—minus the original vulnerability that allowed the jerk to root me in the first place!
System Files
Later versions of Windows, starting with Windows 2000, come with a nifty tool called sigverif. This tool will scan your drive, checking the digital signatures of the files to those on record, and will notify you of incorrect or missing signatures. Having good signatures is part of the basic block and tackling of system integrity. If the signature is good, that application can be trusted. Running sigverif on my XP systems produced the result in Figure 8-2.
Figure 8-2. Sigverif will find and display files that have bad or no crypto fingerprints.

I have to admit that I was moderately annoyed at the fact that these drivers weren’t signed, so I went to the Internet to verify their authenticity. The INI and the GPD file I looked at with a text editor and decided they were harmless. The PSCRIPT.NTF file is a binary “mini driver” that contains descriptions of fonts for PostScript printers.
I figured that anything that started with “hp” would probably be found somewhere on the HP Web site. Using HP’s internal search engine, I popped in hpcps02, hpcprd02, hpcstr02, and hpcui02. My results? Not very rewarding. As a matter of fact, I spent more time on the HP “try again” page than anywhere else. However, an Internet search did turn up references to the files, so I felt a little better.
I went through the same process for the rest of the files, taking about an hour to sort through the entire list. The final judgment was that they were indeed part of my printing subsystem and, although not signed, were okay.
Alternate Data Streams
Streams can be evil. Streams not as in babbling brooks filled with trout, but as in alternate data streams, or ADSs. Attackers can hide executable files in another executable’s data streams. Originally devised to enable compatibility between Windows and the Macintosh Hierarchical File System (HFS), ADS allowed data to be sent to other applications. The thing about this feature is that hackers use ADSs to hide their tools and the fact that they are running on your system. The usual file browsing tools such as dir and Windows Explorer don’t detect ADS-infected executables. Unfortunately, you have to use a third-party tool to audit and detect ADSs on your system because most antivirus (AV) and intrusion prevention tools don’t catch them.
Some useful tools for detecting ADS can be found at the following Web sites:
• www.crucialsecurity.com/products/index.html
A bit of warning before you use these tools: If you’re running AV software, you may want to check with the AV vendor to see how they deal with ADS. Some AV software adds an ADS to each file that it scans, so you may have to add an exclusion to keep the output from being a bit verbose. I could add an exception with command-line based adstools but not the GUI-based crucialads. Adstools also allow you to do the following:
• Include subdirectories
• Debug ADS
• Generate verbose error messages
• Get a summary of all bytes used in the scanned directories
• Exclude any ADS name
• Read a parameters file as input
The last one is nice if you have lots of exclusions.
Crucialads has a nice GUI, so it is a little easier to use so long as you don’t mind that it does the entire drive. I also noticed that mixed in with the results were lots of “error 32 open” notices from trying to open files that were in use. You have to sift through the data to pick out the nuggets of information. The good news is that the information that they found was the same.
Registry Check
For those of you unfamiliar with the Windows Registry, it is the DNA of the Windows operating system. The Windows Registry is a database of information that Windows uses to manage tasks, services, user profiles, how document types are related to applications, and so forth. It replaced the INI files that used to be used in older versions of Windows prior to Windows 95.
Under the system name (usually My Computer), the Registry is broken into five logical sections:
• HKEY_CLASSES_ROOT. Information about registered applications, file associations, and OLE object class IDs
• HKEY_CURRENT_USER. Settings specific to the current user
• HKEY_LOCAL_MACHINE. Information that is general to all users on this system
• HKEY_USERS. Information about all the authorized users of this system
• HKEY_CURRENT_CONFIG. Information gathered during the boot process
HKEY is shorthand for Handle to a KEY.
Before we start, because the Registry is the heart of your Windows system, screwing it up can hose your system. You need to back it up before you make any changes. You can do this by running REGEDIT. Select Export, click My Computer, click Export, and follow the prompts to save the file. You can find a complete set of instructions on how to back up, restore, and edit the Registry at http://support.microsoft.com/kb/322756#E03E0ACAAA.
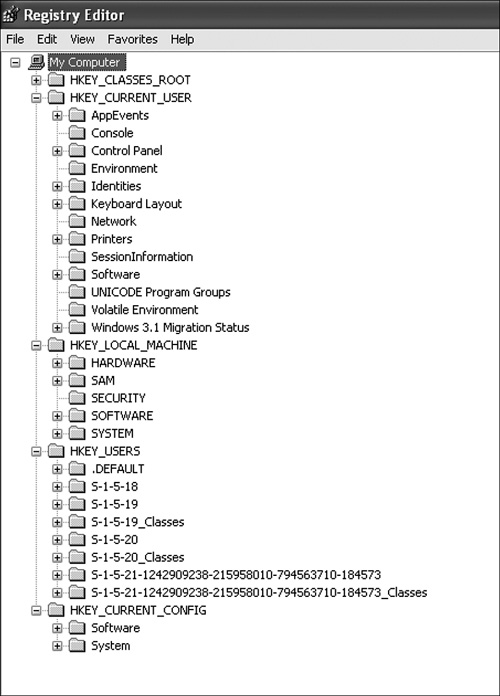
As you can see in Figure 8-3, these five basic hives explode into a considerable number of subkeys. I didn’t expand on HKEY_CLASSES_ROOT because it is a very large list of things.
Figure 8-3. The Windows system Registry is broken into five sections or keys.
For the purposes of our exercise, we’re going to look at just a few keys, because they are predominantly the keys that are going to be modified. Under HKEY_LOCAL_MACHINE, check these subkeys:
• SoftwareMicrosoftWindowsCurrentVersionRun
• SoftwareMicrosoftWindowsCurrentVersionRunOnce
• SoftwareMicrosoftWindowsCurrentVersionRunOnceEx
• SoftwareMicrosoftWindowsCurrentVersionRunServices
• SoftwareMicrosoftWindowsCurrentVersionRunServicesOnce
• SoftwareMicrosoftWindowsNTCurrentVersionWinlogon
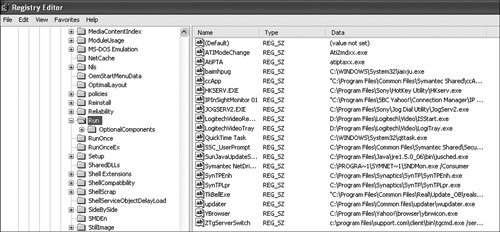
When I checked my Windows Registry, I discovered that there were 21 additional entries under SoftwareMicrosoftWindowsCurrentVersionRun.
• SoftwareMicrosoftWindowsCurrentVersionRunOnce
• SoftwareMicrosoftWindowsCurrentVersionRunOnceEx
were empty and
• SoftwareMicrosoftWindowsCurrentVersionRunServices
• SoftwareMicrosoftWindowsCurrentVersionRunServicesOnce
didn’t exist.
Do this same check for these keys:
• HKEY_CURRENT_USER
• HKEY_USERS.DEFAULT
If the subkeys are empty or do not exist, you should be in fairly good shape as far as the Registry is concerned. I spent some time checking out the 21 entries in my Registry to see whether anything evil lurked. Google and Yahoo! are great resources for checking things out. For example, if you pop “ccApp” into Google, you’ll get a list of potential sources of data. I clicked the first one, http://www.liutilities.com/products/wintaskspro/processlibrary/ccapp/, which took me to a page that told me that this was the Symantec Common Client CC App. You have to go through this for all the entries in the Run subkey to be sure that they’re all legitimate.
Because my Windows laptop was really the property of my employer, I figured that the security folks would get a little peeved if I published copies of the Registry, so I asked a friend who didn’t mind getting fired from her job, and the result is in Figure 8-4. This is from a pretty vanilla Windows XP system.
Figure 8-4. Registry subkeys under HKEY_LOCAL_MACHINESoftwareMicrosoftWindowsCurrentVersionRun.
It’s About the Processes
Another way to examine your system is to see what processes are running. You have to go through the same drill that you went through above, checking each one to see if it’s a legitimate process.
To check what processes are running on your XP system, go to Start > Control Panel > Administrative Tools > Services.
You will be presented with a list of processes, their description, status, startup type, and how they log on to the system. This is a long list, on the order of 100 or so individual processes, so plan on taking a couple of hours to check out everything.
Most of the services may be legitimate, such as Event Log, which was started automatically and running as a local system service. Some of them are a bit more obscure, such as SSDP Discovery Service (UPnP discovery), which was started manually as a local system service. You can eliminate those processes that aren’t started or disabled, such as TELNET and routing. The truly paranoid will check all the services because a rouge service wouldn’t be called “evilservice”; it would probably be called something quite innocuous, like Event Log.
As with most Windows utilities, you can click the column heading to re-sort the entries. I clicked Startup Type to see a list of disabled services, as shown in Figure 8-5.
Figure 8-5. The services admin tool list services, their startup type, and who owns them.

Spyware
Spyware, the programs that collect information and send it back to the mothership, is a little easier to deal with. Anti-spyware is quickly becoming a commodity in the same way that AV has. Popular programs such as Ad-aware10 from Lavasoft and Spyware Doctor11 from PC Tools promise to identify spyware and Trojan horses. A recent review12 of 10 anti-spyware tools by TopTenReviews placed Ad-aware and Spyware Doctor sixth and eighth, respectively. Spy Sweeper13 from Webroot placed number one.
To be fair, in a similar report by About,14 Ad-aware took the number one spot, with the free Spybot Search and Destroy15 snagging the number two spot.
My experience with anti-spyware told me to run a “belt and suspenders” operation by manually running two different detectors. There was enough overlap then to catch everything. However, if the recent reviews are any indication, improvements in the for-fee versions of anti-spyware programs have greatly improved their utility, accuracy, and reliability.
Looking at the Logs
Windows does have a system of logs that an endpoint owner can use to keep track of the system. However, unlike other operating systems, Windows logs aren’t readable unless you use the Windows log viewer. If you’re sending the logs to a central log host, such as a syslog server, the logs must be converted before they’re sent over using a tool such as winlogd.16
Network Stuff
The Windows hosts file is the last reference used by a Windows endpoint. However, this is one of the files that can be modified by attackers. By associating a rogue IP address with an attacker’s Web site, an attacker can fool users into going to a phishing site. If attackers can associate their URL with something like the Bank of America, they can convince your browser to go to a rogue Web site that looks like the Bank of America site. Check the hosts file for any entries other than the local host at 127.0.0.1 and a broadcasthost at 255.255.255.255.
Mop Up
The last thing that I want to mention here is that you probably know what should be on these systems and what shouldn’t. After a while, you’ll be familiar enough to be able to spot something that shouldn’t be there. A quick check of batch files using the search function of Windows may turn up something suspicious enough for you to dig further using the aforementioned tools. There aren’t that many of them anymore, and maybe you’ll get lucky and spot something unusual.
A review of the file system may uncover other things, such as porn, movies, or music, that could place you and your organization square in the sights of law enforcement. Make sure that you have administrative privileges, turn on hidden file viewing, and look for the following:
• JPG
• MOV
• MP3
• AVI
• MPG
• MPEG
• WMV
Be suspicious of any media that you find in out-of-the-way places, but don’t forget to start with the usual location of My Documents, My Pictures, My Music, and My Movies. We already know from the earlier chapters that the very mechanism used to protect intellectual property has been hacked, so checking on a user’s pictures, music, and movies would be a good place to start.
Hardening the Operating System
Regardless of how we got here, either through a fresh image or an unhacked system, we have a good foundation that includes the latest operating system patches, and we’re ready to start the hardening process. However, like everything else in the security world, we’re really only ready to start asking more questions.
You must consider a number of things when hardening a Windows endpoint. You can’t just rush off and start applying security templates to all your Windows endpoints until you understand what it is they’re going to do. Some things you want to know before you start the hardening process are the following:
1. Is the endpoint running NTFS?
2. Is the endpoint going to participate in an Active Directory?
3. Is the endpoint going to be remotely managed?
4. Is the endpoint going to be a server?
5. Is it going to be a stand-alone system?
6. How much security can you tolerate?
Knowing these things about the endpoint will enable you to decide just how much security you’re going to wrench into your endpoint.
Stand-Alone System
Because this is the easiest configuration, we’re going to start with it. It’s also either the least secure or the most secure, depending on how you approach the problem. If I want a general-purpose system that doesn’t give me any hassles when I install stuff, it’s probably going to lean toward the least secure side. As such, a stand-alone system is probably best considered to be the most similar to your home computer. As an endpoint, it’s not part of any Active Directory or domain and operates pretty much independently of all the other endpoints on the network. One other requirement for a Windows system is that it must be running NTFS for many of our protections to work properly. Without NTFS, there is no concept of file ownership, and that’s a key element to restricting access to them.
As a stand-alone endpoint, you are probably going to be the administrator for the system. The administrator has significant power over how drivers are installed and which services are running. This is the first thing that we’re going to fix. We’re going to create a new user for your day-to-day use that isn’t in the administrator group. As you follow the instructions, refer to Figures 8-6 and 8-7:
- Right-click on My Computer.
- Click Manage.
- Click Local Users and Groups.
- Right-click Users.
- Click New User.
- Fill in the new user information.
- Click Create.
Figure 8-6. The list of users on a Windows XP endpoint.
Figure 8-7. A list of typical groups on a Windows XP endpoint.
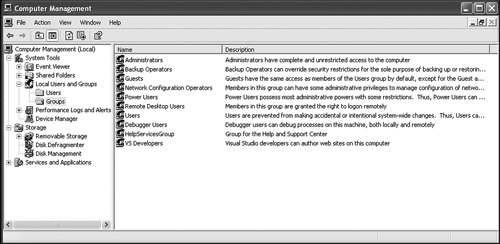
Now we need to check to see who’s an administrator:
- Click Local Users and Groups.
- Right-click Groups.
- Click Administrator.
You should see a list of users, and you shouldn’t be surprised by the members on the list. If you are, you need to go back to the beginning of the chapter. In your stand-alone system, there shouldn’t be a long list of users on this list, and I wouldn’t expect anything other than administrator and possibly one user.
Your new user shouldn’t be in the administrator group list. When you log off, you can begin using this new user account. The reason that this is safer has to do with how the system gets compromised. If, by some chance, you’re online and someone takes advantage of your browsing habits, that perpetrator will gain access only to the user portion of the system rather than the administrator.
The next thing we’re going to do is check to make sure that guest access is turned off. Although many new systems come with the guest account disabled, it’s a good idea to check it anyway. Going back to our open management window, follow these steps:
- Right-click Users.
- If the Guest user is displayed and it doesn’t have a little red X in the lower-right corner of the icon, double-click Guest.
- Click the Disable check box.
- Click Apply.
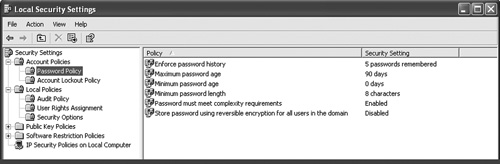
Now we’re ready to deal with the local security policy. Go to Start menu > Settings > Control Panel > Administrator Tools > Local Security Policy.
- Once there, click Account Policies. You should see Password Policy and Account Lockout Policy.
- Click Password Policy.
What you should see now is a screen similar to that in Figure 8-8. For settings, I recommend the following:
• Enforce password history set to 3 passwords remembered
• Maximum password age set to 180 days
• Minimum password age set to 0 days
• Minimum password length set to 8 characters
• Password must meet complexity requirements set to Enabled
• Store password using reversible encryption for all users in the domain set to Disabled
Figure 8-8. Local Security Settings window. Password policy controls complexity, lifetime, and reuse of passwords.
Next, click Account Lockout Policy. You should see a display similar to that in Figure 8-9.
Figure 8-9. Lockout parameters. Lockout prevents automated attacks against the system.
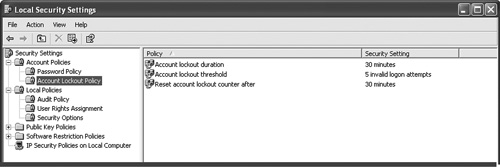
I would set the account lockout parameters as follows:
• Account lockout duration to 30 minutes
• Account lockout threshold to 3 invalid logon attempts
• Reset account lockout counter after to 30 minute
The next thing we’re going to do is check to see whether the firewall is running. If you have Windows XP SP2 or later, it comes with a built-in firewall, and until such time that you get a third-party firewall, it’s better than nothing. The Windows firewall will prevent external connections, but it can also be turned off externally through the built-in API. If you have an earlier Windows system, you need to get a third-party firewall. To check to see whether your firewall is running, go to Start menu > Settings > Control Panel > Windows Firewall.
In the General tab, you should see that the green “firewall good” radio button has been selected, as in Figure 8-10. Next, select the Exceptions tab. I recommend that you uncheck the following:
• File and Printer Sharing
• Remote Assistance
• UPnP
• Remote Desktop
• Windows Media Connect
Figure 8-10. Microsoft recommends that you run the included firewall.
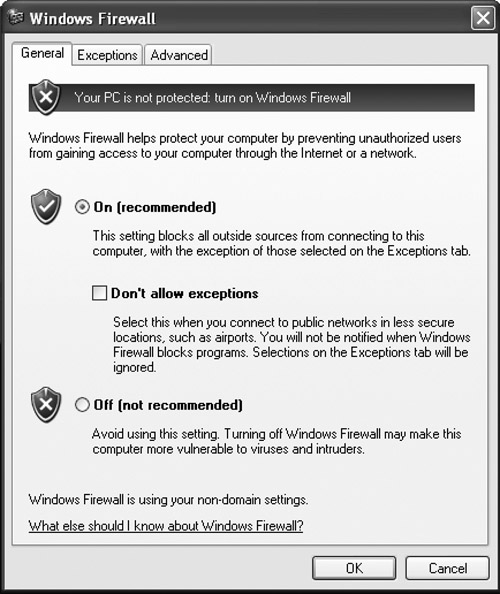
Because this is a stand-alone working (versus gaming) computer, I can’t imagine needing to provide exceptions for any of these services.
This next part pretty much depends on what your AV vendor is, so the instruction is going to be pretty general:
Check Your AV
Ensure that your AV is running by starting the GUI. Just because the icon is in the system tray doesn’t mean that your AV is up and running. I once had a project where the goal was to “whack,” as in kill, the competition’s security product as part of a demonstration. Whacking the product was fairly trivial, but the interesting thing was that a quick look in the system tray indicated that the product was still running, even when it wasn’t! A mouse over the afflicted product’s icon in the system tray made it disappear, and one marketing person actually asked if I could add a whooshing sound!
After you’ve determined that your AV is running, you also need to check to make sure that it has the latest DAT file update. Figure 8-11 shows an example AV status screen. If you have a subscription, it shouldn’t be an issue, but it does require a connection to the Internet to get the updates. Also, if your subscription has expired, you may have absentmindedly clicked on the “don’t bother me with this again” dialog window. I have the Symantec AV on my system, and the GUI tells me that the program is running and that the last update was today.
Figure 8-11. The GUI for the Symantec AV shows status and last DAT file update.

One last check that you should make is to ensure that the schedule feature of your AV is enabled. Having it set to run at 2 a.m. won’t take any cycles from your day or your system’s productivity.
Before we finish with this section, there is one more thing that we need to do. We need to go back into Computer Management and change the passwords of the administrator and our new user so that we can be sure that they comply with the new password policy:
- Right-click My Computer.
- Click Manage.
- Click Local Users and Groups.
- Right-click Users.
- Select Administrator and then your new user.
- Change the passwords.
There is one extra thing that I recommend: changing the name of the administrator to something innocuous and creating a new user named administrator with no privileges. Although this won’t slow an experienced hacker down, if a rookie hacker does happen to get onto the system and gets to the administrator account, it’ll drive the rookie nuts trying to figure out what’s wrong with the system.
The last thing that we’re going to enable is the ability of the system to automatically check for updates. Go to Start menu > Settings > Control Panel > Automatic Updates.
You should see the window shown in Figure 8-12.
Figure 8-12. Automatic Updates will download and install operating system patches and hotfixes.
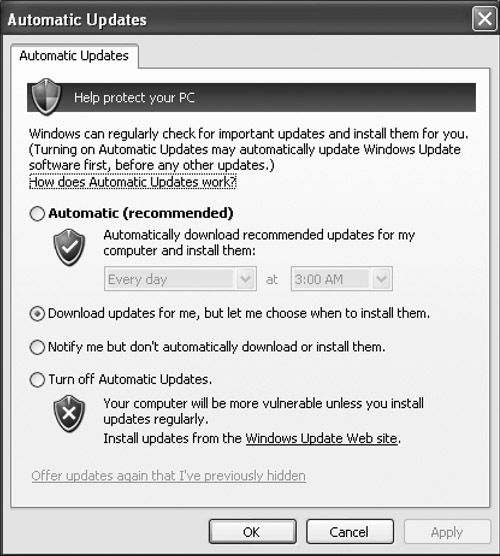
I like to get the updates, but I review them prior to blindly installing them. As I mentioned in the first chapter, sometimes the cure is worse than the illness! Before installing an update, I want to make sure that there aren’t any surprises.
We’re ready to proceed to the next step if you’re interested in increasing your level of protection.
Cranking Down the Screws
We’ve used a manual process to get at some low-hanging fruit, and we have improved the basic security of the endpoint. This manual process is good for those who are loath to get into the deep DNA of Windows or just want to spend a couple of minutes improving their basic security posture. To sum up, at this point we have a system that has
• All operating system patches
• Secured administration access
• Antivirus
• Firewall
Although this is a great start, it is really only the minimum, and we can do much better; but to do so means going a little deeper into the toolbox. Because this isn’t intended to be a complete course on configuring Windows, we’re going to go over the method that should be used to identify and modify those critical security parameters that are important to you. I’ll also say that at this point I’m going to make some recommendations and one of them is to get two documents from Microsoft:
• Windows Server 2003 Security Guide
• Windows XP Security Guide
You can find these documents at www.microsoft.com/technet/security/topics/serversecurity/tcg/tcgch00.mspx.
I’m making the assumption that the system is functioning as a stand-alone system in support of a single user, so many of the security recommendations, such as turning off the user’s ability to write to removable media, aren’t applicable here. Also, this is still a manual process. We get into the automated process description in a later section.
The next thing we’re going to do is to disable autoplay on the CD-ROM/DVD player and the USB. Autoplay is a feature designed to be a convenience, but in reality it can act as an attack vector because Windows reads a part of the media automatically. To turn off this “feature,” follow these steps:
- Double-click My Computer.
- Right-click DVD/CD-RW Drive. (Yours may only say CD-ROM, depending on how your computer is equipped.)
- Select Properties.
- Select the AutoPlay tab.
- In the drop-down menu, select Music CD.
- Click the radio button Select an action to perform.
- Select Take no action.
Repeat Steps 5 through 7 for DVD Movie and all other removable media such as the USB.
Now we’re going to protect our data from theft by encrypting it. You can encrypt the entire file system if you want, but I prefer to just protect the data. To create an encrypted folder, follow these steps:
- Right-click the folder that you want to encrypt.
- Click the Advanced button.
- Select the Encrypt the contents to secure data check box.
- Click OK.
- Click Apply.
- Click OK on the last window.
Because we’re not connected to the domain, we’re going to have to produce our own recovery agent. Go to the Start menu and open a command window. Then enter the following:
Cipher /r:yourcertname
Replace yourcertname with a name that is meaningful to you and nobody else. You will be asked for a password and to reenter the password. When you’re done, you will have two files, one with a .pfx extension and one with a .cer extension. Protect these files carefully; they are your public and private certificates. If someone else gets them, they can become a recovery agent for your data. I suggest that you put them on a CD, DVD, or USB drive for safekeeping.
Now we need to import the certificate and create the recovery agent. From the Microsoft Management Console (MMC), follow these steps:
- Select Local Computer Policy.
- Select Computer Configuration.
- Select Windows Settings.
- Select Security Settings.
- Select Public Key Policies.
- Select Encrypting File System.
- From the Action menu, select Add Data Recovery Agent.
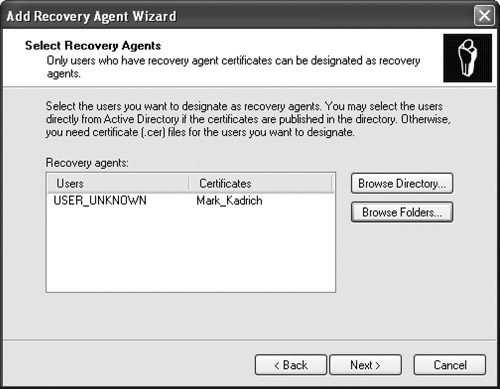
- You will be presented with an Add Recovery Agent Wizard window. Click Next.
- Browse to the folder with your CER file, select it, and click Open. You should see the window shown in Figure 8-13.
Figure 8-13. The Add Recovery Agent Wizard makes generating a recovery agent a breeze.
- Click Next.
- Click Finish.
You should have an entry in the Encrypting File System window similar to the one in Figure 8-14.
Figure 8-14. The recovery agent certificate is added to the local computer policy through the MMC.

Next, we’re going to disable the good Doctor Watson. Dr. Watson is an automatic debugger that collects information and sends it back to Microsoft when applications crash. A knowledgeable hacker could exploit the Doctor, so we’re going to cut off his practice.
Go to Start menu > Run and enter regedit:
- Heed the aforementioned warning.
- Select the Registry key HKEY_LOCAL_MACHINESoftwareMicrosoftWindows NTCurrentVersionAeDebug.
- Delete the AeDebug key.
Applications
Before we get into the next section, I want to discuss another important aspect of the Windows endpoint: the applications that run on them. In the next section, we discuss the process that you use for setting security parameters on an enterprise, so I think that it is important to discuss the application software and some of the security settings that you should consider as you’re formulating your enterprise security policy. In many cases, it is the applications that run on the endpoint that are the targets of attackers. The recommendations that follow are pretty consistent no matter what the level of security you’re trying to achieve.
Software Restriction Policy
Software Restriction Policy (SRP) is the single most powerful tool in the Microsoft arsenal because it uses a policy-based process to decide what software will be executed. It is executed either through Active Directory (AD) and Group Policy or on stand-alone computers. You have two ways of implementing SRP: unrestricted or disallowed. If you select the unrestricted mode, all software can run on the endpoint, and you have to enter specific rules to block applications. However, if you select disallowed, all software execution is prevented unless there is an explicit permit rule.
SRP isn’t just for applications either. It also prevents Visual Basic, Scripting Edition (VBScript), JScript, and other scripting languages.
As a security professional, I like the fact that this policy has an explicit “deny” for all software. SRP uses four rules to identify software. You identify what software is allowed to run and associate a rule with it:
• Hash rule. Uses MD5 or SHA1, file length, hash algorithm ID number
• Certificate rule. Uses digitally signed certificates from the publisher to identify files
• Path rule. Uses the local UNC (Universal Naming Convention) or Registry path to identify the EXE file
• Zone rule. Uses the Internet zone where the EXE originates if it was downloaded by Internet Explorer
Each rule type has different advantages and disadvantages. Hash rules work well if you’re not updating software continuously, because each time you do you must recalculate the hash value and update all the endpoints with it.
Certificate rules require that each software vendor has a registered code-signing certificate on the endpoint. Considering the present state of PKI and the fact that not every vendor has a code-signing certificate, this can be a crap shoot. It tends to be the method of choice for verifying trust in ActiveX controls, however.
The path rule relies on the location of a file to determine trust. If it’s in the right folder, it must be the right software! Registry path rules seem to be an extension of the basic path rules but applied to the Registry. This is the method that Windows uses so that when you set SRP to disallowed it doesn’t lock itself out of the operating system. Four Registry path rules are created:
• %HKEY_LOCAL_MACHINESOFTWAREMicrosoftWindows NTCurrentVersionSystemRoot%
• %HKEY_LOCAL_MACHINESOFTWAREMicrosoftWindows NTCurrentVersionSystemRoot%*.exe
• %HKEY_LOCAL_MACHINESOFTWAREMicrosoftWindows NTCurrentVersionSystemRoot%System32*.exe
• %HKEY_LOCAL_MACHINESOFTWAREMicrosoftWindows NTCurrentVersionProgramFilesDir%
Internet Explorer
Internet Explorer, besides being at the heart of international lawsuits, is at the heart of many exploits. For this reason, we’re going to give IE a bit of attention when we consider our enterprise security policy. If I were to characterize what our approach is going to be, it would be to reduce the possibility that the user can download something evil or change the security settings such that the browser security can be bypassed. So, when we configure our administrative template in the Group Policy Object Editor, we’re going to enable the following:
• Disable Automatic Install of Internet Explorer Components
• Disable Periodic Check for Internet Explorer Software Updates
• Disable Software Update Shell Notifications on Program Launch
• Do Not Allow Users to Enable or Disable Add-ons
• Make Proxy Settings Per-machine (not per-user)
• Security Zones: Do Not Allow Users to Add/Delete Sites
• Security Zones: Do Not Allow Users to Change Policies
• Security Zones: Use Only Machine Settings
• Turn Off Crash Detection
• Internet Explorer Processes (MK Protocol) (This blocks the legacy MK protocol from being used.)
• Internet Explorer Processes (Consistent Mime Handling) (This prevents MIME types from masquerading as text files when they’re really executable.)
• Internet Explorer Processes (MIME Sniffing) (This prevents IE from promoting a file type to executable.)
• Internet Explorer Processes (Scripted Window Security Restrictions) (This prevents Web sites from hiding other windows and generating pop-ups.)
• Internet Explorer Processes (Zone Elevation Protection)
• Internet Explorer Processes (Restrict ActiveX Install)
• Internet Explorer Processes (Restrict File Download) (Non-user-initiated download prompts are disabled.)
• Deny All Add-ons Unless Specifically Allowed in the Add-on List
• Add-on List (needed for the previous rule)
Although we’ve done a great deal of “enabling,” we need to disable some things. Some things seem pretty intuitive, and I believe that the following falls squarely into that category. In the administrative template in the Group Policy Object Editor, disable the following:
• Internet ExplorerInternet Control PanelAdvanced Page—Allow software to run or install even if the signature is invalid
NetMeeting
NetMeeting is a collaboration program that enables users to have video teleconferences from the comfort of their cube. It also has the ability to chat, whiteboard, and, of course, point-to-point audio and video. What it also supports is the ability of the remote user to share his or her desktop! If you have a secure environment, you want to turn this feature off in your domain by setting the administrative template in the Group Policy Object Editor to enable Disable Remote Desktop Sharing. I know it sounds a bit confusing to enable something to disable something, but this is Windows.
Terminal Services
Terminal services allow users to remotely access another computer just as if they were at the console. This is a handy method for doing remote management of other computers and, as you would expect, a handy way to break into a computer. Therefore, in the administrative template in the Group Policy Object Editor, enable the following:
• Client/Server Data Redirection—Do not allow drive redirection (Prevents the local drive from being shared with Terminal Servers.)
• Encryption and Security—Always prompt client for password upon connection
• Client—Do not allow passwords to be saved
Windows Messenger
I’m going to “step in it” here and go on record as saying that IM, or instant messaging, is the universe’s way of getting even with mankind. IM, or chat, is the single largest growing threat to users of the Internet and your enterprise. Files can be exchanged, malware can be downloaded, your systems can be hacked, and you can lose control of your intellectual property. So, I’m very happy to say that in the administrative template in the Group Policy Object Editor, enable Do Not Allow Windows Messenger to be Run. It felt very good to type that.
Windows Update
Windows Update is the automatic service that Microsoft uses to download patches and hotfixes to your system. You’ve probably seen the window pop up near the system tray telling you that “updates are ready for your computer.” To make this work, your system must talk to a server and download the update. This can obviously be used in a nefarious way to install malware onto your Windows endpoint.
Microsoft has expanded this service to the enterprise by combining the Software Update Services (SUS) with the Windows Update service to create the Windows Server Update Services (WSUS). WSUS is an infrastructure service that lives on your network, accepts updates from Microsoft, and makes them available to your clients, thus eliminating the need for them to go to the Internet for updates. Another interesting feature of WSUS is that it eliminates the manual update steps, providing an automatic way to distribute and install updates on your endpoints.
Anything automatic can be subverted if not configured properly, so in the administrative template in the Group Policy Object Editor, we’re going to enable the following:
• Configure Automatic Updates
• Reschedule Automatic Updates Scheduled Installations (Previously scheduled installations will be delayed for a short period of time after system startup.)
• Specify Intranet Microsoft Update Service Location
Some things also need to be disabled in Windows Update, as follows:
• Do Not Display “Install Updates and Shut Down” option in Shut Down Windows Dialog Box
• Do Not Adjust Default Option to “Install Updates and Shut Down” In Shut Down Windows Dialog Box
• No Auto-restart for Scheduled Automatic Updates Installations
Enterprise Security
Until now, we’ve been treating our operating system hardening effort as a one-off kind of procedure. We started with the assumption that you were just doing this to your computer and not the entire enterprise. Now that you have an idea of what it takes to secure a Windows endpoint, we’re going to take that to the next level and leverage this across the network.
Microsoft has two levels of security that it discusses in the security guides that it imposes against three types of clients. These three clients are called stand-alone (SA) client, enterprise client (EC), and specialized security—limited functionality (SSLF). I said two levels of security because the SA and EC clients are pretty much at the same level, and the SSLF is pretty tightly sealed. In the SSLF environment, you’ll get a much better level of trust, but at the expense of flexibility and functionality. This is a perfect example of the traditional security balancing act, only this time the balance tips a bit to the paranoid side. If you decide that you’re going to go with an SSLF enterprise client, be ready for the additional administrative burden that will be imposed on you and your team.
Because most of you will be connecting your endpoints to an Active Directory, we need to change our perspective on what is permissible by the user and what isn’t. Because you were the system owner, the assumption was made that you willingly set up a day-to-day use environment that didn’t have the broad access and power of the administrator. In an enterprise environment, that assumption no longer applies. Users don’t need to have the sweeping power of administrator privileges; in fact, it is those very privileges in combination with poor user awareness that attackers prey upon.
We also need to get comfortable with the fact that the best way to do this is via templates. Because there is a lot to do and you need to be sure that you do it right, this is where we depart from me giving you a list of things to do. Until this point, it was fairly easy to give you a list of things to do because it was a “onesie-twosie” kind of thing. Now we’re going to be pushing things out to hundreds of endpoints, and we need to make sure that we get it right and do it in a way that doesn’t inconvenience users any more than we need to. After all, they’re probably not going to be happy with the new restrictions placed on them.
To get to this level of security, Microsoft says that you should at least:
• Be an MCSE with more than two years of security-related experience or equivalent
• Have an in-depth knowledge of your enterprise’s domain and AD environments
• Know how to use MMC, secedit, gpupdate, and gpresult
• Have experience with administration of Group Policy
• Have experience deploying applications and client computers in enterprise networks
The security guide has a great deal of information in it and is a 200-plus page document all by itself. It walks you through the choices that you as a security administrator need to make before you deploy a new policy to your endpoints. Although I believe that I’ve given you a flavor for what has to be done to secure the operating system, there are nearly a hundred settings that need to be reviewed and could be a separate book all by themselves. At a high level, you need to give thought to the following:
• Update services
• Logon services
• Autoplay
• Remote assistance
• Error reporting
• Remote procedure calls
• Internet access settings
• Network connections
• Firewall
• User services
• Applications
After you have a good idea of the security level that you’re going to pursue, you can begin planning for deployment. The basic steps outlined in the security guide are as follows:
- Configure the AD domain infrastructure.
- Configure the settings for Windows XP clients.
- Create the templates for Windows XP.
- Deploy the templates.
- Wait for complaints.
Okay, the last step was one that I added based on my experience with such matters, but it is an important step. Critical applications may break, and you’ll have to revisit your policy when they do.
Servers
I’ve talked quite a bit about workstation endpoints, so now it’s time to talk about servers. Because servers are a much more tightly controlled environment, or should be, I’m going to go straight to the Group Policy method of imposing security controls. This method enables you to track changes and enables you to map policy to action.
Microsoft has happily provided us with a document to secure our Windows Server 2003 called, surprisingly enough, Windows Server 2003 Security Guide. The guide covers many of the same points that were covered in the Windows XP security guide but adds information specific to a server environment, such as the following:
• Securing the server itself
• Auditing
• Domain controller security
• Infrastructure server role
• File server role
• Print server role
• Web server role
• AIS server role
• Certificate Services server role
• Bastian host role
I can’t stress enough the role that our earlier process plays in developing a secure environment. Because our servers are the central focal point for so many other endpoints, we need to ensure that the process we use for developing them is as secure as we can make it and that our process documents our decisions and actions.
Closing the Loop
This is where the standard Windows tools will no longer suffice. We’re going to need some help because the basic premise is that the system will check its own integrity prior to talking with the network. We need to ensure that the system meets our stated level of trust prior to unleashing it on the rest of the network.
As we discussed in Chapter 4, we need a basic proportional control mechanism for controlling how we introduce risk onto the network. From a technology perspective, we have three choices:
• NAC. Network Admission Control, sponsored by the Trusted Computing Group (TCG) and a consortium of vendors.
• CNAC. Cisco Network Admission Control, a proprietary solution sponsored by Cisco. CNAC is supposed to be compatible with Microsoft NAP, but details haven’t been released.
• NAP. Network Access Protection, the proprietary solution that comes with the new Microsoft Vista operating system.
For those of you who have been following the admission control argument, the main purpose of 802.1x is to address the identity management issue. Through the extension of standardized protocols, as in the case of NAC, or through the use of proprietary solutions, as is the case with CNAC and NAP, the authentication process has been extended to include the endpoint itself. By adding an integrity check of the system to the authentication of the user, you now have enough information to decide whether the endpoint meets your minimum security policy requirements.
Because this chapter has been about Microsoft, I would have liked to have finished this section with a Microsoft-only solution. However, the present offering from Microsoft, Network Access Quarantine Control, offered in Windows Server 2003, is not capable of closing the loop in the way we need. Consider this quote from the Microsoft Windows Server 2003 Network Access Quarantine Control guide:17
Network Access Quarantine Control is not a security solution. It is designed to help prevent computers with unsafe configurations from connecting to a private network; not to protect a private network from malicious users who have obtained a valid set of credentials.
Seeing this gap in Microsoft security support, other companies, such as Symantec, Funk (Juniper), Foundry Networks, and Mirage Networks, have rushed to fill the void. Juniper (through their Funk acquisition) and Symantec (through their Sygate acquisition) have expanded the capability of the 802.1x supplicant beyond simple authentication, and this is where we begin to see the foundation for a real proportional control standard that truly closes the loop today.
Foundry and Funk have embraced the standards from the infrastructure side and with the addition of a suitable agent, such as Symantec’s Enterprise Protection, go beyond basic 802.1x and Extensible Authentication Protocol (EAP) authentication and check the endpoint to ensure that system-level policy issues have been complied with prior to allowing IP connectivity. In addition, remediation of the endpoint to ensure compliance has been addressed through inherent functionality and integrated with other remediation vendors such as Patchlink.
Tools and Vendors
In all my research, I came to the conclusion that although numerous sites discussed Windows vulnerabilities, the best site to find out how to harden Windows is really at Microsoft. Yes, there were lots of hardening templates, but each of those templates was addressing that particular enterprise’s need and didn’t explain in detail why certain decisions were being made the way they were. In the end, I used the Microsoft documents as the core of my reference material:
• www.microsoft.com/technet/security/topics/serversecurity/tcg/tcgch00.mspx
• www.microsoft.com/technet/prodtechnol/winxppro/maintain/rstrplcy.mspx
• Windows Server 2003 Security: A Technical Reference www.awprofessional.com/title/0321305019
This isn’t for the faint of heart, because we know that Microsoft documentation will always default in the verbose mode more often than not. It also pays to verify things at other locations because you will pick up some interesting tidbits here and there.
Another great site that I found was www.windowsecurity.com. There are articles, tutorials, blogs, and RSS feeds. You name it, it’s there. It’s really a great place to start a search.
The following is a list of tools native to every Windows system that can be run from the command line:
• Attrib. Displays, sets, or removes the file attributes read-only, archive, system, and hidden
• Dir. Shows you what files and directories are listed
• Getmac. Shows you the MAC address of the system
• Ipconfig. Shows you the IP related information for specified or all network interfaces
• Mmc. Launches the Microsoft Management Console
• Mode. Displays or sets information about com and parallel ports
• Nbstat. Shows you NetBIOS over TCP/IP protocol statistics
• Netstat. Powerful tool for displaying route and TCP/UDP connection information and network processes
• Ping. ICMP echo request client; great for testing network connectivity
• Route. Displays or modifies the network routing table
• Systeminfo. Dumps information regarding hardware, software, and hotfixes (very useful)
• Tasklist. From the console, will show you all tasks running on the system
• Tracert. Displays the path that your packets are taking to reach a destination
There are a number of lists on the Internet, but you can find the complete and authoritative list at www.microsoft.com/resources/documentation/windows/xp/all/proddocs/en-us/ntcmds.mspx?mfr=true.
A small number of vendors support NAC and remediation:
• www.symantec.com/Products/enterprise?c=prodinfo&refId=1303 Symantec Enterprise Protection, remediation, 802.1x and DHCP enforcement
• www.trustedcomputinggroup.org/specs/TNC Information on Trusted Network Connect
• www.funk.com/radius/enterprise/ea_radius.asp Juniper’s NAC client
• www.mcafee.com/us/enterprise/products/network_access_control/index.html McAfee’s Policy Enforcer
Key Points
Windows is complex. There are many ways to compromise (and through built-in functionality, hide the compromise). An example of this is the use of ADS to hide malware. However, if you start with a known good build, have a documented process for evaluating security settings, and use some third-party software, you can ensure that endpoints that connect to your network meet your minimum level of trust.
Start Fresh
It is best to start with a fresh, clean, secure build. When you can’t, tools such as port scanners and system scanners can tell you with a fair degree of confidence if and how your system has been compromised. In some rare instances, the system can be repaired and brought back online with a high degree of confidence that the system is secure and free of malware.
Rootkits
Rootkits are sophisticated and complex tools designed to evade detection and can be problematic with regard to their removal. No one tool is really going to be able to detect how a system has been compromised when a rootkit is installed by a true expert. External views generated by port scanners can be compared to internal views of processes to generate a “difference” value that might identify a rogue port or service. With this information, a security administrator can sleuth the system in an attempt to uncover and remove the infestation. However, this is time-consuming and in the final analysis may not be sufficient in restoring confidence in the system’s integrity. From an efficiency perspective, it is easier and faster to simply rebuild the system using a secure process.
The Security Arms Race
Although I used rootkits as the basic example, malware has a similar development cycle to the one that fires an arms race. The attackers devise new ways of subverting security and exploiting vulnerabilities as fast as defenders can add new layers and plug discovered holes. It is a constant cycle that, if treated as if it were a series of individual and unique events, will consume your time and energy in constant recovery activity. Simply identifying how a Windows endpoint was compromised and repairing it is no longer enough. You must have a process that incorporates new information into securing all of your endpoints.
Windows Can Be Secure
Although Windows is complex, documented methods, procedures, and tools enable you to build a secure endpoint. Security can be enforced to such a level that rogue applications aren’t allowed to run on the endpoint. But there is a warning. At this level of security, even Microsoft admits that the ease of use and the flexibility of the system have been sacrificed.
Windows security can be centrally managed through the tools provided by Microsoft. Group Policy allows the security administrator to craft and deploy security templates to the enterprise that enforce corporate security policies. This reduces the amount of administrative overhead associated with Windows security.
Process Is Critical
A large number of attributes must be set in a Windows endpoint to make it secure. For this reason, a process that evaluates security attributes and their effect on system usability and application reliability must be employed.
The Loop Can Be Closed
Although there are ways to secure Windows, there is no internal mechanism for “closing the loop” or ensuring that each time the endpoint connects to the network that it represents a minimum level of compliance with corporate security policy. However, through the use of NAC, CNAC, or NAP, a basic proportional control can be employed that ensures compliance and provides for remediation of noncompliant endpoints.