
SESSION INFORMATION
The recording sessions for a given project, e.g. an album, may span over days, weeks or even months. In some cases, a production team may switch between songs before their completion, which will require someone to keep track of what file, group of DAW regions or tape reel(s) to return to. Alongside this, equipment settings may be altered multiple times through the course of sessions, presenting engineers with the challenge of recalling gear parameters in order to carry on working on a given track. In order to allow for continuity during production, session notes, including recall and track sheets, etc. should be generated, allowing the team to work efficiently, saving time and avoiding costly mistakes.
RECALL SHEETS
Recall sheets are created during recording sessions so engineers can replicate certain conditions at later dates. Such documentation can be very simple, e.g. the microphone model and preamplifier gain in the case of a single transducer connected directly to an audio interface with a built-in ‘mic pre’, or more complex by including console and outboard gear parameters, etc. In cases where notes are very simple, the ‘comments’ window of a DAW application may be sufficient to store all the necessary information, with the extra benefit of no possible separation between notes and recorded material (not uncommon in the case of tape boxes and separate printed notes). Notes of greater complexity may alternatively be written on paper or be generated through the use of a computer, in the form of a text document or a dedicated software file, e.g. ‘Teaboy’, etc.
TRACK SHEETS AND SESSION NOTES
As a number of different recording ‘takes’ of a given song are completed or aborted it may become progressively more difficult for the production team to keep track of what has been committed to tape or to hard disk. It is therefore advisable for engineers to develop and use a system that describes the nature of the recorded material, conveying its quality and usability. Historically, written track sheets and session notes, kept inside analogue tape boxes (with their own set of affixed label notes), were utilised for such tasks and engineers were able to save a considerable amount of time in the studio by not having to audition tracks in order to determine their content and merit. Although the value of such documentation is inarguably greater in analogue tape based productions (with no waveform display, automatic time stamping, etc.), engineers can still benefit from having a thorough set of session notes or from simply applying the same data record-keeping principles to their DAW session files, e.g. through the sensible labelling of tracks and the consistent use of ‘comment’ fields. This can undoubtedly help expedite the subsequent editing and mixing stages of production and create a bond between professionals working in isolation, e.g. a good set of notes may lead a mixing engineer or producer to always want to work with a particular recordist.
Take Information
Session notes should incorporate key information describing the different takes recorded onto the multitrack device. Such information should include the song’s key, tempo (plus whether a ‘click’ was used) and any other performance-related observations that may help engineers at subsequent stages. Session notes should also indicate the completeness of takes, where the following shorthand system may be used:
• Complete + Best or (M) – A complete take chosen as the master
• Complete – A complete (but not necessarily the best) take
• I/C – An incomplete (unfinished) take that may be used for editing
• NFU (not for use) – A take considered unusable.
The following pages contain examples of studio input / output, recall and track sheets, and session notes.
Example of Input / Output Recall Sheet

Example of Track Sheet

Example of Console / Outboard Recall Sheet


LYRICS SHEETS
Lyrics sheets allow for the quick communication of vocal performance-related information during tracking and overdubbing, e.g. punching-in points, doubling requirements, etc. and may also be of value during the editing and mixing stages of production. Lyrics sheets should display all sung lines of a composition clearly, i.e. they should not omit or simply indicate repeats, and they may offer detailed information regarding performance, such as breathing points, difficult passages that require a warm-up, etc. The following is an example of a lyrics sheet:

The Scribble Strip
It is easy for engineers to lose track of what is feeding each of the channels (and possibly the monitor paths) of a mixing console when numerous sound sources are recorded simultaneously. In such circumstances, it is advisable for recordists to create ‘scribble strips’, following a labelling system based on instrument name abbreviations written on high-quality (non-residual) masking tape.
Scribble Strip Abbreviations
The following are a few suggested scribble strip abbreviations:
ABASS – Acoustic bass
AGTR – Acoustic guitar
ASAX – Alto saxophone
BD in – Bass drum (inside of shell)
BD out – Bass drum (outside of shell)
BSAX – Baritone saxophone
BSSN – Bassoon
BVs – Backing vocals
CLR – Clarinet
CNGS – Congas
EBASS – Electric bass
EGTR – Electric guitar
EPNO – Electric piano
FHRN or HRN – French horn
FLT – Flute
FT – Floor tom
GPNO (b) – Grand piano (bass)
GPNO (tr) – Grand piano (treble)
HH – Hi-hat
OH ft – Drums’ overhead (floor tom side)
OH hh – Drums’ overhead (high-hat side)
PERC – Percussion
RTB – Return talkback
SD bot or SD b – Snare drum (bottom)
SD top or SD t – Snare drum (top)
SHKR – Shaker
SSAX – Soprano saxophone
SYNTH – Synthesiser
TAMB – Tambourine
TMPN – Timpani
TRMB – Trombone
TPT – Trumpet
TSAX – Tenor saxophone
TT – Tom-Tom (possibly TIM, TAM and TOM if three toms are used).
UPNO (b) – Upright piano (bass)
UPNO (tr) – Upright piano (treble)
VCL – Violoncello
VLA – Viola
VLN – Violin
VOX – Main vocals
NB Instruments with short names such as the tuba, oboe, etc. do not require the use of an abbreviation.

THE PRODUCTION PROGRESSION CHART
It is crucial for producers to have a clear vision of their progress through the recording stage of a project. This can be particularly challenging during sessions that span over extended lengths of time and that require multiple overdubs. In such conditions it is common for production teams to utilise some form of visual tool outlining what has been accomplished and what is still needed for the completion of a project.
The use of charts and other visual aid devices may help the team focus and work towards a given deadline from the beginning of a production (and not only when the end is imminent). The following are two possible approaches to devising a ‘progression chart’. The first one provides a more global view while the second is song specific. Both approaches share the following principles:
• Empty boxes are filled as material is recorded, auditioned and approved.
• A solid grey box indicates that a particular instrument will not be used in a song.
• A letter ‘G’ inside a box indicates that a part was recorded, although it will only be used as a ‘guide’, e.g. ‘scratch’ vocals.
• A diagonal line or a tick inside a box indicates that a part has been recorded, although more overdubs may be necessary or the part may require further assessment.
• A solid black box indicates that all the corresponding instrument parts for a given song have been recorded successfully / been approved.
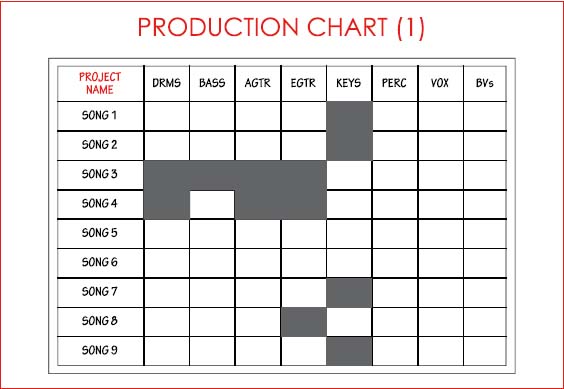

From the first chart, we can see that during pre-production the team decided that:
• Songs 1, 2, 7 and 9 would have no keyboard parts.
• Song 3 would feature keyboards, percussion and vocals (including BVs) only.
• Song 4 would be similar in instrumentation to Song 3, with an added bass part.
• Song 8 would not have an electric guitar part.
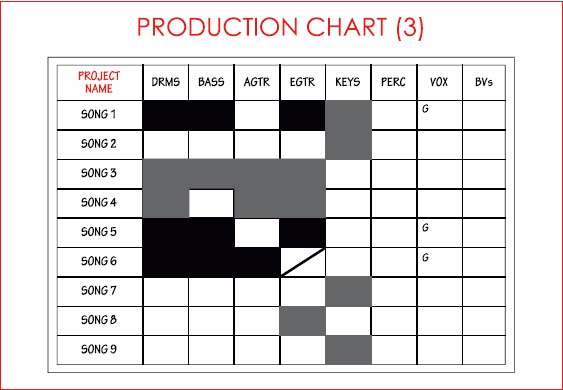
From the second chart we can gather that the during the first day of production, drums, bass, electric guitars and guide vocal parts were recorded for songs 1, 5 and 6 and an acoustic guitar part was captured for song 6.
From the third chart we can see that the team has finished and approved the drums and bass parts for songs 1, 5 and 6. The same applies to the electric guitar, although some extra parts need to be overdubbed onto song 6.
SONG-BASED PROGRESSION CHARTS
A recording team may choose to work with multiple song-based charts when tracking the progress of a production. Such charts should outline the instrumentation used in the different sections of a composition, providing the team with a more detailed view of what has been accomplished and what still needs to be done on a song-by-song basis. The following is an example of a song-based progression chart, which is being filled out as parts are recorded:


From the first chart we can gather that during pre-production for ‘Song 1’ the team decided that:
• The introduction should feature main vocals and acoustic guitar only.
• The drums, bass and electric guitar enter on verse 1.
• The percussion starts playing on verse 2.
• Electric piano and backing vocals parts are added from chorus 1.
• A saxophone plays from the bridge.
• The bass and the drums stop playing during the bridge and again at the outro.
From the second chart, which corresponds to the first day of recording, we can see that the drums, bass, and electric guitar parts were tracked successfully (plus a guide or ‘scratch’ vocal take) and from the third chart we can gather that during the second session electric guitar and piano parts were added to the production.
From the third chart we can gather that all the drum, bass and acoustic guitar parts recorded on day 1 were approved and Song 1 does not require any extra takes of the aforementioned instruments.
The team would subsequently continue to fill the chart until all part boxes were blackened out, which should mark the completion of recording for ‘Song 1’.
Progression Charts and the Deadline
The use of progression charts may be of great value in the case of productions that must be completed within a very limited amount of time. With the help of such simple visual tools, a recording team can work dynamically, reacting quickly to adversities. As an example, producers and artists may agree to create a simpler, more basic version of a song if time is running out and overdubbing is not possible. Such cases emphasise the importance of having a plan ‘B’ and being ready to sacrifice certain ideas in order to finish a production on time and within budget.
Backup and Delivery
It is important to adhere to a consistent system for the labelling and storage of files. As a recommended practice, recordists should try to keep their complete recording DAW session files backed-up and perform edits on a copy of the master. Upon completion of the editing stage another major backup should be performed and the mixing sessions should ideally run from a copy of the final ‘edited’ DAW session file.
Hard Drives
Due to the possibility of hard-drive failure, recordists should ideally back up their session materials onto at least two devices (creating a ‘main’ backup and a ‘safety’ copy). It is important to use (‘spin’) such hard-drives at regular intervals as this may help to avoid mechanical problems and loss of data.
With the development of more reliable solid-state drives, the creation of a ‘safety’ copy may seem unnecessary, although it is important to remember that all media have a given life span and files may become corrupt with the passing of time.
END OF RECORDING
The final day of a project’s recording stage is possibly the last moment when all the key players of a production are found together in one location. This date should be celebrated and memories, plans, etc. should be shared. With luck the production team will meet again, forging stronger relationships and generating new output.