
5 Using microphones
Objectives and problems in recording
It is obvious that any reproduced recording should aim to be either a replica of the original sound or, by means of mixing and editing techniques, a combination of original sounds (not necessarily natural ones) that achieves a particular artistic result. These, then, could be described as the general objectives. The problem is really how to achieve them. The correct use of microphones will go a long way towards realizing this aim, but what in practice is meant by ‘correct’?
Sensible positioning of the microphones is very important, for a start. Experience helps to bring good results quickly and trial-and-error may also be satisfactory – eventually! And while there are no hard and fast rules and no real short cuts, perhaps this chapter can help to point the reader in the right direction. A good way to start may be to highlight some of the more serious errors that can occur.
1. Overload distortion
Typically caused by excessive sound levels at the microphone, this is particularly objectionable as the sound waveform is ‘squared off’. It's important to realize, though, that it is rare for distortion of this type to occur at the microphone diaphragm. Almost invariably it happens at the first amplifier in the chain, which in the case of electrostatic microphones is the pre-amp.
Overload distortion is best avoided by checking on the quality of the recording, either by a playback of a test recording, and/or by keeping a careful watch on monitoring instruments in the recording equipment. (But be careful: not all monitoring meters are reliable in this respect. We explain this point in Chapter 6 when dealing with visual monitoring.)
There should be little risk of this kind of distortion if the microphone is no closer than about 20 cm from a person speaking. Musical instruments may need greater working distances, especially things like trumpets and almost all other brass instruments.
2. Breath and other wind effects on the diaphragm
These show up as a disturbing ‘blast’ effect on playback, sometimes more noticeable on ‘p’ and ‘b’ and similar ‘explosive’ sounds in speech. Microphones differ widely in their susceptibility to this effect – some can be used almost touching the mouth of a singer, others can be affected by a gentle breeze out of doors. One answer is to have a suitable windshield which may be supplied with the microphone as an accessory or may be integral with it. Discs of gauze mounted a few centimetres in front of the mouth are often used as windshields for vocalists.
An often acceptable ad hoc remedy is to wrap a few thicknesses of cloth, such as a clean handkerchief, round the diaphragm end of the microphone and hold this in place with a rubber band. It is worth noting that the apparent density of a makeshift windshield is not always an indication of its effectiveness. In general, the larger the windshield the better – a light spherical gauze shield of large diameter may be far more use than a closely wrapped cloth and it will probably have a less detrimental effect on the sound quality.
Whatever the windshield though, windy conditions out of doors should be avoided if at all possible. If recordings have to be made in circumstances such as these, then working in the downwind side of a building may solve or at least reduce the problem.
3. Rumble
This, if transmitted through floors or tables and travelling thence to the microphone stand, can be very distracting. There may be quite innocent causes – the gentle tapping of a possibly nervous foot against a table leg for instance, and it is quite possible for the offender to be unaware of this at the time. The effect will usually be shown up on loudspeaker or headphone monitoring and if possible the noise should be stopped at source. Failing that, a suitable support for the microphone stand can help, but it may be little use just putting a rubber sheet underneath the stand. Any pad should be thick enough and compliant enough for the microphone and stand to sink into it slightly, as explained in Chapter 3 under ‘Structure-borne sound’.
4. Excessive background noise
It is a curiosity of the hearing process that one is often unaware of extraneous noises until a recording is played back, when it is probably too late to do anything much about them. This is at least partly an aspect of the cocktail party effect mentioned in Chapter 2.
Obviously the best remedies are either to stop the noise or find another and quieter location. If neither is possible, then the use of a directional microphone, such as a cardioid with its ‘dead’ side pointing towards the noise source, can be tried, together with having the microphone as close as possible to the wanted sound, consistent with avoiding distortion and breath noises.
Note, however, that some background noise may be important in establishing the environment. For instance, a sound commentary for a videotape about an industrial process probably should have some of the relevant noise in the background, certainly if the presenter is apparently in that environment.
5. Too much reverberation
This is a very common failing. It arises from either having too long a reverberation time in the room and/or having the microphone too far away from the sound source – most often the latter. It is also typical of much camcorder work using the built-in microphone, especially when high magnification zooming is used: the picture suggests closeness to the action but the microphone is some distance away.
This is an appropriate place to go into the topic of sound perspective – the apparent distance of the sound source – in this case when it is listened to through loudspeakers. It depends on the ratio of the direct sound to the indirect sound. By ‘direct’ we mean the sound which travels directly to the microphone; the ‘indirect’ sound is that which travels to the microphone having undergone reflections from walls, floor, ceiling and other surfaces – in short, the reverberant sound.
Sound perspective – The apparent distance of a source of sound. It depends on the ratio of the sound which travels directly to the listener (the ‘direct sound’) compared with the reverberant, or ‘indirect’ sound. The greater the proportion of indirect sound the further away the source seems.
Briefly, it can be said that too much indirect sound gives speech, to take an example, an excessively distant effect. Usually the aim with recorded speech is to give the impression that the speaker is in the same room as the listeners. If this is not so there can be a sense almost of alienation and lack of any sort of contact with the speaker. This is particularly the case with sound-only recordings. With the medium of television, especially if the speaker is in vision, the brain uses visual information such as facial expressions, lip movements and other gestures to supplement the information reaching the ears. All this means that there can be a little latitude in sound perspectives when there are accompanying pictures. We emphasize the ‘little’ as large discrepancies between sound perspectives and visual perspectives can be severely distracting.
With any sound source the distance and type of microphone both have a big effect on the perspective. Taking distance first, it must be said that, if in an attempt to reduce the indirect sound, the microphone is brought close to a speaker, there can be attendant problems. For example, if a microphone is 30 cm away from a person's mouth then small (e.g. 5 cm) to-and-fro movements of the head will probably not affect too seriously the level of the sound signal. However, if the working distance is reduced to 10 cm, the same to-and-fro movements could cause most undesirable fluctuations in the signal.
Directional microphones can help to alter the apparent perspective. Compared with an omnidirectional microphone, the rejection of random indirect sound by a cardioid or figure-of-eight microphone is significant. A hypercardioid microphone can be even better.
With excessive reverberation then, it may be a matter of attempting some temporary reduction in reverberation time (see Chapter 3), having the microphone as close as possible to the speaker(s) and using one that is directional. A degree of equalization (see Chapter 8) can often reduce the worst effects of reverberation. Again, trial recordings and a carefully listened-to playback are essential.
It may be in order here to make a comment about playbacks. There is a very common, and perhaps natural, tendency for amateur performers, on hearing their spoken or musical efforts, to react with a mixture of embarrassment and delight. This is manifested by various symptoms, ranging from stunned silence to shrieks of laughter. Whatever the reaction, the sound recordist who is seeking to produce as good a result as possible must never allow these effects to interfere with his or her work. If necessary, playbacks used to assess the quality of the recording must be heard in the absence of any performers.
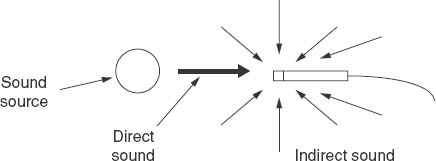
Figure 5.1 Direct and indirect sound
It is nevertheless often a good thing to let, for instance, amateur actors hear themselves at some point to help them eradicate mannerisms, maybe boost their confidence, or perhaps in some cases to make them realize that they aren't quite as good as they thought. A little practical psychology is often necessary!
6. Incorrect sound perspectives with more than one sound source
As an example, a discussion between two people should normally sound to the listener as if both are the same distance away. This means, if a single microphone is being used, that they are equal distances from it. This can be difficult if one has a much louder voice than the other. In practice, it may be possible to move the louder speaker a little further away from the microphone before he/she begins to sound too distant. Or, if a cardioid microphone is being used, the louder voice may be moved round to the side of the microphone. A better solution is to have more than one microphone, perhaps one for each speaker, so that each can be approximately the same distance from their microphone. The levels are then adjusted on the mixing unit.
The point should be made here that ‘correct perspectives’ in a recording does not necessarily mean that there should be the same perspective for all sources. The correct perspective in any situation is that which conveys to the listeners the illusion that the producers of the programme wish to achieve. To take an example, a small musical group such as a string quartet, or four ‘barber shop’ singers, would be expected to be set out on the platform so that each performer is roughly the same distance from the audience. In that case the sound perspectives should be about the same for each performer.
A large orchestra would have the strings closer to the audience than, say, the brass, woodwind or percussion. It would then be in order for the further instruments to sound more distant.
Note that rock music is not being mentioned, but only because there are fewer established conventions than is the case with classical music.
The basic question is, what would the listeners expect? If the recorded perspectives conform to that expectation, at least within reasonable limits, then all is well. If there are no particular expectations, then perhaps either perspectives do not matter or they can be whatever the producer/musicians want.
In drama, different sound perspectives can be vitally important in establishing the scene – a person who is supposed to have entered a room from a door in the far wall should sound much further away than people in the foreground, but intelligibility must not suffer in the process. Compromise is inevitable.
7. The balance is wrong
This means that the relative loudnesses of the various sources, as heard on playback, are inappropriate. It is quite impossible to lay down rules – it all depends on what effect the producer/recordist wishes to obtain. To give a few examples: the speakers in a round-table discussion should all sound more or less equally loud; a singer with a piano accompaniment should normally be a little louder than the piano, although much can depend on the music; the sections of a choir should usually be of comparable loudness, at least as far as the setting-up of the equipment goes – it will be the job of the conductor to vary the balance within the choir according to the music being sung.
When several performers are being recorded, conflicts between balance and perspectives are more difficult to resolve if only one or two microphones are being used. It may then be better to have a number of microphones and achieve the desired balance at the mixing stage.
Specific applications of microphones
As we have said, there are no hard and fast rules about the use of microphones. All too often a recordist has little or no choice in what microphones are available to him or her. Skilled recording frequently depends on the intelligent use of what comes to hand. Nevertheless, the following can be regarded as guidelines. While the list is short it covers sufficient examples for the principles to be easily adapted to other situations. The notes above, about errors to avoid, should be borne in mind.
At the moment it is assumed that the recording is in mono. What is set out below may need mental revision by the reader when the chapter on stereo has been read. In general, though, any modifications to these guidelines will be small when stereo is being used.
1. Interviews out of doors
A single omnidirectional microphone with a windshield and held by the interviewer ought to be sufficient. A good interviewer will hold the microphone so that it is roughly equidistant from both mouths but if necessary holding it closer to the weaker voice.
There should be no need to move the microphone to-and-fro depending on who is speaking unless they are widely separated or there is considerable background noise and it is necessary to pick up as little of the noise as possible. (It's often valuable to watch the techniques of television interviewers.)
Moving coil microphones are usually to be recommended – electrostatic microphones, as we have said, tend to suffer from humidity problems unless they are of the r.f. type mentioned in Chapter 4.
2. The solo presenter
We will take the case of the presenter who may be in front of a camera. A good solution is the small ‘tie-clip’ microphone. The best of these are costly, but relatively inexpensive ones may be perfectly adequate. An alternative is for the presenter to have a hand-held microphone. The latter may be inconvenient if he or she has to hold a clipboard for a script or notes. On the other hand, in front of a camera, a hand-held microphone might sometimes be the answer for a presenter who, like some amateur actors, does not know what to do with his or her hands!
3. Piano
This is a notoriously difficult instrument to record really well. Assuming pessimistically that the ultimate in quality is not going to be achieved anyway, the following notes may be helpful.
Microphones ought not to be too close to the piano. It is important that the microphone can ‘see’ the whole instrument, as otherwise the balance between different sections of the strings may be wrong. For a classical piano piece, the microphone can be relatively distant, so that there is some reverberation ‘surrounding’ the instrument in the recording. For a grand piano with the lid raised, one usually good position is 2 or 3 metres from the piano and in line with the treble end of the keyboard, so that the lid acts as a reflector towards the microphone. This assumes fairly good acoustics, though. In more popular music, microphones may have to be close to the piano to avoid picking up other instruments and then it may be necessary to have two or more microphones to cover each section of the strings.
Upright pianos vary considerably. Sometimes it can help to raise the lid, or remove a panel. Also, a lot of sound is radiated from the rear so that a good place for the microphone(s) may be behind the instrument (but not if the piano is close to a wall).
4. A fairly reliable general rule
While we have said that there are no hard and fast rules about microphone placing, there is nevertheless one very good general rule to adopt when ‘miking’ musical instruments – if an accurate recording of the true sound of that instrument is wanted.
It is to place the microphones so that they are looking in the direction that an audience would. In other words, the microphone takes the place of the audience, but for reasons mentioned earlier will almost invariably have to be much closer to the instrument.
Following this general rule, and to take one or two examples as illustrations, a clarinet is usually pointed downwards by the player. A microphone should not be directed into the bell of the clarinet but should be in front, ‘looking’ at the entire instrument.
On the other hand, trumpets and trombones are usually aimed at the audience and therefore microphones can look towards the bell (but not too close if a harsh ‘breathing’ quality is to be avoided).
The bell of a French horn points away from the audience, frequently towards a reflecting wall or other hard surface, and any microphone should preferably be looking towards the wall as seen by the audience. And so on.
5. Small singing group
Assuming reasonable acoustics, this is one case where an omnidirectional microphone can be used. The other assumption is that the group is internally balanced – that each member's voice is at the right strength compared with the others. If this is not the case then there are three options:
1. Use more than one microphone and adjust the balance on the mixer.
2. Have the quieter voices nearer the microphone.
3. The conductor or leader should try to get the loud singer(s) to sing more quietly. The latter is probably the best solution, but in practice may be the most difficult!
Much depends, of course, on whether the group is performing to an audience or just to the microphones. Almost always, musicians work better with an actual audience – there can be some kind of feedback which stimulates the performers into ‘giving of their best’. The same is true of actors. Only well-trained and experienced actors play really well to inanimate things like microphones!
6. Discussions
Much of what has been said above about small singing groups applies to discussion groups. However, it is likely that clarity and intelligibility are of prime importance in a discussion – the niceties of balance and perspective will probably be secondary. An omnidirectional microphone in the centre may be satisfactory if no speaker is too far from it, and/or the acoustics are relatively ‘dead’ (the RT is short).
A most important point to make here is that no microphone should ever be placed a short distance (5–10 cm, say) above a hard table top. The reason is that some sound waves travel directly to the diaphragm and others arrive after being reflected from the table. The latter will have travelled a greater distance and this can mean that some wavelengths will reinforce, others will cancel, resulting in a peculiar sound quality. Boundary microphones (see Chapter 4) avoid this problem.
7. Small musical group with singer (classical)
If the group is accustomed to public performances it may be necessary to do no more than place the microphone in front of them, the distance being determined by the size of the group, the polar diagram of the microphone and the acoustics of the hall. The exact position should be determined by listening critically to test recordings or by real-time monitoring.
The same technique should work adequately with a larger choir or orchestra.
8. Small musical group with singer (rock)
The main problem here is that most of the instruments will have amplifiers and be very loud, whereas rock singers are not noted for the loudness of their voices. The singer must then have a microphone of the type which can be held close to the mouth and amplified independently of the microphones in the band. Individual microphones for the instruments are likely to be needed, maybe in front of the instrument's loudspeaker. An alternative is to use direct injection (DI) boxes. These allow an electrical signal from each instrument to be routed directly to the mixer.
DI boxes can generally be hired if they are not otherwise available, but they should be selected with caution as poor electrical insulation in the instrument's amplifier can result in dangerous voltages reaching the mixer, or worse still, a performer.
Finally, in this chapter, a few important cautionary words.
First SAFETY.
Cables must always be laid out on floors where there is no chance of anyone tripping over them. At doorways they should be carried over the top if at all possible, or else they can be laid underneath mats or carpets. If they have to go on a bare floor with no covering, they should be securely taped to the floor with no loops that anyone can catch with a foot.
All other items of equipment – loudspeakers for instance – must be securely rigged so that there is no chance of their falling and hitting someone. Cables from microphones on a table or fixed to a microphone stand should be taped to the bottom of the stand, or the bottom of a table leg, so that the cable then lies as close to the floor as possible, again taped down if appropriate. All of this is important even if there is only a small group of performers. It is even more important when there is an audience.
It is a very good idea to check that there is adequate public liability insurance. It may not be your responsibility to deal with insurances but be prepared to ask the question.
Safety is such an important topic that much of what is set out here is repeated in Chapter 14.
Lastly, and this is nothing to do directly with safety, the sound operator must remember that he/she must do nothing to spoil an audience's enjoyment. To begin with, microphones and their cables should be as inconspicuous and tidy as possible. The public have come to see a performance and they don't want an exhibition of the operator's equipment. The ideal sound operator is transparent!
Questions
1. Which of the following microphone types may show the proximity effect (‘bass tip-up’) when a performer is close to the microphone?
a. Omnidirectional |
b. Cardioid |
c. Figure-of-eight |
d. Hypercardioid |
2. A generally good rule about placing microphones when high-quality pick-up of a musical instrument is required is:
a. |
Place the microphone above the instrument so that it is ‘looking down’ at it |
b. |
Place the microphone so that it is ‘looking’ in the same direction that an audience would do |
c. |
Have the microphone as close as possible to the instrument |
d. |
With brass instruments have the microphone ‘looking’ into the bell of the instrument |