
9 Controlling levels
We have earlier emphasized the necessity of not allowing programme (signal) levels to exceed certain limits, and we have shown that the right type of meter will indicate when maximum levels are being approached. What we have not done is to explain how to avoid undesirable excursions of the signal, either into the noise regions by being too low or into distortion by being too high. What is more, the process of keeping the signal within limits must be done with the listeners’ requirements in mind. In some cases, the prime need will be to maintain what we might term ‘artistry’ with the preservation of at least an illusion of a good range from loud to quiet, in others there may be a different requirement. Cassettes to be listened to in cars probably ought to avoid very quiet passages which would not be heard above wind and engine noise. (Equally, classical CDs with a wide dynamic range are often a waste of time in cars – unless the engine is abnormally quiet and there is almost no wind noise!)
In some professional circles, the term ‘control’ is used to mean the setting of the level – control of the signal voltage, if you like. We will use the same term here.
Broadly, there are two ways of controlling the level – it can be done manually or it can be achieved automatically. Both have advantages and disadvantages. We will take them in turn.
Manual control of levels
As it suggests, this means varying the level with a fader, and in those bare terms it sounds extremely easy. Sometimes it can be, but there are times when considerable skill is needed. It all depends on how much and in what way the programme signal is varying.
Take a straightforward recording of speech. A good speaker will maintain a reasonably constant loudness, changing enough to give interest to what is being said, but nevertheless keeping the level within a range of perhaps about 10 dB. (Remember that this could allow the loud parts to be about twice as loud as the quiet parts.) The fader could then be set so that the loudest parts of the speech are a little below the maximum permitted level as indicated on the meter. The quietest parts should then still be well above the noise levels. The reader might ask how to set about achieving this. At the rehearsal is the short answer. Even an experienced reader will probably be glad to have a chance to read through the script and, provided this is done aloud and in the way which will be used for the recording, it is an excellent chance to set the recording levels on the faders.
Alternatively, when the speaker and recordist have worked together before and know each other's methods, it may be sufficient to adopt the professional's time-honoured method and ask for ‘A few words for level, please’. A typical sentence may well be enough.
The less experienced or nervous speaker can be a problem. Here one must expect changes in level, caused not only by variations in voice production, but also by changes in distance from the microphone. A typical ‘working distance’, that is the distance from source – in this case the mouth – to the microphone diaphragm, could be 50 cm. The speaker might unconsciously move closer by only 15 cm, and then get further back, again by only 15 cm, so the working distance has varied from 35 to 65 cm. This alone would result in about a 5 dB change in level – and a movement of 15 cm towards the microphone isn't a vast amount. Leaning forward a little to look more carefully at a script could account for it!
Compensating for level changes of this sort by operating a fader when the person's movements are quite unpredictable is almost impossible. It's possible even to get totally out of step, so that the fader is brought up when the person is nearer the microphone! This might sound ridiculous, but it's not all that rare.
Even worse is the case of an animated discussion between two or more people. As they begin to forget the microphone(s) it is very easy for the members in a small discussion group to sit back in their chairs, lean forward to make a particular point, or turn away to address someone on the same side of the table. In different circumstances this might be termed ‘body language’. The sound recordist has other phrases!
Manual control here is again very difficult. Almost the only thing to do is to set the fader(s) to what one hopes will avoid overloads and then keep one's fingers crossed. Automatic level control, which we will deal with a little later, may be the answer.
It will be noted that the discussion group we have been using as an example is, by its very nature, impromptu and unscripted. Where there is a clear script things become much easier. In recording a play, for example, it should be possible to mark a script during a rehearsal or read-through to indicate quiet and loud parts. These can be anticipated and there can be judicious use of the fader to keep everything within limits – at least technically. To do so and at the same time preserve an artistically satisfactory effect calls for extra skill.
Music and drama both rely upon, amongst many other things, ‘dynamics’, which we can define as changes in loudness. These may sometimes be considerable but are very important in the performance. Music, especially classical music, played at the same loudness is very boring. An orchestra playing fff (molto fortissimo) may, at a distance of only a few metres, produce sound levels of well over 100 dB(A). A short time later the same orchestra may be at a pianissimo (very quiet) passage and producing no more than around 30 dB(A). This is a range of some 70 dB, and it could be much more. This is far beyond the capabilities of any analogue tape system. Yet, if the orchestra's sound level were evened out to a range of, shall we say 30 dB, the music would sound terribly uninteresting.
Dynamic range – the difference in dB between the loudest and quietest signal voltages.
This is where the skilled sound operator can make use of a particular characteristic of the human ear/brain system. We are much more aware of changes in loudness than we are of actual loudnesses in absolute terms. So, when a loud passage in the music is impending the fader can be taken down very slowly, over a minute or so if possible. Provided the drop in level is not too great, the listener will probably not be aware of this. Then comes the sudden loud passage, and if the preceding operation has been carried out correctly, the upper limit will not be exceeded. Similarly, if a quiet section is approaching, the level can be brought up gradually beforehand so that it is not lost in tape hiss.
Figure 9.1 shows the idea, albeit in a rather idealized situation. The point is that the changes in signal level – the dynamics – are largely maintained. If the time scale is long enough, then the slow changes brought about by the operator's use of the fader will probably go unnoticed.
This is a very skilled and tricky operation. It means that signal levels need to be marked in the score or script before the recording, so in the case of music it helps if you can follow a score. (Failing that, get someone who can follow a musical score to sit by you and mark the place.) And what does one do if, for example, a fortissimo passage is followed immediately by a pianissimo one? In this case, one or other has got to be wrong for a while and it is clearly better that the loud parts are undistorted even if the immediately following quiet music is initially too quiet. The fader can then be brought up slowly.
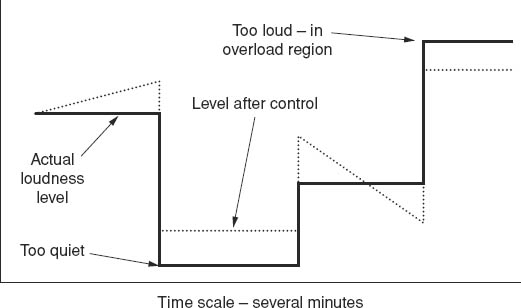
Figure 9.1 An idealized picture of manual control
A point to remember here is that musicians tend to play or sing louder at the actual performance than at a rehearsal.
If a public performance is being recorded then the sound operator has to take what comes and use his or her own skills in the way just indicated. If, though, the recording is being made at the request of the orchestra or drama group and any audience is secondary in importance, it may be possible to get the leader/conductor to co-operate by letting the musicians provide some of the loudness control.
Drama is generally somewhat easier as voices do not as a rule have the same range of dynamics as an orchestra. There still remains, however, the problem of sound effects! Sounds of a gunshot are fortissimo! A clock ticking is pianissimo! It may still, nevertheless, be possible to apply the same techniques as for music. Remember, though, it is the subjective effect which matters. Absolute fidelity is, as far as dynamics go, less important. One could say that if, for the listener, it seems to sound right, then it is right! For instance, a gun shot in a play mustn't, for reasons we have given, be anywhere near its real loudness. But if there is plenty of die-away of the sound, which is always assumed to be a characteristic of gun shots, and in a sound-only recording the dialogue prepares the listeners for a gun shot (‘My God! he's going to fire!’), then the effect can be reasonably impressive. In a television production, of course, we can see the gun being fired, although there are problems here because the noise of the gun may have had to be pre-recorded but played in sync with the action. (A very good application for Foldback!)
An important point here is that with digital recording, which we shall deal with later, the dynamic range of the system is much greater than with analogue recording, so much of what we have said about control may not apply. Nevertheless, if a digital recorder is used as a master but copies are going to be made on to cassettes, then control of the type we have outlined will still have to be used at some stage.
Having mentioned sound effects (and what follows applies pretty equally to sound alone or sound with pictures), it is worth making the point that these may not need to be maintained at a constant level, even though in real life they would be. Suppose a scene opens in what is clearly an urban environment with background traffic noise. It will generally be very important that the scene starts with the traffic noise loud enough to be easily identifiable. After a short while, maybe only a quarter of a minute or even less, and taking advantage of over-riding dialogue, the traffic effects can usually be taken down to a rather lower level so that they are audible but are not in any way obtrusive. It may be appropriate to bring the effects up if the dialogue suggests that this would be appropriate, and again possibly at the end of the scene.
Electronic level control
We have just shown that manual control of programme levels is often a difficult and skilled business. Properly done, though, it can be very effective. We will now deal with electronic control, which is generally far easier but if injudiciously used can have unfortunate results!
What we need is an electronic fader controlled by the incoming audio signal. There are devices which meet this requirement known as voltage controlled amplifiers, or VCAs for short. With VCAs the term ‘amplifying’ in the sense of increasing the signal voltage is irrelevant. In fact, the signal is being reduced most of the time. (So why call it an amplifier? The point is that the circuitry is essentially the same as in a level-increasing device.) And instead of the output level being controlled by a knob a control voltage is fed into the circuit. The simplified diagram in Figure 9.2 illustrates this.
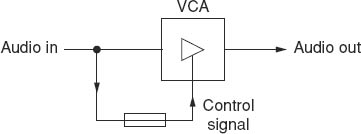
Figure 9.2 VCA controlling programme levels
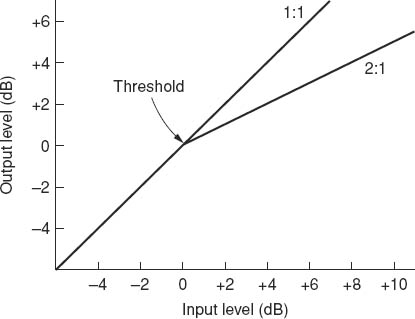
Figure 9.3 Threshold and compression
What is basically happening in the simplified diagram in Figure 9.2 is that the input level is continuously monitored by appropriate circuitry and the amplifier is adjusted to avoid over-high outputs which could cause distortion.
On professional equipment of this kind there is usually a distinction between ‘compression’ and ‘limiting’. In either case, the VCA has no effect on the output until a certain signal level is reached. This is called the threshold. Above the threshold, the output is allowed to rise but not as fast as the input rises. Figure 9.3 shows this for compression.
The straight line marked ‘1:1’ indicates that the output increases at the same rate as the input. The line labelled ‘2:1’ represents compression and here, for every 2 dB increase in the input the output increases by only 1 dB. 2:1 is then known as the compression ratio. Other compression ratios will be available on the professional equipment.
Limiting is simply extreme compression, with a ratio of perhaps 20:1 or even more. Figure 9.4 shows the action of a rather sophisticated device which embodies both compression and limiting.
All this is rather heady stuff and the equipment may not be available to the non-professional user. Nevertheless, camcorders with integral microphones as well as many cassette recorders embody a form of limiter. Interestingly, the cassette recorders with this facility are often in the lower price brackets, being machines with a built-in microphone and no way of controlling the record level. Here, some method of protection against overload is essential so that fairly basic limiters are incorporated. Some professional machines also have limiters, only here they are usually capable of being switched out. They may be called something like ‘ALC’, meaning of course ‘automatic level control’.
Threshold – The level at which compression or limiting starts to occur.
Compression ratio – Above the threshold, the number of decibels by which the input level increases for a 1 dB increase in the output level.
Limiting – An extreme degree of compression. The compression ratio will be 20:1 or more.
So far, automatic limiting seems to be an excellent idea. There is, as ever, a drawback. A further characteristic of all limiter/compressor systems is what is called recovery time, or decay time, and this needs some explanation as it is possible to ruin recordings if one is unaware of its existence. What it means is that, after the VCA has operated to reduce the level, time has to be allowed for it to return to normal (1:1). The question is, should this be instantaneous or should the recovery take a perceptible time, perhaps a few seconds? Let us take two imaginary but perfectly possible situations.
1. We are doing the sound for a videotape about the workings of a factory in which there is a drop forge. We want to record, using one microphone only, a commentary against some of the general factory noise which is not unacceptably loud except for the moments when the drop forge operates. Without any limiter the drop forge noise will be too high in level and consequently distorted, unless we have the recording level set so low that this does not happen, in which case the speech and general background will be too low.
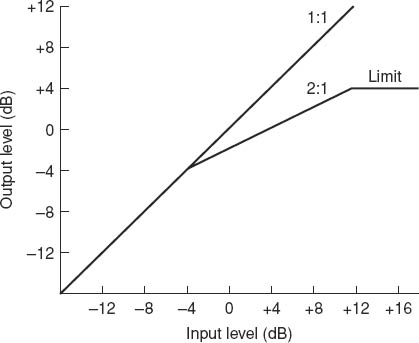
Figure 9.4 Limiting and compression
A limiter will prevent the drop forge distorting. If the recovery time is very short, then levels will return to normal almost immediately after each ‘drop’. If the recovery time is long, then levels will remain depressed after each drop, gradually returning to normal so that speech and background will be very low – possibly almost inaudible – for a few seconds. This is a peculiar effect and obviously to be avoided. For the drop forge factory, then, we would like a very short recovery time, perhaps a tenth of a second or less. (Even so the ‘hole’ in the background which the drop ‘punches out’ will almost certainly be audible but may not be disturbing.)
2. We wish to record a piece of music for which we have not had the chance of attending any proper rehearsal and we know that there will be some very loud passages. Again, we hope to get out of trouble using a limiter. A very short recovery time, which was satisfactory in the drop forge example, will now reduce the dynamic range of the music drastically. Loud passages will be brought down so that they may sound not very different in level from quiet sections. The result is a very boring item to listen to on playback.
If there is a long recovery time, say several seconds, the peaks will not be distorted and the slow change from limited to normal music will tend to preserve the loudness contrasts. The final result may not be ideal but neither might it be totally unacceptable.
What we are saying is that ideally there needs to be a choice of recovery times, and on professional equipment there is likely to be a switch allowing these to be selected from, say, 100 ms (one tenth of a second) to several seconds.
The small cassette machines with a built-in level control appear generally to have a long recovery time, sometimes as much as half a minute. The idea seems to be that it is probably going to be speech only that will be recorded and the limiter sets, as it were, the levels with the first few seconds of the speech.
It is quite easy to find out approximately what a particular machine's recovery time is. The probability these days is that it will be a camcorder that the reader is interested in rather than a very cheap mains-operated cassette recorder. All that is needed is to take the camcorder to a place where there is a reasonably steady low-level background noise. Traffic on a fairly busy road a few hundred metres away, or a running tap nearby, will do. A test recording lasting a minute or so should be made of normal speech which is then changed suddenly to a loud shout, perhaps from close to the camera. On playback, the background noise will be found to drop in level after the shout, coming back to normal gradually. One camcorder I tested in this way had a recovery time of about 5 or 6 seconds. This is useful information to have as it can warn against, for instance, continuing an in-vision commentary immediately after any very loud sounds. The presenter must wait a few seconds.
Advice: treat all ALC facilities with caution. They may be very helpful but don't expect perfect results from using them. On the other hand, there will be many circumstances when ALC is certainly going to be the lesser of two evils.
Recovery time – The time it takes for the signal level to return to normal after limiting or compressing.
Noise gates
These are often only found on the bigger and more expensive mixers, but are worth a mention nevertheless. We've been looking at ways of reducing the dynamic range, but there are also devices for doing the opposite – increasing the dynamic range. These things are called expanders and noise gates are examples. Figure 9.5 shows in graphical form what they do.
Suppose the input programme level (A) is reduced. At B, the output level falls by a selectable amount to C, after which it reduces at a ‘normal’ rate. What, you may ask, is the point of this? Well, suppose we're doing a recording in a studio where there is a little background noise – not too serious as it will be masked when there is normal speech or music, but could be audible in what should be ‘silent’ moments. (This can happen in television studios where there is inevitable sound from camera movements, ventilation and so on.)
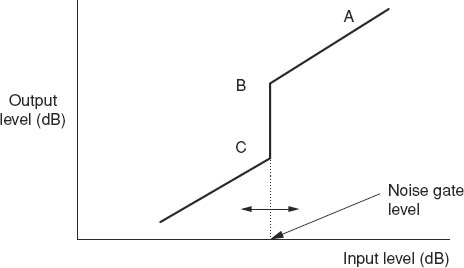
Figure 9.5 Action of a noise gate
If the noise gate level is set to be just above the background noise, then ordinary programme sound isn't affected, but when things should be silent the output level drops to below C and is thus very greatly reduced.
The danger is that if the noise gate is set too high then quiet programme sound also falls into the hole!
Questions
1. A limiter/compressor device is set to a compression ratio of 3:1. This means that
a. The input rises 3 dB for each 1 dB rise in the output below the threshold
b. The output rises 3 dB for each 1 dB rise in the input below the threshold
c. The input rises 3 dB for each 1 dB rise in the output above the threshold
d. The output rises 3 dB for each 1 dB rise in the input above the threshold
2. In a limiter the compression ratio is likely to be
a. 10:1 or more
b. 10:1 or less
c. 20:1 or more
d. 20:1 or less