
Chapter 3
Azure App Service
Overview
Azure App Service is a compute service within Azure that enables you to host web applications, mobile application back ends, and REST APIs. Some key features of Azure App Service include the following:
It provides DevOps integration capabilities to allow for continuous deployment of code using Azure DevOps, Docker Hub, GitHub, and other third-party solutions.
It allows for development in different programming languages like .NET Core, .NET, Node.js, PHP, Python, Java, and others.
It allows for both Windows- and Linux-based applications to run at scale.
Although App Service can help address the requirements of most app deployments, there are a few key points to consider when deciding it is the best service for hosting an app. Some primary reasons to use Azure App Service are as follows:
Automated management OS management activities, including patching and maintenance, are automated. This applies even to the language frameworks supported by the service. This frees development and engineering resources from the burden of managing the back-end platform so they can focus on more business-critical application-development activities.
Support for multiple frameworks In addition to the different programming languages that can be used by App Service, it can also leverage PowerShell scripts and other types of executables for background services.
Robust scaling Both manual and automated scaling operations are supported—including scaling up, down, in, and out. This can help organizations of all sizes embarking on their cloud journey obtain the maximum benefit from their cloud spends.
Global deployment App Service deployments are supported across Microsoft’s globally dispersed regions and datacenters. This allows for app hosting in regions closest to the users.
High availability and uptime guarantees In addition to workloads hosted on the free and shared tiers of services, App Service workloads are guaranteed a 99.95% uptime.
Optimized for DevOps builds Continuous integration and deployment can be achieved by leveraging App Service in conjunction with Azure DevOps, Azure Container Registry, GitHub, Bitbucket, and Docker Hub. This allows for multiple staging and dev/test environments that can be used for testing, validation, and production.
Support for PowerShell and CLI management Apps can be managed using Azure PowerShell, the command-line interface (CLI), or the Azure Portal to help in DevOps and automation activities.
Integration with Docker and containers Apps can be dockerized and hosted as custom containers in App Service. Both Windows- and Linux-based containers are supported. This enables engineers with skills in managing Docker to quickly get up to speed managing Azure App Service.
Adherence to global compliance standards Compliance with ISO, SOC, and PCI standards is built in.
Easy to integrate with existing authentication solutions Various secure authentication solutions can be easily leveraged, enabling users to employ existing Azure Active Directory, Microsoft, Google, Facebook, and Twitter accounts.
Built-in support for mobile apps Mobile app features such as user authentication, notification services, offline data sync, social integration, and automated scaling are all built-in, making it easy to build and deploy apps.
Ability to run code and scripts in a serverless architecture On-demand scripts and code snippets can be executed without deploying back-end servers using serverless computing. This saves time, resources, and money, as compute costs are charged only for actual use.
Connectors for enterprise, SaaS, and internet-based services App Service has ready connectors for integration with enterprise applications, SaaS applications, and internet-based services, making it easy to integrate with the most commonly used platforms and applications.
Hybrid connectivity Support for hybrid connections is available to allow access to on-premises data sources.
Built-in application templates There are numerous application templates available in the Azure Marketplace, including templates for WordPress, Drupal, and Umbraco, to name a few. The list of templates available is quite extensive and is being updated constantly.
Visual Studio and Visual Studio Code integration Deep integration with Visual Studio and Visual Studio Code allows for streamlined app building, deployment, and troubleshooting.
Support for Linux languages and frameworks Linux containers can be run natively or using custom containers (known as Web App for Containers). This allows for the use of built-in Linux images for languages such as .NET Core, Python, Node.js, JRE, PHP, and others. Custom containers help address scenarios not covered by the built-in images.
App Service plans
App Service plans identify the hardware computing resources made available to the App Service to run the required web, API, and mobile apps. Depending on what plan you select, computing resources are dedicated solely to your organization or shared among customers. The App Service plan also defines the specifications of the back-end VM series that is allocated. This, in turn, affects the number of applications that can be hosted using those resources.
When you create an App Service plan, you must define certain parameters for that plan. These include the following:
The pricing tier (Free, Shared, Dedicated, Isolated, etc.)
The region in which the apps will run (Central US, West Europe, East Asia, etc.)
The size of the VM instances required (small, medium, large)
The total number of VM instances required
Once the preceding parameters are defined, the resources identified in the plan are created in the selected region. Thereafter, the resources are made available for the hosting of the required apps.
Choosing the right pricing tier is key. Table 3-1 reviews the four pricing tiers.
Table 3-1 Pricing tiers
Pricing tier | Description | Key features |
|---|---|---|
Free | Allows you to host one or more web apps without having to pay any associated compute charges. | The underlying hardware is shared between customers. You can run only 10 apps. You can have 10 free plans per region. There are time limits on CPU usage. These make this pricing tier ideal for test/dev workloads, and web APIs generally run quickly. There are limits on memory, storage, bandwidth, scalability, and security features. Uptime SLAs do not apply. |
Shared | Similar to the Free tier in that the underlying hardware is shared, but offers more flexibility in terms of CPU usage and so on. | The underlying hardware is shared between customers. You can run 100 apps. You can have 10 plans within a single resource group. You can have unlimited shared plans per region. There are limits on memory, storage, bandwidth, scalability, and security features. However, CPU usage limits apply 240 minutes per day. A per-app charge applies. Uptime SLAs do not apply. |
Dedicated | Provides compute resources that are dedicated to that customer. There are different levels available in this plan—Basic, Standard, Premium, PremiumV2, and PremiumV3—and each defines the number of VM instances that the apps in the plan get access to. | A per-instance charge applies, regardless of the number of apps running. You can scale out by increasing the number of VM instances available. You can scale up by moving from one dedicated tier to a higher one to increase the size of the VM instances. This tier supports several additional features, including features that relate to backups, security, auto-scaling, and integration with traffic management. An uptime SLA of 99.95% applies. |
Isolated | Provides a dedicated set of VMs hosted in an Azure virtual network environment to support compute isolation. | Plans in this tier are deployed into an App Service Environment (ASE), described in more detail later in this chapter. Fixed charges to run the environment apply, as well as variable charges based on the number of instances. This tier provides maximum scale-out capabilities. Fine-grained control over ingress and egress application network traffic is supported. All security and scaling features are available for apps running on this tier. An uptime SLA of 99.95% applies. |
Azure App Service Environments
Earlier, I mentioned that the Isolated pricing tier deploys apps in an App Service Environments (ASE). An ASE is a dedicated, fully isolated environment provisioned to run apps with high levels of security and scalability. An ASE can host Windows or Linux web apps, mobile apps, function apps, and Docker containers.
Although all application workloads can be hosted in an ASE, considering the cost implications, there are certain workload types that are more appropriate for ASEs than others. When deciding if an ASE is the best choice for an app, consider these factors:
Does the app require complete isolation and secure access to on-premises resources?
Does the app have high memory requirements that are not met by the Dedicated tier?
Does the app require a very high level of scalability?
If the answer to all or most of these questions is yes, then an ASE might be the appropriate choice.
Here is a list of some examples of functionality that is only possible when using an ASE:
Hosting apps in a single-tenant environment
Using private or internal Certificate Authority certificates
Publishing a dedicated outbound IP address for all the apps hosted in the ASE
Publishing and accessing apps only on a private internal IP address
Providing the highest level of scaling possible across all App Service plans
Securing outbound network traffic with additional network controls available with integrations that are not part of the app
An ASE is assigned exclusive access to a dedicated set of compute and network resources and is accessible only from a single subscription. Each subscription supports the deployment of 100 App Service plan instances. These can be deployed in one of three ways:
A single App Service plan with 100 instances
100 App Service plans with single instances in each plan
A combination of the two
An ASE is composed of two components:
Front ends Front ends provide HTTP and HTTPS endpoints for ingress termination and load-balancing. Front ends are added automatically as scaling operations take place to handle the additional load.
Workers Workers host the apps deployed by a customer. You specify the size of the workers when you select your App Service plan tier.
Both components are managed services and are deployed or removed automatically as the App Service plans are sized. Because of this design, the charges associated with an ASE are fixed every month based on the plan that is selected. Additionally, every vCPU in the plan has an associated cost, which will be levied when resources are consumed.
There are two different ways to provision network access for an ASE, depending on its public access requirements:
External ASE An internet-facing ASE is deployed with a public IP address so the apps hosted on the ASE can be accessed externally.
Internal ASE An internal ASE is deployed using an internal load balancer (ILB) IP address so it is accessible only on internal networks. This would include any networks connected over VPN or ExpressRoute.
The public virtual IP (VIP) or the ILB IP serve as the endpoints for the termination of the different protocols for client connectivity. Because there is no direct access to the VMs running in the ASE, you can create network security groups (NSGs) to manage the network traffic within the subnet where the ASE is housed. If a site-to-site VPN or ExpressRoute connection to the on-premises environment is in place, the apps hosted in the ASE can communicate with on-premises resources.
App Service walkthrough
The following sections step you through the process of creating a basic web app using the Azure Portal, Azure PowerShell, and Azure CLI. You will use sample GitHub code provided by Microsoft to create a static HTML website, which you will use later to create a Hello World web app.
Using the Azure Portal
To create a sample static HTML website for the Hello World web app using the Azure Portal, follow these steps:
Log in to the Azure Portal and type app services in the search bar.
Under Services, click App Services. (See Figure 3-1.)
FIGURE 3-1 Selecting the App Services service in the Azure Portal.
Click either the Create button or the Create App Service button to launch the Create Web App wizard. (See Figure 3-2.)
FIGURE 3-2 Creating the first App Service.
In the Basics tab, enter the following information for the web app (see Figure 3-3):
Subscription Select the subscription that will host the web app.
Resource Group Select an existing resource group or create a new one to host the web app.
Name Enter a unique name for the web app. If the name you enter is already in use, the wizard will prompt you to select another name.
Publish Select the publishing model for the web app. Your options are Code and Docker Container. In this case, choose Code.
Runtime Stack Choose the runtime stack that corresponds to the app—here, .NET 5.
Operating System Choose an operating system for the app VM—in this case, Windows.
Region Select the Azure region you want to host the app.
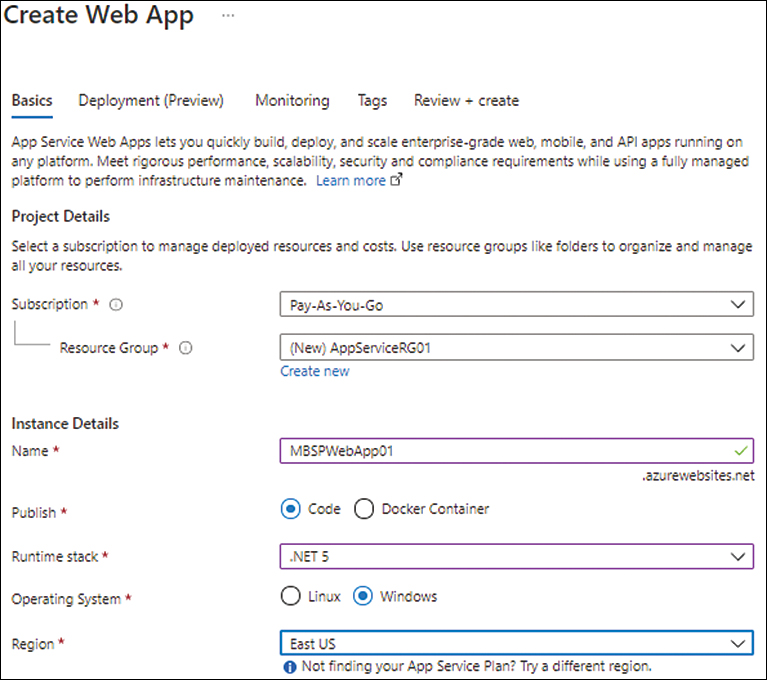
FIGURE 3-3 Setting up the basic configuration for the app.
Still in the Basics tab, under App Service Plan, select an existing App Service plan. Alternatively, to create a new plan, click Create New, type a name for the new plan, and click OK. (See Figure 3-4.)

FIGURE 3-4 Defining a new App Service plan.
In the Sku and Size section, click the Change Size link. (See Figure 3-5.)

FIGURE 3-5 Setting the SKU and size for the App Service plan.
In the Spec Picker window, choose an appropriate pricing tier based on your resource and feature requirements. In this case, click Dev / Test. Then choose the F1 plan (the Free pricing tier) and click Apply. (See Figure 3-6.)

FIGURE 3-6 Set the SKU and size.
Click Next twice. Then, in the Monitoring tab, next to Enable Application Insights, select the No option button and click Next. (See Figure 3-10.)
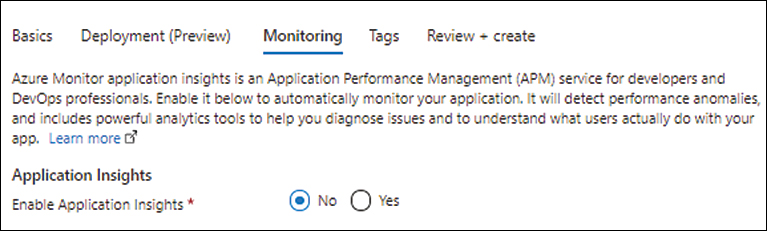
FIGURE 3-10 Choosing settings in the Monitoring tab.
In the Tags tab, enter any tags that you would like to apply to identify the resources for the App Service. For example, type ms-resource in the Name column and WebApp in the Value column. (See Figure 3-11.) Then click Next.

FIGURE 3-11 Setting up tags for the web app.
In the Review + Create tab, review your settings and click Create to create the web app. (See Figure 3-12.)

FIGURE 3-12 Reviewing the web app settings.
After the web app is created, click it. (In this example, it’s called MBSPWebApp01.) Then, in the Overview section of the web app’s page in the Azure Portal, copy the URL for the web app (located in the upper-right corner). (See Figure 3-13.)

FIGURE 3-13 Copying the web app URL.
Paste the URL in your web browser’s address bar to see the associated website. It will look like the one shown in Figure 3-14.

FIGURE 3-14 The default web app website.
Now you’ll build the web app.
In the Deployment section of the web app’s page in the Azure Portal, click Deployment Center.
In the Settings tab, click the Source drop-down list and select External Git. (See Figure 3-15.)

FIGURE 3-15 Setting the deployment source.
Under External Git, type https://github.com/Azure-Samples/html-docs-hello-world.git in the Repository box, type master in the Branch box, and select the Public option button next to Repository Type. (See Figure 3-16.)

FIGURE 3-16 Setting the External Git configuration.
Click Save to apply the changes. This will reload the code from the repository and restart the web app.
Verify the app details. (See Figure 3-17.)

FIGURE 3-17 The external Git configuration.
Click Browse to return to the website.
The website has changed, as shown in Figure 3-18, indicating that the Git repository was successfully cloned to build your web app.

FIGURE 3-18 Sample Azure App Service static HTML site.
Using Azure PowerShell
You can create a sample static HTML website for the Hello World web app with Azure PowerShell using the New-AzAppServicePlan and New-AzWebApp commands. The following code shows you how. (Note that you need to connect to the Azure subscription using PowerShell first.)
Note that you need to make the following replacements in the code:
Replace the app name with a unique name or add (
Get-Random) to the end of the name to randomize it.Replace the
Locationvariable with the desired Azure region.Replace the resource group name with an existing resource group or a different name (optional).
After the script successfully completes, browse to the web app URL to verify the application has been created successfully:
# Set the public GitHub repository URL, AppName and Location variables.
$githubrepo="https://github.com/Azure-Samples/html-docs-hello-world.git"
$appname="MBSPWebApp01"
$location="East US"
$resourcegroup="AppServiceRG01"
# Create a resource group to host the App Service.
New-AzResourceGroup -Name $resourcegroup -Location $location
# Create an App Service plan in Free tier.
New-AzAppServicePlan -Name $appname -Location $location -ResourceGroupName $resourcegroup -Tier Free
# Create a web app using the App Service Plan.
New-AzWebApp -Name $appname -Location $location -AppServicePlan $appname -ResourceGroupName $resourcegroup
# Configure GitHub deployment from your GitHub repo and deploy once.
$PropertiesObject = @{
    repoUrl = "$githubrepo";
    branch = "master";
    isManualIntegration = "true";
}
Set-AzResource -Properties $PropertiesObject -ResourceGroupName $resourcegroup
-ResourceType Microsoft.Web/sites/sourcecontrols -ResourceName $appname/web
-ApiVersion 2015-08-01 -Force
Using the Azure CLI
You can create a sample static HTML website for the Hello World web app with the Azure CLI using the az appservice plan create and az webapp create commands. The following code shows you how. (Note that you need to connect to the Azure subscription using the Azure CLI first.)
Note that you need to make the following replacements in the code:
Replace the app name with a unique name or add (
$RANDOM) to the end of the name to randomize it.Replace the
Locationvariable with the desired Azure region.Replace the resource group name with an existing resource group or a different name (optional).
After the script successfully completes, browse to the web app URL to verify the application has been created successfully:
#!/bin/bash
# Set the public GitHub repository URL, AppName and Location variables.
githubrepo=https://github.com/Azure-Samples/html-docs-hello-world.git
appname=MBSPWebApp01
location=EastUS
resourcegroup=AppServiceRG01
# Create a resource group to host the App Service.
az group create --location $location --name $resourcegroup
# Create an App Service plan in Free tier.
az appservice plan create --name $appname --resource-group $resourcegroup --sku FREE
# Create a web app using the App Service Plan.
az webapp create --name $appname --resource-group $resourcegroup --plan $appname
# Configure GitHub deployment from your GitHub repo and deploy once.
az webapp deployment source config --name $appname --resource-group $resourcegroup
--repo-url $githubrepo --branch master --manual-integration
Planning deployment and operations
There are three main components to take into consideration when planning a deployment to Azure App Service:
Deployment sources
Build pipelines
Deployment mechanisms
Each of these is used differently in every environment, as each environment has unique use cases and development needs. It is difficult to take a one-size-fits-all approach when planning a deployment, so it will serve you well to understand these three main components. First, though, let’s discuss appropriate deployment sources.
Select an appropriate deployment source
One of the first steps in the deployment process is to identify the location where the application code will reside during the development, test, and production phases. There are two main options for this:
A single centralized source for all phases This approach involves using a centralized source such as GitHub, Azure Repos, or Bitbucket, where all the code can reside for deployments as needed.
A hybrid approach This approach involves using a combination of sources: a centralized source for testing and production and a local source on the developer’s local storage for development.
The recommended approach for any enterprise environment is to identify a centralized source so that all the code repository structures can be built and maintained centrally, and code backups can be performed on a regular basis. For example, App Service has built-in integration with GitHub, which can be easily set up when the GitHub environment is online.
Deployment source walkthrough
The following sections step you through the process of setting up a different deployment source for the static web app you created earlier using the Azure Portal, Azure PowerShell, and Azure CLI. If you are following along, then make sure to adjust the web app name and variables as needed for each deployment.
Using the Azure Portal
To select a deployment source using the Azure Portal, follow these steps:
In the Azure Portal, select the web app you created earlier.
In the left pane, under Deployment, click Deployment Center.
In the Settings tab, click the Source drop-down list and choose GitHub. (See Figure 3-19.)

FIGURE 3-19 Selecting a new deployment source.
Click the Authorize button. (See Figure 3-20.)
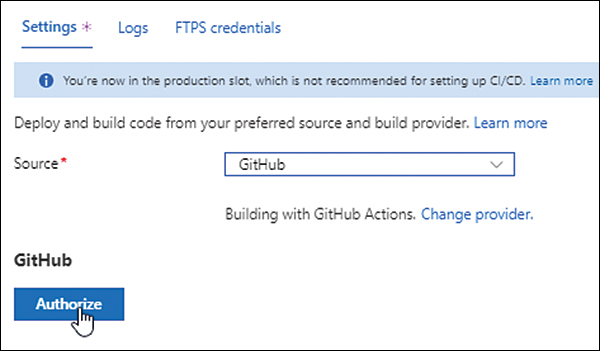
FIGURE 3-20 Authorizing the deployment source (in this case, GitHub).
In the Authorize Azure App Service dialog box, click the Authorize AzureAppService button. (See Figure 3-21.)
In the GitHub login window that opens, enter your login credentials to begin the integration process. This may take a few minutes. When the integration process is complete, you’ll see the options shown in Figure 3-22.
Open the Organization drop-down and choose the appropriate organization.
Open the GitHub Repository drop-down and choose the desired repository.
Open the Branch drop-down list and choose the branch you want to connect the app to.
Under Build, open the Runtime Stack drop-down list and choose the appropriate runtime stack based on your environment. Then open the Version drop-down list and select the appropriate version. (See Figure 3-23.) Finally, click Save.
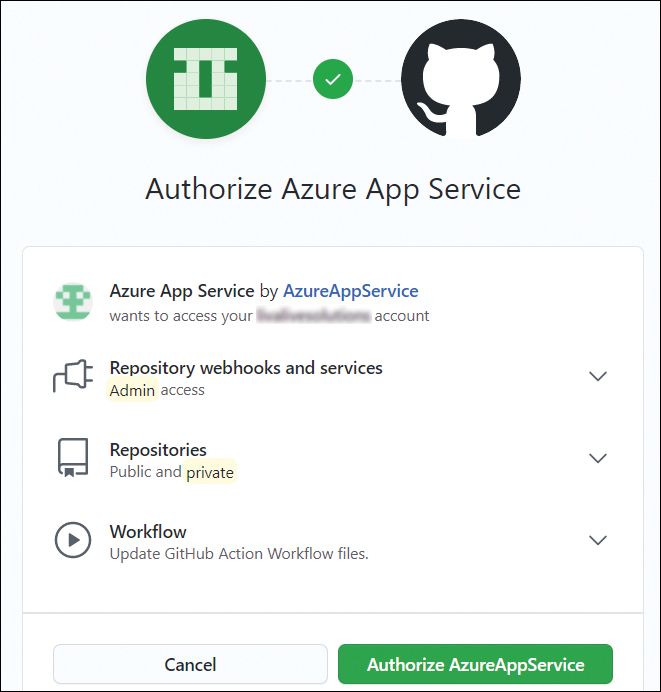
FIGURE 3-21 Authorizing the deployment source (GitHub).

FIGURE 3-22 Setting the organization, repository, and branch under GitHub.

FIGURE 3-23 Selecting the runtime stack and version.
Azure shows a summary of the configuration settings. (See Figure 3-24.)

FIGURE 3-24 Summary of the final config is shown.
Using Azure PowerShell
You can use Azure PowerShell to select a deployment source, as shown here. (Remember to adjust the value of each variable as needed for your environment.)
#Set the Webapp and GitHub variables
$githubrepository="{URL-of-required-GitHub-repo}"
$githubtoken="{GitHub-access-token}"
$webappname="{Name-Of-WebApp}"
$webapplocation="{WebApp-Azure-Region}"
# Setup GitHub token
$PropertyObject = @{token = $githubtoken;}
Set-AzResource -PropertyObject $PropertyObject -ResourceId /providers/Microsoft.Web/sourcecontrols/GitHub -ApiVersion 2015-08-01 -Force
# Configure GitHub deployment from the required GitHub repo
$PropertyObject = @{
    repoUrl = "$githubrepository";
    branch = "master";
}
# Set the Webapp with the GitHub configuration
Set-AzResource -PropertyObject $PropertyObject -ResourceGroupName {resource-group-name}
-ResourceType Microsoft.Web/sites/sourcecontrols -ResourceName $webappname/web
-ApiVersion 2015-08-01 -Force
Using the Azure CLI
You can use the Azure CLI to select a deployment source, as shown here. (Remember to adjust the value of each variable as needed for your environment.)
#Set the Webapp and GitHub variables
githubrepos={URL-Of-GitHub-Repository}
githubtoken={GitHub-Access-Token}
WebApp={WebAppName}
ResourceGroup={ResourceGroupName}
# Configure continuous deployment from GitHub.
az webapp deployment source config --name $WebApp --resource-group $ResourceGroup
--repo-url $githubrepos --branch master --git-token $githubtoken
Build pipelines
A build pipeline helps automate the process of compiling, testing, and packaging source code for deployment. The pipeline reads the source code data from the deployment source and performs a series of predefined steps to prepare it for deployment.
The programming language used for the app build will determine the commands employed during the build process. This process can be executed using Azure Pipelines, a third-party solution, or locally.
Deployment mechanism
After an application package has been built, it is deployed into the web app. This action is called the deployment mechanism. App Service supports multiple deployment mechanisms:
Kudu This open-source engine handles continuous deployments, provides HTTP endpoints, and manages all Git deployments in Azure App Service.
FTP You can use this protocol to upload files from a source website directly to the web app.
WebDeploy This client-server tool, designed by Microsoft, syncs application content and configuration to web apps.
After the selected deployment mechanism copies the code to the web app, every VM instance running the app receives a notification regarding the availability of the new files. Each instance syncs the new files from the shared location in the web app’s /wwwroot directory.
Best practices
Following are several best practices that relate to deployment.
Deployment slots
Deployment slots provide an easy way to deploy and manage code rollouts. A deployment slot creates a live App Service inside the App Service plan. You can use this to load code for testing; then, when testing is complete, you can swap the slot so the code moves to staging or production.
In the back end, the deployment slot is already live on worker instances, ready to receive connections. After the swap is performed, all settings applied to the staging or production slot will be applied to the code in the test slot (depending on which slot is selected). This makes it important to use App Service settings and connection strings to store all the required database and unique app settings required for staging or production. If this configuration is stored in the application code, the staging or production application will write to the test database instances.
It is highly recommended to use deployment slots when deploying new code to staging or production because it makes it easier to swap the previous version of the code in case of any issues. This can reduce downtime while also automating the entire DevOps pipeline workflow to build, test, and validate new code before rolling it out into production.
Deployment slots are not supported on the Free, Shared, or Basic tier plans; they are supported, however, on all plans from the Standard plan onward. For enterprise environments in which DevOps processes are in place, this would generally be the minimum plan selected. Each deployment slot has its own unique URL, which you can use to access the code in that slot for testing at no additional cost.
Along with the codebase is a group of settings that get swapped, as follows:
General application settings, such as the framework version, web sockets, and so on
Connection strings (you can configure these to remain with the slot)
App settings (you can configure these to remain with the slot)
Public certificates
WebJobs content
Handler mappings
There are also settings that are not transferred during a swap. You should take these into consideration and manage the code accordingly to ensure that the right settings are applied at the time of the swap. Following is a list of some of these settings:
Publishing endpoints
Custom domain names
Non-public certificates and TLS/SSL settings
Scale settings
WebJobs schedulers
IP restrictions
The Always On setting
Diagnostic settings
Deployment slots walkthrough
The following sections step you through the process of setting up deployment slots for your web app using the Azure Portal, Azure PowerShell, and the Azure CLI.
Using the Azure Portal
To set up deployment slots using the Azure Portal, follow these steps:
In the Azure Portal, display the page for the web app you created earlier.
In the left pane, under Deployment, click Deployment Slots. (See Figure 3-25.)

FIGURE 3-25 Setting up deployment slots.
If the web app is on the Free, Shared, or Basic tier, you will see the message shown in Figure 3-26. Click Upgrade to upgrade to a Standard or Premium plan. Then, in the Spec Picker window (see Figure 3-27), select a Standard or Premium plan that supports deployment slots, and click Apply.

FIGURE 3-26 Upgrading the App Service plan for slot support.
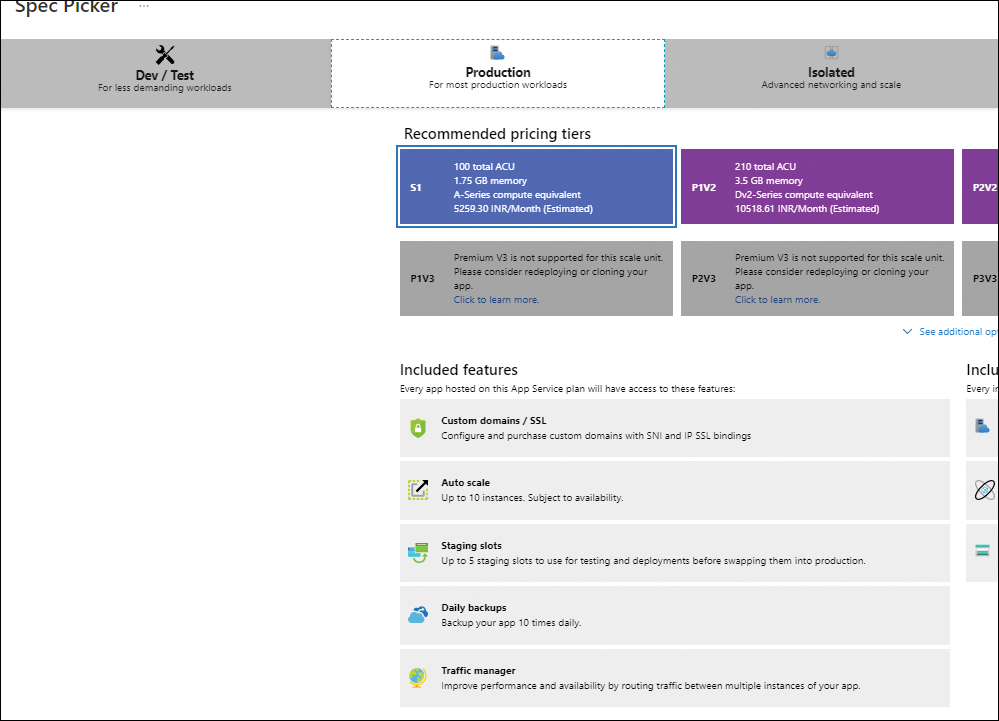
FIGURE 3-27 Selecting a Standard or Premium App Service Plan.
Click the Add Slot button to start the Add a Slot wizard. (See Figure 3-28.)
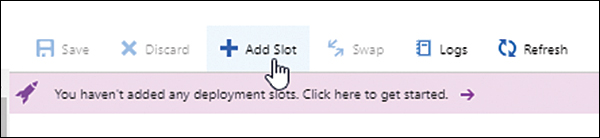
FIGURE 3-28 Adding a new slot.
In the Add a Slot wizard (see Figure 3-29), enter a unique name for the new slot in the Name box. Then open the Clone Settings From drop-down list and specify whether the settings for the slot should be cloned from an existing web app or slot, and if so, which one. Finally, click Add.
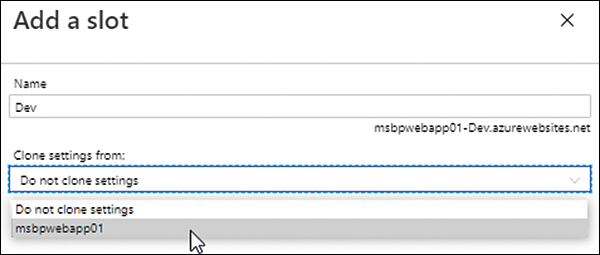
FIGURE 3-29 Selecting the new slot settings.
The new slot appears under the main production slot and any other existing slots for the web app. (See Figure 3-30.)

FIGURE 3-30 Multiple deployment slots.
Obtain the slot’s URL by clicking the slot’s name. The URL is displayed in the upper-right corner of the slot’s Overview tab. (See Figure 3-31.)

FIGURE 3-31 The new deployment slot’s URL.
Click the URL to load the default App Service website in your web browser rather than the custom HTML site you built earlier. (See Figure 3-32.)
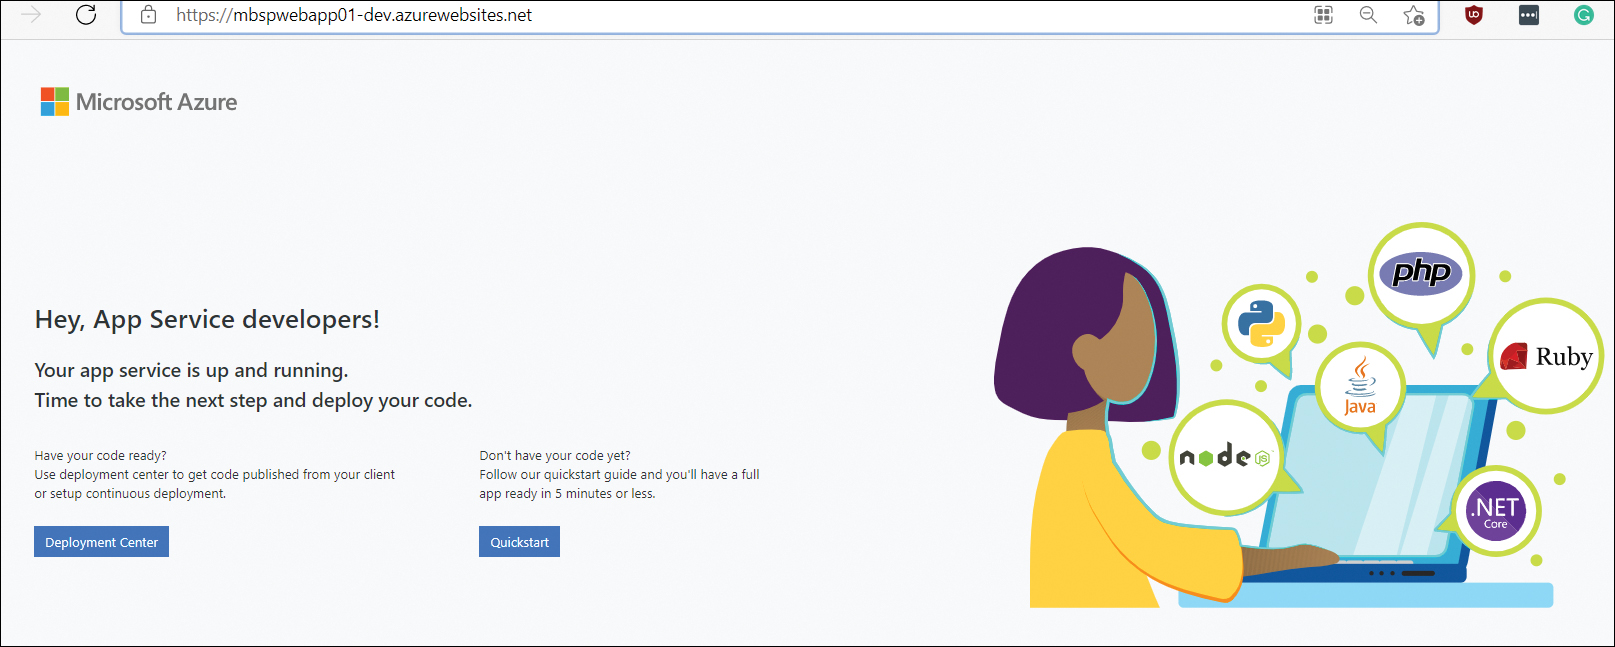
FIGURE 3-32 The website associated with the new deployment slot’s URL.
Click the Deployment Center button on the web page to open the slot’s Deployment Center page with the Settings tab displayed. Notice that the Source setting is blank. (See Figure 3-33.)
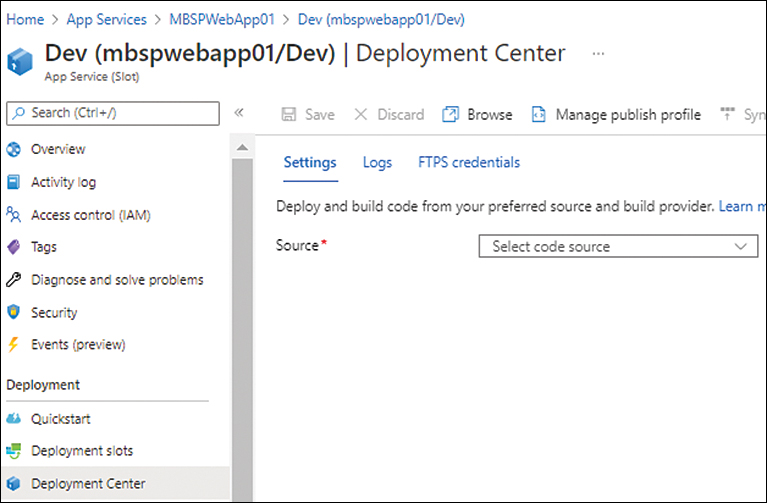
FIGURE 3-33 The slot’s Deployment Center page.
Open the Source drop-down list and choose the same GitHub account you used earlier, but with a different branch.
Using Azure PowerShell
You can create a deployment slot with Azure PowerShell by using the New-AzWebAppSlot command. The following code shows you how to perform this configuration for an existing web app:
$ResourceGroup = “AppServiceRG01”
$WebApp = “MBSPWebApp01”
New-AzWebAppSlot -ResourceGroupName $ResourceGroup -name $WebApp -slot dev
Using the Azure CLI
You can create a deployment slot with the Azure CLI using the az webapp deployment slot create command. The following Bash script shows you how to perform this configuration for an existing web app:
az webapp deployment slot create --name MBSPWebapp01 --resource-group AppServiceRG01
--slot Dev
Deploy code continuously only in staging or testing
You should set up the continuous deployment of code only for staging or testing slots. Setting up continuous deployment for production slots can result in code going live without proper controls.
You should also set up production branch integrations against a dummy slot in the App Service. After the code is deployed in the slot, performing a swap to make the code live is a better approach, as it provides more control over the deployment and allows easy rollback in case of issues.
Use Azure DevOps
Azure DevOps can help with the automated continuous deployment of containers to the App Service. Similarly, you can use the Deployment Center for the continuous delivery of containers to the App Service. After the integration is performed, new commits to the branch will result in the automated building, tagging, and deployment of the updated container.
GitHub Actions
GitHub Actions makes it easy to build, test, and deploy code directly from GitHub to App Service. You should employ GitHub Actions if you are using GitHub as a deployment source to help automate code deployments with proper controls and change tracking.
Multiple instances for production applications
For production applications, it is highly recommended that when you design and code the app, you keep in mind that multiple instances of the application will need to run simultaneously. This might require you to code the app to handle multiple VM instances running the app without sync issues when reading or writing data.
Running a production app with one VM instance creates a single point-of-failure. Instead, you should try to run the application with at least two or three instances, splitting your resource requirements across them, instead of one large instance. This will also help you when any upgrades are performed on the underlying VM instances, because the load will be redirected to the other available instances, preventing any downtime. Fortunately, you can easily achieve this by using the scale-out services provided by your App Service plan. (See Figure 3-34.) It is recommended that you set up automated scaling when handling increased resource or load requirements; setting up a minimum number of instances for the app up front can help mitigate a lot of basic issues.

FIGURE 3-34 Scaling for multiple instances.
Collocation
It is a good practice to host all interconnected workloads in the same region—in other words, to collocate them. This helps reduce the following:
Latency between workloads
Costs incurred due to data transfer between regions
Complexity in design and high-availability builds
Enable Always On
Always On is an App Service feature that ensures that VM instances are kept alive, even if there are no ingress requests or traffic to the VM instances for more than 20 minutes. This can help prevent the instance from going offline due to an idle timeout, thereby creating a cold-start situation that leads to delayed response times. Always On is disabled by default, but you easily enable it using the Azure Portal (see Figure 3-35), Azure PowerShell, or Azure CLI.
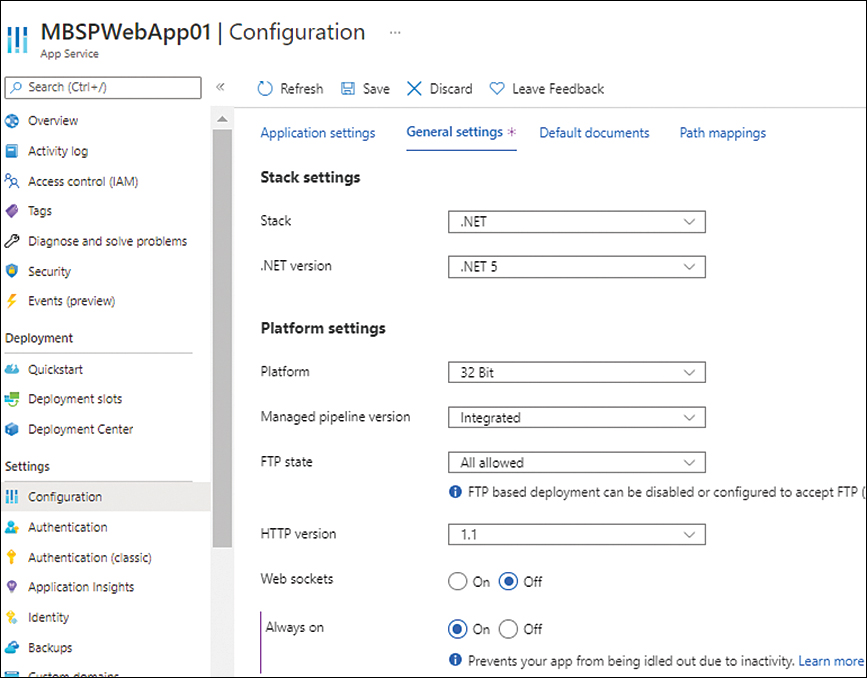
FIGURE 3-35 Enabling the Always On setting.
Disable ARR Affinity
When a client session is unexpectedly disconnected from an app, the general practice is to reconnect the user to the same app instance so the previous session can be continued. One way to do this is to enable the Application Request Routing (ARR) Affinity setting. However, when ARR Affinity is enabled, the app uses affinity cookies, which cause some VM instances to become overloaded with sessions and create load-balancing issues.
To avoid this scenario, it is recommended that you either build a stateless application or store the state information in a back-end service like a database or cache. Once that is in place, you can disable the ARR Affinity setting (see Figure 3-36), which should improve app performance.

FIGURE 3-36 Disabling ARR Affinity.
Production hardware for production apps
As discussed, there are various App Service tiers available for deployment, and each tier offers specific hardware SKUs to meet different requirements. If the App Service plan is being used for a production application deployment, it is advisable to select hardware in the Production tier. (See Figure 3-37.) This ensures that the hardware resources available to the application are consistent and can be scaled automatically as required.
Define Health Check parameters
App Service has a Health Check feature that monitors the health status of running instances and automatically removes unhealthy instances from the load balancer to avoid disruption in service. This feature is disabled by default; however, it is recommended that you enable it. After you do, define the path that the service should poll on a regular basis to identify unhealthy instances. Be sure the path you select is available on all instances and is critical for the functioning of the application. This will help determine the accurate status of the application. (See Figure 3-38.)

FIGURE 3-37 Selecting the production tier.

FIGURE 3-38 Configuring Health Check.
Application Initialization
Application Initialization is a great feature to warm up a new application instance before it is made available to users. You can query a single URL path or multiple URL paths in the application to warm them up or trigger a script to preload cache. If not set, it can result in application instances being put into service at the time of any restart or scale-out operation, without being ready to service clients.
In such cases, the recommended approach is to set App Initialization in the web.config file to define the different custom URL paths that need to be queried to confirm that the application is completely online before the instance is put into service. If multiple URL paths are defined, App Service will wait for all the paths to confirm their status (success or failure) before the instance is made live.
Auto-Heal
Auto-Heal is an App Service feature that enables you to trigger custom actions based on high memory usage, high CPU usage, and so on. The custom actions currently supported include the following:
Email alerts to admins or stakeholders
Automated worker process recycling
Memory dump collection for investigation
This is a great feature, and you can configure it using the web.config tool, the Azure Portal, Azure PowerShell, or the Azure CLI.
Auto-Heal walkthrough
The following section steps you through the process of setting up Auto-Heal using the Azure Portal.
Using the Azure Portal
To set up Auto-Heal using the Azure Portal, follow these steps:
In the left pane of the web app’s configuration page, click Diagnose and Solve Problems. Then, in the right pane, click Diagnostic Tools. (See Figure 3-39.)

FIGURE 3-39 Selecting the Diagnostic Tools option.
Click Auto-Heal. (See Figure 3-40.)

FIGURE 3-40 Selecting Auto-Heal.
Next to Custom Auto-Heal Rules Enabled, click On. Then define the desired conditions, actions, and override options based on your app requirements and click Save. (See Figure 3-41.)
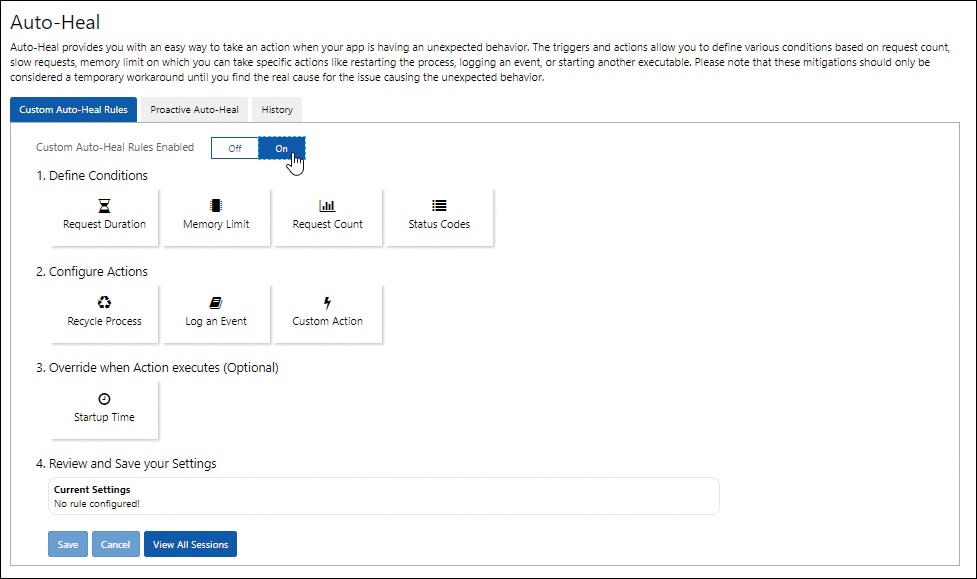
FIGURE 3-41 Enabling Auto-Heal.
Monitor disk space usage
The Azure Portal has an option to monitor App Service quotas, which you can use to monitor an app’s file system usage. For example, you might monitor this to ensure that the web folder has a minimum of 1 GB of free disk space for faster application restarts and scale-outs. (See Figure 3-42 and Figure 3-43.)

FIGURE 3-42 Quota check.

FIGURE 3-43 File system storage usage.
Enable Application Insights
Application Insights is an Azure Monitor feature to detect and analyze performance anomalies, debug code errors, and provide a better understanding of user behavior when using the app.
App Insights includes a feature called the Profiler. This feature enables you to capture the performance of the application and obtain detailed traces to identify hot code paths. (A hot code path is the one that take the longest to respond when handling a web request.) This can help you identify bottlenecks within an app and any dependencies. It also allows you to target development or troubleshooting efforts more appropriately.
Configure monitoring and alerts
Set up monitoring for important parameters and define alerts based on appropriate thresholds. These alerts can be defined on the App Service or the App Service Plan level. There are a few recommendations for monitoring and alerting that can be configured as follows:
Average Working Memory Set This helps identify the average amount of memory in MiBs used by the app. It’s recommended to set this value based on the expected average memory requirements so that any breach is alerted.
Average CPU Percentage This helps identify the average CPU used across all the app instances. It’s recommended to set this value high enough that alerts can help either scaling or remediation actions to be taken before any service interruptions.
HTTP Server Errors This helps to monitor specific HTTP status codes to identify errors or issues being encountered in web requests. It’s recommended to set the value to monitor and alert for high instances of HTTP status codes greater than or equal to 400 and less than 500.
Average Response Time This helps to monitor app responsiveness. If this value is too high, then it might indicate ongoing or imminent problems with the app. It’s recommended to set this value for alerting based on stress testing to identify appropriate thresholds for the hosted app.
Average Memory Percentage This helps to monitor the average memory used in all the instances of the app. It’s recommended to set this value high enough that alerts can help either scaling or remediation actions to be taken before any service interruptions.
Deploy in multiple regions
One of the best ways to achieve high availability and ensure disaster recovery for an app is to deploy it across multiple regions. Doing so can help ensure that any regional outage does not impact app availability. This will require various other considerations as we’ve covered in the Disaster Recovery section later in this chapter.
However, if possible, incorporate this into the application design at the earliest stage possible.
A multi-region design can also help in routing requests to the closest datacenter based on the user’s region. This can be achieved using Azure Front Door or Azure Traffic Manager to manage all the ingress traffic and route it appropriately. This can also help load-balance traffic between multiple geographies providing global load-balancing.
Plan new app deployments in existing plans
Generally, when a new workload is deployed, there is a temporary spike in resource requirements while the workload is completely online and servicing requests, at which point things stabilize and return to earlier levels until user traffic hits the new workload. If you are deploying a new workload using an existing App Service plan, you should check the CPU and memory usage to make sure there is enough spare capacity to handle this deployment spike.
If CPU or memory utilization reaches or exceeds 90%, you should bring additional VM instances online so the overall load goes down. Then you can deploy the new workload. After deployment, the App Service plan can be scaled down based on the new average resource requirements.
Scaling
Scaling is critical for applications using App Service. It can provide both performance benefits and cost savings—which can be maximized if the scaling occurs automatically.
You can achieve scaling (up or down) by changing your App Service plan tier. Be aware, however, that while a lower-tier plan will reduce your costs, it could have an impact on performance and feature availability. Therefore, it is important to identify which features you need in order to meet your application performance requirements and use this information when selecting your plan. For example:
Dev and test phase Use the Free tier so no compute charges are levied.
General testing/pre-production release Use the Shared tier to leverage additional features such as custom DNS and various resources.
Production release Use the Basic Dedicated tier to use SSL/TLS with more resources for scaling.
Scaling up or down by changing plans occurs almost immediately and requires no changes to the code or application configuration. All apps in the App Service plan are affected when scaling occurs; if you update to a higher-tier plan, each app in the plan will be able to use the new features that become available. Generally, scaling up provides access to features including (but not limited to) the following:
More CPU, memory, and disk space
Autoscaling
Custom domains and SSL/TLS certificates
Deployment slots
In contrast, scaling down by changing plans removes or reduces the feature set, depending on which plan you choose.
In addition to scaling up or down, you can also scale out or in. Scaling out increases the number of VM instances allocated to run your app(s). For example, in the Dedicated tier, with the Premium V2 and V3 plans, you can deploy 30 VM instances, whereas in the Isolated tier, you can scale out to 100 VM instances. Scaling in is the reverse of these scenarios; you might scale in to reduce costs or unused capacity.
All scaling operations can be performed manually or automatically—if your App Service plan tier supports this. Autoscaling is available only in the Standard and Premium plans on the Dedicated tier and the ASE hosted on the Isolated tier. You can perform automatic scaling based on schedules and/or metric-based rules that trigger the scaling operation.
Scaling walkthrough
The following sections step you through the process of setting up scaling for your web app using the Azure Portal, Azure PowerShell, and Azure CLI.
Using the Azure Portal
To set up scaling using the Azure Portal, follow these steps:
In the left pane of the web app’s configuration page, under Settings, click Scale Up (App Service Plan). Then, in the right pane, do one of the following:
Click the Manual Scale option button. Then, in the Manual Scale settings, drag the Instance Count slider to 2. (See Figure 3-44.)

FIGURE 3-44 Manual scale configuration.
If you require a more advanced or custom configuration, select the Custom Autoscale option button and specify when you want the custom autoscaling operation to be automatically performed. (See Figure 3-45.)

FIGURE 3-45 Custom autoscale configuration.
Using Azure PowerShell
You can set up scaling with Azure PowerShell when you use the New-AzAppServicePlan command to create the App Service plan and employ the -NumberofWorkers and -PerSiteScaling switches. The following code shows you how:
#Define the variables for your environment
$ResourceGroup = “{ResourceGroupName}”
$AppServicePlan = “{Name-Of-AppServicePlan}”
$Location = “{AzureRegionName}”
#Set scaling config during plan creation
New-AzAppServicePlan -ResourceGroupName $ResourceGroup -Name $AppServicePlan
-Location $Location -Tier Standard -WorkerSize Small -NumberofWorkers 3
-PerSiteScaling $true
Using the Azure CLI
You can set up scaling with the Azure CLI when you use the az appservice plan create command to create the App Service plan and employ the --per-site-scaling and --number-of-workers switches. The following Bash script shows you how:
#Set the web app variables
WebappName="AppService$random"
Location="EastUS"
ResourceGroup = “ResourceGroup01”
# Set scaling config during plan creation
az appservice plan create --name $WebAppName --resource-group $ResourceGroup
--location $Location --sku S1 --number-of-workers 3 --per-site-scaling
Migrate to Azure App Service
One of the key questions in any environment is how best to migrate an existing on-premises app to App Service. To aid with this, Azure provides a free service called App Service Migration Assistant. (See Figure 3-46.) You can use this service to quickly scan and assess an existing web app to determine if it is suitable for migration. If the Migration Assistant service determines that the app is suitable for migration, you can use it to migrate the app to App Service. It is highly recommended that you use this free service to speed up and streamline app migrations.

FIGURE 3-46 Azure App Service Migration Assistant.
Networking considerations
As discussed, you must consider numerous deployment and operational issues when deciding on the most appropriate strategy to set up a new App Service in Azure. Similarly, you need to consider various networking solutions. The following sections cover the different networking services that are supported for integration with Azure App Service and some best practices associated with each.
By default, App Service allows all hosted apps to be accessible over the public internet. Although that might be appropriate for a large number of customer-facing apps, numerous internal or protected applications require more granular control over inbound and outbound traffic. You can set up numerous Azure services and App Service features to provide the required level of protection. Each service can help in addressing the requirements in different ways; thus, it is important to understand how each one works to design the right strategy for App Service networking.
Service endpoints and private endpoints
Azure App Service offers two types of deployment scenarios:
Free, Shared, Basic, Standard, Premium, PremiumV2, and PremiumV3 pricing SKUs Apps are hosted on a multi-tenant infrastructure.
Isolated SKU App Service plan A single-tenant ASE hosts all the apps directly in the client’s Azure virtual network.
In a multi-tenant scenario, service endpoints enable you to define inbound traffic restrictions, allowing traffic only from a set of trusted subnets to connect to the web app. In this way, you can restrict traffic to only required resources such as VMs, other ASEs, or even other apps that use VNet Integration.
Private endpoints are available only in the PremiumV2 and PremiumV3 tier App Service plans. They allow apps hosted on the multi-tenant infrastructure to be securely connected to the customer’s virtual private network. So, all inbound traffic to the web app from the customer’s virtual network flows over a secure and private connection. (See Figure 3-47.)
Some key benefits of using a private endpoint include the following:
You can restrict inbound app access to resources in a specific virtual network.
Users and resources within the connected virtual network can access apps using an internal private IP.
You can use a web application firewall (WAF) used along with a private endpoint for enhanced protection.
Data leakage and data theft are difficult, as the app is accessible only on a protected network.
Some limitations when using private endpoints include the following:
A web app can support only 100 private endpoints.
Remote debugging is not supported.
FTP access to the web app is not allowed.

FIGURE 3-47 Private endpoint connections.
VNet integration
VNet integration helps multi-tenant apps access resources in other Azure VNet and interconnected networks. It provides outbound access from the app to the VNet and connected networks. This makes it possible for the app to access any resource located inside those networks.
This feature has two variations:
Regional integration This is when the integration is with a VNet within the same Azure region as the app. Regional integration requires a dedicated subnet in the VNet for integration.
Gateway-required integration This is when the integration is with a VNet in another Azure region or with a classic VNet in the same region. Here, an Azure virtual network gateway is provisioned in the destination VNet for the integration.
Regional VNet integration
As mentioned, regional VNet integration is when the App Service is integrated with a VNet in the same Azure region as the app. This enables apps to access resources located within:
The same region as the app
Any VNet peered with the integrated VNet
Any networks connected via ExpressRoute to the integrated VNet
Service-endpoint secured services
Private endpoint resources
Some restrictions with regional VNet integration include the following:
The integration subnet must be unused and dedicated to only one App Service plan.
The integration subnet must be /28 or larger.
Classic VNet is not supported.
Only one regional VNet is supported per App Service plan.
Gateway-required VNet integration
Gateway-required VNet integration is useful when an app requires access to resources located in:
An Azure VNet in a region different from the app
An Azure classic virtual network in the same or different region
This requires an Azure Virtual Network gateway configured with an SSTP point-to-site VPN for the integration. Once integrated, the apps can get access to resources located within:
Any VNet peered with the integrated VNet
Any networks connected via VPN to the integrated VNet
Some restrictions with gateway-required VNet integration include the following:
No support for Azure ExpressRoute connections.
Only one VNet at a time can be connected.
An App Service Plan supports a maximum of five VNet integrations.
Traffic Manager and Azure Front Door
You can use Traffic Manager and Azure Front Door to control and distribute requests from web clients across App Service endpoints. These endpoints, which are geographically dispersed, are set to Active or Passive; based on the routing logic applied, traffic is redirected, taking into account the availability and load on the App Service endpoint.
Azure Traffic Manager is a global DNS-based load-balancing service that distributes traffic among back-end application nodes based on a load-balancing algorithm you select. It provides a public endpoint that diverts incoming client requests to the available application node hosted in Azure or in another external service.
Azure Front Door is great for application acceleration and global HTTP(S) load balancing. It provides more features than Traffic Manager and is highly recommended for use with App Service. It supports SSL offloading, Application layer processing, AnyCast routing, and content caching for faster performance and security against DDoS attacks.
Three primary routing algorithms overlap between Traffic Manager and Front Door:
Latency/performance The closest app is selected based on the lowest network latency to the back ends.
Priority Priority is given to the primary app defined in the configuration. Other locations hosting the same app are set up as backups so that traffic can be failed over if the primary is unavailable.
Weighted Traffic is distributed across a set of apps evenly or based on a weight assigned to each app.
In addition to these three, Traffic Manager provides one additional routing algorithm:
Performance Users are redirected to the closest app region based on their network latency to the app location.
Similarly, Azure Front Door provides one additional routing algorithm:
Geographic Users are redirected to apps that are closest to their geographic location.
Hybrid Connections
The Hybrid Connections feature helps connect an app to on-premises resources over a secure port. It does this by setting up a relay agent, called Hybrid Connection Manager (HCM), that requires access to both the on-premises endpoint and App Service over port 443. Once the relay agent is operational, the app hosted in Azure can access resources on any TCP-enabled host endpoint on any port or application protocol. The connection is secured using TLS 1.2; in addition, shared access signature (SAS) keys authenticate and authorize resource access.
Some of the main benefits of using Hybrid Connections are as follows:
Secure access to on-premises resources over private or public networks.
Service-based provisioning, making it fast to set up and configure.
Works on port 443, making it easier to handle across most firewalls.
Multiple networks can be accessed using the same relay agent.
No dependency on application protocol, language, or port requirements, as long as TCP support is available.
However, Hybrid Connections has a few limitations:
It only supports TCP. It does not support the UDP protocol.
It cannot be used to mount network-enabled drives remotely to the app.
It uses dynamic port mapping for app access.
Network security groups
You can use network security groups (NSGs) to block both ingress and egress traffic to all resources in a VNet. For apps that use the regional VNet integration feature:
Egress traffic can be managed using NSGs.
Ingress traffic management requires the use of the Access Restrictions feature.
Route tables
Route tables help to set up custom routes required to enforce a specific routing configuration. You can use route tables to route outbound traffic as needed.
Azure DNS private zones
Once an app is integrated into a VNet, the DNS server configured for the VNet is applied to the app as well. If the VNet is set to use Azure DNS private zones, this would cause issues for the app, because by default, it does not support private DNS zones. However, you can enable this support configuring application settings to force all outbound traffic from the app via the VNet and require the use of the Azure DNS private zone.
Backup and restore
Azure App Service has a built-in backup and restore feature available for the Standard, Premium, and Isolated tiers. This feature allows you to create backups manually or on an automated schedule. Backups can be retained indefinitely, which is useful for organizations with long-term data-retention requirements.
The Azure App Service backup feature can currently back up the following:
File contents
The application configuration
Databases interconnected for use with the app, including Azure SQL Database, Azure Database for MySQL, and Azure Database for PostgreSQL
Some key features of this built-in backup service are as follows:
Each backup is triggered as a full backup rather than an incremental backup. This makes restore operations fast and reliable, as dependencies on earlier backups are reduced.
Restore operations can restore to the existing app or to a new app. This is useful in scenarios in which you need to create a new test or dev environment from a recent backup.
You can schedule backups using the Azure Portal, Azure PowerShell, or the Azure CLI.
It’s important to be aware of a few limitations when setting up the backup feature:
Backups are supported for a maximum of 10 GB of app and database content. In addition, backups of individual databases can have a maximum size of 4 GB. Backups exceeding this size will fail.
This feature is supported only for the Standard and Premium Dedicated tiers and the Isolated tier.
If VNet integration is in place, the backup and restore features cannot be used at the same time.
The Azure storage required to store the backups should be in the same subscription, and preferably the same region, as the App Service.
The firewall service for the storage account should not be configured or online.
Backups for in-app MySQL databases are automatic, without the need for any configuration steps. However, if manual configuration settings, such as connection strings, are put in place, automated backups will not work correctly.
TLS encryption for MySQL or PostgreSQL will cause backups to fail. If that is a requirement for the environment, consider a third-party backup solution.
Backup walkthrough
The following sections step you through the process of setting up backups for your web app using the Azure Portal, Azure PowerShell, and the Azure CLI.
Using the Azure Portal
To set up backups using the Azure Portal, follow these steps:
In the left pane of the web app’s configuration page, under Settings, click Backup. (See Figure 3-48.) By default, no backups are configured.

FIGURE 3-48 Backup configuration for web apps.
Under Backup, click the Backup Is Not Configured. Click Here to Configure Backup for Your App link. (See Figure 3-49.)

FIGURE 3-49 Backup is not configured.
In the Backup Configuration page, enter the following information (see Figure 3-50):
Backup Storage Click the container in which you want to store the backup.
Scheduled Backup Click On.
Backup Every Specify how frequently backups should occur, in days or hours.
Start Backup Schedule From Specify the date, time, and time zone when the backup schedule should start.
Retention (Days) Specify how long (in days) the backup should be retained.
Keep At Least One Backup Click Yes to ensure that at least one backup is always retained.

FIGURE 3-50 Configuring backup settings.
Using Azure PowerShell
You can set up backups for a web app with Azure PowerShell using the New-AzWebAppBackup command. This command triggers a one-time backup. To schedule a backup, you must use the Edit-AzWebAppBackupConfiguration command.
To trigger a one-time backup, use the following code:
#Set variables
$resourcegroup="AppServiceRG01"
$appname="mywebapp$(Get-Random -Minimum 100000 -Maximum 999999)"
$storageaccountname="backupsstorage"
$storagecontainer="backups"
$location="East US 2"
$backupname="BackupOnce"
# Generate an SAS token for the storage container, valid for one month.
$sastokenUrl = New-AzStorageContainerSASToken -Name $storagecontainer -Permission rwdl -Context $storageaccountname.Context -ExpiryTime (Get-Date).AddMonths(1) -FullUri
# Create a one-time backup
New-AzWebAppBackup -ResourceGroupName $resourcegroup -Name $appname -StorageAccountUrl
$sastokenUrl -BackupName $backupname
To schedule a backup, use the following code:
#Set variables
$resourcegroup="AppServiceRG01"
$appname="MSBPAPP01"
$storageaccountname="backupsstorage"
$storagecontainer="backups"
$location="East US 2"
# Generate an SAS token for the storage container, valid for 1 year.
$sastokenUrl = New-AzStorageContainerSASToken -Name $storagecontainer -Permission rwdl -Context $storageaccountname.Context -ExpiryTime (Get-Date).AddYears(1) -FullUri
# Schedule a backup every day, beginning in two hours, and retain for 30 days
Edit-AzWebAppBackupConfiguration -ResourceGroupName $resourcegroup -Name $appname
-StorageAccountUrl $sastokenUrl -FrequencyInterval 1 -FrequencyUnit Day
-KeepAtLeastOneBackup -StartTime (Get-Date).AddHours(2) -RetentionPeriodInDays 30
Using the Azure CLI
You can set up backups for a web app with the Azure CLI using the az webapp config backup create command. This command triggers a one-time backup. To schedule a backup, you must use the az webapp config backup update command.
To trigger a one-time backup, use the following code:
#!/bin/bash
#Set variables
resourcegroupname="AppServiceRG01"
appname=MSBP-APP01
storagename=backupsstorage
location="EastUS2"
backupcontainer="backups"
backupname="backuponce"
expirydate=$(date -I -d "$(date) + 2 months")
# Generates an SAS token for the storage container, valid for one month.
sastoken=$(az storage container generate-sas --account-name $storagename --name $backupcontainer --expiry $expirydate --permissions rwdl --output tsv)
# Construct the SAS URL for the container
sastokenurl=https://$storagename.blob.core.windows.net/$backupcontainer?$sastoken
# Create a one-time backup
az webapp config backup create --resource-group $resourcegroupname --webapp-name
$appname --backup-name $backupname --container-url $sastokenurl
To schedule a backup, use the following code:
#!/bin/bash
#Set variables
resourcegroupname="AppServiceRG01"
appname=MSBP-APP01
storagename=backupsstorage
location="EastUS2"
backupcontainer="appbackup"
expirydate=$(date -I -d "$(date) + 1 month")
# Generate an SAS token for the storage container, valid for one month.
sastoken=$(az storage container generate-sas --account-name $storagename --name $backupcontainer --expiry $expirydate --permissions rwdl --output tsv)
# Construct the SAS URL for the container
sastokenurl=https://$storagename.blob.core.windows.net/$backupcontainer?$sastoken
# Schedule a backup every day and retain for 10 days
az webapp config backup update --resource-group $resourcegroupname --webapp-name
$appname --container-url $sastokenurl --frequency 1d --retain-one true --retention 10
Disaster recovery
In the event of a region-wide failure of the Azure infrastructure, causing App Service and all hosted apps to go offline, you would need to bring App Service back online in another available region and restore your data within that new region. You can achieve this in multiple ways, including the following:
Multi-site architecture You can set up App Service in such a way that the same apps are published across multiple Azure regions and the database is replicated geographically. Moreover, you can set up any interdependent components in a multi-site design or set them up to work with high availability (HA). This type of design is also called an active-active datacenter design.
Standby site You can preconfigure the standby region with all required apps and interconnected services and replicate required data to that site. The standby site can then be brought online in the event of a disaster. This type of design is also called an active-passive with hot standby design.
Cold recovery A cold recovery is where a failover site is identified, and all required services and data are restored and brought online on that site after a disaster, either manually or automatically. This type of design is also called an active-passive with cold standby design.
There are numerous factors to consider when developing a disaster-recovery strategy, especially for cold-recovery scenarios. Be sure to consider the following points in your planning:
Identify all interconnected components within the App Service and decide on the best strategy to make them either region-independent or restorable in another region when required. These should include (but are not limited to) the following:
Deployment slot configurations
TLS/SSL certificates
Azure Key Vault configuration, including secrets, certificates, and managed identities
Integrations with load balancers, Azure Traffic Manager, WAFs, or Azure Firewall
Integrations using Hybrid Connections, site-to-site VPNs, or ExpressRoute
Integrations with third-party services that must be rebuilt
Refer to the product documentation or configuration of each service to validate data replication or availability in the desired failover region in the event of a disaster.
Identify and document the steps to restore each service (and the configuration required to reintegrate it, if needed), and the order in which each service should be restored.
Test the restoration procedure, if possible, on a regular basis.
Identify the testing parameters after restoration to validate a successful restore.
Regularly review procedures and processes in place to ensure any changes in the environment, in product features, or in Microsoft’s terms of service are taken into account in the event a restoration operation becomes necessary.
Cost considerations
It’s relatively easy to set up and scale up Azure App, but you can incur unwanted costs if you don’t plan and monitor it. To better gauge and manage your monthly spend, it is therefore important to understand the different elements in the App Service environment that are subject to charge.
The main resource charges are associated with compute resources for VM instances. These charges depend on the App Service plan tier and the number of VM instances deployed. The charges levied are based on the number of times the instances are online. It is highly recommended to monitor the usage of instances and identify areas where you can better manage it. This can help you significantly decrease your spending.
In addition to compute resources, Microsoft charges for some additional resources, including the following:
App Service domains
App Service certificates
IP-based certificate bindings
Storage for backup and diagnostic logging
A virtual network for the Isolated tier ASE
There are various ways to optimize costs associated with App Service and related workloads. Here are just a few:
Host multiple apps in a single plan One of the best ways to optimize costs is to collocate multiple apps within the same App Service plan. This will require you to analyze application and API loads to determine which apps to host together. On a related note, you can move apps to different App Service plans within the same region and resource group to optimize usage over time based on load analysis. You’ll want to consider this when deciding which plan to use to host your app.
Use the Free or Shared tier to host test and dev workloads Using the Free or Shared tier for dev and test workloads can help keep costs low during those stages. These tiers are also an excellent choice for most environments for hosting functions, scripts, and code snippets, depending on their runtime and SLA requirements.
Use the Standard tier or above to host production workloads Using the Standard tier or above to host production workloads ensures those workloads are covered by the App Service SLA. This is because the hardware available on these tiers provides much better performance than the hardware resources allocated to the Free and Shared tiers. The Standard and above tiers also offer better memory, storage, security, and scaling features.
Use autoscaling Be aware that the cost of running workloads on the Standard or higher tiers is much higher. Therefore, to optimize costs, you should use autoscaling to remove VM instances when they are inactive. Autoscaling is supported in the Standard Dedicated tiers and can be used both to scale out and to scale in, ensuring that only the compute resources required are online.
Reserve instances The Dedicated PremiumV3 and Isolated tiers enable you to reserve and pre-pay for instances at a discount for use later on. You can reserve between one and three years in advance; the longer the reservation period, the cheaper it is. If you know the minimum number of compute resources you will require for the next one to three years, it would be advisable to reserve them to obtain the significant cost benefit.
Set up budgets Setting up a budget can help stakeholders keep better track of their costs and (hopefully) eliminate overspending. You can set up alerts to notify application admins if spending does exceed your budget, enabling them to take immediate action to reduce the spend.
Monitor your spending Once your budget is in place, it is important to monitor your costs on a regular basis to identify unwanted spends and areas that might be ripe for optimization. Trend analysis of this data can also help in forecasting for future planning.
Analyze in PowerBI or Excel You can export the data you collect over time when monitoring costs to Microsoft PowerBI or Microsoft Excel to analyze historical trends across datasets. You can do this on a scheduled basis—daily, weekly, or monthly—making it possible to perform a long-term analysis.
Avoid post-deletion charges Even if you delete all the apps in an App Service plan, charges for that plan, and the number of VM instances deployed, will continue to apply. To avoid incurring these charges, you should delete the plan or scale it down to the Free tier. You can also remove other associated resources manually, such as the following:
Virtual networks created for the Isolated tier
The Key Vault used to store TLS/SSL certificates
Log Analytics workspaces for log ingestion and analysis
Backup and diagnostic logging storage accounts
Security recommendations
There are numerous security recommendations to consider when hosting apps on App Service. These are some of the most common ones:
Use the latest version if possible Make sure the platforms, frameworks, programming languages, and protocols used by your apps are up to date. This can significantly reduce the attack surface.
Turn off anonymous access Anonymous access is one of the leading causes of data theft. Unless there is a need to allow anonymous requests, it is recommended that you disable it completely. If you absolutely must allow anonymous requests, expose only the app elements that require anonymous access while securing all other APIs or access points.
Use the built-in authentication module Rather than using custom code, employ the built-in authentication module to handle all authentication and authorization requests. This helps reduce coding errors that might pose a security threat—not to mention saving you time and effort.
Protect access to back-end resources Make sure back-end resources are protected by using authentication. This authentication could call for either the user’s identity or their managed identity. Managed identity is an identity managed by the Azure platform itself. This makes it easy to maintain because it eliminates the need to rotate secrets manually.
Map custom domains and use certificates It is a good practice to map custom domains for apps. This makes it easier for end-users to access the app. App Service supports several types of certificates, based on security needs:
Free App Service Managed certificate This is a free certificate issued by DigiCert, which is automatically renewed every six months. Be aware that this certificate has some limitations. For example, it does not allow exports, it is not supported with ASE, and it does not support wildcard certifications. In addition, it does not support client authentication and does not integrate with Traffic Manager. However, if these are acceptable, then it is a great option.
App Service certificate This is a certificate issued by GoDaddy. There are two types currently available: Standard and Wildcard. The certificate is stored in Azure Key vault and automatically renewed.
Third-party certificate This is a certificate procured from a trusted third-party certificate provider. These certificates can either be imported into Azure Key Vault and then imported into App Service or imported directly into App Service.
Private certificate This is a certificate created by the customer using an internal PKI infrastructure. This certificate is best for apps used for internal testing or for apps used by internal employees on managed devices. This certificate requires the certificate chain to be deployed on the device. The certificate can be imported into Azure Key Vault and then imported into App Service or imported directly into App Service.
Use certificates to limit access If you need to limit access to the application to specific clients, using a certificate for client authentication is highly recommended, as it blocks connections from clients missing the required certificate.
Use HTTPS instead of HTTP Although App Service allows both HTTP and HTTPS connections, it is highly recommended that all HTTP requests be redirected to HTTPS. This ensures that all connections are secured by default using the SSL/TLS certificate deployed for HTTPS. All authentication and client communication would take place on a secure channel, reducing traffic snooping.
Disable TLS 1.0 Industry standards such as PCI DSS have deemed TLS 1.0 as an unsecure protocol. It is highly recommended that you disable TLS 1.0, forcing all apps to use TLS 1.1 or, preferably, TLS 1.2. Figure 3-51 shows the settings to use HTTPS only and to disable TLS 1.0.

FIGURE 3-51 Setting HTTPS only and specifying the minimum TLS version.
Encrypt communication When integrating apps with other Azure services such as Azure Storage, Azure SQL Database, or other database services, all communication between the workloads remains within the Azure back end. However, that traffic is on shared network infrastructure within Azure. Therefore, it is highly recommended that you encrypt this traffic to ensure that all communication is secure at all times.
Secure FTP traffic Use the FTP protocol judiciously, only when required. In addition, use it only over SSL/TLS so that all communication is secure. In short, avoid using FTP unless absolutely necessary.
Use Key Vault or environment variables Use Azure Key Vault and managed identity for secure storage, access, and management of application secrets. This includes API tokens, database credentials, and private keys that are otherwise included in the application code. If you cannot use managed identities, then it is recommended that you use environment variables in app settings and connection strings to store these values. These are stored securely with encryption and are decrypted just before being passed on to the application’s process memory. The Azure platform manages the encryption keys and rotates them on a regular basis, making the system very difficult to breach.
Define IP restrictions (if necessary) Depending on your application access requirements, access to the app can be restricted for certain IP addresses or IP ranges only. This can help secure access especially for highly sensitive apps where the users accessing the application are known and access has to be limited to known networks only.
Define dynamic access restrictions For apps hosted on a Windows-based App Service, you can prevent external distributed denial of service (DDoS) attacks defining the following parameters to dynamically restrict access:
Deny IP address based on the number of concurrent requests.
Deny IP address based on the number of requests over a period of time.
Use the Isolated pricing tier for network isolation The Isolated tier is best used for apps that require all network infrastructure to be isolated and dedicated for use by a single organization only. If your organization has compliance or security needs that require such enforcement, use the Isolated tier.
Protect communications when accessing on-premises resources On-premises resources can be accessed using Hybrid Connections, via site-to-site VPNs, or by connecting the ASE directly to an on-premises environment. Each of these methods provides secure access to resources. Based on the network topology in place, select the best method for your environment, making sure all communication is directed over the selected channel only.
Use NSGs for ingress traffic Use NSGs to protect and manage ingress traffic and network access. Expose only the required endpoints and prevent access to others. Periodically review the NSG configuration to make sure no unwanted endpoints are exposed.
Leverage Azure Security Center You should use the Azure Security Center service to periodically carry out security assessments. You should also implement recommendations issued by Azure Security Center to plug security holes and employ its Integrated Threat Intelligence functionality to prevent traffic from known-malicious IP addresses.
Use Azure Policy Use Azure Policy to define and implement built-in policies for App Service, such as HTTPS enforcement, minimum allowed TLS version, and enforcement of a virtual network service endpoint.
Use Azure Activity Log to monitor changes After policy definitions are in place, you can use Azure Activity Log to monitor configuration changes to network resources, network settings, and any resources related to App Service.
Use Azure Monitor for centralized logging You can store Azure Activity and App Service Diagnostic Logs in Azure storage, Log Analytics, or event hubs. Azure Monitor then uses these to centrally monitor events and changes.
Encrypt source data at rest It is a recommended practice to encrypt application source data at rest. This means encrypting the data stored in Azure storage with platform- or customer-managed encryption keys and using Azure Key Vault to inject application secrets at runtime as part of the application settings.
Use WAF for inbound traffic Secure access to an internet-facing application using the WAF deployed in front of the app. Then use service endpoints and access restrictions on the WAF to secure ingress traffic. A WAF protects internet-facing applications from DDoS attacks, URI filtering, and SQL injection attacks.
Use Azure Firewall for outbound traffic Use the Azure Firewall service to centrally divert all outbound traffic. This allows the enforcement of traffic-management policies and captures and monitors logs for centralized analysis.