
4. Working with Text
What You’ll Do
Change Text Leading, Kerning, and Tracking
Align, Indent, and Space Paragraphs
Insert Special Text Characters
Add Page Numbers to Continued Text
Introduction
InDesign comes with two main type tools: Type and Type on a Path. The Type tool allows you to create a rectangle text frame where you can store text in your document, while the Type on a Path tool allows you to add text along the inner or outer edge of a path.
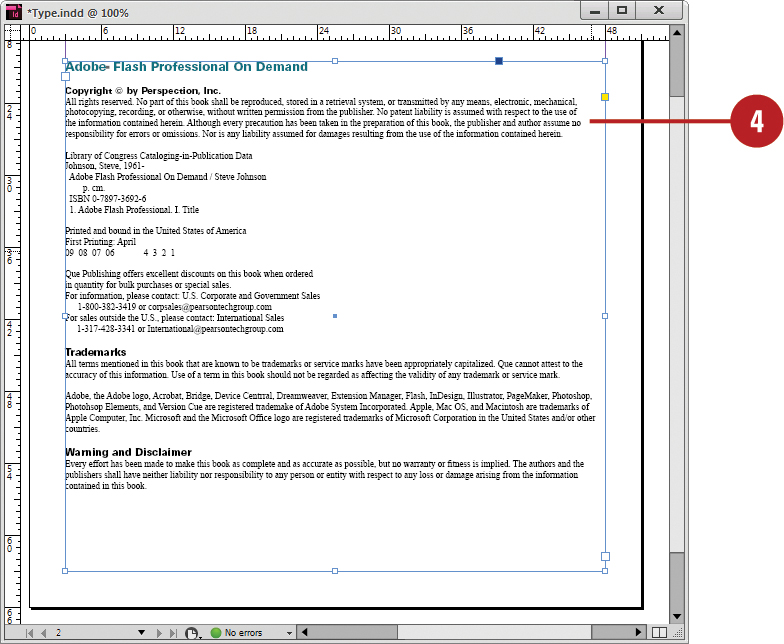
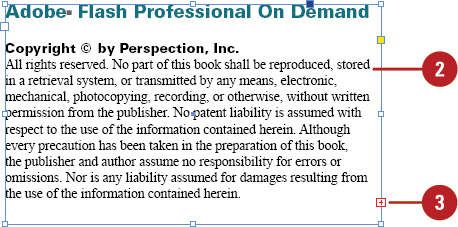
Before you can work with text in InDesign, you need to select it. You can select the entire text frame or the characters in the text frame. You can use the type tools to select only the characters in the text frame, not the text frame itself, or use the Selection and Direct Selection tools to select both characters and the text frame. If you type, paste, or import more text than a text frame can hold, an overflow symbol (a tiny red plus sign in a square) appears on the edge of the text frame. You can reshape the text frame to accommodate the extra text or create a thread (link) to another text frame. You can thread overflow text from one text frame to a new or existing text frame.
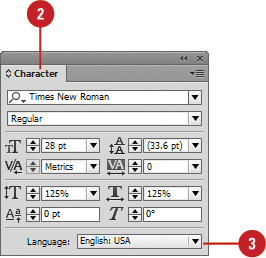
InDesign provides two panels to modify characters and paragraphs. With the Character panel, you can change the font family (for example, Arial or Times New Roman) and style (Italic, Bold, or Condensed), as well as change other text attributes, such as size, kerning, scale, tracking, leading, and language. With the Paragraphs panel, you can change text alignment, indenting, and before and after spacing.
When integrating artwork and graphics with your text, you can wrap the text in a text frame around another object, such as a graphic. Another type effect, Create Outlines, allows you to convert characters in a text frame into a separate object with a path.
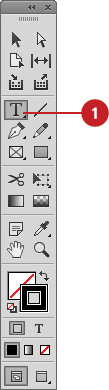
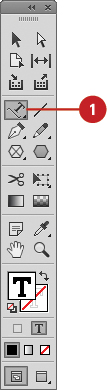
Using Type Tools
InDesign comes with two main type tools: Type and Type on a Path. The Type tool allows you to create a rectangle text frame where you can store text in your document, while the Type on a Path tool allows you to add text along the inner or outer edge of a path. In addition to the type tools, you can also use the Frame tools—Rectangle, Ellipse, and Polygon—to add text to your document. The default font is now the cross-platform Open Type version of Minion Pro Regular instead of Times (Mac) and Times New Roman (Win).
Use Type Tools
![]() Click the Type tool slot on the Tools panel.
Click the Type tool slot on the Tools panel.
♦ Click the arrow on the right of the Type tools menu to create a detachable panel.
![]() Click one of the following Type tools:
Click one of the following Type tools:
♦ Type. Creates a text frame box.
♦ Type on a Path. Creates text along the outer edge of an open or closed path.

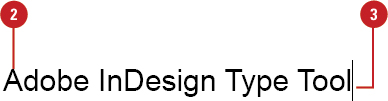
![]() For the Type tool, drag to draw a text box. For the Type on a Path tool, click on a path.
For the Type tool, drag to draw a text box. For the Type on a Path tool, click on a path.
![]() Type some text.
Type some text.
Did You Know?
You can make fonts available for a document. If you store any fonts in a Document Fonts folder in the same location as an InDesign document, the fonts in the folder are available in the opened InDesign document.
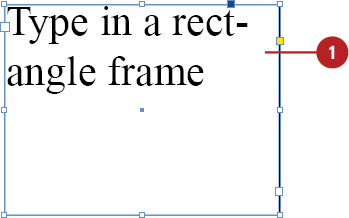
Creating Type in a Text Frame
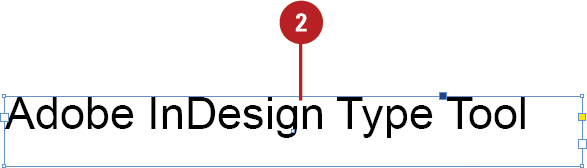
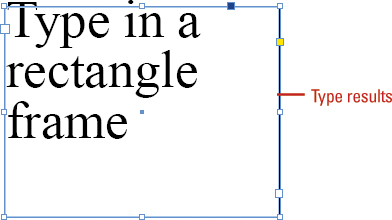
With the Type tool, you can create a rectangle text box any size that you want. Simply, select the Type tool on the Tools pane, drag to create a text frame and then start typing. When you type text in a text frame, it automatically wraps to the size of the frame. If you type more text than the frame can hold, an overflow symbol (a tiny red plus sign in a square) appears on the edge of the rectangle box. You can reshape the text frame object to display the text or create a thread (link) to another text frame.
Create Type in a Text Frame
![]() Select the Type tool on the Tools panel.
Select the Type tool on the Tools panel.
![]() Drag to create a rectangle text box the size that you want.
Drag to create a rectangle text box the size that you want.
A flashing insertion point appears in the text frame.
![]() Type some text. The text automatically wraps to the shape of the text frame. Press Enter (Win) or Return (Mac) if you want to start a new line.
Type some text. The text automatically wraps to the shape of the text frame. Press Enter (Win) or Return (Mac) if you want to start a new line.
♦ If the overflow symbol appears, deselect the text frame, select the Selection tool on the Tools panel, and then drag a corner to reshape the text frame.
For Your Information
Filling a Text Frame with Placeholder Text
If you don’t have any text at the moment to enter into a text frame, you can have InDesign insert placeholder text. Create an empty text frame, and then select it. Right-click (Win) or Control-click (Mac) the text frame, and then click Fill with Placeholder Text. On the Mac, if you want to specify a language, such as Cyrillic, Roman, Greek, Hebrew, Arabic, Japanese, Korean, and Chinese, hold down ![]() when you select the Fill with Placeholder Text command.
when you select the Fill with Placeholder Text command.
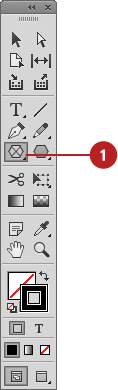
Creating Type Using Frame Tools
In addition to the Type tool, you can also use the Frame tools—Rectangle, Ellipse, and Polygon—to add text to your document. Instead of a rectangle shape for type, you can create irregular shapes to store text in your document. In addition to creating a polygon shape, you can also use the Polygon Frame tool to create a star shape for type. You can drag to create a frame box to the size that you want. If you need a frame box to be an exact size, you can click a blank area with the Rectangle and Ellipse tools or set width and height settings on the Control panel.
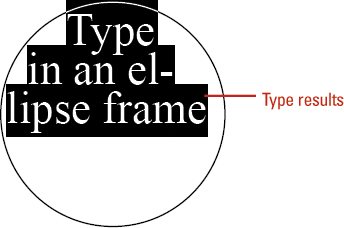
Create a Rectangle or Elliptical Frame for Type
![]() Select the Rectangle Frame or Ellipse Frame tool on the Tools panel.
Select the Rectangle Frame or Ellipse Frame tool on the Tools panel.
![]() Drag to create a rectangle or elliptical frame the size that you want.
Drag to create a rectangle or elliptical frame the size that you want.
♦ To create a frame to an exact size, click a blank area, specify the width and height you want, and then click OK.
![]() Select the Type tool on the Tools panel.
Select the Type tool on the Tools panel.

![]() Click in the frame, and then type some text. The text automatically wraps to the shape of the text frame. Press Enter (Win) or Return (Mac) if you want to start a new line.
Click in the frame, and then type some text. The text automatically wraps to the shape of the text frame. Press Enter (Win) or Return (Mac) if you want to start a new line.
♦ If the overflow symbol appears, deselect the text frame, select the Selection tool on the Tools panel, and then drag a corner to reshape the text frame.


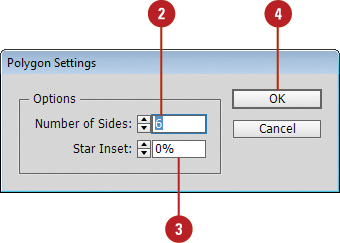
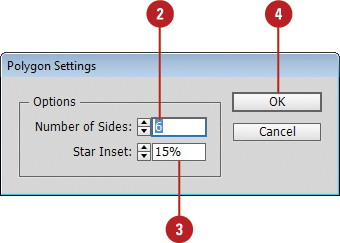
![]() Enter a Number of Sides value for the polygon.
Enter a Number of Sides value for the polygon.
![]() Leave the Star Inset value at 0% to create a polygon.
Leave the Star Inset value at 0% to create a polygon.
![]() Click OK.
Click OK.
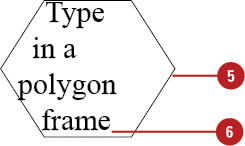
![]() Drag to create a polygon frame box the size that you want.
Drag to create a polygon frame box the size that you want.
♦ As you drag, press the Up or Down arrow keys to increase or decrease the number of sides.
![]() Click in the frame with the Type tool, and then type some text. The text automatically wraps to the shape of the text frame. Press Enter (Win) or Return (Mac) if you want to start a new line.
Click in the frame with the Type tool, and then type some text. The text automatically wraps to the shape of the text frame. Press Enter (Win) or Return (Mac) if you want to start a new line.
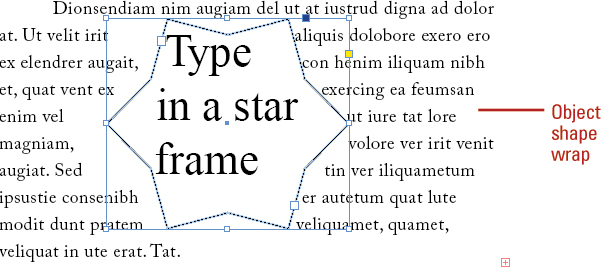
Create a Star Frame for Type
![]() Double-click the Polygon Frame tool on the Tools panel.
Double-click the Polygon Frame tool on the Tools panel.
![]() Enter a Number of Sides value for the star.
Enter a Number of Sides value for the star.
![]() Enter a Star Inset value. The higher the amount, the sharper the points.
Enter a Star Inset value. The higher the amount, the sharper the points.
![]() Click OK.
Click OK.
![]() Drag to create a star frame box the size that you want.
Drag to create a star frame box the size that you want.
♦ As you drag, press the Up or Down arrow keys to increase or decrease the number of sides.
![]() Click in the frame with the Type tool, and then type some text. The text automatically wraps to the shape of the text frame. Press Enter (Win) or Return (Mac) if you want to start a new line.
Click in the frame with the Type tool, and then type some text. The text automatically wraps to the shape of the text frame. Press Enter (Win) or Return (Mac) if you want to start a new line.

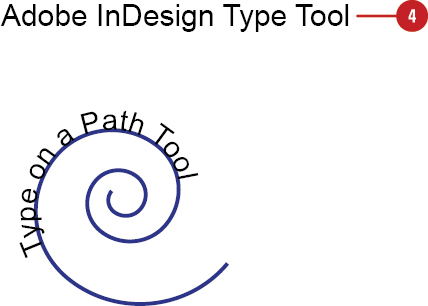
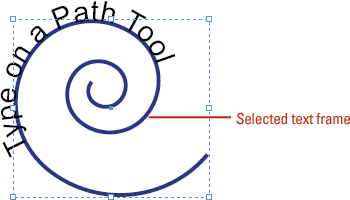
Creating Path Type
With the Type on a Path tool, you can add type along the inner or outer edge of a path. You can place the text on either side of the path, but not on both. If you initially place it on the inner part of the path, you can always move it to the outer part of the path later. When you select text on a path, brackets appear that you can drag to adjust the position and placement of the text.
Create Type on a Path
![]() Select the Type on a Path tool on the Tools panel.
Select the Type on a Path tool on the Tools panel.
![]() Click on the edge of the path (closed or open) to which you want to add type.
Click on the edge of the path (closed or open) to which you want to add type.
A flashing insertion point appears in the text frame. Any fill or stroke on the object is removed.
![]() Type some text. The text automatically wraps to the shape of the text frame. Don’t press Enter (Win) or Return (Mac).
Type some text. The text automatically wraps to the shape of the text frame. Don’t press Enter (Win) or Return (Mac).
The type appears along the edge of the object, conforms to its shape, and removes the fill and stroke.

♦ If the overflow symbol appears, deselect the text frame, select the Direct Selection tool on the Tools panel, and then drag a corner to reshape the text frame.
![]() Select a selection tool or select the type tool again.
Select a selection tool or select the type tool again.
Did You Know?
You can delete the text on a path. With a selection tool, select the text path frame, click the Type menu, point to Type On A Path, and then click Delete Type From Path.
![]() Click on the type.
Click on the type.
Center, left, and right brackets appear around the type.

![]() Drag the bracket (not the square) to adjust the position of the type on a path.
Drag the bracket (not the square) to adjust the position of the type on a path.
♦ Swap Sides. Drag the Center bracket to the other side to change the inner/outer position of the type along the path.
♦ Left. Drag to position the left side (or starting point) of the type along the path.
♦ Center. Drag left or right to position the type along the path.
♦ Right. Drag to position the right side (or ending point) of the type along the path.
If the overflow symbol appears, deselect the text frame, select the Direct Selection tool on the Tools panel, and then drag a corner to reshape the text frame.

![]() To change type on path options, click the Type menu, point to Type on a Path, and then click Options.
To change type on path options, click the Type menu, point to Type on a Path, and then click Options.
♦ Select the Preview check box to view your changes as you make them.
![]() Specify the options (Effect, Flip, Align, To Path, and Spacing) you want, and then click OK.
Specify the options (Effect, Flip, Align, To Path, and Spacing) you want, and then click OK.

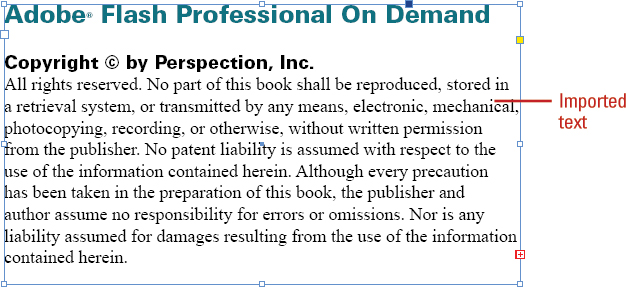
Importing Text
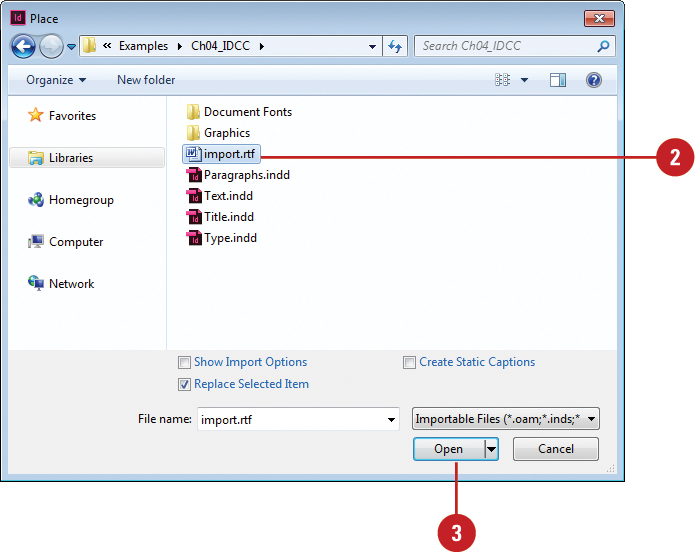
If you have text from another document that you want to use in your InDesign document, you can use the Place command to import it. You can import text from the following text formats: plain text (TXT), Rich Text Format (RTF), Microsoft Word (DOC or DOCX), or Microsoft Excel (XLS or XLSX). When you import text using the Place command on the File menu, InDesign allows you to place the text in a new text frame or an existing one.
Import Text
![]() Click the File menu, and then click Place.
Click the File menu, and then click Place.
![]() Click the Files of Type (Win) or Enable (Mac) list arrow, and then click Importable Files or select a text format:
Click the Files of Type (Win) or Enable (Mac) list arrow, and then click Importable Files or select a text format:
♦ Text Import. Plain text.
♦ Microsoft Word. Microsoft Word 2003 (DOC) or earlier.
♦ Microsoft Word 2007. Microsoft Word 2007 (DOCX) or later.
♦ RTF. Rich Text Format (RTF).
♦ Microsoft Excel. Microsoft Excel 2003 (XLS) or earlier.
♦ Microsoft Excel 2007. Microsoft Excel 2007 (XLSX) or later.
![]() Navigate to the location with the text file you want to import.
Navigate to the location with the text file you want to import.
![]() Select the text file you want to place.
Select the text file you want to place.
![]() Select the Replace Selected Item check box to replace the selected item with the imported text.
Select the Replace Selected Item check box to replace the selected item with the imported text.
![]() Click Open.
Click Open.
The imported text is placed in a loaded text cursor.

![]() Click or drag a text frame with the loaded text cursor to place the text where you want it in your document.
Click or drag a text frame with the loaded text cursor to place the text where you want it in your document.
![]() Click the Files of Type (Win) or Enable (Mac) list arrow, and then click Importable Files.
Click the Files of Type (Win) or Enable (Mac) list arrow, and then click Importable Files.
![]() Navigate to the location with the text file you want to import.
Navigate to the location with the text file you want to import.
![]() Select the text file you want to place.
Select the text file you want to place.
![]() Select the Show Import Options check box to select import options.
Select the Show Import Options check box to select import options.
![]() Click Open.
Click Open.

![]() Select the options you want. Options vary depending on the imported file format.
Select the options you want. Options vary depending on the imported file format.
![]() Click OK.
Click OK.
The imported text is placed in a loaded text cursor.

![]() Click or drag a text frame with the loaded text cursor to place the text where you want it in your document.
Click or drag a text frame with the loaded text cursor to place the text where you want it in your document.
Flowing Imported Text
When you import text into your document, InDesign imports the text into a loaded text cursor with a small text icon and the first part of the text. When the text is loaded, you have several options to place the text into your document. You can create a new text frame or add the text to an existing text frame in a document or master page. When the loaded text cursor displays straight lines, the text will be placed in a new text frame. When the loaded text cursor displays curved lines, the text will be placed in an existing text frame. After you import the text, you can reflow the text manually with the overflow symbol (a tiny red plus sign in a square), or automatically with keyboard options.
Import and Flow Text
![]() Click the File menu, and then click Place.
Click the File menu, and then click Place.
![]() Navigate to and select the text file you want to place.
Navigate to and select the text file you want to place.
![]() Click Open.
Click Open.
The imported text is placed in a loaded text cursor.
![]() Use any of the following to place the imported text in your document:
Use any of the following to place the imported text in your document:
♦ New Text Frame. Drag to create a text frame the size you want.
♦ New Text Frame within Margins. Click to create a text frame the width of the margins.
♦ Existing Text or Master Text Frame. With the text or master text frame not selected, click inside the text frame.
Did You Know?
You can create a master text frame when you create a new document. Click the File menu, point to New, click Document, select the Master Text Frame check box, and then click OK.
![]() Navigate to and select the text file you want to place.
Navigate to and select the text file you want to place.
![]() Click Open.
Click Open.
The imported text is placed in a loaded text cursor.

![]() Use any of the following to place the imported text in your document:
Use any of the following to place the imported text in your document:
♦ Semi-Autoflow. Hold down Alt (Win) or Option (Mac), and then click in an existing frame or drag a new frame. Continue to hold down Alt (Win) or Option (Mac), and then click or drag to create another text frame that is linked to the first.
♦ Autoflow. Hold down Shift, and then point to an existing frame or master frame (unselected) or click at the top-left corner of the margins, click to flow the text on the page and create as many additional pages as needed.
♦ Autoflow on Fixed Pages. Hold down Shift+Alt (Win) or Shift+Option (Mac), and then click in the master text frame or the margins of the page to flow text on the number of pages in the document.

Working with Overflow Text
If you type, paste, or import more text than a text frame can hold, an overflow symbol (a tiny red plus sign in a square) appears on the edge of the text frame. You can reshape the text frame to display the text or create a thread (link) to another text frame. You can thread overflow text from one text frame to a new or existing text frame. After you create a thread between two or more text frames, you can use the Show Text Threads command on the Extras submenu (on View menu) to display the thread connection. If you no longer want to thread two or more text frames, you can unthread or disconnect them. When you unthread text frames, the text in the text frame remains in the first text frame (it may still overflow). When you disconnect text frames, the text in the text frames remains where it is.
Thread Overflow Text and Show Text Threads
![]() Select the Selection tool on the Tools panel.
Select the Selection tool on the Tools panel.

![]() Select the text frame with the overflow text.
Select the text frame with the overflow text.
![]() Click the Out Port icon on the selected object.
Click the Out Port icon on the selected object.
Timesaver
Double-click an Out Port icon with the Selection tool to create a linked copy of the text frame.
The pointer changes to the Loaded Text cursor.
![]() To create a new text frame for the overflow text, click a blank area or drag to create a text frame.
To create a new text frame for the overflow text, click a blank area or drag to create a text frame.
To use an existing text frame, click in an existing text frame.
Overflow text from the first text frame threads to the second text frame.

![]() To display a text thread between text frames, select a threaded text frame, click the View menu, point to Extras, and then click Show Text Threads.
To display a text thread between text frames, select a threaded text frame, click the View menu, point to Extras, and then click Show Text Threads.

![]() Select a threaded text frame.
Select a threaded text frame.
![]() Double-click the In Port or Out Port icon on the selected object.
Double-click the In Port or Out Port icon on the selected object.

Did You Know?
You can show or hide text threads. Click the View menu, point to Extras, and then click Show Text Threads or Hide Text Threads.
Change the Thread Between Frames
![]() Select the Selection tool on the Tools panel.
Select the Selection tool on the Tools panel.

![]() Select a threaded text frame.
Select a threaded text frame.
![]() Click the In Port or Out Port icon on the selected object.
Click the In Port or Out Port icon on the selected object.
![]() To create a new text frame for the overflow text, click a blank area or drag to create a text frame.
To create a new text frame for the overflow text, click a blank area or drag to create a text frame.
To use an existing text frame, click in an existing text frame.

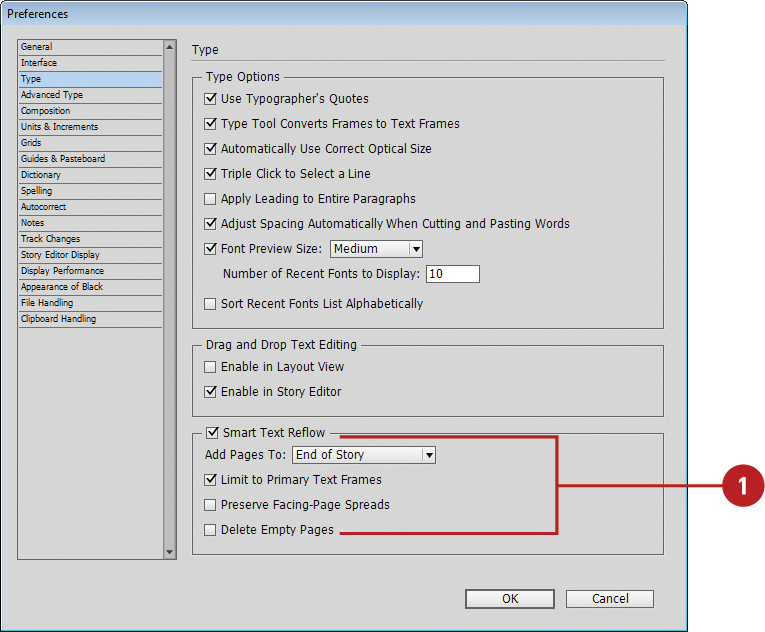
Using Smart Text Reflow
Smart Text Reflow allows you to automatically add or remove pages when you are typing and editing text. You can use Smart Text Reflow on master text frames (the default) and document text frames. When you want to reflow text in document text frames, the text frame needs to be threaded (linked) to another text frame on a different page. Before you reflow text, you can set Smart Text Reflow options in the Type preferences dialog box.
Set Smart Text Reflow Options
![]() Click the Edit (Win) or InDesign (Mac) menu, point to Preferences, and then click Type.
Click the Edit (Win) or InDesign (Mac) menu, point to Preferences, and then click Type.
![]() Select the Smart Text Reflow check box to enable the feature.
Select the Smart Text Reflow check box to enable the feature.
![]() Select from the following Smart Text Reflow options:
Select from the following Smart Text Reflow options:
♦ Add Pages To. Specify where you want to add overflow pages.
♦ Limit To Master Text Frames. Select to only reflow text to master text frames. Deselect to reflow text in a threaded text frame from one page to another.
♦ Preserve Facing-Page Spreads. Select to add two page spreads for text reflow. Deselect to add a single page for text reflow and shuffle pages.
♦ Delete Empty Pages. Select to delete pages when an empty text frame is the only object on the page.
![]() Click OK.
Click OK.

Use Smart Text Reflow
![]() In Type preferences, select the Smart Text Reflow and Delete Empty Pages check boxes.
In Type preferences, select the Smart Text Reflow and Delete Empty Pages check boxes.
♦ Type preferences. Click the Edit (Win) or InDesign (Mac) menu, point to Preferences, and then click Type.
![]() Hold down Ctrl+Shift (Win) or
Hold down Ctrl+Shift (Win) or ![]() +Shift (Mac), and then click the master text frame to override it.
+Shift (Mac), and then click the master text frame to override it.
![]() Type text until you fill the text frame to automatically add a page, or delete enough text to automatically delete a page.
Type text until you fill the text frame to automatically add a page, or delete enough text to automatically delete a page.

Typing and Selecting Text
Before you can work with text in InDesign, you need to select it. You can select the entire text frame or the characters in the text frame. The selection tools (Selection and Direct Selection) allow you to select both characters and its object. You can use the type tools to select only the characters in the text frame, but not the object. When you add text to a text frame, pressing Enter (Win) or Return (Mac) creates a new paragraph. If you want to force a line break, known as a soft return, instead of a new paragraph, you can press Shift+Enter (Win) or Shift+Return (Mac).
Select Type and its Object
![]() Select the Selection or Direct Selection tool on the Tools panel.
Select the Selection or Direct Selection tool on the Tools panel.

![]() Use the appropriate selection method:
Use the appropriate selection method:
♦ Type. Click on the text.
♦ Path Type. Click on the path or text.
Type Text
![]() Select the Type tool on the Tools panel.
Select the Type tool on the Tools panel.

Timesaver
With a selection tool, double-click text to place the insertion point.
![]() Click to place the insertion point where you want to insert text.
Click to place the insertion point where you want to insert text.
![]() Type some text. The text automatically wraps to the shape of the text frame.
Type some text. The text automatically wraps to the shape of the text frame.
![]() Press Enter (Win) or Return (Mac) to create a new paragraph or press Shift+Enter (Win) or Shift+Return (Mac) to create a new line and not a new paragraph.
Press Enter (Win) or Return (Mac) to create a new paragraph or press Shift+Enter (Win) or Shift+Return (Mac) to create a new line and not a new paragraph.


![]() Do any of the following to select:
Do any of the following to select:
♦ Text. Drag the I-beam cursor to select and highlight a word or line of text.
♦ Text Range. Click to place the insertion point at the beginning of the text range, press Shift, and then click at the end of the text range.
♦ Word. Double-click a word of text.
♦ Paragraph. Triple-click a paragraph of text.
♦ All Text. Click to place the insertion point, click the Edit menu, and then click Select All.

Timesaver
Click in a text frame, press Ctrl+A (Win) or ![]() +A (Mac) to select all the text.
+A (Mac) to select all the text.
![]() To deselect the text, click outside the text frame.
To deselect the text, click outside the text frame.
♦ You can also click the Edit menu, and then click Deselect All.

Timesaver
Press Esc to return the text frame from text editing mode.
Did You Know?
You can change what triple-clicking does. Click the Edit (Win) or InDesign (Mac) menu, point to Preferences, click Type, select the Triple Click To Select A Line check box, and then click OK.
Editing Text with Autocorrect
InDesign’s Autocorrect feature automatically corrects common capitalization and spelling errors as you type. Autocorrect comes with hundreds of text and symbol entries you can edit or remove. You can add words and phrases to the Autocorrect dictionary that you tend to misspell, or add often-typed words and save time by just typing their initials. You can use Autocorrect to quickly insert symbols. For example, you can type (c) to insert ©. You can enable Autocorrect and customize settings in the Autocorrect preferences dialog box.
Set Autocorrect Options
![]() Click the Edit (Win) or InDesign (Mac) menu, point to Preferences, and then click Autocorrect.
Click the Edit (Win) or InDesign (Mac) menu, point to Preferences, and then click Autocorrect.
![]() Select the Enable Autocorrect check box to enable the feature.
Select the Enable Autocorrect check box to enable the feature.
![]() Select from the following Autocorrect options:
Select from the following Autocorrect options:
♦ Autocorrect Capitalization Errors. Select to have InDesign automatically correct capitalization errors.
♦ Language. Choose the language dictionary you want InDesign to use when checking your text.
![]() Do one of the following:
Do one of the following:
♦ Add. Type a misspelled word or an abbreviation to add it to the list of words that will be autocorrected.
♦ Edit. Select any words you want to change.
♦ Remove. Select any words you want to delete.
![]() Click OK.
Click OK.

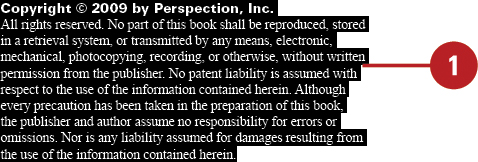
Copying and Moving Text
Like most programs, you can copy and move text by using the Copy or Cut and Paste commands or drag-and-drop techniques. InDesign is no different. There are a couple of differences. When you paste text, you can paste it without formatting. Another difference is that InDesign allows you to inherit formatting from the destination text when you drag and drop text. You can use the Type preferences dialog box to enable drag and drop editing in Layout view and Story Editor.
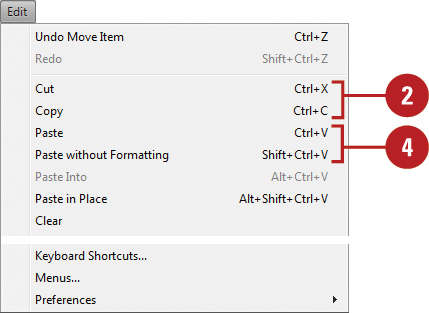
Copy or Cut and Paste Text
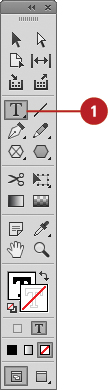
![]() Select the Type tool on the Tools panel, and then select the text you want to copy or cut (move).
Select the Type tool on the Tools panel, and then select the text you want to copy or cut (move).
![]() Click the Edit menu, and then click Cut or Copy.
Click the Edit menu, and then click Cut or Copy.
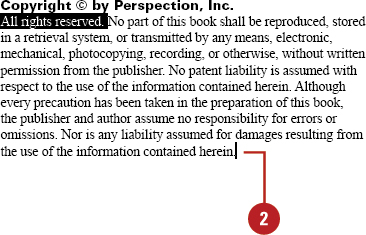
![]() Click to place the insertion point where you want to place the text.
Click to place the insertion point where you want to place the text.
![]() Click the Edit menu, and then click Paste or Paste Without Formatting.
Click the Edit menu, and then click Paste or Paste Without Formatting.
Drag Text
![]() Select the Type tool on the Tools panel, and then select the text you want to move or copy. The cursor changes to an arrow with a T.
Select the Type tool on the Tools panel, and then select the text you want to move or copy. The cursor changes to an arrow with a T.
![]() Use any of the following methods:
Use any of the following methods:
♦ Move. Drag the selected text to a new text frame location.
♦ Copy. Press Alt (Win) or Option (Mac) and drag the selected text to a new text frame location.
♦ Inherit Formatting. Press Shift and drag the selected text to a new text frame location. The text inherits the formatting of the text destination frame.
Changing Fonts
A font is a collection of alphanumeric characters that share the same typeface, or design, and have similar characteristics. With the Character panel, you can change the font family (Arial or Times New Roman) and style (Italic, Bold, or Condensed), as well as change other type attributes, such as size, kerning, scale, tracking, leading, and language. You can also change these and other attributes by using the Type menu and Control panel. On Font menus, a font sample appears for easy recognition, and you can search for fonts (New!) as well as set and show favorite fonts (New!) for easy access. After you select the text that you want to change, you can change font attributes directly on the Control panel. For example, you can style text using All Caps, Small Caps, Underline, Strikethrough, Subscript and Superscript. As you can see, there are several ways to change font attributes.
Change Font Family and Style
![]() Select the Type tool on the Tools panel, and then select the text that you want to change.
Select the Type tool on the Tools panel, and then select the text that you want to change.
♦ You can also select the Selection tool, and then click the text frame to change all text in the frame.

![]() Select the Character panel.
Select the Character panel.
♦ Click the Type menu, and then click Character.
![]() To search for a font (New!), click in the Font Family box, and then type a font name. Matching fonts appear in a list. To cancel, click the Close button in the box.
To search for a font (New!), click in the Font Family box, and then type a font name. Matching fonts appear in a list. To cancel, click the Close button in the box.
♦ Options. Click the Magnifying Glass icon (New!), and then click Search Entire Font Name or Search First Word Only.
![]() Click the Font Family list arrow, click an Expand icon (triangle) to display styles (New!), and then select a font. Recently used fonts appear at the top of the list. You can also browse with Arrow keys.
Click the Font Family list arrow, click an Expand icon (triangle) to display styles (New!), and then select a font. Recently used fonts appear at the top of the list. You can also browse with Arrow keys.
![]() To set and show favorite fonts (New!), click the Font Family list arrow, click a Star icon to set/un-set a font favorite, and then select the Show Favorite Fonts Only check box.
To set and show favorite fonts (New!), click the Font Family list arrow, click a Star icon to set/un-set a font favorite, and then select the Show Favorite Fonts Only check box.


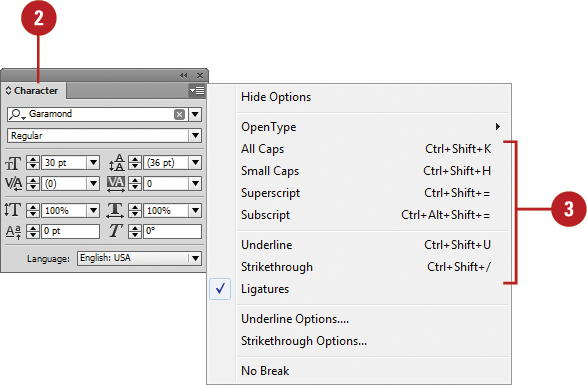
Apply Additional Font Styles
![]() Select the Type tool on the Tools panel, and then select the text that you want to change.
Select the Type tool on the Tools panel, and then select the text that you want to change.
♦ You can also select the Selection tool, and then click the text frame to change all text in the frame.

![]() Select the Character panel.
Select the Character panel.
♦ Click the Type menu, and then click Character.
♦ You can quickly access the following styles on the Options menu or the Control panel.
![]() Click the Options button, and then select the style you want:
Click the Options button, and then select the style you want:
♦ All Caps. Changes lowercase letters to all capitals.
♦ Small Caps. Changes lowercase letters to reduced capitals.
♦ Superscript. Reduces and raises the text above the baseline.
♦ Subscript. Reduces and lowers the text below the baseline.
♦ Underline. Underlines the text.
♦ Strikethrough. Adds a line through the text.
♦ Underline Options. Opens a dialog box, where you can change underline options.
♦ Strikethrough Options. Opens a dialog box, where you can change strikethrough options.

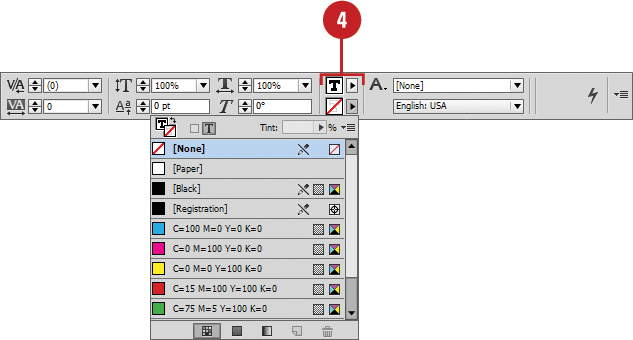
![]() To change the font color, click the Fill or Stroke box on the Control panel, and then select a color from the Swatch menu.
To change the font color, click the Fill or Stroke box on the Control panel, and then select a color from the Swatch menu.
♦ Click the Character Formatting Controls button to display character related options.
Changing Font Size
After setting the font family and style, the next attribute to set is the font size. The font size can range from 6 points to 72 points and beyond depending on the font. Open or TrueType fonts can be scaled to any size and still look and print well. Bitmap (screen fonts) fonts, on the other hand, cannot be scaled and you need to use the available sizes to print well. However, bitmap fonts are the best choice for commercial print jobs. An “O” appears next to an OpenType font, a “TT” appears next to a TrueType font, and an “a” appears next to a bitmap font on the Font submenu.
Change Font Size
![]() Select the Type tool on the Tools panel, and then select the text that you want to change.
Select the Type tool on the Tools panel, and then select the text that you want to change.
♦ You can also select the Selection tool, and then click the text frame to change all text in the frame.

![]() Select the Character panel.
Select the Character panel.
♦ Click the Type menu, and then click Character.
![]() Enter a point size, or click the Font Size list arrow, and then select a font size. Press Enter (Win) or Return (Mac) to apply the value.
Enter a point size, or click the Font Size list arrow, and then select a font size. Press Enter (Win) or Return (Mac) to apply the value.
♦ You can also hold down Ctrl+Shift (Win) or ![]() +Shift (Mac), and then press > to increase the point size or press < to decrease the point size.
+Shift (Mac), and then press > to increase the point size or press < to decrease the point size.
Use Ctrl+Alt-Shift (Win) or ![]() +Option+Shift to change the point size 5 sizes at a time.
+Option+Shift to change the point size 5 sizes at a time.
♦ You can also click the Type menu, point to Size, and then select a point size or Other.

Did You Know?
What is a point? The size of each font character is measured in points (a point is approximately 1/72 of an inch). The default is 12-point Times New Roman.
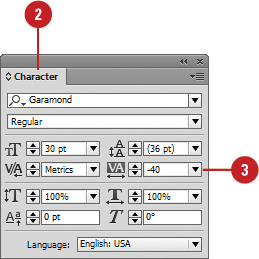
Changing Text Leading
Leading is the distance from the baseline of one line to the baseline of the next line and is measured in points. Each line of text can have a different leading size. You can specify a specific setting or use Auto, which is a percentage of the largest text size on each line. Leading is applied to horizontal text. If you want to change vertical spacing in text, you need to adjust horizontal tracking.
Change Text Leading
![]() Select the Type tool on the Tools panel, and then select the text that you want to change.
Select the Type tool on the Tools panel, and then select the text that you want to change.
♦ You can also select the Selection tool, and then click the text frame to change all text in the frame.

![]() Select the Character panel.
Select the Character panel.
♦ Click the Type menu, and then click Character.
![]() Enter a leading point size, or click the Leading arrows, and then select a leading size. Press Enter (Win) or Return (Mac) to apply the value.
Enter a leading point size, or click the Leading arrows, and then select a leading size. Press Enter (Win) or Return (Mac) to apply the value.
♦ You can also hold down Alt (Win) or Option (Mac), and then press the down arrow to increase the point size or press the up arrow to decrease the point size.
The text increases or decreases by the Size/Leading value set in the Type preferences.
![]() To shift characters up or down from the baseline, enter a baseline value, or click the Baseline Shift arrows, and then select a baseline value. A positive size adds space while a negative number removes space. Press Enter (Win) or Return (Mac) to apply the value.
To shift characters up or down from the baseline, enter a baseline value, or click the Baseline Shift arrows, and then select a baseline value. A positive size adds space while a negative number removes space. Press Enter (Win) or Return (Mac) to apply the value.
Changing Text Kerning
Kerning is adding or removing space between pairs of characters in your text. Sometimes the space between two characters is larger than others, which makes the word look uneven. You can use the Character panel to change the kerning setting for selected characters. You can expand or condense character spacing to create a special effect for a title, or realign the position of characters to the bottom edge of the text—this is helpful for positioning copyright or trademark symbols.
Change Text Kerning
![]() Select the Type tool on the Tools panel, and then click between the two characters of text you want to change.
Select the Type tool on the Tools panel, and then click between the two characters of text you want to change.

![]() Select the Character panel.
Select the Character panel.
♦ Click the Type menu, and then click Character.
![]() Enter a kerning size, or click the Kerning arrows, and then select a kerning size. A positive size adds space while a negative number removes space. Press Enter (Win) or Return (Mac) to apply the value.
Enter a kerning size, or click the Kerning arrows, and then select a kerning size. A positive size adds space while a negative number removes space. Press Enter (Win) or Return (Mac) to apply the value.
♦ You can also hold down Alt (Win) or Option (Mac), and then press the right arrow to increase the point size or press the left arrow to decrease the point size.
The text increases or decreases by the Tracking value set in the Type preferences.


Changing Text Tracking
Tracking is the adjustment of space between three or more characters. Typically, you’ll track a line of text or a few words depending on the length and design application. This is useful for creating specialize text for a caption or short heading. To adjust space between two characters, kerning is the best choice. To track characters, you need to select them first and then set the Tracking option in the Character panel.
Change Text Tracking
![]() Select the Type tool on the Tools panel, and then select the text that you want to change.
Select the Type tool on the Tools panel, and then select the text that you want to change.
♦ You can also select the Selection tool, and then click the text frame to change all text in the frame.

![]() Select the Character panel.
Select the Character panel.
♦ Click the Type menu, and then click Character.
![]() Enter a tracking size, or click the Tracking arrows, and then select a tracking size. A positive size adds space while a negative number removes space. Press Enter (Win) or Return (Mac) to apply the value.
Enter a tracking size, or click the Tracking arrows, and then select a tracking size. A positive size adds space while a negative number removes space. Press Enter (Win) or Return (Mac) to apply the value.
♦ You can also hold down Alt (Win) or Option (Mac), and then press the right arrow to increase the point size or press the left arrow to decrease the point size.
The text increases or decreases by the Tracking value set in the Type preferences.

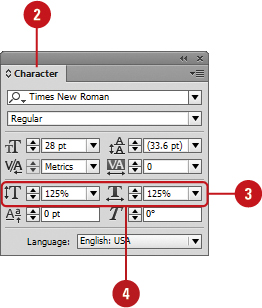
Scaling or Skewing Text
Scaling allows you to make text wider or narrower for horizontal text and taller or shorter for vertical text. You can use the Horizontal Scale and Vertical Scale options in the Character panel to modify text. Skewing allows you to distort the text at an angle to give it perspective. If the scaling or skewing doesn’t look quite right, you can always use the Undo command to reverse the modification.
Scale and Skew Text
![]() Select the text that you want to change.
Select the text that you want to change.
♦ You can also select the Selection tool, and then click the text frame to change all text in the frame.
![]() Select the Character panel.
Select the Character panel.
♦ Click the Type menu, and then click Character.
![]() To scale text, enter a horizontal or vertical percentage, or click the Vertical Scale or Horizontal Scale arrows. Press Enter (Win) or Return (Mac) to apply the value. Other ways of scaling text include:
To scale text, enter a horizontal or vertical percentage, or click the Vertical Scale or Horizontal Scale arrows. Press Enter (Win) or Return (Mac) to apply the value. Other ways of scaling text include:
♦ To scale a text frame, select the object, double-click the Scale tool on the Tools panel, specify a Horizontal and Vertical percentage, and then click OK.
♦ To scale a text frame, select the object, select the Free Transform tool on the Tools panel, and then drag a side handle on the bounding box.
![]() To skew text, enter a degree value, or click the Skew arrows. Press Enter (Win) or Return (Mac) to apply the value.
To skew text, enter a degree value, or click the Skew arrows. Press Enter (Win) or Return (Mac) to apply the value.
Aligning Paragraphs
When you press the Enter (Win) or Return (Mac) in a text frame, InDesign creates a paragraph. You can use the Paragraph panel to align and indent paragraphs in your document. At the top and bottom of the Paragraph panel is a set of buttons that you can use to align text in one or more paragraphs. The panel includes the typical options to align: left, center, right and justify. However, it also includes options to justify text with only the last line aligned left, center, or right.
Align Paragraphs
![]() Select the Type tool on the Tools panel, and then click in a paragraph or select multiple paragraphs you want to align.
Select the Type tool on the Tools panel, and then click in a paragraph or select multiple paragraphs you want to align.
![]() Select the Paragraph panel.
Select the Paragraph panel.
♦ Click the Type menu, and then click Paragraph.
![]() Use any of the following alignment buttons on the panel:
Use any of the following alignment buttons on the panel:
♦ Align Left, Align Center, or Align Right. Click these buttons to align paragraph text left, center, or right.
♦ Justify Left, Center, or Right. Click these buttons to justify the paragraph text with only the last line aligned left, center, or right.
♦ Justify. Click to justify all lines.
♦ Align Towards Spine. Click to align the paragraph text towards the spine.
♦ Align Away From Spine. Click to align the paragraph text away from the spine.
♦ Do Not Align To Baseline Grid. Click to keep the paragraph text from aligning to the baseline grid.
♦ Align To Baseline Grid. Click to align the paragraph text to the baseline grid.


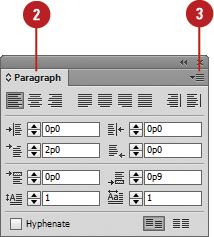
Indenting and Spacing Paragraphs
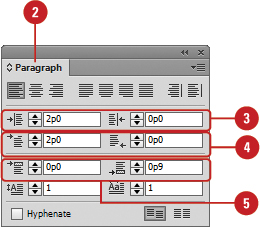
Quickly indent lines of text to precise locations from the left or right margin with the horizontal ruler. Indent the first or last line of a paragraph (called a first-line or last-line indent) as books do to distinguish paragraphs. Indent the second and subsequent lines of a paragraph from the left margin (called a hanging indent) to create a properly formatted bibliography. Indent the entire paragraph any amount from the left and right margins (called left indents and right indents) to separate quoted passages. In addition to indenting paragraphs, you can also set the spacing you want before or after a paragraph.
Indent and Space Paragraphs
![]() Select the Type tool on the Tools panel, and then click in a paragraph or select multiple paragraphs you want to change.
Select the Type tool on the Tools panel, and then click in a paragraph or select multiple paragraphs you want to change.
![]() Select the Paragraph panel.
Select the Paragraph panel.
♦ Click the Type menu, and then click Paragraph.
![]() Enter a Left Indent and/or Right Indent value or use the up and down arrows to specify one. Press Enter (Win) or Return (Mac) to apply the value.
Enter a Left Indent and/or Right Indent value or use the up and down arrows to specify one. Press Enter (Win) or Return (Mac) to apply the value.
![]() To create a first-line or last-line indent, enter a First-Line Indent or Last-Line Indent value or use the up and down arrows to specify one. Press Enter (Win) or Return (Mac) to apply the value.
To create a first-line or last-line indent, enter a First-Line Indent or Last-Line Indent value or use the up and down arrows to specify one. Press Enter (Win) or Return (Mac) to apply the value.
♦ To create a hanging indent, enter a negative value in the First-line Left Indent box.
♦ To insert a manual indent, place the insertion point, click the Type menu, point to Insert Special Character, point to Other, and then click Indent To Here.
![]() To add spacing between paragraphs, enter a Space Before Paragraph and/or Space After Paragraph value or use the up and down arrows to specify one. Press Enter (Win) or Return (Mac) to apply the value.
To add spacing between paragraphs, enter a Space Before Paragraph and/or Space After Paragraph value or use the up and down arrows to specify one. Press Enter (Win) or Return (Mac) to apply the value.

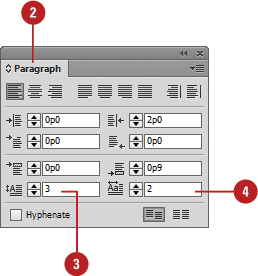
Creating a Drop Cap
A few simple elements—drop caps, borders, and shading—make your newsletters and brochures look like a professional produced them. A drop cap is the enlarged first letter of a paragraph that provides instant style to a document. You can quickly achieve this effect in the Paragraph panel. You can change the drop cap position, font, and height, and then enter the distance between the drop cap and paragraph.
Create a Drop Cap
![]() Select the Type tool on the Tools panel, and then click in a paragraph or select multiple paragraphs you want to change.
Select the Type tool on the Tools panel, and then click in a paragraph or select multiple paragraphs you want to change.
![]() Select the Paragraph panel.
Select the Paragraph panel.
♦ Click the Type menu, and then click Paragraph.
![]() Enter a Drop Cap Number of Lines value or use the up and down arrows to specify one. Press Enter (Win) or Return (Mac) to apply the value.
Enter a Drop Cap Number of Lines value or use the up and down arrows to specify one. Press Enter (Win) or Return (Mac) to apply the value.
![]() Enter a Drop Cap One or More Characters value or use the up and down arrows to specify one. Press Enter (Win) or Return (Mac) to apply the value.
Enter a Drop Cap One or More Characters value or use the up and down arrows to specify one. Press Enter (Win) or Return (Mac) to apply the value.

Applying a Paragraph Rule
If you want a line above or below a paragraph, you can apply it to a paragraph, so the line stays with the paragraph as you add or delete text. A paragraph rule can also be applied as part of a style sheet. In the Paragraph Rules dialog box, you can set the weight, style type, color, width, and position of the paragraph rule line.
Apply a Paragraph Rule
![]() Select the paragraph to which you want to apply a rule.
Select the paragraph to which you want to apply a rule.
![]() Select the Paragraph panel.
Select the Paragraph panel.
![]() Click the Options button, and then click Paragraph Rules.
Click the Options button, and then click Paragraph Rules.

![]() Select the Preview check box to see changes as you make them.
Select the Preview check box to see changes as you make them.
![]() Select Rule Above or Rule Below from the list arrow, and then select the Rule On check box.
Select Rule Above or Rule Below from the list arrow, and then select the Rule On check box.
♦ To set paragraph rules for both Rule Above and Rule Below, repeat Step 5.
![]() Select any of the following appearance options:
Select any of the following appearance options:
♦ Weight. Specify the thickness of the line rule.
♦ Type. Specify the style of the line rule.
♦ Color. Specify the color of the line rule.
♦ Tint. Specify a tint for the line color.
♦ Gap Color. If you selected a type with a gap, specify a gap color for the line rule.
♦ Gap Tint. Specify a tint for the line gap color.
♦ Overprint Gap. Select to set the gap ink to overprint.

![]() Select any of the following appearance options:
Select any of the following appearance options:
♦ Width. Select the rule line length equivalent to the column or the text.
♦ Offset. Specify the position above or below the baseline.
By default, the paragraph rule is positioned on the baseline of the text.
♦ Left and Right Indent. Specify an indent value from the column or text margin.
![]() To keep the rule in the text frame, select the Keep In Frame check box.
To keep the rule in the text frame, select the Keep In Frame check box.
![]() Click OK.
Click OK.


Did You Know?
The Preview box in any dialog box is retained. When you select a Preview check box in any dialog box, InDesign remembers the selection after you exit and restart InDesign.
See Also
See “Setting Advanced Type Preferences” on page 488 for more information on setting options for language usage with Adobe Composers.
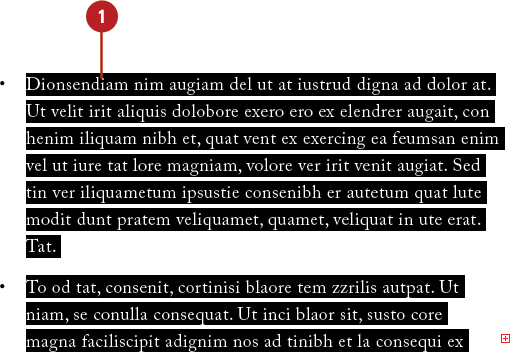
Adding Bullets and Numbering
The best way to draw attention to a list is to format the items with bullets or numbers. For different emphasis, change any bullet or number style to one of InDesign’s many predefined formats. For example, switch round bullets to check boxes or Roman numerals to lowercase letters. You can also customize the list style. If you move, insert, or delete items in a numbered list, InDesign sequentially renumbers the list for you.
Add Bullets or Numbering to a Paragraph
![]() Select the paragraphs to which you want to add bullets or numbers.
Select the paragraphs to which you want to add bullets or numbers.
![]() Click the Paragraph Formatting Controls button to display paragraph related options.
Click the Paragraph Formatting Controls button to display paragraph related options.
![]() Click the Bulleted List or Numbered List button on the Control panel.
Click the Bulleted List or Numbered List button on the Control panel.
♦ You can also click the Type menu, point to Bulleted & Numbered Lists, and then click Apply Bullets or Apply Numbers.
The last used settings in the Bullets and Numbering dialog box are applied to the text.

Did You Know?
You can convert bullets or numbers to text. Select the text, click the Type menu, point to Bulleted & Numbered Lists, and then click Convert Bullets To Text or Convert Numbering To Text.
![]() Click the Options button, and then click Bullets and Numbering.
Click the Options button, and then click Bullets and Numbering.

![]() Select the Preview check box to see changes as you make them.
Select the Preview check box to see changes as you make them.
![]() Click the List Type list arrow, and then select Bullets or Numbers.
Click the List Type list arrow, and then select Bullets or Numbers.
![]() For Bullets, select from the following options:
For Bullets, select from the following options:
♦ Bullet Character. Select a bullet character. Add or remove specific characters from the list.
♦ Text After. Specify characters to separate the bullet and text.
♦ Character Style. Specify a bullet style.

![]() For Numbers, select from the following options:
For Numbers, select from the following options:
♦ Format. Specify a number format style.
♦ Number. Specify characters to separate the number and text.
♦ Character Style. Specify a number style.
♦ Mode. Specify a start number or sequence.
![]() Select any of the following Bullet or Number Position options:
Select any of the following Bullet or Number Position options:
♦ Alignment. Specify an alignment.
♦ Left Indent. Specify an indent value.
♦ First Line Indent. Specify a first line indent value.
♦ Tab Position. Specify the position of the first character after the bullet or number.
![]() Click OK.
Click OK.

Setting Tabs
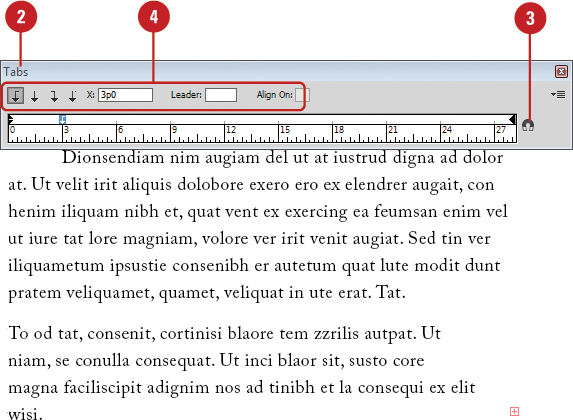
In your document, tabs determines how text or numerical data is aligned in relation to the document margins. A tab stop is a predefined stopping point along the document’s typing line. Default tab stops are set every half-inch, but you can set multiple tabs per paragraph at any location. Choose from four types of text tab stops: left, right, center, and decimal (for numerical data). In the Tabs panel, you can view a ruler with the current tab setting for the selected text and add, move, or delete tab stops. When you press the Tab key with the insertion point active, the text shifts to the next tab stop.
Set Tabs
![]() Select the Type tool on the Tools panel, and then click to place the insertion point in a text frame.
Select the Type tool on the Tools panel, and then click to place the insertion point in a text frame.
![]() Select the Tabs panel.
Select the Tabs panel.
♦ Click the Type menu, and then click Tabs.
♦ To use the default tabs, press the tab key to shift the text to the next default tab stop.
![]() To move the panel next to the text, click the Position Panel Above Text Frame button on the panel.
To move the panel next to the text, click the Position Panel Above Text Frame button on the panel.
![]() Do any of the following:
Do any of the following:
♦ Insert. Click one of the tab stop buttons, and then click in the ruler where you want to place it. You can also enter a number in the X box to insert a tab at an exact position.
♦ Move. Drag the tab stop left or right or enter an exact position in the X box.
♦ Delete. Drag a tab stop down off the ruler.
♦ Leader. Enter a character that repeats in the tabbed space, such as a period.
♦ Align On. Enter a character that is used with the Decimal tab, such as a decimal point.
Working with Glyphs
A glyph is a style variation—such as ligatures, ordinals, swashes, and fractions—for a given character in an OpenType font. OpenType fonts appear with an “O” next to the font name on the Font submenu. OpenType fonts are designed to work well on both Windows and Macintosh operating systems, which reduces font substitution problems when going back and forth between platforms. However, you can always add more character styles to extend the font format. For example, you can change fractions with numerals and slashes to properly formatted fractions. You can automatically insert alternate glyphs with the OpenType panel or insert them manually with the Glyphs panel to extend the font format.
Replace or Insert a Glyph
![]() Select the Type tool on the Tools panel, and then select a character (to replace a glyph) or click in text (to insert a glyph).
Select the Type tool on the Tools panel, and then select a character (to replace a glyph) or click in text (to insert a glyph).
![]() Select the Glyphs panel.
Select the Glyphs panel.
♦ Click the Type menu, and then click Glyphs.
![]() Select a different font and font style.
Select a different font and font style.
![]() Click the Show list arrow, and then select a glyphs category.
Click the Show list arrow, and then select a glyphs category.
Alternates for Selection or Entire Font are common choices.
![]() Double-click the glyph that you want to replace or insert.
Double-click the glyph that you want to replace or insert.

Did You Know?
You can use the OpenType panel to insert glyphs. Select the OpenType submenu from the Character Options button, select the text that you want to change or deselect all text for the entire document, and then select the buttons with the options for glyphs that you want to apply, such as ligatures, swashes, titling, ordinals, and fractions.
Inserting Special Text Characters
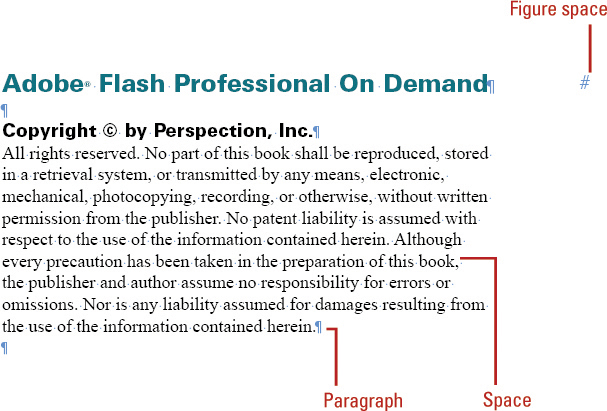
In addition to inserting normal alphanumeric text, you can also insert special text characters, such as symbols, markers, hyphens, dashes, white space, and breaks. For example, you can insert text breaks to force a break between lines, or add white space, such as an Em or En space, between characters. If you want to keep two words together on the same line, you can insert a nonbreaking space. You can insert special characters, white space, and break characters by using submenus on the Type menu.
Insert Special Text Characters
![]() Select the Type tool on the Tools panel.
Select the Type tool on the Tools panel.
![]() Click to place the insertion point where you want to place the text.
Click to place the insertion point where you want to place the text.
![]() To insert a break, click the Type menu, point to Insert Break Character, and then select a text break.
To insert a break, click the Type menu, point to Insert Break Character, and then select a text break.
♦ Includes column, frame, page, paragraph return, and forced line break.
![]() To insert special characters, click the Type menu, point to Insert Special Character, point to any of the following, and then select a special character:
To insert special characters, click the Type menu, point to Insert Special Character, point to any of the following, and then select a special character:
♦ Symbols. Includes copyright and trademark.
♦ Markers. Includes page numbers and section markers.
♦ Hyphens and Dashes. Includes Em and En dashes.
♦ Quotation Marks. Includes double and single quotation marks.
♦ Other. Includes tabs and indents.
![]() To insert a space, click the Type menu, point to Insert White Space, and then select a text break.
To insert a space, click the Type menu, point to Insert White Space, and then select a text break.
♦ Includes Em and En space, Hair, Thin, Punctuation, and Figure.

Working with Hidden Text
When you edit a document, sometimes it’s hard to see the number of spaces between words. To make this job easier, you can show hidden characters, such as the Spacebar, Tab key, and Enter (Win) or Return (Mac) key. If you’re still having trouble viewing the text, you can change the color of the hidden text by changing the color of the layer in the Layers panel. Hidden text is also hidden in Preview or Overprint Preview mode.
Show and Hide Text
♦ Show Hidden Text. Click the Type menu, and then click Show Hidden Characters.
Timesaver
Press Alt+Ctrl+I (Win) or Option+![]() +I (Mac).
+I (Mac).
♦ Hide Hidden Text. Click the Type menu, and then click Hide Hidden Characters.
Setting Text Frame Options
If you need to make adjustments to all the text in a text frame, you can use the Text Frame Options dialog box to make all your changes in one place. You can create columns with fixed or flexible widths, balance text in columns, adjust inset spacing and vertical justification, specify a first baseline offset, add a baseline grid for a text frame, and set auto-sizing text frames reflow and constraints. Inset spacing is the space between the text and the frame. Vertical justification controls the alignment of text and paragraph spacing limits in rectangle and non-rectangle text frames from the top to the bottom. If you’re working with wrapped text in a text frame, you can set an option to ignore it.
Set Text Frame Options
![]() Select the text frame you want to change.
Select the text frame you want to change.
![]() Click the Object menu, and then click Text Frame Options.
Click the Object menu, and then click Text Frame Options.
![]() Select the Preview check box to see changes as you make them.
Select the Preview check box to see changes as you make them.
![]() Click the General tab.
Click the General tab.
![]() Select any of the following Columns options:
Select any of the following Columns options:
♦ Columns. Select to keep a fixed column width or number, or allow a flexible width.
♦ Number. Specify the number of columns you want to create.
♦ Width. Specify the column width you want.
♦ Gutter. Specify the gutter space between the columns you want.
♦ Maximum. For Flexible Width, specify the maximum size before adding a column.
♦ Balance Columns. Select to automatically balance text across columns in a multiple column text frame.
![]() Specify inset spacing values for Top, Bottom, Left and Right.
Specify inset spacing values for Top, Bottom, Left and Right.
![]() Select any of the following Vertical Justification options:
Select any of the following Vertical Justification options:
♦ Align. Specify an alignment option for a text frame.
♦ Paragraph Spacing Limit. When you select the Justify alignment option, specify a paragraph spacing limit.
![]() To ignore text wrapping for the selected text frame, select the Ignore Text Wrap check box.
To ignore text wrapping for the selected text frame, select the Ignore Text Wrap check box.

![]() Click the Baseline Options tab.
Click the Baseline Options tab.
![]() Click the Offset list arrow, select an option, and then specify a minimum offset space.
Click the Offset list arrow, select an option, and then specify a minimum offset space.
![]() Select any of the following Baseline Grid options:
Select any of the following Baseline Grid options:
♦ Use Custom Baseline Grid. Select to create a baseline grid for the selected text frame.
♦ Start. Specify a start location for the baseline grid.
♦ Relative To. Specify a relative location where you want the baseline grid.
♦ Increment Every. Specify an interval for the baseline grid.
♦ Color. Select a color for the baseline grid.

![]() Click the Auto-Size tab.
Click the Auto-Size tab.
![]() Click the Auto-Sizing list arrow, select an option: Off, Height Only, Width Only, Height and Width, and Height and Width (Keep Proportions).
Click the Auto-Sizing list arrow, select an option: Off, Height Only, Width Only, Height and Width, and Height and Width (Keep Proportions).
![]() Select an auto size reflow option.
Select an auto size reflow option.
![]() Select from the following available Auto-Sizing Constraints options:
Select from the following available Auto-Sizing Constraints options:
♦ Minimum Height or Width. Select to set the minimum height or width for auto-sizing.
♦ No Line Breaks. Select to specify no line breaks during auto-sizing.
![]() Click OK.
Click OK.

Creating Columns
You can create columns with fixed or flexible widths and automatically balance text in the same text box. You can span a paragraph across multiple columns or split a paragraph into multiple columns within the same text frame. When you have a paragraph span across multiple columns, InDesign balances the text before the spanning paragraph. Vertical justification controls the alignment of text in rectangle and non-rectangle text frames from the top to the bottom. When you set vertical justification to Justify, you can set paragraph spacing limits. Keep options are applied to paragraphs that span or split columns.
Create Multiple Columns
![]() Click to place the insertion point in the paragraph you want to change.
Click to place the insertion point in the paragraph you want to change.

![]() Select the Paragraph panel.
Select the Paragraph panel.
![]() Click the Options button, and then click Span Columns.
Click the Options button, and then click Span Columns.
![]() To span columns, click the Paragraph Layout list arrow, click Span Columns, and then specify the following options:
To span columns, click the Paragraph Layout list arrow, click Span Columns, and then specify the following options:
♦ Span. Specify the number of columns you want the paragraph to straddle.
♦ Space Before Span or Space After Span. Specify the space before or after the span.
![]() To split columns, click the Paragraph Layout list arrow, click Split Columns, and then specify the following options:
To split columns, click the Paragraph Layout list arrow, click Split Columns, and then specify the following options:
♦ Sub-columns. Specify the number of columns you want to divide the paragraph into.
♦ Space Before Split or Space After Split. Specify the space before or after the split.
♦ Inside Gutter or Outside Gutter. Specify the gutter space between (inside) columns or outside the columns.
![]() To remove split or span, click the Paragraph Layout list arrow, and then click Single Column.
To remove split or span, click the Paragraph Layout list arrow, and then click Single Column.
![]() Click OK.
Click OK.

![]() Click the Object menu, and then click Text Frame Options.
Click the Object menu, and then click Text Frame Options.
![]() Select the Preview check box to see changes as you make them.
Select the Preview check box to see changes as you make them.
![]() Click the General tab.
Click the General tab.
![]() Select any of the following Columns options:
Select any of the following Columns options:
♦ Column. Select to keep a fixed column width or number, or allow a flexible width.
♦ Number. Specify the number of columns you want to create.
♦ Width. Specify the column width you want.
♦ Gutter. Specify the gutter space between the columns you want.
♦ Maximum. For Flexible Width, specify the maximum size before adding a column.
♦ Balance Columns. Select to automatically balance text across columns in a multiple column text frame.
![]() Select any of the following Vertical Justification options:
Select any of the following Vertical Justification options:
♦ Align. Specify an alignment option for a rectangle text frame.
♦ Paragraph Spacing Limit. When you select the Justify alignment option, specify a paragraph spacing limit.
![]() Click OK.
Click OK.

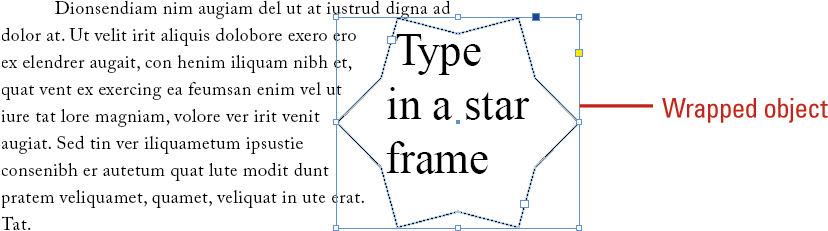
Wrapping Text Around an Object
When integrating graphics with your text, you can wrap the text around objects to create the results that you want. You can use the Text Wrap panel to quickly select button options to wrap text around an object. Some of the text wrapping options include No Wrap, Bounding Box, Object Shape, Jump Object, and Jump to Next Column. When you select Object Shape, you can select additional options to customize text wrapping around the object.
Wrap and Unwrap Text Around an Object
![]() Arrange the object to be wrapped in front of the text frame. The objects should be overlapping.
Arrange the object to be wrapped in front of the text frame. The objects should be overlapping.
![]() Select the object to be wrapped.
Select the object to be wrapped.

![]() Select the Text Wrap panel.
Select the Text Wrap panel.
♦ Click the Window menu, and then click Text Wrap.
![]() Select one of the following buttons:
Select one of the following buttons:
♦ No Text Wrap. Text flows through the object.
♦ Bounding Box. Text wraps around the bounding box.
♦ Object Shape. Text wraps around the shape.
♦ Jump Object. Text wraps to the space under the object.
♦ Jump to Next Column. Text wraps to the next column or text frame.
![]() Select the Invert check box to flow the text inside the object.
Select the Invert check box to flow the text inside the object.

![]() Enter offset values to specify the distance between the text and the object.
Enter offset values to specify the distance between the text and the object.
♦ Click the Make All Settings the Same button (chain icon) to set all the offset values to be the same. Click it again (broken chain icon) if you want to set different values.
![]() Select the Text Wrap panel.
Select the Text Wrap panel.
![]() Click the Object Shape button.
Click the Object Shape button.
![]() Click the Wrap To list arrow, and then select an option:
Click the Wrap To list arrow, and then select an option:
♦ Right Side. Wraps around the right side.
♦ Left Side. Wraps around the left side.
♦ Both Right & Left Sides. Wraps to both sides.
♦ Side Towards Spine. Wraps to the left or right side towards the spine.
♦ Side Away From Spine. Wraps to the left or right side away from the spine.
♦ Largest Area. Wraps to the side with the most space.
![]() Click the Type list arrow, and then select an option to control the shape of the wrap:
Click the Type list arrow, and then select an option to control the shape of the wrap:
♦ Bounding Box. Uses the bounding box rectangle.
♦ Detect Edges. Uses the difference between the image pixels and the background.
♦ Alpha Channel. Uses an embedded alpha channel.
♦ Photoshop Path. Uses an embedded path.
♦ Graphic Frame. Uses the frame of the graphic object.
♦ Same As Clipping. Uses the clipping path shape for the graphic.
![]() Select the Include Inside Edges check box to wrap text inside holes in the graphic, path, or alpha channel.
Select the Include Inside Edges check box to wrap text inside holes in the graphic, path, or alpha channel.

Creating Type Outlines
The Create Outlines command converts characters in a text frame into a separate object with a path. Some characters, such as “A” or “B,” that contain an interior shape (known as a counter) are converted into compound objects. After you create an outline, you can reshape the path, use it as a mask object, fill it with a gradient or a mesh, or use it in a compound object. When you create outlines, the fill and stroke attributes and any appearances of the type are applied to the outlines. Before you use the Create Outlines command, it’s a good idea to make a copy of the text frame or your document as a backup to preserve a copy of the original text frame.
Create Type Outlines
![]() Select the Selection tool on the Tools panel.
Select the Selection tool on the Tools panel.

![]() Select the text frame or select characters.
Select the text frame or select characters.
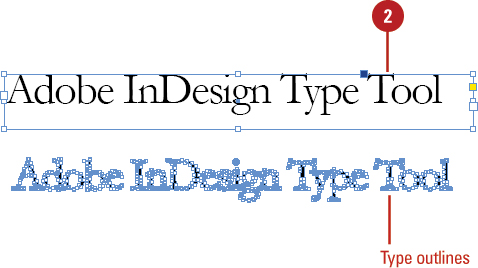
![]() Click the Type menu, and then click Create Outlines.
Click the Type menu, and then click Create Outlines.
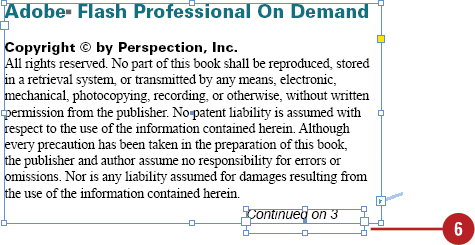
Adding Page Numbers to Continued Text
When you enter or import text for an article or story that you want to continue on another page, you can add a page number in a separate text frame to the bottom of the article or story as a jump line to where it continues. The continuation page number is typically put in a separate text frame, so the reflow of text doesn’t move it. When you change pagination in a document, the continuation page numbers are automatically updated.
Add Page Numbers to Continued Text
![]() Select the Type tool on the Tools panel.
Select the Type tool on the Tools panel.
![]() Drag to create a text frame for the page number.
Drag to create a text frame for the page number.
![]() Select the Selection tool on the Tools panel, and then drag to move the text frame so that it touches or overlaps the frame containing the story you want to continue on another page.
Select the Selection tool on the Tools panel, and then drag to move the text frame so that it touches or overlaps the frame containing the story you want to continue on another page.

![]() Select the Type tool on the Tools panel, click in the text frame, and then type text you want to appear next to the page number, such as Continued on or Continued from.
Select the Type tool on the Tools panel, click in the text frame, and then type text you want to appear next to the page number, such as Continued on or Continued from.
![]() Click the Type menu, point to Insert Special Character, point to Marker, and then click Next Page Number or Previous Page number.
Click the Type menu, point to Insert Special Character, point to Marker, and then click Next Page Number or Previous Page number.

![]() Shift-click to select the text frame and the frame containing the story, click the Object menu, and then click Group to keep both together.
Shift-click to select the text frame and the frame containing the story, click the Object menu, and then click Group to keep both together.
Working With Different Languages
If you work with languages, such as English, French, or Greek, you can specify a language for the document in the Character or Control panel. If you work with non-western languages, you can set options in Advanced Type preferences or on the Options menu in the Paragraph panel to use Adobe World-Ready Composer (WRC)—a GUI-less, scriptable methods—to display the correct word shaping and options. You can enable Single-line Composer or Every-line composer to base text justification on individual lines or paragraphs. WRC supports Indian languages as well as east asian languages, including Japanese, Chinese, and Korea, as well as mixed language use. Some languages require a language specific version of InDesign; see Adobe for details.
Change Text Language
![]() Select the Type tool on the Tools panel, and then select the text that you want to change.
Select the Type tool on the Tools panel, and then select the text that you want to change.
♦ You can also select the Selection tool, and then click the text frame to change all text in the frame.
![]() Select the Character panel.
Select the Character panel.
♦ Click the Type menu, and then click Character.
![]() Click the Language list arrow, and then select the available language you want from the list.
Click the Language list arrow, and then select the available language you want from the list.
♦ If the language you want is not available from the list, you need to download and install the font on your system. You can get fonts from Adobe Creative Cloud. See the Adobe Creative Cloud web site for details.
See Also
See “Setting Advanced Type Preferences” on page 488 for more information on setting options for language usage with Adobe Composers.