A. Installing Apache, PHP, and MySQL
Apache, PHP, and MySQL are available for many combinations of operating systems and web servers. In this appendix, we explain how to set up Apache, PHP, and MySQL on a UNIX platform from (almost) scratch, and offer pointers for installing these technologies on Windows and Mac OS X.
Key topics covered in this appendix include
![]() Running PHP as a CGI interpreter or as a module
Running PHP as a CGI interpreter or as a module
![]() Installing Apache, SSL, PHP, and MySQL under UNIX
Installing Apache, SSL, PHP, and MySQL under UNIX
![]() Installing Apache, PHP, and MySQL using all-in-one installation packages
Installing Apache, PHP, and MySQL using all-in-one installation packages
![]() Installing PEAR
Installing PEAR
![]() Considering other web server configurations
Considering other web server configurations
Note
Detailed information for adding PHP to Microsoft Internet Information Server or other web servers is not included in this appendix. We recommend using the Apache web server when possible. However, pointers to other web server configurations can be found at the end of this appendix.
Our goal in this appendix is to provide you with an installation guide for a web server that will enable you to host multiple websites. Some sites that you create will require Secure Sockets Layer (SSL) for e-commerce solutions, and most sites are driven via scripts to connect to a database (DB) server to extract and process data. Therefore, we include instructions for the common setup of PHP, MySQL, and Apache with SSL on a UNIX machine.
Many PHP users never need to install PHP on a machine, which is why this material is in an appendix rather than Chapter 1, “PHP Crash Course.” The easiest way to get access to a reliable server with a fast connection to the Internet and PHP already installed is to simply sign up for an account at one of the thousands of hosting services or hosting service resellers around the globe. If this is the route you take, be sure your hosting provider is using up-to-date versions of Apache, PHP, and MySQL, otherwise you will be susceptible to security issues that you cannot control (not to mention you will not be able to use the latest and greatest features within the technologies).
Depending on why you are installing PHP on a machine, you might make different decisions. For example, if you have a machine permanently connected to the network that you intend to use as a live server, then performance will be important to you. If you are building a development server where you can build and test your code, then having a similar configuration to the live server will be the most important consideration.
Note
The PHP interpreter can be run as either a module or as a separate common gateway interface (CGI) binary. Generally, the module version is used for performance reasons. However, the CGI version is sometimes used for servers where a module version is not available or because it enables Apache users to run different PHP-enabled pages under different user IDs.
In this appendix, we primarily cover the module option as the method to run PHP.
Installing Apache, PHP, and MySQL Under UNIX
Depending on your needs and your level of experience with UNIX systems, you might choose to do a binary install or compile the programs directly from their source. Both approaches have their advantages.
A binary install will take an expert minutes and a beginner not much longer, but it will result in a system that is probably a minor version or two behind the current releases and one that is configured with somebody else’s choices of options. If you have read the subsequent release changelogs and know what you’re missing, or if the build options used by the maintainer of the binary distribution meet your needs, then by all means perform a binary installation.
Although a source install will take additional time to download, install, and configure, and such an approach may be intimidating the first few times you do it, it does give you complete control over the configuration of the technologies. When performing a source installation, you may choose exactly what to install, which version to use, and have complete control over the configuration directives that can be set.
Binary Installation
Most Linux distributions include a preconfigured Apache Web Server with PHP built in. The details of what is provided out of the box depend on your chosen distribution and version.
One disadvantage of binary installs is that you rarely get the latest version of a program. Depending on how important the last few bug fix releases are, getting an older version might not be a problem for you. However, we recommend that if you intend to use the preconfigured binary installations of PHP, MySQL, Apache, and any ancillary libraries, then before you begin using them be sure to update the packages using your distribution’s typical update method (e.g., using apt-get, yum, or other package managers).
The biggest issue with binary installations is that you do not get to choose what options are compiled into your programs. The most flexible and reliable path to take is to compile all the programs you need from their sources. This path will take a little more time than installing packages using a package manager, so we understand you might choose to use binary packages when available, and in fact if you just want a basic configuration, it is likely that the official pre-packaged binaries for your system will meet your needs.
Source Installation
To install Apache, PHP, and MySQL from source under a UNIX environment, the first step is to decide which extra modules you will load under the trio. Because some of the examples covered in this book show the use of a secure server for web transactions, you should install an SSL-enabled server.
For purposes of this book, the PHP configuration is more or less the default setup but also covers ways to enable the gd2 library under PHP.
The gd2 library is just one of the many libraries available for PHP. We included this installation step so that you can get an idea of what may be required to build from source and enable extra libraries within PHP. Compiling most UNIX programs follows a similar process, but as you can see as we move through this section, there are times when it is just easier to install precompiled packages anyway.
You usually need to recompile PHP after installing a new library, so if you know what you need in advance, you can install all required libraries on your machine and then begin to compile the PHP module.
Here, we describe installation from source on a Ubuntu server, but the description is generic enough to apply to other UNIX servers as well.
Start by gathering the required files for the installation. You need these items:
![]() Apache (http://httpd.apache.org/)—The web server
Apache (http://httpd.apache.org/)—The web server
![]() OpenSSL (http://www.openssl.org/)—Open source toolkit that implements the Secure Sockets Layer
OpenSSL (http://www.openssl.org/)—Open source toolkit that implements the Secure Sockets Layer
![]() MySQL (http://www.mysql.com/)—The relational database
MySQL (http://www.mysql.com/)—The relational database
![]() PHP (http://www.php.net/)—The server-side scripting language
PHP (http://www.php.net/)—The server-side scripting language
![]() JPEG (http://www.ijg.org/)—The JPEG library, needed for
JPEG (http://www.ijg.org/)—The JPEG library, needed for gd2
![]() PNG (http://www.libpng.org/pub/png/libpng.html)—The PNG library, needed for
PNG (http://www.libpng.org/pub/png/libpng.html)—The PNG library, needed for gd2
![]() zlib (http://www.zlib.net/)—The zlib library, needed for the PNG library, above
zlib (http://www.zlib.net/)—The zlib library, needed for the PNG library, above
![]() IMAP (ftp://ftp.cac.washington.edu/imap/)—The IMAP C client, needed for IMAP
IMAP (ftp://ftp.cac.washington.edu/imap/)—The IMAP C client, needed for IMAP
If you want to use the mail() function, you will need to have an MTA (mail transfer agent) installed, although we do not go through this here.
We assume that you have root access to the server and the following tools installed on your system:
![]()
gzip or gunzip
![]()
gcc and GNU make
When you are ready to begin the PHP, Apache, and MySQL installation processes, you should start by downloading all file sources to a temporary directory. In our case, we chose /usr/src for the temporary directory. You should download them as the root user to avoid permissions problems.
Installing MySQL
In this section, we show you how to do a binary install of MySQL. Installing the official distributed binary version of MySQL for your system is actually the recommended process, given the few build configuration options you could possibly need, combined with the number of steps in the build process that have proven finicky throughout the years. Although it’s completely possible to download and build MySQL from source, and in fact the instructions are quite good, you’ll get up and running quicker and with no difference in functionality if you just install the binaries for your particular system.
In this example, we are using the apt repository for Ubuntu 14.04, but you can navigate to the proper binary repository for your system at http://www.mysql.com/downloads/. This type of install automatically places files in various locations and handles system configuration options.
We downloaded the release package mysql-apt-config_0.3.2-1ubuntu14.04_all.deb and then installed it using
# sudo dpkg -i mysql-apt-config_0.3.2-1ubuntu14.04_all.deb
At this point you will be asked which components you wish to install, as shown in Figure A.1.

Select “Server” and continue, then select the server version in the next step. Select “Apply” to apply the changes, then “Ok” to set the configuration. At this point your system is prepared to use apt to install precisely the application you wish to use, so issue the update command like so:
# sudo apt-get update
When this process finishes, finally install the MySQL server:
# sudo apt-get install mysql-server
You may be asked to install additional necessary libraries, and if so select Y to continue.
Next in the installation process, you should next see a request to set the MySQL root password, as shown in Figure A.2.
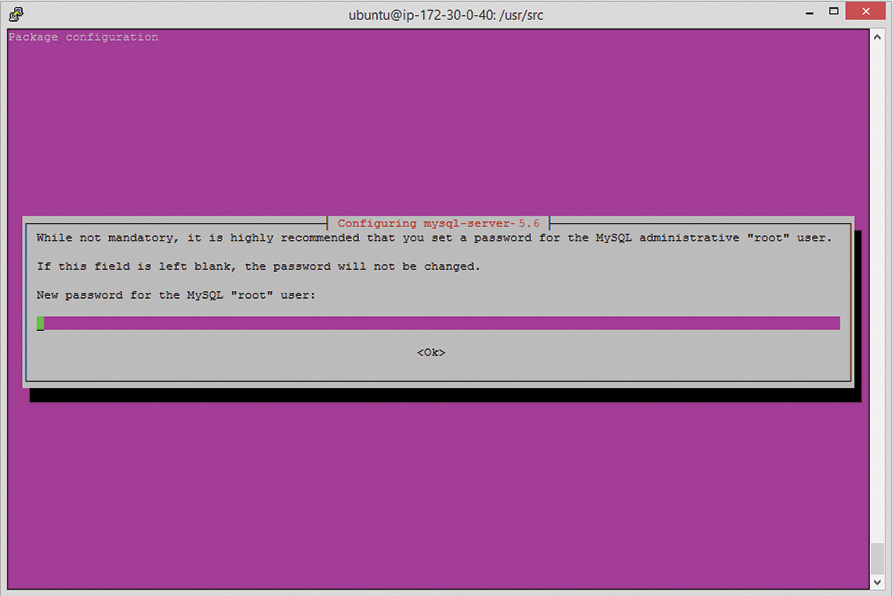
After setting the password, you will be asked to confirm it, and the installation process will continue.
When you install MySQL, it automatically creates three databases. One is the mysql table, which controls users, hosts, and DB permissions in the actual server. The others are information_schema and performance_schema, which store additional metadata about the MySQL server. You can check your database via the command line like this:
# mysql -u root –p
Enter password:
mysql> show databases;
+--------------------+
| Database |
+--------------------+
| information_schema |
| mysql |
| performance_schema |
+--------------------+
3 rows in set (0.00 sec)
Type quit or q to quit the MySQL client.
The default MySQL configuration allows any user access to the system without providing a username or password. This is obviously undesirable, which is why the installation process takes you through the step of setting a password for the root user
The final compulsory piece of MySQL housekeeping is deleting any anonymous accounts that may be part of the distributed database. Opening a command prompt and typing the following lines accomplish that task:
# mysql -u root –p
Enter password:
mysql> use mysql
mysql> delete from user where User='';
mysql> quit
You then need to type
# mysqladmin -u root -p reload
for these changes to take effect. (You should be prompted for your password.)
At this point you have a working secured installation of MySQL that you can use with PHP.
Installing PHP and Apache
Please note that in the examples below, the word VERSION is used as a placeholder for the recent version of the software available to you. The installation process does not differ from version to version. When running the commands listed, substitute VERSION with the specific version number of the software you have downloaded.
Before installing PHP, let’s get a vanilla version of Apache configured and installed so that the PHP install process can find everything related to Apache. Don’t worry, we will come back to the topic of fully configuring and installing Apache later in this section. First, ensure you are in the directory that contains the source-code distribution.
# cd /usr/src
# sudo gunzip httpd-VERSION.tar.gz –
# sudo tar –xvf httpd-VERSION.tar
# cd httpd-VERSION
# sudo ./configure --prefix=/usr/local/apache2 –-enable-so
The second configuration flag is present to make sure that mod_so will be compiled into Apache. This module, named for the UNIX shared object (*.so) format, enables the use of dynamic modules such as PHP with Apache.
Let’s continue the build process by issuing the following commands:
# sudo make
# sudo make install
At this point, a basic version of Apache is configured on your system. To continue preparing to build PHP, you will need to build the additional libraries that PHP and Apache will use in our example (JPEG, PNG, zlib, OpenSSL, and IMAP) so that the PHP build configuration properly points to those libraries.
To install the JPEG library, follow these steps:
# cd /usr/src
# sudo gunzip jpegsrc.VERSION.tar.gz
# sudo tar –xvf jpegsrc.VERSION.tar.gz
# cd jpeg-VERSION
# sudo ./configure
# sudo make
# sudo make install
After the final step, unless there were error messages along the way, the JPEG library should be installed in /usr/local/lib. If there were error messages during the process, follow the instructions in the error message or refer to the JPEG library documentation.
Repeat the gunzip, tar, configure, make, and make install process for the PNG and zlib library source files, and note the installation directories for each.
For installing the IMAP C-client library, you can download and build the source files in much the same way, but there are some idiosyncrasies involved that may result in differences from system to system. We recommend you follow the most recent guidelines published in the PHP manual at http://php.net/manual/en/imap.requirements.php.
You might also find it considerably simpler to install the precompiled package for your UNIX server type, as we do here on Ubuntu 14.04:
# sudo sudo apt-get install libc-client-dev
With all of the libraries prepared for use, let’s switch back to setting up PHP. Extract the source files and change to its directory:
# cd /usr/src
# sudo gunzip php-VERSION.tar.gz
# sudo tar –xvf php-VERSION.tar# cd php-VERSION
Many options are available with PHP’s configure command. Use ./configure --help to determine what you want to add. In this case, let’s add support for MySQL, Apache, and gd2.
Note that the following is all one command. You can put it all on one line or, as shown here, use the continuation character, the backslash (). This character allows you to type one command across multiple lines to improve readability:
# ./configure --prefix=/usr/local/php
--with-mysqli=mysqlnd
--with-apxs2=/usr/local/apache2/bin/apxs
--with-jpeg-dir=/usr/local/lib --with-png-dir=/usr/
local/lib
--with-zlib-dir=/usr/local/lib
--with-imap=/usr/lib
--with-kerberos
--with-imap-ssl
--with-gd
The first configuration flag sets the location of the installation directory for PHP, in this case /usr/local/php. The second flag ensures that PHP is built with the native driver for MySQL. The third flag tells PHP the location of apxs2 (the Apache Extension tool), which is used to build Apache modules, of which PHP will be one. The need to configure the location of apxs2 within the PHP build process is so that the appropriate Apache module version of PHP can be built, resulting in the need to pre-configure and install at least a basic version of Apache before building PHP.
The next set of configuration flags point the PHP configuration tool to the location of the libraries you installed previously (JPEG, PNG, zlip, and IMAP). The --with-kerberos and –with-imap-ssl flags are additional flags related to the use of the IMAP library; depending on the precompiled package you use on your system, you may not need these flags or you may need additional flags. The configuration process will tell you what flags are missing.
Once the configuration has completed, you will see a message something like this:
Generating files
configure: creating ./config.status
creating main/internal_functions.c
creating main/internal_functions_cli.c
+--------------------------------------------------------------------+
| License: |
| This software is subject to the PHP License, available in this |
| distribution in the file LICENSE. By continuing this installation |
| process, you are bound by the terms of this license agreement. |
| If you do not agree with the terms of this license, you must abort |
| the installation process at this point. |
+--------------------------------------------------------------------+
Thank you for using PHP.
config.status: creating php7.spec
config.status: creating main/build-defs.h
config.status: creating scripts/phpize
config.status: creating scripts/man1/phpize.1
config.status: creating scripts/php-config
config.status: creating scripts/man1/php-config.1
config.status: creating sapi/cli/php.1
config.status: creating sapi/cgi/php-cgi.1
config.status: creating ext/phar/phar.1
config.status: creating ext/phar/phar.phar.1
config.status: creating main/php_config.h
config.status: main/php_config.h is unchanged
config.status: executing default commands
At this point your system is prepared to make and install the binaries; issue the make and make install commands to build the binaries according to your specifications:
# make
# make install
After the final step, unless there were error messages along the way, the PHP binary will have been built and installed, and the PHP Apache module will have been built and installed and put in the proper directory within the Apache directory structure. The last bit of configuration you might want to do is to ensure that the php.ini file is located in a stable and usual place:
# sudo cp php.ini-development /usr/local/php/lib/php.ini
or
# sudo cp php.ini-production /usr/local/php/lib/php.ini
The two versions of php.ini in the suggested commands have different options set. The first, php.ini-development, is intended for development machines. For instance, it has display_errors set to On. This makes development easier, but it is not really appropriate on a production machine. When we refer to a php.ini setting’s default value in this book, we mean its setting in this version of php.ini. The second version, php.ini-production, is intended for production machines.
You can edit the php.ini file to set PHP options. There are numerous options that you might choose to set, but a few in particular are worth noting. You might need to set the value of sendmail_path if you want to send email from scripts.
With PHP all set, it’s time to briefly return to the Apache source files and reconfigure and recompile in a more appropriate way for development work (beyond the basics we configured earlier). In addition to the configuration option --enable-so, which enabled the use of shared objects such as PHP, let’s use --enable-ssl to enables the use of the mod_ssl module. Additionally, we set the base directory for OpenSSL, which we configured and installed earlier in this section.
# cd /usr/local/httpd-VERSION
# sudo SSL_BASE=../openssl-VERSION
./configure
--prefix=/usr/local/apache2
--enable-so
--enable-ssl
# sudo make
# sudo make install
If everything goes well, you will be returned to the command prompt without error messages and can make the final configuration modifications to your installation. If the installation process encounters any errors, visit the Apache HTTP Server 2.4 documentation for help working through any anomalies: http://httpd.apache.org/docs/2.4/.
Basic Apache Configuration Modifications
The file used for most of the Apache configuration is called httpd.conf. If you have followed the previous instructions, your httpd.conf file will be located in the /usr/local/apache2/conf directory. To ensure that your server will startup and use PHP and SSL, you’ll need to make a few modifications:
![]() Find the line that begins with
Find the line that begins with #ServerName and make it simply say ServerName yourservername.com
![]() Find the block of lines that begin with AddType and add the following to ensure that files with the PHP extension are appropriately routed through the PHP module for processing:
Find the block of lines that begin with AddType and add the following to ensure that files with the PHP extension are appropriately routed through the PHP module for processing:
AddType application/x-httpd-php .php
AddType application/x-httpd-php-source .phps
Now you are ready to start the Apache server to see whether it works with PHP. First, let’s start the server without the SSL support and see whether it comes up at all. In the next sections we’ll check for PHP support and also SSL support to see whether everything is working.
You can use configtest to check whether the configuration is set up properly:
# cd /usr/local/apache2/bin
# sudo ./apachectl configtest
Syntax OK
# sudo ./apachectl start
./apachectl start: httpd started
If it worked correctly, you will see something similar to Figure A.3 when you connect to the server with a web browser.
Note
You can connect to the server by using a domain name or the actual IP address of the computer. Check both cases to ensure that everything is working properly.

Is PHP Support Working?
Now that you’re sure the Apache web server works on its own, you can test its PHP support. Create a file named test.php in the document root path, which should be /usr/local/apache/htdocs if you followed the installation instructions above. Note that you can change this directory path in the httpd.conf file.
The file should contain just the following line of code:
<?php phpinfo(); ?>
The output screen should look like Figure A.4.

Is SSL Working?
At this stage, SSL should not be working on your machine, because we have not created the SSL certificates and keys that go along with it. Apache is configured and ready to go, but the underlying certificates that secure your data are not yet present.
You can create self-signed certificates for development purposes using OpenSSL; if you are going to use your site in production, you should use legitimately signed SSL certificates from a Certificate Authority. For example, Let’s Encrypt is a free, automated, and open certificate authority (CA), run for the public’s benefit by the Internet Security Research Group (ISRG). Learn more at https://letsencrypt.org/.
To create a self-signed certificate, issue the following command to create a certificate and key and place both in a location that Apache expects:
# sudo openssl req -x509 -nodes -days 365 -newkey rsa:2048
-keyout /usr/local/apache2/conf/server.key
-out /usr/local/apache2/conf/server.crt
The certificate and key creation script will ask some information such as country, state, company name, and domain name; you can make dummy information or use real information, as you’d like. After the script finishes, you will have a dummy self-signed certificate good for 365 days, placed in /usr/local/apache2/conf along with its matching key.
The Apache SSL module has its own configuration file, located at /usr/local/apache2/conf/extra/httpd-ssl.conf. You can leave it untouched at this stage and just restart Apache for all changes to take effect, or you can continue on to modify the configuration as you wish. For documentation on the possible Apache httpd-ssl.conf modifications, please see http://httpd.apache.org/docs/2.4/mod/mod_ssl.html.
In Apache 2.4, all you need to do to enable SSL at the server level is uncomment the rule for the httpd-ssl.conf file in httpd.conf. Instead of this in httpd.conf,
# Include conf/extra/httpd-ssl.conf
the line should read:
Include conf/extra/httpd-ssl.conf
Once configuration changes have been made, simply restart the server:
# sudo /usr/local/apache2/bin/apachectl restart
Test to see whether it works by connecting to the server with a web browser and selecting the https protocol, like this:
https://yourserver.yourdomain.com
Try your server’s IP address also, like this:
https://xxx.xxx.xxx.xxx
or
http://xxx.xxx.xxx.xxx:443
If the configuration and self-signed certificates are all working, the server will send the certificate to the browser to establish a secure connection. Given this is a self-signed certificate, the browser will also show you a warning before allowing you to proceed, as shown in Figure A.5. If it were a certificate from a certification authority your browser already trusts, the browser would not prompt you.

Figure A.5 When using a self-signed certificate, your browser will prompt you to add an exception to ensure you trust it
Installing Apache, PHP, and MySQL for Windows and Mac OS X Using All-in-One Installation Packages
If you have the appropriate development tools, you can install PHP, Apache, and MySQL from source on both Windows and Mac OS X systems. You can also manually install PHP, Apache, and MySQL packages individually, as described in the installation pages of the PHP manual at http://php.net/manual/en/install.php. However, for getting up and running quickly in a development environment, you can use a third-party installation package that offers an all-in-one installation solution.
A popular and well-maintained third-party installation package for Apache, MySQL, and PHP is XAMPP—the “X” indicates it is cross-platform, and in fact you can download for free an XAMPP package for Linux, Windows, or Mac OS X at https://www.apachefriends.org/download.html:
There are two other solid third-party installation packages for Apache, MySQL, and PHP that are specific to operating systems:
![]() WAMP—Installation of Apache, MySQL, and PHP on Windows. See http://www.wampserver.com/ for more information.
WAMP—Installation of Apache, MySQL, and PHP on Windows. See http://www.wampserver.com/ for more information.
![]() MAMP—Installation of Apache, MySQL, and PHP on Mac. See http://www.mamp.info/ for more information.
MAMP—Installation of Apache, MySQL, and PHP on Mac. See http://www.mamp.info/ for more information.
To set up PHP, Apache, and MySQL on your Windows or Mac OS X system, follow the instructions of the third-party installation package of your choice. It is very likely that you will encounter a one-click install process, or a simple wizard-based installation process that will lead you carefully through the steps for installation and configuration.
Testing Your Work
Once you have finished using your third-party configuration and installation package, start your web server and test to ensure that PHP is working as intended. Create a test.php file and add the following line to it:
<?php phpinfo(); ?>
Make sure the file is in the document root directory (for example, on Windows this is typically C:Program FileApache Software FoundationApache2.4htdocs); then open it in your browser, as follows:
http://localhost/test.php
or
http://your-ip-address-here/test.php
If you see a page similar to the one shown in Figure A.4, you know that PHP is working with Apache.
Installing PEAR
PEAR, the PHP Extension and Application Repository (PEAR), is a distribution system for reusable PHP components contributed by the PHP developer community. There are currently over 200 packages available for PHP 5+, all of which provide extended functionality to the base PHP installation.
To use PEAR, you must first ensure you have the PEAR package installer. This package installer will already exist and be available for use subsequent to a UNIX-based PHP installation, but to install the PEAR package installer on Windows, go to the command line and type :c:phpgo-pear.
The go-pear script asks you a few straightforward questions about where you would like the package installer and the standard PEAR classes installed, then downloads and installs them for you. At this stage, you should have an installed version of the PEAR package installer and the basic PEAR libraries. You can then simply install packages by typing
pear install package
where package is the name of the package you want to install.
To get a list of available packages, type
pear list-all
To see what you have installed currently, try
pear list
If you want to check for newer versions of any installed packages, use
pear upgrade pkgname
If the preceding procedure does not work for you for whatever reason, we suggest you try downloading PEAR packages directly. To do this, go to http://pear.php.net/packages.php. From this location you can navigate through the various packages available until you find the one you need, at which time you can download and manually place the files in the PHP PEAR directory on your system.
Installing PHP with Other Web Servers
Although using PHP with the Apache web server is almost a default configuration given how long the two technologies have been working together successfully (well over 15 years at this point), you can certainly set up PHP with several other web servers. For example, a configuration that has been rising in popularity recently is PHP with Nginx (http://nginx.org). For detailed instructions regarding the installation of PHP on an Nginx server, please see the PHP manual at http://php.net/manual/en/install.unix.nginx.php.
Additional web server configuration instructions for UNIX systems are also available in the PHP manual at http://php.net/manual/en/install.unix.php.