3. Using Arrays
This chapter shows you how to use an important programming construct: arrays. The variables used in the previous chapters were scalar variables, which store a single value. An array is a variable that stores a set or sequence of values. One array can have many elements, and each element can hold a single value, such as text or numbers, or another array. An array containing other arrays is known as a multidimensional array.
PHP supports arrays with both numerical and string indexes. You are probably familiar with numerically indexed arrays if you’ve used any other programming language, but you might not have seen arrays using string indexes before, although you may have seen similar things called hashes, maps, or dictionaries elsewhere. Rather than each element having a numeric index, you can use words or other meaningful information.
In this chapter, you continue developing the Bob’s Auto Parts example using arrays to work more easily with repetitive information such as customer orders. Likewise, you write shorter, tidier code to do some of the things you did with files in the preceding chapter.
Key topics covered in this chapter include
![]() Non-numerically indexed arrays
Non-numerically indexed arrays
![]() Array sorting
Array sorting
![]() Array functions
Array functions
What Is an Array?
You learned about scalar variables in Chapter 1, “PHP Crash Course.” A scalar variable is a named location in which to store a value; similarly, an array is a named place to store a set of values, thereby allowing you to group variables.
Bob’s product list is the array for the example used in this chapter. In Figure 3.1, you can see a list of three products stored in an array format. These three products are stored in a single variable called $products. (We describe how to create a variable like this shortly.)

After you have the information as an array, you can do a number of useful things with it. Using the looping constructs from Chapter 1, you can save work by performing the same actions on each value in the array. The whole set of information can be moved around as a single unit. This way, with a single line of code, all the values in the array can be passed to a function. For example, you might want to sort the products alphabetically. To achieve this, you could pass the entire array to PHP’s sort() function.
The values stored in an array are called the array elements. Each array element has an associated index (also called a key) that is used to access the element. Arrays in many programming languages have numerical indices that typically start from zero or one.
PHP allows you to interchangeably use numbers or strings as the array indices. You can use arrays in the traditional numerically indexed way or set the keys to be whatever you like to make the indexing more meaningful and useful. (This approach may be familiar to you if you have used associative arrays, maps, hashes, or dictionaries in other programming languages.) The programming approach may vary a little depending on whether you are using standard numerically indexed arrays or more interesting index values.
We begin by looking at numerically indexed arrays and then move on to using user-defined keys.
Numerically Indexed Arrays
Numerically indexed arrays are supported in most programming languages. In PHP, the indices start at zero by default, although you can alter this value.
Initializing Numerically Indexed Arrays
To create the array shown in Figure 3.1, use the following line of PHP code:
$products = array( 'Tires', 'Oil', 'Spark Plugs' );
This code creates an array called $products containing the three values given: 'Tires', 'Oil', and 'Spark Plugs'. Note that, like echo, array() is actually a language construct rather than a function.
Since PHP 5.4, you can use a new shorthand syntax for creating arrays. This uses the [ and ] characters in place of the array() operator. For example, to create the array shown in Figure 3.1 with the shorthand syntax, you would use the following line of code:
$products = ['Tires', 'Oil', 'Spark Plugs'];
Depending on the contents you need in your array, you might not need to manually initialize them as in the preceding example. If you have the data you need in another array, you can simply copy one array to another using the = operator.
If you want an ascending sequence of numbers stored in an array, you can use the range() function to automatically create the array for you. The following statement creates an array called numbers with elements ranging from 1 to 10:
$numbers = range(1,10);
The range() function has an optional third parameter that allows you to set the step size between values. For instance, if you want an array of the odd numbers between 1 and 10, you could create it as follows:
$odds = range(1, 10, 2);
The range() function can also be used with characters, as in this example:
$letters = range('a', 'z');
If you have information stored in a file on disk, you can load the array contents directly from the file. We look at this topic later in this chapter under the heading “Loading Arrays from Files.”
If you have the data for your array stored in a database, you can load the array contents directly from the database. This process is covered in Chapter 11, “Accessing Your MySQL Database from the Web with PHP.”
You can also use various functions to extract part of an array or to reorder an array. We look at some of these functions later in this chapter under the heading “Performing Other Array Manipulations.”
Accessing Array Contents
To access the contents of a variable, you use its name. If the variable is an array, you access the contents using both the variable name and a key or index. The key or index indicates which of the values in the array you access. The index is placed in square brackets after the name. In other words, you can use $products[0], $products[1], and $products[2] to access each of the contents of the $products array.
You may also use the {} characters to access array elements instead of the [] characters if you prefer. For example, you could use $products{0} to access the first element of the products array.
By default, element zero is the first element in the array. The same numbering scheme is used in C, C++, Java, and a number of other languages, but it might take some getting used to if you are not familiar with it.
As with other variables, you change array elements’ contents by using the = operator. The following line replaces the first element in the array, 'Tires', with 'Fuses':
$products[0] = 'Fuses';
You can use the following line to add a new element—'Fuses'—to the end of the array, giving a total of four elements:
$products[3] = 'Fuses';
To display the contents, you could type this line:
echo "$products[0] $products[1] $products[2] $products[3]";
Note that although PHP’s string parsing is pretty clever, you can confuse it. If you are having trouble with array or other variables not being interpreted correctly when embedded in a double-quoted string, you can either put them outside quotes or use complex syntax, which we discuss in Chapter 4, “String Manipulation and Regular Expressions.” The preceding echo statement works correctly, but in many of the more complex examples later in this chapter, you will notice that the variables are outside the quoted strings.
Like other PHP variables, arrays do not need to be initialized or created in advance. They are automatically created the first time you use them.
The following code creates the same $products array created previously with the array() statement:
$products[0] = 'Tires';
$products[1] = 'Oil';
$products[2] = 'Spark Plugs';
If $products does not already exist, the first line will create a new array with just one element. The subsequent lines add values to the array. The array is dynamically resized as you add elements to it. This resizing capability is not present in many other programming languages.
Using Loops to Access the Array
Because the array is indexed by a sequence of numbers, you can use a for loop to more easily display its contents:
for ($i = 0; $i<3; $i++) {
echo $products[$i]." ";
}
This loop provides similar output to the preceding code but requires less typing than manually writing code to work with each element in a large array. The ability to use a simple loop to access each element is a nice feature of arrays. You can also use the foreach loop, specially designed for use with arrays. In this example, you could use it as follows:
foreach ($products as $current) {
echo $current." ";
}
This code stores each element in turn in the variable $current and prints it out.
Arrays with Different Indices
In the $products array, you allowed PHP to give each item the default index. This meant that the first item you added became item 0; the second, item 1; and so on. PHP also supports arrays in which you can associate any scalar key or index you want with each value.
Initializing an Array
The following code creates an array with product names as keys and prices as values:
$prices = array('Tires'=>100, 'Oil'=>10, 'Spark Plugs'=>4);
The symbol between the keys and values (=>) is simply an equal sign immediately followed by a greater than symbol.
Accessing the Array Elements
Again, you access the contents using the variable name and a key, so you can access the information stored in the prices array as $prices['Tires'], $prices['Oil'], and $prices['Spark Plugs'].
The following code creates the same $prices array. Instead of creating an array with three elements, this version creates an array with only one element and then adds two more:
$prices = array('Tires'=>100);
$prices['Oil'] = 10;
$prices['Spark Plugs'] = 4;
Here is another slightly different but equivalent piece of code. In this version, you do not explicitly create an array at all. The array is created for you when you add the first element to it:
$prices['Tires'] = 100;
$prices['Oil'] = 10;
$prices['Spark Plugs'] = 4;
Using Loops
Because the indices in an array are not numbers, you cannot use a simple counter in a for loop to work with the array. However, you can use the foreach loop or the list() and each() constructs.
The foreach loop has a slightly different structure when using non-numerically indexed arrays. You can use it exactly as you did in the previous example, or you can incorporate the keys as well:
foreach ($prices as $key => $value) {
echo $key." – ".$value."<br />";
}
The following code lists the contents of the $prices array using the each() construct:
while ($element = each($prices)) {
echo $element['key']." – ". $element['value'];
echo "<br />";
}
The output of this script fragment is shown in Figure 3.2.

In Chapter 1, we looked at while loops and the echo statement. The preceding code uses the each() function, which we have not yet covered. This function returns the current element in an array and makes the next element the current one. Because we are calling each() within a while loop, it returns every element in the array in turn and stops when the end of the array is reached.
In this code, the variable $element is an array. When you call each(), it gives you an array with four values and the four indices to the array locations. The locations key and 0 contain the key of the current element, and the locations value and 1 contain the value of the current element. Although the one you choose makes no difference, we chose to use the named locations rather than the numbered ones.
There is a more elegant and common way of doing the same thing. The construct list() can be used to split an array into a number of values. You can separate each set of values that the each() function gives you like this:
while (list($product, $price) = each($prices)) {
echo $product." – ".$price."<br />";
}
This line uses each() to take the current element from $prices, return it as an array, and make the next element current. It also uses list() to turn the 0 and 1 elements from the array returned by each() into two new variables called $product and $price.
When you are using each(), note that the array keeps track of the current element. If you want to use the array twice in the same script, you need to set the current element back to the start of the array using the function reset(). To loop through the prices array again, you type the following:
reset($prices);
while (list($product, $price) = each($prices)) {
echo $product." – ".$price."<br />";
}
This code sets the current element back to the start of the array and allows you to go through again.
Array Operators
One set of special operators applies only to arrays. Most of them have an analogue in the scalar operators, as you can see by looking at Table 3.1.

These operators are mostly fairly self-evident, but union requires some further explanation. The union operator tries to add the elements of $b to the end of $a. If elements in $b have the same keys as some elements already in $a, they will not be added. That is, no elements of $a will be overwritten.
You will notice that the array operators in Table 3.1 all have equivalent operators that work on scalar variables. As long as you remember that + performs addition on scalar types and union on arrays—even if you have no interest in the set arithmetic behind that behavior—the behaviors should make sense. You cannot usefully compare arrays to scalar types.
Multidimensional Arrays
Arrays do not have to be a simple list of keys and values; each location in the array can hold another array. This way, you can create a two-dimensional array. You can think of a two-dimensional array as a matrix, or grid, with width and height or rows and columns.
If you want to store more than one piece of data about each of Bob’s products, you could use a two-dimensional array. Figure 3.3 shows Bob’s products represented as a two-dimensional array with each row representing an individual product and each column representing a stored product attribute.

Using PHP, you would write the following code to set up the data in the array shown in Figure 3.3:
$products = array( array('TIR', 'Tires', 100 ),
array('OIL', 'Oil', 10 ),
array('SPK', 'Spark Plugs', 4 ) );
You can see from this definition that the $products array now contains three arrays.
To access the data in a one-dimensional array, recall that you need the name of the array and the index of the element. A two-dimensional array is similar, except that each element has two indices: a row and a column. (The top row is row 0, and the far-left column is column 0.)
To display the contents of this array, you could manually access each element in order like this:
echo '|'.$products[0][0].'|'.$products[0][1].'|'.$products[0][2].'|<br />';
echo '|'.$products[1][0].'|'.$products[1][1].'|'.$products[1][2].'|<br />';
echo '|'.$products[2][0].'|'.$products[2][1].'|'.$products[2][2].'|<br />';
Alternatively, you could place a for loop inside another for loop to achieve the same result:
for ($row = 0; $row < 3; $row++) {
for ($column = 0; $column < 3; $column++) {
echo '|'.$products[$row][$column];
}
echo '|<br />';
}
Both versions of this code produce the same output in the browser:
|TIR|Tires|100||OIL|Oil|10|
|SPK|Spark Plugs|4|
The only difference between the two examples is that your code will be much shorter if you use the second version with a large array.
You might prefer to create column names instead of numbers, as shown in Figure 3.3. To store the same set of products, with the columns named as they are in Figure 3.3, you would use the following code:
$products = array(array('Code' => 'TIR',
'Description' => 'Tires',
'Price' => 100
),
array('Code' => 'OIL',
'Description' => 'Oil',
'Price' => 10
),
array('Code' => 'SPK',
'Description' => 'Spark Plugs',
'Price' =>4
)
);
This array is easier to work with if you want to retrieve a single value. Remembering that the description is stored in the Description column is easier than remembering it is stored in column 1. Using descriptive indices, you do not need to remember that an item is stored at [x][y]. You can easily find your data by referring to a location with meaningful row and column names.
You do, however, lose the ability to use a simple for loop to step through each column in turn. Here is one way to write code to display this array:
for ($row = 0; $row < 3; $row++){
echo '|'.$products[$row]['Code'].'|'.$products[$row]['Description'].
'|'.$products[$row]['Price'].'|<br />';
}
Using a for loop, you can step through the outer, numerically indexed $products array. Each row in the $products array is an array with descriptive indices. Using the each() and list() functions in a while loop, you can step through these inner arrays. Therefore, you can use a while loop inside a for loop:
for ($row = 0; $row < 3; $row++){
while (list( $key, $value ) = each( $products[$row])){
echo '|'.$value;
}
echo '|<br />';
}
You do not need to stop at two dimensions. In the same way that array elements can hold new arrays, those new arrays, in turn, can hold more arrays.
A three-dimensional array has height, width, and depth. If you are comfortable thinking of a two-dimensional array as a table with rows and columns, imagine a pile or deck of those tables. Each element is referenced by its layer, row, and column.
If Bob divided his products into categories, you could use a three-dimensional array to store them. Figure 3.4 shows Bob’s products in a three-dimensional array.

From the code that defines this array, you can see that a three-dimensional array is an array containing arrays of arrays:
$categories = array(array(array('CAR_TIR', 'Tires', 100 ),
array('CAR_OIL', 'Oil', 10 ),
array('CAR_SPK', 'Spark Plugs', 4 )
),
array(array('VAN_TIR', 'Tires', 120 ),
array('VAN_OIL', 'Oil', 12 ),
array('VAN_SPK', 'Spark Plugs', 5 )
),
array(array('TRK_TIR', 'Tires', 150 ),
array('TRK_OIL', 'Oil', 15 ),
array('TRK_SPK', 'Spark Plugs', 6 )
)
);
Because this array has only numeric indices, you can use nested for loops to display its contents:
for ($layer = 0; $layer < 3; $layer++) {
echo 'Layer'.$layer."<br />";
for ($row = 0; $row < 3; $row++) {
for ($column = 0; $column < 3; $column++) {
echo '|'.$categories[$layer][$row][$column];
}
echo '|<br />';
}
}
Because of the way multidimensional arrays are created, you could create four-, five-, or even six-dimensional arrays. There is no language limit to the number of dimensions, but it is difficult for people to visualize constructs with more than three dimensions. Most real-world problems match logically with constructs of three or fewer dimensions.
Sorting Arrays
Sorting related data stored in an array is often useful. You can easily take a one-dimensional array and sort it into order.
Using sort()
The following code showing the sort() function results in the array being sorted into ascending alphabetical order:
$products = array('Tires', 'Oil', 'Spark Plugs');
sort($products);
The array elements will now appear in the order Oil, Spark Plugs, Tires.
You can sort values by numerical order, too. If you have an array containing the prices of Bob’s products, you can sort it into ascending numeric order as follows:
$prices = array(100, 10, 4);
sort($prices);
The prices will now appear in the order 4, 10, 100.
Note that the sort() function is case sensitive. All capital letters come before all lowercase letters. So A is less than Z, but Z is less than a.
The function also has an optional second parameter. You may pass one of the constants SORT_REGULAR (the default), SORT_NUMERIC, SORT_STRING, SORT_LOCALE_STRING, SORT_NATURAL, SORT_FLAG_CASE.
The ability to specify the sort type is useful when you are comparing strings that might contain numbers, for example, 2 and 12. Numerically, 2 is less than 12, but as strings '12' is less than '2'.
Passing the SORT_LOCALE_STRING constant will sort the array as strings depending on the current locale, as sort orders are different in different locales.
Using SORT_NATURAL causes a natural sort order to be used. You can also get this by using the natsort() function. Natural sort order is like a combination of string and numeric sorts, to be more intuitive. For example, using a string sort for the strings 'file1', 'file2', and 'file10' would order them as 'file1', 'file10', 'file2'. Using a natural sort, they would be ordered as 'file1', 'file2', 'file10', which is more intuitive—or more natural—for humans.
The constant SORT_FLAG_CASE is used in conjunction with SORT_STRING or SORT_NATURAL. Use the bitwise and operator to combine them, as follows:
sort($products, SORT_STRING & SORT_FLAG_CASE);
This makes the sort() function ignore case, so 'a' and 'A' are treated as equivalent.
Using asort() and ksort() to Sort Arrays
If you are using an array with descriptive keys to store items and their prices, you need to use different kinds of sort functions to keep keys and values together as they are sorted.
The following code creates an array containing the three products and their associated prices and then sorts the array into ascending price order:
$prices = array('Tires'=>100, 'Oil'=>10, 'Spark Plugs'=>4);
asort($prices);
The function asort() orders the array according to the value of each element. In the array, the values are the prices, and the keys are the textual descriptions. If, instead of sorting by price, you want to sort by description, you can use ksort(), which sorts by key rather than value. The following code results in the keys of the array being ordered alphabetically—Oil, Spark Plugs, Tires:
$prices = array('Tires'=>100, 'Oil'=>10, 'Spark Plugs'=>4);
ksort($prices);
Sorting in Reverse
The three different sorting functions—sort(), asort(), and ksort()—sort an array into ascending order. Each function has a matching reverse sort function to sort an array into descending order. The reverse versions are called rsort(), arsort(), and krsort().
You use the reverse sort functions in the same way you use the ascending sort functions. The rsort() function sorts a single-dimensional numerically indexed array into descending order. The arsort() function sorts a one-dimensional array into descending order using the value of each element. The krsort() function sorts a one-dimensional array into descending order using the key of each element.
Sorting Multidimensional Arrays
Sorting arrays with more than one dimension, or by something other than alphabetical or numerical order, is more complicated. PHP knows how to compare two numbers or two text strings, but in a multidimensional array, each element is an array.
There are two approaches to sorting multidimensional arrays: creating a user-defined sort or using the array_multisort() function.
Using the array_multisort() function
The array_multisort() function can be used either to sort multidimensional arrays, or to sort multiple arrays at once.
The following is the definition of a two-dimensional array used earlier. This array stores Bob’s three products with a code, a description, and a price for each:
$products = array(array('TIR', 'Tires', 100),
array('OIL', 'Oil', 10),
array('SPK', 'Spark Plugs', 4));
If we simply take the function array_multisort() and apply it as follows, it will sort the array. But in what order?
array_multisort($products);
As it turns out, this will sort our $products array by the first item in each array, using a regular ascending sort, as follows:
'OIL', 'Oil', 10
'SPK', 'Spark Plugs', 4
'TIR', 'Tires', 100
This function has the following prototype:
bool array_multisort(array &a [, mixed order = SORT_ASC [, mixed sorttype =
SORT_REGULAR [, mixed $... ]]] )
For the ordering you can pass SORT_ASC or SORT_DESC for ascending or descending order, respectively.
For the sort type, array_multisort() supports the same constants as the sort() function.
One important point to note for array_multisort() is that, while it will maintain key-value associations when the keys are strings, it will not do so if the keys are numeric, as in this example.
User-Defined Sorts
Taking the same array as in the previous example, there are at least two useful sort orders. You might want the products sorted into alphabetical order using the description or by numeric order by the price. Either result is possible, but you can use the function usort() to tell PHP how to compare the items. To do this, you need to write your own comparison function.
The following code sorts this array into alphabetical order using the second column in the array—the description:
function compare($x, $y) {
if ($x[1] == $y[1]) {
return 0;
} else if ($x[1] < $y[1]) {
return -1;
} else {
return 1;
}
}
usort($products, 'compare');
So far in this book, you have called a number of the built-in PHP functions. To sort this array, you need to define a function of your own. We examine writing functions in detail in Chapter 5, “Reusing Code and Writing Functions,” but here is a brief introduction.
You define a function by using the keyword function. You need to give the function a name. Names should be meaningful, so you can call it compare() for this example. Many functions take parameters or arguments. This compare() function takes two: one called $x and one called $y. The purpose of this function is to take two values and determine their order.
For this example, the $x and $y parameters are two of the arrays within the main array, each representing one product. To access the Description of the array $x, you type $x[1] because the Description is the second element in these arrays, and numbering starts at zero. You use $x[1] and $y[1] to compare each Description from the arrays passed into the function.
When a function ends, it can give a reply to the code that called it. This process is called returning a value. To return a value, you use the keyword return in the function. For example, the line return 1; sends the value 1 back to the code that called the function.
To be used by usort(), the compare() function must compare $x and $y. The function must return 0 if $x equals $y, a negative number if it is less, or a positive number if it is greater. The function will return 0, 1, or -1, depending on the values of $x and $y.
The final line of code calls the built-in function usort() with the array you want sorted ($products) and the name of the comparison function (compare()).
If you want the array sorted into another order, you can simply write a different comparison function. To sort by price, you need to look at the third column in the array and create this comparison function:
function compare($x, $y) {
if ($x[2] == $y[2]) {
return 0;
} else if ($x[2] < $y[2]) {
return -1;
} else {
return 1;
}
}
When usort($products, 'compare') is called, the array is placed in ascending order by price.
Note
Should you run these snippets to test them, there will be no output. These snippets are meant to be part of large pieces of code you might write.
The u in usort() stands for user because this function requires a user-defined comparison function. The uasort() and uksort() versions of asort and ksort also require user-defined comparison functions.
Similar to asort(), uasort() should be used when sorting a non-numerically indexed array by value. Use asort if your values are simple numbers or text. Define a comparison function and use uasort() if your values are more complicated objects such as arrays.
Similar to ksort(), uksort() should be used when sorting a non-numerically indexed array by key. Use ksort if your keys are simple numbers or text. Define a comparison function and use uksort() if your keys are more complicated objects such as arrays.
Reverse User Sorts
The functions sort(), asort(), and ksort() all have matching reverse sorts with an r in the function name. The user-defined sorts do not have reverse variants, but you can sort a multidimensional array into reverse order. Because you provide the comparison function, you can write a comparison function that returns the opposite values. To sort into reverse order, the function needs to return 1 if $x is less than $y and -1 if $x is greater than $y. For example,
function reverse_compare($x, $y) {
if ($x[2] == $y[2]) {
return 0;
} else if ($x[2] < $y[2]) {
return 1;
} else {
return -1;
}
}
Calling usort($products, 'reverse_compare') would now result in the array being placed in descending order by price.
Reordering Arrays
For some applications, you might want to manipulate the order of the array in other ways than a sort. The function shuffle() randomly reorders the elements of your array. The function array_reverse() gives you a copy of your array with all the elements in reverse order.
Using shuffle()
Bob wants to feature a small number of his products on the front page of his site. He has a large number of products but would like three randomly selected items shown on the front page. So that repeat visitors do not get bored, he would like the three chosen products to be different for each visit. He can easily accomplish his goal if all his products are in an array. Listing 3.1 displays three randomly chosen pictures by shuffling the array into a random order and then displaying the first three.
Listing 3.1 bobs_front_page.php—Using PHP to Produce a Dynamic Front Page for Bob’s Auto Parts
<?php
$pictures = array('brakes.png', 'headlight.png',
'spark_plug.png', 'steering_wheel.png',
'tire.png', 'wiper_blade.png');
shuffle($pictures);
?>
<!DOCTYPE html>
<html>
<head>
<title>Bob's Auto Parts</title>
</head>
<body>
<h1>Bob's Auto Parts</h1>
<div align="center">
<table style="width: 100%; border: 0">
<tr>
<?php
for ($i = 0; $i < 3; $i++) {
echo "<td style="width: 33%; text-align: center">
<img src="";
echo $pictures[$i];
echo ""/></td>";
}
?>
</tr>
</table>
</div>
</body>
</html>
Because the code selects random pictures, it produces a different page nearly every time you load it, as shown in Figure 3.5.

Reversing an Array
Sometimes you may want to reverse the order of an array. The simplest way to do this is with the function array_reverse(), which takes an array and creates a new one with the same contents in reverse order.
Using the range() function usually creates an ascending sequence, as follows:
$numbers = range(1,10);
You can then use the array_reverse() function to reverse the array created by range():
$numbers = range(1,10);
$numbers = array_reverse($numbers);
Note that array_reverse() returns a modified copy of the array. If you do not want the original array, as in this example, you can simply store the new copy over the original.
Alternatively, you could create the array in descending order in the first place, one element at a time, by writing a for loop:
$numbers = array();
for($i=10; $i>0; $i--) {
array_push($numbers, $i);
}
A for loop can go in descending order like this: You set the starting value high and at the end of each loop use the -- operator to decrease the counter by one.
Here, we create an empty array and then use array_push() for each element to add one new element to the end of an array. As a side note, the opposite of array_push() is array_pop(). This function removes and returns one element from the end of an array.
Note that if the desired array is just a range of descending integers, you can also create it in reverse order by passing –1 as the optional step parameter to range():
$numbers = range(10, 1, -1);
Loading Arrays from Files
In Chapter 2, “Storing and Retrieving Data,” you learned how to store customer orders in a file. Each line in the file looked something like this:
01:34, 14th September 2015 1 tires 2 oil 3 spark plugs $145.2 123 Main
Street, Sometown, CA 95128
To process or fulfill this order, you could load it back into an array. Listing 3.2 displays the current order file.
Listing 3.2 vieworders.php—Using PHP to Display Orders for Bob
<?php
// create short variable name
$document_root = $_SERVER['DOCUMENT_ROOT'];
?>
<!DOCTYPE html>
<html>
<head>
<title>Bob's Auto Parts - Order Results</title>
</head>
<body>
<h1>Bob's Auto Parts</h1>
<h2>Customer Orders</h2>
<?php
$orders= file("$document_root/../orders/orders.txt");
$number_of_orders = count($orders);
if ($number_of_orders == 0) {
echo "<p><strong>No orders pending.<br />
Please try again later.</strong></p>";
}
for ($i=0; $i<$number_of_orders; $i++) {
echo $orders[$i]."<br />";
}
?>
</body>
</html>
This script produces almost exactly the same output as Listing 2.3 in the preceding chapter, which was shown in Figure 2.4. This time, the script uses the function file(), which loads the entire file into an array. Each line in the file becomes one element of an array. This code also uses the count() function to see how many elements are in an array.
Furthermore, you could load each section of the order lines into separate array elements to process the sections separately or to format them more attractively. Listing 3.3 does exactly that.
Listing 3.3 vieworders_v2.php—Using PHP to Separate, Format, and Display Orders for Bob
<?php
// create short variable name
$document_root = $_SERVER['DOCUMENT_ROOT'];
?>
<!DOCTYPE html>
<html>
<head>
<title>Bob's Auto Parts - Customer Orders</title>
<style type="text/css">
table, th, td {
border-collapse: collapse;
border: 1px solid black;
padding: 6px;
}
th {
background: #ccccff;
}
</style>
</head>
<body>
<h1>Bob's Auto Parts</h1>
<h2>Customer Orders</h2>
<?php
//Read in the entire file
//Each order becomes an element in the array
$orders= file("$document_root/../orders/orders.txt");
// count the number of orders in the array
$number_of_orders = count($orders);
if ($number_of_orders == 0) {
echo "<p><strong>No orders pending.<br />
Please try again later.</strong></p>";
}
echo "<table>
";
echo "<tr>
<th>Order Date</th>
<th>Tires</th>
<th>Oil</th>
<th>Spark Plugs</th>
<th>Total</th>
<th>Address</th>
<tr>";
for ($i=0; $i<$number_of_orders; $i++) {
//split up each line
$line = explode(" ", $orders[$i]);
// keep only the number of items ordered
$line[1] = intval($line[1]);
$line[2] = intval($line[2]);
$line[3] = intval($line[3]);
// output each order
echo "<tr>
<td>".$line[0]."</td>
<td style="text-align: right;">".$line[1]."</td>
<td style="text-align: right;">".$line[2]."</td>
<td style="text-align: right;">".$line[3]."</td>
<td style="text-align: right;">".$line[4]."</td>
<td>".$line[5]."</td>
</tr>";
}
echo "</table>";
?>
</body>
</html>
The code in Listing 3.3 loads the entire file into an array, but unlike the example in Listing 3.2, here we use the function explode() to split up each line so that we can apply some processing and formatting before printing. The output from this script is shown in Figure 3.6.

Figure 3.6 After splitting order records with explode(), you can put each part of an order in a different table cell for better-looking output
The explode function has the following prototype:
array explode(string separator, string string [, int limit])
In the preceding chapter, we used the tab character as a delimiter when storing this data, so here we do the following:
$line = explode(" ", $orders[$i]);
This code “explodes” the passed-in string into parts. Each tab character becomes a break between two elements. For example, the string
16:44, 28th September 2014 1 tires 2 oil 3 spark plugs $145.2 123 Main Street,
Sometown CA 95128
is exploded into the parts "16:44, 28th September 2014", "1 tires", "2 oil", "3spark plugs", "$145.2", and "123 Main Street, Sometown CA 95128". Note that the optional limit parameter can be used to limit the maximum number of parts returned.
This example doesn’t do very much processing. Rather than output tires, oil, and spark plugs on every line, this example displays only the number of each and gives the table a heading row to show what the numbers represent.
You could extract numbers from these strings in a number of ways. Here, we used the function intval(). As mentioned in Chapter 1, intval() converts a string to an integer. The conversion is reasonably clever and ignores parts, such as the label in this example, which cannot be converted to an integer. We cover various ways of processing strings in the next chapter.
Performing Other Array Manipulations
So far, we have covered only about half the array processing functions. Many others will be useful from time to time; we describe some of them next.
Navigating Within an Array: each(), current(), reset(), end(), next(), pos(), and prev()
We mentioned previously that every array has an internal pointer that points to the current element in the array. You indirectly used this pointer earlier when using the each() function, but you can directly use and manipulate this pointer.
If you create a new array, the current pointer is initialized to point to the first element in the array. Calling current($array_name) returns the first element.
Calling either next() or each() advances the pointer forward one element. Calling each($array_name) returns the current element before advancing the pointer. The function next() behaves slightly differently: Calling next($array_name) advances the pointer and then returns the new current element.
You have already seen that reset() returns the pointer to the first element in the array. Similarly, calling end($array_name) sends the pointer to the end of the array. The first and last elements in the array are returned by reset() and end(), respectively.
To move through an array in reverse order, you could use end() and prev(). The prev() function is the opposite of next(). It moves the current pointer back one and then returns the new current element.
For example, the following code displays an array in reverse order:
$value = end ($array);
while ($value){
echo "$value<br />";
$value = prev($array);
}
For example, you can declare $array like this:
$array = array(1, 2, 3);
In this case, the output would appear in a browser as follows:
3
2
1
Using each(), current(), reset(), end(), next(), pos(), and prev(), you can write your own code to navigate through an array in any order.
Applying Any Function to Each Element in an Array: array_walk()
Sometimes you might want to work with or modify every element in an array in the same way. The function array_walk() allows you to do this. The prototype of array_walk() is as follows:
bool array_walk(array arr, callable func[, mixed userdata])
Similar to the way we used usort() earlier, array_walk() expects you to declare a function of your own. As you can see, array_walk() takes three parameters. The first, arr, is the array to be processed. The second, func, is the name of a user-defined function that will be applied to each element in the array. The third parameter, userdata, is optional. If you use it, it will be passed through to your function as a parameter. We’ll see how this works shortly.
A handy user-defined function might be one that displays each element with some specified formatting. The following code displays each element on a new line by calling the user-defined function my_print() with each element of $array:
function my_print($value){
echo "$value<br />";
}
array_walk($array, 'my_print');
The function you write needs to have a particular signature. For each element in the array, array_walk() takes the key and value stored in the array, and anything you passed as userdata, and calls your function like this:
yourfunction(value, key, userdata)
For most uses, your function will be using only the values in the array. For some, you might also need to pass a parameter to your function using the parameter userdata. Occasionally, you might be interested in the key of each element as well as the value. Your function can, as with my_print(), choose to ignore the key and userdata parameter.
For a slightly more complicated example, you can write a function that modifies the values in the array and requires a parameter. Although you may not be interested in the key, you need to accept it to accept the optional third parameter:
function my_multiply(&$value, $key, $factor){
$value *= $factor;
}
array_walk($array, 'my_multiply', 3);
This code defines a function, my_multiply(), that will multiply each element in the array by a supplied factor. You need to use the optional third parameter to array_walk() to take a parameter to pass to the function and use it as the multiplication factor. Because you need this parameter, you must define the function, my_multiply(), to take three parameters: an array element’s value ($value), an array element’s key ($key), and the parameter ($factor). You can choose to ignore the key.
A subtle point to note is the way $value is passed. The ampersand (&) before the variable name in the definition of my_multiply() means that $value will be passed by reference. Passing by reference allows the function to alter the contents of the array.
We address passing by reference in more detail in Chapter 5. If you are not familiar with the term, for now just note that to pass by reference, you place an ampersand before the variable name in the function declaration.
Counting Elements in an Array: count(), sizeof(), and array_count_values()
You used the function count() in an earlier example to count the number of elements in an array of orders. The function sizeof() is an alias to count(). This function returns the number of elements in an array passed to it. You get a count of one for the number of elements in a normal scalar variable and zero if you pass either an empty array or a variable that has not been set.
The array_count_values() function is more complex. If you call array_count_values($array), this function counts how many times each unique value occurs in the array named $array. The function returns an associative array containing a frequency table. This array contains all the unique values from $array as keys. Each key has a numeric value that tells you how many times the corresponding key occurs in $array.
$array = array(4, 5, 1, 2, 3, 1, 2, 1);
$ac = array_count_values($array);
creates an array called $ac that contains

This result indicates that 4, 5, and 3 occurred once in $array, 1 occurred three times, and 2 occurred twice.
Converting Arrays to Scalar Variables: extract()
If you have a non-numerically indexed array with a number of key value pairs, you can turn them into a set of scalar variables using the function extract(). The prototype for extract() is as follows:
extract(array var_array [, int extract_type] [, string prefix] );
The purpose of extract() is to take an array and create scalar variables with the names of the keys in the array. The values of these variables are set to the values in the array.
Here is a simple example:
$array = array('key1' => 'value1', 'key2' => 'value2', 'key3' => 'value3');
extract($array);
echo "$key1 $key2 $key3";
This code produces the following output:
value1 value2 value3
The array has three elements with keys: key1, key2, and key3. Using extract(), you create three scalar variables: $key1, $key2, and $key3. You can see from the output that the values of $key1, $key2, and $key3 are 'value1', 'value2', and 'value3', respectively. These values come from the original array.
The extract() function has two optional parameters: extract_type and prefix. The variable extract_type tells extract() how to handle collisions. These are cases in which a variable already exists with the same name as a key. The default response is to overwrite the existing variable. The allowable values for extract_type are shown in Table 3.2.
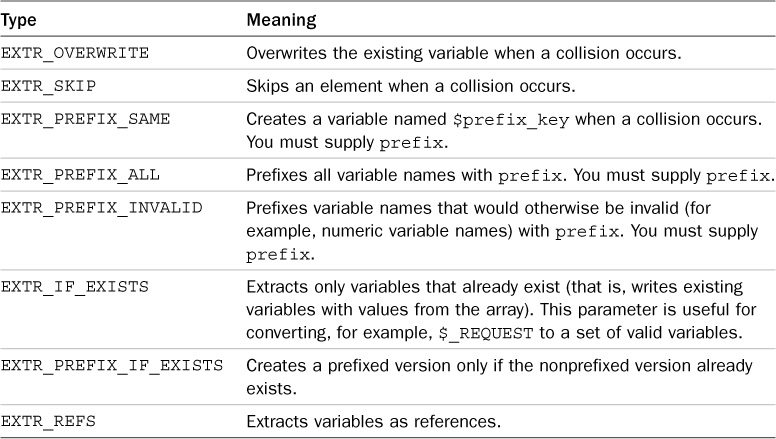
The two most useful options are EXTR_OVERWRITE (the default) and EXTR_PREFIX_ALL. The other options might be useful occasionally when you know that a particular collision will occur and want that key skipped or prefixed. A simple example using EXTR_PREFIX_ALL follows. You can see that the variables created are called prefix_keyname:
$array = array('key1' => 'value1', 'key2' => 'value2', 'key3' => 'value3');
extract($array, EXTR_PREFIX_ALL, 'my_prefix');
echo "$my_prefix_key1 $my_prefix_key2 $my_prefix_key3";
This code again produces the following output:
value1 value2 value3
Note that for extract() to extract an element, that element’s key must be a valid variable name, which means that keys starting with numbers or including spaces are skipped.
Further Reading
This chapter covers what we believe to be the most useful of PHP’s array functions. We have chosen not to cover all the possible array functions, as there are a huge variety of them. The online PHP manual available at http://www.php.net/array provides a brief description for each.
Next
In the next chapter, you will learn about string processing functions. We cover functions that search, replace, split, and merge strings, as well as the powerful regular expression functions that can perform almost any action on a string.