9. Reading and Sending Email
In this chapter, you’ll learn how to set up email accounts on your Kindle Fire, how to check your email, and how to send email. You’ll also learn how to deal with email attachments.
Your Kindle Fire comes with an app for email and an app for managing your email contacts. You can read your email, send emails, and even view email attachments.
Your Kindle Fire supports various email services including Gmail, Hotmail, Yahoo!, and POP3 and IMAP servers. You can set up multiple email accounts on your Kindle Fire. You can then either access each inbox individually or you can use the unified inbox to see all of your messages from all accounts on one screen.
Email Accounts
The first step in using email on your Kindle Fire is setting up your email account. Kindle Fire supports basic accounts (Gmail, Yahoo!, Hotmail, and AOL) as well as IMAP and POP3 accounts that most Internet service providers offer their subscribers.
While on the account setup screen, tap the Menu icon and tap Help for settings you can use for many common email providers.
Adding a Basic Account
If you have a Gmail, Yahoo!, Hotmail (Windows Live), or AOL email account, you can easily configure it on your Kindle Fire.
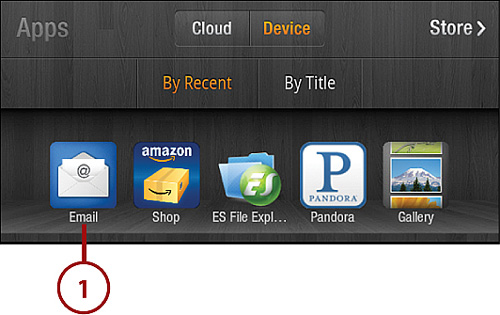
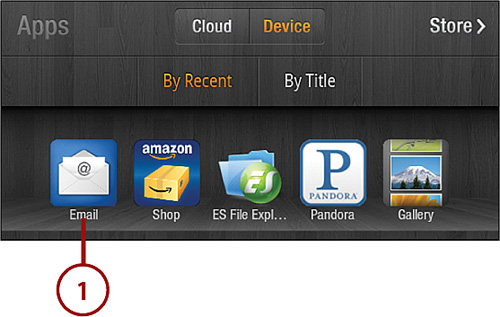
1. Start the Email app from the Kindle Fire’s Apps page.
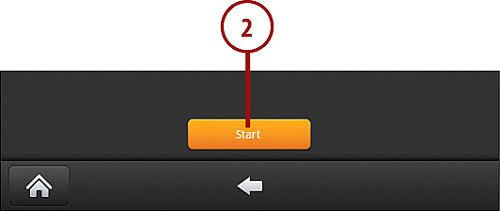
2. Tap Start.
3. Tap your email provider from the list: Gmail, Yahoo, Hotmail, or AOL.

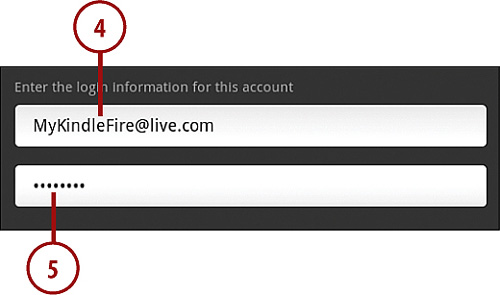
4. Enter your username. (This is typically your full email address.)
5. Enter your password.
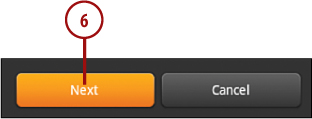
6. Tap Next.
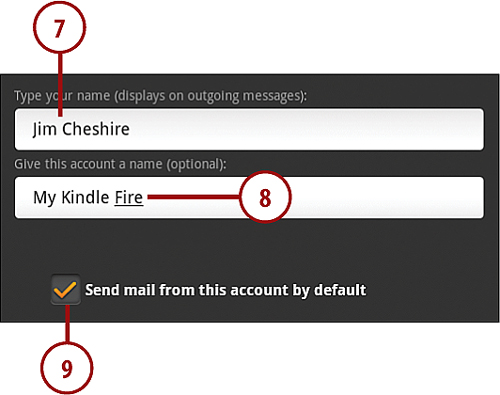
7. Enter your name.
8. Enter the display name for this account on your Kindle Fire.
9. Check the box if you want new email messages to use this account by default.
If you’re setting up a Gmail account, you’ll have the option to import your contacts if you want.
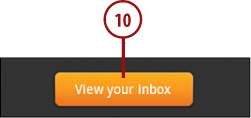
10. Tap View Your Inbox.
Adding an Additional Email Account
The start screen that shows you a collection of buttons for setting up a new email account only appears when you haven’t set up any email accounts. The steps for setting up additional accounts are slightly different.
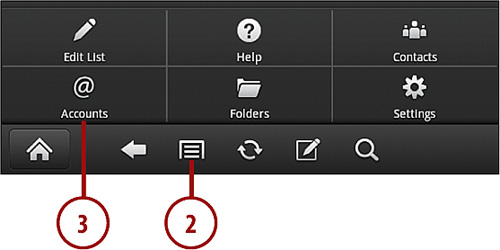
1. Launch the Email app.
2. Tap the Menu icon.
3. Tap Accounts.
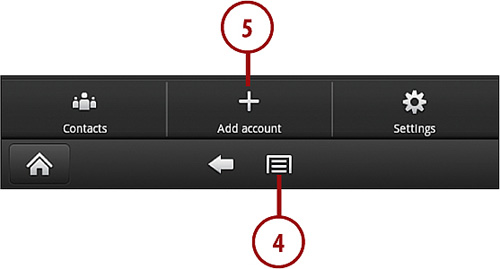
4. Tap the Menu icon.
5. Tap Add Account and follow the steps as they are described in the previous section, “Adding a Basic Account,” or in the following section, “Adding a POP3 or IMAP Account.”
Adding a POP3 or IMAP Account
You can set up your Kindle Fire to read and send email from a POP3 or IMAP account.
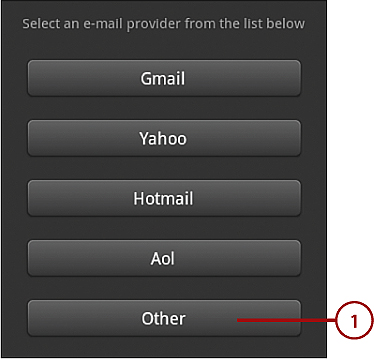
1. From the email provider list, tap Other.
3. Enter your password.

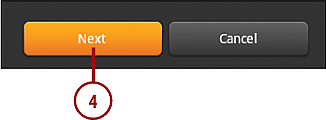
4. Tap Next.
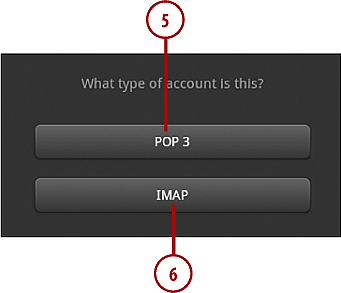
5. Tap POP 3 to set up a POP3 account.
6. Tap IMAP to set up an IMAP account.
Configuring a POP3 Account
After you select POP3 as your account type, you need to configure the account. Most of this information is already filled in based on information you’ve already entered, but you should check it to ensure that it’s correct.
If you’re unsure about a setting, check with your email provider.
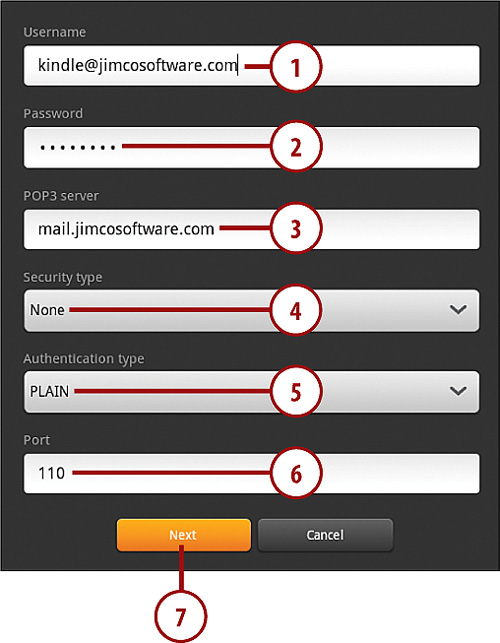
1. Enter your username.
2. Enter your password.
3. Enter the address of your POP3 server.
4. Tap Security Type and select a security type if necessary.
5. Tap Authentication Type and select the authentication type.
6. Enter a new port number if required. Note that the existing port number is based on the security type, and it’s likely correct already.
7. Tap Next.
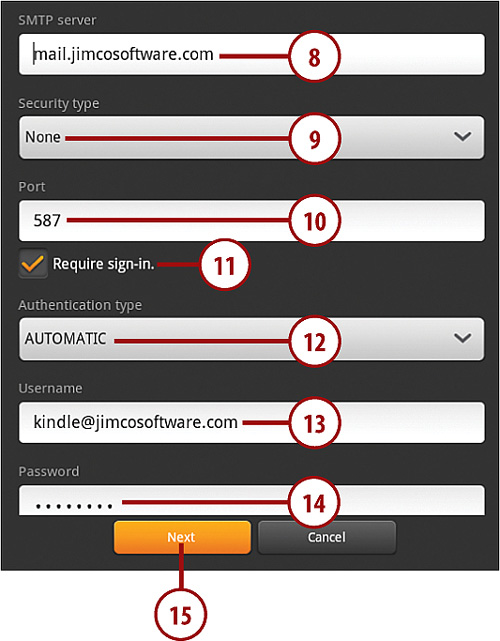
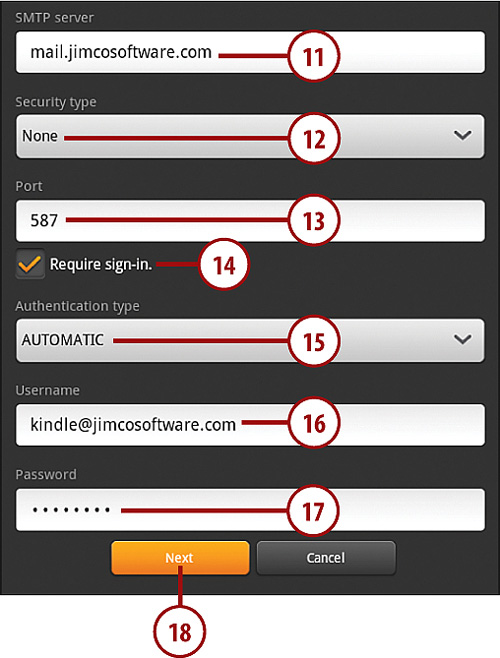
8. Enter your SMTP (outgoing server) address.
9. Tap Security Type and select a security type.
10. Enter a port number if required.
11. If your SMTP server requires you to log in (most do), check Require Sign-In.
12. Tap Authentication Type and select the authentication type. Leave it set to Automatic if you’re unsure.
13. Enter your username.
14. Enter your password.
15. Tap Next.
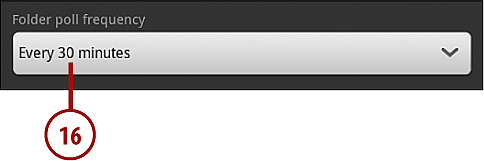
16. Tap Folder Poll Frequency and select how often you want to check for new mail.
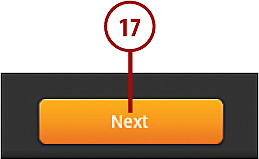
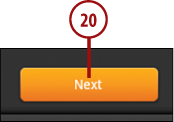
17. Tap Next.
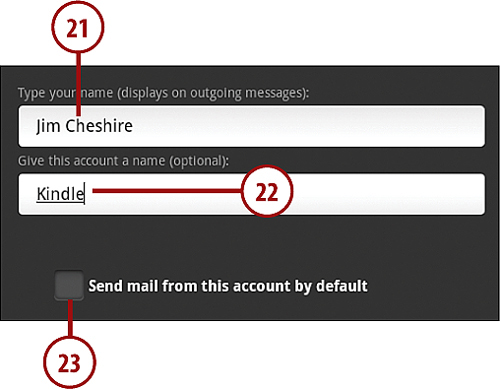
18. Enter the name that you want to display on emails sent from this account.
19. Enter a display name for this account on your Kindle Fire.
20. Check the box if you want email to be sent from this account by default.

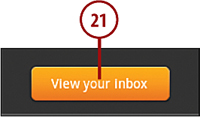
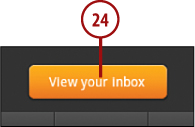
21. Tap View Your Inbox to go to your inbox.
Unlike many POP3 email clients, the Kindle Fire’s email app does not remove emails from your server when you read them. Therefore, if you have your email account configured on another device or computer, you can still see your mail on that device after reading it on your Kindle Fire. Even if you delete an email message from your Kindle Fire, the email message remains on the server by default.
Configuring an IMAP Account
After you select IMAP as your account type, you need to configure the account. Most of this information is already filled in based on information you’ve already entered, but you should check it to ensure that it’s correct.
If you’re unsure about a setting, check with your email provider.
1. Enter your username.
2. Enter your password.
3. Enter your IMAP server’s address.
4. Tap Security Type and select a security type.
5. Tap Authentication Type and select an authentication type.
6. Change the port if required.

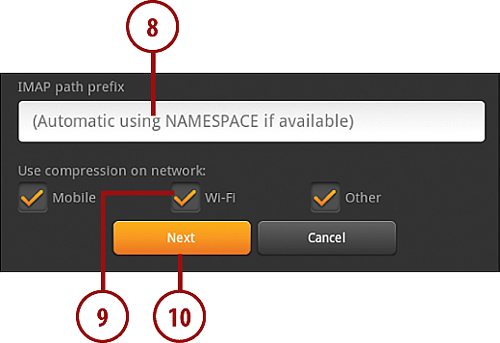
7. Scroll down to reveal additional options.
8. Enter an IMAP Path Prefix if necessary. (This can be left as-is in most cases.)
9. Check Wi-Fi to enable compression if you want. If you have metered Internet, this can save some bandwidth. (Mobile and Other aren’t applicable on the Kindle Fire.)
10. Tap Next.
11. Enter your SMTP (outgoing server) address.
12. Tap Security Type and select a security type.
13. Change the port if necessary.
14. Tap Require Sign-In if your SMTP server requires you to sign in.
15. Tap Authentication Type and select an authentication type if necessary.
16. Enter your username.
17. Enter your password.
18. Tap Next.
19. Tap Folder Poll Frequency and select how often you would like to check for new email.

20. Tap Next.
21. Enter a name to display on emails sent from this account.
22. Enter a display name for this account on your Kindle Fire.
23. Check the box to have emails sent from this account by default.
24. Tap View Your Inbox to be taken to your inbox.
Removing an Account
You can remove an account from your Kindle Fire if you no longer want to read email from that account on your device.
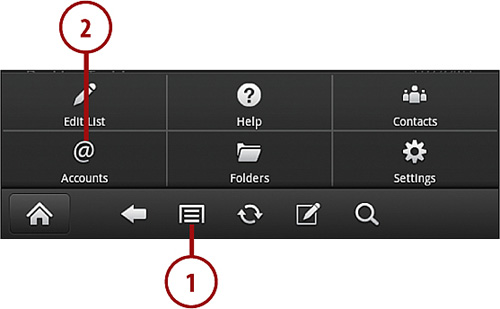
1. While viewing your inbox, tap the Menu icon.
2. Tap Accounts to access the Accounts screen.
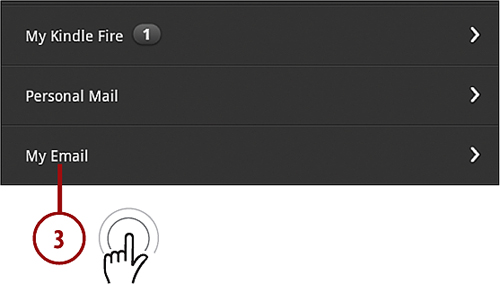
3. Tap and hold the account you want to remove.
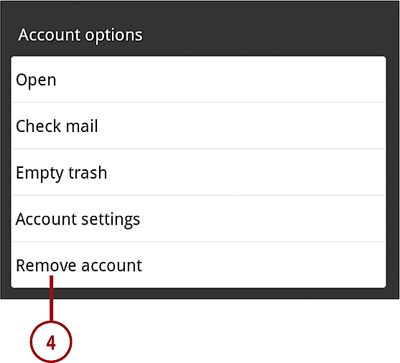
4. Tap Remove Account.
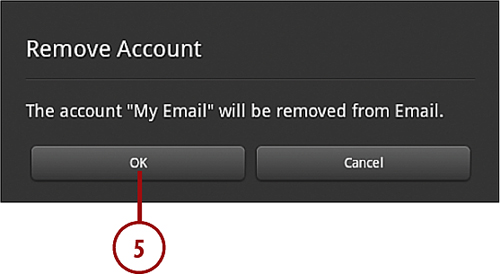
5. Tap OK to confirm the removal of the account.
Managing Your Email Inbox
Your inbox is where you can view all of the email messages that have been received. Without opening a mail message, you can see who sent the mail, the subject of the email, and a brief snippet of the message. You can flag your mail, sort your mail, and delete messages you aren’t interested in as well.
Choosing an Inbox
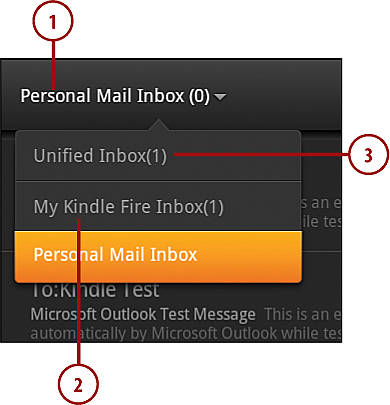
Your inbox can display email messages from a single account or in a unified account view that shows all messages from all accounts.
1. From your inbox, tap the current account name.
2. Select a different account to view the inbox for that account.
3. Select Unified Inbox to view the inbox for all accounts in a unified view.
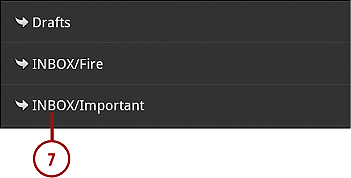
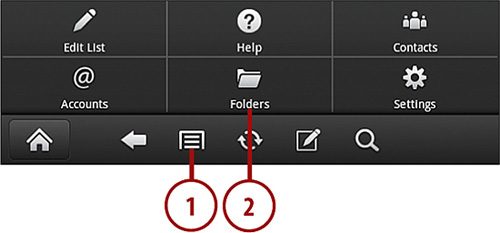
Choosing a Folder
Most email providers allow you to create folders so that you can organize email that you want to keep. You can choose which folder is displayed when viewing an account’s inbox.
1. From your inbox, tap the Menu icon.
2. Tap Folders.
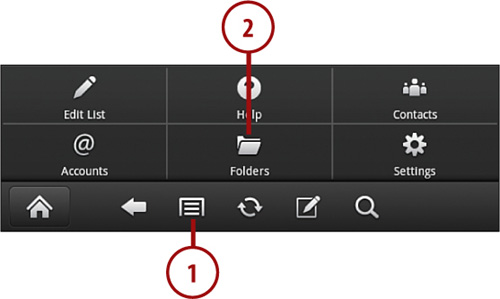
3. Select a folder to display that folder.
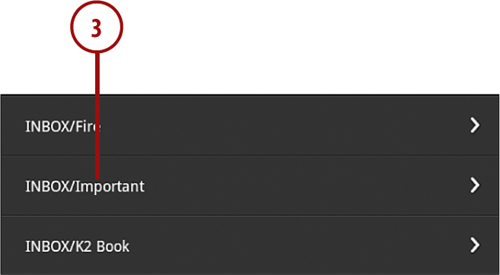
4. Tap to load messages from the selected folder.
Sorting Email
By default, email is sorted with the newest emails listed first. You can change this sort order.
1. Tap the current sort order.
2. Tap the desired sort order to resort your inbox.

Searching Email
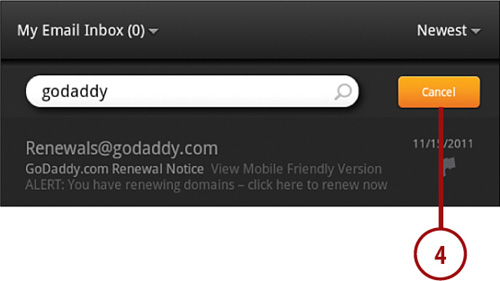
You can search your email messages. Only email messages that have been downloaded are searched. Search only displays results for the current folder.
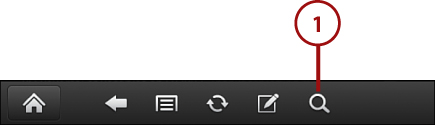
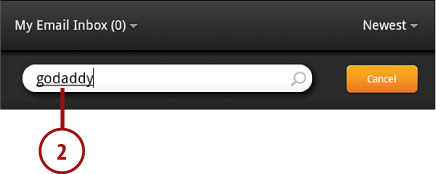
1. Tap the Search icon.
2. Enter the text you want to search for. Your Kindle Fire can search the email address, subject, and message text.
3. Tap Search on the keyboard.

4. Tap a message from your search results in order to open the message for viewing.
You can also access the search box by swiping down when you’re at the top of your inbox.
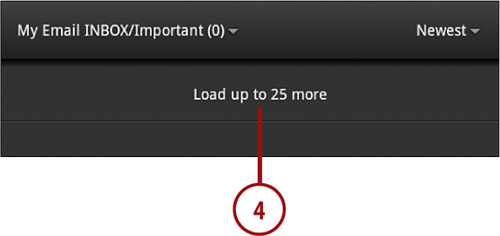
Synchronizing Email
If you chose a poll frequency of Manual when you set up your account, your Kindle Fire only checks for mail when you manually synchronize mail. You can also manually synchronize mail at any time to check for new messages between polling intervals.
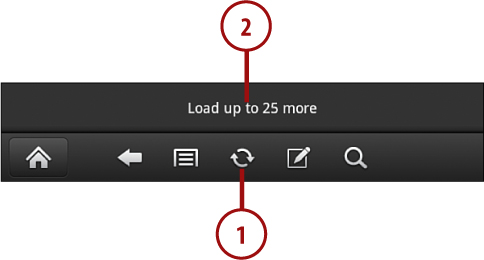
1. From one of your mailboxes, tap the Synchronize icon.
2. Tap Load Up To 25 More at the bottom of the list of messages in order to load additional messages if necessary. (The Kindle Fire only retrieves 25 messages at a time.)
Selecting and Managing Multiple Messages
You can select one or more messages in your inbox. You can then choose to delete the messages, move them to another folder, or mark them as read or unread.
1. Swipe right on a message you want to select.
2. Tap other email messages to select them.
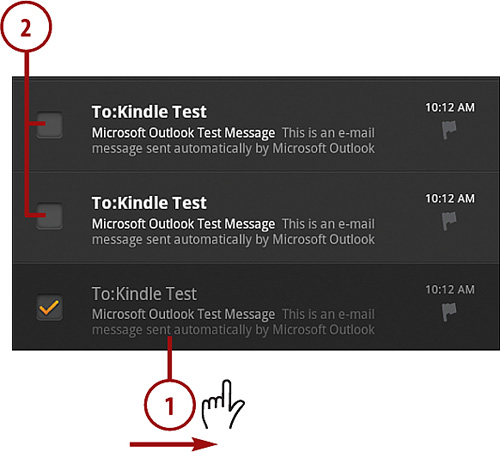
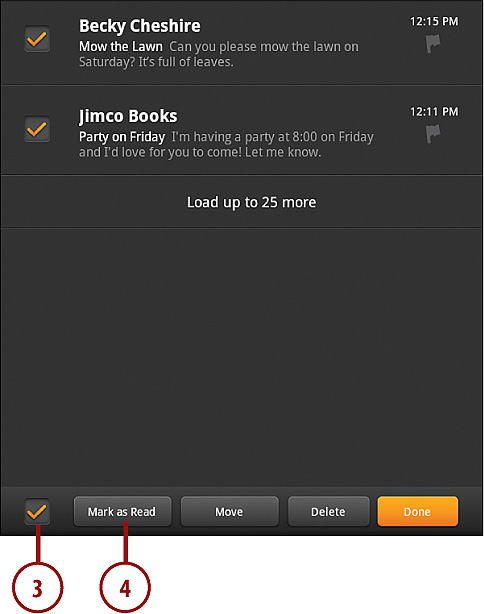
3. Tap the checkbox at the bottom of the screen to select all messages in the current folder.
4. Tap Mark as Read to mark all messages read.
5. Tap Mark as Unread to mark messages as unread. (Only available if all selected messages are currently marked as read.)
6. Tap Move to move the selected messages to another folder.
7. Choose a folder to move the messages.

8. Tap Delete to delete the selected messages.
9. Tap Done when finished or swipe left on any message.
You can also select multiple messages by tapping the Menu icon, tapping Edit List, and then checking the messages you want to select.
Accessing Email Settings
There are several configuration settings available for your account. They are all available in the Settings screen. All settings changes apply only to the account you are viewing. If you want a setting to apply to all accounts, you must change the setting for each account.
To access the email Settings screen, while viewing the inbox for your account, tap the Menu icon and then tap Settings.

Changing Polling Frequency
You can change the polling frequency that you selected during the initial setup of your email account.
1. While in the Settings screen for the desired account, tap Fetch New Messages.
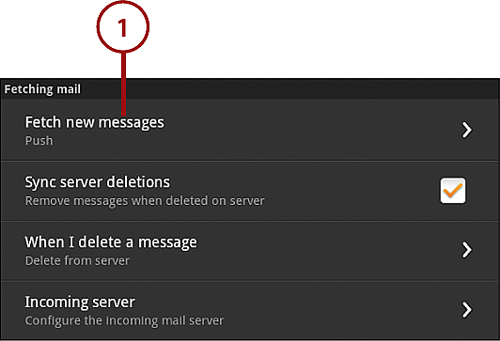
2. Select a new poll frequency.
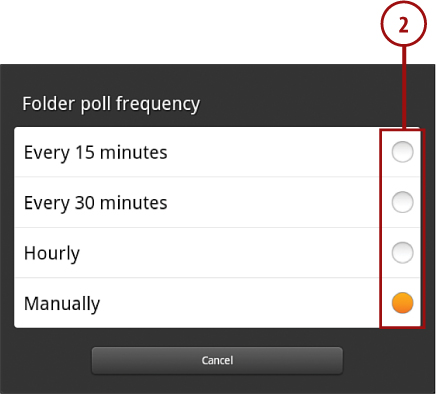
IMAP accounts only list Manual and Push for polling frequency. Push downloads new messages as they are available. Manual only downloads messages when you manually synchronize.
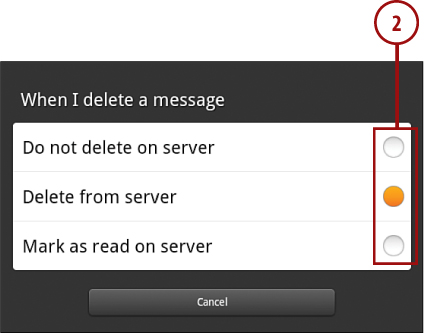
Controlling What Happens When Mail Is Deleted
By default, deleted messages are not deleted from your email server. (IMAP accounts other than Gmail are an exception. When you delete a message from a non-Gmail IMAP account, it is deleted from the server.) You can change the default behavior from the Settings screen for the account you want to modify.
1. Tap When I Delete a Message.
2. Tap to select what happens when a message is deleted.
3. Check Sync Server Deletions if you want mail deleted from another device or computer to also be deleted from your inbox on your Kindle Fire.

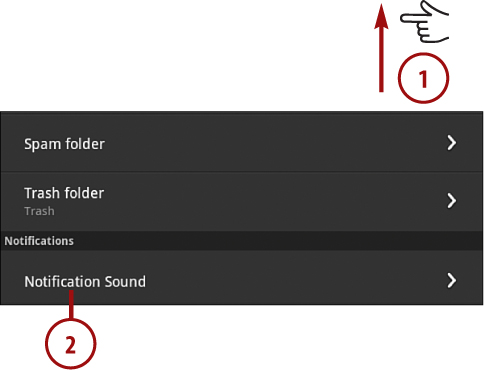
Adding a Notification Sound
By default, no sound is played when new email arrives. You can add a notification sound from the Settings screen for the account you want to modify.
1. Scroll to the bottom of the Settings screen.
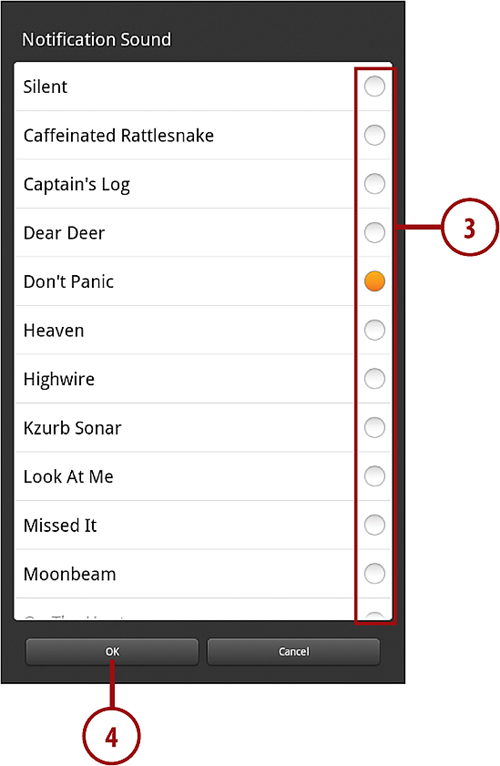
2. Tap Notification Sound.
3. Select a notification sound. The sound plays when you tap the sound option.
4. Tap OK when you have chosen a sound that you like.
Emptying the Trash
After you’ve deleted messages, you can empty the trash to remove them from the folder that contains deleted items.
1. Tap the Menu icon.
2. Tap Folders.
3. Tap the Menu icon.
4. Tap Empty Trash.
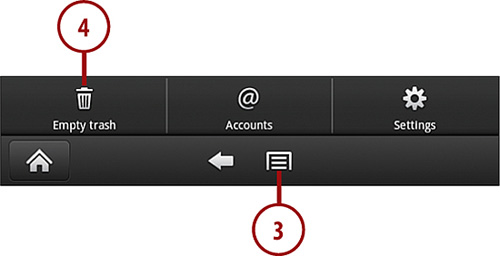
While you’re on the Accounts screen, tap and hold an account and tap Empty Trash to empty the trash for that account.
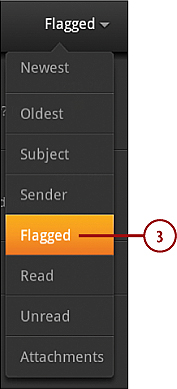
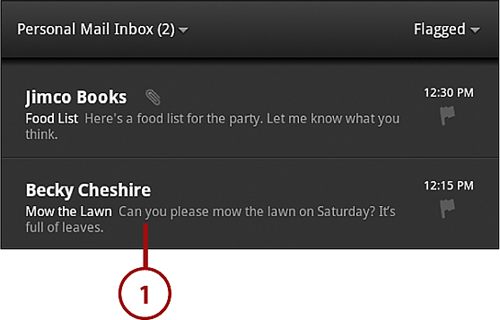
Flagging a Message
You can flag a message so that you can more easily locate it later.
1. From one of your email folders, tap the flag to mark a message as flagged.
2. If a message is already flagged, tap the flag to unflag it.

3. Sort by Flagged to easily locate flagged messages.
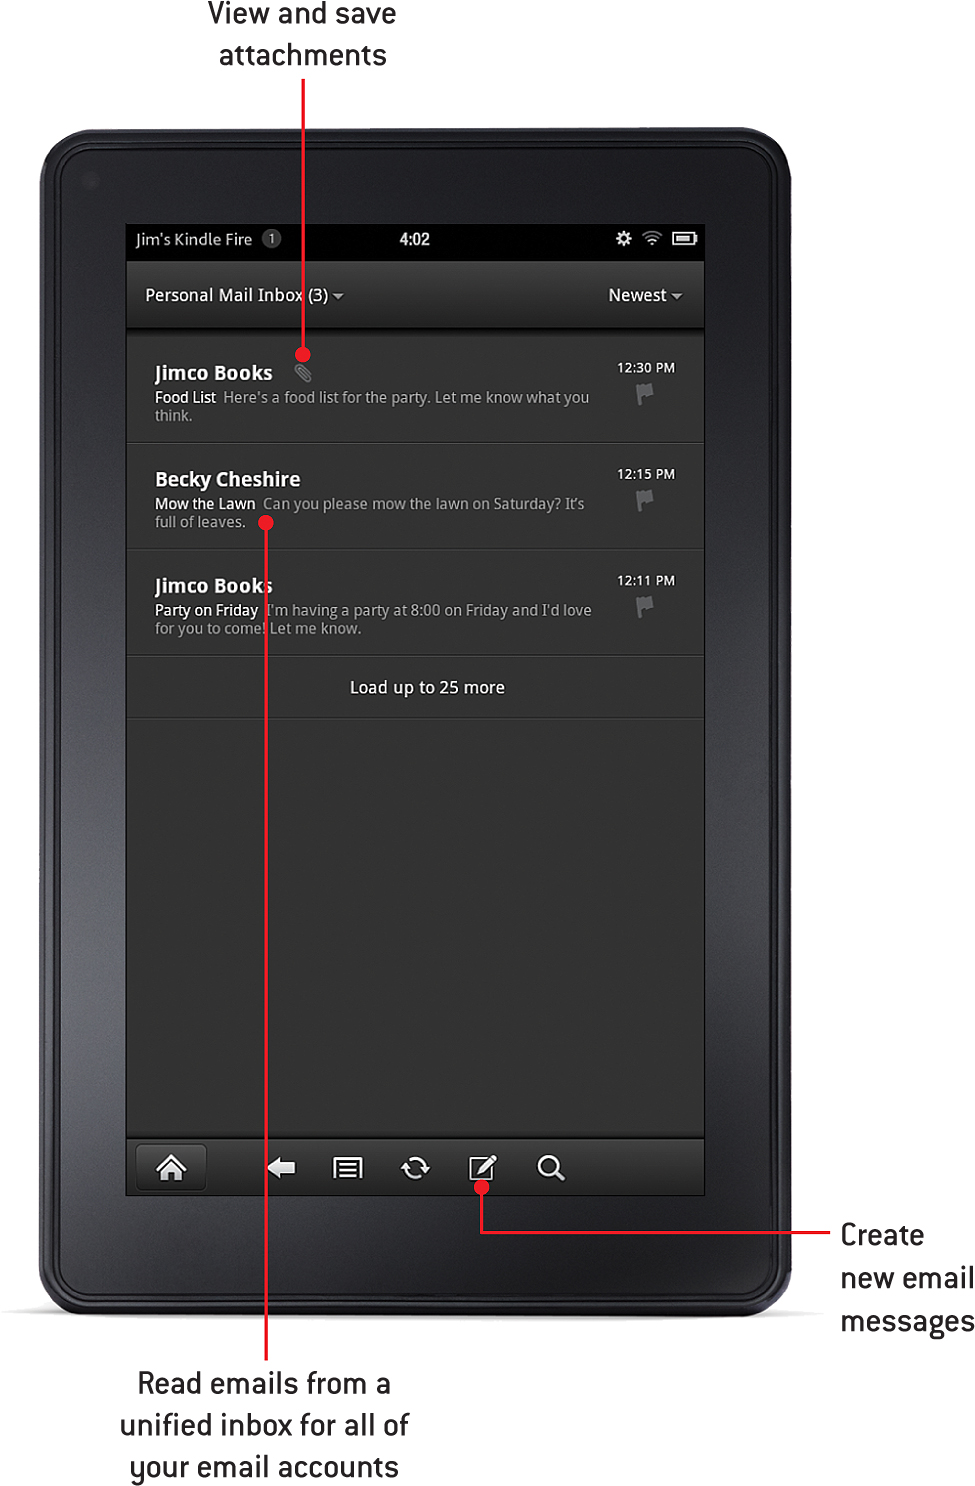
Reading Mail
Having email on your Kindle Fire is a great convenience. Not only is it nice to browse through your mail while you relax on the couch, but it’s also easy to triage your email from the Kindle Fire. By that, I mean that you can quickly peruse your inbox and delete junk mail or other mail you’re not interested in, move mail to another folder, mark important mail for follow-up later, and so forth.
Reading a Message
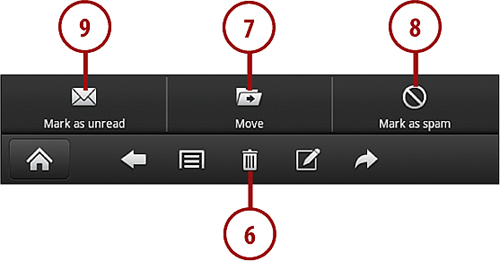
While reading a message, you can view information about the message, mark it as spam, move it to another folder, or delete the message.
1. Tap a message to open it.
2. Tap the header to display the address to which the mail was sent and the CC list.
3. Tap the flag to flag the message.
4. Tap Previous to view the previous message in your inbox.
5. Tap Next to view the next message in your inbox.
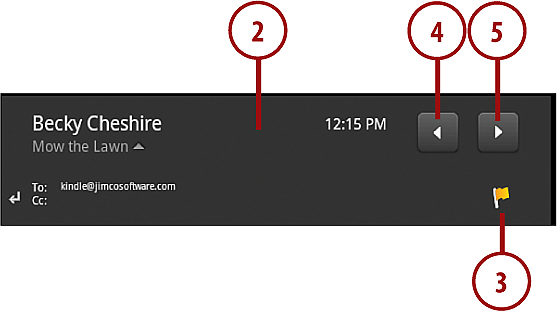
6. Tap the Trash icon to delete the message.
7. Tap the Menu icon and tap Move to move the message to another folder.
8. Tap the Menu icon and tap Mark as Spam to move the message to your junk mail folder.
9. Tap the Menu icon and tap Mark as Unread to mark the message as unread.
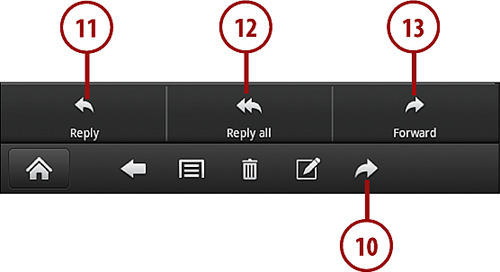
10. To reply to or forward the message, tap the Reply icon.
11. Tap Reply to reply to the sender.
12. Tap Reply All to reply to the sender and other recipients.
13. Tap Forward to forward the message and any attachments to a new recipient.
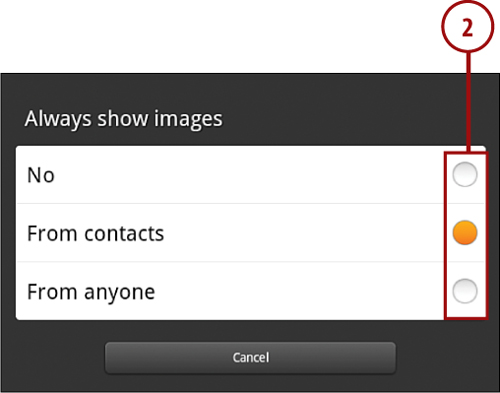
Choosing When Images Are Displayed
Some emails might contain images that are embedded within the email text. You can control when these images are displayed from the Settings screen.
1. From the Settings screen of the account you want to modify, tap Always Show Images.
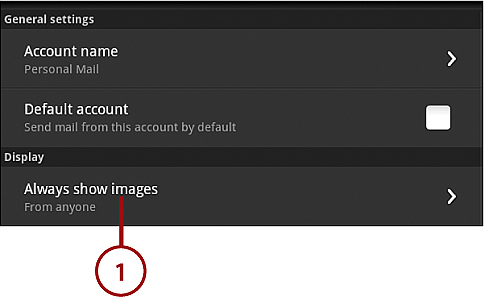
2. Tap to select when images should be displayed.
Images that are added inline to an email message are sometimes not actually part of the message. Instead, they may reside on another computer on the Internet. When these images are displayed, your Kindle Fire initiates a connection with the other computer in order to download the images. Because you don’t control where that connection is going, it’s a good idea to prevent the display of images unless the sender of the email is someone you know.
Another reason you might want to hide images is to prevent images from downloading to your Kindle Fire. If images aren’t displayed, they won’t be downloaded to your device where they will take up valuable storage space.
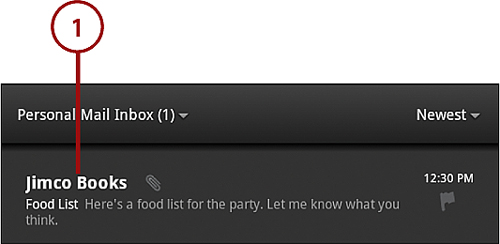
Viewing Attachments
Some email messages have one or more files attached that you can view. Your Kindle Fire comes with apps that can view many file types, including images, some videos, PDF files, and Microsoft Office documents.
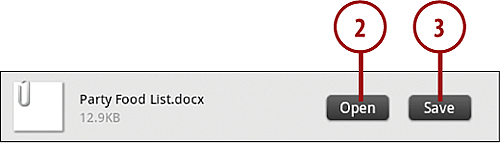
1. Tap a mail message containing an attachment. (A paper clip is displayed on messages that contain an attachment.)
2. Tap Open to open the attachment.
3. Tap Save to save the attachment to your Kindle Fire. (Attachments are saved to the Download folder on your device.)
You can use an app such as ES File Explorer to view the contents of your Download folder and open saved attachments. For details on using ES File Explorer, see the “Indispensable Apps” section in Chapter 8.
Sending Messages
You can send emails from your Kindle Fire. You can attach files to your emails so that you can share pictures or other files with others. You can also specify a signature that is added automatically to the emails that you send.
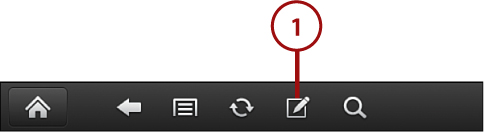
Composing a New Email Message
You can compose a new email message while viewing your inbox or while viewing an email message.
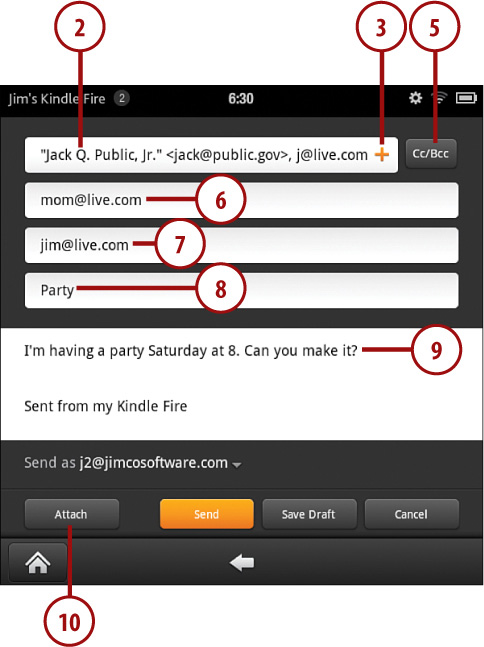
1. Tap the New Mail icon.
2. Enter an email address to which the message should be sent. Separate multiple emails with a comma.
3. Tap + to select a contact.
4. Tap a contact to add him or her to the recipient list. For more information on using contacts, see the “Working with Contacts” section later in this chapter.
5. Tap CcBcc to display the Cc and Bcc fields.
6. Enter an email address to Cc if desired.
7. Enter an email address to Bcc if desired.
8. Enter a subject for your message.
9. Enter the text of the message.
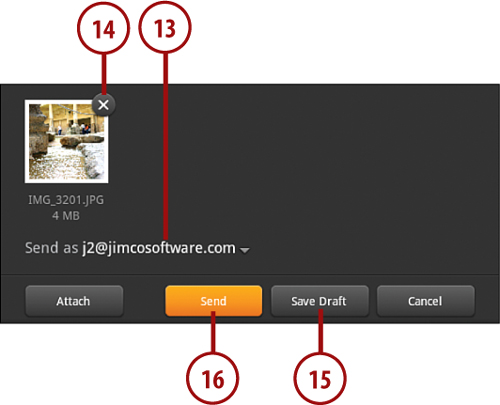
10. Tap Attach to attach a file to your message.
11. Choose an app to use for browsing to the file you want to attach.

12. Select the file you want to attach using the app you selected.

13. Tap Send As to change the email address used to send the mail message.
14. Tap the X to remove a previously attached file.
15. Tap Save Draft to save a draft of your message that you can complete later. (Drafts are saved to the Drafts folder.)
16. Tap Send to send your message.
Sending Replies or Forwards
You can reply to or forward an email message that you have received.
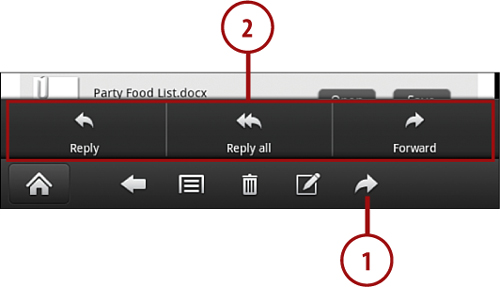
1. While reading the email, tap the Reply icon.
2. Tap Reply, Reply All, or Forward.
3. Enter an email address if desired. (When replying, the sender’s email address is added automatically.)
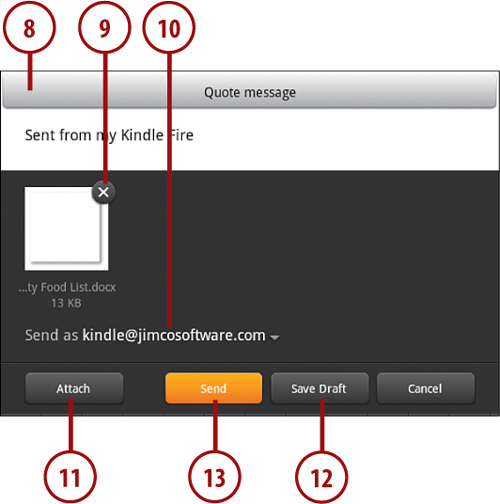
4. Tap + to add one of your contacts.
5. Tap Cc/Bcc to copy or blind copy a recipient.
6. Enter your message text.
7. Tap X to remove the original message if it’s included.
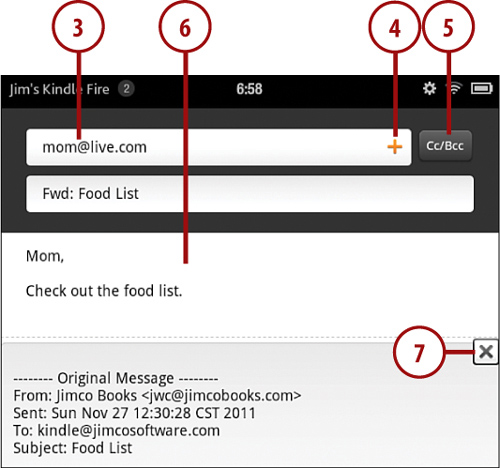
8. Tap Quote Message to add the original message to your message if desired.
9. If a forwarded message contains an attachment, tap the X to remove the attachment if you prefer.
10. Tap Send As and select the email address from which the email should be sent.
11. Tap Attach to add an attachment.
12. Tap Save Draft to save a draft of the message.
13. Tap Send to send the message.
Creating a Signature
You can create a signature that is automatically added to all of your email messages. By default, the signature line reads “Sent from my Kindle Fire.” You can change that to whatever text you choose, or you can remove the signature entirely. It’s your choice.
1. From the Settings screen for the desired account, tap Composition Defaults.

2. Check the Use Signature box.
3. Enter your signature.
4. Choose where you would like the signature to appear.

5. Tap the keyboard icon on the keyboard.
6. Tap Back to return to your inbox.
Sending Messages in Plain Text
By default, messages are created in HTML format so that the formatting and inline images of the original message are preserved. You can choose to send messages in plain text instead. Some people prefer plain text email over HTML email because hidden code can’t be added to plain text email and it’s more secure.
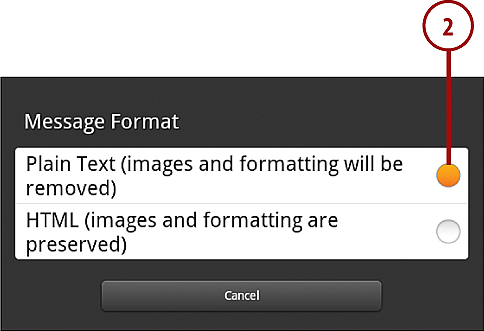
1. From the Settings screen for the desired account, tap Message Format.
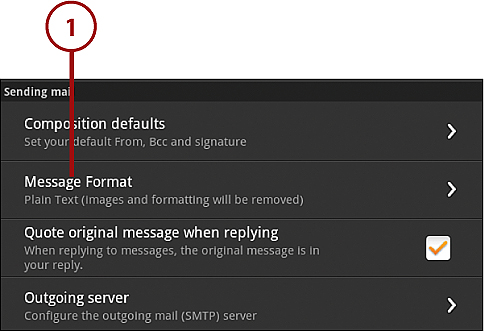
2. Tap Plain Text.
Changing Whether Original Message Is Quoted
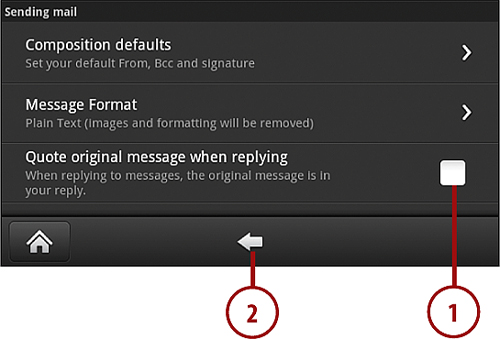
By default, when you reply to or forward a message, the original message is quoted at the bottom of your message. You can turn off this feature if you don’t like it. If you do turn off this feature, you can still add a quote of the original message to individual emails.
1. From the Settings screen for the desired account, tap Quote Original Message When Replying to clear the checkbox.
2. Tap Back to return to your inbox.
Working with Contacts
Your Kindle Fire’s Contacts app makes it easy to maintain a list of contacts for email messages or for reference. You can easily import contacts from another source to your Kindle Fire. If you make changes to your contacts on the Kindle Fire and you want to apply those changes to your contact list in another email application, you can export your Kindle Fire contacts so that you can use them elsewhere.
Viewing Contacts
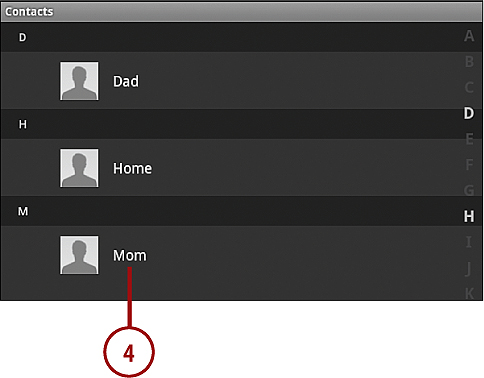
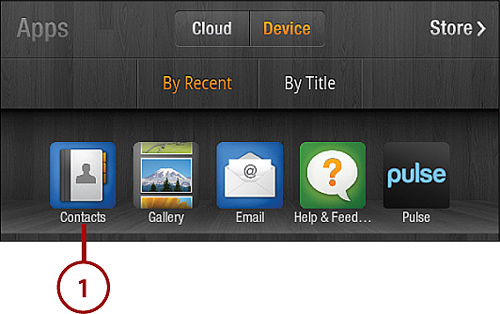
You can view your contacts from the Contacts app.
1. Open the Contacts app.
2. Tap All to view all of your contacts.
3. Tap Favorites to view your favorite contacts.
4. Tap a letter to jump to contacts that start with that letter.
5. Scroll to see more contacts.
6. Tap a contact to view contact details.
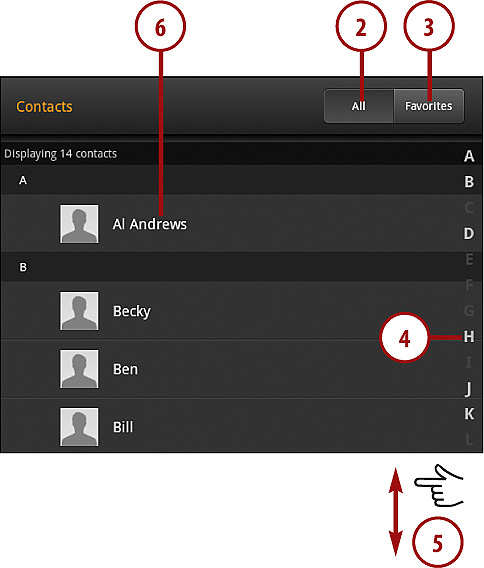
You can add a contact to your favorites list by tapping and holding on the contact and then tapping Add to Favorites.
Adding a Contact
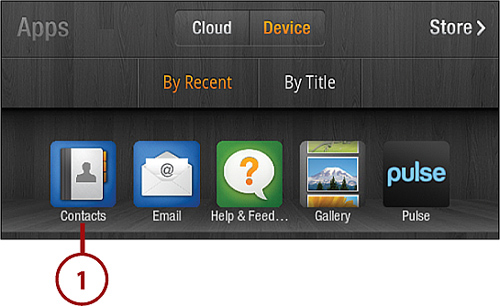
You can add a contact from the Contacts app.
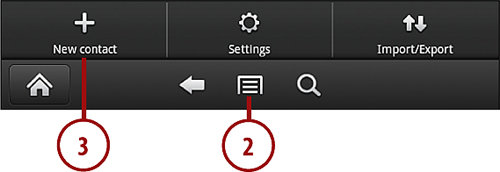
1. Open the Contacts app.
2. Tap the Menu icon.
3. Tap New Contact.
When I want to add a picture for a contact, I take a picture with my cell phone and email it to myself. I can then save the attachment on my Kindle Fire and add the picture to my contact.
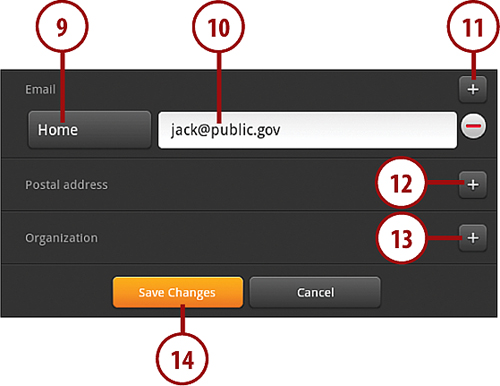
4. Tap the picture icon to add a picture for the contact. (The picture must already be on your device.)
5. Enter the name information for your contact.
6. Tap Home and select a new type for the phone number if necessary.
7. Enter a phone number.
8. Tap + to add a new phone number for the contact.
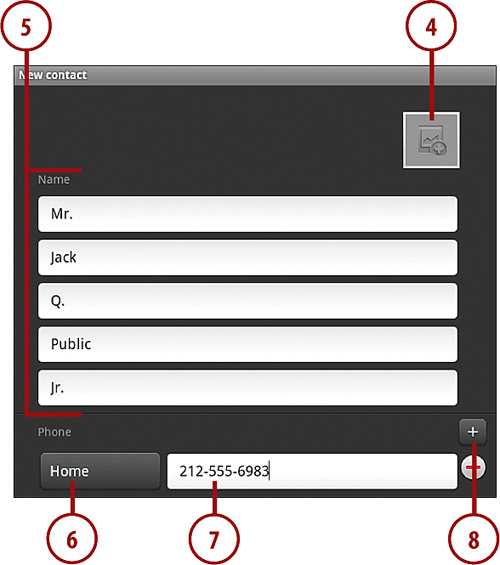
9. Tap Home to change the type of email address if necessary.
10. Enter the email address.
11. Tap + if you want to add an additional email address.
12. Tap + if you want to add a mailing address.
13. Tap + if you want to add organization information.
14. Tap Save Changes.
Editing a Contact
You can edit an existing contact.
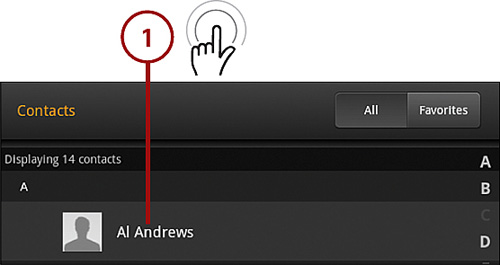
1. Tap and hold a contact in your contact list.
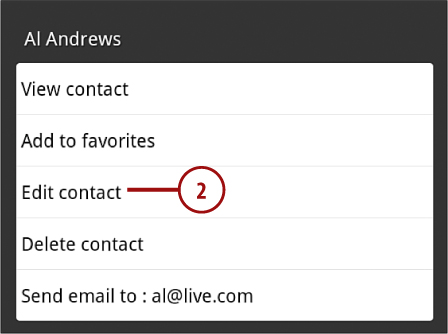
3. Edit the information as necessary and tap Save Changes.

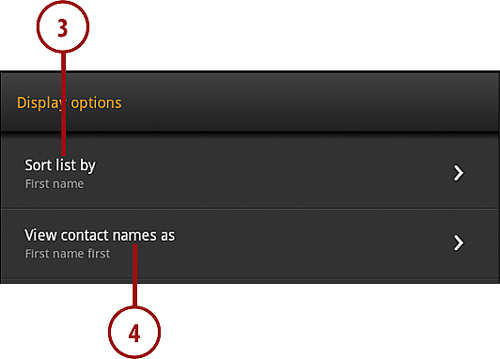
Changing Contact Sort Order and Name Display
You can change how your contact names are displayed and the sort order of your contacts.
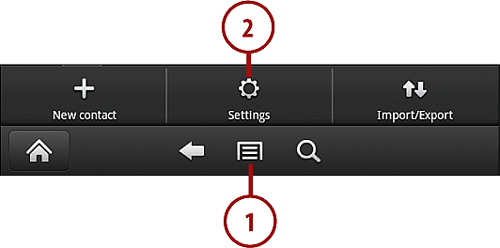
1. From your contact list, tap the Menu icon.
2. Tap Settings.
3. Tap Sort List By to change sort order between first name and last name.
4. Tap View Contact Names As to switch from first name first to last name first.
Importing Contacts
It’s likely that you already have a list of contacts either in the cloud or in another email application. You can import these contacts to your Kindle Fire.
Contacts must be in vCard format in order to be imported. If your email application can’t export existing contacts in vCard format, there are numerous free utilities available that can convert common formats to vCard format.
If you use an email application on your computer that stores contacts in vCard format, you should be able to locate them by searching your computer. Their location varies based on where the application stores information.
If you are converting existing contacts to vCard format, you specify where you want your vCards to be saved when you do the conversion. That’s the location you’ll want to use when importing your vCards into your Kindle Fire.
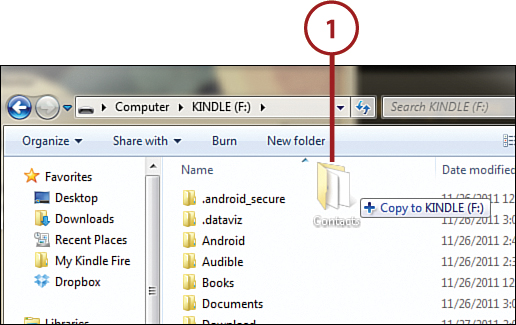
1. Connect your Kindle Fire to your computer and copy a folder containing your vCards to your Kindle Fire. It doesn’t matter where you put them on your Kindle Fire, but I prefer to put mine in a Contacts folder so that I can identify them later.
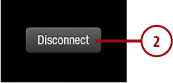
2. Disconnect your Kindle Fire.
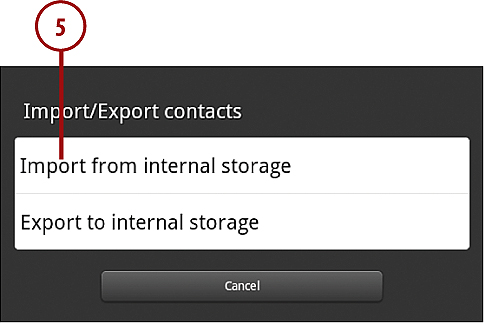
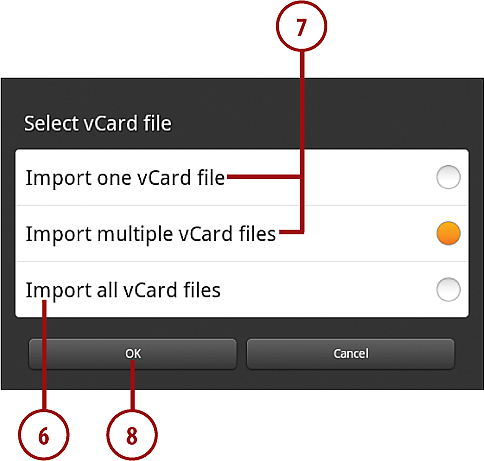
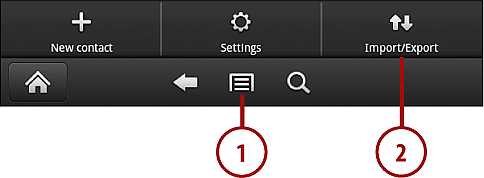
3. From your contact list, tap the Menu icon.
4. Tap Import/Export.

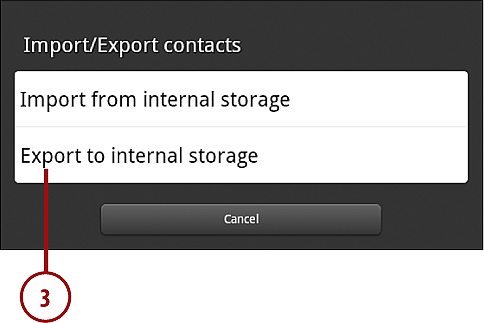
5. Tap Import from Internal Storage.
6. Select Import All vCard Files to import all vCards to your Kindle Fire.
7. Select Import One vCard File or Import Multiple vCard Files to choose which vCards to import.
8. Tap OK.
9. Tap the contacts that you would like to import.
10. Tap OK to import the selected contacts.

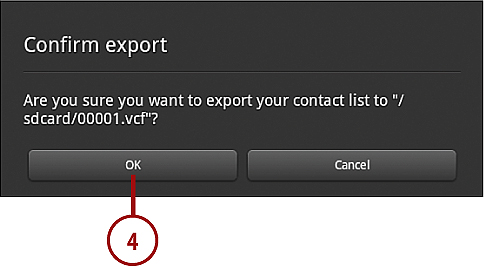
Exporting Contacts
You can export your contacts to a single vCard. If you export your contacts and save them somewhere other than on your Kindle Fire, you can import them to a new Kindle Fire device or after resetting your existing Kindle Fire.
1. From your contact list, tap the Menu icon.
2. Tap Import/Export.
3. Tap Export to Internal Storage.
4. Tap OK to confirm that you want to export your contacts. You’ll see a message telling you the name of the vCard file that contains your exported contacts. You’ll need to copy that file from your Kindle Fire to a computer.