2. Amazon’s Cloud Services
In this chapter, you learn about Amazon’s cloud services that make your Kindle Fire more enjoyable.
Amazon offers a collection of cloud services that augment the functionality of the Kindle Fire. In fact, your Kindle Fire is designed to be a handheld conduit into these cloud services. You can set up a cloud drive, add all of your music, and that music is immediately available to you on your Kindle Fire anywhere you can connect to Wi-Fi. You can get a movie or TV show from Amazon on your computer or set-top box, watch part of it on your television, and then pick right up to watch the rest on your Kindle Fire while in bed or while traveling. You may as well think of your Kindle Fire as a window into the world of Amazon’s cloud services.
Amazon Cloud Drive
Your computer has a hard drive in it where you can store your stuff. When you’re sitting at your computer, that stuff is easy to access, but what about when you’re not at your computer? If you have Internet access, that’s when cloud storage comes in handy. The cloud is just another word for the Internet, so when you have something stored in the cloud, you can access it from anyplace where you have Internet access.
Amazon provides 5GB of free storage that you can use for music, pictures, videos, or anything else you want to store in the cloud. You can buy additional storage for a nominal fee.
While your Kindle Fire’s Music screen does provide access to your music stored in the cloud, you’ll need to use Silk (the Kindle Fire’s web browser) to view other file types stored in your Cloud Drive.
As of this writing, if you purchase any paid Cloud Drive plan for as little as $20 per year, Amazon gives you unlimited space for music files, whether purchased from Amazon or not.
Accessing Your Cloud Drive
You can access your Cloud Drive using Silk on your Kindle Fire or using the web browser on your computer.
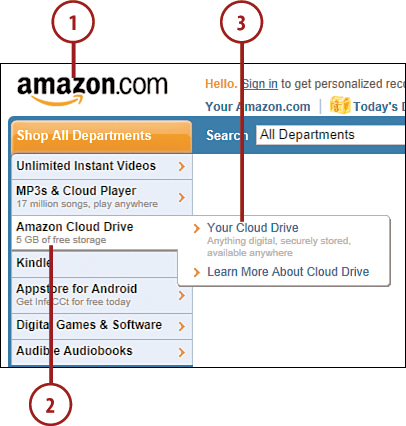
1. Open your web browser and browse to www.amazon.com.
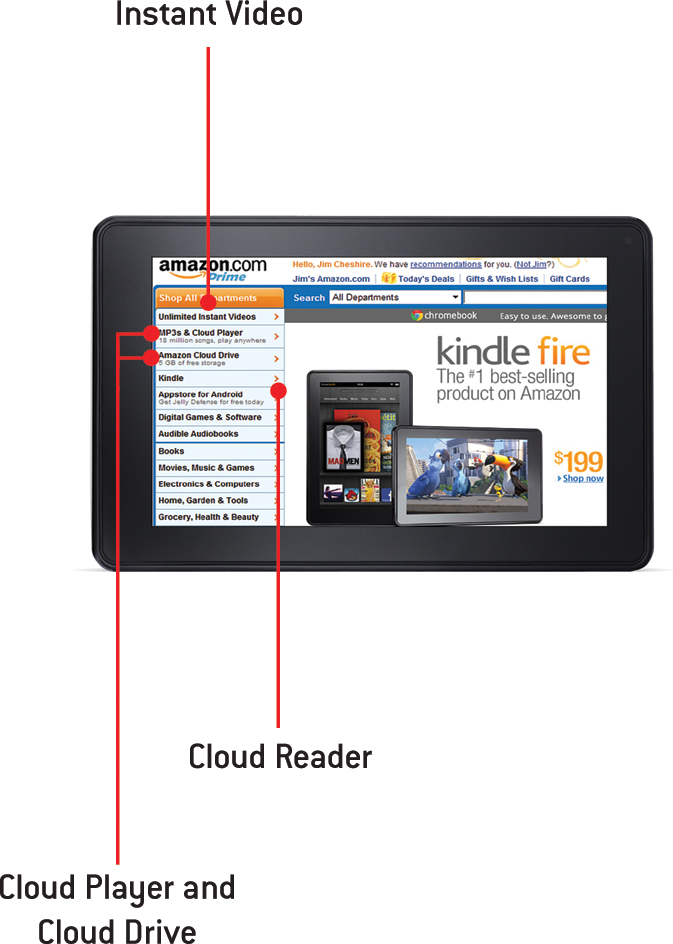
2. Point to Amazon Cloud Drive.
3. Select Your Cloud Drive from the menu.
4. Enter your email address and your Amazon password if prompted.
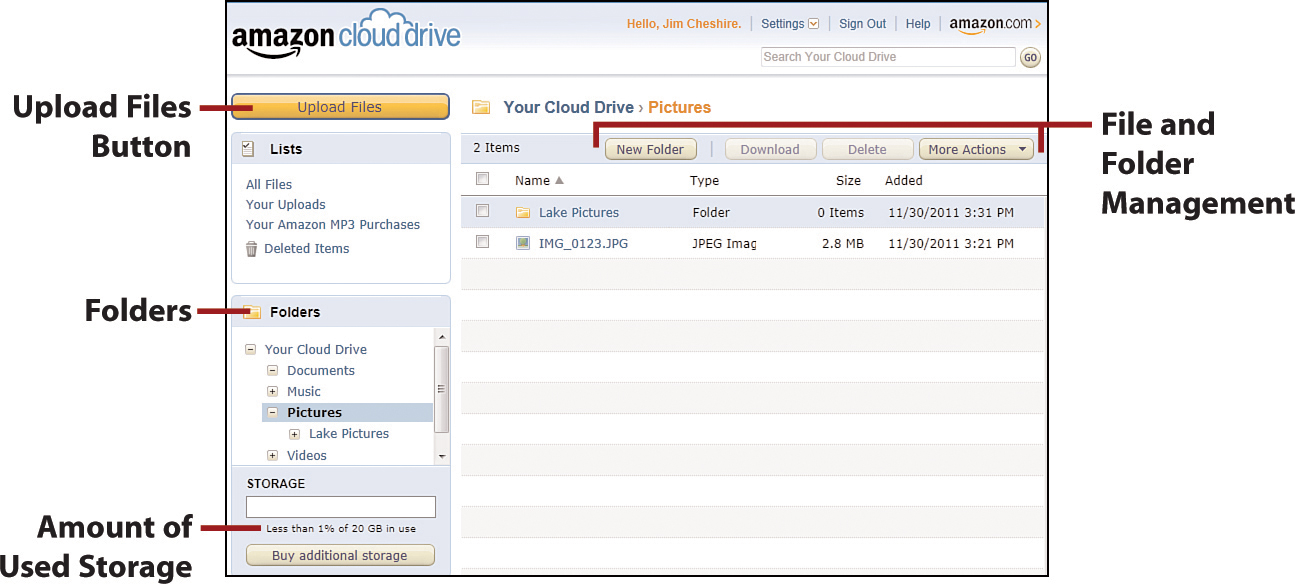
After you log in, you’ll see your Cloud Drive and a big Upload button if you haven’t uploaded any files yet. I’ll show you how to create folders and upload files next.
Creating Folders
By default, your Cloud Drive contains folders for common file types. You’ll see folders for music, pictures, documents, and so forth. Those folders are a good starting point, but you might want to create additional folders. For example, if you’re uploading pictures from a recent family vacation, you might want to create a folder inside of the Pictures folder called Family Vacation and upload your pictures there.
1. Click New Folder.
2. Enter a name for the folder.
3. Click Save Folder.

Deleting a Folder
You can delete folders from your Cloud Drive that you no longer need or to free up some space.
1. Click Your Cloud Drive so that your folders are visible.
2. Check the box to the left of the folder(s) you want to delete.
3. Click Delete.
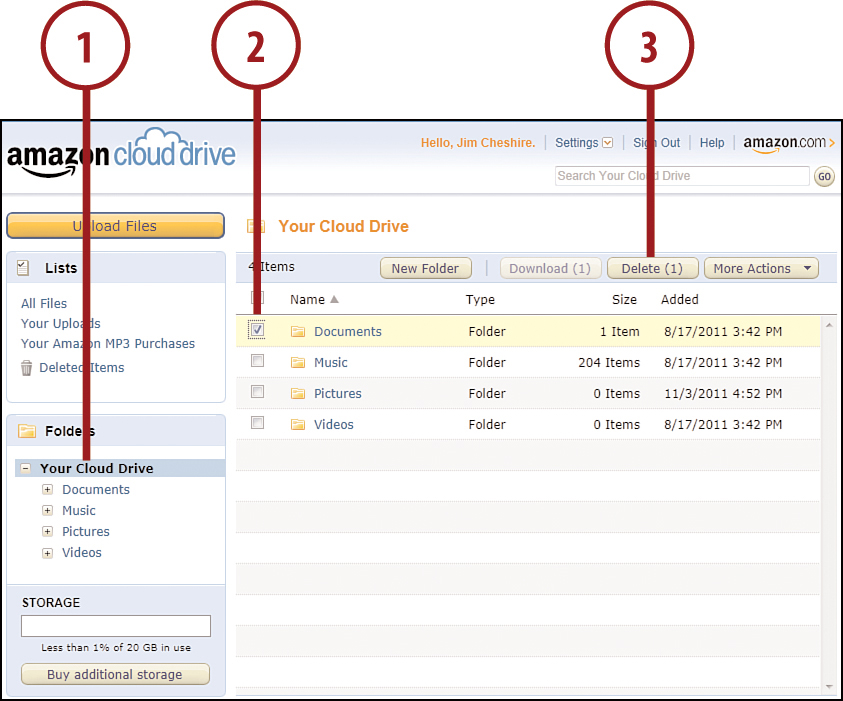
If you delete a folder that contains files, the files are deleted along with the folder. If you accidentally delete your files, you can recover them from Deleted Items. Files in Deleted Items remain there until you permanently delete them, and they continue to use space in your cloud drive. To permanently delete them, click the Permanently Delete button in Deleted Items.
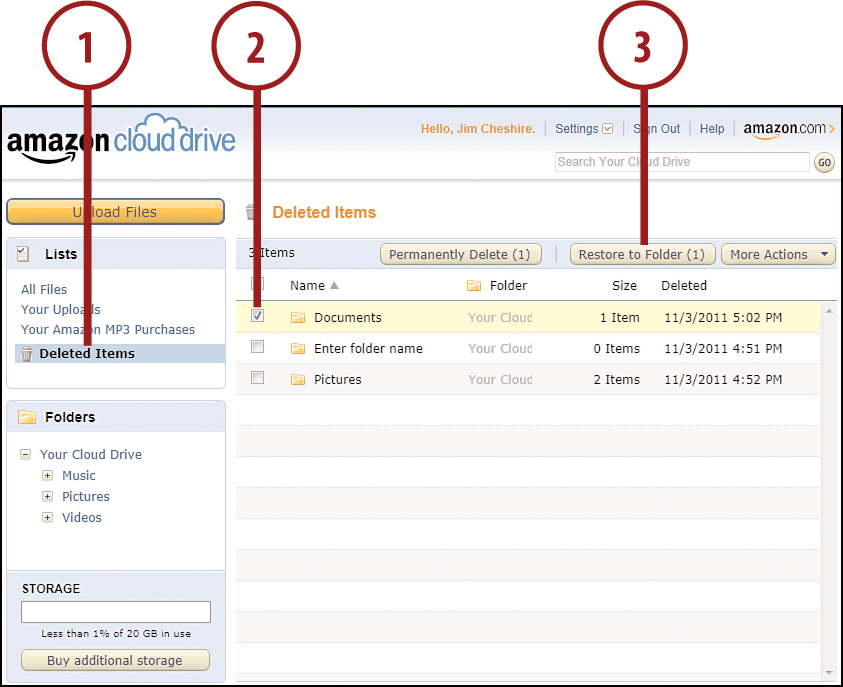
Recovering Deleted Items
You can recover folders that you’ve accidentally deleted. Recovering a folder also recovers the files that were originally inside the folder.
1. Click Deleted Items.
2. Check the box to the left of the folder(s) you want to recover.
3. Click Restore to Folder.
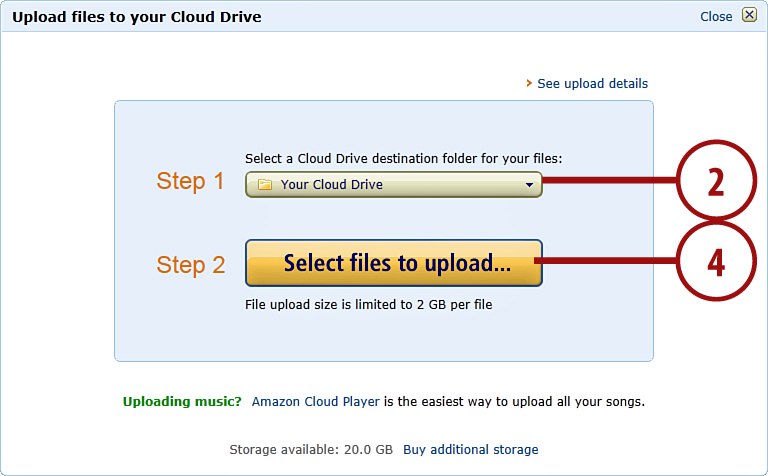
Adding Files to Your Cloud Drive
To add files to your Cloud Drive, you upload them to Amazon.
1. Click the Upload Files button near the top left corner of the Cloud Drive screen.
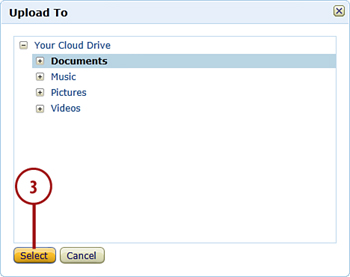
2. Click the drop-down to select a folder for your uploaded files.
3. Select your folder and click Select.
4. Click Select Files to Upload.
5. Select one or more files for upload.
If you’re uploading music files, you can use Amazon Cloud Player to upload more easily using Amazon’s MP3 Uploader. Click the Amazon Cloud Player link in the Upload Files dialog in step 2.
Music that you upload to your Cloud Drive can be streamed or downloaded from the Music screen on your Kindle Fire. Other files in your Cloud Drive are accessible using Silk.
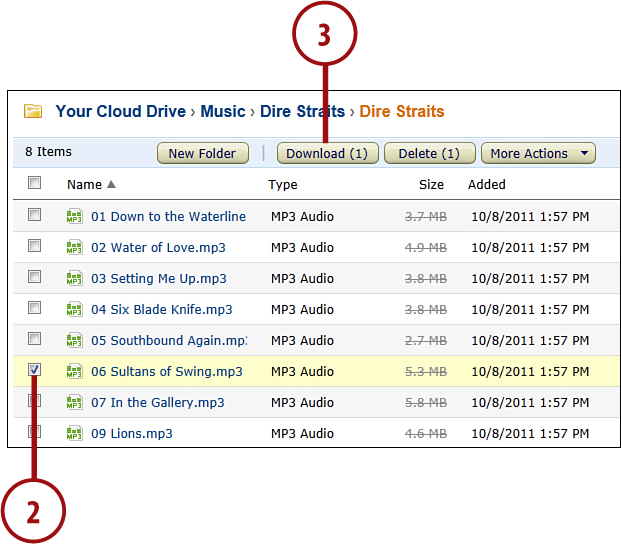
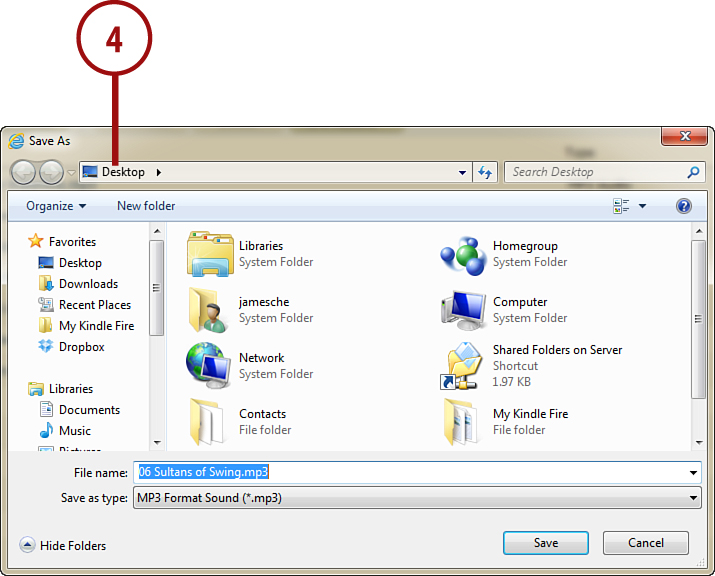
Downloading Files from Your Cloud Drive
You can download one file at a time from your Cloud Drive.
1. Navigate to the file you want to download by clicking the folder that contains the file.
2. Place a check in the box to the left of the file you want to download.
3. Click Download.
4. Select the folder where you want to save the file.
If you would like to download multiple music files, use Amazon Cloud Player, which only allows for the download of music files and provides a better interface for doing so.
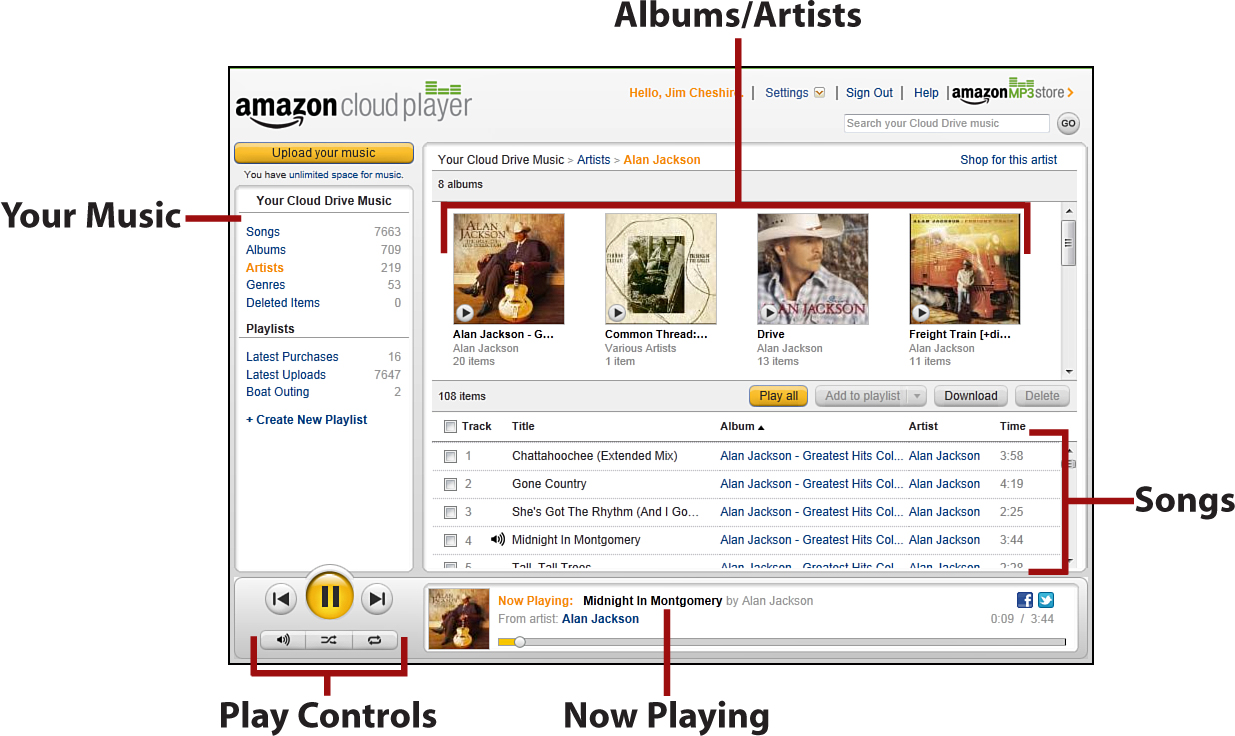
Amazon Cloud Player
Amazon Cloud Player is a convenient way to listen to music on your Cloud Drive when you don’t have your Kindle Fire with you. You can use Cloud Player on a computer or on most mobile devices.
Launching Cloud Player
Amazon Cloud Player is available as an Android application if you have an Android phone. If not, you can access the Cloud Player from your web browser. While you can use Silk to access Cloud Player, it doesn’t really make sense to do so because the Music screen provides access to your Cloud Drive music.
1. Open your web browser and browse to www.amazon.com.
2. Point to MP3s and Cloud Player on the menu.
3. Click on Cloud Player for Web.
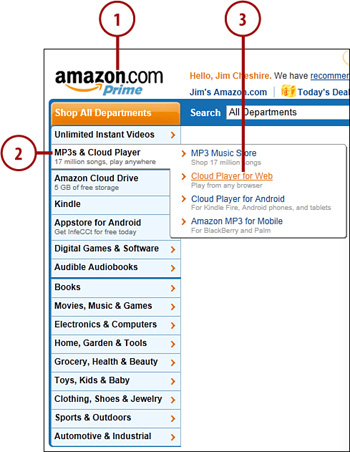
4. If prompted, enter your email address and Amazon password.
Playing Music
You can stream music from Cloud Player without downloading the music to your computer.
1. Locate the music you want to play. You can browse by song, artist, album, or genre.
2. Click the checkbox next to one or more songs to select the songs to play. You can also check the box at the top of the list to select all songs that are displayed.
3. Click the Play button.
4. To go to the next song, click the Next button.
5. To go to the previous song, click the Previous button.
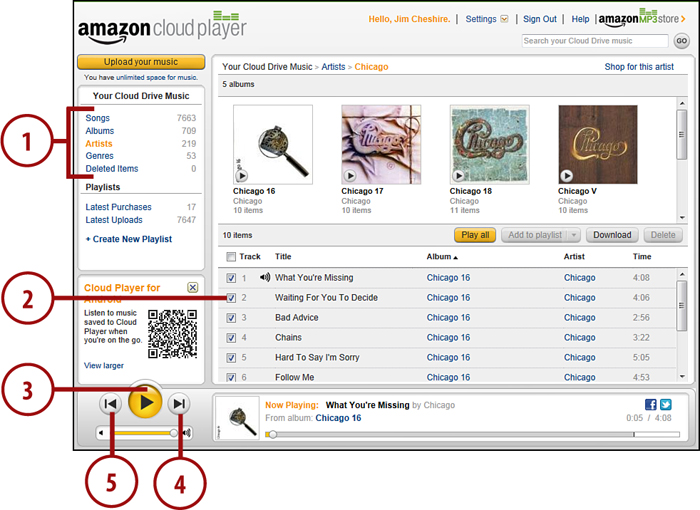
You can shuffle or repeat the songs you are playing by clicking the Repeat or Random button under the large Play button in the lower-left corner of Cloud Player.
Creating Playlists
You can create playlists of songs in order to play only the songs you want to hear. Playlists are a great way to make a song list for a party or special event. Playlists you create in Cloud Player are also available on your Kindle Fire.
Your Cloud Drive on your Kindle Fire refreshes every 10 minutes. Songs or playlists that you add will appear once a refresh occurs.
1. Select the songs you want to add to your playlist.
2. Click the Add to Playlist button.
3. If you haven’t created a playlist yet, enter a name for a new playlist. Otherwise, choose New Playlist or an existing playlist for the selected songs.

4. Browse to other songs and add them to your playlist as desired.
Downloading Songs to a Computer
If you plan on being away from an Internet connection, you can still play your music by first downloading it to your computer.
1. Select the songs you want to download.
2. Click the Download button. If you don’t already have the Amazon MP3 Downloader, you are asked to download and install it.
3. Your browser prompts you to open or save a file with an .amz file extension. Select the option to open the file.
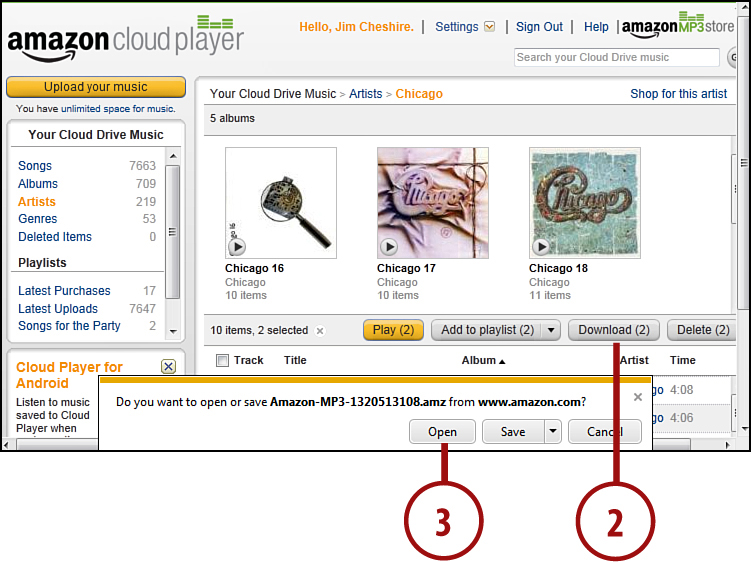
4. The MP3 Downloader launches, downloads your files, and imports them into iTunes or Windows Media Player on your computer.


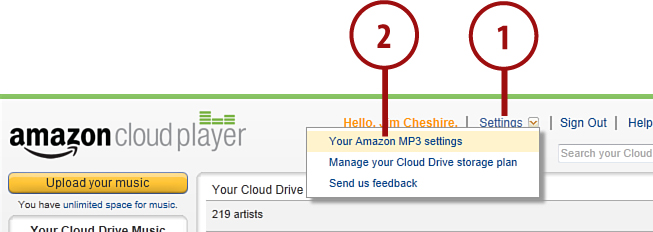
Changing How Amazon Handles Purchased Music
You can choose whether Amazon automatically adds music that you buy from Amazon’s MP3 Music Store to your Cloud Drive. You can also choose whether or not music added to your Cloud Drive automatically is downloaded to your computer.
1. Click Settings from the Amazon Cloud Player.
2. Select Your Amazon MP3 Settings.
3. Select whether songs are saved to your Amazon Cloud Drive or saved to a device. If you choose Save to Device, purchases download to your computer and are not saved to your Cloud Drive.
4. If you choose to save music to your Cloud Drive automatically, you can also choose whether or not music added to your Cloud Drive is downloaded to your computer.
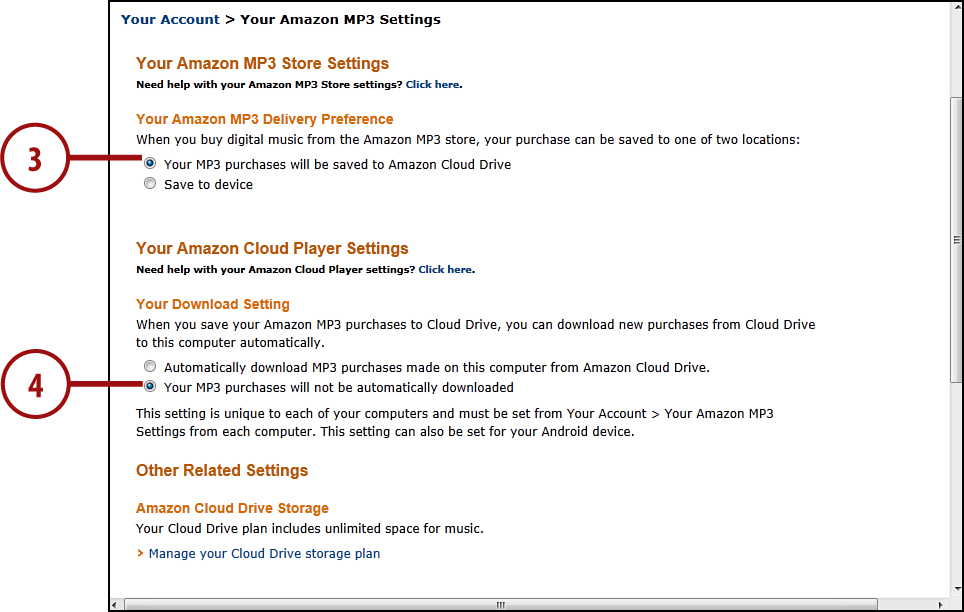
Settings Are Instant and Per Computer
Changes you make to your Amazon MP3 options take effect immediately and are unique to the computer you are using when you set them. If you want your options to take effect on all computers, you need to change them explicitly on each computer you use.
Amazon Instant Video
Amazon has a huge selection of videos, including both movies and television programs, that you can watch on your Kindle Fire, but you can also watch those videos on your computer. You can also purchase or rent videos on your computer and watch them on your Kindle Fire or vice versa.
Getting Videos from Amazon Instant Video
You can use your computer to buy, rent, or stream Amazon Instant Video. Videos that you buy or rent are available on your computer, on your Kindle Fire, or on any other device that supports Amazon Instant Video.
If you’re an Amazon Prime subscriber, you have access to more than 10,000 videos that you can stream instantly at no additional charge to your computer, TV, or Kindle Fire.
If you’re a primary caregiver (mom, dad, grandparent, and so forth) for a young child, you can get Prime free by joining Amazon Mom. Browse to www.amazon.com/prime for details.
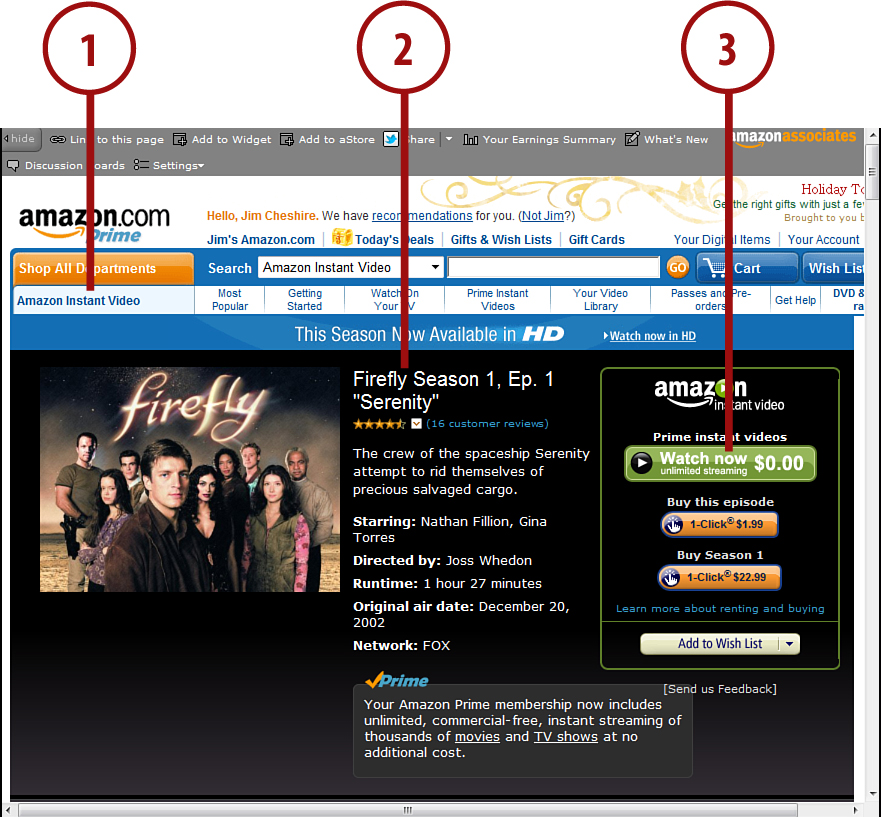
1. Open your web browser and browse to www.amazon.com/instantvideo.
2. Select the movie or TV show that you want to watch.
3. Choose to purchase, rent, or watch your video. Not all options are available for all titles.
Why Rent or Buy Instead of Stream Free Prime Video?
If you’re an Amazon Prime member, you may be able to watch a title free, but you still may want to rent it instead. Why? If you want to watch on your Kindle Fire and you don’t have Wi-Fi access, you need to first download the movie or TV show. You can only download videos that you’ve either purchased or rented.
If you rent a video, you have 30 days to begin watching it before it expires. After you begin watching it, you have 48 hours to complete it before the rental expires.
Kindle Cloud Reader
The Kindle Cloud Reader makes it possible to read your Kindle books in your web browser from any location with Internet access. Kindle Cloud Reader requires either Google Chrome (www.google.com/chrome), Apple Safari (www.apple.com/safari), or Firefox version 6 or higher (www.getfirefox.com).
Accessing Kindle Cloud Reader
1. Browse to read.amazon.com using the Chrome, Safari, or Firefox web browsers.
If you have an iPhone, an iPad, or an iPod touch, you can use Safari on that device to use Kindle Cloud Reader. By using Cloud Reader on your device, you can shop for Kindle books from within the integrated store, something that’s not possible with the Kindle app for iOS.
2. Click the Sign In to Get Started button.
3. Enter your email address and your Amazon password.
4. If you want to be able to continue reading in Kindle Cloud Reader without an Internet connection, click Enable Offline to enable offline reading.
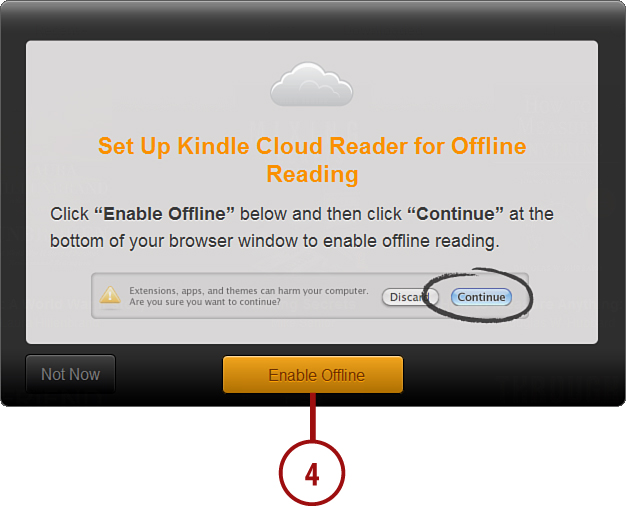
5. Click Continue to install Cloud Reader.
6. Click the Cloud Reader app in your browser.
7. Click the Get Started Now button to start using Kindle Cloud Reader.
Opening and Downloading Books
You can read books that are in the cloud (stored on Amazon’s computers) or that are downloaded to your own computer. Only books that you’ve downloaded to your own computer can be read without an Internet connection.
1. Locate the book you’d like to read. You can click the magnifying glass at the top of the screen to search for books if necessary.
2. Click on a book to start reading it. If you want to download a book for offline reading right-click the book and click Download & Pin Book.

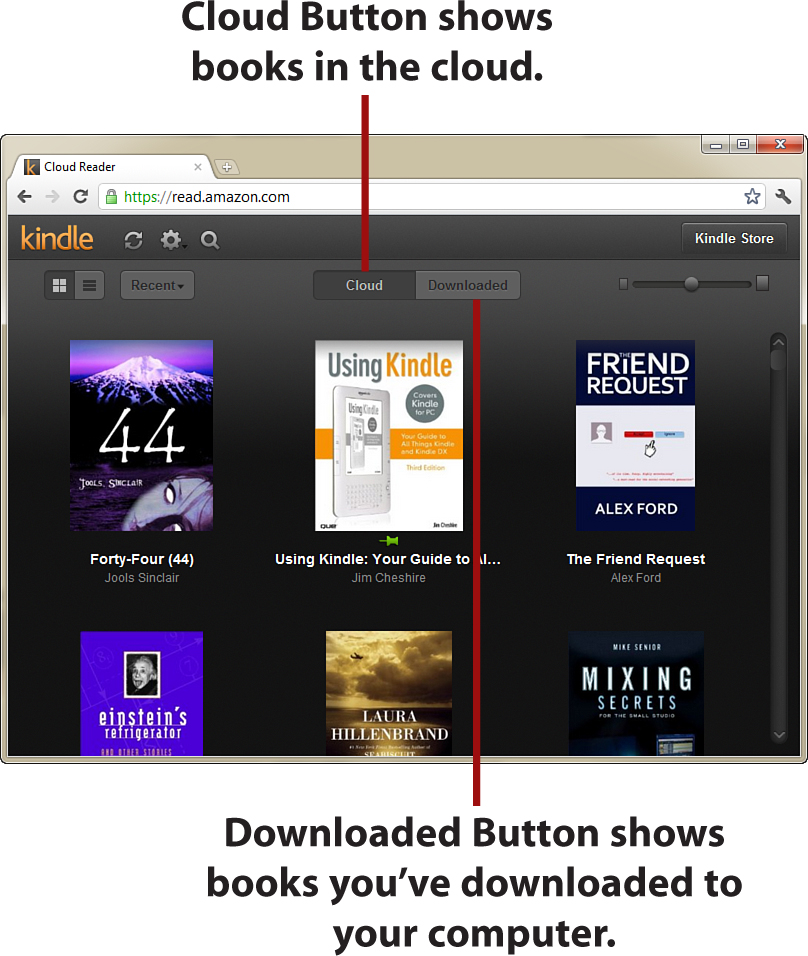
Downloaded books are accessible by clicking the Downloaded button at the top of the screen, but they’re also visible when Kindle Cloud Reader’s Cloud button is pressed. Downloaded books display a green pin under the book’s cover.
After you download your first book, Cloud Reader downloads other books that you read automatically. These books are automatically deleted periodically. If you want to ensure that a downloaded book isn’t automatically deleted, right-click it and choose Download & Pin Book.
Reading Books
Cloud Reader has many of the same reading features you find in the Kindle Fire.
1. Open a book as described in the previous section. If the book has been opened previously on any Kindle device, it automatically opens at the furthest point read.
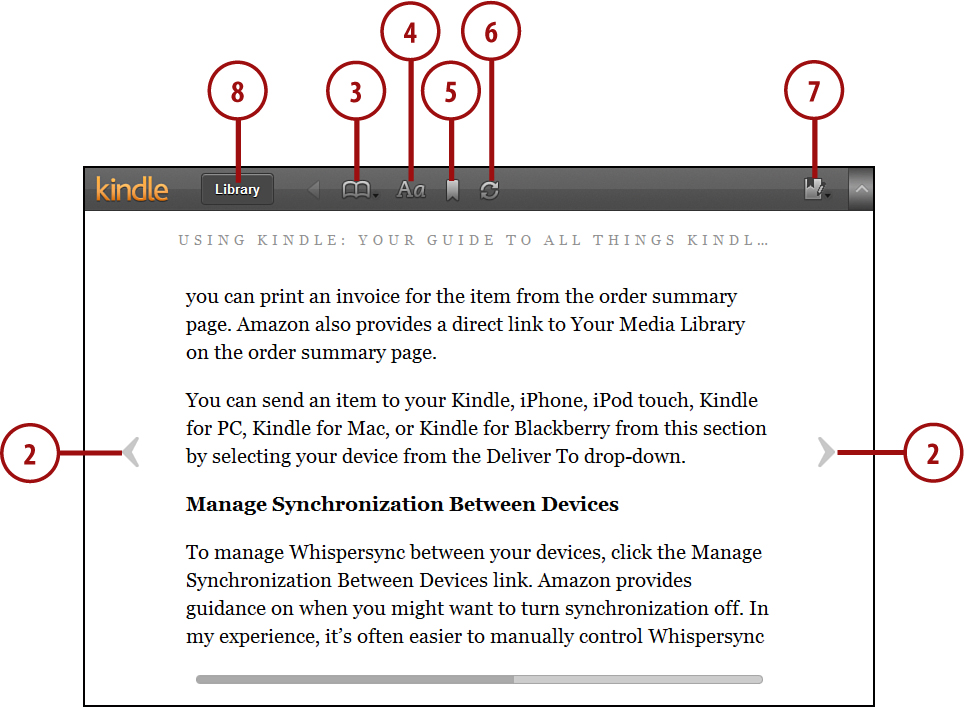
2. To turn pages, use the arrow keys on your keyboard or click the arrows on the left and right sides of the page.
3. Quickly access a part of the book using the Go To menu.
4. Change font size, margins, and color settings using the View Settings button.
5. Bookmark a page using the Bookmark button.
6. Synchronize with your other Kindle devices using the Synchronize button.
7. View notes and highlights using the Toggle Notes and Marks button.
8. Click the Library button to return to your library.
You cannot create notes and highlights in Cloud Reader, but you can view notes and marks created on your Kindle Fire or other Kindle device or app.