
1. Getting Started with the Kindle Fire

In this chapter, you connect your Kindle Fire to your Wi-Fi network, register it with Amazon (if it’s not already registered), and discover the basics of navigating and using your tablet. Topics include the following:
• Basic Usage of the Kindle Fire
• Settings
• Searches
The Kindle Fire is unassuming at first glance. However, after you power it on, you soon realize that it opens up a new world of entertainment and information. Couple it with Amazon’s wide range of services, and the Kindle Fire becomes a truly extraordinary device. In fact, it’s likely that in addition to being a great reading device, your Kindle Fire might replace your computer for many of the things you do on the Internet.
The Kindle Fire is not difficult to use. Many of its features are intuitive and you can easily discover many of the great things it can do. However, if this is your first tablet, there are some essentials that you should be familiar with to get the most from the device. This chapter starts you off on the right foot by teaching you about the basic operation of the Kindle Fire.
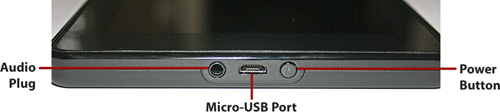
The Hardware
Your Kindle Fire is equipped with a power button on the bottom of the device. Press and release this button to power on your Kindle Fire. If the Kindle Fire is already turned on, a quick press of the power button puts it to sleep. Pressing and holding the power button enables you to power off your Kindle Fire completely.
The display on your Kindle Fire is the primary power consumer on the device. Therefore, your Kindle Fire uses much less power when it’s in sleep mode. Turning it off completely obviously uses even less power, but if you subscribe to a magazine or a newspaper, you won’t get your subscription automatically when your Kindle Fire is turned off.
To the left of the power button is a micro-USB port for charging your Kindle Fire. You can also use the micro-USB port to connect your Kindle Fire to a computer so that you can manually transfer files to the device. However, Amazon doesn’t provide a micro-USB cable when you purchase a Kindle Fire, so you have to buy one separately if you want to connect the Kindle Fire to a computer.
When your Kindle Fire is plugged into your computer with a USB cable, the power button lights up orange as though the device were charging. However, the battery charges over USB only when the screen is turned off. If the screen is turned on, the battery drains even if the Kindle Fire is connected to a computer by USB cable.
When your Kindle Fire is charging, the power button illuminates with an orange glow. When your Kindle Fire is fully charged, the light turns green. Charging the Kindle Fire takes about four hours, and you can expect to get approximately eight hours of use from a full charge. However, if you play a lot of games or use the Wi-Fi connection a lot, you can expect fewer hours of use between charges.
To the left of the micro-USB port is a 1/4″ audio plug for headphones or other audio devices, such as an external speaker set. The Kindle Fire is best suited for earbuds such as those that come with cell phones or portable music players. If you have a high-quality set of headphones, you might want to use a portable headphone amplifier to improve the audio quality.
At the top of your Kindle Fire are two stereo speakers. These speakers are suitable for basic sounds from your Kindle Fire, but for listening to music or watching videos, headphones or an external speaker set are definitely better options.

One thing you might notice missing in the way of buttons is a volume control. There aren’t buttons on the Kindle Fire for controlling volume. Instead, you have to use the volume slider that is available in the Kindle Fire interface. See the “Adjusting the Volume” task later in this chapter for more information about controlling the volume.
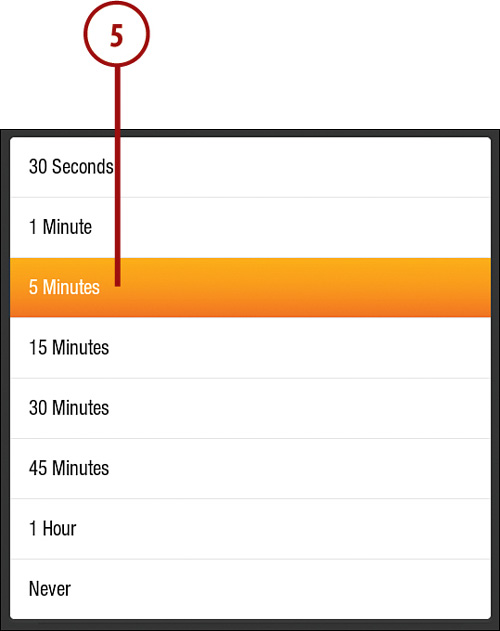
Changing the Screen Timeout
Your Kindle Fire’s screen turns off automatically after 5 minutes without use. You can adjust the timeout or you can turn the automatic timeout off completely.
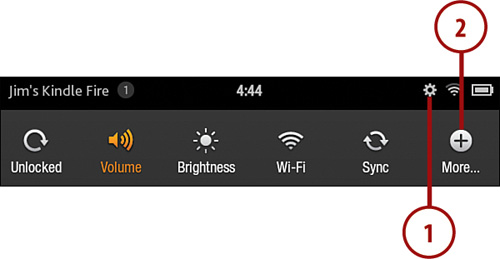
1. Tap Quick Settings.
2. Tap More.
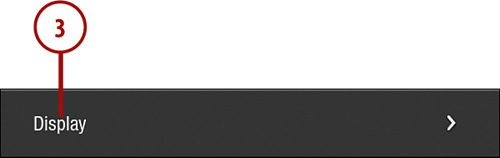
3. Tap Display.
4. Tap Screen Timeout.
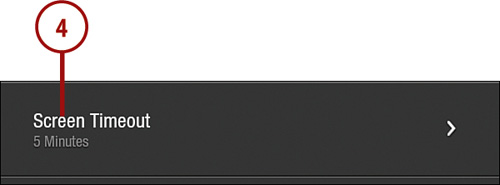
5. Select a screen timeout.
Initial Setup
When you first turn on your Kindle Fire, you see the lock screen. Swipe your finger in the direction of the colored arrow to unlock the device. You then go through a series of steps that get you started using your new device.
Connecting to a Listed Wi-Fi Network
In order to access content on your Kindle Fire, you need to connect to a Wi-Fi network, which is where the initial set-up process begins.
Manually Connecting to a Wi-Fi Network
If you need to return to the Wi-Fi setup, you can tap Quick Settings and then tap Wi-Fi.
1. Tap the name of your Wi-Fi network.

2. Enter the password for your Wi-Fi network.
3. Tap Connect.

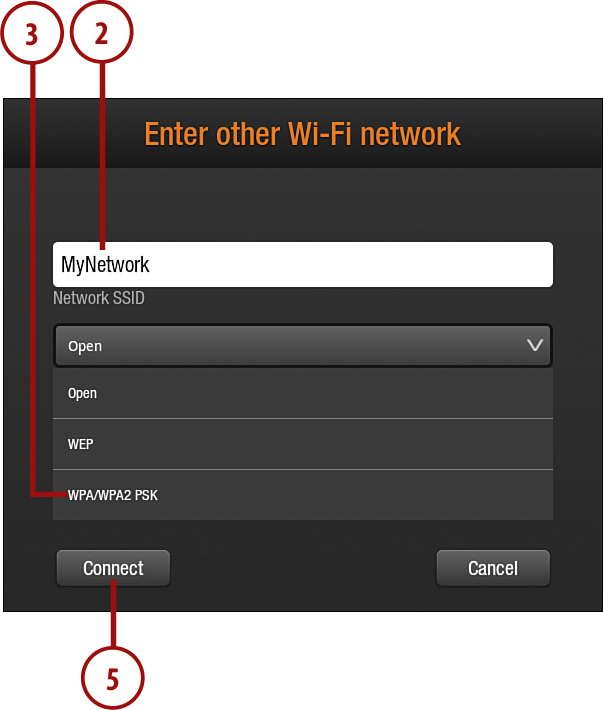
Connecting to an Unlisted Wi-Fi Network
If your network’s name isn’t listed, you might need to manually enter the information necessary to connect to your Wi-Fi network.
1. Tap Enter Other Wi-Fi Network.

2. Enter the name (SSID) of your network.
3. Tap the type of security that your network uses.
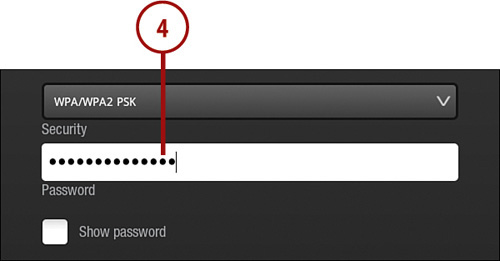
4. Enter the password for your network if necessary.
5. Tap Connect.
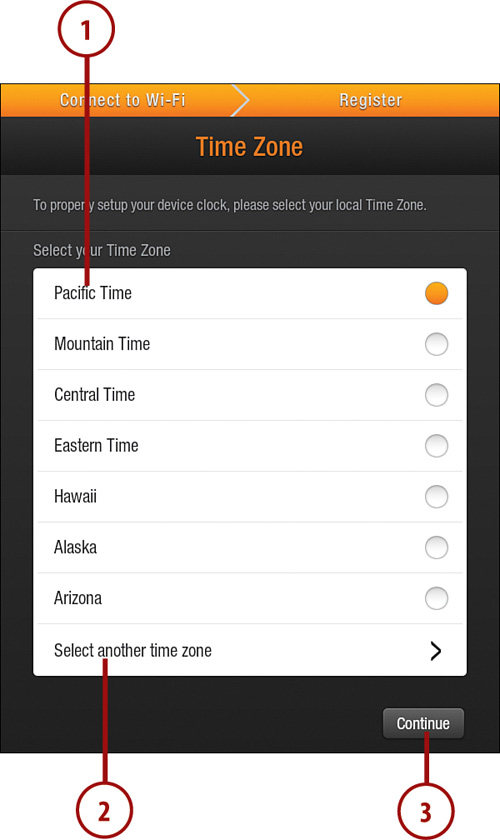
Setting Your Time Zone
Your Kindle Fire doesn’t have a GPS, so it can’t determine your time zone automatically. You need to select your time zone during setup.
1. Tap your time zone.
2. If your time zone isn’t listed, tap Select Another Time Zone to see a list of additional time zones.
3. Tap Continue.
Registering with Amazon
Your Kindle Fire must be registered with an Amazon account so that you can access content. If your Kindle is not already registered to your Amazon account (often they’re shipped already registered to the buyer’s account), you need to do that next.
1. Enter your email address that is registered with Amazon.
2. Enter your Amazon password.
3. Tap Register.

If you don’t already have an Amazon account, you can create one online at Amazon.com or you can tap Create an Account to create one on your Kindle Fire.
It’s possible that your Kindle Fire won’t have the latest version of the Kindle operating system. If it doesn’t, the latest version is downloaded and installed automatically when you set up your Kindle Fire for the first time.
The final step in the initial setup is the Welcome screen. Tap Get Started Now to begin using your Kindle Fire. The Kindle Fire guides you through a series of screens that describe some of the basic usability features of the tablet.
Basic Usage of the Kindle Fire
By now you’re already familiar with tapping to select buttons and other items on your Kindle Fire. You can also use several other gestures to interact with your Kindle Fire.
Taps are registered when you lift your finger from the screen. If you tap something by mistake and you want to cancel the tap, slide your finger onto another part of the screen before lifting it.
In addition to tapping to select items, you can double-tap to do things such as zoom on a figure in a book or a website. To double-tap, tap your finger on the same point on the screen twice in quick succession.

You can scroll through lists of items both horizontally and vertically by swiping your finger. Hold your finger on the list and move it up and down or left and right to scroll through items. To quickly scroll, flick your finger in the direction you want to scroll as you remove your finger from the screen.
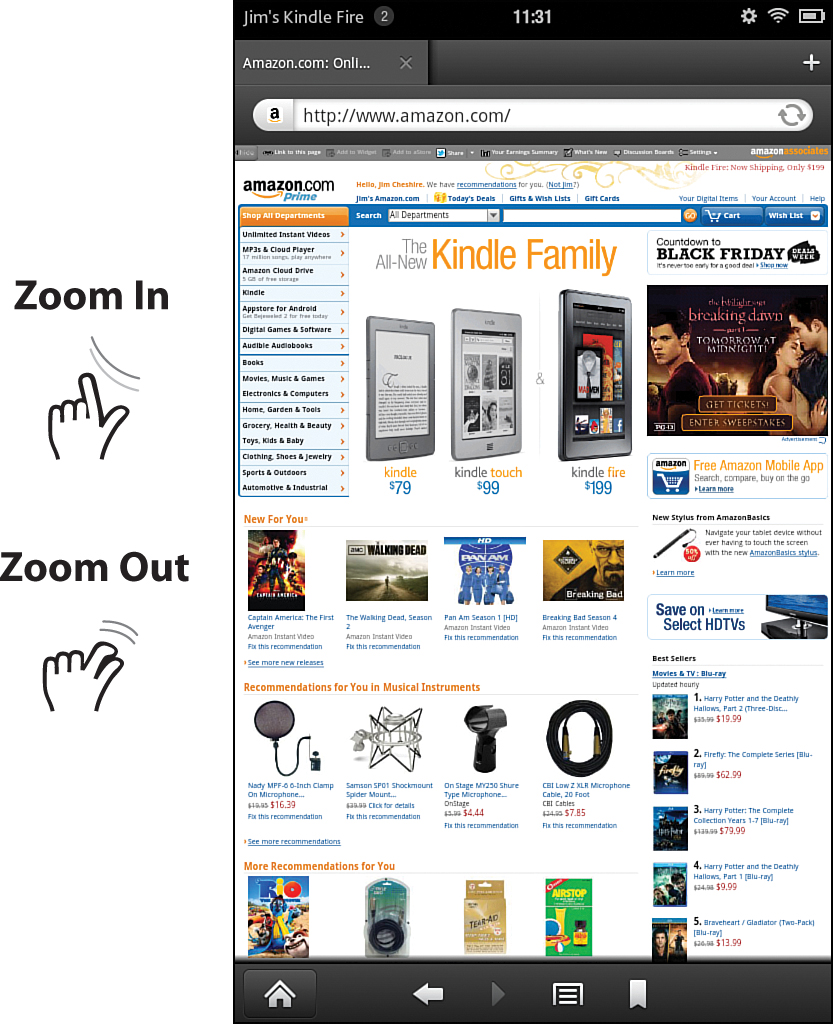
To incrementally zoom in and out, you can use pinch and reverse pinch gestures. This is typically used on pictures, websites, and subscription content, but many applications also allow you to use this gesture.
To zoom in, place your thumb and index finger on the screen close together and move them apart (reverse pinching). To zoom out, place your thumb and index finger on the screen with some distance between them and move them together (pinching).
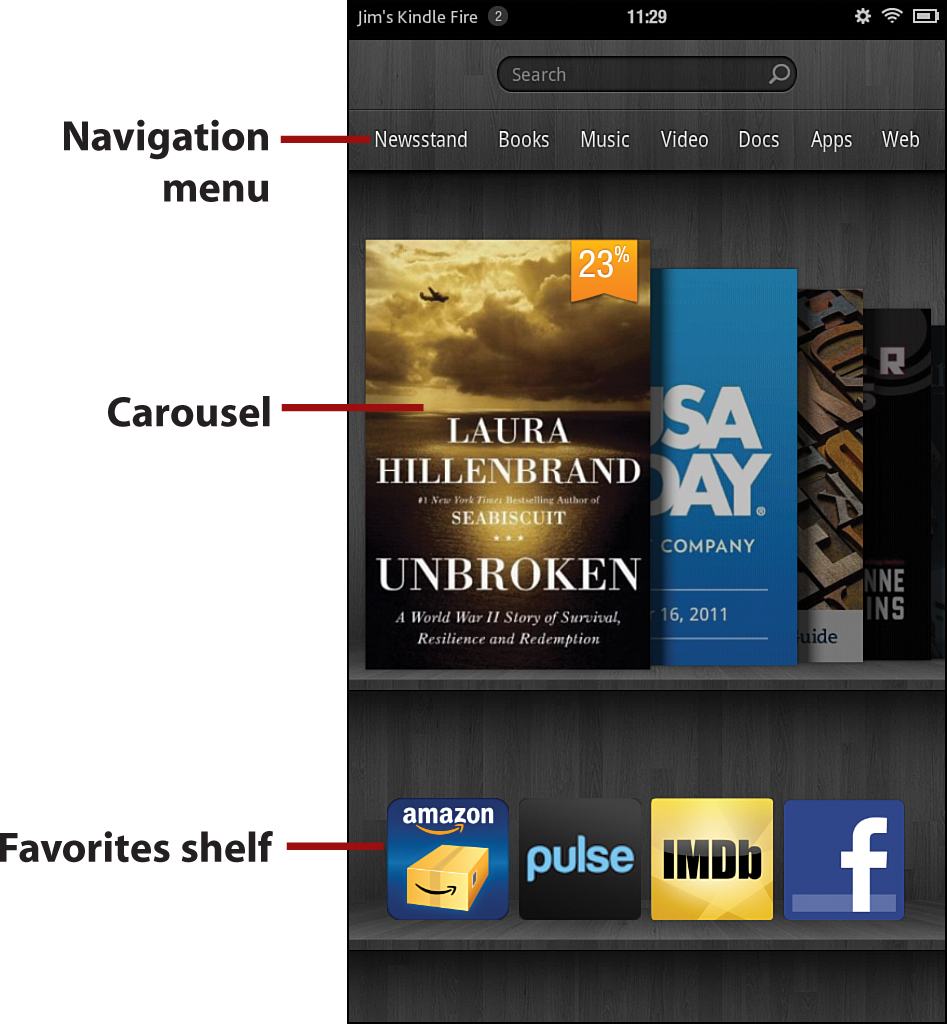
The Home Screen
After you complete the initial setup, your Kindle Fire automatically takes you to the main screen (called the Home screen). The Navigation menu provides quick access to the content libraries available on the Kindle Fire. The Carousel contains thumbnails for your books, subscription content, and recently accessed videos, music, and websites. Slide or flick across the Carousel to browse the items available there. Tapping an item opens that item. You can’t change the order of items in the Carousel. The most recently accessed items will always appear first.
You can tap on the right edge of any item that’s visible and the Carousel immediately flips to that item. You can then tap it to select it.
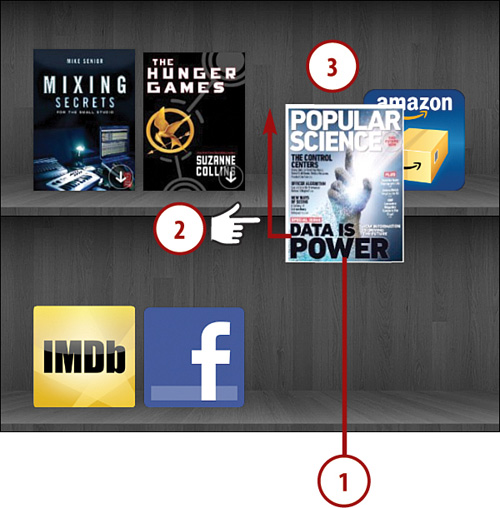
Downloading Items
The Carousel displays both items on your Kindle Fire (called device items) and items that are in your online library (called cloud items). If you want to open a cloud item, you first need to download it to your device.
Cloud items display a downward arrow in the lower-right when they are the topmost item in the carousel.
1. Swipe to the item you’d like to download. You see a downward-pointing arrow in the lower-right corner of the item.

2. Tap the item to download it to your device.
3. While the item is downloading, you can tap the X to cancel the download. Once an item has been downloaded, it is a device item and can be accessed at any time, even when not connected to Wi-Fi.

Removing Downloaded Items from Your Device
After an item is downloaded, it takes up some of the memory on your Kindle Fire. You only have 8GB of memory for storage of downloaded items, so you can free up some memory by removing unused items from your device. Removing an item from the device only removes the downloaded copy. The item is still available to you in your cloud library.
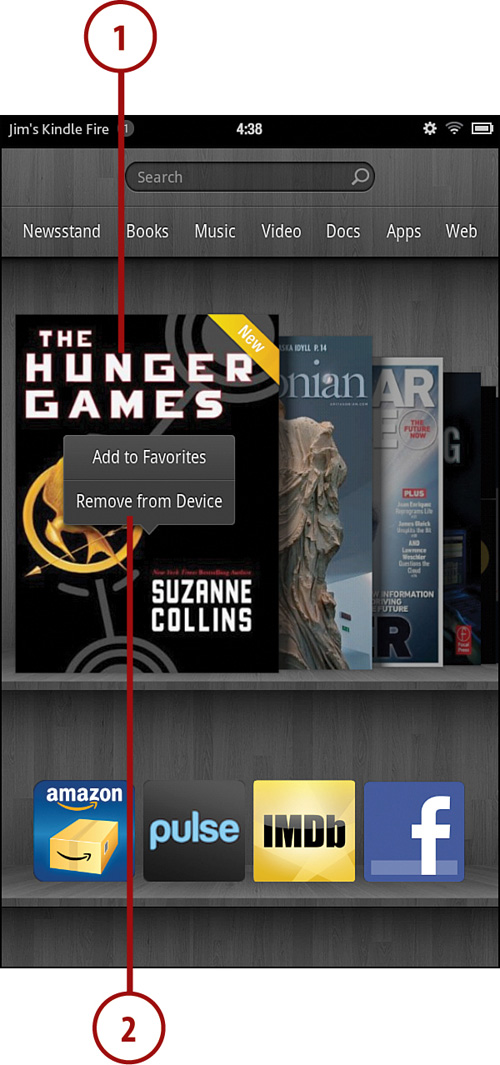
1. Tap and hold on the item you’d like to remove.
2. Tap Remove from Device.
“Cloud” is a common buzz phrase in today’s technology. If something is in the cloud, it means that it exists on a computer that you access via the Internet instead of on your local device. The Kindle Fire accesses a lot of its content on Amazon’s computers in the cloud.
Many screens on the Kindle Fire enable you to choose whether you are viewing content on the device or in the cloud. Having content in the cloud makes it easy to share that content between multiple devices.
Adding an Item to Favorites
The Favorites shelf is located below the carousel. It provides a convenient way for you to access your most often used items. You can add any item to Favorites.
By default, there are two Favorites shelves. However, as you add items to Favorites, your Kindle Fire adds additional shelves as needed. You can swipe up and down to browse the Favorites shelves.
1. Tap and hold on the item you want to add to Favorites.
2. Tap Add to Favorites.

Adding Subscription Items to Favorites
If you add a subscription item to Favorites and that item isn’t currently on your device, the item is downloaded immediately. If you remove that item from your device at a later time, it is automatically removed from Favorites as well.
Removing an Item from Favorites
If you decide you no longer want an item to be listed in Favorites, you can remove it.
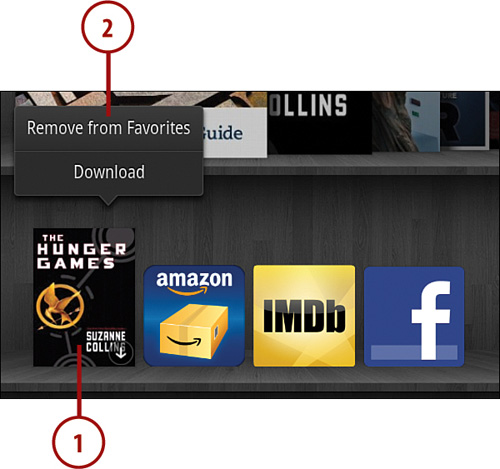
1. Tap and hold on the item in Favorites.
2. Tap Remove from Favorites.
Rearranging Favorites
By default, items are listed in Favorites in the order in which you add them. If you’d like to rearrange your Favorites, you can easily do so.
1. Tap and hold on the item you’d like to move.
2. Drag the item to the new location.
3. Release the item.
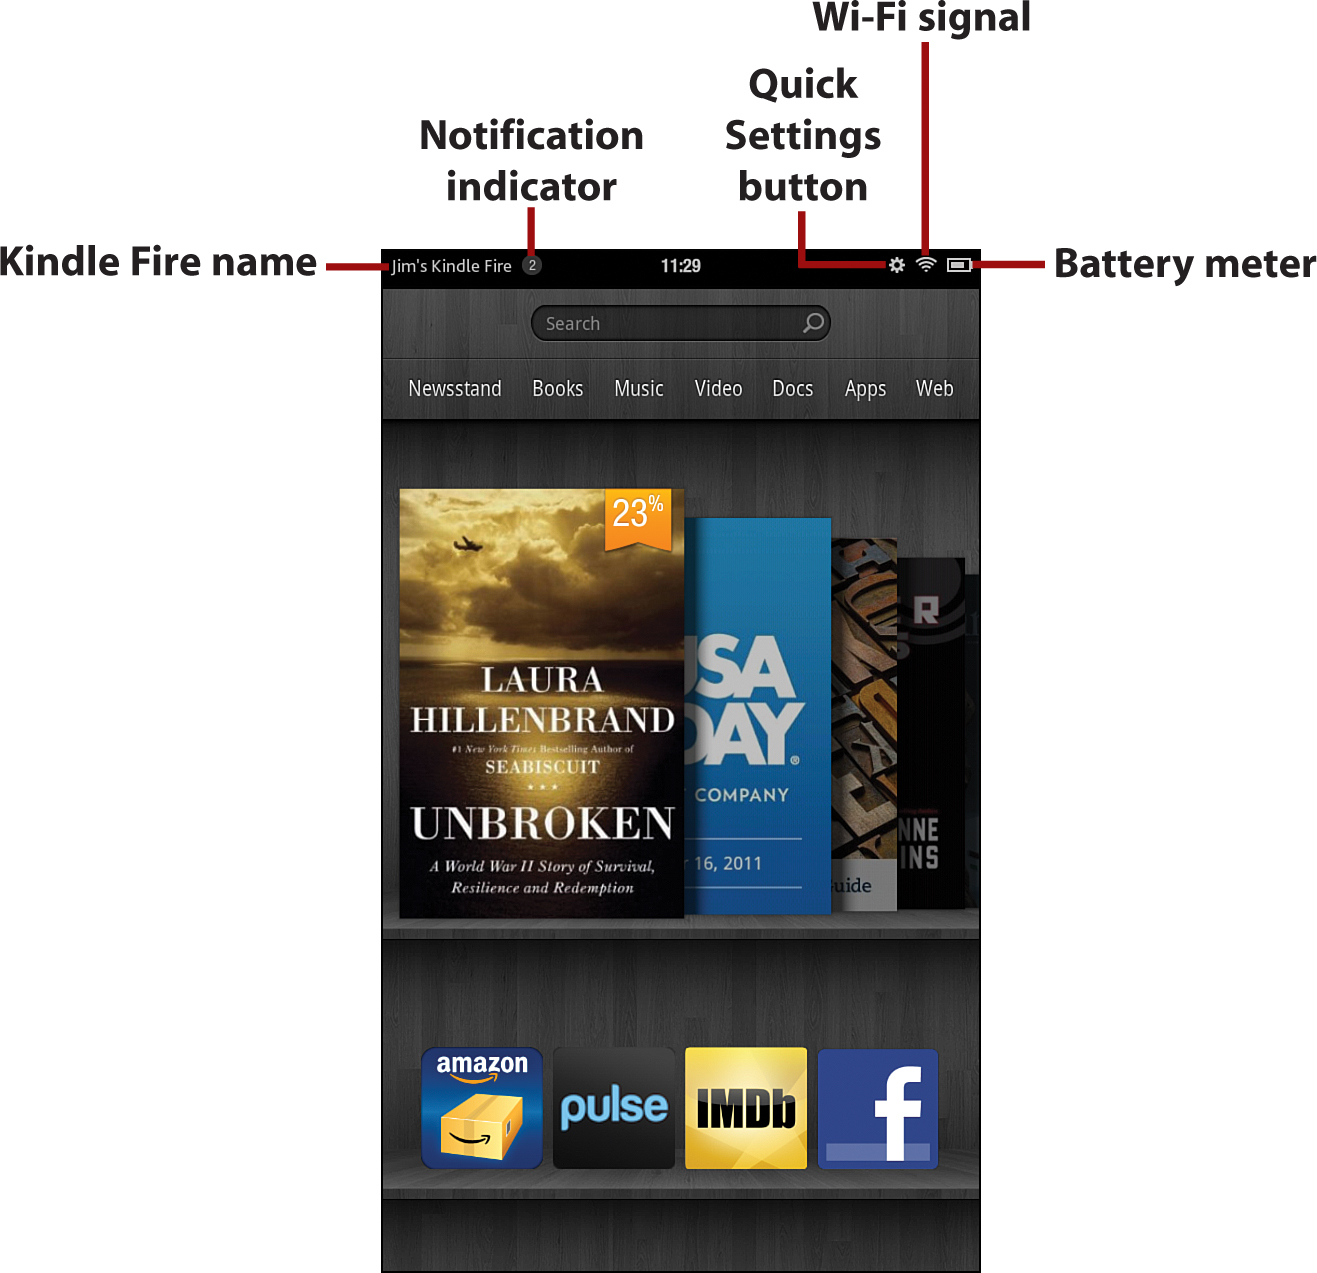
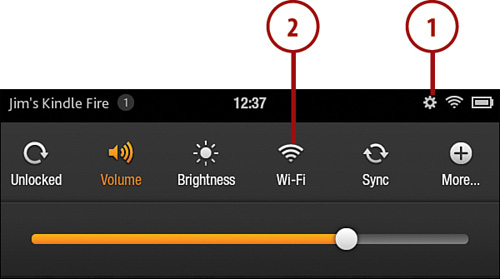
Notifications and Options
The Status Bar appears at the top of most Kindle Fire screens. The Status Bar displays the name of your Kindle Fire, a notification indicator (if notifications are present), the clock, the Quick Settings button, the Wi-Fi signal indicator, and the battery meter.
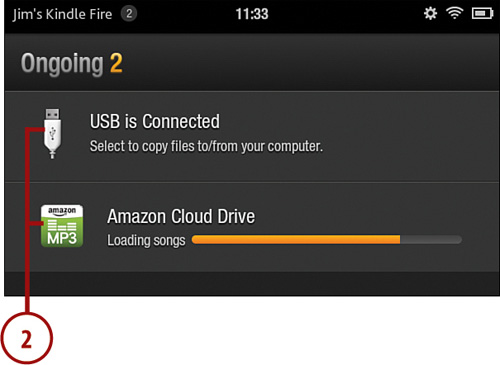
Notifications
Your Kindle Fire uses the notification indicator to inform you of any background tasks and other important information that’s going on behind the scenes. When you see the notification indicator, you can tap it to get more information.
1. Tap the notification indicator.

2. Tap a notification for more information or additional options.
Notifications might not be very obvious from the Home screen, but the information and options they provide is often valuable. I cover specific notifications that you should pay special attention to throughout the book.
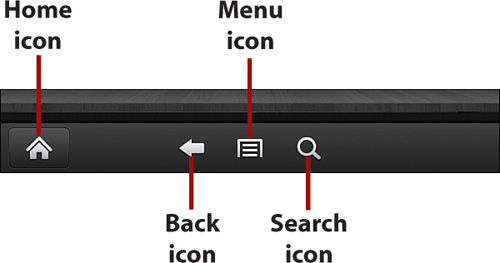
Options
The Options bar appears at the bottom of most screens. The buttons on the Options Bar are called icons and include a Home icon, a Back icon, a Menu icon, and a Search icon on most screens. The Home icon always takes you to the Home screen. The Back icon takes you back one screen, the Menu icon displays a menu for the current screen, and the Search icon displays the Search screen.
Depending on the screen, you might see additional icons on the Options bar. These are covered throughout the book where they’re applicable.
Settings
I cover many of the Kindle Fire’s settings throughout the book as necessary, but there are some general settings that you should be familiar with immediately.
Locking the Screen Orientation
Your Kindle Fire features an accelerometer that can sense the orientation of the device. When you turn the device while holding it, the screen rotates automatically to match the orientation of the device. In some cases, you might want to prevent the screen from rotating. For example, if you’re reading a web page in portrait mode, setting your Kindle Fire on a table will sometimes flip the orientation. You can lock the orientation to prevent this.
Orientation Isn’t Always Your Choice
If you are watching videos, your Kindle Fire will switch to landscape orientation automatically.
1. With the screen displaying the desired orientation, tap Quick Settings.
2. Tap Unlocked to lock the orientation. The label on the icon changes to Locked.
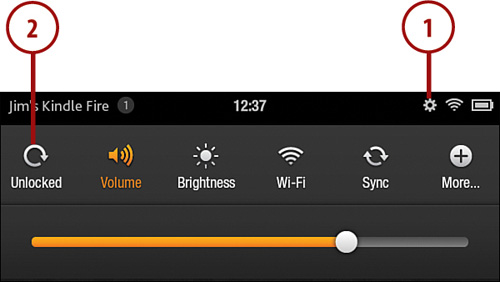
Adjusting the Volume
There are no hard buttons for adjusting the volume on your Kindle Fire. You adjust volume using an onscreen slider.
1. Tap Quick Settings.
2. If the volume control isn’t visible, tap Volume.
3. Slide the volume control to the right to increase volume and to the left to decrease volume.
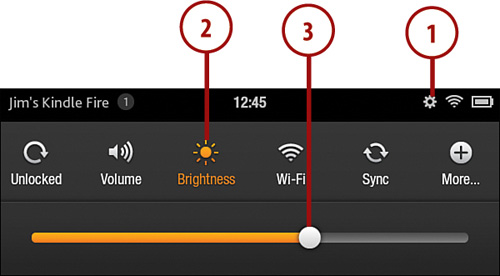
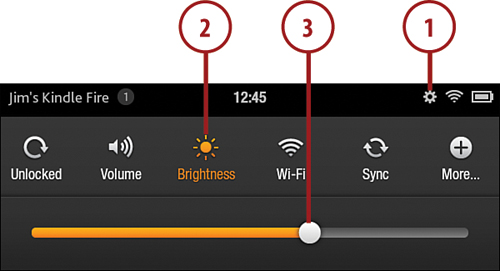
Adjusting Screen Brightness
As mentioned earlier, the screen on the Kindle Fire uses more power than anything else, and the brighter the screen, the more battery power it uses. To increase battery life, you can lower the brightness of the display.
1. Tap Quick Settings.
2. Tap Brightness.
3. Slide the brightness control to the right to increase brightness and to the left to decrease brightness.
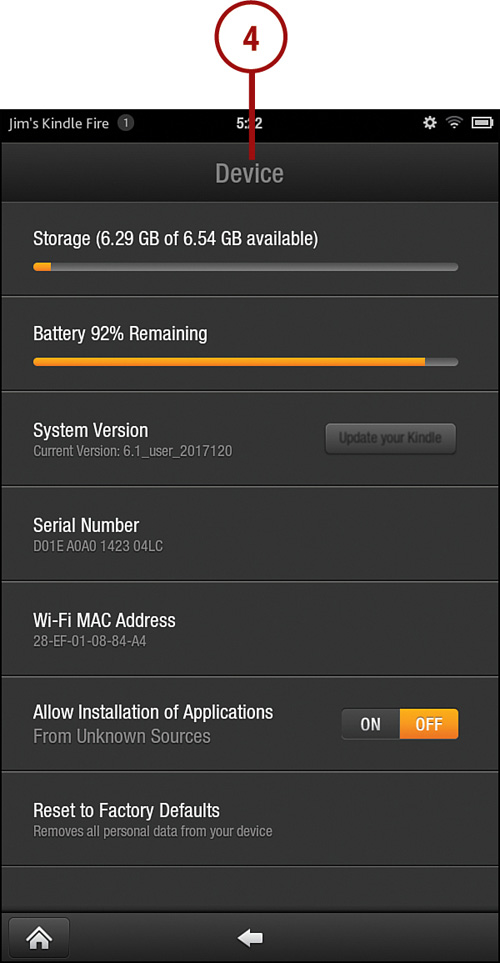
Checking Device Information
The Device screen displays information about your Kindle Fire, such as the percentage of battery remaining, how much storage space you’ve used, the version of your operating system, and other useful information.
1. Tap Quick Settings.
2. Tap More.
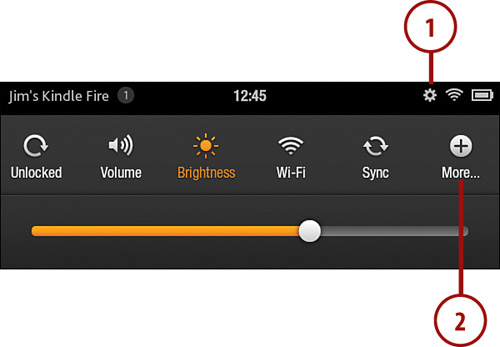
3. Tap Device.

4. The Device screen displays.
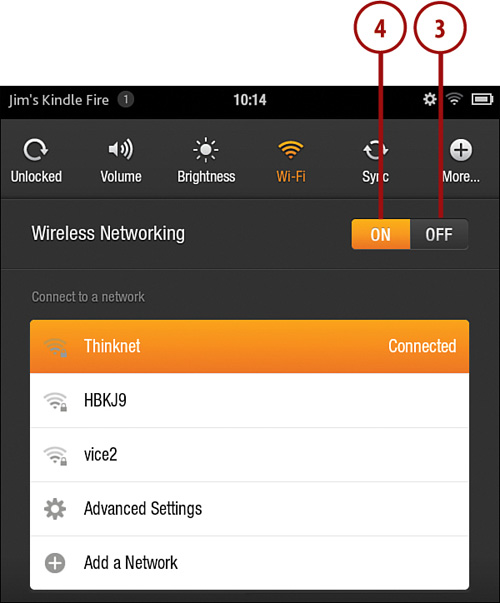
Turning Off Wi-Fi
There may be occasions where you need to turn off your Kindle Fire’s Wi-Fi radio, such as when you’re traveling on commercial flights and in other sensitive areas. Turning Wi-Fi off also consumes less battery power when you’re just kicking back and reading.
1. Tap Quick Settings.
2. Tap Wi-Fi.
3. Tap Off to turn off Wi-Fi.
4. Tap On to turn Wi-Fi on again.
Searches
All of the content in your Kindle library is indexed for easy searching. Search is more useful than it might at first seem. For example, when you’re reading a novel, you can use search to find references to a particular character. This is particularly helpful when you pick up a partially read book that you haven’t read in a while.
Search results include content both on your device and in the cloud.
You can also search within books and other content. I cover how to do that in the Searching Content section of Chapter 3, “Reading on the Kindle Fire.”
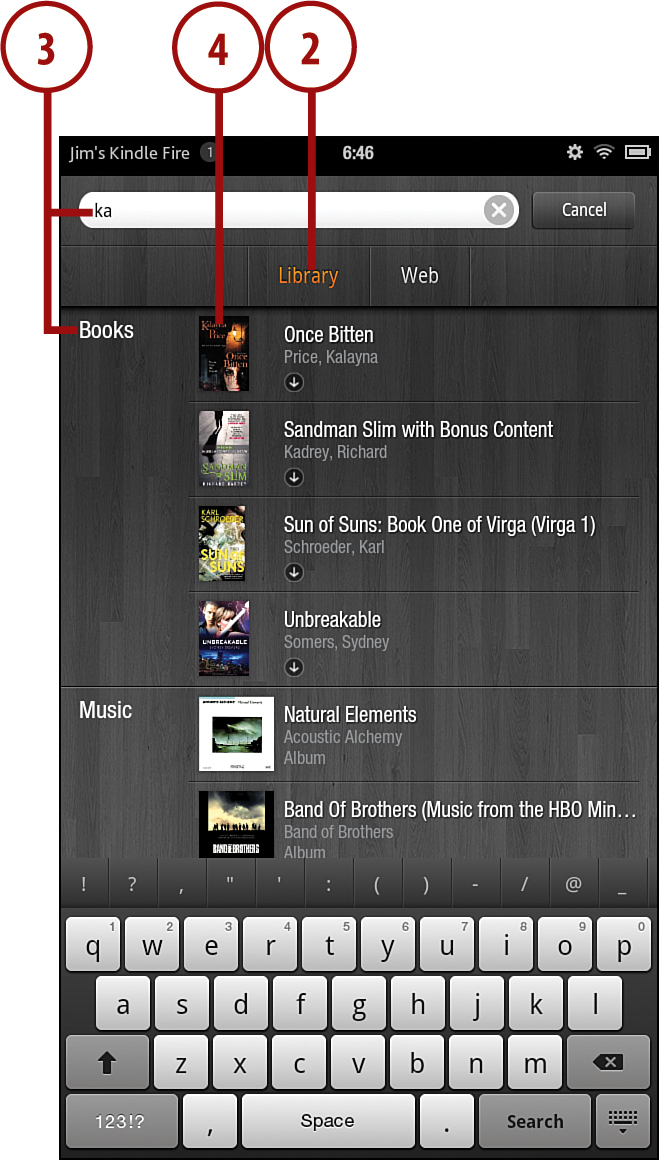
Searching Your Library
Searching your library returns results from books, periodicals, music, documents, and apps.
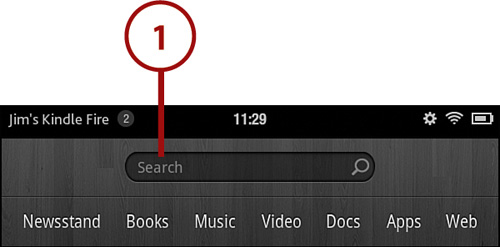
1. From the Home screen, tap inside the search box.

2. Tap Library to search your library.
3. Enter the text you’d like to search for using the keyboard that appears at the bottom of the screen. Results appear as you type.
4. Tap the item to either download the item or go to the item.
Searching the Web
In addition to searching for items in your library, you can also search the Web quickly from the Home screen.
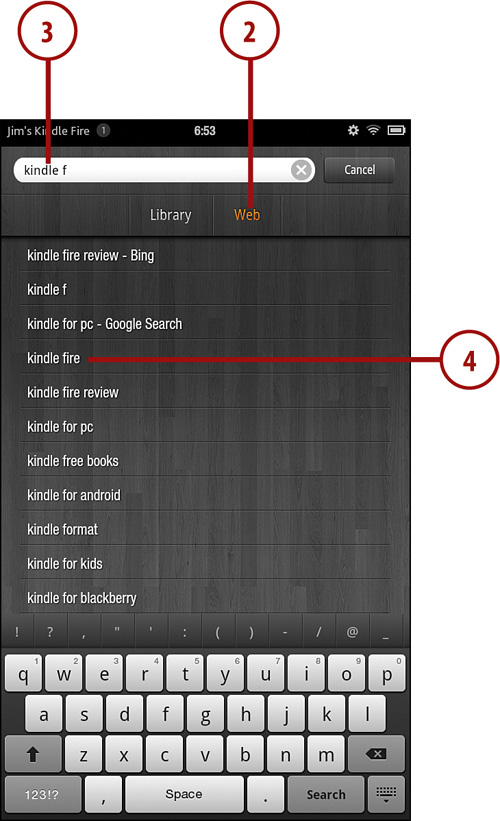
1. From the Home screen, tap inside the search box.
2. Tap Web to search the Web.
3. Enter the text you’d like to search for. Results appear as you type.
4. Tap an item in the results to open a search page using your default search engine.
Changing Your Web Search Engine
I cover how you can change your default web search engine in Chapter 10, “Browsing the Web with Silk,” when we talk about the Kindle Fire’s web browser.
The Kindle Fire Keyboard
Your Kindle Fire’s keyboard is much like the keyboard you use on your computer. However, unlike your computer’s keyboard, there are obviously no physical keys. Instead, your Kindle Fire’s keyboard uses touch just like the rest of the interface.
At first, you might find the Kindle Fire’s keyboard a bit hard to get used to, but after some time, you’ll find it to be an easy way to enter data. In fact, there are some features that the Kindle Fire’s keyboard provides that you won’t find on your computer.
Entering Text
Entering text using your Kindle Fire’s keyboard is a simple task, and there are a few convenient features to make it easier.
1. Tap an area where text entry is possible.
2. Tap letters on the keyboard to enter your text.
3. Tap a suggested word to insert the word.
4. Tap the Keyboard icon to dismiss the keyboard if you need to see what’s behind it.
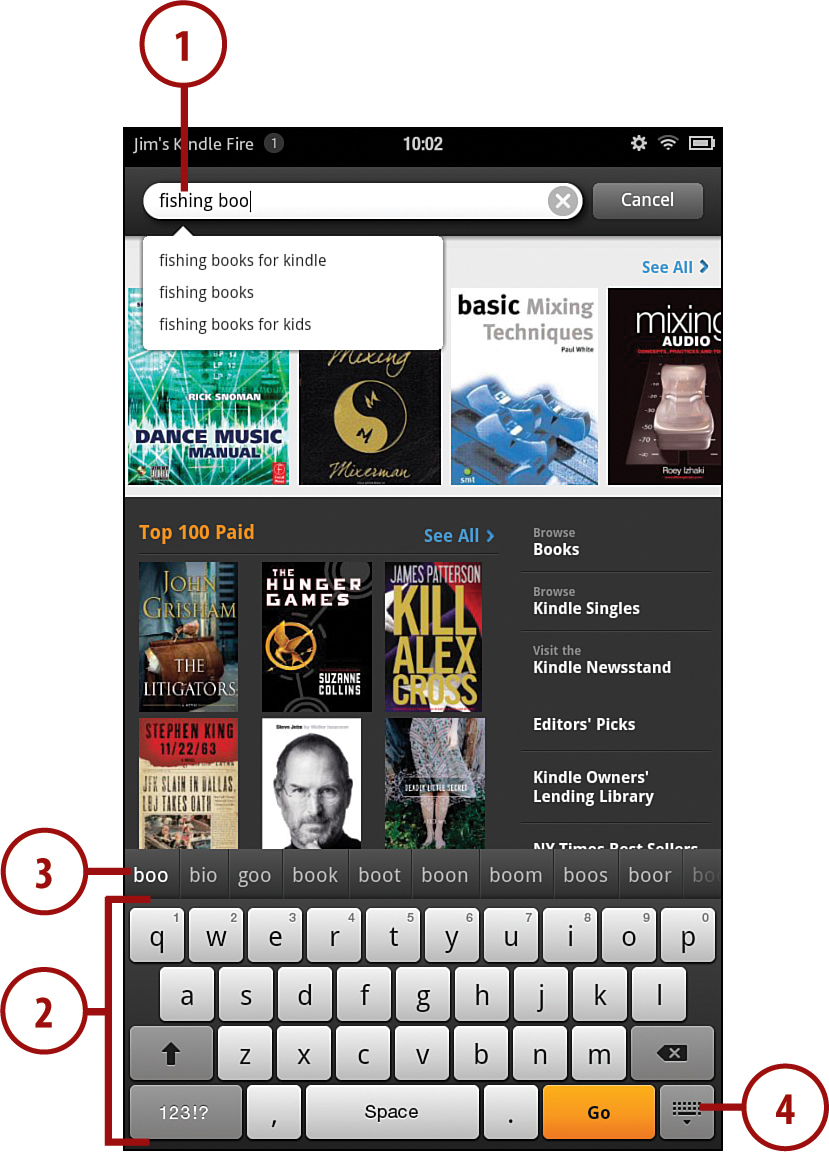
In some cases, the Home icon or the Back icon might be hidden by the keyboard. In those cases, you’ll need to tap the Keyboard icon to dismiss the keyboard.
You can quickly add a period to the end of a sentence by double-tapping the space key.
You can activate caps lock by double-tapping the Shift key.
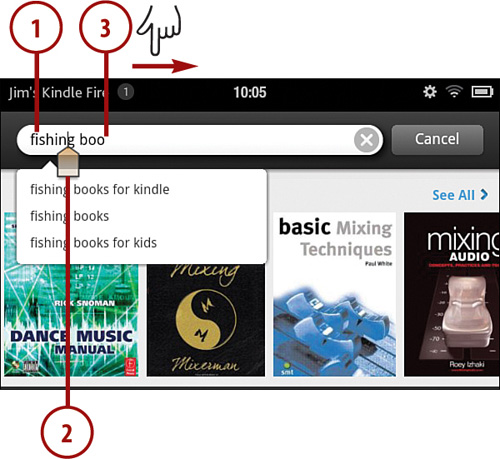
Positioning the Cursor and Selecting Text
As you type, characters are added at the position of the cursor. You can reposition the cursor if necessary.
1. Tap in the text entry area.
2. Tap and hold on the cursor indicator.
3. Drag the cursor indicator to a new position and release it.
Selecting and Editing Text
You might need to select some or all of the text you’ve entered in order to change it or remove it.
1. Double-tap the entered text.
2. Drag the left indicator to the beginning of your desired selection.
3. Drag the right indicator to the end of your desired selection.
4. Press Backspace to delete the section or type to replace the selection.

Copy/Cut and Paste
You might find that you want to copy or cut some text and then paste it somewhere else. For example, you might want to copy some text from one email message and paste it into another.
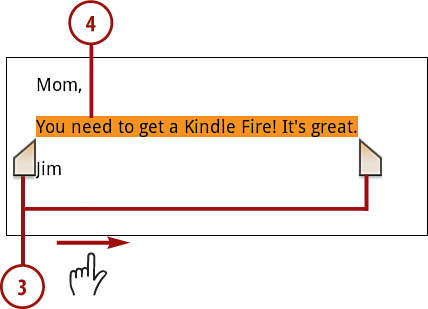
1. Tap and hold on the text you want to copy.

2. Tap Select Word or Select All.

3. Drag the selection handles to highlight text you want to copy.
4. Tap and hold on the selected text.
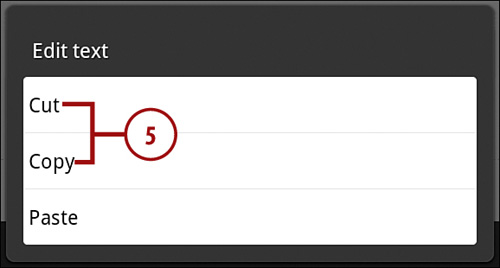
5. Tap Copy or Cut.
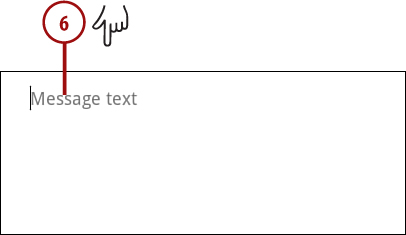
6. Tap and hold where you want to paste the text you copied.
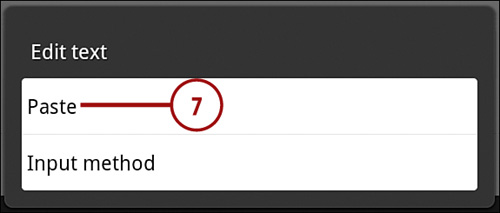
7. Tap Paste.
Entering Punctuation and Numbers
Punctuation and numbers can be entered by using the number key.
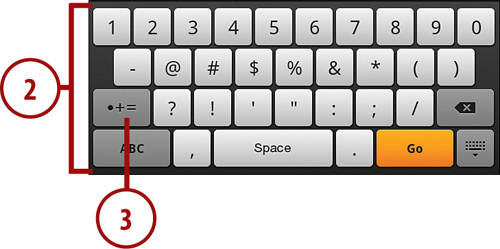
1. Tap the number key to change the keyboard so that it displays numbers and punctuation marks.
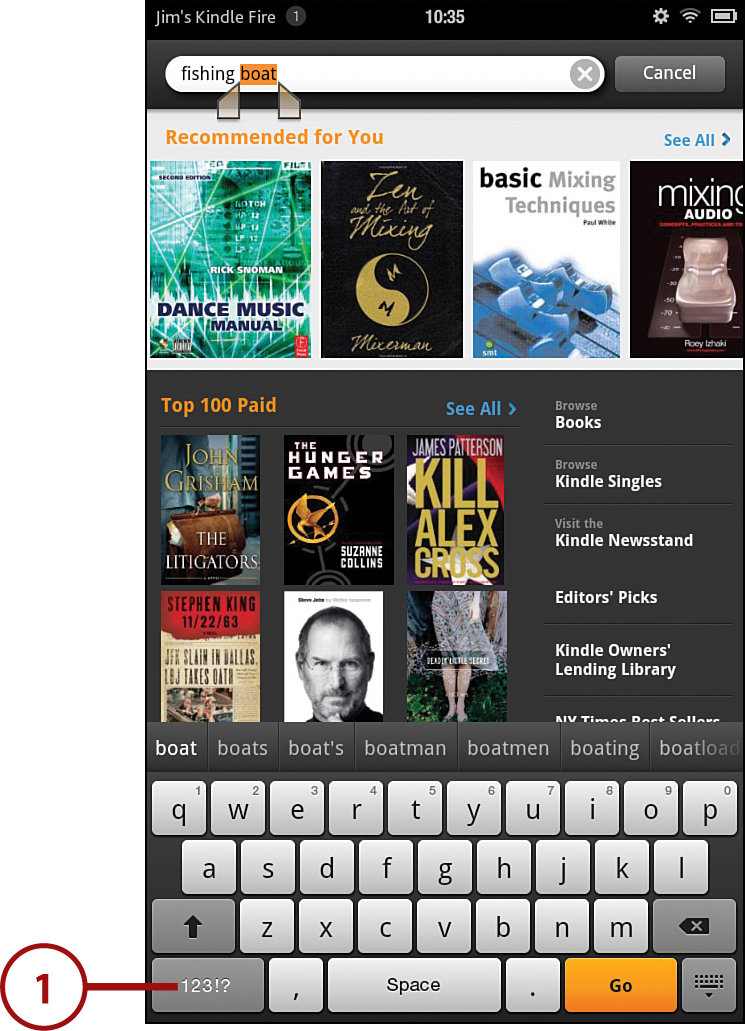
2. Tap a number or punctuation mark to enter it.
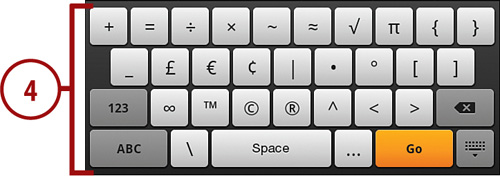
3. Tap the symbol key to switch the keyboard to symbol mode.
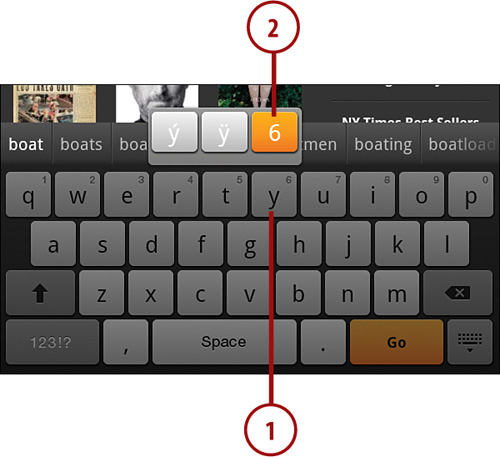
There’s an easier way to enter punctuation and numbers.
1. Tap and hold a letter on the top row.
2. Slide your finger to highlight the desired character and release.
3. Tap and hold on the period key to display punctuation characters.
4. Slide your finger to highlight the desired character and release.
