
9. Repairing, Retouching, and Recomposing Images
Lesson Overview
For some images you’ll need to deal with flaws other than color or exposure problems. A picture that was taken hurriedly might be spoiled by being tilted or poorly composed. Perhaps you have an antique photograph that is creased and worn or a scanned image marked by dust and scratches.
Sometimes the problem has nothing to do with the photograph itself, such as an extraneous object that clutters an otherwise striking composition or even just spots and blemishes on a portrait subject’s skin.
In this lesson, you’ll learn a range of techniques for restoring, retouching, and rearranging the composition of such flawed images:
• Using the Straighten tool
• Customizing the Crop tool
• Re-framing an image to improve composition
• Improving the impact of an image with the Recompose tool
• Retouching skin with the Healing Brush tool
• Working with opacity and blending modes in layers
• Removing unwanted objects with content-aware healing
You’ll probably need about one and a half hours to complete this lesson.

Not every image problem is a result of incorrect camera settings. Learn how to straighten a tilted photo, rearrange an image’s composition, and retouch spots and blemishes on your subject’s skin. The same tools, techniques and tricks used to remove spots or repair creases and tears when you’re restoring a treasured keepsake can also be used creatively to manipulate reality and produce exactly the image you want.
Getting started
You’ll begin by importing the sample images for this lesson to the CIB Catalog that you created at the beginning of Lesson 1.
1. Start Photoshop Elements and click Organize in the Welcome Screen. When the Organizer opens, make sure that your CIB Catalog is loaded (if you need to refresh your memory, refer to step 2 in the Getting Started section in Lesson 5).
Before you start working on this lesson, make sure that you’ve installed the software on your computer from the application CD (see the Photoshop Elements 10 documentation) and that you have correctly copied the Lessons folder from the CD in the back of this book onto your computer’s hard disk (see “Copying the Classroom in a Book files” on page 2). You should also have created a working catalog (see “Creating a new catalog” on page 8).
2. Choose File > Get Photos And Video > From Files And Folders. In the Get Photos And Videos From Files And Folders dialog box, locate and select your Lesson09 folder. Activate the option Get Photos From Subfolders and disable the automatic processing options; then, click Get Media. In the Import Attached Keyword Tags dialog box, select the Lesson 09 tag, and then click OK. Click OK to close any other alert dialog box.
3. The lesson images appear in the Media Browser. If you don’t see filenames below the thumbnails, choose View > Show File Names.
Improving the composition of a photo
When you’re hurried, distracted by movement, or shooting in awkward conditions, the result is often a photo that could have been great—if only it had been framed better. In the Full Edit mode toolbox, the Crop tool and the Straighten tool will help you turn the shot you got into the photo you should have captured.
The Crop tool can be customized, offering a range of preset aspect ratios, and a choice of cropping overlays to help you bring out the visual potential of your image.
Sometimes you’re just too busy fitting everyone into frame to notice a crooked horizon. The Straighten tool makes it easy to quickly correct a tilted image.
Using the Straighten tool
With the Straighten tool you can draw a line in your crooked photo to be used as either a horizontal or vertical reference. Photoshop Elements rotates the image to straighten it in relation to your reference line.
1. Select the file 09_01.jpg in the Media Browser; then, click the arrow on the Fix tab above the Task Pane and choose Full Photo Edit. Alternately, you could select the file and choose Edit > Edit With Photoshop Elements Editor.
2. Click the Reset Panels button (![]() ) at the top of the Editor workspace. Hide the Project Bin by double-clicking its header bar or by un-checking its name in the Window menu. Hide the Panel bin by un-checking its name in the Window menu, and then double-click the Hand tool or choose View > Fit On Screen.
) at the top of the Editor workspace. Hide the Project Bin by double-clicking its header bar or by un-checking its name in the Window menu. Hide the Panel bin by un-checking its name in the Window menu, and then double-click the Hand tool or choose View > Fit On Screen.
3. Select the Straighten tool (![]() ). In the tool options bar, make sure that Canvas Options is set to Grow Or Shrink Canvas To Fit. As there are no truly straight lines in the sculpture in the foreground, and no reliable horizon, our best reference for a true level in this photo is the old building in the background. Drag a line along the ledge between the first and second stories.
). In the tool options bar, make sure that Canvas Options is set to Grow Or Shrink Canvas To Fit. As there are no truly straight lines in the sculpture in the foreground, and no reliable horizon, our best reference for a true level in this photo is the old building in the background. Drag a line along the ledge between the first and second stories.
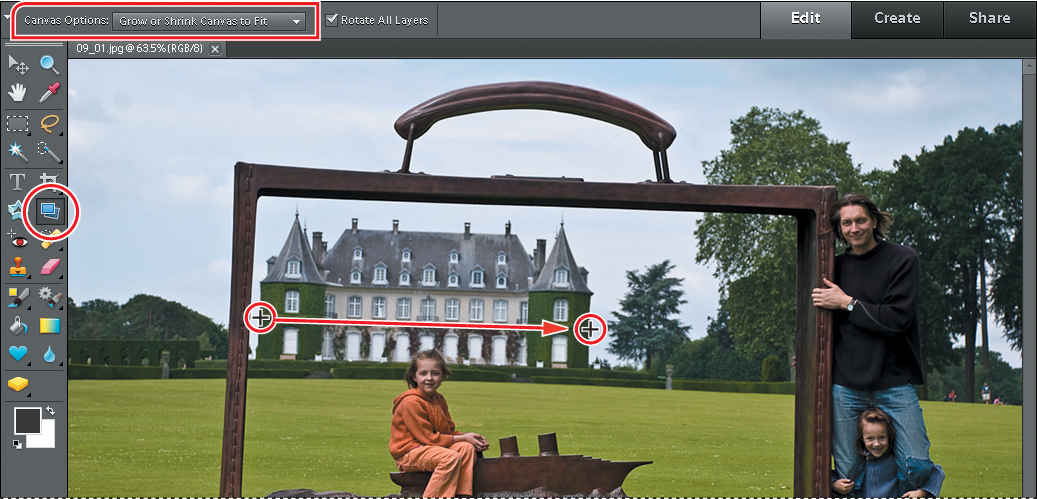
For this image we chose the Straighten tool option Grow Or Shrink Canvas To Fit because we wish to have manual control over cropping. When this is not an issue, try the options Crop To Remove Background and Crop To Original Size, which are also available from the Canvas Options menu in the tool options for the Straighten tool.
4. When you release the mouse button, Photoshop Elements straightens the image relative to the line you’ve just drawn. Choose Fit On Screen from the View menu or the menu on the Arrange button (![]() ) so that you can see all of the newly enlarged canvas surrounding the rotated image.
) so that you can see all of the newly enlarged canvas surrounding the rotated image.
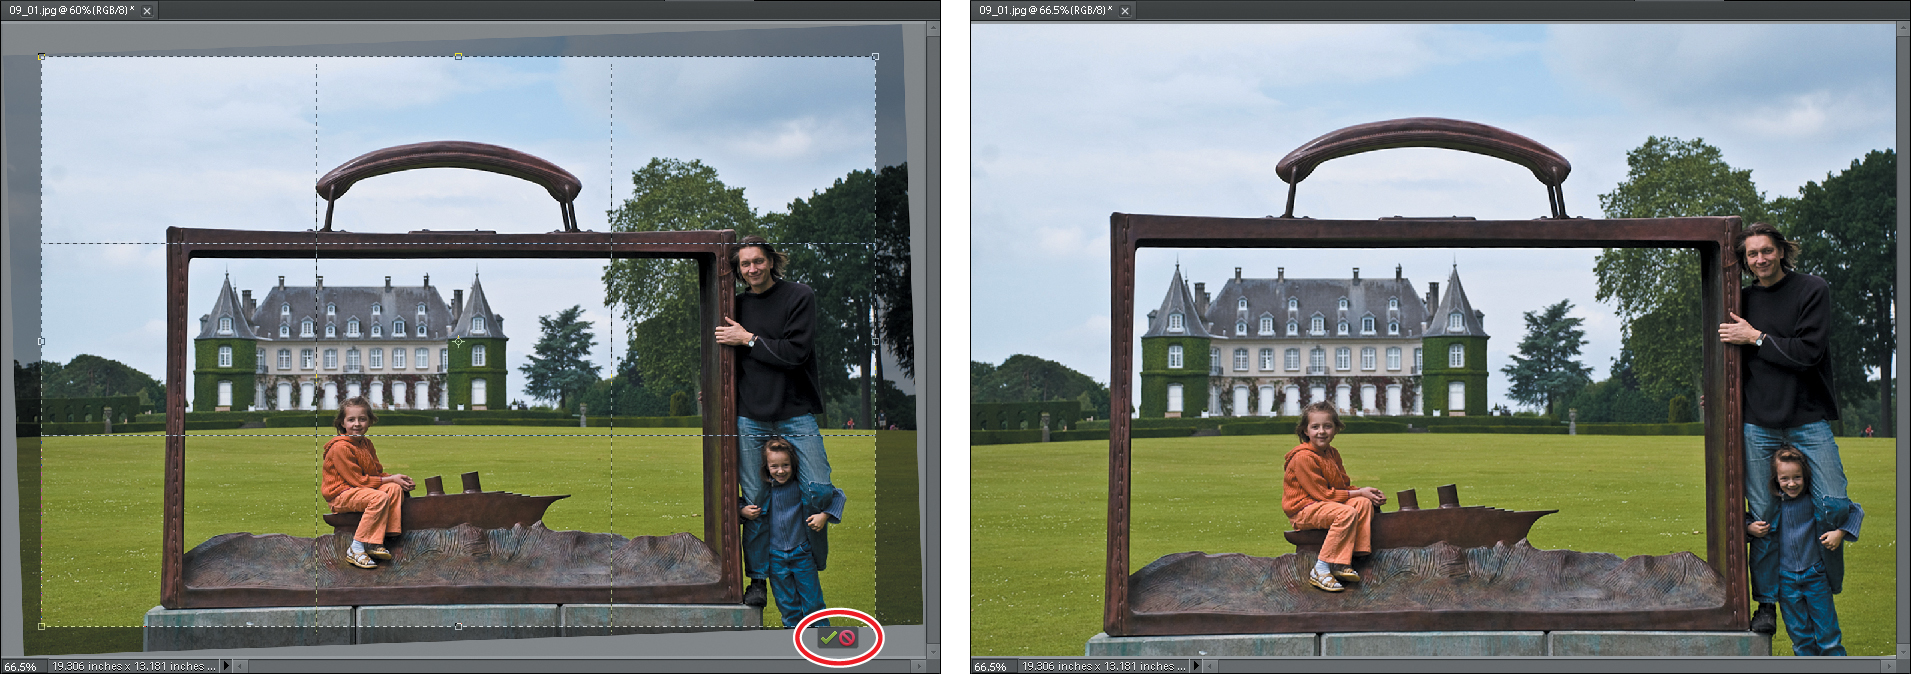
5. In the toolbox, select the Crop tool (![]() ). From the Aspect Ratio menu in the tool options bar, choose Use Photo Ratio; this will constrain the cropping rectangle to the original proportions. Drag a cropping rectangle inside the image, which is now displayed at an angle—being careful not to include any of the blank area around the photo. When you’re satisfied with the crop, click the green Commit button in the lower right corner of the cropping rectangle. The straightened and cropped image is much more comfortable to look at than the tilted original.
). From the Aspect Ratio menu in the tool options bar, choose Use Photo Ratio; this will constrain the cropping rectangle to the original proportions. Drag a cropping rectangle inside the image, which is now displayed at an angle—being careful not to include any of the blank area around the photo. When you’re satisfied with the crop, click the green Commit button in the lower right corner of the cropping rectangle. The straightened and cropped image is much more comfortable to look at than the tilted original.
6. Choose File > Save As. Make sure the new file will be included in the Organizer, but not in a Version Set. Name the file 09_01_Straight.jpg to be saved to your My CIB Work folder in JPEG format. Click Save; then, click OK to dismiss the JPEG Options dialog box. Keep the file open for now.
7. Staying in the Editor, choose File > Open; then, navigate to and open your Lesson09 folder, select the file 09_02.jpg, and click Open.

In this photo, the horizon is hidden, the river bank is irregular, and the horizontal lines of the building in the background are angled by perspective—so your best option is to use one of the vertical lines in the large apartment building. By default, the Straighten tool is set for a horizontal reference; to designate a vertical reference you need to use the tool together with the Ctrl / Command key.
In some cases, you can achieve good results by choosing either Straighten Image, or Straighten And Crop Image from the Image > Rotate > menu. Both of these commands perform straightening functions automatically.
8. Select the Straighten tool (![]() ). In the tool options bar, make sure that Canvas Options is set to Grow Or Shrink Canvas To Fit. Click and hold down the mouse button on a point at the top of a vertical lines in the apartment building; then, press the Ctrl / Command key and drag a line down your vertical reference. Release the mouse button, and then the Ctrl / Command key.
). In the tool options bar, make sure that Canvas Options is set to Grow Or Shrink Canvas To Fit. Click and hold down the mouse button on a point at the top of a vertical lines in the apartment building; then, press the Ctrl / Command key and drag a line down your vertical reference. Release the mouse button, and then the Ctrl / Command key.
9. Select the Crop tool (![]() ). In the tool options bar, set the cropping aspect ratio to No Restriction. Drag a rectangle inside the rotated photo, retaining as much of the image as possible without including any of the blank canvas surrounding it. When you’re satisfied with your crop, click the Commit button in the lower right corner of the cropping rectangle.
). In the tool options bar, set the cropping aspect ratio to No Restriction. Drag a rectangle inside the rotated photo, retaining as much of the image as possible without including any of the blank canvas surrounding it. When you’re satisfied with your crop, click the Commit button in the lower right corner of the cropping rectangle.

10. Choose File > Save As. Make sure the new file will be included in the Organizer, but not in a Version Set. Name the file 09_02_Straight.jpg, to be saved to your My CIB Work folder in JPEG format. Click Save; then, click OK to close the JPEG Options dialog box. Choose File > Close to close the file.
Re-framing a photo with the Crop tool
Composing your photo well can make the difference between an ordinary snapshot and a striking, memorable image. Unfortunately, in practice, there’s often just not enough time to frame your photo carefully.
Framing too much irrelevant detail can diminish the impact of your photo by detracting from your intended focus, and an awkward arrangement of forms within the frame can make your picture appear unbalanced. The Crop tool can be customized to achieve exactly the crop you want, and offers a choice of overlays to guide you in framing a balanced composition.
1. With the image 09_01_Straight.jpg open in the Edit window, select the Crop tool (![]() ). Click the white triangle at the far left of the tool options bar and choose Reset Tool from the menu. From the Aspect Ratio menu, choose Use Photo Ratio; this will produce a crop of the same proportions as the original image. By default, the Overlay option is set to Rule Of Thirds. According to this rule, objects look more interesting and balanced when aligned with the lines and intersections of the grid. Drag a rectangle around the girl on the sculpture so that the lines intersect on her face.
). Click the white triangle at the far left of the tool options bar and choose Reset Tool from the menu. From the Aspect Ratio menu, choose Use Photo Ratio; this will produce a crop of the same proportions as the original image. By default, the Overlay option is set to Rule Of Thirds. According to this rule, objects look more interesting and balanced when aligned with the lines and intersections of the grid. Drag a rectangle around the girl on the sculpture so that the lines intersect on her face.

2. Click the Cancel button at the lower right of the cropping rectangle. From the Overlay menu in the tool options bar, choose Golden Ratio. This guide is based on a formula that has been used to create appealing compositions in painting and architecture through the ages. The Aspect Ratio menu is now disabled; the Golden Ratio works within a rectangle of set proportions. Inside the rectangle, the intersection of two diagonals defines a focus.
3. Drag a small rectangle anywhere in the image; then, drag the lower right handle of the cropping box upwards and to the left to flip the orientation of the Golden Ratio guides.

4. Adjust the cropping rectangle to define a pleasing crop, with the focus of the Golden Ratio centered on the girl’s face. Click the Commit button to execute the crop.

5. Choose File > Save As. Make sure the new file will be included in the Organizer, but not in a Version Set. Name the file 09_01_GoldenCrop.jpg, to be saved to your My CIB Work folder in JPEG format. Click Save; then, click OK to close the JPEG Options dialog box. Choose File > Close.
Recomposing an image within its frame
Do you have a group shot where you wish the group had stood a little closer together? Or a photo where a walk-on extra draws attention away from the stars and the main story? With the Recompose tool you can fix these and other image composition problems in a few easy steps.
As with the Healing brushes and the Clone Stamp tool that are covered later in this chapter, and the Photomerge tools that you’ll use in Lesson 10, the Recompose tool is also a lot of fun to use creatively, letting you manipulate reality to produce exactly the image you want.
Essentially, the Recompose tool enables you to crop your photo from the inside, rather than at the edges. Whether you want to bring people closer together, fit a horizontal image to a vertical space, or remove extraneous elements that spoil the composition, the Recompose tool puts image editing magic at your fingertips.
In this exercise, you’ll use the Recompose tool to tighten the arrangement of this group portrait and re-frame the landscape format image as a square composition.
1. If you’re still in the Editor from the previous exercise, switch to the Organizer now by clicking the Organizer button (![]() ) at the top right of the Editor workspace. In the Keyword Tags panel, click the Find box beside the Lesson 09 tag, if necessary, to isolate the images for this lesson.
) at the top right of the Editor workspace. In the Keyword Tags panel, click the Find box beside the Lesson 09 tag, if necessary, to isolate the images for this lesson.
2. In the Media Browser, right-click / Control-click the image 09_03.jpg and choose Edit With Photoshop Elements Editor from the context menu.
3. If you don’t already see some gray space around the edge of the photo in the Edit window, press Ctrl / Command together with the minus sign key (–) to zoom out a little.
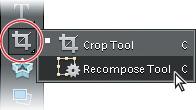
4. In the toolbox, right-click / Control-click the Crop tool (![]() ) and select the Recompose tool (
) and select the Recompose tool (![]() ). A message appears with quick instructions on using the Recompose tool, including a link to a video tutorial. For now, click OK to dismiss the message.
). A message appears with quick instructions on using the Recompose tool, including a link to a video tutorial. For now, click OK to dismiss the message.
The image is now surrounded by a live bounding box, with control handles at the corners and at the mid-point of each side. For simple recomposing operations, all you need to do is drag the handles; the Recompose tool makes use of content-aware scaling technology that distinguishes people and other featured objects and attempts to prevent them being distorted as the background is compressed around them. For this exercise, however, we’ll use the special Recompose brushes instead. For more complex images, this generally produces better results.
5. Select the green Mark For Protection brush in the tool options bar. Either type in the brush size text box or use the slider to increase the brush size to about 150 px.
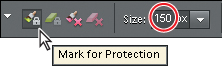
As its name suggests, you can use this brush to define those areas in the image that you want protected from any scaling operation.
6. Paint roughly over the girl on the left side of the photo, making sure that her extended left arm and hand are well protected. As she is already very close to the edge of the image, cover the area between the girl and the left edge of the photo—including her shadow—to mark it for protection. If you find that you’ve over-painted, use the green eraser (![]() ), right beside the protection brush in the tool options bar, to modify your strokes. You can decrease or increase the size of the eraser as you work by pressing the left and right bracket keys ( [,]).
), right beside the protection brush in the tool options bar, to modify your strokes. You can decrease or increase the size of the eraser as you work by pressing the left and right bracket keys ( [,]).
7. Right-click / Control-click the image and change the mode for the brush from the default Use Normal Highlight to Use Quick Highlight. In the default mode, you need to paint over the entire area you wish to protect. In Quick Highlight mode you mark an area for protection by simply drawing a line to surround it.
8. Set the brush size to 50 px; then, draw a rough outline to surround the girls at the right, together with their shadows. You don’t need to protect all of the jacket carried by the girl at the far right. Release the mouse button; the area you outlined is marked for protection automatically. Right-click / Control-click the image again and switch back to Normal Highlight mode.
9. In the tool options bar, select the red Mark For Removal brush. Set the brush size to 100 px. You can use this brush to define any areas that you wish the Recompose tool to remove from the image. Click once on each of the dead leaves on the grass in the foreground. You can also mark the sky, as shown in the illustration below, so that the Recompose tool will remove that area before compressing the adjacent areas. This will help to minimize distortion in the trees at the top of the image.

10. Alternate between the red Mark For Removal brush and its associated eraser, using the bracket keys ( [,]) to decrease or increase the brush size as you work.

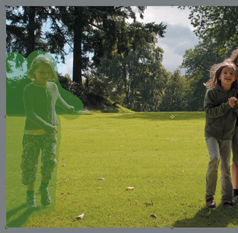
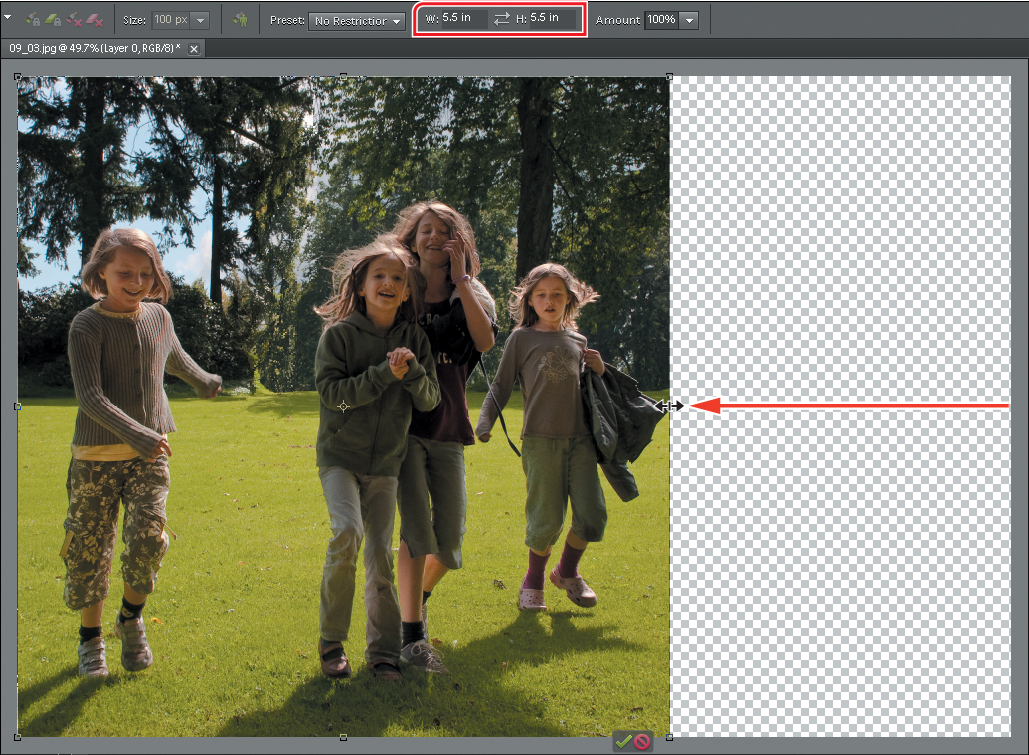
11. Now for the fun part! Move the pointer over the handle on the right side of the bounding box and, when the double-arrow cursor appears, drag the handle slowly in towards the center of the photo. Watch the photo as you drag; some areas of the image are removed while others are compressed and merged with their surroundings. As the proportions of the image become closer to a square, keep an eye on the width (W) and height (H) values in the Tool options bar; stop dragging and release the mouse button when the two values are equal.
As this was a rather extreme operation, you may find some seam artifacts, especially near the edges of areas that were removed or protected. If these are noticeable enough to worry you, a few strokes with the Clone Stamp tool or the Healing Brush tool will fix the problem. You’ll learn more about those tools later in this lesson. Use the Zoom tool to inspect the area where the wedge of sky was removed. Experiment with recomposing the original image in different ways; try removing slices of foliage instead of the sky area.
12. Click the green Commit button at the lower right of the recomposed photo or press Enter / Return to accept and render the new composition.
13. Choose Image > Crop. A cropping box appears on the image; drag the handles to crop the file to the new square format, trimming away the transparent area. The edges of the cropping box snap to the edges of the image to make the operation very easy. Click the green Commit button or press Enter / Return.
14. Choose File > Save As. Make sure the new file will be included in the Organizer, but not in a Version Set. Name the new image 09_03_Recompose.jpg, to be saved to your My CIB Work folder in JPEG format. Click Save; then click OK to accept the default JPEG Options settings. Choose File > Close.
The Recompose tool is as easy to use as it is powerful—with creative possibilities that are virtually limitless. Play with as many pictures as you can; you’ll learn how content-aware scaling works and what to expect from different types of image as you have fun finding creative new ways to make the most of your photos.
Removing wrinkles and spots
In this exercise, you’ll explore several techniques for retouching skin flaws and blemishes to improve a portrait photograph. Retouching skin can be a real art, but luckily Photoshop Elements provides several tools that make it easy to smooth out lines and wrinkles, remove blemishes, and blend skin tones—even for a novice.
1. If you’re still in the Editor, switch to the Organizer. Use the Lesson 09 tag, if necessary, to isolate the images for this lesson. Right-click / Control-click the image 09_04.jpg and choose Edit With Photoshop Elements Editor.
2. In the Editor, click the Reset Panels button (![]() ) at the top of the workspace. Drag the Layers panel out of the Panel Bin by its header bar, and then hide the Panel Bin and the Project Bin by un-checking their names in the Window menu.
) at the top of the workspace. Drag the Layers panel out of the Panel Bin by its header bar, and then hide the Panel Bin and the Project Bin by un-checking their names in the Window menu.
3. Drag the Background layer to the New Layer button (![]() ) at the bottom of the Layers panel to create another layer, named “Background copy” by default. Drag the new Background copy layer to the New Layer button to create a third layer. If necessary, resize the Layers panel by dragging its lower right corner. You only need the panel to be just big enough to show your three layers.
) at the bottom of the Layers panel to create another layer, named “Background copy” by default. Drag the new Background copy layer to the New Layer button to create a third layer. If necessary, resize the Layers panel by dragging its lower right corner. You only need the panel to be just big enough to show your three layers.
4. Use the Zoom tool to zoom in on the upper half of the photo, as you’ll be retouching the skin around the woman’s eyes first.

This photo is quite a challenging candidate for retouching; the harsh flash lighting has caused strong reflections on the skin that only serve to accentuate the wrinkles. You’ll begin the retouching process using the Healing Brush tool in botox mode.


Using the Healing Brush tool
1. Make sure that the top layer, Background copy 2, is still active, and then right-click / Control-click to select the Healing Brush tool (![]() ) which is grouped together in the toolbox with the Spot Healing Brush tool.
) which is grouped together in the toolbox with the Spot Healing Brush tool.

2. In the tool options bar, click the small arrow to open the Brush Picker and set the Diameter to 20 px. Set the brush Mode to Normal and Source to Sampled. Make sure that the options Aligned and Sample All Layers are disabled.
3. Alt-click / Option-click a smooth area on the left cheek to define the area sampled as a reference texture. Note that if you switch to another tool and then back to the Healing Brush, you’ll need to repeat this step.

4. Draw a short horizontal stroke under the left eye. As you drag, it may look as if you’re creating a strange effect, but when you release the mouse button, the color will be blended and natural skin tones will fill the area.

5. Continue to smooth the skin on the face with the Healing Brush. Avoid areas very close to the eyes, shadowed areas, and the hair-line. You can also reduce the worst of the shine caused by the harsh flash. As you work, re-establish the reference area occasionally by Alt-clicking / Option-clicking in new areas of the face to sample appropriate skin tone and texture. Press the left and right bracket keys ( [,]) to decrease or increase the brush size as you work. Be sure to remove the moles on the woman’s right cheek and the spots on her left cheek and just below the lower lip. You can use the same techniques on the neck.
Use short brush strokes. Try just clicking rather than dragging, taking care to overlap your clicks to avoid a spotty effect. If you see results you don’t like, check that the Aligned option is disabled in the tool options bar.
Long strokes may produce unacceptable results—especially near shaded areas where the darker tones may spread. If that happens, choose Edit > Undo Healing Brush. Try setting the brush to a smaller size or reversing the direction of your strokes. If the problem is related to the shadowed areas beside the nose or at the sides of the face, try stroking towards the shadows rather than away from them, or temporarily changing the mode for the Healing Brush tool from Normal to Lighten in the tool options bar.
6. Choose Window > Undo History. You can use the Undo History panel to quickly undo a series of steps. Every action you perform is recorded in chronological order from the earliest at the top to the most recent at the bottom of the panel. To restore the file to an earlier state, simply select an earlier (higher) action in the Undo History list.
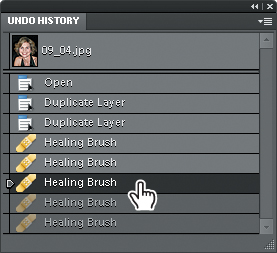
As long as you have not made any further changes to the file, you can still return the image to a more recent state by selecting a step lower in the list. Once you’ve used the Undo History panel to restore a photo to an earlier state, any change you make to the image will replace all the actions in the more recent history.
The Healing Brush tool copies texture from the source area, not color. It samples the colors in the target area—the area you’re brushing—and arranges those colors according to the texture of the reference area. Consequently, the Healing Brush tool appears to be smoothing the skin. So far however, the results are not convincingly realistic; you’ll work to improve that in the next exercise.
Refining the Healing Brush results
In this exercise, you’ll make your retouching work look a little more natural by altering the opacity of the layer you’ve been working on, and then use another of the texture tools to refine the resulting blend.
1. Choose Window > Navigator. In the Navigator panel, use the zoom slider and drag the red frame in the Navigator preview to focus the view in the image window on the area around the woman’s eyes and mouth.

Extensive retouching can leave skin looking artificially smooth, looking a little like molded plastic. Reducing the opacity of the retouched layer will give the skin a more realistic look by allowing some of the wrinkles on the un-edited Background layer to show through.
2. In the Layers panel, change the Opacity of the layer “Background copy 2” to about 50%, using your own judgment to set the exact percentage.
We opted for quite a low setting, wishing a fairly natural look for this photo of a friend, but the opacity value you set will depend on the extent of your retouching and the purpose for which the edited image is intended.
The opacity change restores some realism, but three noticeable blemishes have also made a reappearance—one on each cheek and one just below the lower lip.
3. Select the layer “Background copy” to make it the active layer.
4. Set the brush size for the Healing Brush tool to 20 px and click once or twice on each blemish. Gone!
5. In the toolbox, select the Blur tool (![]() ). In the tool options bar, set the brush diameter to approximately 13 px and set the Blur tool’s Strength to 50%.
). In the tool options bar, set the brush diameter to approximately 13 px and set the Blur tool’s Strength to 50%.
6. With the layer “Background copy” still active, drag the Blur tool over some of the deeper lines around the eyes and brow. Use the Navigator panel to change the zoom level and shift the focus as needed. Reduce the Blur tool brush diameter to 7 px and smooth the lips a little, avoiding the edges.
To remove spots and small blemishes in your photo, try the Spot Healing Brush in Proximity Match mode as an alternative to the Healing Brush. With the Spot Healing Brush, you can either click or drag to smooth away imperfections without needing to set a reference point.
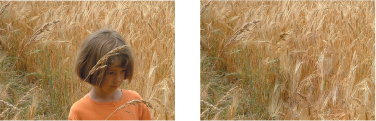
Compare your results to those below—the original, the version retouched with the Healing Brush, and final refined version. Toggle the visibility of your retouched layers to compare the original image in your Background layer with the edited results.

7. Choose File > Save As. Make sure that the new file will be included in the Organizer, but not in a Version Set. Name the edited image 09_04_Retouch, to be saved to your My CIB Work folder in Photoshop (PSD) format.
8. Make sure that the Layers option is activated, and then click Save.
9. Choose File > Close.
For a quick and easy solution to portrait retouching, try the Perfect Portrait procedure listed under Fun Edits in the Guided Edit mode, where you’ll be stepped through smoothing skin, removing spots, fixing red eye, increasing definition in facial features, whitening teeth, and even slimming your subject!
In this exercise, you’ve learned how to set an appropriate source for the Healing Brush tool, and to sample the texture of the source area to repair flaws in another part of the photograph. You also used the Blur tool to smooth textures, and an opacity change to achieve a more realistic look. You’ve also gained a little experience in working with both the Undo History and Navigator panels.
Removing unwanted objects from images
The impact of a photo can easily be spoiled by an unwanted object in the frame. In the modern world, it’s often impossible to photograph even a remote landscape without capturing a fence, power lines, satellite dishes, or litter—mundane clutter that can reduce the drama of an otherwise perfect shot.

Photoshop Elements offers several tools to help you improve an image by getting rid of extraneous detail. As you’ve seen, the Recompose tool lets you remove areas as you scale a photo. In this set of exercises you’ll use the Spot Healing Brush tool to remove an object without altering the overall composition.
1. If you’re still in the Editor, switch to the Organizer. Use the Lesson 09 tag, if necessary, to isolate the images for this lesson. Ctrl-click / Command-click to select the photos 09_05.jpg and 09_06.jpg; then, right-click / Control-click either selected image and choose Edit With Photoshop Elements Editor.
2. In the Editor, either choose Window > Reset Panels or click the Reset Panels button (![]() ) at the top of the workspace. In the Project Bin, double-click the photo of the two girls to make it the active image and bring its image window to the front in the Edit pane.
) at the top of the workspace. In the Project Bin, double-click the photo of the two girls to make it the active image and bring its image window to the front in the Edit pane.
3. Select the Zoom tool; then, check the tool settings right above the toolbox to make sure that the Zoom In Mode is activated. In the Edit pane, drag a marquee with the Zoom tool to closely surround the lower half of the photo.
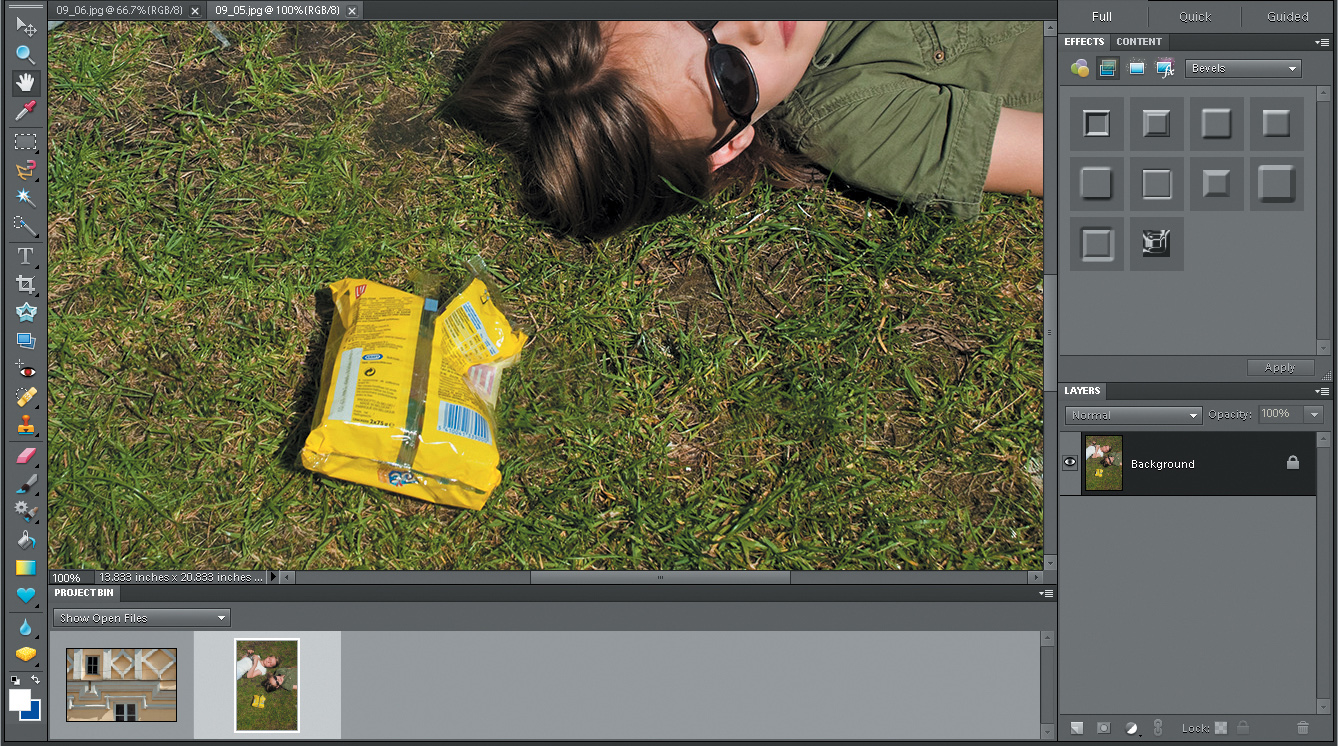
4. Press Shift+Tab on your keyboard to hide everything but the image window and the toolbox.
Using the Content-Aware healing feature
In the last project, you may have used the Spot Healing Brush in Proximity Match mode to help smooth skin blemishes in a portrait photo. In this exercise you’ll set the Spot Healing Brush to Content-Aware mode.

In Content-Aware mode, the Spot Healing Brush tool compares nearby image content to fill the area under the pointer, seamlessly maintaining detail such as shadows, object edges, and even perspective, as shown in the illustration above.
1. Right-click / Control-click to select the Spot Healing Brush tool (![]() ), which is grouped together in the toolbox with the Healing Brush tool. In the tool options bar, make sure that the Content-Aware option is activated. Type in the text box to set a brush diameter of 330 pixels.
), which is grouped together in the toolbox with the Healing Brush tool. In the tool options bar, make sure that the Content-Aware option is activated. Type in the text box to set a brush diameter of 330 pixels.

2. Position the circular cursor so that it completely surrounds the yellow plastic package and its shadow; then click once.

3. If you notice any image artefacts such as blurring or obvious repetition of detail, reduce the brush size to 50 pixels and click a few points to break up the effect.
4. Choose File > Save As. Make sure that the new file will be included in the Organizer, but not in a Version Set Name the new file 09_05_Remove, to be saved to your My CIB Work folder in JPEG format, and then click Save. Click OK to accept the JPEG Options settings; then, close the file.
Now that you’ve seen how content-aware healing works, you can take on something a little more complex. A little practice will produce impressive results.
5. The image 09_06.jpg should still be open in the Editor. Double-click the Zoom tool to magnify the image to 100%; then, use the Hand tool to focus your view on the left end of the wire that runs through the upper half of the photo. Select the Spot Healing Brush. In the tool options bar, set the brush diameter to 25 pixels, and check that the Content-Aware option is still activated.
6. Keeping the circular cursor centered over the wire, work along the line in short, overlapping strokes, releasing the mouse button after each. If a stroke produces an unwelcome artefact, press Ctrl+Z / Command+Z to undo, and then try again. Press the space bar on your keyboard to switch temporarily to the Hand tool and drag the image to the left to focus on the next length of wire.
7. If an area proves to be particularly difficult, try clicking instead of dragging, or drag over the same area two or three times, being careful not to over-work it. Reduce the brush size as needed, and try reversing the direction or changing the angle of the stroke. You’ll need to take extra care as you cross man-made edges. Don’t drag through too many texture or color changes with the one stroke; move across one border, and then stop.

8. When you’re done, choose View > Fit On Screen to admire your work. Choose File > Save As. Make sure that the file will be included in the Organizer, but not in a Version Set. Name the new file 09_06_Remove, to be saved to your My CIB Work folder in JPEG format; then, click Save. Click OK to accept the JPEG Options settings, and then close the file.

Review questions
1. By default, dragging in a tilted image with the Straighten tool produces a horizontal reference in relation to which the your photo will be rotated. What do you do if you can’t find any horizontal element in the image to provide a true level?
2. What is the purpose of the grid overlays offered in the Overlay menu in the tool options bar when you select the Crop tool?
3. How do you use the different brushes and erasers that appear in the tool options bar when you select the Recompose tool?
4. How can you quickly undo a whole series of edit steps at once?
5. What are the similarities and differences between the Healing Brush tool and the Spot Healing Brush tool for retouching photos?
Review answers
1. To designate a vertical element in your tilted photo as reference, you need to hold down the Ctrl / Command key while you drag in the photo with the Straighten tool.
2. The Crop tool’s grid overlays can guide you in framing a balanced composition. The Rule Of Thirds overlay divides the image horizontally and vertically into three equal parts; according to this rule, objects look more balanced when aligned with the lines and intersections of the grid. The Golden Ratio overlay works within a rectangle of set proportions, within which the intersection of two diagonals defines a focus. The Grid overlay provides a simple grid to help you with basic alignment.
3. Use the green Mark For Protection brush to define areas in the image that you want protected from a scaling operation. Use the red Mark For Removal brush to define any areas that you want removed from the image; the Recompose tool will cut those areas before compressing others. Each of the Recompose brushes has its associated eraser.
4. The Undo History panel lists every action performed in chronological order. To restore the file to an earlier state, select an action higher in the list. Until you make further changes, you can restore the image to a later state by selecting a step lower in the list.
5. Both healing tools blend pixels from one part of an image into another. Although the Spot Healing Brush tool enables you to remove blemishes quicker than is possible with the Healing Brush, the Healing Brush can be customized, and enables you to specify the source reference area, giving you more control.