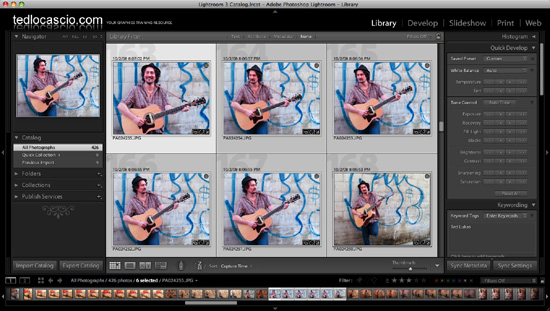
5. Searching for Images
What You’ll Do
Search with the Attribute Filter
Search with the Metadata Filter
Save a Custom Metadata Filter Preset
Filter with the Filmstrip Controls
Introduction
Before you can apply any develop settings to your images, or output them to a printer, Web gallery, or a slideshow, you must first locate them in the catalog. As you learned in Chapter 4, “Working with Metadata and Keywords,” you can add keyword tags, flags, ratings, color labels, and IPTC metadata to your photos to easily identify them when conducting a filtered search.
In this chapter, you learn how to use the Filter Bar to search for images that contain specific text data, such as filename or keywords, or that have certain attributes applied, such as flags, ratings, and color labels. You also learn how to use the Metadata Filter to conduct an advanced search.
This chapter also teaches you how to save your search results into temporary Quick or Target Collections, or into permanent collections stored in the Lightroom database. You also learn how to create a hierarchy by organizing your collections into related sets. Lastly, you learn how to automatically add images to smart collections by assigning specific rules based on search criteria, such as keywords, metadata, ratings, color labels, capture date, and file type.
Performing a Text Search
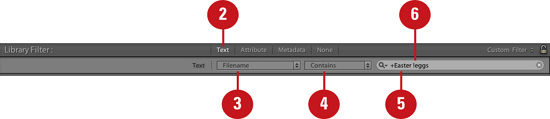
One of the easiest ways to locate images in Lightroom is to perform a text search. If you click the Text button in the Filter Bar, you can choose specific search criteria from the Target and Rule drop-down lists and then enter a search term in the search field. By taking the time to add keywords, custom metadata, or apply custom filenames to your images, you can later use the text filter option to locate them easily in your catalog.
Filter photos by text data
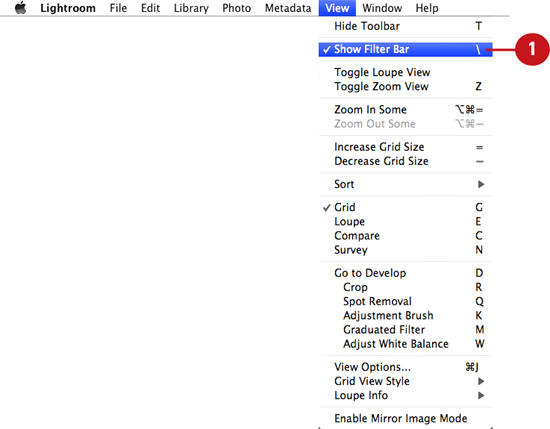
![]() To display the Filter Bar, choose View > Show Filter Bar.
To display the Filter Bar, choose View > Show Filter Bar.
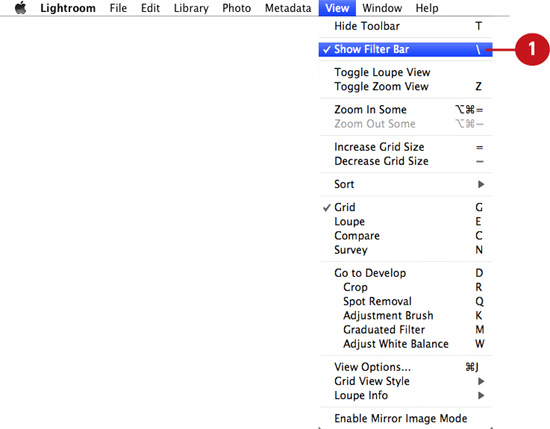
![]() Click the Text button to display the Text Filter options in the Filter Bar.
Click the Text button to display the Text Filter options in the Filter Bar.
![]() Choose a text search option from the Target drop-down list. Options include Any Searchable Field, Filename, Copy Name, Title, Caption, Keywords, Searchable Metadata, Searchable IPTC, Searchable EXIF, or Any Searchable Plug-in Field.
Choose a text search option from the Target drop-down list. Options include Any Searchable Field, Filename, Copy Name, Title, Caption, Keywords, Searchable Metadata, Searchable IPTC, Searchable EXIF, or Any Searchable Plug-in Field.
![]() Choose a search limit option from the Rule drop-down list. Options include Contains, Contains All, Doesn’t Contain, Starts With, and Ends With.
Choose a search limit option from the Rule drop-down list. Options include Contains, Contains All, Doesn’t Contain, Starts With, and Ends With.
Timesaver
By clicking the search field icon (the magnifying glass), you can access a combined drop-down list with all the target and rule search options.
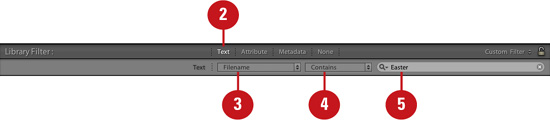
![]() Type a text term in the Filter Bar search field.
Type a text term in the Filter Bar search field.
Timesaver
Choose Library > Find or press Cmd+F (Mac) or Ctrl+F (Win) to go directly to the search field in the Filter Bar.
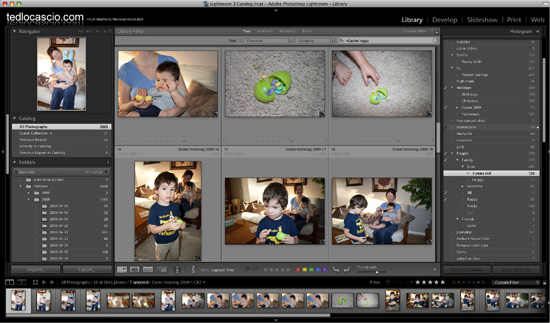
Lightroom displays all images that match the current search criteria in the Content area and Filmstrip.
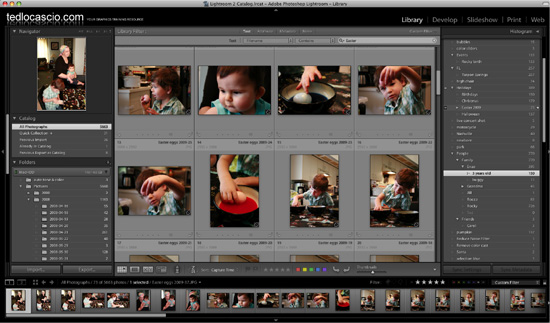
Images that match the current search criteria are displayed in the Content area and Filmstrip.
Performing a Refined Text Search
You can refine your search by entering certain characters in the text filter search field. To perform a text search that starts with a specific word or phrase, simply add a plus symbol (+) before the words. To perform an inverse search that excludes specific words, type an exclamation point (!) before the search term.
Filter photos by entering specific search field criteria
![]() To display the Filter Bar, choose View > Show Filter Bar.
To display the Filter Bar, choose View > Show Filter Bar.

![]() Click the Text button to display the Text Filter options in the Filter Bar.
Click the Text button to display the Text Filter options in the Filter Bar.
![]() Choose a text search option from the Target drop-down list.
Choose a text search option from the Target drop-down list.
![]() Choose Contains from the Rule drop-down list.
Choose Contains from the Rule drop-down list.
Timesaver
By clicking the search field icon (the magnifying glass), you can access a combined drop-down list with all the target and rule search options.
![]() In the Filter Bar search field, enter a + (plus symbol) before the search term. Doing so is the same as choosing Starts With from the Rule drop-down list.
In the Filter Bar search field, enter a + (plus symbol) before the search term. Doing so is the same as choosing Starts With from the Rule drop-down list.
![]() In the Filter Bar search field, enter an ! (exclamation point) before the next search term. Doing so indicates which words to exclude from the search.
In the Filter Bar search field, enter an ! (exclamation point) before the next search term. Doing so indicates which words to exclude from the search.
Lightroom displays all images that match the current search criteria in the Content area and Filmstrip.
Lightroom displays images that match the current search criteria in the Content area and Filmstrip.
Searching with the Attribute Filter
In addition to filtering images by text data, you can also filter them by applied attribute, such as flag status (pick or reject), star rating, color label, or a combination of all three. You can also use the Attribute filter to display just those images that are virtual copies (for more about creating virtual copies in Lightroom, see Chapter 9, “Develop Module Workflow.”
Filter photos by flag status
![]() To display the Filter Bar, choose View > Show Filter Bar.
To display the Filter Bar, choose View > Show Filter Bar.

![]() Click the Attribute button to display the Attribute Filter options in the Filter Bar.
Click the Attribute button to display the Attribute Filter options in the Filter Bar.
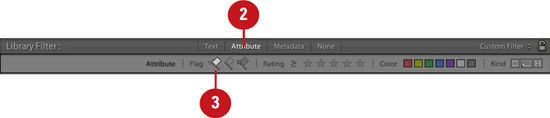
![]() Click any of the Flag icons in the Filter Bar. Options include Flagged Only, Unflagged Only, and Rejected Only. Note that it is possible to enable more than one of these flag filter options at a time.
Click any of the Flag icons in the Filter Bar. Options include Flagged Only, Unflagged Only, and Rejected Only. Note that it is possible to enable more than one of these flag filter options at a time.
Lightroom displays all images that match the current search criteria in the Content area and Filmstrip.
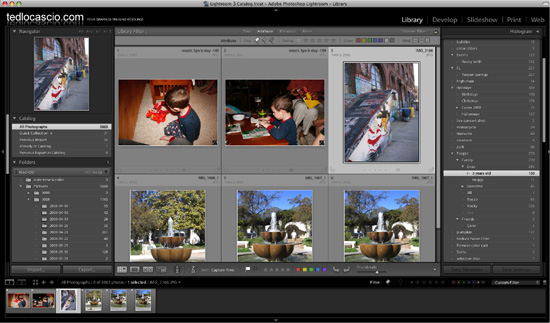
Lightroom displays images that match the current search criteria in the Content area and Filmstrip.
Filter photos by rating
![]() To display the Filter Bar, choose View > Show Filter Bar.
To display the Filter Bar, choose View > Show Filter Bar.

![]() Click the Attribute button to display the Attribute Filter options in the Filter Bar.
Click the Attribute button to display the Attribute Filter options in the Filter Bar.
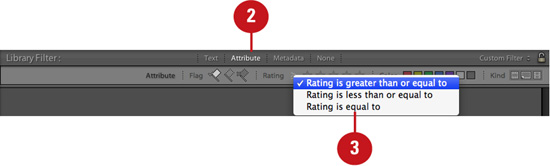
![]() To access the Rule drop-down list, click the symbol that is currently displayed between the star icons and the word “Rating” in the Filter Bar. Choose an Attribute Filter rule from the list provided. Options include Rating is Greater Than or Equal to, Rating is Equal To, and Rating is Less Than or Equal to.
To access the Rule drop-down list, click the symbol that is currently displayed between the star icons and the word “Rating” in the Filter Bar. Choose an Attribute Filter rule from the list provided. Options include Rating is Greater Than or Equal to, Rating is Equal To, and Rating is Less Than or Equal to.
![]() Click a star icon in the Filter Bar to determine which photos are displayed in the Content area. The lowest rating (1 star) is on the left and the highest (5 stars) is on the right.
Click a star icon in the Filter Bar to determine which photos are displayed in the Content area. The lowest rating (1 star) is on the left and the highest (5 stars) is on the right.

Lightroom displays all images that match the current search criteria in the Content area and Filmstrip.
Lightroom displays images that match the current search criteria in the Content area and Filmstrip.
Filter photos by color label
![]() To display the Filter Bar, choose View > Show Filter Bar.
To display the Filter Bar, choose View > Show Filter Bar.

![]() Click the Attribute button to display the Attribute Filter options in the Filter Bar.
Click the Attribute button to display the Attribute Filter options in the Filter Bar.
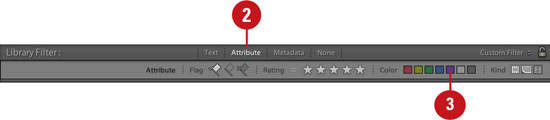
![]() Click any of the Color Label icons in the Filter Bar to indicate which colors to search for. Note that it is possible to include multiple colors in your search.
Click any of the Color Label icons in the Filter Bar to indicate which colors to search for. Note that it is possible to include multiple colors in your search.
Important
To display images that have no color label applied, click the gray color swatch in the Filter Bar.
Lightroom displays all images that match the current search criteria in the Content area and Filmstrip.
Lightroom displays images that match the current search criteria in the Content area and Filmstrip.
Filter photos by kind
![]() To display the Filter Bar, choose View > Show Filter Bar.
To display the Filter Bar, choose View > Show Filter Bar.

![]() Click the Attribute button to display the Attribute Filter options in the Filter Bar.
Click the Attribute button to display the Attribute Filter options in the Filter Bar.
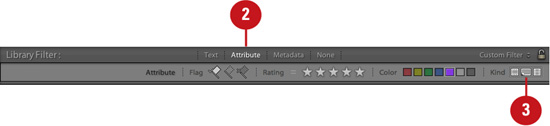
![]() Click the Kind buttons in the Filter Bar:
Click the Kind buttons in the Filter Bar:
• Master Photos—Click the button on the left to display only master photos in the Content area.
• Virtual Copies—Click the button in the middle to display only virtual copies in the Content area.
• Movies—Click the button on the right to display only movie files in the Content area.
Lightroom displays all images that match the current search criteria in the Content area and Filmstrip.
Lightroom displays images that match the current search criteria in the Content area and Filmstrip.
Searching with the Metadata Filter
The Metadata Filter enables you to display images based on specific metadata info, such as date, keywords, file type, and camera model. The Metadata Filter columns are also fully customizable. You can set them up in various configurations to conduct an advanced filter search. You can also adjust the height of the Metadata Filter by clicking and dragging the bottom bar up or down.
Filter photos by specific metadata information
![]() To display the Filter Bar, choose View > Show Filter Bar.
To display the Filter Bar, choose View > Show Filter Bar.

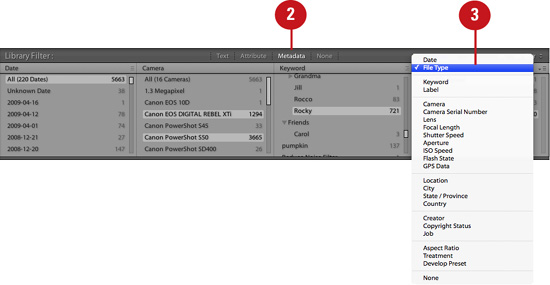
![]() Click the Metadata button to display the Metadata Filter options in the Filter Bar.
Click the Metadata button to display the Metadata Filter options in the Filter Bar.
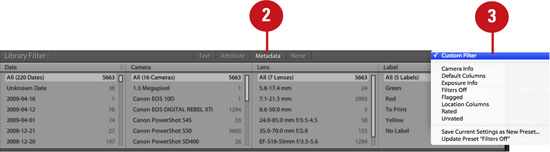
![]() Click in the upper-right corner of the Filter Bar to choose a metadata preset from the drop-down list.
Click in the upper-right corner of the Filter Bar to choose a metadata preset from the drop-down list.
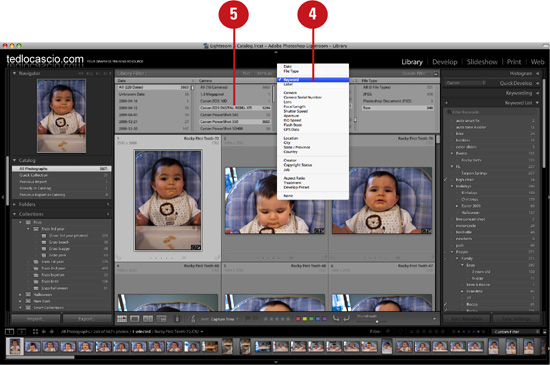
![]() Click the top of any column to access the metadata drop-down list and choose custom metadata filter settings.
Click the top of any column to access the metadata drop-down list and choose custom metadata filter settings.
Images that match the current search criteria are displayed in the Content area and Filmstrip.
![]() Under each column, click the metadata items that you would like to add as search criteria.
Under each column, click the metadata items that you would like to add as search criteria.
Timesaver
Shift+click to select multiple adjacent items; Cmd+click (Mac) or Ctrl+click (Win) to select multiple nonadjacent items.
Lightroom displays all images that match the current search criteria in the Content area and Filmstrip.
Saving a Custom Metadata Filter Preset
There are several useful Metadata Filter presets that ship with Lightroom 3. These presets give you quick access to specific images, such as all flagged photos in a catalog or all unrated photos. However, as useful as these presets are, they’re not client-specific. Thankfully, Lightroom 3 also enables you to save and recall your own custom Metadata Filter settings as presets.
Save custom Metadata Filter settings as a preset
![]() To display the Filter Bar, choose View > Show Filter Bar.
To display the Filter Bar, choose View > Show Filter Bar.
![]() Click the Metadata button to display the Metadata Filter options in the Filter Bar.
Click the Metadata button to display the Metadata Filter options in the Filter Bar.
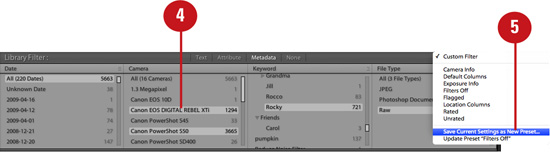
![]() Click the top of any column to access the metadata drop-down list to choose custom metadata filter settings.
Click the top of any column to access the metadata drop-down list to choose custom metadata filter settings.
![]() Under each column, click the metadata items that you would like to add as search criteria.
Under each column, click the metadata items that you would like to add as search criteria.
Timesaver
Shift+click to select multiple adjacent items; Cmd+click (Mac) or Ctrl+click (Win) to select multiple non-adjacent items.
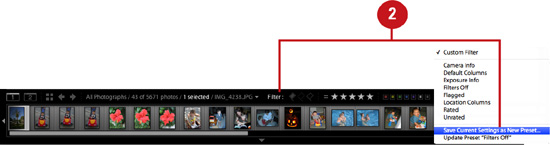
![]() Click in the upper-right corner of the Filter Bar to access the drop-down list and choose Save Current Settings as New Preset.
Click in the upper-right corner of the Filter Bar to access the drop-down list and choose Save Current Settings as New Preset.
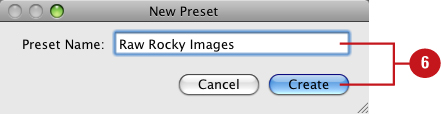
![]() In the New Preset dialog box that appears, enter a name for the preset and click Create.
In the New Preset dialog box that appears, enter a name for the preset and click Create.
The new preset is added to the Metadata Filter preset list.
Filtering with the Filmstrip Controls
The Filter Bar can take up a lot of space on your screen, especially when the Metadata Filter options are made visible. To save space on screen, you can apply attribute filters and apply Metadata Filter presets from the Filmstrip instead of from the Filter Bar. The attribute filter icons and the Metadata Filter preset list all appear and function in the same way as they do in the Filter Bar.
Filter photos by attribute or metadata preset
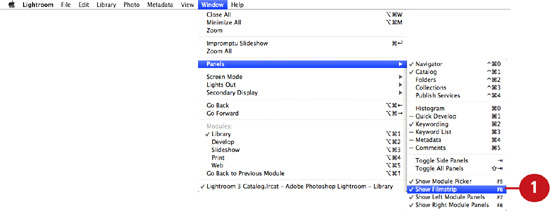
![]() Choose Window > Panels > Show Filmstrip, or click the up arrow located at the bottom of the interface to display the Filmstrip.
Choose Window > Panels > Show Filmstrip, or click the up arrow located at the bottom of the interface to display the Filmstrip.
![]() Apply any of the following Filmstrip filters:
Apply any of the following Filmstrip filters:
• Flag Status—Click any of the Flag icons to indicate which photos to display. Options include Flagged Only, Unflagged Only, and Rejected Only. Note that it is possible to enable more than one of these flag filters at a time.
• Rating—Click a star icon to indicate which photos to display. The lowest rating (1 star) is on the left and the highest (5 stars) is on the right.
• Color Label—Click any of the Color Label icons to indicate which photos to display. Note that it is possible to include multiple colors in your search.
• Metadata Preset—Choose a metadata preset from the drop-down list provided.
Lightroom displays all images that match the current search criteria in the Content area and Filmstrip.
Images that match the current search criteria are displayed in the Content area and Filmstrip.
Saving Photos to the Quick Collection
Lightroom enables you to save selected photos as part of a temporary “Quick” Collection, which you can access from the Catalog panel. This is a great feature for temporarily saving your search results. Although you can have only one Quick Collection per catalog, you can continue to add photos to it or remove them at any time. As an added bonus, Lightroom remembers the Quick Collection even after you restart the application.
Combine search results into a temporary collection
![]() Use the Filter Bar or Filmstrip filter controls to locate the photos that you would like to save in the Quick Collection.
Use the Filter Bar or Filmstrip filter controls to locate the photos that you would like to save in the Quick Collection.
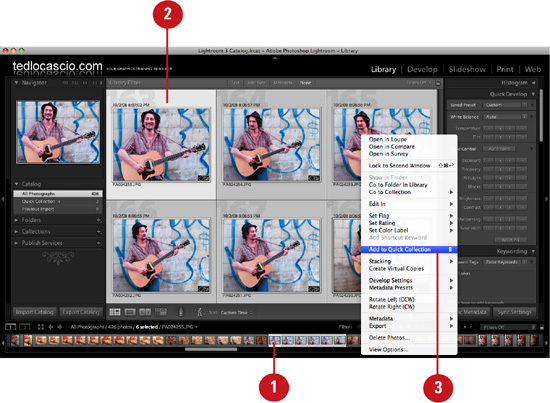
![]() Select the photos from the Grid or Filmstrip.
Select the photos from the Grid or Filmstrip.
![]() Choose Photo > Add to Quick Collection, or Control+click (Mac) or right+click (Win) and choose the command from the contextual menu.
Choose Photo > Add to Quick Collection, or Control+click (Mac) or right+click (Win) and choose the command from the contextual menu.
Timesaver
Press Cmd+B (Mac) or Ctrl+B (Win) to display the Quick Collection images in the Content area and Filmstrip.
Lightroom displays a circle in the upper-right corner of the image thumbnail to indicate that it is now part of the Quick Collection.
Images that are added to the Quick Collection are marked with a gray circle in the upper-right corner of the thumbnail.
Setting a Target Collection
Although you can only have one Quick Collection per catalog, you can select any permanent collection and make it behave like the Quick Collection for as long as it is targted. Target Collections are ideal for grouping photos together temporarily for further processing.
Make any permanent collection behave as the Quick Collection
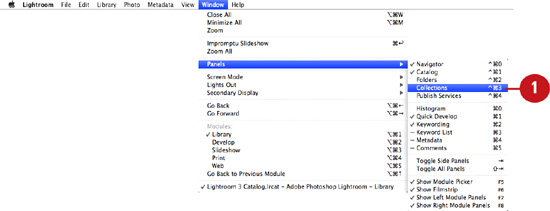
![]() To display the Collections panel, choose Window > Panels > Collections.
To display the Collections panel, choose Window > Panels > Collections.

Timesaver
Press Control+Cmd+3 (Mac) or Ctrl+Shift+3 (Win) to show or hide the Collections panel quickly.
![]() Control+click (Mac) or right+click (Win) the collection from the Collections panel and choose Set As Target Collection from the contextual menu.
Control+click (Mac) or right+click (Win) the collection from the Collections panel and choose Set As Target Collection from the contextual menu.
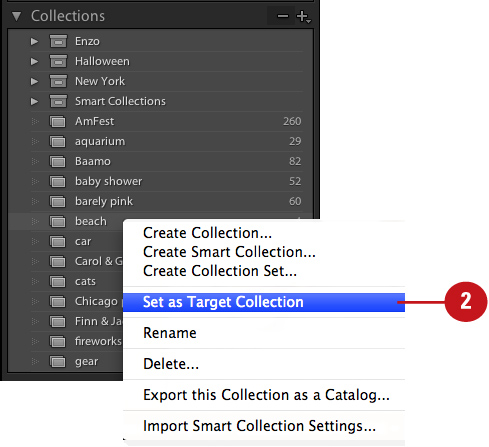
Lightroom displays a white + icon next to the collection name in the Collections panel to indicate that it is now targeted.
![]() Select the photos you would like to add to the temporary collection from the Grid or Filmstrip.
Select the photos you would like to add to the temporary collection from the Grid or Filmstrip.
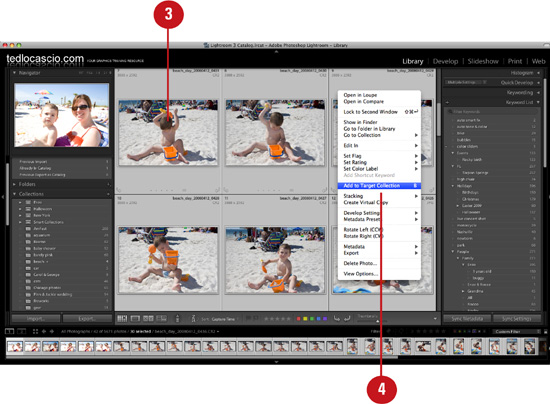
![]() Choose Photo > Add to Target Collection, or Control+click (Mac) or right+click (Win) and choose the command from the contextual menu.
Choose Photo > Add to Target Collection, or Control+click (Mac) or right+click (Win) and choose the command from the contextual menu.
Lightroom displays a circle in the upper-right corner of the image thumbnail to indicate that it is now part of the Target Collection.
Creating a Collection
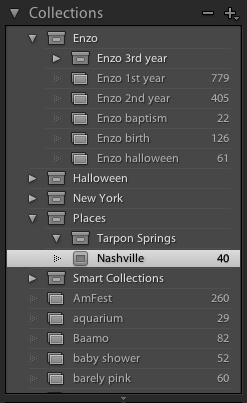
A collection is a select group of photos saved in the Lightroom database. You can select a collection from the Collections panel and display just those images in the Grid and Filmstrip. Collections can also be module-specific, which means that you can create them in the Slideshow, Print, and Web modules, and in the Library. In the Collections panel, Lightroom displays a module-specific icon next to any collection created in the Slideshow, Print, and Web modules. When you double-click a module-specific collection from the Collections panel, Lightroom selects the photos from the catalog and takes you directly to that module.
Create a collection in the Library module
![]() To display the Collections panel, choose Window > Panels > Collections.
To display the Collections panel, choose Window > Panels > Collections.

Timesaver
Press Control+Cmd+3 (Mac) or Ctrl+Shift+3 (Win) to show or hide the Collections panel quickly.
![]() Select the images that you would like to include in the collection from the Grid or Filmstrip.
Select the images that you would like to include in the collection from the Grid or Filmstrip.
Timesaver
Shift+click to select multiple adjacent photos; Cmd+click (Mac) or Ctrl+click (Win) to select multiple non-adjacent photos.
![]() Choose Library > New Collection, or click the plus icon (+) in the upper-right corner of the Collections panel and choose Create Collection from the drop-down list.
Choose Library > New Collection, or click the plus icon (+) in the upper-right corner of the Collections panel and choose Create Collection from the drop-down list.
![]() In the Create Collection dialog box that appears, enter a name for the collection.
In the Create Collection dialog box that appears, enter a name for the collection.
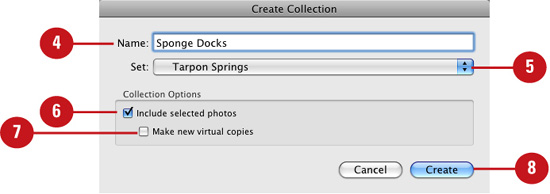
![]() From the Set drop-down list, choose what set you would like to save the collection into. If you prefer not to save the collection as part of a set, choose None.
From the Set drop-down list, choose what set you would like to save the collection into. If you prefer not to save the collection as part of a set, choose None.
![]() Enable the Include Selected Photos option.
Enable the Include Selected Photos option.
![]() If you would like to make virtual copies of the selected photos, enable the Make New Virtual Copies option. Note that doing so adds the virtual copies to the collection without the master photos.
If you would like to make virtual copies of the selected photos, enable the Make New Virtual Copies option. Note that doing so adds the virtual copies to the collection without the master photos.
![]() Click Create. Lightroom adds the generic collection to the Collections panel.
Click Create. Lightroom adds the generic collection to the Collections panel.
Create a collection in the Slideshow, Print, or Web modules
![]() To display the Collections panel, choose Window > Panels > Collections.
To display the Collections panel, choose Window > Panels > Collections.

Timesaver
Press Control+Cmd+3 (Mac) or Ctrl+Shift+3 (Win) to show or hide the Collections panel quickly.
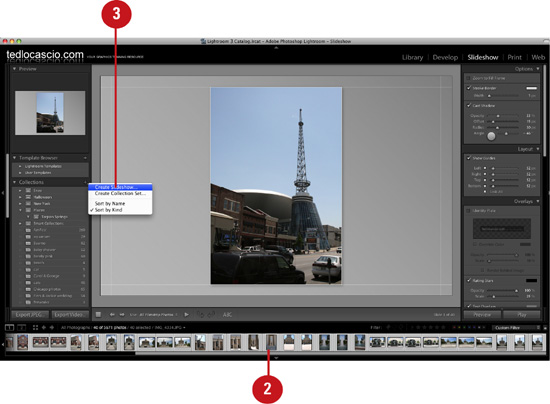
![]() Select the images that you would like to include in the collection from the Filmstrip.
Select the images that you would like to include in the collection from the Filmstrip.
Timesaver
Shift+click to select multiple adjacent photos; Cmd+click (Mac) or Ctrl+click (Win) to select multiple non-adjacent photos.
![]() To access the panel menu, click the plus icon (+) in the upper-right corner of the Collections panel. Choose Create Print (Print Module), Create Web Gallery (Web Module), or Create Slideshow (Slideshow Module) from the drop-down list.
To access the panel menu, click the plus icon (+) in the upper-right corner of the Collections panel. Choose Create Print (Print Module), Create Web Gallery (Web Module), or Create Slideshow (Slideshow Module) from the drop-down list.
![]() In the Create Print, Create Web Gallery, or Create Slideshow dialog box that appears, enter a name for the collection.
In the Create Print, Create Web Gallery, or Create Slideshow dialog box that appears, enter a name for the collection.
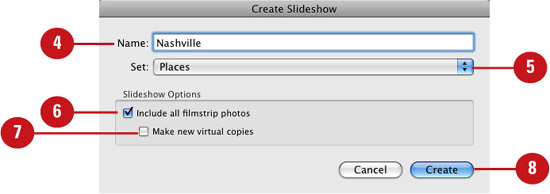
![]() From the Set drop-down list, choose what set you would like to save the collection into. If you prefer not to save the collection as part of a set, choose None.
From the Set drop-down list, choose what set you would like to save the collection into. If you prefer not to save the collection as part of a set, choose None.
![]() Enable the Include Selected Photos option.
Enable the Include Selected Photos option.
![]() If you would like to make virtual copies of the selected photos, enable the Make New Virtual Copies option. Note that doing so adds the virtual copies to the collection without the master photos.
If you would like to make virtual copies of the selected photos, enable the Make New Virtual Copies option. Note that doing so adds the virtual copies to the collection without the master photos.
![]() Click Create.
Click Create.
Lightroom adds the module-specific collection to the Collections panel.
The slideshow collection is added to the Collections panel.
Creating a Collection Set
Lightroom enables you to organize your collections into folders, called collection sets. By placing your collections into related folder groups, you can create a collection hierarchy. Doing so helps keep the Collections panel organized and makes it much easier for you to locate specific groups of photos.
Create a collection hierarchy with collection sets
![]() To display the Collections panel, choose Window > Panels > Collections.
To display the Collections panel, choose Window > Panels > Collections.

Timesaver
Press Control+Cmd+3 (Mac) or Ctrl+Shift+3 (Win) to show or hide the Collections panel quickly.
![]() To access the panel menu, click the plus icon (+) in the upper-right corner of the Collections panel. Choose Create Collection Set from the drop-down list.
To access the panel menu, click the plus icon (+) in the upper-right corner of the Collections panel. Choose Create Collection Set from the drop-down list.
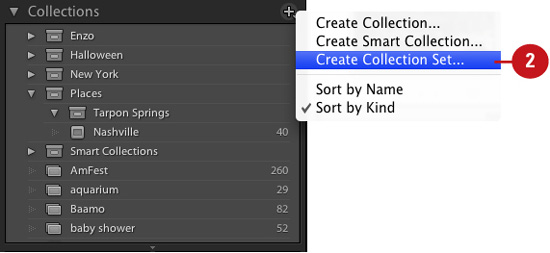
![]() In the Create Collection Set dialog box that appears, enter a name for the collection set.
In the Create Collection Set dialog box that appears, enter a name for the collection set.
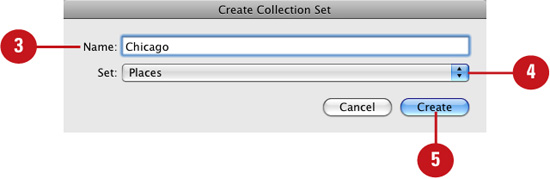
![]() From the Set drop-down list, choose what set you would like to save the collection set into. If you prefer not to nest the collection set inside of an existing set, choose None.
From the Set drop-down list, choose what set you would like to save the collection set into. If you prefer not to nest the collection set inside of an existing set, choose None.
![]() Click Create.
Click Create.
Lightroom adds the collection set to the Collections panel.
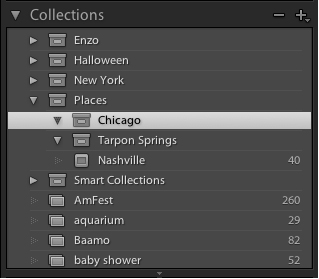
The collection set is added to the Collections panel.
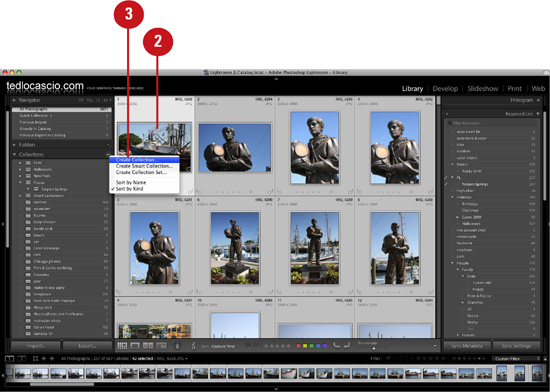
Creating a Smart Collection
With smart collections, you can assign a specific set of rules that ultimately determines what images are automatically added to them. You can create smart collections based on specific search criteria, such as keywords, metadata, ratings, color labels, capture date, and file type.
Create a collection that auto-updates its contents
![]() To display the Collections panel, choose Window > Panels > Collections.
To display the Collections panel, choose Window > Panels > Collections.

Timesaver
Press Control+Cmd+3 (Mac) or Ctrl+Shift+3 (Win) to show or hide the Collections panel quickly.
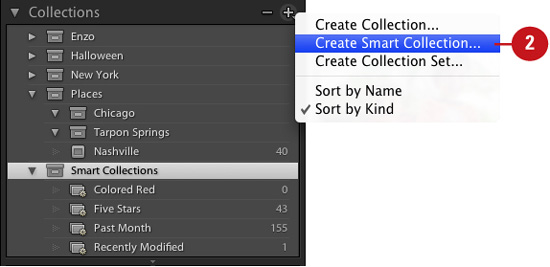
![]() To access the panel menu, click the plus icon (+) in the upper-right corner of the Collections panel. Choose Create Smart Collection from the drop-down list.
To access the panel menu, click the plus icon (+) in the upper-right corner of the Collections panel. Choose Create Smart Collection from the drop-down list.
![]() In the Create Smart Collection dialog box that appears, enter a name for the collection set.
In the Create Smart Collection dialog box that appears, enter a name for the collection set.
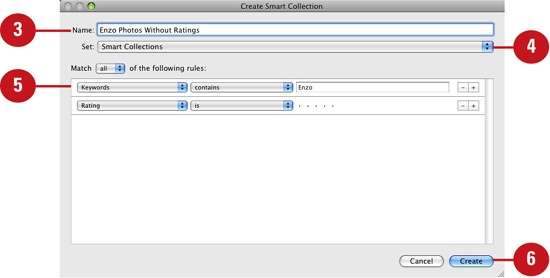
![]() From the Set drop-down list, choose what set you would like to save the smart collection into. If you prefer not to save the smart collection as part of a set, choose None.
From the Set drop-down list, choose what set you would like to save the smart collection into. If you prefer not to save the smart collection as part of a set, choose None.
![]() In the rules area of the dialog box, choose the preferred settings from the Target and Rule drop-down lists.
In the rules area of the dialog box, choose the preferred settings from the Target and Rule drop-down lists.
Important
Click the plus symbol (+) to the right of the dialog box to add a rule. Click the minus symbol (-) to remove a rule.
![]() Click Create.
Click Create.
Lightroom adds the smart collection to the Collections panel and automatically adds all the photos that meet its smart collection criteria.
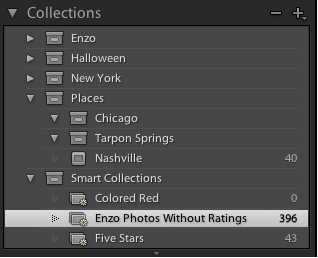
The smart collection is added to the Collections panel.
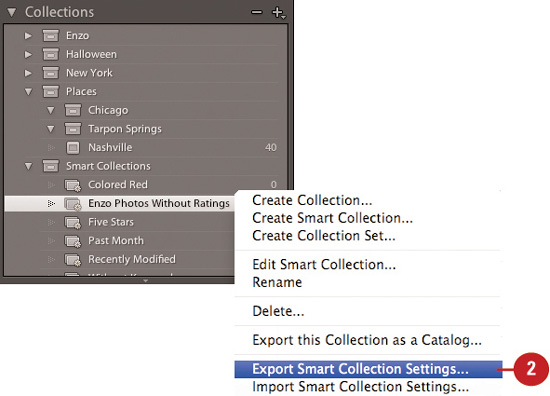
Exporting and Importing Smart Collection Settings
It is possible to import smart collections into your other catalogs or share smart collections with other Lightroom users. To do so, you must export the smart collection settings from one Lightroom catalog and then import them into another.
Export a smart collection
![]() To display the Collections panel, choose Window > Panels > Collections.
To display the Collections panel, choose Window > Panels > Collections.
Timesaver
Press Control+Cmd+3 (Mac) or Ctrl+Shift+3 (Win) to show or hide the Collections panel quickly.
![]() Control+click (Mac) or right+click (Win) the smart collection from the Collections panel and choose Export Smart Collection Settings from the contextual menu.
Control+click (Mac) or right+click (Win) the smart collection from the Collections panel and choose Export Smart Collection Settings from the contextual menu.
![]() In the Save dialog box that appears, enter a name for the .lrsmcol file in the Save As field.
In the Save dialog box that appears, enter a name for the .lrsmcol file in the Save As field.
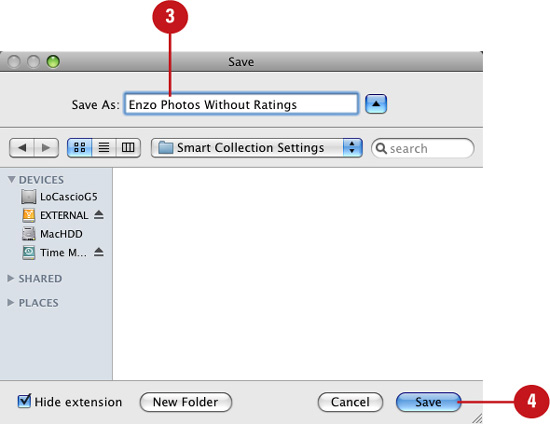
![]() Choose a save location for the file on your system and click Save.
Choose a save location for the file on your system and click Save.
Lightroom creates a .lrsmcol file in the location you specified.
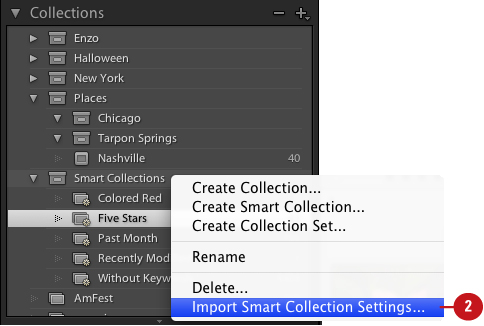
Import a smart collection
![]() To display the Collections panel, choose Window > Panels > Collections.
To display the Collections panel, choose Window > Panels > Collections.

Timesaver
Press Control+Cmd+3 (Mac) or Ctrl+Shift+3 (Win) to show or hide the Collections panel quickly.
![]() Control+click (Mac) or right+click (Win) the collection set that you would like to import the smart collection into from the Collections panel and choose Import Smart Collection Settings from the contextual menu.
Control+click (Mac) or right+click (Win) the collection set that you would like to import the smart collection into from the Collections panel and choose Import Smart Collection Settings from the contextual menu.
![]() In the Import Smart Collection dialog box that appears, navigate to and select the .lrsmcol file.
In the Import Smart Collection dialog box that appears, navigate to and select the .lrsmcol file.
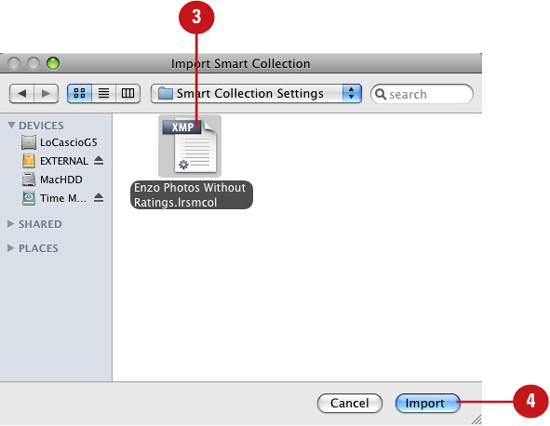
![]() Click Import.
Click Import.
Lightroom adds the smart collection to the collection set and automatically adds any photos that meet the smart collection criteria.