3. Organizing Images in the Library
What You’ll Do
Apply Ratings, Flags, and Labels with the Painter Tool
Introduction
The key to good photo asset management is to maintain a well-organized photo catalog. This can prove to be a daunting task when you are managing thousands of photos at a time. Thankfully, Lightroom includes several organizational features that can help you manage large photo libraries with ease.
In this chapter, you learn how to rotate and flip photos so that they appear the way you like in the Library Content area. You also learn how to apply searchable attributes, such as 0–5 star ratings, pick or reject flags, and custom color labels.
This chapter also explains how to control the sort order for the thumbnails in the Content area and Filmstrip. You learn the various ways you can sort images, as well as how to change their sort direction from ascending to descending and vice versa.
Lastly, you learn how to conserve room in the Content area by stacking related photos into groups, and how to conserve room in the catalog by removing unusable photos.
Rotating Images
If the photos you import are taken using a digital camera that embeds camera orientation metadata (portrait or landscape), then Lightroom automatically rotates the image thumbnails in the Library Content area accordingly. If not, then you can click the Rotate buttons or apply the Rotate Left (CCW) or Rotate Right (CW) commands.
Rotate images clockwise or counterclockwise
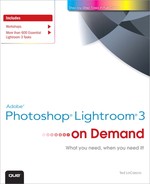
![]() In Grid View of the Library module, select any image thumbnail (or multiple image thumbnails) that you’d like to rotate.
In Grid View of the Library module, select any image thumbnail (or multiple image thumbnails) that you’d like to rotate.
Timesaver
Shift+click to select multiple adjacent photos; Cmd+click (Mac) or Ctrl+click (Win) to select multiple non-adjacent photos.
![]() Cick the Rotate buttons in the Library Toolbar or choose Photo > Rotate Left (CCW) or Rotate Right (CW).
Cick the Rotate buttons in the Library Toolbar or choose Photo > Rotate Left (CCW) or Rotate Right (CW).
Important
Choose Rotate from the Toolbar flyout menu to display the Rotate buttons in the Library toolbar.
The selected thumbnail(s) appear rotated in the Content area and Filmstrip.
The selected images are rotated clockwise.
Flipping Images
In addition to rotating images in the Library, you can also flip them in the opposite horizontal or vertical direction from the way they were originally shot. Doing so can sometimes improve an image’s composition, as long as it’s not too obvious that the photo has been flipped.
Flip images to face the opposite direction
![]() Select any image thumbnail (or multiple image thumbnails) from the Grid or Filmstrip.
Select any image thumbnail (or multiple image thumbnails) from the Grid or Filmstrip.

Timesaver
Shift+click to select multiple adjacent photos; Cmd+click (Mac) or Ctrl+click (Win) to select multiple non-adjacent photos.
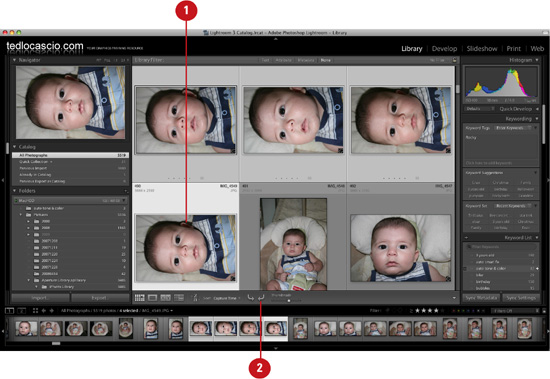
![]() Choose Photo > Flip Horizontal or Flip Vertical.
Choose Photo > Flip Horizontal or Flip Vertical.

The selected photo(s) appear flipped in the Content area and Filmstrip.

The selected image is flipped horizontally.
Rating Images
One excellent way to organize your catalog images is to categorize them by rating. Lightroom enables you to apply ratings from zero to five stars. After you apply them, you can then use the Filter bar or Filmstrip filter controls to search for specific catalog images based on their ratings. Ratings are stored in an image’s metadata and are accessible in other applications, such as Adobe Bridge.
Apply 0-5 star ratings to your catalog images
![]() Select any image thumbnail (or multiple image thumbnails) from the Grid or Filmstrip.
Select any image thumbnail (or multiple image thumbnails) from the Grid or Filmstrip.

Timesaver
Shift+click to select multiple adjacent photos; Cmd+click (Mac) or Ctrl+click (Win) to select multiple non-adjacent photos.
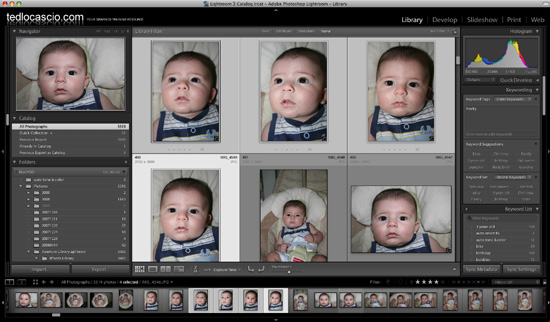
![]() To apply a rating to the selected photo(s), choose Photo > Set Rating and then select a star rating from the flyout submenu. You can also Control+click (Mac) or right+click (Win) and choose one from the contextual menu. If you’ve chosen to display them, you can also apply a rating by clicking one of the star icons in the Toolbar.
To apply a rating to the selected photo(s), choose Photo > Set Rating and then select a star rating from the flyout submenu. You can also Control+click (Mac) or right+click (Win) and choose one from the contextual menu. If you’ve chosen to display them, you can also apply a rating by clicking one of the star icons in the Toolbar.
Timesaver
Press the right bracket key to increase the rating; press the left bracket key to decrease it.
If the Show Grid Extras view option is enabled, Lightroom displays the rating in the grid cell.
Flagging Images
Another way to label your best images as top picks from a photoshoot is to mark them as flagged. When you flag an image, and the Show Grid Extras view option is enabled, a flag icon is displayed in the upper-left corner of the grid cell. You can then apply a filtered search for all flagged images and display just those photos in the Content area.
Mark catalog images as flagged
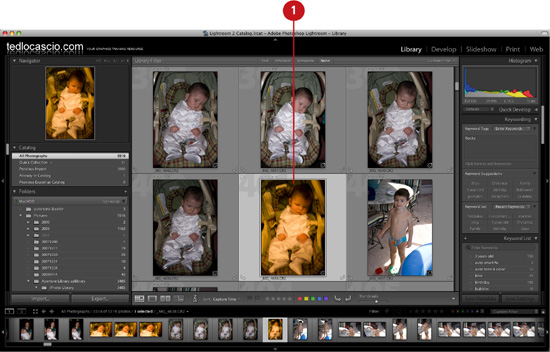
![]() Select any image thumbnail (or multiple image thumbnails) from the Grid or Filmstrip.
Select any image thumbnail (or multiple image thumbnails) from the Grid or Filmstrip.

Timesaver
Shift+click to select multiple adjacent photos; Cmd+click (Mac) or Ctrl+click (Win) to select multiple non-adjacent photos.
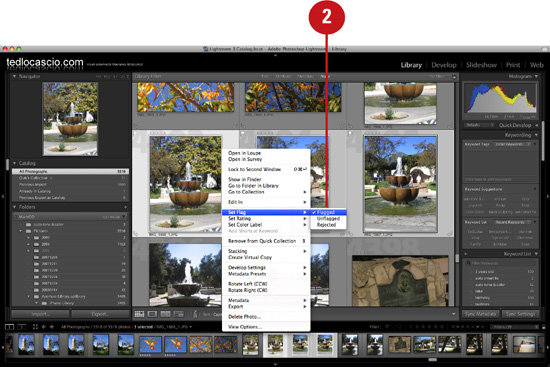
![]() To flag or unflag the selected photo(s), choose Photo > Set Flag and then select Flagged or Unflagged from the flyout submenu. You can also Control+click (Mac) or right+click (Win) and select either option from the contextual menu. If you’ve chosen to display it, you can also flag or unflag an image by clicking the flag icon in the Toolbar.
To flag or unflag the selected photo(s), choose Photo > Set Flag and then select Flagged or Unflagged from the flyout submenu. You can also Control+click (Mac) or right+click (Win) and select either option from the contextual menu. If you’ve chosen to display it, you can also flag or unflag an image by clicking the flag icon in the Toolbar.
Timesaver
Press Cmd+Up arrow (Mac) or Ctrl+Up arrow (Win) to increase flag status. Press Cmd+Down arrow (Mac) or Ctrl+Down arrow (Win) to decrease flag status.
If the Show Grid Extras view option is enabled, Lightroom displays the flag in the respective grid cells.
Rejecting Images
In addition to marking your top image picks as flagged, you can also mark all your out of focus or generally unusable photos as rejects. You should consider adopting this method as an alternative to deleting those images that you consider unusable. You never know when a photo that might not be suitable for one project could wind up being useful for another.
Mark catalog photos as rejected
![]() Select any image thumbnail (or multiple image thumbnails) from the Grid or Filmstrip.
Select any image thumbnail (or multiple image thumbnails) from the Grid or Filmstrip.
Timesaver
Shift+click to select multiple adjacent photos; Cmd+click (Mac) or Ctrl+click (Win) to select multiple non-adjacent photos.
![]() To reject the selected photo(s), choose Photo > Set Flag and then select Rejected from the flyout submenu. You can also Control+click (Mac) or right+click (Win) and select it from the contextual menu. If you’ve chosen to display it, you can also reject an image by clicking the reject icon in the Toolbar.
To reject the selected photo(s), choose Photo > Set Flag and then select Rejected from the flyout submenu. You can also Control+click (Mac) or right+click (Win) and select it from the contextual menu. If you’ve chosen to display it, you can also reject an image by clicking the reject icon in the Toolbar.

Timesaver
Press Cmd+Up arrow (Mac) or Ctrl+Up arrow (Win) to increase flag status. Press Cmd+Down arrow (Mac) or Ctrl+Down arrow (Win) to decrease flag status.
Applying Color Labels
With color labels, you have the freedom to associate whatever interpretations you like to each color. For example, you may assign a red color label to mean “reject” or a green label to mean “good to print.” These interpretations can be saved in a Color Label Set. Note that all applied color labels are specific to the color label set that is currently chosen. If you use Lightroom with Bridge, be sure to assign the same interpretations to the colors in both applications. Doing so ensures that there will be no color label metadata conflicts.
Separate images into groupings with color labels
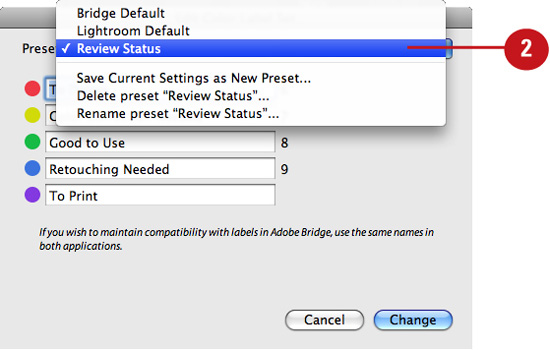
![]() Choose Color Label Set from the Metadata menu and select one of the three default sets: Bridge Default, Lightroom Default, or Review Status.
Choose Color Label Set from the Metadata menu and select one of the three default sets: Bridge Default, Lightroom Default, or Review Status.

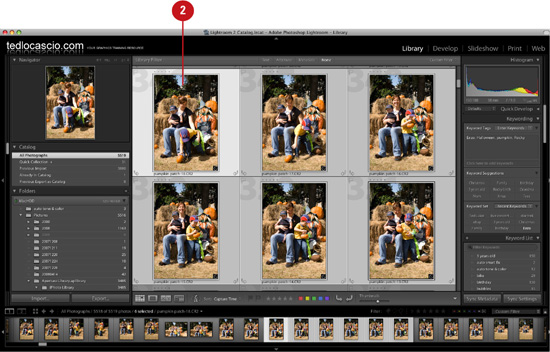
![]() Select any image thumbnail (or multiple image thumbnails) from the Grid or Filmstrip.
Select any image thumbnail (or multiple image thumbnails) from the Grid or Filmstrip.
Timesaver
Shift+click to select multiple adjacent photos; Cmd+click (Mac) or Ctrl+click (Win) to select multiple non-adjacent photos.
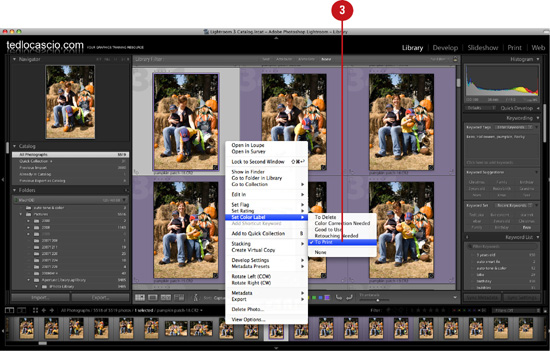
![]() To apply a color label to the selected photo(s), choose Photo > Set Color Label and then select a color from the flyout submenu. You can also Control+click (Mac) or right+click (Win) and select one from the contextual menu. If you’ve chosen to display them, you can also apply a color label to an image by clicking the color icons in the Toolbar.
To apply a color label to the selected photo(s), choose Photo > Set Color Label and then select a color from the flyout submenu. You can also Control+click (Mac) or right+click (Win) and select one from the contextual menu. If you’ve chosen to display them, you can also apply a color label to an image by clicking the color icons in the Toolbar.
Timesaver
Press the keyboard numbers 6 through 9 to assign a color label quickly: red (6), yellow (7), green (8), and blue (9). There is no keyboard shortcut for purple.
Creating a Custom Color Label Set
Lightroom includes three default Color Label Sets: Bridge Default, Lightroom Default, and Review Status. However, you are not limited to working with just these three presets. You can edit them and save as many custom presets of your own as you like.
Edit and save a Color Label Set
![]() Choose Color Label Set from the Metadata menu and select Edit.
Choose Color Label Set from the Metadata menu and select Edit.

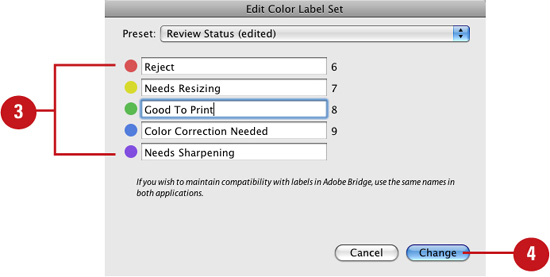
![]() In the Edit Color Label Set dialog box that appears, choose a Color Label Set from the Preset drop-down list.
In the Edit Color Label Set dialog box that appears, choose a Color Label Set from the Preset drop-down list.
![]() Enter new text in the respective color fields.
Enter new text in the respective color fields.
![]() From the Preset menu, choose Save Current Settings as New Preset.
From the Preset menu, choose Save Current Settings as New Preset.
![]() In the New Preset dialog box that appears, enter a name for the preset and click Create.
In the New Preset dialog box that appears, enter a name for the preset and click Create.
The new set is added to the Color Label Set Preset list.

Applying Ratings, Flags, and Labels with the Painter Tool
The Painter tool enables you to apply the same attributes to multiple images in Grid View quickly, without having to select them first. You can use the Painter tool as an alternative to working with clickable grid cell items to apply ratings, flags, and color labels. The Painter tool also remembers your last settings, so you can quickly apply them to other thumbnails the next time you select the tool.
Apply ratings, flags, and labels repeatedly with the Painter
![]() To access the Painter tool, choose Metadata > Enable Painting. Or if you’ve chosen to display the Painter icon in the Toolbar, you can click it to access the tool.
To access the Painter tool, choose Metadata > Enable Painting. Or if you’ve chosen to display the Painter icon in the Toolbar, you can click it to access the tool.

Timesaver
Press Option+Cmd+K (Mac) or Alt+Ctrl+K (Win) to enable or disable the Painter tool quickly.
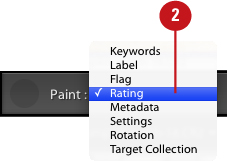
![]() In the Toolbar, choose Rating, Flag, or Label from the Paint drop-down list.
In the Toolbar, choose Rating, Flag, or Label from the Paint drop-down list.
![]() When you choose Rating or Label, the star rating and color label options appear next to the drop-down list. Select a star rating or a color label before painting with the tool.
When you choose Rating or Label, the star rating and color label options appear next to the drop-down list. Select a star rating or a color label before painting with the tool.
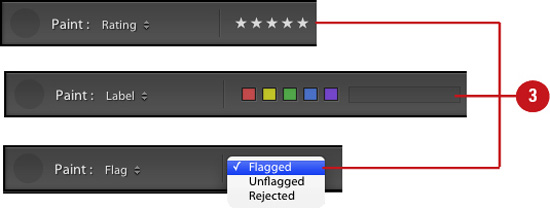
When choosing Flag, you must choose an option from the drop-down list that appears. Options include: Flagged (the default), Unflagged, or Rejected.
![]() Hover over any thumbnail in the Grid and click with the Painter tool to apply the chosen rating, color label, or a flag.
Hover over any thumbnail in the Grid and click with the Painter tool to apply the chosen rating, color label, or a flag.
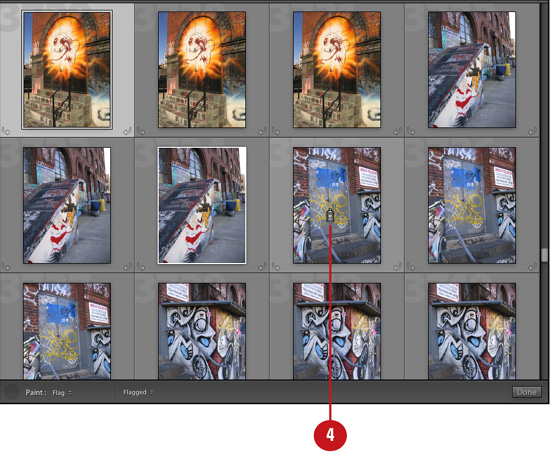
Important
You must click directly on the thumbnail and not the grid cell to apply attributes with the Painter tool.
Sorting Images
Lightroom enables you to control how the image thumbnails are sorted in the Library Content area and the Filmstrip. The most common way to sort is by Capture Time, but you can also sort by Added Order, or Edit Time, or by applied attributes such as Rating, Pick (flag), and Label Color or Label Text. You can change the way the thumbnails are sorted at any time.
Choose how to sort images in the Content area and Filmstrip
![]() Under the View menu, choose a sort option from the Sort submenu. Or if you’ve chosen to display the Sort tools in the Toolbar, you can choose an option from the Sort drop-down list.
Under the View menu, choose a sort option from the Sort submenu. Or if you’ve chosen to display the Sort tools in the Toolbar, you can choose an option from the Sort drop-down list.
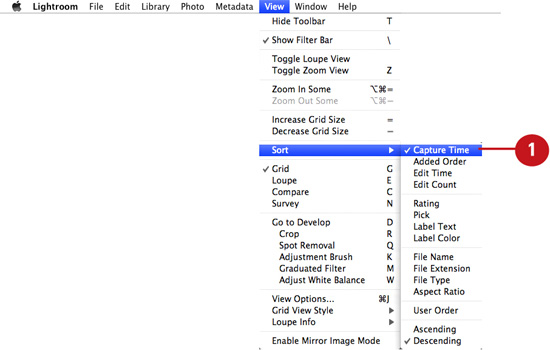
The image thumbnails are displayed accordingly in the Content area and Filmstrip.

The thumbnails are sorted accordingly.
Changing Sort Direction
After you choose how you would like to sort the thumbnails in the Content area and Filmstrip, you can also choose whether to display them in ascending or descending order. The most common way to sort images is by Capture Time in descending order, so that your most recent images are positioned at the top of the thumbnail grid.
Toggle sort direction
![]() Under the View menu, choose ascending or descending from the Sort submenu. Or if you’ve chosen to display the Sort tools in the Toolbar, you can click the Sort Direction icon.
Under the View menu, choose ascending or descending from the Sort submenu. Or if you’ve chosen to display the Sort tools in the Toolbar, you can click the Sort Direction icon.

The image thumbnails are displayed accordingly in the Content area and Filmstrip.

The thumbnails are displayed accordingly.
Grouping Photos into Stacks
Lightroom’s Stacking feature enables you to group related photos into a condensed stack in the Library Grid. By grouping images into stacks, you can save room in the Content area and ultimately spend a lot less time scrolling through thumbnails to find a specific image you’d like to work with. Note that grouping images into stacks will only affect the way the thumbnails are displayed in the Grid. It does not change the location of the files on your system.
Group related photos into a virtual stack
![]() Select any image thumbnail (or multiple image thumbnails) from the Grid or Filmstrip.
Select any image thumbnail (or multiple image thumbnails) from the Grid or Filmstrip.

Timesaver
Shift+click to select multiple adjacent photos; Cmd+click (Mac) or Ctrl+click (Win) to select multiple non-adjacent photos.
![]() Choose Photo > Stacking > Group Into Stack. You can also Control+click (Mac) or right+click (Win) and select Stacking > Group Into Stack from the contextual menu.
Choose Photo > Stacking > Group Into Stack. You can also Control+click (Mac) or right+click (Win) and select Stacking > Group Into Stack from the contextual menu.
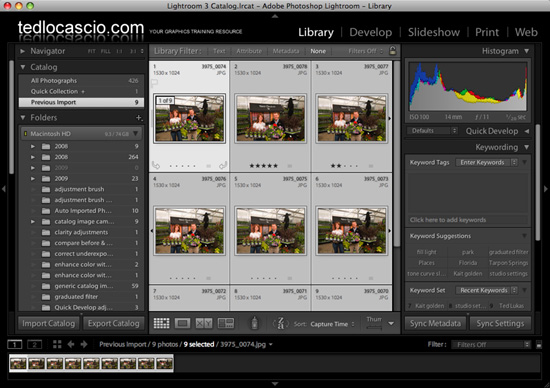
Lightroom creates the group. The number of images in the stack is displayed in the upper-left corner of the topmost thumbnail.
![]() To expand the stack, click the left or right edge of the topmost thumbnail, or choose Photo > Stacking > Expand Stack. You can also right+click (Win) or Control+click (Mac) and select Stacking > Expand Stack from the contextual menu.
To expand the stack, click the left or right edge of the topmost thumbnail, or choose Photo > Stacking > Expand Stack. You can also right+click (Win) or Control+click (Mac) and select Stacking > Expand Stack from the contextual menu.

Promoting a Photo to the Top of the Stack
When you group a related series of photos into a stack, only one image remains visible when the stack is collapsed. By default, the first image selected is automatically positioned at the top when you create the stack. However, you can choose a different image from within the stack to represent the group at any time.
Select an image to represent the stacked group
![]() Select the stack from the Grid. To expand the stack, click the left or right edge of the topmost thumbnail, or choose Photo > Stacking > Expand Stack. You can also right+click (Win) or Control+click (Mac) and select Stacking > Expand Stack from the contextual menu.
Select the stack from the Grid. To expand the stack, click the left or right edge of the topmost thumbnail, or choose Photo > Stacking > Expand Stack. You can also right+click (Win) or Control+click (Mac) and select Stacking > Expand Stack from the contextual menu.

![]() Select the image in the stack that you would like to promote to the top.
Select the image in the stack that you would like to promote to the top.

![]() Choose Photo > Stacking > Move to Top of Stack. You can also Control+click (Mac) or right+click (Win) and select Stacking > Move to Top of Stack from the contextual menu.
Choose Photo > Stacking > Move to Top of Stack. You can also Control+click (Mac) or right+click (Win) and select Stacking > Move to Top of Stack from the contextual menu.
The image thumbnail is displayed at the top of the stack and remains visible even when the stack is collapsed.
The selected thumbnail is promoted to the top of the stack.
Removing Photos from a Stack
If for any reason, you want to remove a grouped image (or several grouped images) from a stack, all you need to do is select the image(s) from the group and apply the Remove from Stack command. When removed, the image thumbnails are placed outside the group and back into the main Library Grid.
Select and remove an image from a stacked group
![]() Select the stack from the Grid. To expand the stack, click the left or right edge of the topmost thumbnail, or choose Photo > Stacking > Expand Stack. You can also Control+click (Mac) or right+click (Win) and select Stacking > Expand Stack from the contextual menu.
Select the stack from the Grid. To expand the stack, click the left or right edge of the topmost thumbnail, or choose Photo > Stacking > Expand Stack. You can also Control+click (Mac) or right+click (Win) and select Stacking > Expand Stack from the contextual menu.

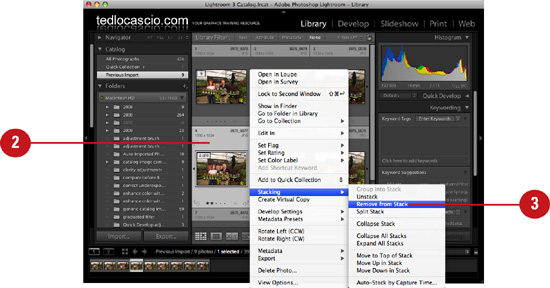
![]() Select the image(s) in the stack that you would like to remove.
Select the image(s) in the stack that you would like to remove.
Timesaver
Shift+click to select multiple adjacent photos; Cmd+click (Mac) or Ctrl+click (Win) to select multiple non-adjacent photos.
![]() Choose Photo > Stacking > Remove from Stack. You can also Control+click (Mac) or right+click (Win) and select Stacking > Remove from Stack from the contextual menu.
Choose Photo > Stacking > Remove from Stack. You can also Control+click (Mac) or right+click (Win) and select Stacking > Remove from Stack from the contextual menu.
The image thumbnail is removed from the stack and placed outside the group in the Library Grid.
The selected thumbnail is removed from the stack.
Unstacking Photos
In Lightroom, image stacks are extremely flexible and are never permanent. You can release a stacked group of images at any time by selecting it from the Library Grid and applying the Unstack command.
Release a stacked group
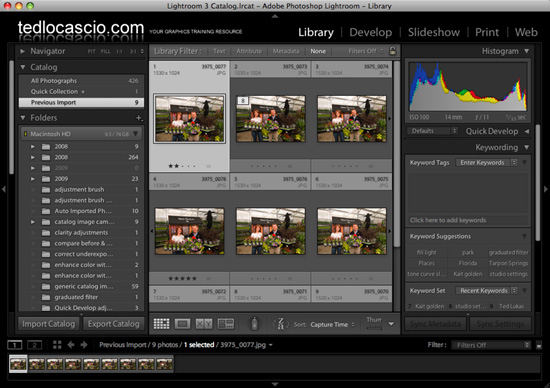
![]() Select the stack from the Library Grid. It does not matter if it is expanded or collapsed.
Select the stack from the Library Grid. It does not matter if it is expanded or collapsed.
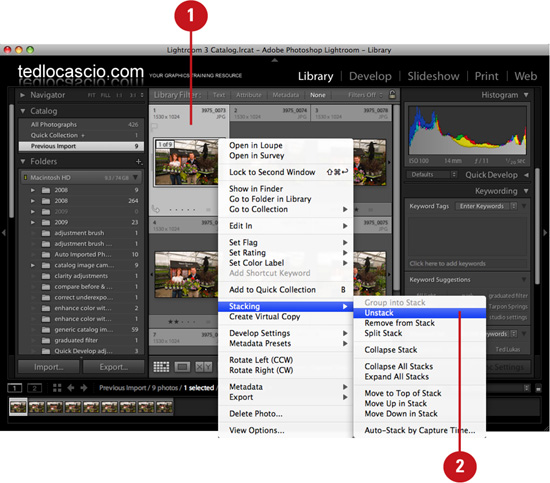
![]() Choose Photo > Stacking > Unstack. You can also Control+click (Mac) or right+click (Win) and select Stacking > Unstack from the contextual menu.
Choose Photo > Stacking > Unstack. You can also Control+click (Mac) or right+click (Win) and select Stacking > Unstack from the contextual menu.
The stack is released and the image thumbnails are no longer grouped together.
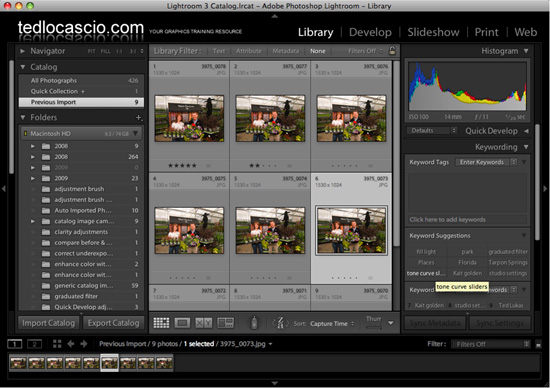
The grouped photos are released from the stack.
Removing Photos
Not every photo is perfect. Some may even be less than perfect. To avoid cluttering up your catalog with unusable images, it is possible to remove them from the database. However, you should consider keeping copies of these photos on your computer’s hard disk, just in case you find another use for them down the road.
Delete an image from the catalog, but not the hard disk
![]() From the Grid or Filmstrip, select the image thumbnail (or multiple image thumbnails) for the photo(s) you would like to remove from the catalog.
From the Grid or Filmstrip, select the image thumbnail (or multiple image thumbnails) for the photo(s) you would like to remove from the catalog.

Timesaver
Shift+click to select multiple adjacent photos; Cmd+click (Mac) or Ctrl+click (Win) to select multiple non-adjacent photos.
![]() Choose Photo > Delete Photo, or press the Delete key. You can also Control+click (Mac) or right+click (Win) the thumbnail and select Delete Photo from the contextual menu.
Choose Photo > Delete Photo, or press the Delete key. You can also Control+click (Mac) or right+click (Win) the thumbnail and select Delete Photo from the contextual menu.
![]() In the warning dialog box that appears, click Remove.
In the warning dialog box that appears, click Remove.

Lightroom removes the image(s) from the catalog; however, the original file still remains on your computer’s hard disk.
Timesaver
To bypass the warning dialog box, choose Photo > Remove Photos from Catalog or press Option+Delete (Mac) or Alt+Delete (Win).
Deleting Photos
Although it’s always a good idea to keep copies of all your images (both good and bad) stored somewhere, you can still delete them from both the catalog and hard disk at the same time. However, just as a safeguard, Lightroom places these photos in your system’s Trash (Mac) or Recycle Bin (Win) without emptying it.
Delete an image from the catalog and the hard disk
![]() From the Grid or Filmstrip, select the image thumbnail (or multiple image thumbnails) for the photo(s) you would like to remove from the catalog.
From the Grid or Filmstrip, select the image thumbnail (or multiple image thumbnails) for the photo(s) you would like to remove from the catalog.

Timesaver
Shift+click to select multiple adjacent photos; Cmd+click (Mac) or Ctrl+click (Win) to select multiple non-adjacent photos.
![]() Choose Photo > Delete Photo, or press the Delete key. You can also Control+click (Mac) or right+click (Win) the thumbnail and select Delete Photo from the contextual menu.
Choose Photo > Delete Photo, or press the Delete key. You can also Control+click (Mac) or right+click (Win) the thumbnail and select Delete Photo from the contextual menu.
![]() In the warning dialog box that appears, click Delete from Disk.
In the warning dialog box that appears, click Delete from Disk.

Lightroom removes the image(s) from the catalog and places it in the system’s Trash (Mac) or Recycle Bin (Win). Note that the image is not officially deleted from the hard disk until you manually empty the Trash/Recycle Bin.