8. Applying Localized Adjustments
What You’ll Do
Clone with the Spot Removal Tool
Heal with the Spot Removal Tool
Apply Localized Adjustments with the Adjustment Brush
Save Effect Settings as Presets
Introduction
The majority of adjustments that you can apply to an image in the Develop module are administered globally (to the entire image). However, there is also a special group of tools that enable you to apply adjustments locally (to a specific area of the image). These tools are located at the top of the Tools panel and include the Spot Removal tool, the Red Eye Correction tool, the Graduated Filter tool, and the Adjustment Brush.
In this chapter, you learn how to clone and heal with the Spot Removal tool, and how to correct red eye with the Red Eye Correction tool. You also learn how to apply adjustments to specific areas of an image with the Adjustment Brush, and how to edit effect settings for applied brush strokes simultaneously.
This chapter also teaches you how to create and save effect setting presets, and how to utilize the built-in Soften Skin preset. You also learn how to work with the Adjustment Brush in Auto Mask mode, especially when hand tinting a black-and-white image.
The final sections of this chapter teach you how to apply localized sharpening with the Adjustment Brush, and how to use the Graduated Filter tool to apply adjustments that gradually fade along a linear path.
Cloning with the Spot Removal Tool
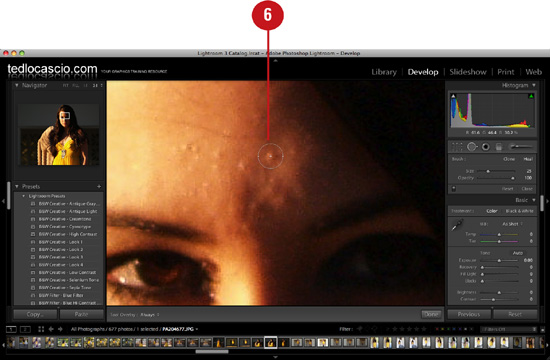
The Spot Removal tool enables you to remove blemishes, such as dust spots, from an image. When you use the tool in Clone mode, Lightroom copies pixels using a feathered circle edge. Note that you can add as many spot circles to the image as you like, and they can be edited or removed at any time. To hide the spot circles as you work with the tool, press the H key. You can delete a spot circle by clicking to select it and then pressing Delete. To remove all spot circles from the image, click the Reset button in the Tools panel.
Remove blemishes in Clone mode
![]() From the Library module Grid or the Filmstrip, select the photo that you would like to work with.
From the Library module Grid or the Filmstrip, select the photo that you would like to work with.
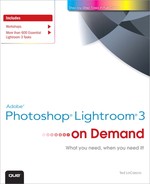
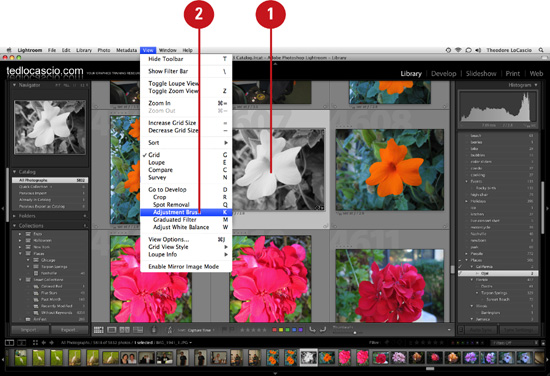
![]() Choose View > Go to Develop or click the Develop button in the upper-right corner of the interface.
Choose View > Go to Develop or click the Develop button in the upper-right corner of the interface.
Lightroom displays the photo in the Content area of the Develop module.
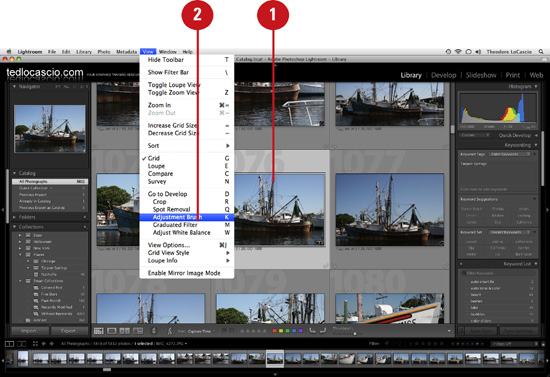
![]() To access the Spot Removal tool, choose Tools > Spot Removal, or click the Spot Removal icon in the Tools panel.
To access the Spot Removal tool, choose Tools > Spot Removal, or click the Spot Removal icon in the Tools panel.
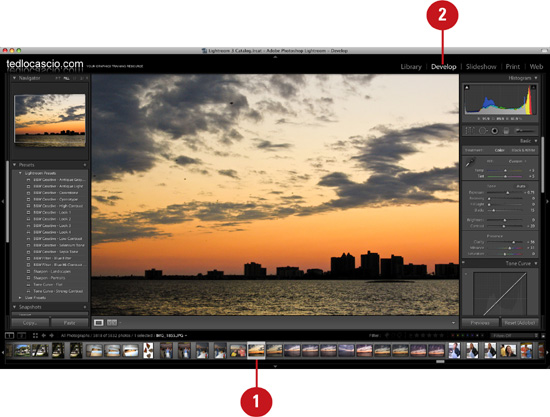
![]() Click the Clone button in the Tools panel.
Click the Clone button in the Tools panel.
![]() Size the Spot Removal tool cursor by adjusting the Size slider.
Size the Spot Removal tool cursor by adjusting the Size slider.
Timesaver
Press the left bracket key ([) to decrease the cursor size; press the right bracket key (]) to increase it.
![]() Use one of the following methods to remove a blemish from the image:
Use one of the following methods to remove a blemish from the image:
• Click once over the blemish to create a spot circle and allow Lightroom to autoselect a sample point.
• Click and drag outward to create the spot circle and manually select a sample point.
• To size the spot circle as you create it, hold down Cmd (Mac) or Ctrl (Win) and draw a marquee over the blemish. Lightroom autoselects the sample point

Lightroom displays the source (thin) and destination (thick) spot circles in the image.
If necessary, you can reposition the source circle by dragging it to another area of the image. As you do, Lightroom hides the destination circle so that you can preview the effect accurately.
![]() Click the Close button in the Tools panel to turn off the Spot Removal tool.
Click the Close button in the Tools panel to turn off the Spot Removal tool.

Healing with the Spot Removal Tool
When you use the Spot Removal tool in Heal mode, Lightroom copies pixels and blends them around the inner edges of the spot circle. This results in a much softer cloning effect, which works best for retouching facial portraits. Otherwise, the Spot Removal tool behaves exactly the same in Clone mode as it does in Heal mode. You can add as many spot circles to an image as you like, and edit or remove them at any time.
Remove blemishes in Heal mode
![]() From the Library module Grid or the Filmstrip, select the photo that you would like to work with.
From the Library module Grid or the Filmstrip, select the photo that you would like to work with.

![]() Choose View > Go to Develop or click the Develop button in the upper-right corner of the interface.
Choose View > Go to Develop or click the Develop button in the upper-right corner of the interface.
Lightroom displays the photo in the Content area of the Develop module.
![]() To access the Spot Removal tool, choose Tools > Spot Removal, or click the Spot Removal icon in the Tools panel.
To access the Spot Removal tool, choose Tools > Spot Removal, or click the Spot Removal icon in the Tools panel.
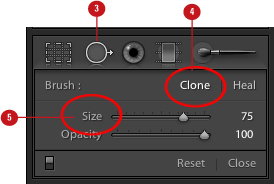
![]() Click the Heal button in the Tools panel.
Click the Heal button in the Tools panel.
![]() Size the Spot Removal tool cursor by adjusting the Spot Size slider.
Size the Spot Removal tool cursor by adjusting the Spot Size slider.
Timesaver
Press the left bracket key ([) to decrease the cursor size; press the right bracket key (]) to increase it.
![]() Use one of the following methods to remove a blemish from the image:
Use one of the following methods to remove a blemish from the image:
• Click once over the blemish to create a spot circle and allow Lightroom to autoselect a sample point.
• Click and drag outward to create the spot circle and manually select a sample point.
• To size the spot circle as you create it, hold down Cmd (Mac) or Ctrl (Win) and draw a marquee over the blemish. Lightroom autoselects the sample point.
Lightroom displays the source (thin) and destination (thick) spot circles in the image.
![]() If necessary, you can reposition the source circle by dragging it to another area of the image. As you do, Lightroom hides the destination circle so that you can preview the effect accurately.
If necessary, you can reposition the source circle by dragging it to another area of the image. As you do, Lightroom hides the destination circle so that you can preview the effect accurately.

![]() Click the Close button in the Tools panel to turn off the Spot Removal tool.
Click the Close button in the Tools panel to turn off the Spot Removal tool.
Correcting Red Eye
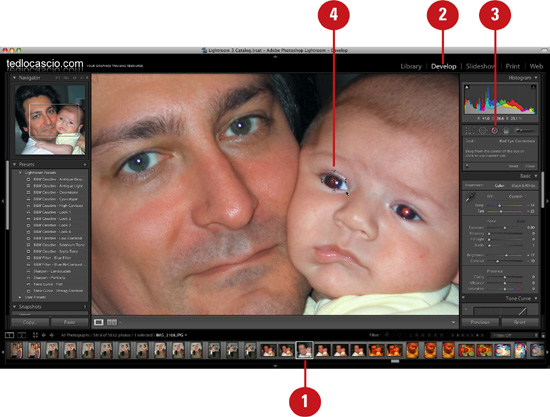
Although many digital cameras include an antired eye flash mode, it is sometimes better to rely on Lightroom’s Red Eye Correction tool to fix this common problem. It’s difficult to capture spontaneous snapshots when you have to wait for the camera to fire a couple of preflashes before actually taking the picture. Also, there is an added benefit to relying on the Red Eye Correction tool, because as it is with all adjustments in Lightroom, you can edit or remove any corrections that you make at any time.
Remove red eye with precision
![]() From the Library module Grid or the Filmstrip, select the photo that you would like to work with.
From the Library module Grid or the Filmstrip, select the photo that you would like to work with.
![]() Choose View > Go tTo Develop or click the Develop button in the upper-right corner of the interface.
Choose View > Go tTo Develop or click the Develop button in the upper-right corner of the interface.
Lightroom displays the photo in the Content area of the Develop module.
![]() To access the Red Eye Correction tool, choose Tools > Red Eye, or click the Red Eye Correction icon in the Tools panel.
To access the Red Eye Correction tool, choose Tools > Red Eye, or click the Red Eye Correction icon in the Tools panel.
![]() Drag from the center of the eye outward, or simply click the center of the eye with the tool.
Drag from the center of the eye outward, or simply click the center of the eye with the tool.
Lightroom targets the red area that needs correcting and darkens it.
![]() If necessary, adjust the pupil size in the correction circle by dragging the Pupil Size slider in the Tools panel. You can also resize the correction circle itself by clicking and dragging its edge.
If necessary, adjust the pupil size in the correction circle by dragging the Pupil Size slider in the Tools panel. You can also resize the correction circle itself by clicking and dragging its edge.

![]() Adjust the pupil darkness by dragging the Darken slider in the Tools panel.
Adjust the pupil darkness by dragging the Darken slider in the Tools panel.
![]() Click the Close button in the Tools panel to turn off the Red Eye Correction tool.
Click the Close button in the Tools panel to turn off the Red Eye Correction tool.
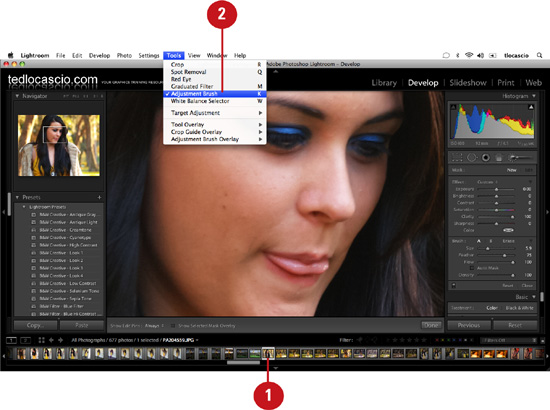
Applying Localized Adjustments with the Adjustment Brush
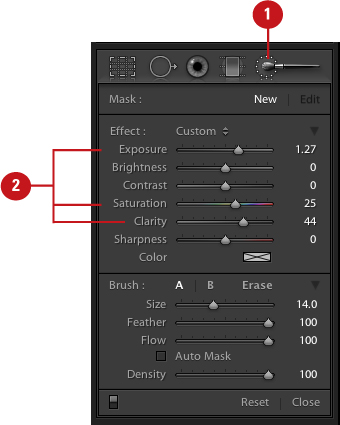
The sliders in the Basic panel enable you to apply adjustments to an entire image. However, if you’d like to apply an adjustment to a specific area of an image, you must do so using the Adjustment Brush. To apply multiple effects at once, you must drag the Effect Sliders in the Tools panel. Each brush stroke you apply is saved in a stroke set. Note that you can create as many stroke sets as you like, and you can edit them at any time.
Use the Adjustment Brush Effect Sliders
![]() From the Library module Grid or the Filmstrip, select the photo that you would like to work with.
From the Library module Grid or the Filmstrip, select the photo that you would like to work with.
![]() Choose View > Adjustment Brush.
Choose View > Adjustment Brush.
Lightroom automatically selects the Adjustment Brush in the Tools panel.
![]() Adjust the sliders for the effects that you would like to apply.
Adjust the sliders for the effects that you would like to apply.
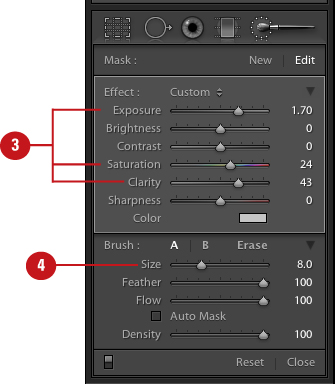
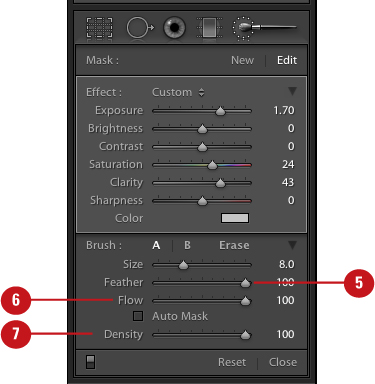
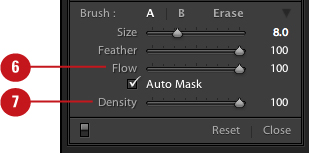
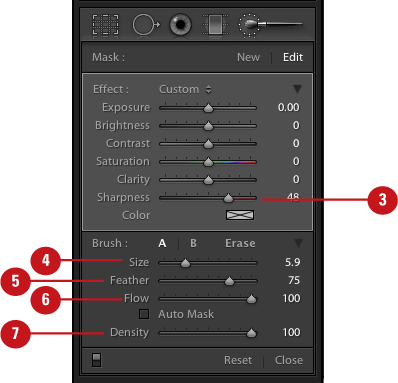
![]() Size the Adjustment Brush by adjusting the Size slider in the Tools panel.
Size the Adjustment Brush by adjusting the Size slider in the Tools panel.
Timesaver
Press the left bracket key ([) to decrease the cursor size; press the right bracket key (]) to increase it.
![]() Indicate the hardness or softness of the brush by adjusting the Feather slider in the Tools panel.
Indicate the hardness or softness of the brush by adjusting the Feather slider in the Tools panel.
Timesaver
Press Shift+left bracket key ([) to decrease the Feather amount; press Shift+right bracket key (]) to increase it.
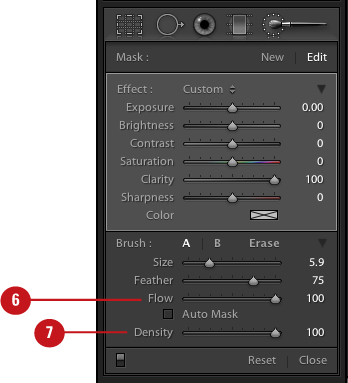
![]() Indicate the airbrush flow of the brush by adjusting the Flow slider in the Tools panel.
Indicate the airbrush flow of the brush by adjusting the Flow slider in the Tools panel.
![]() Indicate the maximum brush opacity by adjusting the Density slider in the Tools panel.
Indicate the maximum brush opacity by adjusting the Density slider in the Tools panel.
![]() Click and drag over the image area that you’d like to adjust.
Click and drag over the image area that you’d like to adjust.
Lightroom adds a reference pin marker where you first clicked.
![]() Click the Close button in the Tools panel to turn off the Adjustment Brush.
Click the Close button in the Tools panel to turn off the Adjustment Brush.
Editing Adjustment Brush Strokes
You can simultaneously edit settings for all strokes contained in a set. To do so, you must select the pin marker for the set and then adjust the individual sliders in the Tools panel. You can also adjust all the settings at once by positioning the cursor over the pin marker and holding down Option (Mac) or Alt (Win), and then dragging right to increase or left to decrease. Lightroom also enables you to add or erase strokes with the Adjustment Brush. Click and drag to add strokes; Opt+drag (Mac) or Alt+drag (Win) to erase. To erase an entire set, select the pin marker and press Delete.
Combine and apply Adjustment Brush develop settings
![]() From the Library module Grid or the Filmstrip, select a photo that contains localized adjustments made with the Adjustment Brush.
From the Library module Grid or the Filmstrip, select a photo that contains localized adjustments made with the Adjustment Brush.

![]() Choose View > Adjustment Brush.
Choose View > Adjustment Brush.
Lightroom automatically selects the Adjustment Brush in the Tools panel.
Timesaver
Press Shift+Cmd+H (Mac) or Shift+Ctrl+H (Win) to toggle tool overlay visibility on and off.
![]() Select the pin marker for the strokes you would like to edit.
Select the pin marker for the strokes you would like to edit.
![]() Adjust the slider settings for the selected group of strokes. You can also add strokes with the Adjustment Brush or erase them.
Adjust the slider settings for the selected group of strokes. You can also add strokes with the Adjustment Brush or erase them.
Timesaver
Click on the pin marker and hold down Option (Mac) or Alt (Win) and drag left or right to decrease or increase the effect.
![]() Click the Close button in the Tools panel to turn off the Adjustment Brush.
Click the Close button in the Tools panel to turn off the Adjustment Brush.
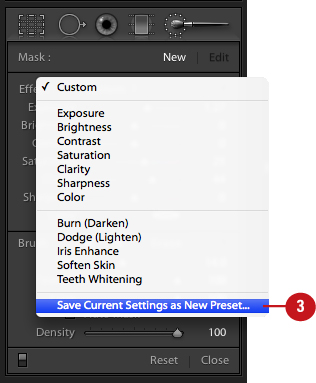
Saving Effect Settings as Presets
Lightroom enables you to save your favorite Adjustment Brush effect settings as presets. By choosing the preset from the Effect drop-down list in the Tools panel, you can instantly recall the effect combinations that you use most. Note that you can edit, update, and delete effect presets at any time.
Save Adjustment Brush settings as an effect preset
![]() In the Develop module, choose View > Adjustment Brush, or click the Adjustment Brush icon in the Tools panel.
In the Develop module, choose View > Adjustment Brush, or click the Adjustment Brush icon in the Tools panel.
![]() In the Tools panel, adjust the sliders for the effects that you would like to save as a preset.
In the Tools panel, adjust the sliders for the effects that you would like to save as a preset.
![]() Choose Save Current Settings as New Preset from the Tools panel Effect menu.
Choose Save Current Settings as New Preset from the Tools panel Effect menu.
![]() In the New Preset dialog box that appears, enter a name for the preset.
In the New Preset dialog box that appears, enter a name for the preset.

![]() Click Create.
Click Create.
Lightroom adds the preset to the Effect drop-down list.
Using Auto Mask Mode
The Auto Mask option cleverly analyzes the color and tone of the area where you first click with the Adjustment Brush. As you add strokes, it applies the effect to matching areas in the image. It also resamples continously as you paint with the tool. Overall, the Auto Mask option works very well but may require some fine-tuning around certain image edges that are similar in tone.
Mask the image as you paint with the Adjustment Brush
![]() From the Library module Grid or the Filmstrip, select a photo that contains localized adjustments made with the Adjustment Brush.
From the Library module Grid or the Filmstrip, select a photo that contains localized adjustments made with the Adjustment Brush.

![]() Choose View > Adjustment Brush.
Choose View > Adjustment Brush.
Lightroom automatically selects the Adjustment Brush in the Tools panel.
![]() Using the sliders available in the Tools panel, choose the adjustment settings that you would like to apply. In this example, it’s the Color effect.
Using the sliders available in the Tools panel, choose the adjustment settings that you would like to apply. In this example, it’s the Color effect.

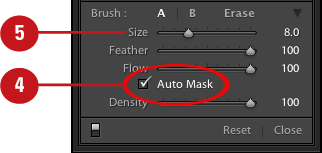
![]() Enable the Auto Mask mode option in the Tools panel.
Enable the Auto Mask mode option in the Tools panel.
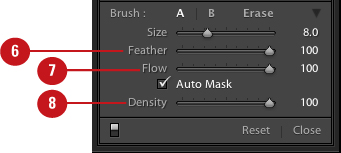
![]() Size the Adjustment Brush by adjusting the Size slider in the Tools panel.
Size the Adjustment Brush by adjusting the Size slider in the Tools panel.
Timesaver
Press the left bracket key ([) to decrease the cursor size; press the right bracket key (]) to increase it.
![]() Indicate the hardness or softness of the brush by adjusting the Feather slider in the Tools panel.
Indicate the hardness or softness of the brush by adjusting the Feather slider in the Tools panel.
Timesaver
Press Shift+left bracket key ([) to decrease the Feather amount; press Shift+right bracket key (]) to increase it.
![]() Indicate the airbrush flow of the brush by adjusting the Flow slider in the Tools panel.
Indicate the airbrush flow of the brush by adjusting the Flow slider in the Tools panel.
![]() Indicate the maximum brush opacity by adjusting the Density slider in the Tools panel.
Indicate the maximum brush opacity by adjusting the Density slider in the Tools panel.
![]() Click and drag over the image area that you’d like to adjust. In this example, it’s the snow and ice that are targeted.
Click and drag over the image area that you’d like to adjust. In this example, it’s the snow and ice that are targeted.
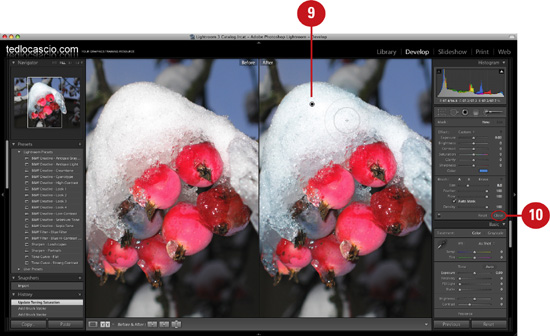
Lightroom adds a reference pin marker and analyzes the tone and color of the area where you clicked to generate the auto mask.
![]() Click the Close button in the Tools panel to turn off the Adjustment Brush.
Click the Close button in the Tools panel to turn off the Adjustment Brush.
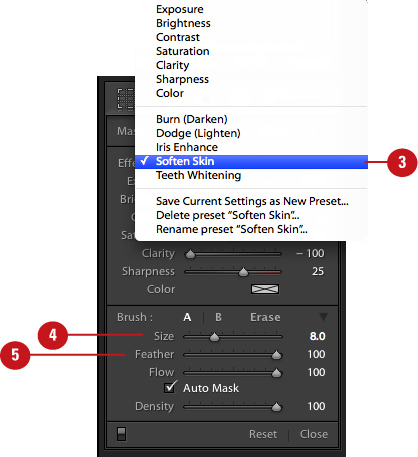
Softening Skin
Lightroom ships with a built-in skin softening preset, which combines a negative Clarity effect with a positive Sharpness adjustment. You can use this preset with the Adjustment Brush to soften specific areas of skin in a portrait image.
Use the Soften Skin effect preset
![]() From the Library module Grid or the Filmstrip, select the photo that you’d like to work with.
From the Library module Grid or the Filmstrip, select the photo that you’d like to work with.

![]() Choose View > Adjustment Brush.
Choose View > Adjustment Brush.
Lightroom automatically selects the Adjustment Brush in the Tools panel.
![]() Choose Soften Skin from the Tools panel Effect menu.
Choose Soften Skin from the Tools panel Effect menu.
![]() Size the Adjustment Brush by adjusting the Size slider in the Tools panel.
Size the Adjustment Brush by adjusting the Size slider in the Tools panel.
Timesaver
Press the left bracket key ([) to decrease the cursor size; press the right bracket key (]) to increase it.
![]() Indicate the hardness or softness of the brush by adjusting the Feather slider in the Tools panel.
Indicate the hardness or softness of the brush by adjusting the Feather slider in the Tools panel.
Timesaver
Press Shift+left bracket key ([) to decrease the Feather amount; press Shift+right bracket key (]) to increase it.
![]() Indicate the airbrush flow of the brush by adjusting the Flow slider in the Tools panel.
Indicate the airbrush flow of the brush by adjusting the Flow slider in the Tools panel.
![]() Indicate the maximum brush opacity by adjusting the Density slider in the Tools panel.
Indicate the maximum brush opacity by adjusting the Density slider in the Tools panel.
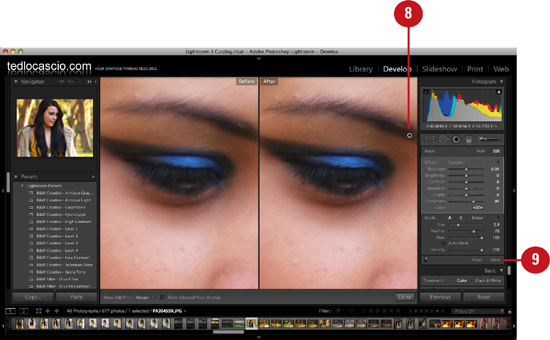
![]() Click and drag over the areas of skin that you’d like to soften.
Click and drag over the areas of skin that you’d like to soften.
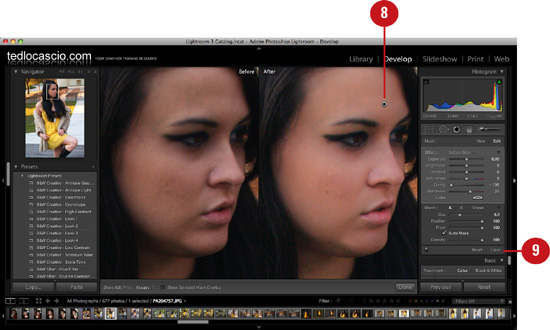
Lightroom adds a reference pin marker and applies the softening effect.
![]() Click the Close button in the Tools panel to turn off the Adjustment Brush.
Click the Close button in the Tools panel to turn off the Adjustment Brush.
Hand-Coloring a Black-and-White Image
Another creative way to work with the Adjustment Brush is to paint with the Color effect. By doing so, you can hand tint a black and white photo. Note that the photo does not have to be shot in black-and-white. In Lightroom, you can remove color from an image non-destructively, as described in Chapter 10, “Working in Black and White.” As you paint with the Adjustment Brush, you can create a new stroke set for every color you apply. Doing so allows for greater editing control.
Open your primary image selection in the Develop module
![]() From the Library module Grid or the Filmstrip, select the photo that you’d like to work with.
From the Library module Grid or the Filmstrip, select the photo that you’d like to work with.
![]() Choose View > Adjustment Brush.
Choose View > Adjustment Brush.
Lightroom automatically selects the Adjustment Brush in the Tools panel.
![]() Click the Color swatch icon in the Tools panel.
Click the Color swatch icon in the Tools panel.

![]() Select a color by clicking inside the color spectrum, or by clicking one of the color preset swatches located at the top of the Color Picker window.
Select a color by clicking inside the color spectrum, or by clicking one of the color preset swatches located at the top of the Color Picker window.
![]() If necessary, adjust the Hue value using the “scrubbie” slider.
If necessary, adjust the Hue value using the “scrubbie” slider.
![]() If necessary, adjust the Saturation level by dragging the slider provided.
If necessary, adjust the Saturation level by dragging the slider provided.
![]() Click the Close button in the upper-left corner of the Color Picker window.
Click the Close button in the upper-left corner of the Color Picker window.
![]() Enable the Auto Mask mode option in the Tools panel.
Enable the Auto Mask mode option in the Tools panel.

![]() Size the Adjustment Brush by adjusting the Size slider in the Tools panel.
Size the Adjustment Brush by adjusting the Size slider in the Tools panel.
Timesaver
Press the left bracket key ([) to decrease the cursor size; press the right bracket key (]) to increase it.
![]() Indicate the hardness or softness of the brush by adjusting the Feather slider in the Tools panel.
Indicate the hardness or softness of the brush by adjusting the Feather slider in the Tools panel.
Timesaver
Press Shift+left bracket key ([) to decrease the Feather amount; press Shift+right bracket key (]) to increase it.
![]() Indicate the airbrush flow of the brush by adjusting the Flow slider in the Tools panel.
Indicate the airbrush flow of the brush by adjusting the Flow slider in the Tools panel.
![]() Indicate the maximum brush opacity by adjusting the Density slider in the Tools panel.
Indicate the maximum brush opacity by adjusting the Density slider in the Tools panel.
![]() Click and drag over the image areas where you’d like to apply the color.
Click and drag over the image areas where you’d like to apply the color.

Lightroom adds a reference pin marker and applies the Color effect.
![]() Click the Close button in the Tools panel to turn off the Adjustment Brush.
Click the Close button in the Tools panel to turn off the Adjustment Brush.
Applying Localized Sharpening
The Sharpening sliders in the Detail panel enable you to apply sharpening to an entire image. However, in some cases, such as when working with a fashion photo or portrait image, you may want to apply extra sharpening to specific areas, such as the eyes, mouth, and hair. With the Adjustment Brush, you can boost midtone contrast by painting with increased clarity settings. For stronger results, you can paint with the Sharpness effect.
Sharpen localized image areas with the Clarity effect
![]() From the Library module Grid or the Filmstrip, select the photo that you’d like to work with.
From the Library module Grid or the Filmstrip, select the photo that you’d like to work with.
![]() Choose View > Adjustment Brush.
Choose View > Adjustment Brush.
Lightroom automatically selects the Adjustment Brush in the Tools panel.
![]() In the Tools panel, increase the amount of clarity by dragging the Clarity slider to the right.
In the Tools panel, increase the amount of clarity by dragging the Clarity slider to the right.

![]() Size the Adjustment Brush by adjusting the Size slider in the Tools panel.
Size the Adjustment Brush by adjusting the Size slider in the Tools panel.
Timesaver
Press the left bracket key ([) to decrease the cursor size; press the right bracket key (]) to increase it.
![]() Indicate the hardness or softness of the brush by adjusting the Feather slider in the Tools panel.
Indicate the hardness or softness of the brush by adjusting the Feather slider in the Tools panel.
Timesaver
Press Shift+left bracket key ([) to decrease the Feather amount; press Shift+right bracket key (]) to increase it.
![]() Indicate the airbrush flow of the brush by adjusting the Flow slider in the Tools panel.
Indicate the airbrush flow of the brush by adjusting the Flow slider in the Tools panel.
![]() Indicate the maximum brush opacity by adjusting the Density slider in the Tools panel.
Indicate the maximum brush opacity by adjusting the Density slider in the Tools panel.
![]() Click and drag over the image areas that you’d like to apply midtone contrast to, such as the mouth, eyebrows, and hair in this example photo.
Click and drag over the image areas that you’d like to apply midtone contrast to, such as the mouth, eyebrows, and hair in this example photo.

Lightroom adds a reference pin marker and applies the sharpening effect.
![]() Click the Close button in the Tools panel to turn off the Adjustment Brush.
Click the Close button in the Tools panel to turn off the Adjustment Brush.
Sharpen localized image areas with the Sharpen effect
![]() From the Library module Grid or the Filmstrip, select the photo that you’d like to work with.
From the Library module Grid or the Filmstrip, select the photo that you’d like to work with.

![]() Choose View > Adjustment Brush.
Choose View > Adjustment Brush.
Lightroom automatically selects the Adjustment Brush in the Tools panel.
![]() Increase the amount of sharpness to apply by dragging the Sharpness slider to the right.
Increase the amount of sharpness to apply by dragging the Sharpness slider to the right.
![]() Size the Adjustment Brush by adjusting the Size slider in the Tools panel.
Size the Adjustment Brush by adjusting the Size slider in the Tools panel.
Timesaver
Press the left bracket key ([) to decrease the cursor size; press the right bracket key (]) to increase it.
![]() Indicate the hardness or softness of the brush by adjusting the Feather slider in the Tools panel.
Indicate the hardness or softness of the brush by adjusting the Feather slider in the Tools panel.
Timesaver
Press Shift+left bracket key ([) to decrease the Feather amount; press Shift+right bracket key (]) to increase it.
![]() Indicate the airbrush flow of the brush by adjusting the Flow slider in the Tools panel.
Indicate the airbrush flow of the brush by adjusting the Flow slider in the Tools panel.
![]() Indicate the maximum brush opacity by adjusting the Density slider in the Tools panel.
Indicate the maximum brush opacity by adjusting the Density slider in the Tools panel.
![]() Click and drag over the image areas that you’d like to apply sharpness to, such as the eyes and hair in this example photo
Click and drag over the image areas that you’d like to apply sharpness to, such as the eyes and hair in this example photo
Lightroom adds a reference pin marker and applies the sharpening effect to the localized areas.
![]() Click the Close button in the Tools panel to turn off the Adjustment Brush.
Click the Close button in the Tools panel to turn off the Adjustment Brush.
Using the Graduated Filter Tool
With the Graduated Filter tool, you can apply adjustments that gradually fade along a linear path, from maximum strength to minimum strength. Graduated Filter effects can be used to add drama to an image, such as the landscape shown in this example.
Apply linear Graduated Filter fade adjustments
![]() From the Library module Grid or the Filmstrip, select the photo that you would like to work with.
From the Library module Grid or the Filmstrip, select the photo that you would like to work with.
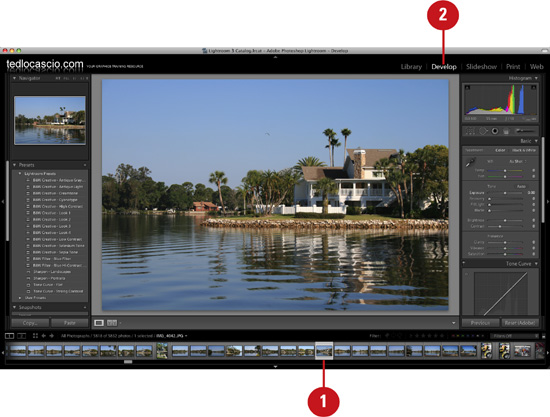
![]() Choose View > Go to Develop or click the Develop button in the upper-right corner of the interface.
Choose View > Go to Develop or click the Develop button in the upper-right corner of the interface.
Lightroom displays the photo in the Content area of the Develop module.
![]() To access the Graduated Filter tool, choose Tools > Graduated Filter, or click the Graduated Filter icon in the Tools panel.
To access the Graduated Filter tool, choose Tools > Graduated Filter, or click the Graduated Filter icon in the Tools panel.

![]() Using the controls available in the Tools panel, choose the adjustment settings that you would like to apply. In this example, it’s a negative Exposure effect.
Using the controls available in the Tools panel, choose the adjustment settings that you would like to apply. In this example, it’s a negative Exposure effect.
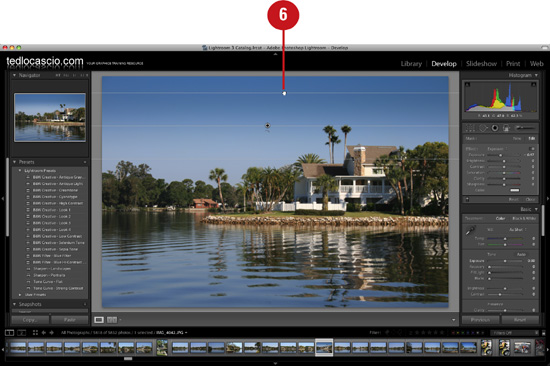
![]() Click in the photo to determine the starting point for the Graduated Filter. Hold down the mouse button and drag in the picture to define the area that will be affected. Release the mouse button at the point where you’d like the filter to stop.
Click in the photo to determine the starting point for the Graduated Filter. Hold down the mouse button and drag in the picture to define the area that will be affected. Release the mouse button at the point where you’d like the filter to stop.
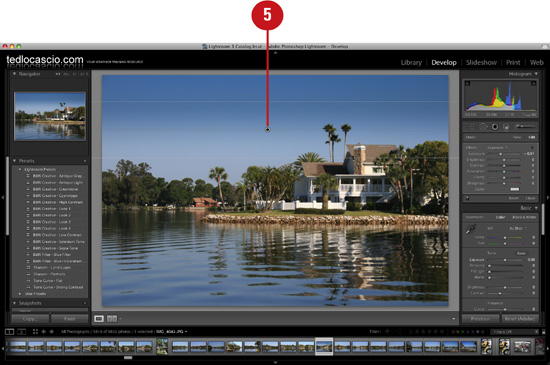
Lightroom adds a reference pin marker and displays three parallel lines, which indicate the spread of the Graduated Filter.
![]() If necessary, you can change the width of the spread by clicking and dragging any of the three parallel lines.
If necessary, you can change the width of the spread by clicking and dragging any of the three parallel lines.
![]() If necessary, you can rotate the graduated filter by hovering the cursor next to the pin marker and dragging up or down.
If necessary, you can rotate the graduated filter by hovering the cursor next to the pin marker and dragging up or down.

![]() Click the Close button in the Tools panel to turn off the Adjustment Brush.
Click the Close button in the Tools panel to turn off the Adjustment Brush.