4. Working with Metadata and Keywords
What You’ll Do
Change Metadata Panel View Modes
Edit and Save a Metadata Preset
Introduction
Every photo captured with a digital camera contains information embedded within the file. This information, referred to as “metadata,” includes specifics about the camera and the settings used to take the shot. Metadata also includes other useful information, such as capture time, file size, format, dimensions, and image resolution.
In addition to the basic metadata info embedded in the photos by your camera, you can also add information in Lightroom, such as photographer copyright and contact info, captions and titles, and scene location. Any ratings and color labels that you apply are also stored in the file’s metadata.
Keywords are descriptive tags stored in the metadata of your photos. The benefit to applying keywords is that you can later perform a filtered keyword search to locate specific images in your catalog. There’s no better way to keep your catalog organized.
In this chapter, you learn how to add custom metadata and utilize metadata presets. You also learn why you should choose to include metadata changes made to a photo in Lightroom in the internal XMP space of the file. In addition, you learn how to organize and apply your keywords by hierarchy and utilize Lightroom’s Keyword Set and Keyword Suggestions features.
Changing Metadata Panel View Modes
The Metadata panel displays all the metadata information embedded in a selected photo. Some of the view modes, such as Default or EXIF, display basic info about the photo, such as its filename and the camera settings used to take the shot. Other view modes include editable fields for adding or changing specific metadata info, such as Copyright, Title, Caption, and Location. These different view modes enable you to access the info you need without taking up a lot of room onscreen.
Choose a Metadata panel layout
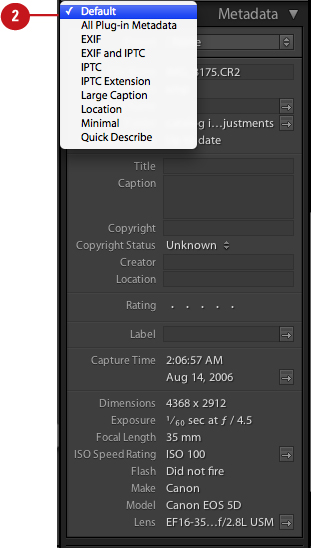
![]() Choose Window > Panels > Metadata to display the Metadata panel.
Choose Window > Panels > Metadata to display the Metadata panel.

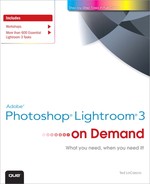
![]() Select a view mode from the Metadata panel drop-down list, (located in the upper-left corner of the panel). Options include: Default, All Plug-In Metadata, EXIF, EXIF and IPTC, IPTC, IPTC Extension, Large Caption, Location, Minimal, and Quick Describe.
Select a view mode from the Metadata panel drop-down list, (located in the upper-left corner of the panel). Options include: Default, All Plug-In Metadata, EXIF, EXIF and IPTC, IPTC, IPTC Extension, Large Caption, Location, Minimal, and Quick Describe.
The Metadata panel view changes to display the chosen view mode.
Adding Custom Metadata
The Metadata panel not only displays the information embedded in a file by the camera, it also enables you to add your own metadata by entering your information in the editable fields. The IPTC view mode contains the bulk of editable metadata fields available, whereas other view modes, such as Large Caption and Location, focus on specific image info.
Add image-specific information to a selected photo’s metadata
![]() Choose Window > Panels > Metadata to display the Metadata panel.
Choose Window > Panels > Metadata to display the Metadata panel.
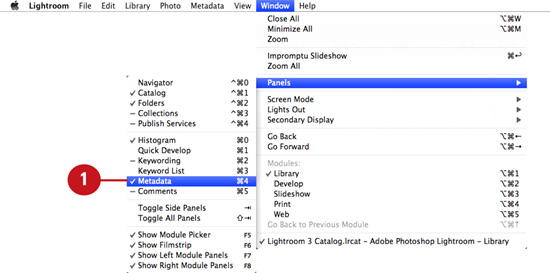
![]() Select IPTC from the Metadata panel drop-down list.
Select IPTC from the Metadata panel drop-down list.
![]() Click in any of the editable fields of the Metadata panel to enter your own image-specific information.
Click in any of the editable fields of the Metadata panel to enter your own image-specific information.
Lightroom embeds the added information in the catalog database.
Editing and Saving a Metadata Preset
Certain metadata information, such as copyright and contact info, should be applied to every image in your catalog. Rather than entering the same information repeatedly to every image, try saving it as a metadata preset. After the info is saved as a preset, you can then select the images from the Content area or the Filmstrip and apply it via the Metadata panel Preset list. Lightroom also enables you to apply a metadata preset to photos as you import them into a catalog.
Save commonly used metadata info as a preset
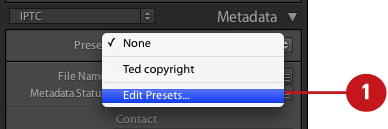
![]() Choose Edit Metadata Presets from the Metadata menu or Edit Presets from the Metadata panel Preset list.
Choose Edit Metadata Presets from the Metadata menu or Edit Presets from the Metadata panel Preset list.
![]() In the Edit Metadata Presets dialog box that appears, enter new image-specific information in the fields available.
In the Edit Metadata Presets dialog box that appears, enter new image-specific information in the fields available.

![]() Check only the boxes for the items you would like to include in the Metadata preset. In most cases, items such as Caption, Label, Rating, and Title are specific to each individual photo; therefore, you may not want to save them as part of a preset. Blank fields that are checked will also be saved as part of a preset.
Check only the boxes for the items you would like to include in the Metadata preset. In most cases, items such as Caption, Label, Rating, and Title are specific to each individual photo; therefore, you may not want to save them as part of a preset. Blank fields that are checked will also be saved as part of a preset.
Important
Always remember that all checked items saved in a metadata preset will overwrite the existing info when applying the preset to an image. If you do not want a specific field, such as Keywords, to appear blank after applying the preset, do not check the blank Keywords field in the Edit Metadata Presets dialog box.
![]() Click Done.
Click Done.
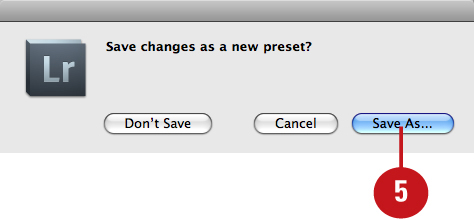
![]() In the dialog box that appears, click Save As.
In the dialog box that appears, click Save As.
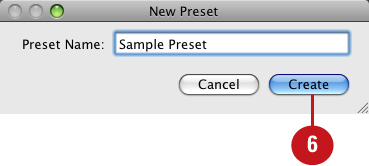
![]() In the New Preset dialog box that appears, enter a name in the field and click Create.
In the New Preset dialog box that appears, enter a name in the field and click Create.
Deleting a Metadata Preset
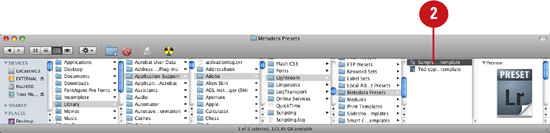
Strangely enough, there is no way to delete a metadata preset from within the Lightroom 2 application. To remove a metadata preset from the Metadata panel drop-down list, you must locate it on your system and delete it manually. After removing the metadata preset from the folder, you must restart Lightroom 2.
Remove a metadata preset from Lightroom in Mac Os X
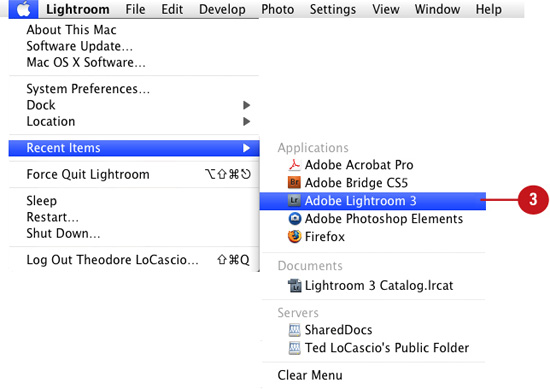
![]() Choose Lightroom > Quit Lightroom or click the Close button in the upper-left corner of the interface.
Choose Lightroom > Quit Lightroom or click the Close button in the upper-left corner of the interface.

![]() Go to Username/Library/Application Support/Adobe/Lightroom/Metadata Presets and remove or delete the .lrtemplate file.
Go to Username/Library/Application Support/Adobe/Lightroom/Metadata Presets and remove or delete the .lrtemplate file.
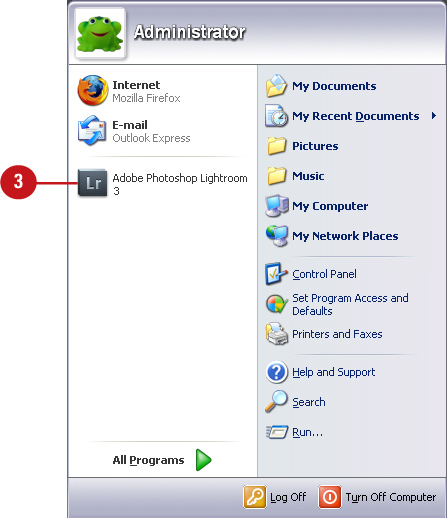
![]() Restart Lightroom 3.
Restart Lightroom 3.
Remove a metadata preset from Lightroom in Windows XP/Vista/7
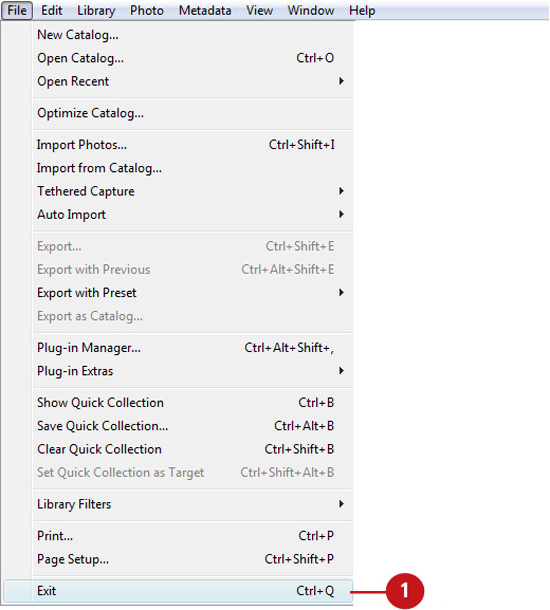
![]() Choose File > Exit or click the Close button in the upper-right corner of the interface.
Choose File > Exit or click the Close button in the upper-right corner of the interface.
![]() In Windows XP, go to Local Disk (C:)Documents and SettingsUsernameApplication DataAdobeLightroomMetadata Presets and remove or delete the .lrtemplate file.
In Windows XP, go to Local Disk (C:)Documents and SettingsUsernameApplication DataAdobeLightroomMetadata Presets and remove or delete the .lrtemplate file.
In Windows Vista or 7, go to UsersUsernameApp DataRoamingAdobeLightoomMetadata Presets and remove or delete the .lrtemplate file.

![]() Restart Lightroom 3.
Restart Lightroom 3.
Editing Metadata for Multiple Images
In addition to presets, you can also apply the same metadata information to multiple images at once by selecting them from the Library Content area (or Filmstrip) and entering new information in the editable fields of the Metadata panel. This method is not as efficient as working with presets but can still be useful for quick editing of common metadata categories.
Apply the same metadata info to multiple selected images
![]() In Grid View of the Library module, select the image thumbnails you’d like to edit.
In Grid View of the Library module, select the image thumbnails you’d like to edit.
Timesaver
Shift+click to select multiple adjacent photos; Cmd+click (Mac) or Ctrl+click (Win) to select multiple non-adjacent photos.
Note that when multiple images are selected and they contain different metadata, Lightroom displays <mixed> in the corresponding Metadata panel fields.
![]() Enter new image-specific information in the editable fields of the Metadata panel.
Enter new image-specific information in the editable fields of the Metadata panel.

Important
When the Show Metadata for Target Photo Only command is selected, the Metadata panel displays only info for the target photo.
Lightroom embeds the added information in the catalog database.
Saving Metadata to XMP
All the metadata settings applied to your images in Lightroom, such as IPTC info, keywords, ratings, color labels, flags, and even Devleop module and Quick Develop settings, are automatically stored in the master catalog (lrcat) file. However, in addition to what is stored in the catalog file, Lightroom also gives you the option to write this info to the internal XMP space for JPEG, TIFF, PSD, and DNG files, and to XMP sidecar files for proprietary raw images. Doing so ensures that all the metadata will be recognized when opening your images in other applications, such as Bridge and Camera Raw.
Enable the auto write to XMP catalog setting
![]() Under the Lightroom menu (Mac) or the Edit menu (Win), choose Catalog Settings.
Under the Lightroom menu (Mac) or the Edit menu (Win), choose Catalog Settings.

Timesaver
Press Cmd+Option+comma (Mac) or Ctrl+Alt+comma (Win) to display the Catalog Settings dialog box quickly.
![]() In the Catalog Settings dialog box that appears, click the Metadata tab.
In the Catalog Settings dialog box that appears, click the Metadata tab.

Timesaver
You can also use the left and right arrow keys to quickly toggle between tabs in any dialog box.
![]() Enable the Automatically Write Changes into XMP option.
Enable the Automatically Write Changes into XMP option.
![]() To write Lightroom Develop module and Quick Develop settings to the XMP for all JPEG, TIFF, and PSD files, enable the Include Develop Settings in Metadata inside JPEG, TIFF, and PSD files option.
To write Lightroom Develop module and Quick Develop settings to the XMP for all JPEG, TIFF, and PSD files, enable the Include Develop Settings in Metadata inside JPEG, TIFF, and PSD files option.
Important
Including Lightroom develop settings in the XMP metadata for JPEG, TIFF, and PSD files will cause them to open in Camera Raw rather than Photoshop.
![]() Close the Catalog Settings dialog box.
Close the Catalog Settings dialog box.
Synchronizing Metadata Settings
One other way to quickly apply the same metadata info to multiple images at a time is to use the Sync Metadata feature. If you have all the metadata info that you’d like to share already applied to a particular photo, then you can use this feature to synchronize specific settings to other photos in a selection.
Synchronize metadata settings to the target photo in a selection
![]() In Grid View of the Library module, select the images that you’d like to synchronize. Note that Lightroom synchronizes the metadata with the settings currently applied to the target photo.
In Grid View of the Library module, select the images that you’d like to synchronize. Note that Lightroom synchronizes the metadata with the settings currently applied to the target photo.

Timesaver
Shift+click to select multiple adjacent photos; Cmd+click (Mac) or Ctrl+click (Win) to select multiple non-adjacent photos.
![]() Choose Sync Metadata from the Metadata menu, or click the Sync Metadata button located in the lower-right corner of the Lightroom interface.
Choose Sync Metadata from the Metadata menu, or click the Sync Metadata button located in the lower-right corner of the Lightroom interface.
![]() In the Synchronize Metadata dialog box that appears, check the metadata items that you would like to synchronize with the target photo in your selection.
In the Synchronize Metadata dialog box that appears, check the metadata items that you would like to synchronize with the target photo in your selection.

![]() Click Synchronize.
Click Synchronize.
Lightroom synchronizes the specified metadata info.
Editing Capture Time
If you forgot to set the date and time correctly in your camera, then the capture time embedded in the metadata of all your photos will be incorrect. You’ll also run into this problem if your camera’s clock does not automatically reset when traveling through different time zones. Thankfully, you can edit incorrect capture time data in Lightroom using the Edit Capture Time feature.
Fix incorrect capture time
![]() In Grid View of the Library module, select any image(s) that contains incorrect capture time data.
In Grid View of the Library module, select any image(s) that contains incorrect capture time data.

Timesaver
Shift+click to select multiple adjacent photos; Cmd+click (Mac) or Ctrl+click (Win) to select multiple nonadjacent photos.
![]() Choose Edit Capture Time from the Metadata menu, or click the Edit Capture Time button located next to the Capture Time field in the Metadata panel.
Choose Edit Capture Time from the Metadata menu, or click the Edit Capture Time button located next to the Capture Time field in the Metadata panel.
![]()
Important
The Edit Capture Time button appears only when displaying the Default View mode in the Metadata panel.
![]() In the Edit Capture Time dialog box that appears, choose from one of the following options:
In the Edit Capture Time dialog box that appears, choose from one of the following options:
• Adjust to a Specified Date and Time—This option enables you to enter an entirely new date and time in the Corrected Time field.
• Shift by Set Number of Hours (Time Zone Adjust)—This option enables you to correct the capture date time zone. Select the number of hours to add or subtract from the list provided.
• Change to file’s creation date—This option automatically changes the capture date to match the file’s creation date.
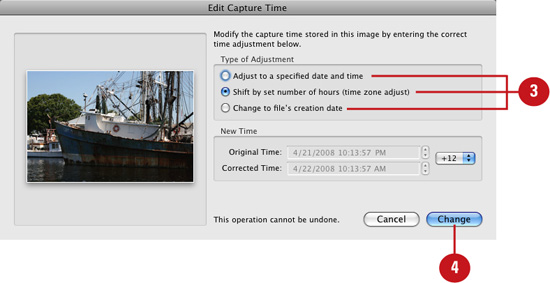
![]() Click the Change button.
Click the Change button.
Adding Keywords
The best way to keep your catalog organized is to tag your images with keywords. When you add keywords to an image, you can later perform a filtered keyword search to locate the image quickly. Keywords can be added when you import your photos into a catalog, or after you import them via the Keywording and Keyword List panels. You can also apply keywords using the Painter tool.
Adding keywords to photos with the Keywording panel
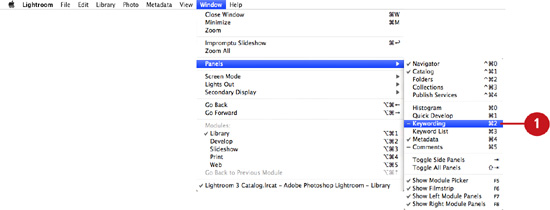
![]() Choose Window > Panels > Keywording to display the Keywording panel.
Choose Window > Panels > Keywording to display the Keywording panel.
![]() In Grid View of the Library module, select any image(s) that you’d like to apply keywords to.
In Grid View of the Library module, select any image(s) that you’d like to apply keywords to.

Timesaver
Shift+click to select multiple adjacent photos; Cmd+click (Mac) or Ctrl+click (Win) to select multiple non-adjacent photos.
![]() In the bottom field of the Keywording panel, enter the keywords you would like to tag the selected photos with. Lightroom displays any keywords already applied to the photo in the central field of the Keywording panel.
In the bottom field of the Keywording panel, enter the keywords you would like to tag the selected photos with. Lightroom displays any keywords already applied to the photo in the central field of the Keywording panel.

Important
The keywords that you type into the Keywording panel are not added to the selected photos until you press Return (Mac) or Enter (Win).
Lightroom adds the keywords to the selected photos.
Adding keywords to the Keyword List panel
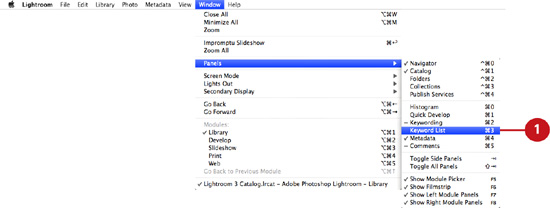
![]() Choose Window > Panels > Keyword List to display the Keyword List panel.
Choose Window > Panels > Keyword List to display the Keyword List panel.

![]() In the upper-left corner of the Keyword List Panel, click the Create New Keyword Tag (+) button.
In the upper-left corner of the Keyword List Panel, click the Create New Keyword Tag (+) button.

![]() In the Create Keyword Tag dialog box that appears, enter the keywords you would like to add into the Keyword Tag field, separated by commas.
In the Create Keyword Tag dialog box that appears, enter the keywords you would like to add into the Keyword Tag field, separated by commas.
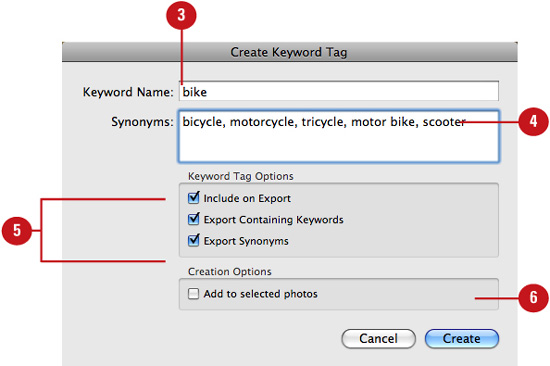
![]() Enter related words in the Synonyms field. Doing so allows you to search for a keyword by association. Adding synonyms instead of adding multiple related keywords prevents you from cluttering up the keyword list.
Enter related words in the Synonyms field. Doing so allows you to search for a keyword by association. Adding synonyms instead of adding multiple related keywords prevents you from cluttering up the keyword list.
![]() Choose from the following options:
Choose from the following options:
• Include on Export—Enabling this option includes the keyword when exporting any photos that are tagged with it.
• Export Containing Keywords—If the keyword is part of a hierarchy, enabling this option includes all higher-level keyword tags when exporting any photos tagged with it.
• Export Synonyms—Enabling this option includes synonyms when exporting any photos tagged with the keyword.
• Add to Selected Photos—Enabling this option applies the keyword to the photo(s) you currently have selected in the Content area or Filmstrip.
![]() Click the Create button.
Click the Create button.
Adding keywords by dragging
![]() Choose Window > Panels > Keyword List to display the Keyword List panel.
Choose Window > Panels > Keyword List to display the Keyword List panel.

![]() In Grid View of the Library module, select any image(s) that you’d like to apply keywords to.
In Grid View of the Library module, select any image(s) that you’d like to apply keywords to.

Timesaver
Shift+click to select multiple adjacent photos; Cmd+click (Mac) or Ctrl+click (Win) to select multiple non-adjacent photos.
![]() Drag the selected thumbnail(s) over the keyword in the Keyword List panel, or drag the keyword over the selected photo(s) in the Content area.
Drag the selected thumbnail(s) over the keyword in the Keyword List panel, or drag the keyword over the selected photo(s) in the Content area.

Lightroom adds the keyword to the selected photos.
Adding keywords to photos using the Painter tool
![]() If it’s not already visible, choose Show Toolbar from the View menu.
If it’s not already visible, choose Show Toolbar from the View menu.

![]() To display the Painter tool icon in the Library toolbar, choose Painter from the Library Toolbar drop-down list.
To display the Painter tool icon in the Library toolbar, choose Painter from the Library Toolbar drop-down list.

![]() Click the Painter tool icon in the Library toolbar.
Click the Painter tool icon in the Library toolbar.
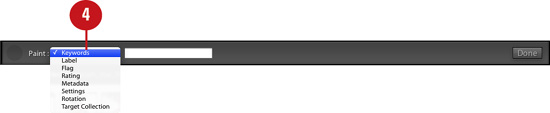
![]() Choose Keywords from the Paint drop-down list.
Choose Keywords from the Paint drop-down list.
![]() Enter the keywords you would like to apply in the Library Toolbar field.
Enter the keywords you would like to apply in the Library Toolbar field.
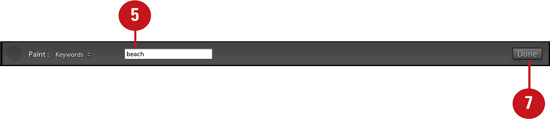
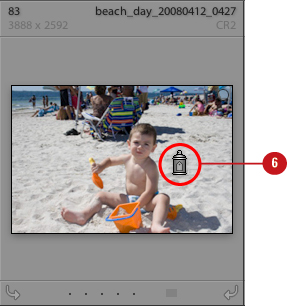
![]() Click directly on the thumbnail of the image(s) you would like to tag (not the surrounding cell areas). Note that you do not have to select the image(s) prior to painting with the Painter tool.
Click directly on the thumbnail of the image(s) you would like to tag (not the surrounding cell areas). Note that you do not have to select the image(s) prior to painting with the Painter tool.
![]() When you finish applying keywords with the Painter tool, click the Done button in the Library Toolbar.
When you finish applying keywords with the Painter tool, click the Done button in the Library Toolbar.
Adding keywords to photos as you import them
![]() Plug your camera or card reader into your computer. Make sure the memory card is inserted and the device is turned on.
Plug your camera or card reader into your computer. Make sure the memory card is inserted and the device is turned on.
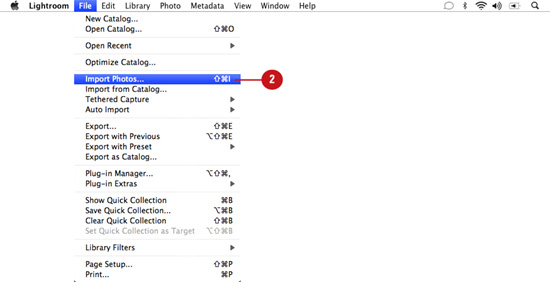
![]() Under the File menu, choose Import Photos or click the Import button in the lower-left corner of the Library module interface.
Under the File menu, choose Import Photos or click the Import button in the lower-left corner of the Library module interface.
![]() Choose the necessary import options from the import dialog box that appears.
Choose the necessary import options from the import dialog box that appears.

![]() In the Apply During Import panel of the import dialog box, enter keywords in the Keywords field. Separate each keyword with a comma.
In the Apply During Import panel of the import dialog box, enter keywords in the Keywords field. Separate each keyword with a comma.
![]() Click the Import button.
Click the Import button.
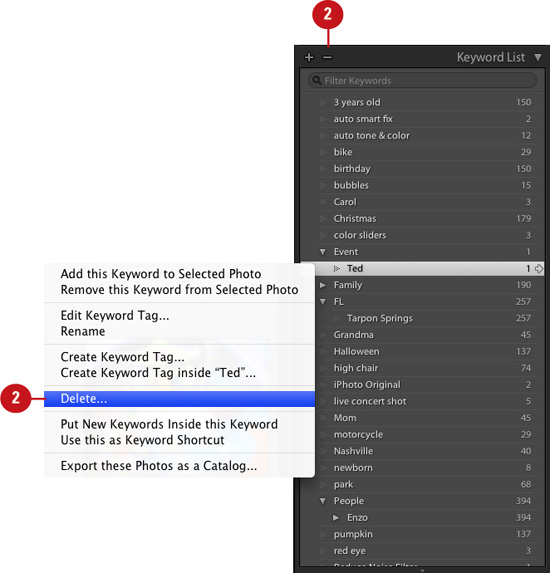
Removing Keywords
Removing keywords in Lightroom is just as easy as applying them. All you need to do is select the keyword from the Keyword List panel and click the Delete Selected Keyword Tag button, or right-click any keyword and choose Delete from the contextual menu. Doing so removes the keyword from the catalog database and from any photos it was applied to. If you want to remove a keyword from a photo, but not from the Keyword List panel, then you need to Control-click (Mac) or right-click (Win) and choose Remove this Keyword from Selected Photo from the contextual menu.
Removing keywords from photos
![]() Choose Window > Panels > Keyword List to display the Keyword List panel.
Choose Window > Panels > Keyword List to display the Keyword List panel.

![]() In Grid View of the Library module, select any image thumbnail (or multiple image thumbnails) that you’d like to remove keywords from.
In Grid View of the Library module, select any image thumbnail (or multiple image thumbnails) that you’d like to remove keywords from.
Timesaver
Shift+click to select multiple adjacent photos; Cmd+click (Mac) or Ctrl+click (Win) to select multiple non-adjacent photos.
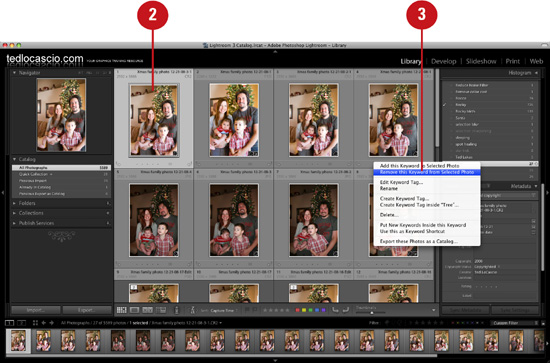
![]() Right-click (Win) or Control+click (Mac) on the keyword in the Keyword list panel, and choose Remove This Keyword from Selected Photo from the contextual menu.
Right-click (Win) or Control+click (Mac) on the keyword in the Keyword list panel, and choose Remove This Keyword from Selected Photo from the contextual menu.
Lightroom removes the keyword from the selected photo(s).
Important
If the Automatically Write Changes into XMP option (in Catalog Settings) is not enabled when you remove a keyword, then the image’s XMP metadata will need to be updated. To view unsaved metadata warnings in grid cells, enable the Unsaved Metadata preference in View Options. To update a photo’s metadata, click the unsaved metadata cell icon or choose Metadata > Save Metadata to Files.
Removing keywords from the Keyword List panel
![]() Choose Window > Panels > Keyword List to display the Keyword List panel.
Choose Window > Panels > Keyword List to display the Keyword List panel.
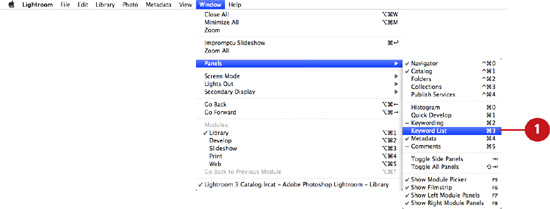
![]() Select a keyword and click the Delete selected keyword tag (–) button in the Keyword List panel, or right-click (Win) or Control+click (Mac) on the keyword in the Keyword list panel and choose Delete from the contextual menu.
Select a keyword and click the Delete selected keyword tag (–) button in the Keyword List panel, or right-click (Win) or Control+click (Mac) on the keyword in the Keyword list panel and choose Delete from the contextual menu.
Lightroom removes the keyword from the catalog database and from any photos tagged with it.
Important
If the Automatically Write Changes into XMP catalog setting is not enabled when you remove a keyword from a photo, then the image’s XMP metadata will need to be updated. To view unsaved metadata warnings in grid cells, enable the Unsaved Metadata preference in View Options. To update a photo’s metadata, click the unsaved metadata cell icon or choose Metadata > Save Metadata to Files.
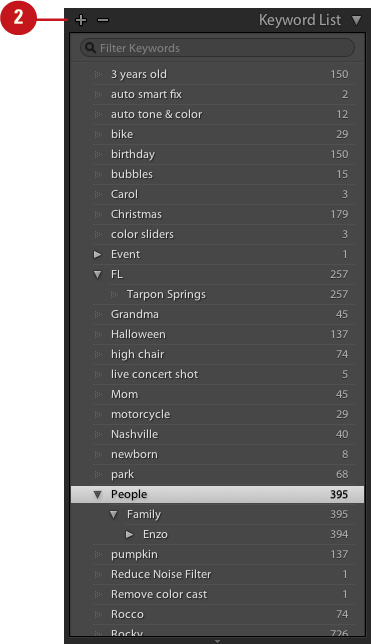
Creating a Keyword Hierarchy
The best way to organize your ever-expanding keyword list is to create keyword hierarchies. The Keyword List panel enables you to store groups of related keywords inside larger keyword categories. For example, the keywords “Craig Park” can be stored inside of “Tarpon Springs,” which can be stored inside “Florida.” One way to create a hierarchy with your existing keywords is to select one from the Keyword List panel and drag it over another keyword in the list. You can also create a hierarchy when adding keywords with the Keywording panel or the Create Keyword Tag dialog box.
Create a keyword hierarchy with the Keywording panel
![]() Choose Window > Panels > Keywording to display the Keywording panel.
Choose Window > Panels > Keywording to display the Keywording panel.

![]() In the Keywording panel, enter the keyword hierarchy you would like to add. To create a keyword hierarchy, include a greater-than (>) character between keywords.
In the Keywording panel, enter the keyword hierarchy you would like to add. To create a keyword hierarchy, include a greater-than (>) character between keywords.
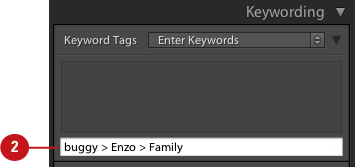
Lightroom adds the keyword hierarchy to the Keyword List panel and to any photos you have selected in the Content area or Filmstrip.
Create a keyword hierarchy from the Keyword List panel
![]() Choose Window > Panels > Keyword List to display the Keyword List panel.
Choose Window > Panels > Keyword List to display the Keyword List panel.

![]() Select a keyword from the Keyword List panel and click the Create New Keyword Tag (+) button.
Select a keyword from the Keyword List panel and click the Create New Keyword Tag (+) button.
![]() In the Create Keyword Tag dialog box that appears, enter the keyword you would like to add into the Keyword Tag field.
In the Create Keyword Tag dialog box that appears, enter the keyword you would like to add into the Keyword Tag field.

![]() Enable the Put Inside “selected keyword” option.
Enable the Put Inside “selected keyword” option.
![]() Click the Create button.
Click the Create button.
Lightroom adds the keyword hierarchy to the Keyword List panel.
Exporting and Importing Keywords
If you’ve created the perfect keyword hierarchy system and would like to share it with your co-workers, you can export the keywords as a tab-delimited text file. The other members of your team can then import the text file into their own Lightroom database and use the same keywording system that you do.
Export keywords as a tab-delimited text file
![]() Choose Export Keywords from the Metadata menu.
Choose Export Keywords from the Metadata menu.

![]() In the Export Keywords dialog box that appears, choose where you would like to save the tab-delimited text file on your system.
In the Export Keywords dialog box that appears, choose where you would like to save the tab-delimited text file on your system.
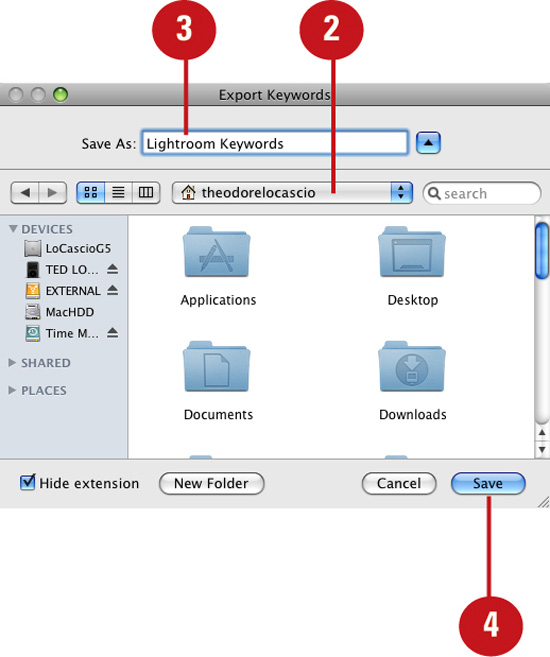
![]() Enter a name for the text file in the Save As field of the Export Keywords dialog box. The default name is Lightroom Keywords.
Enter a name for the text file in the Save As field of the Export Keywords dialog box. The default name is Lightroom Keywords.
![]() Click Save.
Click Save.
Lightroom generates the tab-delimited text file.
Import keywords from a tab-delimited text file
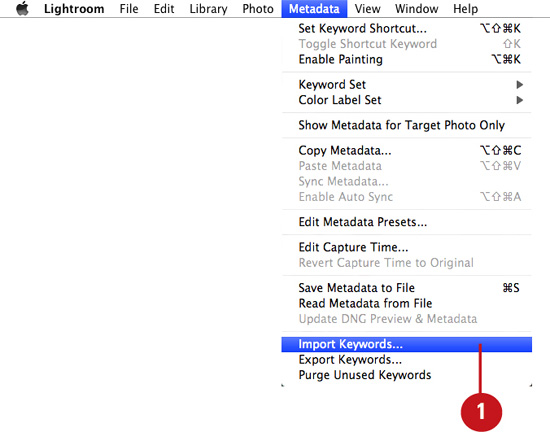
![]() Choose Import Keywords from the Metadata menu.
Choose Import Keywords from the Metadata menu.
![]() In the Import Keywords dialog box that appears, select the tab-delimited text file on your system.
In the Import Keywords dialog box that appears, select the tab-delimited text file on your system.
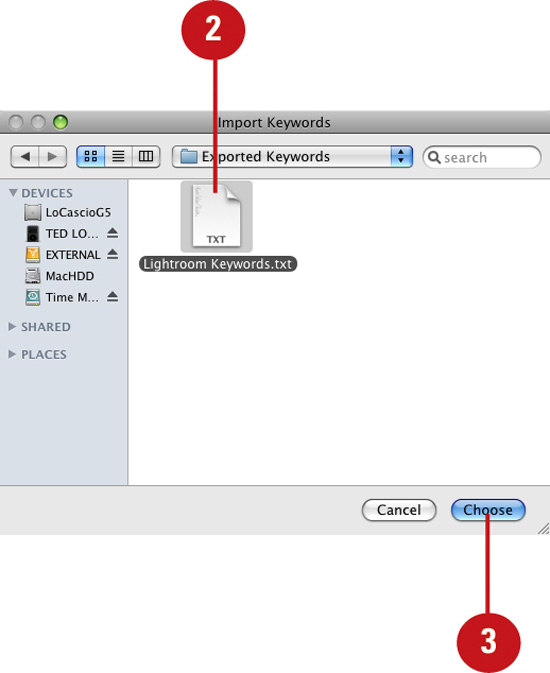
![]() Click Choose.
Click Choose.
Lightroom imports the keywords from the tab-delimited text file.
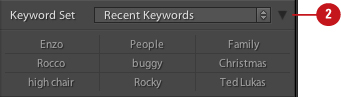
Utilizing Keyword Sets
At the bottom of the Keywording panel is a special section for keyword sets. This area of the panel gives you quick access to a group of keywords. The default set displayed is the Recent Keywords set, which includes the last nine keywords you applied. Lightroom 3 also ships with three other useful built-in keyword sets: Outdoor Photography, Portrait Photography, and Wedding Photography.
Applying keywords with Keyword Sets
![]() Choose Window > Panels > Keywording to display the Keywording panel.
Choose Window > Panels > Keywording to display the Keywording panel.
![]() Click the disclosure triangle to reveal the Keyword Set portion of the Keywording panel.
Click the disclosure triangle to reveal the Keyword Set portion of the Keywording panel.

![]() Choose a Keyword Set from the drop-down list provided (the default set is Recent Keywords).
Choose a Keyword Set from the drop-down list provided (the default set is Recent Keywords).
Lightroom displays a maximum of nine keywords in the Keyword Set portion of the Keywording panel.
![]() In Grid View of the Library module, select any image(s) that you’d like to apply keywords to.
In Grid View of the Library module, select any image(s) that you’d like to apply keywords to.
Timesaver
Shift+click to select multiple adjacent photos; Cmd+click (Mac) or Ctrl+click (Win) to select multiple non-adjacent photos.
![]() Click any keyword in the Keyword Set to apply it to the selected photos.
Click any keyword in the Keyword Set to apply it to the selected photos.
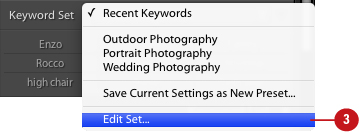
Creating a Keyword Set
Lightroom enables you to edit and save groups of commonly used keywords into keyword sets. By saving your most frequently applied keywords into custom sets, you can access them quickly via the Keyword Set portion of the Keywording panel. Because it gives you quick access to multiple keywords at a time, this feature provides a nice alternative to working with the keywords filter available in the Keyword List panel.
Save commonly used keywords as a Keyword Set
![]() Choose Window > Panels > Keywording to display the Keywording panel.
Choose Window > Panels > Keywording to display the Keywording panel.

![]() Click the disclosure triangle to reveal the Keyword Set portion of the Keywording panel.
Click the disclosure triangle to reveal the Keyword Set portion of the Keywording panel.
![]() Choose Edit Set from the Keyword Set drop-down list.
Choose Edit Set from the Keyword Set drop-down list.
![]() In the Edit Keyword Set dialog box that appears, use the fields provided to enter the keywords you would like to save. Lightroom allows for a minimum of one and a maximum of nine in a set.
In the Edit Keyword Set dialog box that appears, use the fields provided to enter the keywords you would like to save. Lightroom allows for a minimum of one and a maximum of nine in a set.

![]() Choose Save Current Settings as New Preset from the Preset drop-down list.
Choose Save Current Settings as New Preset from the Preset drop-down list.
![]() In the New Preset dialog box that appears, enter a name in the Preset Name field.
In the New Preset dialog box that appears, enter a name in the Preset Name field.
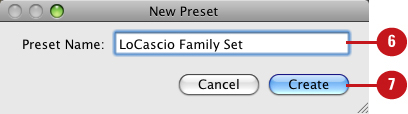
![]() Click Create.
Click Create.
![]() Click Change in the Edit Keyword Set dialog box.
Click Change in the Edit Keyword Set dialog box.
Using Keyword Suggestions
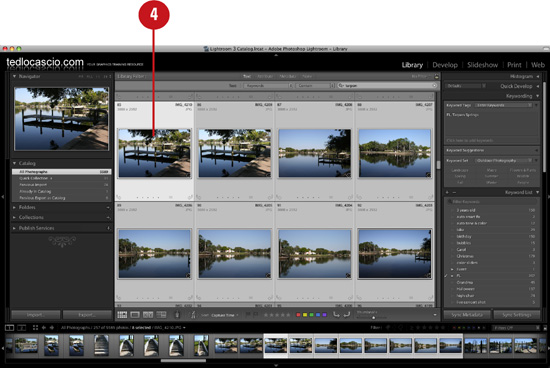
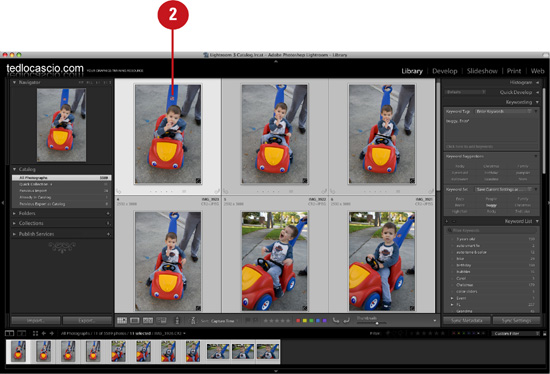
The Keyword Suggestions feature is a new addition to Lightroom 3. This feature compares the keywords currently applied to the selected photo(s) with those applied to photos taken around the same capture time. Using this logic system, Lightroom can suggest additional related keywords for you to work with.
Apply related keywords
![]() Choose Window > Panels > Keywording to display the Keywording panel.
Choose Window > Panels > Keywording to display the Keywording panel.

![]() In Grid View of the Library module, select any image(s) that you’d like to apply keywords to.
In Grid View of the Library module, select any image(s) that you’d like to apply keywords to.
Timesaver
Shift+click to select multiple adjacent photos; Cmd+click (Mac) or Ctrl+click (Win) to select multiple non-adjacent photos.
![]() Click the disclosure triangle to reveal the Keyword Suggestions portion of the Keywording panel.
Click the disclosure triangle to reveal the Keyword Suggestions portion of the Keywording panel.
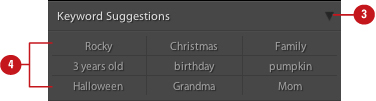
Lightroom displays a maximum of nine related keywords in the Keyword Suggestions portion of the Keywording panel.
![]() Click any keyword in the Keyword Suggestions portion of the Keywording panel to apply it to the selected photos.
Click any keyword in the Keyword Suggestions portion of the Keywording panel to apply it to the selected photos.
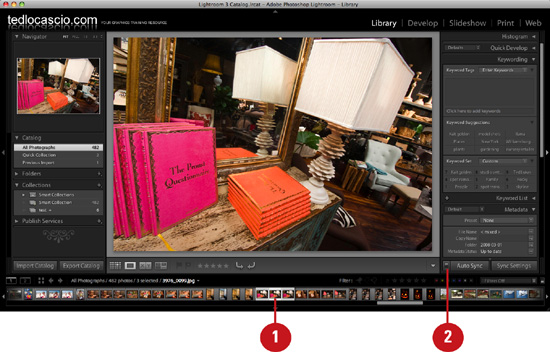
Applying Keywords and Metadata with Auto Sync
The Auto Sync feature enables you to apply the same keywords and metadata to multiple selected images at once. With Auto Sync enabled, keywords and metadata are applied to the selected images simultaneously as you enter them in the Keywords and Metadata panels. When working in Loupe, Compare, or Survey view, you can enable the Auto Sync feature by clicking the Auto Sync toggle button.
Apply keywords and metadata to multiple images at once
![]() In Grid View of the Library module or the Filmstrip, select the images that you would like to apply the same keywords and/or metadata to.
In Grid View of the Library module or the Filmstrip, select the images that you would like to apply the same keywords and/or metadata to.
Timesaver
Shift+click to select multiple adjacent photos; Cmd+click (Mac) or Ctrl+click (Win) to select multiple non-adjacent photos.
![]() Choose Metadata > Enable Auto Sync. If the primary selected photo is currently displayed in Loupe view, you can also click the Auto Sync toggle button.
Choose Metadata > Enable Auto Sync. If the primary selected photo is currently displayed in Loupe view, you can also click the Auto Sync toggle button.
Timesaver
Press Option+Shift+Cmd+A (Mac) or Alt+Shift+Ctrl+A (Win) to apply the Enable Auto Sync command.
![]() As described earlier in this chapter, proceed to add keywords and/or metadata to the images using the controls available in the Keywording and Metadata panels.
As described earlier in this chapter, proceed to add keywords and/or metadata to the images using the controls available in the Keywording and Metadata panels.

Important
Lightroom displays a warning dialog box when auto syncing metadata. Click Apply to Selected to proceed.
The keywords and metadata are applied to all the selected images simultaneously.