
Go Completely Digital with Your Music
Grow Your Media Collection with Digital Downloads
Play the Critic and Rate the Music
Transform Your Computer into a Karaoke Machine
Create Soundtracks to Your Life
Become a DJ Sensation Overnight
Now that you’re familiar with Windows Media Player’s interface, have customized its look and feel to fit your every mood, and know how to play CDs and stream radio stations, it’s time to start building your collection of digital media or organizing digital content already stored on your computer. No matter how big or small your media collection is (or has the potential to become), once your music is organized and you know what you have and how to access it quickly, you can be the record producer, critic, or DJ you’ve always wanted to be. With Windows Media Player, a little pizzazz, and a few pieces of equipment, you can be the next overnight sensation!

Your first source of music will probably be your own CD collection. So to begin, I’ll show you how to add songs from your CDs to Media Library. You’ll probably want to download a few titles too, since that is at the heart of creating a personal and diverse music library (and of course, the latest thing). I’ll show you how to purchase a premium service from MusicNow, which allows you to download music right from Media Player. With its free, seven-day trial offer that permits unlimited downloads, MusicNow is a great way to get your feet wet.
Once you start building your media collection, you’ll need to organize your music and videos so that you can find what you need, when you need it. Media Library contains very powerful features that allow you to sort the media by genre, artist, album, and more. It can even automatically download information that’s missing in your music database like lyrics, song length, and similar media info. Once you’re organized, I’ll show you how to personalize your media files by appending them with information you obtain and ratings you create.
Finally, I’ll show you how to let that record producer inside of you express him or herself by creating custom playlists made of songs culled from your vast media collection. You’ll learn how to create playlists that fit any occasion; your only limitations will be your imagination and perhaps your Internet connection speed. If you still haven’t purchased Microsoft Plus! Digital Media Edition, get it now so that you can use those playlists during your next party. Let the Plus! Party Mode DJ do all the work of playing and managing the music, leaving you free for schmoozing with your guests.
If you have a large enough hard disk, you can copy literally thousands of songs and videos and become the envy of all of your music-loving friends. You can use the songs you’ve saved to Windows Media Player’s database, Media Library, to create personal playlists, auto playlists, and even turn your computer into a virtual jukebox or karaoke machine. Before you can do any of that, you have to add data to Media Library.
When you first open Media Library, it offers to search your system for any and all media files that are currently on the computer and add them to the database automatically. It’s the easiest way to add songs to the library. If you skipped that option earlier, it’s not too late to try it now. Just follow these steps:
Click Tools and click Search For Media Files.
Tell Media Player where to look for the media and how to update the information as it is acquired. (If you are not sure where your media is stored or where it has been downloaded, choose All Drives.)
Click Advanced and choose to add volume leveling values (see the "Auto Volume Leveling" section later in this chapter) if desired, then click Search. Figure 4-1 shows a file search in progress.

The media files that are found will be added to Media Library, along with any data that is attached to them, such as artist, genre, length, and so on. Now that the files on your computer are in the Media Library database, you can access them quickly and easily.
To add music from a CD to Media Player, you’ll have to copy the songs to your hard disk first. Here’s how:
Insert a CD into the CD-ROM drive.
Click Copy From CD on the Media Player taskbar.
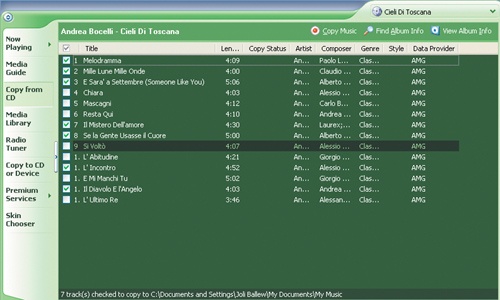
Select the songs to copy to the hard disk and add to Media Library by placing and removing check marks in the song list, as shown in Figure 4-2.
Click Copy Music.
The first time you use this feature, you’ll be asked a few questions regarding how you’d like the content to be copied. In the Copy Options dialog box, select a licensing option to copy protect the content you are adding to Media Library. Adding copy protection to your music enables the music copied from the CD to be played on your computer and compatible devices, and provides legal protection from licensing infringement. If you choose not to copy protect the music, the music copied from the CD can be played on any computer or device.
Note
For more information about copyrights, licensing, and copyright infringement, visit http://www.microsoft.com/windowsxp/windowsmediaplayer/getstarted/copy.asp. There will also be more information about this later in the chapter.
Place a check mark in the box next to I Understand That Music Copied From CDs Is Protected By Law, Including US And International Copyright Laws, And That I Am Solely Responsible For The Appropriate Use Of The Content That I Have Copied. Click Next.
You’ll be prompted to choose a media audio format for copying the audio CD. For now, choose Keep My Current Format Settings. (You’ll learn about other media formats in Chapter 6. For now, let’s focus on getting data into the Music Library.) Click Next.
You can watch the progress of the music being copied in the Copy From CD window. As tracks are successfully copied, the Copy Status will show Copying (%) and then Copied To Library. The music is copied to the My Music folder by default, and information about the music appears in Media Library.
If you have music on your computer that hasn’t been added to the Media Library database, you can add it easily. You can also add tracks and playlists to the library as music plays. So if you are ever listening to a song and decide you like it, you can add it with only a few clicks of the mouse. Here’s how:
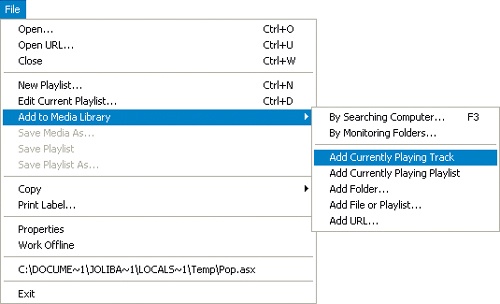
On the File menu, point to Add To Media Library, and then click Add Folder, Add File Or Playlist, Add URL, Add Currently Playing Track, or Add Currently Playing Playlist. These choices are shown in Figure 4-3.
Depending on the choice, either browse to the location of the item to add or type the URL. If you’re adding a currently playing track or playlist, you won’t need to do anything.
By default, Windows Media Player monitors the My Music folder on the root drive of the system, looking for new, deleted, renamed, or moved digital media files. Most computers these days come with large hard disks though, and large hard disks are often partitioned into two or more sections. If you store your digital media on a second or third partition (say, D: or E: instead of C:), those folders probably aren’t being monitored. If you store media on an additional hard disk or similar media, you’ll encounter the same problem. You can tell Windows Media Player which folders you want automatically monitored, and you can add folders from additional hard disks or partitions.
In addition to monitoring files on your hard disk, you can configure Media Player to add music files to Media Library automatically as they are played (not including CDs) and to automatically add any media that you purchase from the Internet.
Figure 4-4 shows the Media Library tab in the Options dialog box. (Click Tools, then click Options.) Here, you can change which folders to monitor, choose to automatically add purchased music to the library, and configure the way new media information will be applied to existing media files.

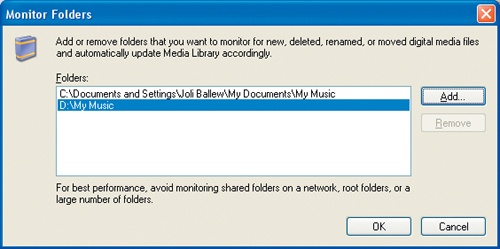
To change which folders are automatically monitored, click Monitor Folders, click Add in the Monitor Folders dialog box, and then browse to the location of the folder, partition, or additional hard disk. The new location will be added and will be automatically monitored. See Figure 4-5. It is best to choose only folders, not an entire drive. Monitoring an entire drive, shared folders on a network, or multiple folders can slow down the system.
On the Media Library tab you can also select or clear the following options:
Automatically Add Purchased Music To My Library
Delete Item From Your Computer When Deleted From Media Library
Update My Music Files (WMA And MP3 Files) By Retrieving Missing Media Information
Overwrite Existing Information
Find Media Information For Music Copied With Another Program
Rename And Rearrange Music Using Media Information
These options allow you to further personalize Media Player by configuring how you want updates to monitored folders to be applied. I leave the defaults as they are, except that I select the option to automatically add purchased music to the library and to rename and rearrange music using media information. As you become familiar with the process, you can decide which preferences work best for you.
Finally, you can add music files to Media Library while they are playing by clicking the Player tab of the Options dialog box and selecting Add Music Files To Media Library When Played.
Downloading music from the Internet one song at a time (or a group of songs at a time) is an excellent way to customize and complete your music library. You can create your own CDs with your favorite songs from any number of albums, and you can organize those CDs by artist, by genre, by the time of day they can best be enjoyed, or even by mood. You can create CDs for driving, dating, dancing, working out, biking, or any other number of things. But remember, you shouldn’t redistribute or share the content unless you have the necessary permission to do so!
As you’ve probably heard, there are several not-so-honest ways to download music from the Internet, and I don’t plan to tell you about those ways here. I’m a strong believer in copyrights, and downloading music illegally is stealing. It’s as simple as that. In addition, sites that encourage this illegal activity tend to cover you with spyware, and your privacy, as well as the performance of your computer, will suffer for it. So, instead of going that route, let’s talk about how to legally download music for free (for seven days), and you can decide where to go from there. Follow these steps:
In Windows Media Player, click the Premium Services button on the taskbar.
Click the MusicNow icon.
Fill in the required information for each page to start your free seven-day trial.
Download the required software as prompted from the Web site. Save the download to your computer, making a note of the location of the saved file.
After the download is complete, locate the downloaded file and run the software’s installation program. Be careful to follow the directions, including closing all open programs before installing. When prompted, choose to add an icon to the Quick Launch area of the Windows taskbar.
What songs do you need to complete your music library? Do you want to download several to create a collection for a CD? Are you looking for the perfect song to use for the background in that wedding video you are going to create a month from now? Maybe you want to make a CD for that long drive back to campus or simply listen to a specific song on your computer. Whatever you want to do or create, make a list of the songs you want, and let’s set off to find and download them. Just follow these steps:
Double-click the MusicNow icon in the Quick Launch area of the Media Player taskbar.
Notice that there are three tabs (shown in Figure 4-6): Home, Channels, and Artists.
On the Home tab, scroll through the various channels and click Add if you want to add any of them to your Favorites list. Click the name of the channel to get information about that channel. (You aren’t adding songs here; you are simply creating a Favorites list.)
On the Channels tab, browse through even more channels. As with the Home tab, you can add any channel to your Favorites list; click its title to see more about the channel and what it offers.
On the Artists tab, select a music genre or search for music by artist.
Use the Type Search Here box to search for a song by artist, track, or album.
Whatever method you choose, you’ll eventually come across a song you want to download or listen to. Click the disc icon located to the left of the song’s title. You’ll see the Play, Add, and Buy icons, as shown in Figure 4-7. Now make the appropriate choice.

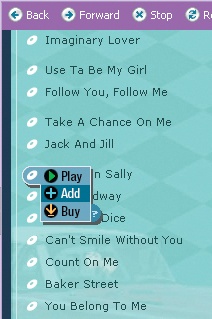
You’ll have to decide what to do with a song after you’ve located it. You’ll usually have three choices—Play, Add, or Buy—but not always. MusicNow adds tracks as it has rights and permissions to; therefore, not all tracks can be played, added, and purchased. Here’s how to decide what to choose, and what happens when you choose it:
If you choose Play, the song will begin playing after the connection has been made. A temporary download of the file is saved to your hard disk.
If you choose Add, the song will be downloaded automatically and added to the My Music folder on your hard disk, where you can listen to it from your computer even when you aren’t connected to the Internet. The song will also appear in Media Library. You can play the tracks as long as you remain a subscriber to MusicNow.
If you choose Buy, you’ll be instructed on how to purchase the music so that it can be burned to a CD, transferred to a portable device, or transferred to another computer. You will not be able to burn the tracks to create an audio CD unless you purchase the tracks. You can create a data CD that can be transferred to another Windows XP computer you own if you download the MusicNow software and transfer the licenses as required. To do so, you’ll have to log in to MusicNow from the new computer and fill out the required information.
When you choose Play, Add, or Buy, the selected track is automatically downloaded and added to your music collection, and the MusicNow Transfer Details window appears. It might be minimized, so you might have to open it from the Windows taskbar. The Transfer Details window shows what songs have been chosen for download, how much of the current song has been transferred, what songs are pending, and any errors that might have occurred during transmission. The downloads can take a while if you have a dial-up modem, so be patient. Figure 4-8 shows a download in progress with one completed song, two with an error, one in progress, and several pending.

So much for the fun part. As you know, you have to have licenses to play music you’ve downloaded from the Internet, and if you don’t have the proper licenses, you can’t burn the files to a CD or move them to a portable device. Furthermore, Windows Media Player can’t even play the files on your computer if your licenses are expired, invalid, or can’t be located.
What’s the big deal anyway? Licenses allow the record companies, content providers, artists, writers, and musicians to get the royalties they deserve when a song or album is sold or played. In the old days, this was easy. Royalties were paid based on a simple mathematical formula–take the number of albums sold (or the number of times it was played) and multiply by the royalty rate. These days it isn’t that simple because there are multiple ways to obtain music from the Internet, and many of these are not-so-honest ways. Because of this, the rightful owners of the music don’t get their fair share of the royalties. To ensure that these folks get the royalties they deserve, licensing requirements are necessary.
Because licenses are so important, you should back them up occasionally in case there’s a hard disk crash, or if you purchase a new computer and need to transfer the files to it. You can back up the licenses to a floppy disk and use that disk to transfer licenses to a new computer, to a work computer, or to a laptop. Here’s how:
Click Tools, and then click License Management.
Click Change, and in the Browse For Folder dialog box, click the folder (or floppy disk drive) that you want to store the backup copies of your licenses on, and click Make New Folder.
Name the folder License Backup and click OK.
In the License Management dialog box, click Back Up Now, as shown in Figure 4-9.

With the proper backup created, you can restore licenses easily. Using the same method detailed in the previous section, open the License Management dialog box, browse to the location of the backup folder, and click Restore Now. When you restore, you’ll have to be connected to the Internet because Microsoft keeps track of how many times you’ve restored the licenses. There is a specific number of times that you can restore licenses, and when you restore them, information is sent to Microsoft so that it can keep track of that number.
If you’ve downloaded the Windows Media Bonus Pack for Windows XP, you’ve downloaded the Personal License Update Wizard for Windows Media Player too. This wizard enables you to update the licenses for the protected content you’ve copied to your hard disk so that you can play the content on other computers. The wizard is available by clicking Start, pointing to All Programs, pointing to Windows Media Bonus Pack For Windows XP, and then clicking Personal License Update Wizard For Windows Media Player. If you haven’t downloaded the Bonus Pack, what are you waiting for? It’s free! Turn to the Introduction at the beginning of this book for more information.
If it’s difficult to find a pair of matching socks in the morning, imagine how hard it is to locate a song if all of your 3,000 media files were simply grouped together in a big lump. You’d have to sift through all of them just to locate the one you want to hear. What happens once you’ve collected hundreds, if not thousands, of songs on your computer? How do you find what you want to hear or see? What if you remember the name of the artist but can’t remember which song you like?
Don’t fret. Media Library is a database, and the music that’s stored in it is sorted in multiple ways. Just like in a real library, you can search by title, author, and genre. So, if you’ve been haphazardly downloading songs from the Internet, or if you have thousands of songs on your hard disk, don’t worry. Windows Media Player has been working in the background, and all of your songs are already neatly arranged! Amazing, isn’t it?
Open Media Library and take a look at how it’s organized. The screen in Figure 4-10 shows that Media Library has already organized my songs pretty well. The left pane contains the different options for viewing the media files—by album, artist, genre, playlist, downloaded music, and all content. Select any of the options on the left, and the information on the right will change.
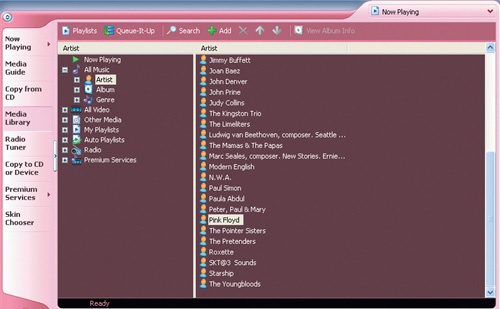
Figure 4-10. Media Library already has your files organized. In this figure, the media files are sorted by Artist.
As you explore Media Library, click the plus and minus signs in the left pane to expand and to hide the lists under each. In this figure, All Music is expanded and Artist is chosen. Click any title to sort the data by that information. For instance, in Figure 4-10, clicking Pink Floyd changes the details Media Player displays. The result is shown in Figure 4-11. From here, categories including Title, Artist, Album, Rating, Media Info and more can be sorted simply by clicking the title bar.

To view all of your music, click All Music either in the Quick Access area or in the left pane of Media Library. Every song that’s stored on your computer will be listed. By clicking the column headings above the song list, you can sort your songs based on the information you have about them.
Here are some of the options and how they affect the song list arrangement:
Click Title to sort the tracks alphabetically by name.
Click Artist to sort the tracks alphabetically by artist.
Click Album to sort the tracks alphabetically by album.
Click Rating to sort the tracks by their rating of one to five stars.
You’ll have to decide how you can best find your music. Remember, this is a database, which means that the information is stored in lots of ways. Take a few minutes to familiarize yourself with the various playlists and options.
I don’t expect that you’ll have problems locating a particular song unless you have thousands of songs in your library. By the time you have that many songs, you’ll probably familiar with quite a few sorting options. However, a few are worth noting here, which should prove useful to you as your library grows:
Use the Search button. How simple is that? Just click Search and type the name of whatever it is you want to find.
Change which columns are showing in the Details pane (the right pane) by right-clicking any category heading and then clicking the column heading names to show or hide. For instance, Acquisition Time is an option. If you remember that you downloaded a song two days ago but can’t remember what it was, you can probably find the track using this method.
Click View and then click Choose Columns to show or hide column headings in the Details pane.
Take advantage of the auto playlists. By adding titles to these lists you can organize your songs in groups that reflect how and when you like to listen to them. Some auto playlist categories include Favorites – Listen To At Night and Music Tracks I Dislike. More information on auto playlists appears later in this chapter.
To hear a song of a specific genre, click Genre in the left pane under All Music.
Metadata—that’s the technical term for the media information that tells you what the song title is, who the artist is, and what the album is called (among other things). Metadata is obtained from a database on the Internet. Sometimes, not all of the information can be found about an album or a song, especially if it’s a CD your friend just created in his personal music studio or it’s a really obscure album; other times, the information is incorrect or just isn’t what you want to see (maybe it’s classified as the wrong genre—grunge instead of hard core, for example). When this happens, you can enter (or change) the information manually.
You can edit other information too, including group description, conductor, and other items that are headings. Adding or changing ratings is also important. You can use the Advanced Tag Editor to add detailed information about the song or the artist, add static lyrics, add pictures, and even add and edit comments. You can also synchronize the lyrics and add information about related Web sites.
Note
If you are not receiving information for your CDs and DVDs from the Internet database, verify that the privacy options are configured correctly. Click Tools, click Options, and click Privacy. The Retrieve Media Information For CDs And DVDs From The Internet option must be selected if you want to receive this information.
The easiest way to edit a track’s information is to right-click the song title, click Edit, and then press the Tab key to move to the text you want to edit. You can then edit the information as desired, and press Enter when you’re finished. You can use the Advanced Tag Editor to edit track information, or you can edit track information from any of the following panes:
Now Playing
Copy From CD
Media Library
Copy To CD Or Device
Everyone’s a critic, and if you have a little of that in you, you’ll especially like the rating options in Media Library. By default, all items are given a rating of three stars (in case you were wondering who rated those tracks you just downloaded). These ratings are raised automatically if you play the song a lot, and they are lowered if you never play the song. Ratings range from one to five stars.
BE YOUR OWN CRITIC

If you really want to personalize your Media Library, you can do more than just rate songs based on whether you like them. You can use the rating system to categorize your songs, and then create personalized playlists based on the customized ratings. Try these on for size:
Create ratings based on song type. Give a one-star rating to your soft rock songs, three stars for classic rock, and five stars for heavy metal. Fill in the middle with your own choices.
Rate children’s songs one star, holiday songs two, romantic songs three, comedy tracks four, and party music five.
If you use your computer and Media Library when you’re a DJ at parties, create ratings for party types—one star for family reunions, two for weddings, three for graduations, four for class reunions, and five for the "under 20" crowd.
Rate your music by the year it was popular; one star for music created before 1960, two for the 1960s, three for the 1970s, and so forth. Sorting by year offers a quick way to locate the genre you (or your guests) want to hear.
Whatever the occasion, simply sort the songs accordingly and play the desired rating.
RATINGS MIGRATION
If you rate your music regularly and create playlists based on those ratings, you’ll want to get the Rating Migration PowerToy. Like other PowerToys, you have to download the program first from http://www.wmplugins.com/itemdetail.aspx?itemID=58. With my 56 K modem, the download took about 15 seconds, and the installation was even faster. (If you need help with the download or installation, check out the Introduction.) The Ratings Migration PowerToy allows you to copy user ratings from Media Library to MP3 and WMA files. The ratings can be restored to update the library if you plan to move the files to a new computer.
You can access the PowerToy by clicking Tools, pointing to Plug-Ins, and clicking Ratings Migration. There are only two options, Save Ratings and Restore Ratings.

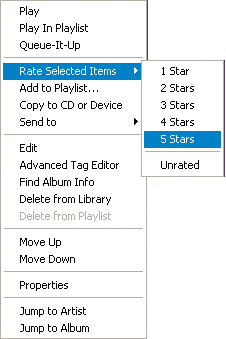
If you want to rate the songs yourself, you certainly can. To rate an item or change its rating, right-click the item to rate, choose Rate Selected Items, and make the appropriate choice, as shown in Figure 4-12. This rating will override any automatic ratings and will be used when creating auto playlists or when sorting media files.
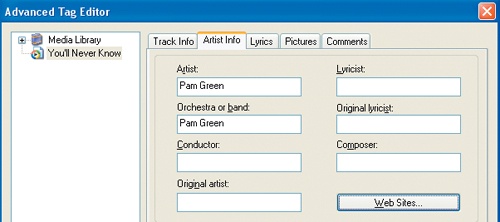
The most comprehensive way to edit media information is to use the Advanced Tag Editor. Besides changing the title, artist, and other headings, you can add detailed information, including comments, lyrics, pictures, and information about the artist’s Web site. When you use the Advanced Tag Editor, you’ll notice that there are several tabs for entering information. These tabs are shown in Figure 4-13.
To add or edit media information using the Advanced Tag Editor, follow these steps:
Click Media Library.
In the Details pane, right-click the item to edit, and then click Advanced Tag Editor.
Work through the tabs, inputting media information for the item. To insert a picture, browse to its location, highlight it, and click Open.
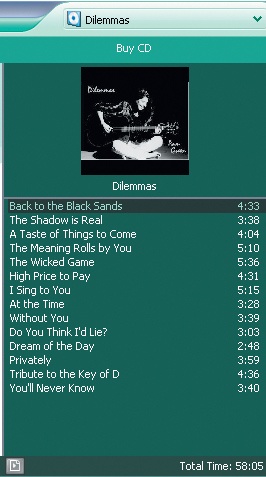
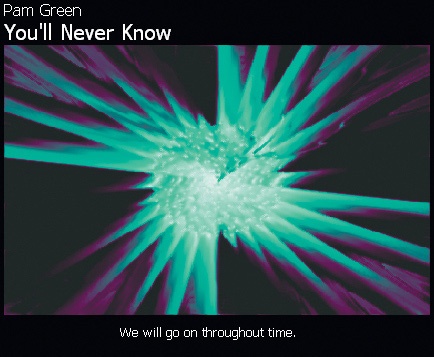
When you play back a file from this track or album, the information you added can be viewed in the Info Center View pane. If you’ve added pictures or if pictures are already configured for this album or track, they will be shown as well. Figure 4-14 shows the Info pane for a CD called Dilemmas, by artist Pam Green. I added the information and pictures manually because WindowsMedia.com did not have information about the CD in its database.
To see the information you’ve added, play the edited album or track in the Now Playing pane. On the View menu, point to Info Center View, and click either Show Only When Detailed Media Information Is Available or Always Show. (You can also make this choice from the Now Playing options in the Visualizations or Enhancements window.)
The data for the song or album will appear in the Info pane. This information varies depending on the information available. In Figure 4-14, the only information for the Dilemmas CD was what I added. This included some artist information, album information, and a couple of pictures. Windows Media Player was able to determine the song length. In Figure 4-15, there’s much more information because the album and artist are well known, and data is readily downloadable from the Internet.
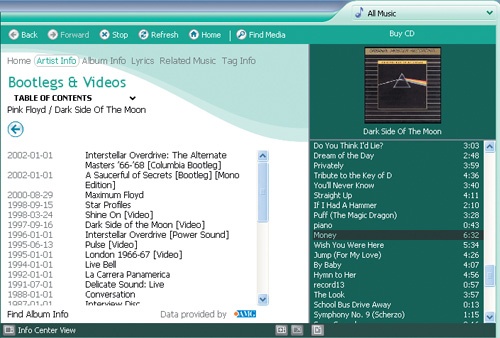
To move from one area of the Info pane to another, click the links at the top of the Info pane. Links include Home, Artist Info, Album Info, Lyrics, Related Music, and Tag Info. Within each area, use the right and left arrows to see additional information, including pages that contain the band’s biography, reviews of the album, latest releases, available videos, and more. You’ll be amazed at some of the information you can access!
If you like to sing along, you might be able to find the lyrics to the song you are listening to by clicking the Lyrics link. I haven’t been very successful on that front, but perhaps that’s because I listen to more obscure music than most. If lyrics are associated with a track, they’ll be listed. If no lyrics are associated with a track, you can click Add Lyrics to add your own.
There are two types of lyrics, static and synchronized. Static lyrics are just that, static; they appear when the song plays. Synchronized lyrics are played at times you specify during the playback of a file.
Note
To view synchronized lyrics, you must turn on captions and subtitles by clicking the Play menu, pointing to Captions And Subtitles, and then clicking the appropriate option.
To add static lyrics, follow these steps:
Click Now Playing.
In the playlist pane, click the file you want to add lyrics to. (If you can’t see this pane, click View, point to Now Playing Options, and click Show Playlist.)
In the Info Center View pane, click Lyrics. (If you can’t see this pane, click View, point to Info Center View, and then click Show Always or Show Only When Detailed Media Information Is Available.) If the song you selected isn’t showing in the Info pane, click Refresh.
Click Add Lyrics, type the lyrics, then click Save Lyrics. Once saved, the Save Lyrics link will change to Edit Lyrics, as shown in Figure 4-16.

Once you have the lyrics configured, play the song in Now Playing. To view static lyrics, show the Info pane and click the Lyrics tab. The static lyrics will appear there. You can also view the static lyrics in Visualization view, and the lyrics will show beneath the visualization.
To add synchronized lyrics, follow these steps:
Click Media Library.
Right-click a file, then click Advanced Tag Editor.
Click the Lyrics tab, and then click Synchronized Lyrics.
In the Description box, click Edit, and type a description for the lyrics. If you’ve already typed in static lyrics, and you want to make those synchronized, click Edit instead.
Select a language and a content type from their respective drop-down lists.
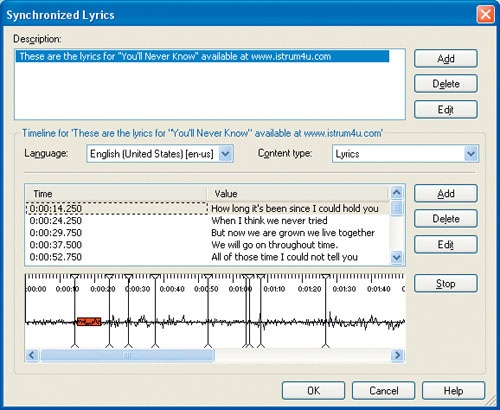
In the Time and Value area, you’ll configure at what time the synchronized lyrics should appear on the screen. There are two ways to achieve this. If you already have static lyrics that you’d like to synchronize, you can use the existing timeline. Click the first Time and Value entry, click Play, and move the slider for the first line of lyrics to the appropriate place on the timeline, as shown in Figure 4-17. (The red bar shows where in the song you are.) Repeat this for each line in the lyrics.
If you do not have the static lyrics, in the Time and Value area, click Add. Type a time in hh:mm:ss:msec format for where you want the lyrics to start, and then type the text for the lyrics. Repeat this step for multiple entries.
After all of the lyrics have been entered and edited, fine-tune the position of the lyrics in the song by repeatedly clicking Play and Stop and moving the sliders appropriately. When finished, click OK twice.
TURN YOUR COMPUTER INTO A KARAOKE MACHINE

If you can add synchronized lyrics to your songs, you can turn your computer into a karaoke machine. Just configure synchronized lyrics using the Advanced Tag Editor, grab a banana (to use as a microphone, of course), and click Play! The lyrics will appear on the screen just when you need them, and you’ll be the hit of the party. Without specialized music tracks, though, you won’t have true karaoke. For that you’ll need to purchase or obtain music files without the lead singer’s part, and ideally, with the words embedded in them.
Windows Media Player can play MIDI (.mid) and Karaoke (.kar) files, which are usually the two file types you’ll be looking for to play on your new karaoke machine. Just search the Internet for "Karaoke and Computers" and you’ll find many choices. I particularly like www.koolpages.com/karaoke, where there are free files and short explanations of how to use them.
Once you’ve located and downloaded the songs, uncompress them, if necessary, and work through the following steps:
In Windows Media Player, click Tools, and then click Search For Media Files.
In the Search On drop-down list, choose where to search, and then click Search. The newly downloaded files will be added to Media Library.
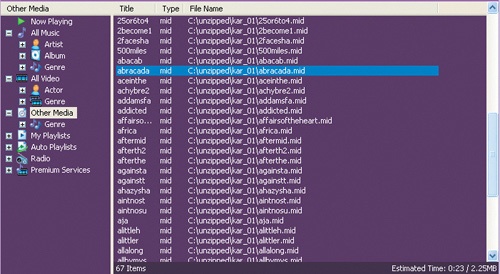
Click Media Library and locate a newly downloaded file to play. (Karaoke and MIDI files will be placed in the Other Media section.)
Double-click the song to play.
Although Windows Media Player can play both MIDI and Karaoke files, you won’t see the words to a song even if they are embedded in the file itself. If you know the words or want to add synchronized lyrics, that’s all well and good, but to see the words, you’ll have to download a different player, specifically, a karaoke player. A good player is VanBasco’s; however, there are many more players available, and several of them are free.
If you want a true karaoke experience, search online bookstores for karaoke software, which include onscreen lyrics and thousands of songs. Many karaoke programs allow you to adjust the key or tempo of songs and create automatic playlists without requiring additional hardware. I found some fairly inexpensive karaoke programs, making experimenting well within reach.
To view the synchronized lyrics, verify that Captions And Subtitles are turned on in the Play menu, switch to Visualization mode, and play the song. The song’s lyrics will appear at the appropriate times as the song plays. Figure 4-18 shows synchronized lyrics in action.
Home is where the playlist is (since the playlist is really the heart of Media Player). Playlists are lists that contain songs, videos, radio stations, or a combination of all three. You can create a playlist before burning a CD, thus collecting all of the songs you want in one place. You can create a "Nighttime" playlist, a "Third Date" playlist, or even a "Karaoke" playlist. Let your imagination run wild. Read the next few sections and you’ll be able to create, edit, and rearrange your own playlists, and customize the auto playlists included with Windows Media Player.
If you want to burn a CD, collect your favorite songs, or create some other specialty grouping of songs or digital media, you should create a playlist. Creating a playlist is easy too; just tell Windows Media Player that’s what you want to do, select the files, and you’re done! Follow these steps and you’ll see:
Click Media Library, click the Playlists button in the taskbar that runs across the top of the Media Library window pane, and then click New Playlist. (You could click the File menu and click New Playlist, if you prefer.)
In the View Media Library By list, click a category to sort the music by. Artist/Album is generally where I start. The songs in that category will show in the left pane.
In the left pane, click any entry to expand it (if necessary), and select songs one at a time to add to the playlist.
Watch the Total Time indicator in the lower right corner of the right pane as you add items to your playlist; most CDs record only 74 minutes or so of audio. (You’ll learn more about burning CDs in Chapter 6.) If you’re creating a playlist for a DVD, check the specifications for the disc. Some DVDs can hold as much as 180 minutes of video on a 4.7 GB capacity disk.
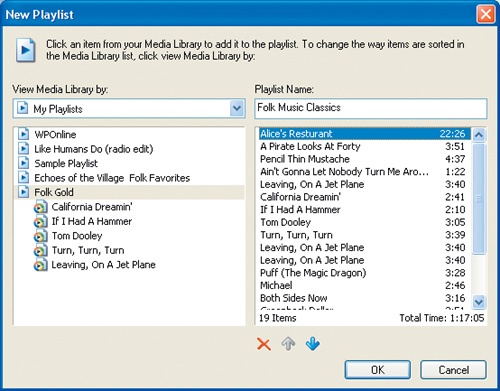
In the Playlist Name box, type a name for the playlist. Figure 4-19 shows the New Playlist dialog box and a new playlist being created.
Select any song in the right pane, and use the arrows to move the song up or down in the list, or use the red × to delete it from the playlist. Click OK when you are finished.
In Media Library, locate My Playlists and expand it if necessary, and locate the new playlist there.
Chances are good that you’ll want to edit your playlists at one time or another. Perhaps your musical tastes have changed (I used to love AC/DC), your significant other doesn’t like a particular song, or there’s one song that is too distracting/sad/fast/slow/loud for the mix in the playlist. You can add, rearrange, and rename songs, as well as perform additional edits simply by right-clicking the playlist. You can copy tracks from one playlist to another, delete a track, or delete the track from the entire library by right-clicking a song in the playlist. Follow these steps to edit a playlist:
Click Media Library and expand My Playlists in the left pane.
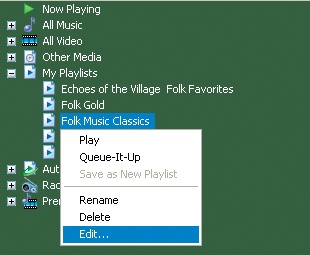
Right-click the playlist you created in the previous section, as shown in Figure 4-20. If you can’t see the playlist, on the View menu, point to Now Playing Options, and then click Show Playlist. Now you can perform one of the following actions:
To rename the playlist, click Rename, and then type a new name for the playlist.
To delete the playlist, click Delete, and then choose an option for deleting the content. You can delete the playlist from Media Library only, or you can delete it from both Media Library and the computer.
To edit the playlist’s contents, click Edit. The Edit Playlist dialog box will appear (similar to the New Playlist dialog box shown in Figure 4-19), and you can edit the tracks by rearranging them or deleting them. You can also right-click any track in the right pane of this dialog box and click Edit again to rename the track.
In the right pane, right-click a track in the playlist and choose any of the following to edit the track:
Rate Selected Items. To rate the track.
Add To Playlist. To add that song to another existing playlist using the Add To Playlist dialog box.
Edit. To edit the title, artist, album, and other headings.
Advanced Tag Editor. To enter track info, artist info, lyrics, pictures, or comments.
Move Up and Move Down. To move the song up or down in the playlist.
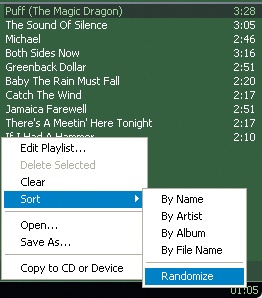
You can temporarily change the order of the items in a playlist too. Just click Now Playing, select a playlist, and click the Select Playlists Options button in the lower left corner of the Playlist pane, point to Sort, and click Randomize. (See Figure 4-21.)
Besides temporarily making changes to a playlist by changing the order in which the songs are played, you can temporarily add songs to a playlist, as described here:
While playing a playlist, click Media Library, and find a track you’d like to temporarily add to the current playlist (the one that is playing).
Right-click the item to temporarily add it, and then click Queue-It-Up. You can temporarily add entire albums, artist lists, and other playlists. The item will be added to the end of the playlist until you play another playlist or exit Media Player.
If you want to save the temporary playlist, on the File menu, click Save Playlist As and type a new name for it. Click Save.
Auto playlists are playlists that Windows Media Player creates automatically and behind the scenes. The titles in this list are determined by existing grouping criteria. For instance, the auto playlist "4 and 5 Star Rated" contains songs that have ratings of four or five stars, while "Have Not Heard Recently" contains songs you rarely listen to. Windows updates and changes these playlists each time you start Media Player, depending on your activities. You can customize Media Player by renaming existing auto playlists, removing auto playlists, and editing auto playlists. Let’s look at the existing auto playlists on your system, and edit them.
No matter how well your media player thinks it knows you, there are times when you’ll have to step in and set it straight. Here’s how you edit an auto playlist that was automatically created by Media Player:
Click Media Library and expand Auto Playlists.
Click Favorites – 4 and 5 Star Rated and notice the songs in the Details pane. All of these songs have been rated four or five stars, which is the grouping criteria.
Click the other auto playlists to see how Media Player has configured them. The auto playlist Listen To On Weekdays has been created based on what you usually listen to during the week. Fresh Tracks – Yet To Be Played contains songs you’ve downloaded or copied but haven’t yet listened to.
Right-click any auto playlist in the left pane and choose Edit.
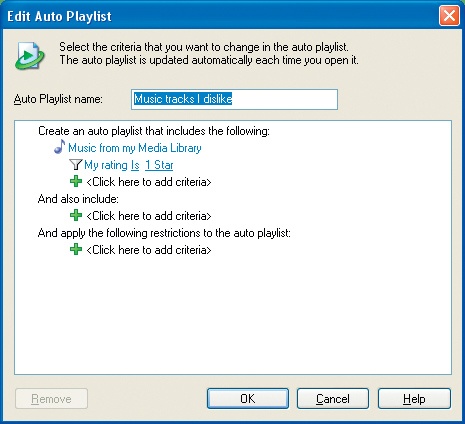
In the Edit Auto Playlist dialog box, shown in Figure 4-22, you can edit the playlist name and criteria. I’ve selected the Music Tracks I Dislike auto playlist.
To edit any existing criteria, click the underlined value once. In Figure 4-22, the number of stars can be changed, as can the word is. I’ll change mine to say "My Rating Is 1 Star."
To add criteria to the first section, click Click Here To Add Criteria. Select More from the drop-down list so that you can see all of the options. Select an option such as Date Released, File Type, Duration, or another option. Repeat step 6 to configure values for the new rule, and repeat step 7 until all desired rules are added.
To configure a maximum size for the auto playlist, configure options for applying restrictions to the playlist.
To edit or add criteria for any another section that has no criteria previously set, click Click Here To Add Criteria, and choose Music From My Media Library or Video From My Media Library, and then set the additional criteria as detailed in steps 6 and 7.
When you listen to songs on the radio, the DJ sometimes fades out the current song and fades in the new one. In addition, the station takes into account the volume level of each song and monitors it so that you don’t get blown out of your car when a rap song follows the love song you were listening to. (This is NOT true of commercial breaks on television!) You can create similar transitions using Windows Media Player. You can create transitions between songs on your playlists just like a pro.
CREATING YOUR OWN AUTO PLAYLIST

Windows Media Player is such a know-it-all! It creates lists all by itself and calls them cute names like "Fresh Tracks" and "Listen to at Night." Creative, yes, but what if you have your own playlists in mind? If you have an auto playlist that you want to create, you can. Don’t let Windows Media Player show you up!
Try this:
Click Media Library, click the Playlists button, and click New Auto Playlist.
In the New Auto Playlist dialog box, type a name for the new list and add criteria to your heart’s content. The new playlist will appear in the Auto Playlist list.
Here are some ideas for creating your own auto playlists:
Songs Recently Added to Library. Configure criteria to sort music by songs that were downloaded less than a week ago.
Songs by <name of artist>. Configure criteria to sort music by artist.
Rap Songs. Configure criteria by content provider genre and select Rap.
Songs Recently Played. Configure criteria to collect songs that you have played in the past week.
Long Story Songs. Configure criteria for Folk, and choose the song length to be greater than six minutes.

Using the audio crossfade feature, you can create smooth audio transitions from one song to the next. Smooth transitions are perfect for music you’ll use for dance parties or workout CDs, for listening to music at the office, and for creating background music for movies or photo stories. Smooth transitions are usually preferred because there’s minimal interference between songs, and there are no jarring transitions when music stops or starts. To get that smooth, professional quality, follow these steps:
If you’ve downloaded music and created a playlist from various sources, you might find that some tracks play louder than others. This is because media files are typically created using different volume levels, and these differences are noticeable when a mix of music from various sources is played. Using auto volume leveling, you can have the volume of all of the songs averaged so that each file plays at roughly the same volume. Windows Media Player averages out the volume by assigning a volume leveling value to the Windows Media or MP3 file. It then uses this value to determine the correct volume during playback.
Note
Volume leveling values cannot be added to files that are read-only such as store-bought CDs, but volume leveling can be assigned to music CDs that you burn on your own computer, and assigned to media stored in the Media Library.
Because each track needs a volume leveling value assigned to it, and because volume leveling is new to Windows Media Player, you’ll need to assign values to your older audio files, specifically, the files created under earlier versions of Media Player.
LET’S PARTY!

Having a party? Don’t worry about hiring a professional DJ—use Plus! Party Mode instead. You can organize the songs for your party ahead of time and then just turn the music on, leaving Windows Media Player to do the rest. No more fumbling around with CDs or CD changers, no more worrying about the proper mix of music during the party, no more lost/stolen/sticky/broken/missing CDs the next day, and better yet, no more dead air. With Party Mode, you can leave a full-screen skin running too, so you might even want to connect your computer to a larger monitor or dual monitors for added effect.
In addition to saving wear and tear on your CDs and viewing cool visualizations, you can save the playlists you create for the party, as well. Using descriptive names like New Year’s Eve 2003, John and Kim’s Wedding Reception, or Mike’s Graduation Party 2004, you can burn CDs for a nice memento of the revelry.
First you’ll need to purchase Plus! Digital Media Edition. Visit www.microsoft.com/windows/plus/dme/dmehome.asp and refer to the Introduction if you need more information. However, if you don’t have Microsoft Plus! Digital Media Edition, but you do have Microsoft Plus!, try the Plus! Personal DJ. This program offers similar options and is also quite comprehensive.
PLAYING MUSIC WITH PLUS! PARTY MODE
With Plus! Party Mode, you can turn your computer into a jukebox for a party without allowing access to files on your computer, which prevents guests from changing the playlist, skipping songs, or logging on. Here’s a primer on creating the perfect party music mix:
Click Start, point to All Programs, point to Microsoft Plus! Digital Media Edition, and click Plus! Party Mode For Windows Media Player.
Read the welcome screen message and click OK.
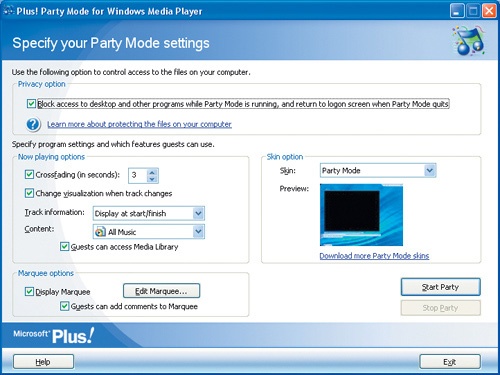
In the Specify Your Party Mode Settings window, configure the settings as desired.
To lock the computer so guests cannot access it, click Block Access To Desktop And Other Programs While Party Mode Is Running, And Return To The Logon Screen When Party Mode Quits. (Only someone with Administrator’s credentials can unlock the computer.)
Click Crossfading (In Seconds) if desired.
Click Change Visualization When Track Changes if desired.
In the Track Information list, select Display At Start/Finish, Do Not Display, or Always Display.
In the Content list, select the desired playlist or Media Library, or choose All Music.
Click Guests Can Access Media Library if you want your guests to be able to access the library. Do not select this option if you do not want to allow access.
Under Marquee Options, click Display Marquee, then click Edit Marquee. In the Edit Marquee dialog box, type the text for the marquee, and click OK.
Click Guests Can Add Comments To Marquee if you desire.
In the Skin list, select an appropriate skin for the party. The skin will show in full mode.
Click Start Party.
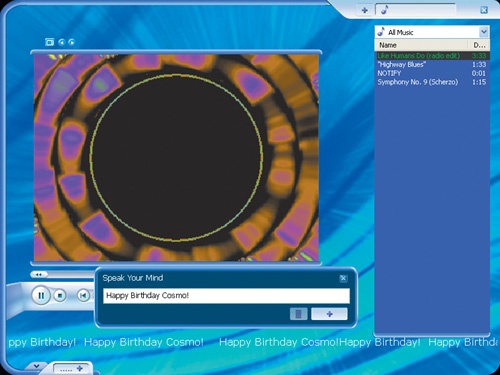
Check out this party in action: guests can access Media Library and edit the marquee, and the Party Mode skin is selected. Party on, Dude!
To add volume leveling values to existing files, follow these steps:
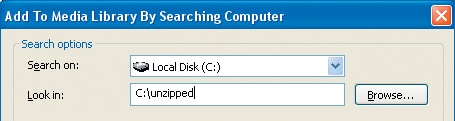
On the File menu, point to Add To Media Library, and then click By Searching Computer.
In the Search On list, choose the location of the Windows Media or MP3 files to add volume leveling values to.
Click Advanced Options.
Select Add Volume Leveling Value For All Files (Slow), and then click Search.
Media Player will search through the folders you selected and add volume leveling values to all of your audio files. The files will then be added to Media Library. (Volume leveling values are automatically added to tracks copied to Media Library or to an audio CD using Windows Media Player.)
Once volume leveling has been applied to the audio tracks on your computer, you should turn on Auto Volume Leveling in the Enhancements pane.
- auto playlist
A list of songs created automatically by Windows Media Player. Auto playlists are updated each time Media Player is opened, and the lists organize music by most played, least played, and other criteria.
- auto volume leveling
A way to play music tracks in Windows Media Player so that each track played is approximately the same volume. With auto volume leveling, Media Player adjusts the volume level of the files automatically so that no track is ever too loud or too soft in relation to the other files on the media.
- copy protect
A way to protect digital media files from illegal distribution. A license protects a file and specifies how long the file can be played, how it can or cannot be copied to other media, and on which computer the file can be opened.
- crossfade
Blending one music track into another. Crossfading blends the end of one track with the beginning of the next one, creating a smooth and pleasing transition.
- database
A collection of data such as music files and information about them. Windows Media Player’s Media Library is a database of the media files stored on the computer. Because it is a database, files can be sorted by title, artist, rating, or any other criteria that has been input.
- metadata
Information about digital media. Metadata can include the artist’s name, title, album, cover art, and more.
- partitioned
A hard disk is partitioned if it is separated into more than one section. Most larger hard disks are separated into C: and D: partitions. C: is the root where the operating system files are stored, and D: is the section of the disk where data is stored. Many older computers are not partitioned at all.
- spyware
Technology that aids in gathering information about people without their knowledge. Generally, spyware is downloaded to a person’s computer via a virus or by consent when installing a particular program.
- static lyrics
Lyrics that are displayed when a music track begins. In Windows Media Player, static lyrics are displayed in their entirety and do not change with the music. You can add your own static lyrics to a song using the Advanced Tag Editor.
- synchronized lyrics
Lyrics that are displayed in Windows Media Player in synchronization with the song being played. You can add your own synchronized lyrics using the Advanced Tag Editor.