Lesson Files | Soundtrack Pro book files > 01-02_Projects&Media > 2-1 Jazz Start, 2-2 Jazz Final |
Time | This lesson takes approximately 1 hour and 15 minutes to complete. |
Goals | Create a new project |
Explore the project properties | |
Work with Tempo, Key, and Time Signature | |
Change a project’s time format | |
Add, move, and remove tracks | |
Change track formats | |
Arrange musical parts in the Timeline | |
View the Project Preferences window |
There are two types of projects that you can work on in Soundtrack Pro: multitrack projects in the Timeline, and audio file projects in the Waveform Editor. For this lesson, you’ll focus on multitrack projects.
Understanding the different project properties, types of tracks, and multitrack projects is an important step in mastering Soundtrack Pro, yet often is overlooked by the casual user. In this lesson, you’ll work with a variety of multitrack properties at the track level and at the project level. Then, you’ll work with some arranging techniques to move and modify clips already in the Timeline to complete a project. Finally, you’ll create a multitrack project from scratch and finish it using the skills you’ve learned so far.
Although this lesson is titled “Creating and Arranging a Multitrack Project,” it goes a lot deeper than that. You’ll be working with the different project properties, adding and removing tracks, changing a track’s time format, arranging and modifying clips, and determining if the projects you create are time-based or beats-based. Along the way you’ll also learn more Timeline maneuvers, techniques, and keyboard shortcuts. Once you’re comfortable with the concepts in this lesson, you’ll be ready for the more challenging real-world sound design projects in this book, which begin in Lesson 3, “Creating Suspense with Sound Design.”
You will begin this lesson by opening a new project. If you have any other Soundtrack Pro projects open, you should close them at this time. If you just finished Lesson 1, “Working with the Interface,” Soundtrack Pro should already be open and ready to begin.
Quit all open applications, except for Soundtrack Pro.
If Soundtrack Pro is not already open, Press Shift-Cmd-A from the Finder to go to the Applications folder on your computer. Then double-click the Soundtrack Pro icon to launch the program.
Soundtrack Pro opens with a new Untitled project.
If Soundtrack Pro was already open, choose File > New Multitrack project, or press Cmd-N to open a new Multitrack project.
Project properties include Tempo, Time Signature, Key, and Sample Rate. You can also determine whether a project is time-based or beats-based and what the initial number of tracks are.
New multitrack projects are created with the project properties set in the project Preferences. Once a project has been created, you can always modify its properties by using the Project controls located at the top of the Project window.
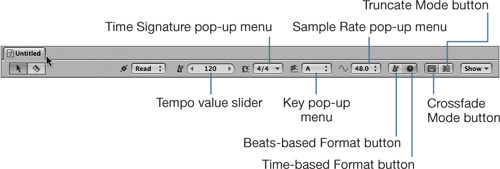
Tempo value slider: Sets the tempo for current project in beats per minute (BPM). The range is 60 to 200 BPM.
Time Signature pop-up menu: Sets the project time signature. The choices are 3/4, 4/4, 5/4, 6/8, 7/8, and Other.
Key pop-up menu: Sets the current project’s key. The range is any key in the chromatic scale from A to G#, or None.
Sample Rate pop-up menu: Sets the project sample rate. The choices are 32 kHz, 44.1 kHz (CD-quality audio), 48 kHz (DVD-quality audio), 88.2 kHz, and 96 kHz.
Beats-based Format button: Sets the project to a beats-based format.
Time-based Format button: Sets the project to a time-based format.
Crossfade Mode button: Sets the overlap mode to crossfade. The crossfade overlap mode creates a crossfade between two overlapping clips in the same track.
Truncate Mode button: Sets the overlap mode to truncate (cut short) a clip when you drag another clip over it.
Any changes that you make to the current project properties will go unnoticed until you add clips and start to build your multitrack project.
Rather than start from scratch, you’ll test some of the project properties on a finished project. First, though, let’s take inventory on the current default settings of your Untitled project.
Count the number of empty tracks in the current project.
This is an easy task, since all new tracks are numbered sequentially. The default number of new tracks should be 8. If you changed your project properties in the Preferences window prior to this lesson, you may have a different default number.
Next, you’ll look at some of the Project controls, starting with Tempo.
Check the Tempo value slider for the project’s tempo; the default is 120.
Look at the Time Signature pop-up menu; the default is 4/4.
Notice the Key pop-up menu; the default key is A.
Examine the Sample Rate pop-up menu. The default setting is 48.0 kHz, which is also the default audio sample rate for video projects in Final Cut Pro and DVD Studio Pro.
Click the Beats-based Format button (metronome) to change the project time format to beats.

When the project time format is beats-based, the Time display and Time ruler display Beats above Timecode (TC).

Click the Time-based Format button (clock) to change the project format to time.

Now the project timecode is displayed above beats in both the Time ruler and the Time display.
What do all of those project controls mean? Good question, and you’ll find out more in the next series of exercises.
Choose File > Close, or press Cmd-W to close the current project.
A Save dialog opens prompting you to save the project.
Click Don’t Save to discard the project.
In the previous lesson, you opened a project from the Finder and simultaneously launched Soundtrack Pro. This time, you’ll open a project while Soundtrack Pro is already open. The projects that you’ll be working with in this lesson are located in the 01-02 Projects&Media folder within the Soundtrack Pro book files folder.
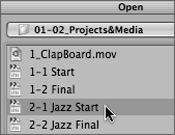
Choose File > Open or press Cmd-O to bring up the Open window.
Navigate to the Soundtrack Pro book files folder in the Finder.
If your Soundtrack Pro book files folder is on the desktop, click the Desktop icon on the Sidebar of the Open window, then select the Soundtrack Pro book files folder.
Select the 01-02 Projects&Media folder to reveal the contents.
Double-click the 2-2 Jazz Final project file, or select the 2-2 Jazz Final project file and click the Open button to open the finished project.
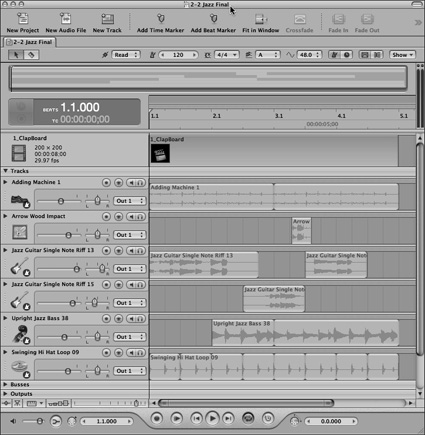
The 2-2 Jazz Final project opens and is a variation of the project that you worked on in the previous lesson.
Press Shift-Z to fit the project in the Project window.
It’s much easier to experiment with the different project controls when you can actually see and hear the changes in the Timeline. Over the next series of exercises, you’ll work with the project Time signature, Key, Time format, and Tempo controls to see and hear how they set the tone (literally) for your Soundtrack Pro projects.
Note
Even if you’re a video editor with little interest in music theory, don’t let musical terms like tempo, key, and time signature send you flipping past this section of the book. It’s important to understand these basics so that you’ll be able to control the outcome of your projects.
Time signature is just a way of counting beats. The upper number indicates the number of beats per measure; the lower number is the basic beat value. The relationship between beats and measures is referred to as the time signature. The default time signature is 4/4, or four beats per measure. A waltz uses 3/4 time, one-two-three, one-two-three. A rock song, on the other hand, follows a faster, constant beat of 4/4 time.
Play the project in the Timeline once, then pause playback.
Press Return or the Home key to move the playhead back to the beginning of the project in the Timeline.

Play the project again, but this time watch the Beats counter in the Time display. The current time signature is 4/4 or four beats per measure. The first number is the measure, followed by the beats and then fractions of a beat.
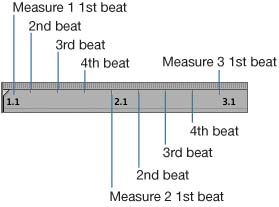
Continue playback again, and watch the Time ruler to see the relationship between beats and the tick marks between measures.
The hi-hat drum loop hits on each beat, which makes it easy to hear and feel the time signature of this piece.
Pause playback and press the End key to move the playhead to the end of the project.

The project ends around 5.1 which is the 1st beat of the 5th measure.
Note
When you press the End key, the playhead moves to the end of the last clip in the Timeline. In this case, that’s the video clip. Normally a musical piece would end on a beat at the end of a measure. However, the length of this piece is determined by the video clip, which is 8 seconds in length (timecode 00:00:08;00 NTSC 29.97 frames per second). The duration of the video clip is based on timecode, not musical time (beats).
Click the Time signature pop-up menu and choose 3/4 as the project time signature.
The Time ruler changes to the new time signature of 3 beats per measure.
Press Shift-Return to play the project from the beginning. While it plays, notice that the Beats change sequentially (1, 2, 3) in the Time display and there are only three tick marks for beats per measure in the Time Ruler.
The project sounds and looks the same in the Timeline.
Pause playback and press the End key.

The project now ends around the 2nd beat of the 6th measure. There are only three tick marks in the Time ruler for each measure.
Press Return, and then change the Time signature back to 4/4 in the Time signature pop-up menu.
So what’s the moral of this musical-time story? Basically, changing the time signature of a project will not change the way it sounds. It only changes the counting method used for keeping musical time in beats and measures.
Tempo, the rate at which the beats occur in a piece of music, is measured in beats per minute (BPM). The faster the tempo, the more upbeat and energetic a piece of music sounds. The slower the tempo, the more relaxed a song sounds. The default tempo for a Soundtrack project is 120 BPM.
Changing the tempo of a project will make the files based on musical time play faster or slower. However, the video clip and all time-based files will remain unchanged. Actions speak louder than words, so let’s try it. The Tempo value slider is located to the left of the Time signature pop-up menu.

Click and drag the middle of the Tempo value slider all the way to the left to set a tempo value of 60 BPM.

60 BPM is half of the original tempo of 120.

The video clip in the video track now appears to be half of the length of the overall project.
Play the project to hear it at the slowest tempo. While the project plays, notice that the music is painfully slow, yet the video does not appear slower in the video tab, and the sound effect on track 2 is still synchronized (in sync) with the video.
Now that you’ve seen and heard the effect of the slowest tempo, let’s speed things up and try the fastest tempo. This time you’ll type the new tempo into the value slider.
Click the Tempo value slider and type 200 (the fastest tempo); then press Return.
Press Shift-Z to see the full impact of the change in tempo in the Timeline.

Now the video clip appears to be much longer than the musical clips.
Play the project at the current tempo.
That’s the sound of jazz musicians after way too much coffee! What about the sound effect on track 2? The sound effect appears later than all the musical parts in the Timeline, yet it still maintains sync with the video. Why? Because the video and all time-based files remain unchanged. The music changed around them. In other words, changing the tempo of a project only changes the beats-based files, while the time-based files stay the same.
Pause playback if you haven’t done so already.
Change the Tempo value slider back to 120 BPM, then press Shift-Z again to fit the project in the window.
The default key for any project in Soundtrack Pro is the key of A. Every looping file you add to the Timeline will automatically adjust to match the key of the project. You can also change the key of the entire project at any time by changing the Key control, which is located at the right of the Time signature control.
Click the Key pop-up menu to change the key to A#.
Play the project.
The difference in key may not be very noticeable to the untrained ear. To make things more interesting, let’s continue the key change experimentation with the project playing. Then you’ll hear the changes in key with no ear training required.
With the project playing, choose the B key from the Key pop-up menu. Continue playback and try each different key to hear all variations of the project.
Did you notice that the sound effect on track 2 was unaffected by the change in key? That’s because the sound effect is a non-looping file. Nonlooping files, such as sound effects, and dialog are not musically based so they are not recorded or tagged in a specific key.
Earlier in this lesson you clicked the Time-based and Beats-based format controls on an empty project. Now that you have a basic understanding of the Time Signature, Tempo, and Key controls, it’s time to apply that knowledge to decide if the project should be beats-based or time-based.
The 2-2 Jazz Final project is currently beats-based, and for good reason—the project is primarily music, which is based on beats. If your Soundtrack Pro project is primarily dialog, sound effects, and non-looping parts, than the project should be time-based—based on timecode. If your project includes a mixture of the different types of files, you can always change the project’s format as needed. However, a project’s time format also determines which elements are resized visually in the Timeline during tempo changes.
Click the Time-based format button (clock) to change the project’s format to time.
Click the Tempo value slider and drag the mouse right and left to raise and lower the tempo value.
As the tempo changes, the time-based elements (including the video clip and sound effect) remain fixed in the Timeline, while the beats-based elements grow longer and shorter to reflect the tempo changes.
Click the Beats-based format button (metronome) to change the project’s format back to beats.
Drag the Tempo value slider again in both directions to see the changes to the files in the Timeline.
This time, the beats-based files remained fixed in the Timeline, while the video clip and sound effect extend or shorten to reflect the tempo changes. Keep in mind that a tempo change only affects beats-based files in the Timeline, regardless of the project’s format. The video and time-based files don’t actually change—only the way they are displayed in the Timeline relative to the beats-based files.
Change the project tempo back to 120.
Next, you’ll put some of these skills to work as you add tracks, arrange clips, and complete the 2-1 Jazz Start project.
At this time you’ll need to open the start version of the project where you will arrange the clips to build the final version of the soundtrack.
Each open project is represented by tabs, which are located in the top-left corner of the Project window. You currently have two different projects open, so you’ll see two different project tabs.
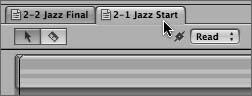
Click the 2-2 Jazz Final tab to view the finished version of the project, then click the 2-1 Jazz Start tab to see the starting version.
You can keep the finished version of the project open as a reference while working on the starting version, so that you can switch back and forth between the two anytime.
The 2-1 Jazz Start project is the primary project that you’ll be working with for the remainder of the lesson, so perhaps you’d like to make it the first tab in the Project window.
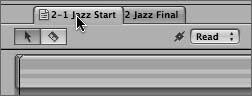
Drag the 2-1 Jazz Start tab to the left and release it once it is positioned in front of the 2-2 Jazz Final tab.
Changing a tab’s position does not change which tab is open. Only the project for the selected tab appears in the Project window.
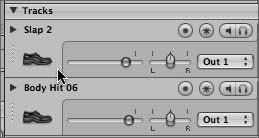
The current project includes six tracks. The top two tracks are the Slap and reversed Body Hit sound effects that you worked with in Lesson 1. During the next series of exercises, you’ll add and modify additional sound effects and then delete the original sound effects tracks. Once the sound effects are in place, you’ll work on arranging the music to improve the overall piece.
You’re already familiar with the different project formats, but did you know that you can also determine whether a track is time-based or beats-based? New tracks will be created in the same format as the project; however, they can always be changed once they are created.
What happens if a non-looping time-based sound effect is placed in a beatsbased track? Nothing, unless you change the project’s tempo. Changing tempo will effect some time-based clips if they are in a beats-based track. Whew! Just when you thought you understood the whole time-based vs. beats-based thing. Relax, it’ll all make much more sense when you test it for yourself.
Take a close look at the top two tracks in the Timeline. These are timebased tracks and contain time-based non-looping files.
Now take a close look at the lower four tracks in the Timeline.
Notice anything different near the track icons?

The small metronome symbol next to the track icon indicates that a track is beats-based instead of time-based. If there is no metronome symbol, then it’s a time-based track.
You can change a track’s time base in the Multitrack menu at the top of the interface or in a Shortcut menu. Let’s try it the first way now.
Click inside the Slap 2 track (top track) in the Timeline to select the track.
The track becomes highlighted in blue to indicate that it has been selected.
Choose Multitrack > Track Time Base > Beats.
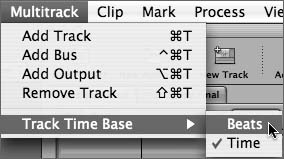
The beats-based metronome symbol appears next to the icon on the Slap 2 track.

Play the project once to hear it without a tempo change.
The Slap sound effect is still in sync with the video, even though the track is beats-based.
Change the project tempo to 100.
The Slap sound effect moved according to the tempo change, while the video clip and Body Hit sound effects remained unchanged.
Play the project at the new tempo.
The musical parts are slower in tempo, and the slap is clearly out of sync with the video. Hence, it’s a good idea to keep time-based clips in timebased tracks.
Change the project tempo back to 120.
The tracks all change accordingly.
Ctrl-click the metronome symbol on the Slap 2 track and choose Make- Time Based from the shortcut menu.
The first track is once again a time-based track.
Change the project tempo to 100 and play the project.
This time, only the beats-based tracks and musical parts change tempo. The sound effects remain in perfect time-based sync.
Change the project tempo back to 120.
That’s it for the time-based vs. beats-based track experiment. Hopefully, it’s not so confusing now that we’ve walked through it.
This is a good time to save the project to your folder on the desktop.
Your goal in this exercise is to create two new tracks that will contain nonlooping, time-based sound effects that stay in sync with the video clip. What is the current project’s time format? What time format do you want the new tracks to be? Remember, new tracks are created in the same time format as the project.
Click the Time-based format button (clock) to make the project timebased if that is not the current time format.
Press Cmd-T or choose Multitrack > Add Track to add a track to the Timeline.
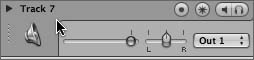
A new time-based track titled Track 7 appears at the bottom of the Timeline. New tracks are always created in sequential numeric order below the lowest track in the Timeline.
Nice track. Although it would be even nicer if it was at the top of the Timeline with the other sound effect tracks.
Rearranging the order of tracks in the Timeline is as simple as grabbing them by the drag handle and moving them. The tricky part is finding the handle.

Look carefully at the left edge of Track 7. The dotted vertical line is the drag handle.
Click the drag handle on Track 7 and drag the track to the top of the Timeline.
A blue line (position indicator) shows the new position of the track before you release the mouse button.
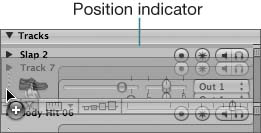
Track 7 should now appear at the top of the Timeline.
You can also add tracks to specific places in the Timeline by using a shortcut menu.
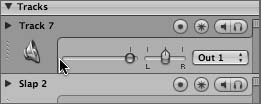
Ctrl-click the header of Track 7 and choose Insert Track Before from the shortcut menu.
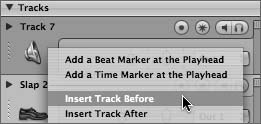
A new track, titled Track 8, appears at the top of the Timeline.
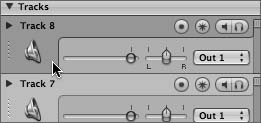
Okay, you’ve created two new time-based tracks in the Timeline; now all you need to do is add a few sound effects.
Soundtrack Pro includes hundreds of professional quality sound effects that you can add to your projects. You’ll be working extensively with sound effects in Lessons 3 and 4. For now, you’ll just get acquainted with the Sound Effects file category in the Search tab. You’re looking for one sound effect to replace the Slap and Body Hits effects when the clapboard closes and another to emulate the sound of the digital numbers changing on the slate itself.
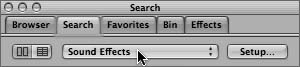
Click the Search tab on the Media and Effects Manager.
Choose Sound Effects from the file category pop-up menu.
Click the Column view button to the left of the category pop-up menu to view the different Sound Effects Keywords.
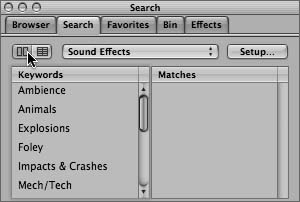
There are over a dozen different Sound Effect Keywords, including Ambience, Animals, Explosions, Foley, Impacts & Crashes, Mech/Tech, Misc., Motions & Transportations, People, Sci-Fi, Sports & Leisure, Transportation, Weapons, and Work/Home.
The first sound effect you’ll be looking for is something that sounds like the clapboard slamming closed.
Select the Impacts & Crashes Keyword on the Search tab.
The list of sound effects narrows to around 50.
Click once on the first sound effect in the results list, Air Pressure Blast 1.aiff, to preview (listen to) the effect.
Interesting, but not right for this project.
Press the down arrow key to preview the next file in the list Arrow Body Impact.aiff.
Great effect, the way you might imagine an arrow penetrating a body would sound. Not many people know what that actually sounds like, or would want to. Next.
Press the down arrow key again to hear the Arrow Wood Impact.aiff effect.
Perfect. It sounds like a variation on the effect you created in Lesson 1 when you combined a reversed Body Hit with a Slap sound effect. This one effect can be used to replace both of the previous effects.
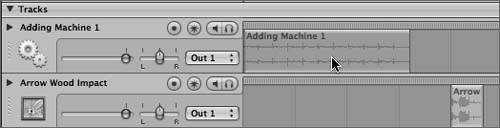
Drag the Arrow Wood Impact.aiff file from the Search tab to Track 7 and release it near the middle of the track.

The track’s name changes from Track 7 to Arrow Wood Impact to reflect the first file added to that track.
On the Search tab, click the Mech/Tech category.
Mech/Tech stands for Mechanical and Technology sound effects.
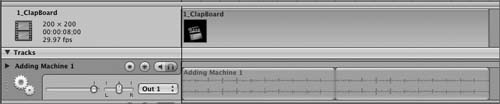
Preview the first file in the list, Adding Machine 1.aiff.
This one is a little extreme, but might work really well for this animated slate. Let’s try it.
Drag the Adding Machine 1.aiff file from the Search tab to the beginning of Track 8 (the top track) in the Timeline.
Your sound effects are in the Timeline, so now all you need to do is save.
Press Cmd-S to save your progress.
Since the new Arrow Wood Impact effect is like a combination of the Body Hit and Slap effects, you can use their waveforms guide for alignment. Once you align the new effect, you’ll delete the old effects, track and all.
Move the playhead over the Slap 2 sound effect in the Timeline.
Press Cmd-8 to change the tracks to a Medium size, if they are not already that size.
Press the up arrow key to zoom in to the Timeline for a good view of the sound effect clips.
The waveforms in the Body Slap 2 clip show where the sound effect needs to begin, so just align the second part of the Arrow Wood Impact clip to the beginning of the Slap 2 waveform.
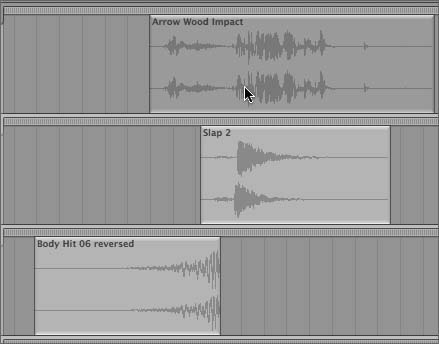
Move the Arrow Wood Impact clip left or right to align it with the other effects.
Play the project to hear the new combination of sound effects.
Feel free to continue adjusting the effect until you’re satisfied with its placement. Once you’re finished, take a moment and return the Timeline to your normal settings.
Press Shift-Z to fit the project in the window, press Cmd-7 to change the track height to Small, and press Return to move the playhead to the beginning of the Timeline.
Now that you’ve added a new sound effects track, you can remove the Slap 2 and Body Hit 06 tracks in a few simple steps.
Click the drag handle on the Slap 2 track in the Timeline to select the track.
Next, you’ll simultaneously select the Body Hit 06 track.
Tip
To select multiple tracks, hold the Command key and click the track headers rather than simply clicking the track within the Timeline. The easiest way to do this without accidentally changing one of the track controls is to click the drag handle on the left edge of the track.
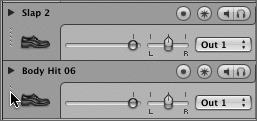
Cmd-click the drag handle on the Body Hit 06 track on the line above the volume slider to simultaneously select that track.
Choose Multitrack > Remove Tracks, or press Shift-Cmd-T to remove the selected tracks.
The Slap 2 and Body Hit tracks should no longer exist on your Timeline.
Press Cmd-S to save your progress.
So far, you’ve learned that projects can have either a time-based or beats-based format. You also know that individual tracks are either time-based or beatsbased. Well, you also need to consider the looping or non-looping playback mode of the actual files within the tracks.
In Lesson 1, we worked with both looping and non-looping audio files. Loops are generally used to create repeating patterns, and often include musical phrases useful for creating music. Non-looping files are usually sound effects and non-musical sounds, such as dialogue.
When you add an audio file to the Timeline, it is added as a clip with the nonlooping playback mode unless the audio file is tagged as a loop. Some files can be tagged to be either looping or non-looping files. Once you’ve added a clip to the Timeline, you can change the file’s playback mode.
Why would you change a clip’s playback mode? Suppose you have a sound effect, such as an Adding Machine, that you’d like to loop in the Timeline. The Adding Machine 1 sound effect is a non-looping file, but you need to loop it so that it repeats to extend its duration. That’s a good goal for this exercise, so first let’s isolate (solo) the Adding Machine track to focus on that sound in the Timeline.
Each track includes Mute and Solo buttons so that you can either silence or isolate a track in the Timeline. The solo button looks like a pair of headphones and is located in the top-right corner of the track header.
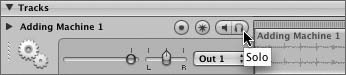
Click the Solo button on the Adding Machine 1 track.
The Solo button darkens when it is on, and all of the other tracks turn darker gray to show that they have temporarily been muted.
Play the project to hear only the current Adding Machine 1 clip in the Timeline.
As you can hear, soloing a track can be very useful.
The Adding Machine 1 sound really works well with the digital numbers on the clapboard of the video clip. However, the sound doesn’t last the duration of the project. Next, you’ll extend the clip then convert the playback mode to looping.
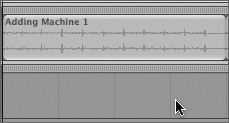
Drag the right edge of the Adding Machine 1 file to extend it the full eight seconds of the project.

Well, you’ve accomplished part of your goal. The clip is indeed longer. Unfortunately, because the file is non-looping, the extended portion of the clip contains empty space with no sound.
Ctrl-click the Adding Machine 1 clip in the Timeline and choose Convert to Looping from the shortcut menu.

The Adding Machine 1 clip in the Timeline converts to a looping file with two full looped segments in the Timeline.
Play the project.
Amazing! Notice how well the looped sound effect goes with the video clip? Not only does it work, the change in sound between the loop segments actually matches the quick turn the clapboard makes onscreen. I wish I could take credit for that, but it’s pure luck. Looping this particular effect might not work in some cases because of the change in sound between segments. However, in this case, it’s perfect.
Click the Solo button again to unsolo the track.
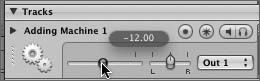
While you’re focused on the Adding Machine 1 track header, let’s turn the volume level of the track down a bit, so that it will be more subtle. The sound effect is just to enhance the piece, not overpower the percussion tracks.

Each track header also includes a handy Volume slider. You’ll learn much more about working with volume levels in Lessons 8 and 9. For now, it’s just important to know that you can raise and lower the volume level as needed for each track.
What’s the difference between recording music and arranging music? Recording music usually requires recording equipment, musicians, instruments, a studio, and a lot of time. Arranging music, on the other hand, is the art of the music producer and involves carefully combining different instruments and music parts that sound good together to create a finished song.
For this lesson, the raw parts for this musical piece are already in the Timeline. All you’ll need to do is change the arrangement a little to make the song even better.
Before you start trimming and moving music clips around in the Timeline, you need to remember one really important thing.
Rule 1: Music loops are beats-based and depend on beats and snapping to stay in musical time.
Soundtrack Pro includes two foolproof features to keep your music loops in time and on beat: snapping and gridlines. Previously, you’ve moved sound effects around in the Timeline to match action in the video clip. You could move sound effects to any position on a track because they are time-based. Moving music clips involves a little more attention to musical timing.
What’s the big deal about musical time (a.k.a. beats-based) format? Ever heard an orchestra tuning? Music time in a preschool class? Saturday afternoon at a music store with a dozen people testing out drum kits, guitars, and keyboards at the same time? The two things that can lead directly to musical chaos are parts that don’t match the project key, or parts that are out of musical time. For now, you’ll focus on musical time and beats-based loops, tracks, and projects.
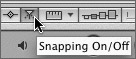
Make sure the snapping feature is turned on. (It will appear darker gray.)
Tip
You can toggle snapping on and off by pressing the N key, clicking the Snapping button, or choosing View > Snap.
That takes care of snapping. What about the gridlines? Well, you can’t physically grab or move gridlines. However, zooming in to the Timeline displays more gridlines per measure, and zooming out displays fewer gridlines per measure. As you work with this lesson, feel free to zoom in or out as needed to control the number of gridlines per measure.
Notice how many gridlines you see in the first two measures of the project.
The number of gridlines and their spacing depends on the current zoom scale, monitor resolution, and size of the project window.
Press the up arrow key to zoom in one level in the Timeline.
Now check how many gridlines you have. There should be more per measure than you had at the previous zoom level.

Since you’ll be editing and arranging music, now is a good time to change the Project format back to Beats.
Click the Beats-based format button (metronome) in the Project controls to change the Time Ruler, and Time Display priority to Beats.
The current musical piece isn’t bad, but it isn’t great either. It’s somewhere in between. You don’t have to be a musician to recognize when music works; it either does or it doesn’t. You can also recognize mediocrity.
In the real world, most music starts with one or two instruments, then the other musicians or parts join in. Jazz is interesting in that some songs start with the bass to carry the rhythm, while in others, the bass joins in. How and when different instruments join the song is all part of the fine art of arrangement.
For this exercise, you’ll use gridlines and snapping as a guide to trim and move the loops to make them sound more like actual musicians joining the song. Let’s start by trimming the beginning of the Upright Jazz Bass part so it begins a little later in the song.
Press Return to move the playhead to the beginning of the project in the Timeline (Beat 1.1.000).
Press the right arrow key repeatedly if needed to move the playhead one gridline at a time toward the right until you reach the 1st beat of the 2nd measure (2.1.000).

Drag the left edge of the Upright Jazz Bass 38 loop to the playhead (2.1.000) to trim the beginning of the bass part of the song.

The bass part now starts at the beginning of the 2nd measure, also referred to in musical terms as Bar 2.
Next, you’ll trim the empty space from the beginning of the Jazz Guitar Single Note Riff 13 loop on the track with the same name. Trimming this loop and moving it to the left will kick the song off with the first guitar note.
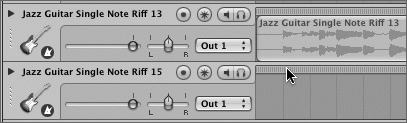
The pause at the beginning of the Jazz Guitar loop is only one beat, so trimming the pause will shorten the loop by one full beat.
Drag the left edge of the Jazz Guitar Single Note Riff 13 loop one beat to the right.

Note
To trim or extend a loop, drag the left or right edge of the loop. To move a loop in the Timeline, drag from within the loop itself.
Now that you’ve trimmed the guitar clip, you can move it by dragging from within the loop itself.
Drag the trimmed guitar loop to the left and snap it to the beginning of the track in the Timeline (1.1.000).

Play the revised song.
The beginning is good, but the end still has a bit of conflict between dueling guitar parts. To remedy this, you’ll trim the Jazz Guitar Single Note Riff 16 loop that is on the same track as the guitar loop you just trimmed.
Move the playhead to the 1st beat in the 4th measure (Bar 4 or 4.1.000).
Trim the left edge of the Jazz Guitar Single Note Riff 16 loop to the playhead position.

When you move the pointer over the Timeline or drag a clip to a new position, you’ll see blue vertical Position Indicators that you can use to help with alignment.
Drag the trimmed loop to the left until it starts on the 3rd beat of the 3rd measure (3.3.000).
Use the blue vertical Position Indicators (lines) in the Timeline to see the clip’s position in the Time Ruler.

Press Cmd-S to save, then play the finished project in the Timeline.
Congratulations! You finished the project and learned about multitrack project properties and time formats along the way.
Now that you understand the basics of Time formats, Project controls, and Tracks, it’s time to set the Project Preferences and create a new project. You’ll learn different Soundtrack Pro preferences over the course of this book. For now, you’ll focus on the Project Preferences, which determine the Project Properties for new projects that you create in Soundtrack Pro.
Choose Soundtrack Pro > Preferences, or press Cmd-, (comma) to open the Soundtrack Pro Preferences window.

Click the Project icon at the top of the Preferences window to view the Project Pane in the Preferences Window.
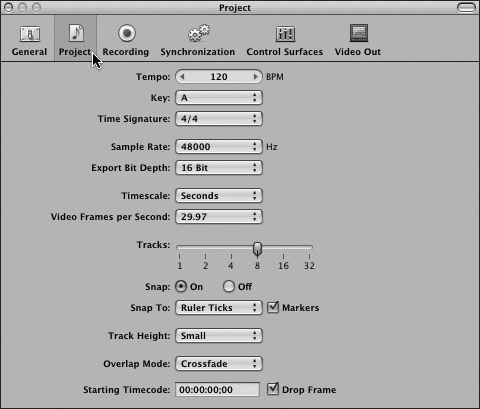
The Project properties listed in the Preferences window are self-explanatory, and similar to Project properties such as Tempo, Key, and Time Signature, which you worked with earlier in the Project window. The Timescale pop-up menu allows you to change the time format for the new project to either Seconds (time-based) or Beats (beats-based).
Click the Timescale pop-up menu and change the Timescale to Beats.

When you create a new project, the project and tracks will be beats-based. The other default settings should be fine.
Note
If you changed any of the settings, make sure that they are set as follows before closing the Preferences window: Tempo 120, Key A, Time Signature 4/4, Sample Rate 48000, Export Bit Depth 16 Bit, Timescale Beats, Video Frames per Second 29.97, Tracks 8 (this sets the initial number of tracks in a new project), Snap On, Snap To: Ruler Ticks, Snap To Markers checkbox selected, Track Height Small, Overlap Mode Crossfade, Starting Timecode 00:00:00;00, and Drop Frame checkbox selected.
Click the Close (x) button at the upper left of the Preferences window or press Cmd-W to close the Preferences window.
Press Cmd-N to create a new multitrack project, then press Cmd-Shift-S and save the project as Clapboard Score in the My Soundtrack Pro Projects folder on your desktop.
It’s your turn to create a simple score for the ClapBoard 1 video clip. You’ll use all of the skills that you’ve learned so far in this book. First, you’ll need to add the ClapBoard 1.mov clip, and then add some sound effects and music loops. The ClapBoard 1.mov clip should still be located in your Favorites tab. If not, you’ll find it in the Browser in the 01-02 Projects&Media folder.
Once you’re finished, save the final version of your project and press Shift- Cmd-W to close all open projects.
Give yourself a 15-minute time limit. Choose one or two sound effects and add several music loops and arrange a simple score. Feel free to adjust the project properties as needed. Have fun!
Finder | |
|---|---|
Shift-Cmd-A | opens the Applications window |
Windows | |
Cmd-W | closes the active window |
Shift-Cmd-W | closes all active windows or open projects |
accesses the Open window | |
Cmd-N | creates a new multitrack project |
Shift-Cmd-A | cpens the Save As window |
Navigation and Timeline | |
Cmd-N | creates a new multitrack project |
Cmd-T | adds a track to the Timeline |
Shift-Cmd-T | removes selected tracks |
Cmd-6 | changes track height to Reduced (smallest) |
Cmd-7 | changes track height to Small |
Cmd-8 | changes track height to Medium |
Cmd-9 | changes track height to Large |
N | toggles Snapping feature on and off |
Click drag handle | selects track |
Cmd-click drag handle | selects multiple tracks |
Right or left arrow keys | moves playhead forward or back to the nearest gridline |
Media and Effects Manager | |
Click once | to select and preview an audio file |
Up and down arrow keys | preview the previous or next file in the list |