
After gathering preliminary information about the target and identifying potential systems that are alive, you need to determine what services the targets are running. One way to identify services is to scan the hosts with a port scanner. The port scanner looks for open service ports on the target. Each port is associated with a service that may be exploitable or contain vulnerabilities. Port scanners can be used “surgically” to scan for specific ports or they can be used to scan every port on each host. The more surgical you can be in your scans, the better your chances of avoiding detection. However, a complete port scan should be performed toward the end of the engagement to identify ports that may have been missed. Below we discuss some of the more popular port scanners and describe how to use them.
URL: www.insecure.org/nmap (www.eEye.com/html/Research/Tools/nmapnt.html for Windows NT)
Client OS: Linux, UNIX, Windows NT
Target OS: TCP/IP networks
Price: Free
Description: In Chapter 12 we discussed Nmap's use in performing TCP pings and OS identification. In this chapter, we discuss Nmap's abilities as a port scanner. Nmap is one of the most advanced port scanners in the industry. It offers more features and options than we have seen in any other port scanner. Nmap provides options for stealth scanning, using decoys, spoofing, fragmentation, and many other features.
Nmap operates primarily on UNIX platforms. Nmap has been ported to Windows NT by eEye Digital Security, but not all the functionality was carried over and it can be difficult to get working properly. On UNIX systems, Nmap can be difficult to load and operate if you are not familiar with the UNIX operating environment. To load Nmap, either you can use the RPM version (Red Hat Linux) or the binary, or you can compile it from the source code. As with any tool you obtain from the Internet, we recommend you compile the source code yourself. If you compile the tool on the platform it will be used on it will normally perform better. When you compile the tool yourself you will have an opportunity to examine the source code for Trojan horses and other back doors.
There is a GUI for interfacing with Nmap called Nmapfe (front end). Nmapfe does not offer all the options the command line version offers, but it is easy to use and it provides the syntax for the commands you would have to issue manually to achieve the same results. The visual tool provides an excellent way to become familiar with Nmap's syntax, so you can move onto the command line version to take full advantage of all the tool's options.
Use: One of Nmap's most valuable features is the ability to perform stealth scans. Most port scanners make full TCP connections to the target system. These types of scans can be easily detected by the target network or host. Stealth scans use only a portion of a TCP connection, such as the SYN or FIN packets, and do not make a complete TCP connection. A complete TCP connection involves the sender sending a SYN, the receiver sending a SYN-ACK, and the sender replying with an ACK. This is commonly referred to as the three-way handshake. Many times when a stealth scan is used the host and target network do not realize the system was scanned because a full TCP connection never occurred. Stealth scans may help avoid detection by some intrusion detection systems (IDSs). In fact, many times we test IDSs by using Nmap's stealth scan utility with other options such as fragmentation to see if the sensor can detect the activity. Most of the newer IDSs are able to detect stealth scans, so don't think that using the stealth scan option alone will keep you from being detected. By adding fragmentation (-f option) the scanner fragments the packets it sends during the port scan. By fragmenting the packets, you may avoid detection by some IDSs. An IDS looks for specific patterns in the network traffic. By fragmenting the scan, the network traffic pattern may not be recognized by the IDS or by a system administrator reviewing system logs. In addition to bypassing IDSs, fragmentation can be very useful when testing IDSs. A robust IDS should be able to detect a fragmented Nmap stealth scan (Nmap with –sS and –f options…). If your company has an IDS, try running an Nmap stealth scan with fragmentation to test its effectiveness. The downside to these stealth scans is that the results are less reliable since a full connection to the port was never made. Stealth scans are very useful when trying to remain undetected during testing, but keep in mind that the results could be inaccurate. Some ports reported as open may actually be closed and vice versa.
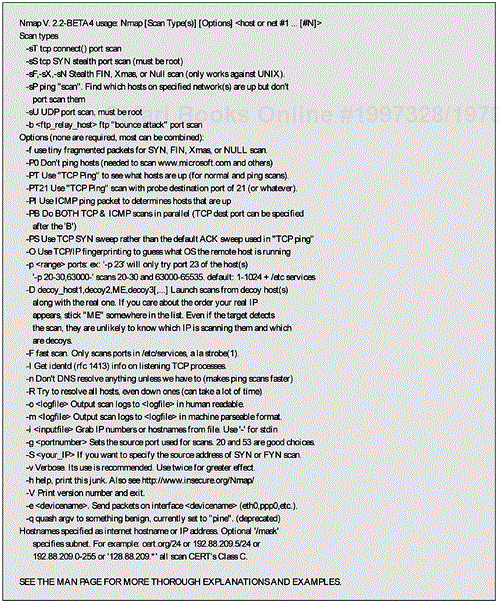
Figure 13-1 presents a sample of help output from Nmap showing many of the options available. Nmap has several options for scanning networks: normal TCP port scan (-sT), TCP SYN stealth scan (-sS), stealth FIN scans (-sF), and UDP port scans (-sU).
Normally, we begin our Nmap port scans with a SYN stealth scan looking for selected ports and using OS identification option. By using the stealth scan feature and confining our scan to a few choice ports, we obtain valuable information while significantly improving the chances of remaining undetected. We begin by scanning for ports that support services that we know provide valuable information or that we may be able to exploit. We have developed a list of some of these ports (see Table 13-1). You should add and delete ports from this list based on what you find to be successful and the type of systems you are targeting.
The syntax for this stealth scan can be confusing at first. Here is the command you could use to execute the SYN stealth scan we just described (remember, UNIX is case sensitive):
#nmap –sS –O –P0 –f –p 7,9,13,21,25,135-139,5800,etc. –v –o
outputfile.txt 10.10.10.10-10.10.10.100
Table 13-1. Sample Ports to Scan
| Port | Service |
|---|---|
| 7 | Echo |
| 9 | Discard |
| 13 | Daytime |
| 19 | Character generator |
| 21 | FTP |
| 22 | SSH |
| 23 | telnet |
| 25 | SMTP |
| 37 | Time |
| 42 | Wins hostname server |
| 53 | DNS |
| 69 | TFTP |
| 79 | Finger |
| 80 | HTTP |
| 110 | POP |
| 111 | SUN RPC |
| 135–139 | NT services NetBIOS |
| 143 | IMAP |
| 161–162 | SNMP |
| 256–258 | Check Point Firewall |
| 443 | SSL |
| 512–515 | r services |
| 2049 | NFS |
| 2301 | Compaq |
| 5800 | VNC |
| 5900 | VNC |
| 6000–6023 | X Windows |
| 12345 | Netbus |
| 32760–32785 | RPC services |
| 65301 | pcAnywhere |
There are several options included in this command. -sS specifies a SYN stealth scan. -O enables OS identification. -P0 indicates that Nmap should not attempt to ping the target. -P0 is a very important option; if this option is not used, Nmap will attempt to ping the target, and if the target does not respond to ping, Nmap will not scan it. Therefore, if you want to scan only hosts that respond to ping do not use -P0, but be aware that you may miss hosts that have disabled or filtered ping. Using -P0 will enable you to scan hosts that do not respond to ping. The scan will take longer since Nmap will attempt to scan the specified ports on every address even if the host is not active. -f indicates that the scan should be fragmented into small packets to help avoid detection. -p specifies the ports to be scanned. Follow the -p with your list of ports, as demonstrated in the example on page 232. Note that in our example we used “etc” to signify that you could continue to add specific ports. If you do not specify the -p option Nmap will scan its default list of ports. -v indicates the verbose setting, which will display all output on the screen. We recommend using the verbose option so that you can examine the output as it is produced and catch problems early. -o allows you to specify an output file so that you can analyze the results later. Finally, enter the IP address range of the systems to be scanned. In our example, we are scanning 10.10.10.10 through 10.10.10.100. We could have easily added another range or individual hosts by adding a comma after each range or host.
Nmap offers some more advanced options that increase the functionality of the tool. Before we start discussing these options and providing examples, one word of warning. The decoy option, -D, enables you to specify fake addresses to make it appear as if those addresses are performing the scan. Be careful using this option since you could cause a lot of confusion and potential problems for other companies. For example, let's say you randomly choose three IP addresses to use as decoys and then perform a full 65,000 port scan on a target. This may set off alarms on the target network. The target's system administrator traces the addresses and discovers that XYZ Company owns the IP address that you randomly picked as a decoy. The system administrator or a manager from the target company calls XYZ and accuses them of conducting suspicious activity against the site that could be considered a precursor to an attack. You can see how this can get ugly quickly and potentially waste multiple companies' time and resources trying to track down exactly what happened. So, be careful using this option; use it only when you are authorized, and enter as decoys only addresses that you have permission to use.
-g enables you to specify a source port from which your scan originates. This is very useful in trying to bypass port filtering routers and firewalls. For instance, if a firewall at the target network is filtering all ports except 53, 80, and 443, you will not be able to find any open ports except for the ones the firewall is allowing through. The problem here is that there may be many other ports open on systems inside the firewall that may help you identify services and systems and find additional holes. To find these ports that are filtered by the firewall, you need to specify a different source port. By using the -g option and specifying one of the ports allowed through by the firewall, you may be able to bypass the filters. For instance, you could use -g 53, which would attempt to connect to the target ports by coming from port 53, DNS. The firewall may allow this packet through since the source port is permitted. The packet will contact the target port (for example, port 110), and the reply will be sent back to the specified source port. Using this technique you may be able to identify additional ports and services that you would not have otherwise been able to find. This technique will not work against a stateful inspection or proxy firewall since they actually examine the packet contents.
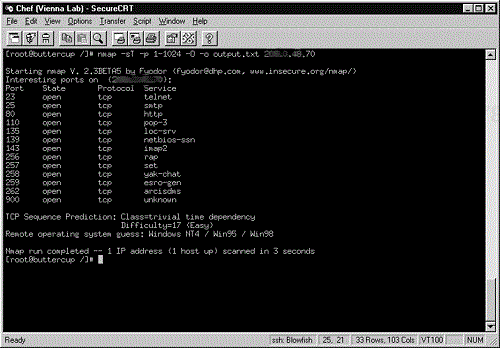
In Figure 13-2 we have included sample results from a normal TCP scan (-sT).
Benefits: Nmap is a powerful tool that is considered one of the best port scanners in the industry. It offers many different options, and the output is very reliable. Nmap is one of the few tools that offer stealth scans, specification of source ports, fragmentation, and OS identification. Nmap can also be very useful for testing the detection capability of IDSs. In addition, Nmap has a lot of documentation contained in the manual (man) pages as well as online.
Cons: The tool can be difficult to use and install if you are not familiar with UNIX. OS identification with the don't ping option can take a very long time to run. The Windows NT version and GUI version do not offer all the same options as the command line version.
URL: www.hackers.com/html/archive.5.htm
Client OS: Windows 9x/NT/2000
Target OS: TCP/IP networks
Price: Free
Description: 7th Sphere, shown in Figure 13-3, is an excellent Windows 9x/NT/2000 tool for port scanning a range of ports on a single host. It is a fast port scanner with a nice GUI. As an added bonus 7th Sphere provides text response from the scanned port (quasi banner grabbing). This information helps you learn more about the target and the services running on it.
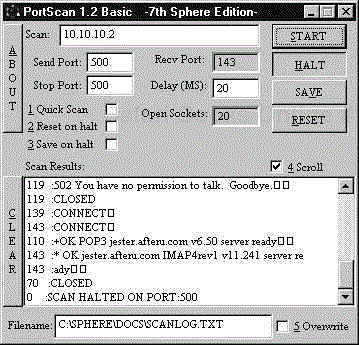
Use: 7th Sphere is very useful when attempting to further probe a single host. To begin, enter the IP address or host name of the target in the Scan window. Next, specify the ports you wish to scan. We normally start by scanning ports 1–1024 since they are commonly used ports. Later you may wish to scan all 65535 ports. Keep in mind, scanning all 65535 ports will take some time and may alert IDSs. The tool also offers options for Quick Scan, Reset on halt, and Save on halt. We tend to leave these options unchecked, but check them as you need them. The last important step is specifying an output file in the Filename window. If you do not enter a new file name for each scan, you will overwrite the results of the previous scan. Once you have your settings correct, click on the start button and wait for the tool to finish its work.
Benefits: The tool is quick and easy to use. It offers a nice GUI and runs on Windows 9x/NT. This is an excellent port scanner for performing in-depth scans on a single host.
Con: You can scan ports only by ranges and you cannot specify multiple target hosts. For scanning select ports on a number of different hosts, use a different scanner such as Nmap or SuperScan.
URL: www.packetstormsecurity.org
Client OS: Linux, UNIX
Target OS: TCP/IP networks
Price: Free
Description: Strobe is a quick and easy-to-use UNIX-based tool that will scan through any number of ports you select. It can run by itself and place all the results in an output file.
Strobe has several functions, but we have found the most effective way to use it is to give it one IP address and scan through port 5000. This will capture most common services and provide valuable information for exploitation.
Use: To use Strobe, you need to specify a beginning port (-b) and ending port (-e). For instance, to scan ports 1–2000 on host 10.10.10.10 you would use the following command:
#strobe –b 1 –e 2000 10.10.10.10
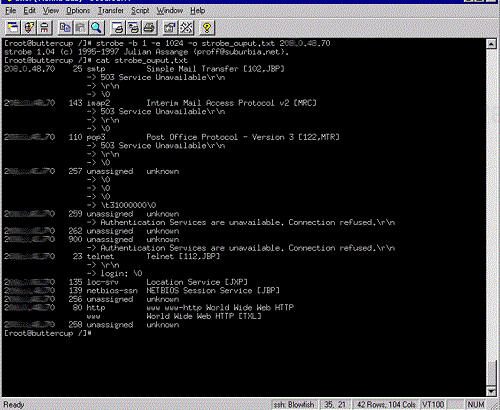
Figure 13-4 displays sample output from a Strobe scan.
Benefits: Strobe is easy to use and fast. The tool is also free.
Cons: Strobe is not as robust as Nmap and does not offer as many options.
URL: www.packetstormsecurity.org
Client OS: Windows 9x/NT/2000
Target OS: TCP/IP networks
Price: Free
Description: SuperScan, displayed in Figure 13-5, is a versatile port scanner for Windows 9x/NT/2000 systems. You can scan a range of hosts or individual hosts from a text file. Similarly, you can scan port ranges or select ports from the port setup list. Additionally, SuperScan can be used to perform ping sweeps using the Ping only option. The port list accompanying SuperScan is an excellent reference for associating a port number with a specific service.
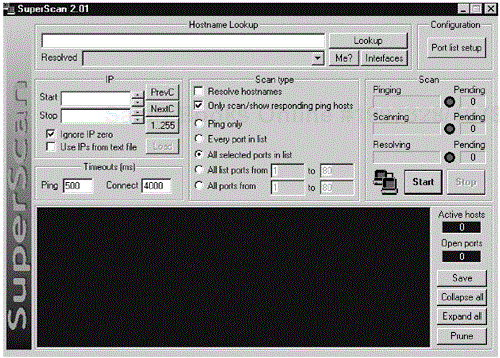
Use: Figure 13-5 displays SuperScan's interface. To begin using the tool, enter the start and end IP addresses in the Start and Stop blocks on the left side of the screen. You can enter the IP address of a name server in the Hostname Lookup window for the tool to use to resolve addresses.
The Scan type window offers several options. Check the Resolve hostnames box if you wish to resolve the names, but keep in mind it may take a little longer to perform the scan. The next box, Only scan/show responding ping hosts, is important. If you check this box, the tool will first ping each address and scan only those that respond to ping. This makes the scan proceed faster, but you will miss any hosts that do not respond to ping. If you uncheck this box, the tool will scan each address completely, but the scan will take longer because scans on each nonexistent host will have to time out before the tool advances to the next target. The next set of options includes Ping only, Every port in list, All selected ports in list (which scans each port you have checked in the port list setup), All list ports from (which scans a specified range of the ports from the list), and All ports from (which allows you to input a range of ports).
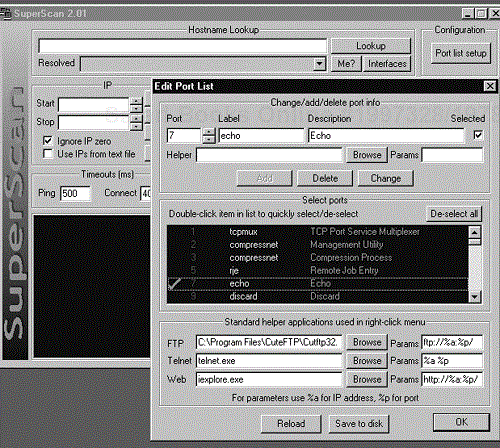
In the upper right corner, the configuration box contains a Port list setup button. If you click on this button, SuperScan displays a list of ports from which you can choose the ports you wish to scan (see Figure 13-6). If a port you need is not listed, you can add the port. The tool also allows you to save the port list to disk so you can use it again later.
Once you have configured your options and selected the ports you wish to scan, select the Start button. The scan information window just above the Start button shows you the progress of the scanner. The blue window at the bottom of the page displays the output as it is collected.
Benefits: SuperScan is a fast, highly configurable scanner. You can scan individual hosts or ranges for selected ports. The port list setup is convenient so that you don't have to remember the port numbers for every service. SuperScan is a freeware tool and is an excellent choice for a Windows-based scanner.
Con: SuperScan cannot perform stealth scans or any of the more advanced scan features that Nmap offers.