Many people are familiar with a number of the automated vulnerability scanners available in the industry. While these scanners are useful in security testing, they are often misused by organizations. We usually find that organizations either rely too heavily on automated scanners, thinking they are the end all and be all of testing, or do not use automated scanners at all. Vulnerability scanners are a useful tool in testing, but they are only one part of the test. Effective security testing includes the use of automated scanners but also includes all the other phases we describe in this book.
Vulnerability scanners are automated tools designed to scan hosts and networks for known vulnerabilities and weaknesses. There are a number of these tools on the market. Some are free and others will significantly strain your budget. Network Associates CyberCop Scanner and Internet Security Systems (ISS) Internet Scanner are two of the leading commercial scanners in the industry. These tools essentially perform a series of automated checks against each target, trying to locate known vulnerabilities. Each tool has a vulnerability signature database that it can use to test the host for known vulnerabilities. If the vulnerability does not exist in the database, the tool cannot find it. Additionally, if the database is not continually updated, the tool will not find the latest vulnerabilities and will become less effective. Therefore, the number of vulnerabilities a scanner looks for and the frequency of the updates are important criteria for selecting the right vulnerability scanner. The problem is each vendor does not define the term vulnerability in the same way. For instance, some scanners find one vulnerability and then report each piece of information that can be gathered as a result of this one vulnerability as additional vulnerability checks. So a single vulnerability becomes ten as reported by the scanner.
Vulnerability scanners can effectively locate many of the holes discussed in Chapter 4. The scanner can be used to identify vulnerabilities you may have missed during earlier testing. Additionally, the tools can help discover vulnerabilities that have been published but not yet patched on systems. By using the information from the scanner in conjunction with the rest of the testing data, you can gain an excellent picture of the network and systems. Most scanners look for vulnerabilities at the operating system level. They look for such holes as misconfigured file permissions, open services, and other operating system problems. In addition, many scanners look for vulnerabilities in commonly exploited applications such as Web services, domain name services, and sendmail. Now specialized scanners are being developed to test databases and other specific applications. We see these specialized scanners becoming more popular in the near future.
While automated vulnerability scanners are an effective tool for helping to secure a network, they do have shortfalls. First, many people tend to rely too heavily on automated scanners, thinking that the scanner can replace comprehensive penetration testing. These individuals don't quite understand how a scanner works. There is a quote used often in the security community: “Computers don't break into other computers, people do.” Therefore, it is unrealistic to expect a vulnerability scanner to replace a skilled penetration tester. While the scanners do identify vulnerabilities, they are not good at chaining vulnerabilities—combining vulnerabilities such as bypassing filtering rules to access a poorly configured FTP server or exploiting one system to gain passwords to another. Comprehensive security testing should identify additional holes that can lead to network penetrations that most scanners would miss. Vulnerability scanners help find and correct some of these vulnerabilities, but a skilled person with a bag of tools and tricks is still the only effective way to find and then plug as many holes as possible.
Another weakness of vulnerability scanners is that they are only as good as their signature database. If the database is not continually updated (or is not very good at the start), the results of the scan will be poor. Each day new vulnerabilities are published for a variety of systems and applications. If you are going to use a scanner, choose one with a good vulnerability database and regular updates.
Some scanners can be confusing to use. In fact, some are even dangerous if not used properly. For example, Network Associates' CyberCop Scanner and ISS Internet Scanner contain denial-of-service (DoS) testing modules. While these modules are intended only to test for the existence of DoS vulnerabilities, they could cause an actual DoS condition on the target. An inexperienced tester may not be aware of these modules before running the tool and may inadvertently bring down a company's network. Also, automated scanners can generate a lot of network traffic. If used during the wrong time of day on busy networks, the scanner could reduce network and system performance. Also, if the network you are testing has an intrusion detection system (IDS) installed, you need to check with the IDS operations personnel before running the tool. Some IDSs are configured to shut down network segments if suspicious activity is detected. In those network environments the scanner will set off the IDS sensor and shut down the network segment being tested. Be sure that these conditions do not exist before running the tools on the network. Also, if you are trying to remain undetected during testing, a vulnerability scanner is not the route to choose. However, if you do use an automated scanner on a network with an IDS and are not detected, you can be pretty sure the IDS will not detect anything else either.
Most vulnerability scanners provide false positives in addition to legitimate findings. You must be able to review and analyze the output to determine whether the vulnerability truly applies or is a false positive. Recognizing that the vulnerability affects an operating system other than the system being scanned, or that the service reported to contain the vulnerability does not exist on the server, can help to identify false positives. Other types of false positives can be more difficult to verify.
In addition, you must find ways to fix the vulnerability the scanner identifies. Many scanners, such as Internet Scanner and CyberCop, provide recommended fixes to address the reported vulnerability. However, the recommendation may not contain enough detailed to enable you to fix the vulnerability without performing additional research. Nevertheless, the recommendation at least gives a starting point for addressing the exposure. Sometimes the recommended fix considers only security implications, although the vulnerability may have a significant impact on performance or business operations. For instance, the recommended fix may shut down a service that you actually need on your network. In this case you will have to find another way to control the risk resulting from the vulnerability. Regardless, you should always test recommended fixes in a nonproduction environment before applying the repair. This way you will hopefully catch any problems before they are introduced into a production environment.
There are two main types of automated scanners, network-based and host-based. Network-based scanners attempt to look for vulnerabilities from the outside in. The scanner is launched from a remote system such as a laptop or desktop with no type of user or administrator access on the network. Conversely, the host-based scanner looks at the host from the inside out. Host-based scanners usually require a software agent to be installed on the server. The agent then reports back to a manager station any vulnerabilities it finds. Network-based scanners look for exploitable remote vulnerabilities such as IIS holes, open ports, buffer overflows, and so on. Host-based scanners look for problems such as weak file permissions, poor password policy, lack of security auditing, and so on.
Host-based and network-based scanners complement one another well. It is very effective to employ both when testing critical systems. Again, you need to be careful when using these scanners. Network-based scanners have many options for dangerous tests, such as denial of service. Host-based scanners usually require an agent be loaded on the system being tested. This could introduce a problem on the target host if the software is not configured properly or if the agent conflicts with an application or service on the target system. Therefore, you should always test your host-based scanner on nonproduction systems prior to using it in a live environment.
Host-based scanners can also be used as configuration management tools. A host-based scanner can report changes a system administrator or other user made to the system. For instance, if a system administrator inadvertently changes file permissions on a server or opens an authorized service, the tool could report this change to the management server.
As we stated earlier, specialized scanners are becoming more popular. ISS has developed a database scanner and other companies are following the lead. In addition, scanners for enterprise resource planning (ERP) systems are currently under development. The number of scanners developed for specialized, widely distributed applications will probably continue to grow. These scanners will most likely have many of the same problems we have discussed above, but they should also offer significant benefits in security testing.
Other developments in the automated vulnerability scanner market include integration into an active security model. Active security combines different automated tools into an unmanned network defense. For instance, if the automated scanner detects a vulnerability, it could automatically send a message to the firewall to close the port to the affected host so the vulnerability cannot be accessed. At the same time the scanner could send a message to the help desk to fix the problem it just detected. Network Associates is rapidly developing the active security model, as are other vendors such as ISS. While these models offer exciting possibilities, we think they still have some distance to go before becoming as effective as they promise to be.
Table 11-1 lists some of the leading network- and host-based vulnerability scanners for some of the more popular operating systems. Often we are asked, “What is the best scanner?” This is a difficult question to answer. There are several good tools available and each has its strengths and weaknesses. One scanner may be better than another at scanning a particular operating system. Another scanner may be faster than the others. Which one is the best really depends on what you are going to be using it for and what features are important to you. Network Associates CyberCop scanner and ISS Internet Scanner are two of the leading scanners for UNIX and Windows NT systems. Our experiences show that Internet Scanner may find vulnerabilities that CyberCop does not and vice versa. Therefore, it may be beneficial to run more than one scanner. This could be very expensive. CyberCop, Internet Scanner, and other leading scanners are not cheap. In fact, we find them quite expensive, but they are considered the top of the pack in automated network-based vulnerability scanners.
Table 11-1. Scanners for Each Operating System by Type
| Target Host | Type of Scanner | |
|---|---|---|
| Network-Based | Host-Based | |
| Windows NT | CyberCop, ISS Internet Scanner, HackerShield, NetRecon, Nessus | Enterprise Security Manager (ESM), Pentasafe VigilEnt, ISS System Scanner, Bindview |
| Netware | NetRecon, Kane Security Analyst | ESM, Bindview, Pentasafe VigilEnt |
| Solaris | CyberCop, ISS Internet Scanner, Nessus, HackerShield, NetRecon | ESM, Pentasafe VigilEnt, Bindview |
| AIX | CyberCop, ISS Internet Scanner, HackerShield, Nessus, NetRecon | ESM, Pentasafe VigilEnt |
| HP-UX | CyberCop, ISS Internet Scanner, HackerShield, Nessus, NetRecon | ESM, Pentasafe VigilEnt |
| AS/400 | CyberCop, ISS Internet Scanner, HackerShield, Nessus, NetRecon (all mainly test TCP stack only) | Pentasafe, SafeStone, ESM (with SafeStone plug-in) |
If you have a limited budget, there are free scanners on the market. Nessus is a leader among free scanners and is challenging the top commercial scanners. The January 2001 issue of Network Computing tested the ability of eight vulnerability scanners (Nessus, Network Associates' CyberCop, ISS Internet Scanner, Axent's NetRecon, Bindview's HackerShield, eEye Digital Security's Retina, Security Administrator's Research Assistant [SARA], and World Wide Digital Security's System Analyst Integrated Network Tool [SAINT]) to detect 17 of the top vulnerabilities.[1] Nessus led the group, detecting 15 of the 17 vulnerabilities. Nessus appears to be a viable option as a vulnerability scanner. Nessus is an open-source project that currently has captured a lot of attention and support. If the tool continues to be well supported, it will remain a force in the industry.
Often, a scanner that works well for Windows NT and UNIX does not work well for Novell. Thus, for Novell systems you usually need to find a different scanner. NetRecon and Kane Security Analyst are considered excellent tools for Novell.
One key feature to look for in any automated scanner, whether commercial or free, is the frequency of the database updates. In order for the tool to be effective, it must use an up-to-date vulnerability database. The updates enable the scanner to detect the latest vulnerabilities. The level of support for the tools varies. Therefore, before you purchase a scanner be sure to find out how often it is updated.
The following sections focus on specific network-based and host-based scanners.
URL: www.nai.com
Client OS: LINUX, Windows NT
Target OS: Windows NT, UNIX
Description: CyberCop is one of the top scanners for testing Windows NT and UNIX platforms. CyberCop is relatively easy to install. However, once installed it can be confusing to configure for the first time. CyberCop has several options, such as IDS and DoS testing, other than vulnerability scanning alone, but here we concentrate on explaining the vulnerability-scanning features first. Also, CyberCop supports scans by operating system. If the tool can detect the type of OS it will disable modules that do not apply. The OS-specific scanning and CyberCop's multithreaded engine options enable it to scan systems quickly and efficiently.
To prepare CyberCop for vulnerability scanning there are three main areas you need to configure: scan settings, module settings, and application settings. We describe each of the three areas to help get you started with the tool. However, you should read the documentation and become proficient with the scanner in a test environment before using the tool against production systems.
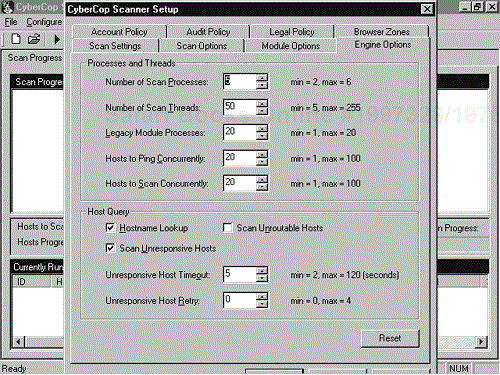
Figures 11-1 and 11-2 show the Scan Settings screens. There are three main areas to configure on this setting. First, you need to input the hosts you will be scanning. On the Scan Settings tab shown in Figure 11-1, you can either enter the hosts to be scanned as a range or use a host file. Next, you need to remember to change the name of the results file found at the bottom of the screen; otherwise you will overwrite the scan results each time you perform a scan and lose the data from your previous scans. Finally, on the Engine Options tab depicted in Figure 11-2, you need to decide whether to select the Scan Unresponsive Hosts option. If Scan Unresponsive Hosts is not checked, CyberCop will attempt to ping the host. If the host does not respond to ping, CyberCop will skip that address. If the targets you are scanning are not configured to respond to ICMP pings, you will need to select the Scan Unresponsive Hosts option. Keep in mind that having Scan Unresponsive Hosts checked will cause your scan to take a lot longer since each module will have to time out on each address that has a live host. This can cause the scan to take significantly more time. The Engine Options tab also offers many different settings for number of threads and concurrent scans.
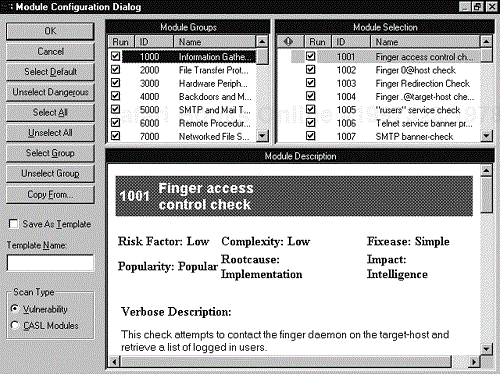
Module settings can also be confusing. CyberCop checks for hundreds of vulnerabilities that are organized into modules. You can see on the Module Configuration screen shown in Figure 11-3 that there are many module options. Knowing which modules to run or not run can be confusing. Fortunately, version 5.5 of CyberCop introduced a nice button called Unselect Dangerous. This button unselects any test that Network Associates thinks is dangerous to the target system or network. Dangerous tests are marked with a red caution sign. These are generally the DoS tests or other tests that could cause the target system to hang or crash. If you select the Unselect Dangerous button you should notice that all the tests with a red caution sign are not checked.
There are a few modules you should consider whether or not you want to run even when Unselect Dangerous has been selected. Password grinding, for instance, is not considered dangerous, but it could lock out accounts on systems that have account lockout enabled. Module 30005 sends a message to each NT host being tested that “the system is being scanned by CyberCop” so you may want to unselect it if you want to try to stay undetected. You should really go through all the modules to get an idea of what each one scans for. Each test contains a module description that outlines the type of test performed, the security concern associated with the vulnerability, and a recommended repair. Make sure you verify the fix before implementing it since it may not apply to your environment or could introduce problems into your particular network. Always test before implementing any fix on a production system.
The Application Settings tab contains some interesting options. Remember to select the Show Scan Results option, otherwise you will have to wait until the scan has completed before seeing any of the results or progress. You should also verify that the working directory, utilities directory, and templates directory are correct before beginning the scan.
Once you have the settings complete, you are ready to start your scan. You can begin the scan by using either the Scan drop-down menu or the button with the blue arrow pointing to the right. The scanner will show the progress of the scan. If you need to stop the scan, either select Stop Scan from the menu or use the square blue button.
Once the scan finishes, look at the results to see where you are vulnerable. To view the results, select View Results from the Reports drop-down menu. CyberCop reporting uses the Microsoft management console. Find and select the events mdb file from the scan just conducted. Next you have to choose the format or view you want for the information. We like to view the report by vulnerability ID so that we can see each host affected by vulnerability. Exporting the report can be a little more difficult. Frequently the format of the exported report is poor when Microsoft Word or text format is chosen. The exported report could consist of hundreds of pages that could be difficult to navigate.
URL: www.iss.net
Client OS: LINUX, UNIX, Windows NT
Target OS: Windows NT, UNIX
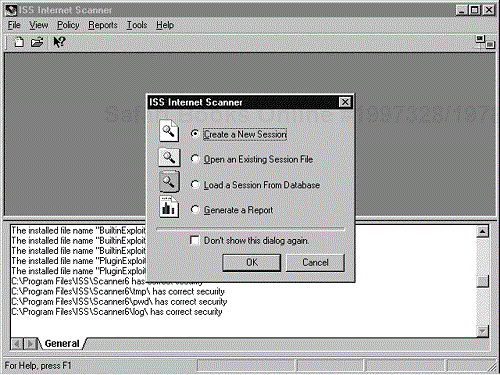
Description: ISS Internet Scanner is another top network-based vulnerability scanner. It is very similar to CyberCop. Figure 11-4 shows the initial Internet Scanner screen. Internet Scanner uses a wizard format to guide you through the process of setting up a scan, prompting you to input the range of hosts to be scanned.
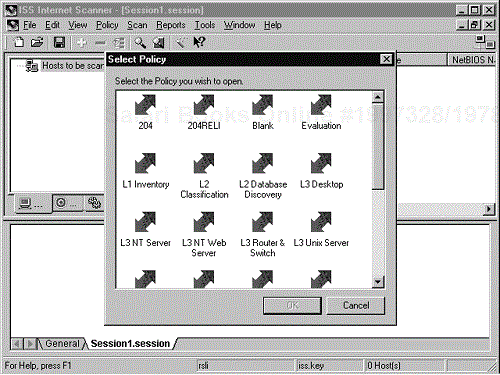
Next you need to select a policy. A policy essentially consists of the vulnerability checks the tool will perform. Internet Scanner presents several default policies you can use as a starting point to create your own policy. As shown in Figure 11-5, there are different levels of policies for NT, UNIX, and Web servers. Each policy has different options selected from the vulnerability checklist. The defaults are nice for someone who does not have a lot of experience with the tool, but a more experienced user will develop his or her own policy. Usually we start with Level 5 for each operating system, which is the highest level and performs the most checks, and then we customize the policy from there.
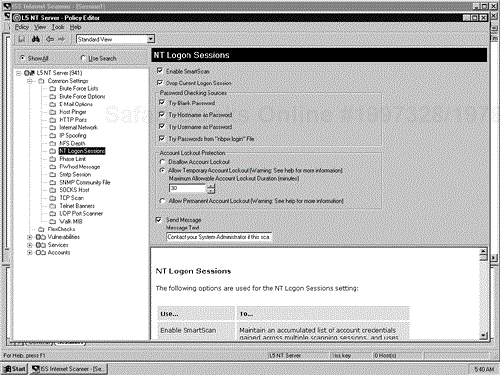
Internet Scanner sends messages to the systems being scanned that a scan is being performed. If you do not want this message to be sent you must edit the policy to suppress the message. For Windows NT uncheck the Send Message box in NT Logon Sessions under Common Settings (shown in Figure 11-6). For UNIX delete the message in the RWhod Message box under Common Settings.
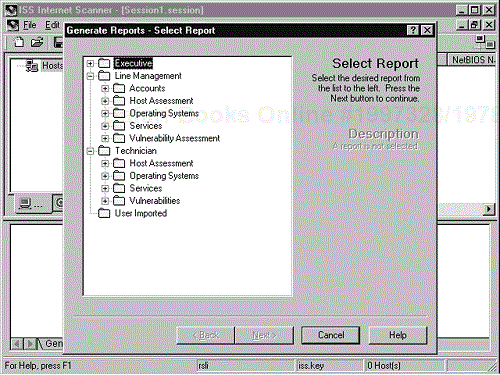
Once the policy has been selected the session is ready for scanning. When the scan has ended, you can view the vulnerabilities or generate a report. The report generation function offers several different options that can be useful. Figure 11-7 shows some of the different report options available. The report can be exported in several different formats. We have had problems with reports exported to Microsoft Word format. HTML format is usually a safe choice.
URL: www.nessus.org
Client OS: UNIX (for server), UNIX, Windows 9x/NT (client)
Target OS: UNIX, Windows NT
Description: Most of the vulnerability-scanning tools we have described are very expensive. If you are looking for a free tool, Nessus seems to be the tool of choice. Nessus works on a client–server system. Currently, the server is available only for UNIX systems. Nessus does have a Windows client and a Java client that can be used to control and access the server.
Nessus can be a little more difficult to get running if you are not familiar with UNIX, but once it is running it is relatively easy to use. It requires compiling four files on the UNIX server. The installation instructions on the Nessus Web site are quite informative and easy to follow. Even a person unfamiliar with UNIX should be able to install the tool using these instructions. The FAQ section is also particularly helpful for troubleshooting problems you may encounter during installation.
Once the server piece is installed, the client configuration is very easy. The Windows client installation simply requires launching a setup executable. Once the client is installed, you enter the IP address of the Nessus server to enable the client to communicate with the server. The client's GUI interface is easy to use. You select the modules to run and then launch the scan. Nessus has a Disable Dangerous Checks feature that is helpful for preventing potential problems during scanning. You can view the results from the client GUI. The Nessus reports are easy to generate and offer many format choices.
Nessus performs a number of checks and is considered a top open-source security tool. Currently, it is receiving tremendous support, and updates to the tool are posted frequently. If the current level of support continues, Nessus will remain a top vulnerability scanner.
URL: www.symantec.com
Client OS: Windows NT
Target OS: UNIX, Windows NT, Netware
Description: Symantec acquired Axent Technologies and continues to support and improve its NetRecon scanning product. NetRecon is another vulnerability scanner that has been rapidly improving. It is one of the few network-based scanners that can scan Netware systems. The tool also performs “progressive scanning,” whereby it can use information found while scanning one system to scan another system. For example, if NetRecon discovered a weak password on one system, it can try to use that password against the next system it scans. The tool scans for many vulnerabilities and has an intuitive interface. NetRecon also reports assumptions that help the user to qualify findings and eliminate false positives.
URL: www.bindview.com/products/hackershield/index.html
Client OS: Windows NT
Target OS: UNIX, Windows 9x/NT
Description: HackerShield, now called bv-control for Internet Security, is another popular network security scanner. The scanner is relatively easy to install and use. The tool's vulnerability database is frequently updated with new exploits discovered by Bindview's Razor team. The Razor team is highly regarded in the security industry and is a major benefit to the Bindview product.
URL: www.symantec.com
Client OS: Windows NT, UNIX, Netware, VMS
Target OS: Windows NT, UNIX, Netware, VMS
Description: Enterprise Security Manager (ESM) by Symantec (formerly Axent Technologies) is one of the leading host-based scanners and is also an effective configuration management tool. ESM installs a software agent on each test system and performs checks from a system administrator's point of view. The agent communicates with a manager station that records the data from the agent and directs what checks the agent will perform. ESM has agents for almost every platform, including Windows NT, Netware, many UNIX flavors, and VMS.
ESM consists of three pieces: the agent, the manager, and the console. Each piece can exist on a separate system or all on the same box. Frequently, we deploy the manager and console on our laptops and install the agent on the systems to be tested. The manager consumes the most system resources and is therefore better to be kept off the system being tested. ESM does not require a reboot when installed, and the agent runs at the lowest priority so as to minimize the impact on the performance of the server.
ESM has several different default policies. Each policy performs a different battery of tests. We usually run the most comprehensive policy, Phase 3:c Strict. Users can also customize their own policies as well. ESM output is very easy to read. Each finding is presented along with an explanation of the finding, the risk the finding causes to the network, and a recommended fix. While the recommendation and risk may not be the exact solution you are looking for, they provide a starting point for additional research or a suggestion on which you can build.
To begin using ESM, you need to do some preliminary planning. First, you need to select a system on which to load the manager. We like to make the manager a separate station since it bears the majority of the resource utilization. Another thing to keep in mind is that the manager and agent do not have to be on the same operating system. A Windows NT manager can have UNIX agents and vice versa. Once the manager is loaded you have to install the console. The console provides the GUI interface to the manager and can connect to multiple managers to centrally control all ESM activity. Figure 11-8 shows the ESM console view. We normally load the console on the same system we install the manager for our testing. Once the manager and console are loaded, you are ready to install the agents. One thing to keep in mind when planning agent and manager locations is that the manager and agents communicate via TCP ports 5600 and 5601. Therefore, if there is a firewall or filtering router between the two systems, ports 5600 and 5601 must be open between them.
Loading the agent is easy. Insert the CD, find the directory with the name of your platform's operating system, and launch the setup executable. ESM then guides you through the installation. First, it prompts you for the type of install, full or agent only. Select agent only. When prompted for the name of the manager, enter the host name of the station on which you just installed the manager. ESM then attempts to register the agent with the manager. At this point in the process many people run into problems. First, the agent needs to be able to resolve the host name of the manager into an IP address and vice versa. If there is no DNS entry for the manager or agent, the registration process will fail. If this happens there are two things you can do to fix the problem. You can either create a DNS entry for each host or enter the host in each system's host file (for NT, this file is under WINNT/system32/drivers/etc/hosts; for UNIX, it's under /etc/hosts). Once you have registered the host, check the console to see if the agent has been added under the appropriate manager. Then repeat this process for each additional agent. There is a Remote Install option for loading agents. At this writing we do not recommend remote installation. Sometimes this option fails, and even when it is successful, the uninstall process usually fails on hosts that have been installed remotely. Symantec is working on a solution to this problem and hopefully it will be fixed in future versions.
After you have all your agents installed and registered, you are ready to run scans. We find the easiest way to start a scan is to use the Run Policy wizard. The wizard guides you through the process of selecting the domain, manager, agents, policy, and policy modules. Again, we normally use policy Phase 3c: Strict. As shown in Figure 11-9, Phase 3c checks a number of areas including account integrity, backup integrity, file attributes, login parameters, network integrity, object integrity, OS patches, password strength, registry, startup files, system auditing, and user files.
Once your scan has been configured and launched you will see policy run ID 1 under Policy Runs. To view the status of the policy run, double click on the number of the run, under the Policy Run heading. You can also view the progress of the run by selecting the View Modules button on the Properties for Policy Run screen.
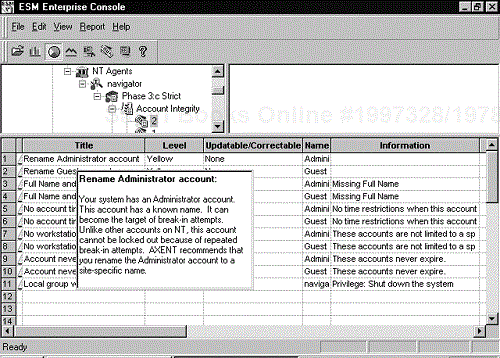
Once the run has completed you can view the results by either generating a report or by clicking on the appropriate agent on the main screen of the ESM console. The results of each module can be seen in the summary window. ESM lists the finding, information about the finding, details explaining the finding, and a recommendation. Figure 11-10 displays sample ESM output. In addition, you can generate reports by selecting an option from the Report menu.
URL: www.pentasafe.com
Client OS: Windows NT, UNIX, AS400, Netware
Target OS: Windows NT, UNIX, AS400, Netware
Description: Pentasafe has been known for its AS400 host-based assessment tool. Recently they have added functionality for Windows NT, UNIX, and Netware. The tool functions similarly to Symantec's ESM. Pentasafe's VigilEnt NT agent has a nice feature: instead of needing to be loaded on the system being tested, the NT agent can be loaded on any system in the target domain under a domain administrator account and can run queries against any domain system. In addition, Pentasafe's VigilEnt does offer an integrated console to manage different agents (NT, UNIX, AS400). However, the reporting features do not offer much information describing vulnerabilities nor provide recommendations on how to fix the problem. Pentasafe is working to improve its descriptions and recommendations, and future versions should have this functionality.
Pentasafe's VigilEnt also offers many features that can assist with system administration across the enterprise. The products can be used to enforce policy and make configuration changes across the NT domain and other agents. The integrated console enables system administrators to monitor and maintain resources from one centralized station. Pentasafe continues to improve its product lines and will be a major player in this market space.
There are a number of effective vulnerability scanners in the marketplace today. As an educated security tester you need to remember two key pieces of information. First, select a tool that is appropriate for your organization and meets your needs in the areas of comprehensiveness, frequency of updates, speed, and types of operating systems and applications tested. Second, realize that vulnerability scanners are not the silver bullets of security testing. Vulnerability scanners are effective tools for helping to test systems and networks, but they cannot replace comprehensive security testing by a professional tester.
[1] Forristal, Jeff, and Greg Shipley. 2001. “Vulnerability Assessment Scanners.” Network Computing, January 8. Accessed online at www.networkcomputing.com/1201/1201f1b1.html.


