Chapter 3: Setting Up and Getting Organized
Up to this point, you have learned the role that APIs play in our new digital transformation and modernization space. You have also seen how API Connect (APIC) can provide all of the tools you will need to realize these benefits in a seamless and secure manner. You are probably eager to dive right in and start creating and exposing your own APIs! You will get there but before doing that it is critical that you take some time to get organized and perform some housekeeping to ensure your digital transformation is following a framework for success.
If you think about it, an API is nothing new. It is simply a common piece of code or a module that can be called or consumed from some other program or application. The thing that sets APIs apart is how you organize, publish, and make them available to the outside world for consumption. The old "if you build it they will come" line of thinking really doesn't apply when we are talking about APIs. They need to be easily discovered by consumers and well organized. This is why taking the time to set up and get organized is critical. API Connect provides the framework for you to organize and publish your APIs so that consumers can discover them easily and know how to invoke them.
Of course, stating that you must take the time to plan out your organizational structure is easy to say, but if you are not aware of what each component is and how it could impact the final outcome, it might be a more difficult task than it should be and you will likely not get the desired outcome.
In this chapter, we will discuss and demonstrate how API Connect allows you to organize your API environments. This will include everything from who can create and manage products and APIs to how they are managed throughout their life cycle, and finally, how consumers can discover them. When you are finished, you should have a good understanding of how this all fits together, which will give you the knowledge to guide yourself through your own planning exercise. To accomplish this, we will cover the following main topics:
- The big picture
- Provider Organizations
- API Catalogs
- Utilizing spaces
- Developer Portal
Technical requirements
This chapter will start with the assumption that you already have an API Connect installation complete, along with the required components configured within the Cloud Manager. You should have all of your gateways services, SMTP server, and portal services already configured. Your hostnames being used for all of your services and components should be added to your DNS server and network communication between all components should be open.
The big picture
As you are introduced to all of the terminology and structure of how things are organized within API Connect, it could start to get a little overwhelming. So before diving into each piece of the setup that you will need to perform, let's take a look at the big picture and how things are organized. Hopefully, this will give you a high-level perspective on where each piece of the puzzle fits and provide some clarity on how you can structure your environment.
In Figure 3.1, you can see a very high-level overview of the main components and their hierarchy. You can see here that most of these components are required and you can have more than one defined. The one exception here is spaces. Spaces are not required but we will get into more detail on this in the Utilizing spaces section later in this chapter. Also, note that for simplicity, plans are not shown here as they will be covered in subsequent chapters:

Figure 3.1 – High-level organization within APIC
As we go through each of the components shown in Figure 3.1, you can refer to it to see where and how each of these fits into the overall scheme. Although your implementation and organization will likely be more complex, this will give you the most simplistic view for your understanding.
For a more realistic illustration, Figure 3.2 shows what a typical organization structure might look like. Your setup will likely expand upon this, but this will give you an idea of the basic structure:

Figure 3.2 – Common configuration
The remainder of this chapter will take the time to explain the role of each of these components and how to configure them. Again, careful planning and understanding of these concepts will ensure that your digital transformation is following a framework for success!
Your first step when configuring your environment is to define your Provider Organization. As you can see in Figure 3.1, this is the highest level in the hierarchy. This is typically defined for your organization and it is common to only have one. It is, however, possible that you would like to define multiple Provider Organizations to represent different subsidiaries of your parent company.
Provider Organizations
A Provider Organization is just as it sounds. It is the organization that provides the APIs. This should not be confused with a consumer organization, which you might have guessed is the organization that consumes the APIs. Defining your Provider Organization is done within the Cloud Manager UI and must be defined before you or anyone else can access the API Management Console to develop and publish your APIs. It is here that you define a few important pieces of information, as follows:
- Organization title/name
- The user registry that will be used to authenticate the owner's user access
- The owner of the organization
Configuring your Provider Organization
Let's begin with the configuration:
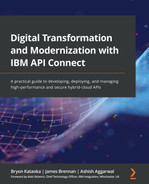
- To begin configuring your Provider Organization, you must be logged into the Cloud Manager UI. Once logged in, you should be at the home screen where you need to click the Manage Organizations icon as shown in Figure 3.3:
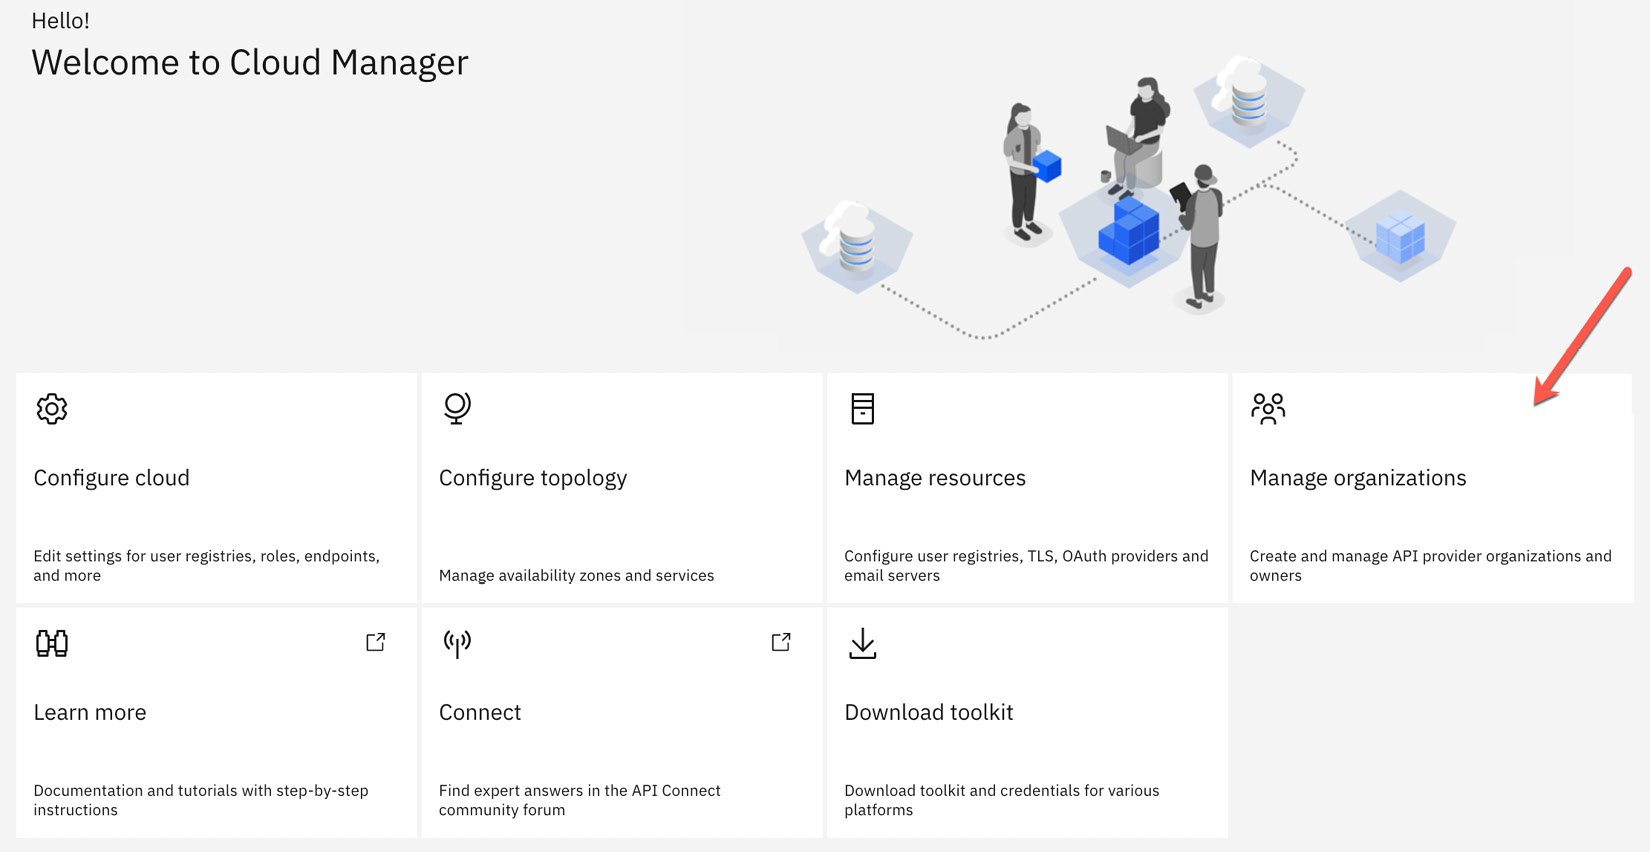
Figure 3.3 – Cloud Manager UI home screen
- You should now see a screen that would show you all of your configured organizations. Since you don't have any yet, this list should be empty so you will need to add one. From this screen, in the top-right corner, you will see an Add button where you will click Add | Create organization.
- This will bring you to a screen where you will enter all of the required information for your new Provider Organization.
- The first field you will enter is the Title for your organization. This will be the name you will see when you view your existing Provider Organizations as well as the name that will be seen within the portal where your APIs will be discovered. For our example, we will create a fictitious healthcare Provider Organization with the title APIC Healthcare.
- Once a value for Title is entered, you will see that the Name field will auto-populate with a slugified representation of the Title field. This means it is converted to lower case and spaces are replaced with the - character. For our example, our APIC Healthcare title was converted to apic-healthcare. This value will be used in the URL to access the Developer Portal and invoke APIs within this organization as well as to identify your organization within the Developer Toolkit CLI.
- The next section, which will complete your Provider Organization configuration, will be to define the Owner of the organization. The owner of the organization will be the administrator of the organization who will have the authority to invite new members to the organization, author APIs and products, and manage the API and product life cycle. To set the organization owner, you have two possible options: you can select an existing user in one of the registries configured within the Cloud Manager, or you can add a new user to one of these pre-defined registries.
All of your pre-defined public registries will be listed in the User registry field within a dropdown.
Info:
User registries have visibility. When the cloud administrator sets a user registry to private, that user registry will not be available when creating a new Provider Organization.
One of these must be selected before entering the owner's user ID. An important thing to note here is that once your Provider Organization is created, you cannot change this value to a different user registry.
- Once the registry is selected, you can specify whether you will use an existing user from the registry selected, or you wish to add a new user. This will be specified via the radio button for the field Type of user. If you are using an existing user, you must specify the username in the Username field. If this is a new user to be added, you will see one additional field, Email, where you will enter the new user's email address in addition to Username, First name, Last name, and Password.
- Once the organization title and the organization owner are set, you can click the Create button to create your organization. Figure 3.4 shows our new Provider Organization, APIC Healthcare, being created. You can see that Title had spaces so Name was autogenerated as the title was transposed to all lower case and spaces were replaced with -. In this example, we chose to create a new user within our existing registry as the Provider Organization owner so we selected New User from the Type of User field and filled out the appropriate details:

Figure 3.4 – Create new Provider Organization
- Once you complete the new Provider Organization step and click the Create button, a new user is entered into the specified registry and a new Provider Organization is created. You will be brought back to the Provider Organizations screen, where you will see a message indicating that your new Provider Organization has been created also indicating the owner that has been assigned. You can see in Figure 3.5 that our example Provider Organization was created and now appears in the list of Provider Organizations:

Figure 3.5 – New Provider Organization created
Congratulations! You have now created your Provider Organization, which will be the foundation for all other components that you will define within it. The owner of this organization can now invite other users to the organization and move on to the next step of the process, which is to create the Catalog(s) within the organization.
API Catalogs
An API Catalog is a component within your Provider Organization that provides a logical partition within your Provider Organization as well as the Developer Portal and the gateway executing the APIs themselves. This logical separation will be apparent in the Developer Portal and the URL used to invoke the APIs themselves as they will be unique for each Catalog. Catalogs are typically used to segregate each environment within your software development life cycle (SDLC). For example, you might configure DEV, STAGE, QA, and PROD Catalogs to represent each environment. You will see these as logical partitions within API Manager, however, you can choose to have different physical gateway services for each Catalog.
Now that you have your Provider Organization configured, you can move on to configuring your Catalog(s). The owner of the Provider Organization, or anyone that the owner has invited to the Provider Organization, can now log in to API Manager to perform this task. Before you begin to configure your API Catalogs, you should have already determined what Catalogs will be needed and what they will be named. This is all part of the careful, upfront planning you did before jumping right into your configuration effort.
Configuring your API Catalog
To begin configuring your Catalog(s), you will first log into API Manager using a credential that has been granted access to your particular Provider Organization. This could be the owner of the organization you previously set up, or some other person that was invited to join the organization. Let's move on to the next steps now:
- Once logged into API Manager, you will be at the home screen with your newly-created Provider Organization shown at the top-right of the screen and several options on the main screen, as shown in Figure 3.6. From here, you will click on the Manage catalogs link:

Figure 3.6 – API Manager home screen
- This will bring you to the Manage screen where you will see all Catalogs currently configured for your Provider Organization. You will notice one Catalog named Sandbox is present, which is created by default when a Provider Organization is created. Since you just created your Provider Organization, you will only see the default Catalog named Sandbox as shown in Figure 3.7:

Figure 3.7 – Manage Catalogs
- You can choose to use the default Sandbox Catalog to quickly test APIs and resources such as LDAP registries for API authentication. Using the Sandbox to initially test APIs has the benefit of not needing to create a Product nor acquire a ClientId or secret. Those are automatically generated for you in the Sandbox. The Sandbox should be limited to learning and testing APIs. You will most likely want to start creating your own, more meaningful Catalogs that you included while planning your overall architecture. As mentioned earlier, a practical use of Catalogs is to have one for each of your SDLC environments.
- To start, we will create a Catalog named DEV to be used for our APIC Healthcare organization's development efforts and unit testing. To create a Catalog, from the Manage catalogs screen in API Manager, click the Add button at the top right of the screen, then click Create catalog as shown in Figure 3.7.
- This will bring you to the Create catalog screen, showing the fields required to create a new Catalog where you will enter the Title for your new Catalog. In our example, we entered DEV as the title. Once the title is entered, you will see that the Name field is automatically populated with the slugified representation of the Title field. This will be used as part of the URL used to access the Developer Portal as well as to invoke your APIs published to this Catalog. This will be evident as we configure the Developer Portal.
- You will notice that the Select user field is prepopulated with the user logged into API Manager. This user will be the owner of the new Catalog. You can select from the drop-down list any user that has been added to the Provider Organization as the owner of this Catalog. If you wish to add a user to the registry that you would want to be designated as the owner of this Catalog, you will need to return to the previous Manage screen and select Add | Invite catalog owner as you can see in Figure 3.7. Once all fields are completed for your new Catalog, you will click the Create button to create the new Catalog. Figure 3.8 shows this screen with the new Catalog being created named DEV:
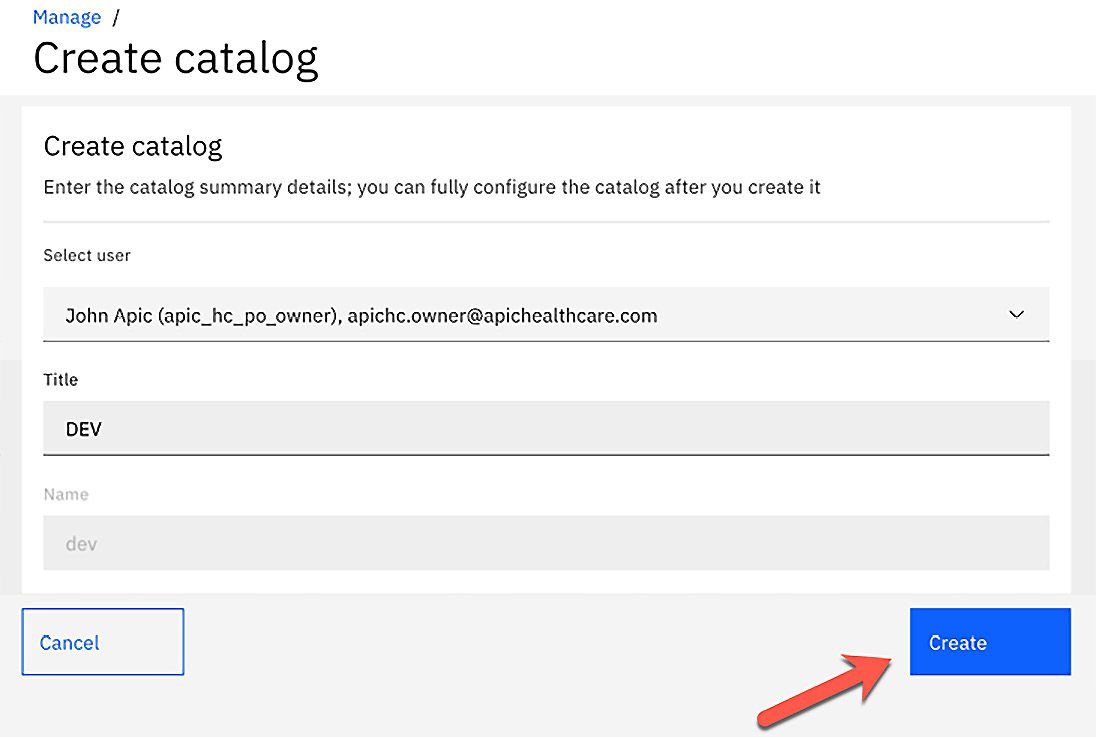
Figure 3.8 – Create a new Catalog
- After you click the Create button, the Catalog is created and you will be returned to the Manage screen where you will see the Catalog you just created listed on the main screen with a message at the top right, as seen in Figure 3.9:

Figure 3.9 – New Catalog created
We now have a Catalog created for our DEV environment but it is not yet ready to publish and execute APIs. For this, a gateway service must be assigned to this Catalog. This will be one of the gateway services that you would have configured in your initial setup in the Cloud Manager. This step is only necessary if you are not planning on configuring Spaces for this Catalog, which we will discuss later in this chapter.
- If you are not planning on enabling Spaces in your Catalog, you can assign a gateway service to it by selecting your Catalog from the Manage screen and then clicking the Catalog settings tab at the top of the screen and then the Gateway services link on the left navigation. On this screen, you should see an empty list for your gateway services as you have not yet added one for this Catalog. Figure 3.10 shows this screen for our example DEV Catalog:

Figure 3.10 – Catalog settings | Gateway services
- From this screen, you can add a Gateway service by clicking the Edit button in the upper-right corner of the screen. This will then bring you to a screen with a list of all gateway services configured that you can select from. Select the checkbox next to the gateway service you want to add to this Catalog and click the Save button. Figure 3.11 shows a gateway service selected for the DEV Catalog in our example:
Figure 3.11 – Select gateway service
- After clicking the Save button, you will be returned to the previous screen where you will see the gateway service added to the list of Gateway services along with a message at the top right indicating that it has been added to the Catalog as shown in Figure 3.12:
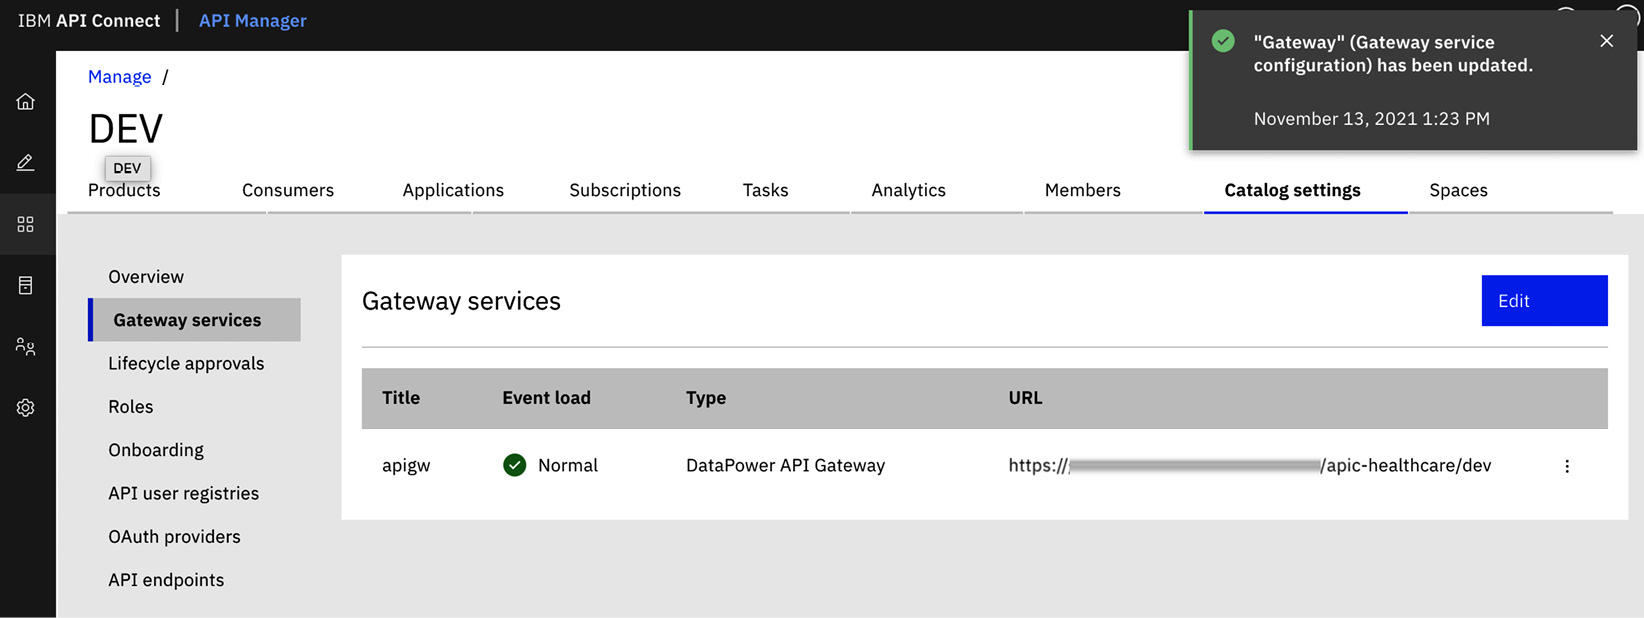
Figure 3.12 – Gateway service added
At this point, you should have a good understanding of what a Catalog is and how it could fit into your API Connect Provider Organization structure. In our example, we walked you through the creation of one Catalog named DEV. You can repeat this process for every Catalog you need to create for your organization. Once that has been completed, you can move on to the next steps, which we will describe in similar detail.
Utilizing Spaces
Spaces are a part of the API Connect syndication feature, which will allow you to subdivide your Catalog into partitions. Of all of the configurations we have covered within this chapter thus far, this is the first optional configuration we will demonstrate. Spaces could be useful if you have different divisions within your organization that you need to segregate within a Catalog.
For example, our sample healthcare organization might be split into two divisions within the company. One for prescription benefit management (PBM), and one for insurance. We might want to segregate these divisions within our Catalogs so that each division will be independent of the others within the Catalog. This independence would include the separation of authorized users, product life cycle, and runtime environment altogether.
Spaces would be the ideal feature to accomplish this because it provides this logical partition from all other spaces within the Catalog as well as a segregated runtime environment. In addition, Spaces will provide its own analytics for each space configured. Keep in mind that this only provides this segregation for development, management, analytics, and runtime, which are all internal. Spaces will not be evident within the Developer Portal to an outside consumer. To the outside consumer who will discover and consume your APIs, they will all appear to be within the same Catalog.
New with v10.0.1.5
There is a new feature to apply Catalog actions to Spaces. You can read more on this capability in the What's New section: https://www.ibm.com/docs/en/api-connect/10.0.1.x?topic=overview-whats-new-in-latest-release-version-10015
If you decide that your organization will require the use of Spaces, you must configure them at the Catalog level within each individual Catalog configuration.
Configuring your spaces
Here is how we configure the spaces:
- To accomplish this, you will click the Catalog you wish to configure from the Manage catalogs screen. If you are at the Home screen from within the API Manager, you will navigate to Manage catalogs | DEV.
- You will now be on the configuration screen for your Catalog. From here, you will click on the Catalog settings tab at the top of the screen and toggle the Spaces slider to On as shown in Figure 3.13:

Figure 3.13 – Enable Spaces for a Catalog
Once you enable Spaces within a Catalog, you can no longer configure a gateway service for the Catalog. At least one space must be configured and assigned a gateway service. Products and APIs can only be published to a space and not the Catalog itself.
- You can now begin to configure the individual spaces for your Catalog. While in Catalog configuration, click on the Spaces tab at the top of the screen. By default, you will see one Space listed with the same name as your Catalog. To create a new space, click the Add button in the top-right corner of the screen and then Create space as shown in Figure 3.14:

Figure 3.14 – Create a new Space
- This will now bring you onto the configuration screen to configure your new space where you will enter the details required. These details should be starting to look familiar to you as they are similar to the ones entered for your Provider Organization and your Catalogs. Like these, you will select the owner for space and provide a title that will then be converted to lower case and used to auto-populate the Name field.
If you wish to invite a new user to be the owner of the space, you will go to the previous screen and click Add | Invite space owner. Once these fields are populated, you can click Create to create your new Space. Figure 3.15 shows the creation of a new space for our healthcare organization with a Title of PBM:

Figure 3.15 – Create a new Space
- Once you click the Create button, the space is created and you are brought back to the Catalog configuration page. Here, you should see your new space listed and a message at the top right. You can see in Figure 3.16 the new Space we created within the DEV Catalog named PBM:
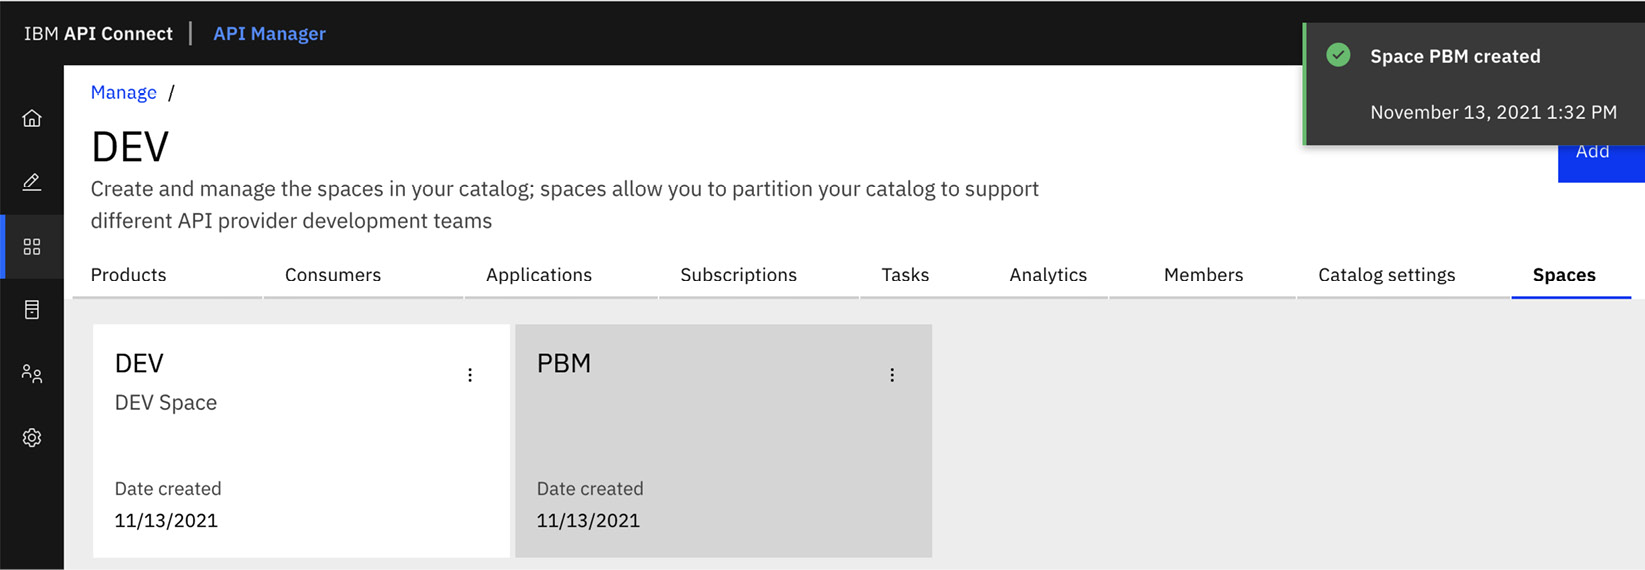
Figure 3.16 – New Space created
- Once you have created all of your spaces for your Catalog, you must repeat the process for each Catalog in your Provider Organization that you want to use spaces within. In our fictional healthcare company, we configured two spaces for each Catalog, one for PBM and one for Insurance as we want each division to have its own management, life cycle, analytics, and runtime. When we publish our products and APIs, this isolation is never seen in the Developer Portal. Figure 3.17 shows our DEV Catalog with these two spaces created:
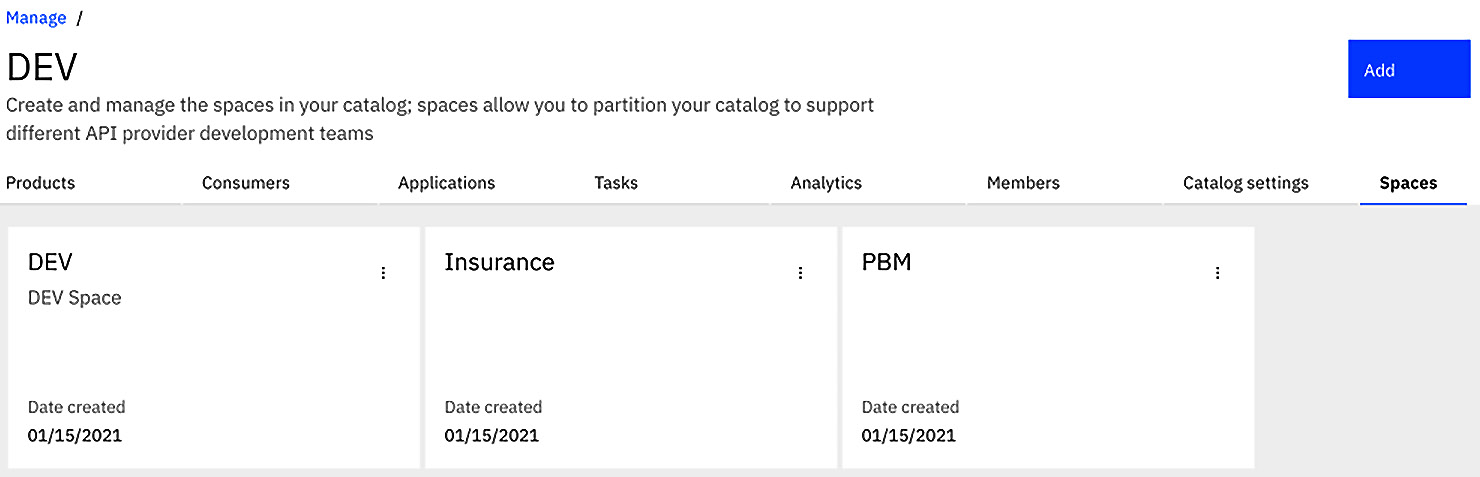
Figure 3.17 – DEV Catalog Spaces
- If you recall when we configured our Catalogs, you had to add a gateway service but only if you were not planning on utilizing spaces within the Catalog. That is because each space will have its own runtime, or gateway service, configured. To configure the gateway service for each of your spaces, you will click on the space from within the Spaces tab of your Catalog. From here, you will navigate to the Space settings tab and click the Gateway services link on the left navigation menu. From here, you can add a gateway service to the space the same way you would have for a Catalog by clicking Edit, selecting the gateway service to add, and then Save.
The structure of our new organization is now starting to take form. Up to this point, we have defined our Provider Organization, Catalogs, and spaces. We now have the ability to start publishing products and APIs, which we will cover in later chapters.
Developer Portal
Once you have configured your carefully planned out Provider Organization, Catalogs, and spaces, you can technically begin developing and publishing your APIs and products. Although you might be tempted to jump right into this, there is one final piece we must configure so that the consumers can discover your APIs—the Developer Portal. You might develop the most useful APIs going, but as we said earlier in this chapter – if no one can find them, they aren't much good.
The Developer Portal is the place developers will go to discover and register for your APIs that are available. This is where you will socialize your APIs to the outside world. This is their window into your API organization. In addition to socializing your APIs, the Developer Portal also provides analytics, forums, blogs, and rating facilities.
Since this is where the consumers of your APIs will go to find them, the Developer Portal will be a representation of your company to the outside world. For this reason, the Developer Portal is fully customizable so that you can brand and customize it to best represent your organization. The level of customization is entirely up to you, though. You can put as little or as much time into customizing it as you see fit.
Before we think about customization and branding, we must first configure the Developer Portal for each Catalog.
Configuring the Developer Portal
This is done at the Catalog level for each Catalog you have configured within your Provider Organization.
- To begin this configuration, you must be logged into API Manager and be on the Home screen.
- You will then navigate to Manage catalogs | DEV and click the Catalog settings tab. From this screen, you will click the Portal link on the left navigation menu as shown in Figure 3.18:

Figure 3.18 – Catalog settings
- From this screen, you can see that there are no Developer Portals added to this Catalog so we will need to create one by clicking the Create button in the top-right corner.
This will bring you to a screen where you will simply need to select one of the Portal services that were created in the Cloud Manager during your initial setup. You will see that the URL field will be automatically populated for you, which will include the Provider Organization and the Catalog name in the URI.
- Clicking the Create button then completes the Developer Portal creation. Figure 3.19 shows this screen where we are creating a new Developer Portal for our DEV Catalog. You can see that we have chosen our previously defined portal service named Developer Portal and the URL was automatically populated with the base URL defined in the Portal Service and the URI made up from the Provider Organization name and the Catalog name:

Figure 3.19 – Create a new Developer Portal
- Once you click the Create button, you will be brought back to the previous Catalog settings page. That page indicates that your new Developer Portal creation has been initiated along with the new Developer Portal details showing the Portal Service being used, the Portal URL, and the User Registry used. Figure 3.20 shows this confirmation page for the creation of our new Developer Portal for our DEV Catalog in our APIC Healthcare Provider Organization:

Figure 3.20 – Developer Portal creation confirmation
- The Developer Portal creation can take some time to complete, so be patient. Once it completes, you will receive an email that will be sent to the email address listed for the user that you have logged into API Manager with. The text within this email will be addressed to Administrator (admin) because this email will contain a link that will bring you to the Developer Portal page to reset the password for the admin user. An example of this email is shown here:

Figure 3.21 – Developer Portal creation email
This is a one-time-use-only link and will bring you to the page shown in Figure 3.22, which will make it clear that this link can only be used once. From here, you will click the Sign in button to change your admin password:

Figure 3.22 – Change admin password
- The next screen will again make it clear that this is a one-time login link and you will enter your new password for the admin account and confirm it as shown in Figure 3.23:
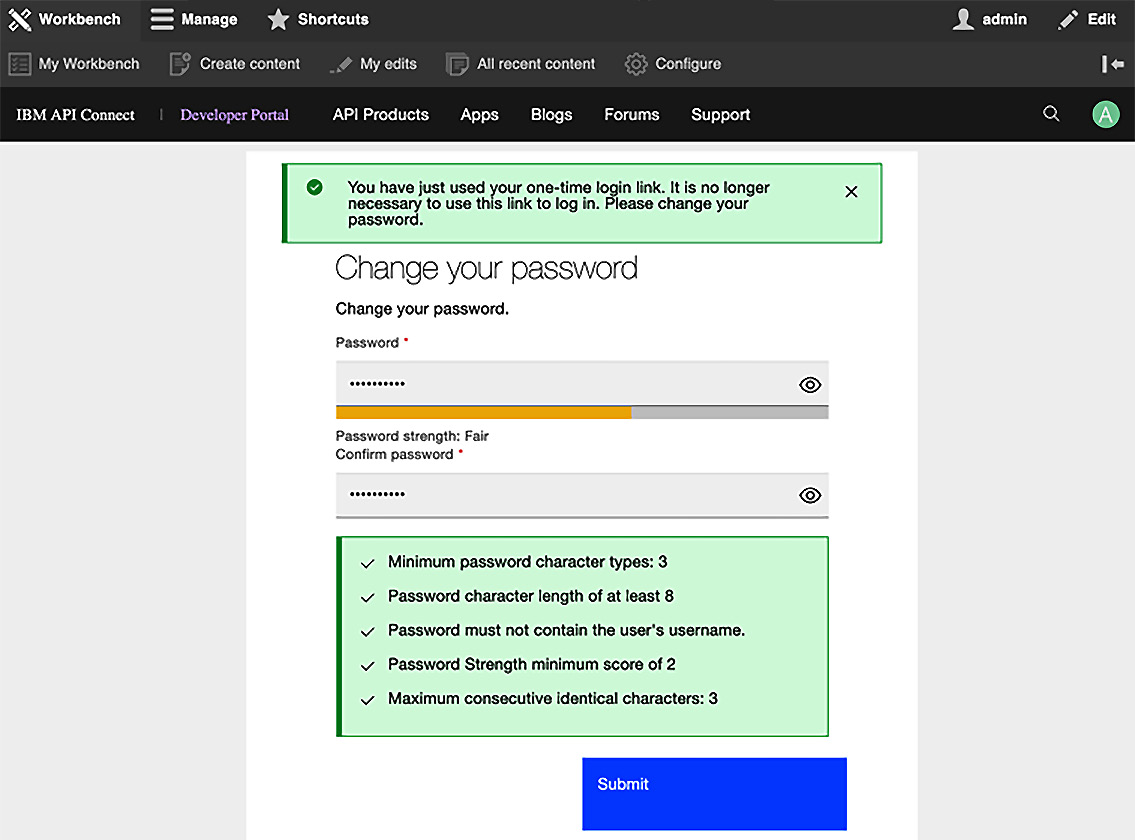
Figure 3.23 – Enter new admin password
- After entering your new admin password and confirming it, click the Submit button to complete the process. If the passwords are valid, your admin password will be changed and you will be redirected to the Developer Portal home page as shown in Figure 3.24:

Figure 3.24 – Your new Developer Portal
You have now successfully added a Developer Portal for your Catalog. You would need to repeat this process for each Catalog within your Provider Organization the same way. As you complete this process for each Catalog, you will notice that the URL to access the Developer Portal for each Catalog will change to reflect the Catalog that it belongs to. As you publish your products and APIs to each of these Catalogs, you will see them appear in the respective Developer Portal for consumers to discover.
At this point, you can move on to customize your Developer Portal to personalize and brand it to represent your organization, or you can simply leave the default look. The choice is entirely up to you. You can find more information on customizing the look of the Developer Portal in Chapter 15, API Analytics and the Developer Portal:
You have now completed the configuration of your entire Provider Organization and can now begin to create, publish, and socialize your APIs!
Summary
In this chapter, we have taken you on a long journey and introduced you to many terms and concepts. You were introduced to configuring your first Provider Organization, Catalogs, spaces, and finally, the Developer Portal. All of this may seem a bit overwhelming at first, but as you go through your planning sessions to determine the structure and layout of your own organization, this will become clearer. It cannot be stressed enough how critical careful upfront planning and organization are to the success of your digital framework transformation. This will become more evident as you go through the API life cycle from development, to publishing, to retirement.
Now that you have learned about the foundation for setting up your API environments, our next chapter will expand on this by explaining and demonstrating the process of creating your own APIs.