Chapter 6: Supporting FHIR REST Services
In Chapter 4, API Creation, and Chapter 5, Modernizing SOAP Services, you learned how to set up the Local Testing Environment (LTE) and began developing APIs with the designer. You also learned how to take advantage of your existing SOAP assets and convert those into APIs.
In this chapter, you will learn about how to begin implementing APIs that utilize the Health Level Seven International (HL7) Fast Healthcare Interoperability Resources (FHIR) standard (pronounced fire) that is now being mandated by the Centers for Medicare & Medicaid Services (CMS).
FHIR is an HL7 standard that supports providing resources using REST APIs and JSON. This chapter introduces how to develop REST APIs that support the FHIR specification. You can read more on FHIR by visiting the website: https://www.hl7.org/fhir/overview.html.
In this chapter, we will cover the following main topics:
- Introducing FHIR API
- Creating a RESTful FHIR API
- Applying logic policies in your API
When you complete this chapter, you will know how to create RESTful services using API Connect with a focus on delivering FHIR APIs and embedded logic. You will also have a good understanding of how FHIR is a good example of digital transformation.
Technical requirements
With this chapter, you will be referencing a number of Swagger files to assist you with the learning experience. You will find these files in GitHub using the following URL: https://github.com/PacktPublishing/Digital-Transformation-and-Modernization-with-IBM-API-Connect.
You should copy the files for this chapter to your development environment. We will be utilizing the LTE and API Manager to perform the development tasks. If you prefer to use some of the skills you learned from Chapter 2, Introducing API Connect, you can use the CLI commands to push the sample files up to API Connect. The assumption going forward is you will begin utilizing the API Manager to draft new APIs.
Now that you understand what you will be attempting, let's begin with understanding the business use case for FHIR.
Introducing FHIR
Interoperability between healthcare organizations has been like the search for the holy grail. The HL7 organization has been around since 1987 and has tackled the task of establishing standards for sharing healthcare information. There have been many levels of maturity of the standard over the years, with the most prominent being HL7v2.
Version 2 is an exchange of data that is delimited with pipes. Unfortunately, at the time, this method was too lenient, and some fields were left up to the provider to declare. These fields then created issues for consumers because they didn't have the consistency needed to receive the same type of file from different sources. Fields were of different types and values. Version 3 was introduced by HL7 to improve the data exchange quality by using XML and XML schemas. The adoption of version 3 was not as successful as they had hoped. XML schemas were difficult to digest and made implementations complicated. The goal was still to develop an improved version, but there needed to be something more digital that took advantage of Web 2.0, APIs, and JSON. That is how Fast Healthcare Interoperability Resources (FHIR) got started. The current version is FHIR v4.0.1. Although you can implement FHIR in various ways, the predominant way is by creating an FHIR server and accessing the FHIR resource data with APIs. Remember that the goal is to exchange data. Let's explore how that is accomplished by creating FHIR resources.
FHIR resources
A resource in FHIR represents small and locally distinct units of exchanged data. Each resource has a defined behavior and meaning. Contained within the resource are elements and extensions of elements, some narrative, and other extensions to the resource.
It also has metadata, which has elements such as known identity and the location of the data. Of course, each resource has some interest in healthcare (patients, observations, diagnostic reports, and so on). Figure 6.1 shows the relationship between resources and elements:

Figure 6.1 – A FHIR resource examined
There are hundreds of resources defined by FHIR. You can visit the HL7 FHIR website, https://www.hl7.org/fhir/resourcelist.html, to peruse the various resource definitions.

Figure 6.2 – FHIR resources
When you review a resource, you will find a data structure that it supports. You might wonder how you support this structure if your data is in relational databases. Your FHIR architecture may vary based on the approach you wish to take, given the tools you have at your disposal. You have various options for implementing your interoperability interface:
- Broker adapter for FHIR: If you have already used HL7 schemas from previous versions, you can set up a broker transformation into FHIR.
- Proprietary mixed APIs: Perhaps you are using multiple methods to exchange FHIR data. It can be a combination of FHIR and other APIs.
- Vendor-neutral clinical repository: In a clinical situation where you have multiple backend systems, you can establish a vendor-neutral repository to hold all your FHIR resources.
Something to keep in mind is the number of API endpoints you may be exposing. Let's look at the patient operations:
- Get lists of all patients.
- Get a single patient resource.
- Create a patient record.
- Update a patient record.
- Delete a patient record.
There are approximately 144 FHIR resources. If we support the 5 endpoints listed on all the resources, your number of endpoints totals 720, and that doesn't include custom endpoints based on consumer/business requirements.
Assuming you may be only addressing a small number of resources, let's discuss where the data resides after you have utilized one of the various options.
FHIR server
The FHIR server is where you will initiate your API calls to begin the exchange of data. You might think of it as the repository of the resource data accessed via the APIs you create. Many of the FHIR servers are built on Java but other languages exist. There are a number of test FHIR servers on the web and many others that you can download and use as models. The HL7 application programming interface (HAPI) FHIR server is one of them:

Figure 6.3 – The HAPI FHIR server can be used for testing APIs
In this chapter, we will be running tests on a HAPI FHIR server that is prepopulated with test resources. You can access the HAPI FHIR test server at this URL:
Before you start developing your first FHIR API, it will be beneficial to understand the motivation of using API Connect to implement your RESTful FHIR APIs.
Government-mandated FHIR interfaces
As mentioned in the chapter introduction, CMS has mandated payers (insurance companies) to implement a Patient Access API and a Provider Directory API for consumption by third-party entities using the FHIR standard. While the implementation date was moved from January 1, 2021, to July 1, 2021, nevertheless, payers will need to comply.
The benefits proposed by these two requirements are as follows:
- Patient Access: This is the government's response to putting patients first, giving them access to their health information when they need it most, and in a way that they can best use it. During a pandemic such as COVID-19, this would be very beneficial.
- Provider Directory: The government is requiring an FHIR interface to a directory of a health insurer's in-network providers and pharmacies for patients/consumers. Again, during a pandemic such as COVID-19, this would be very beneficial.
These two benefits to consumers are just what the doctor ordered. Having information readily available is critical to healthcare and patient care. Now that we will be learning how to create RESTful FHIR APIs, it is important to note the reasons why using API Connect is a good choice.
Figure 6.4 highlights reasons for building APIs, managing the FHIR API lifecycle, and maintaining the integrity of data:
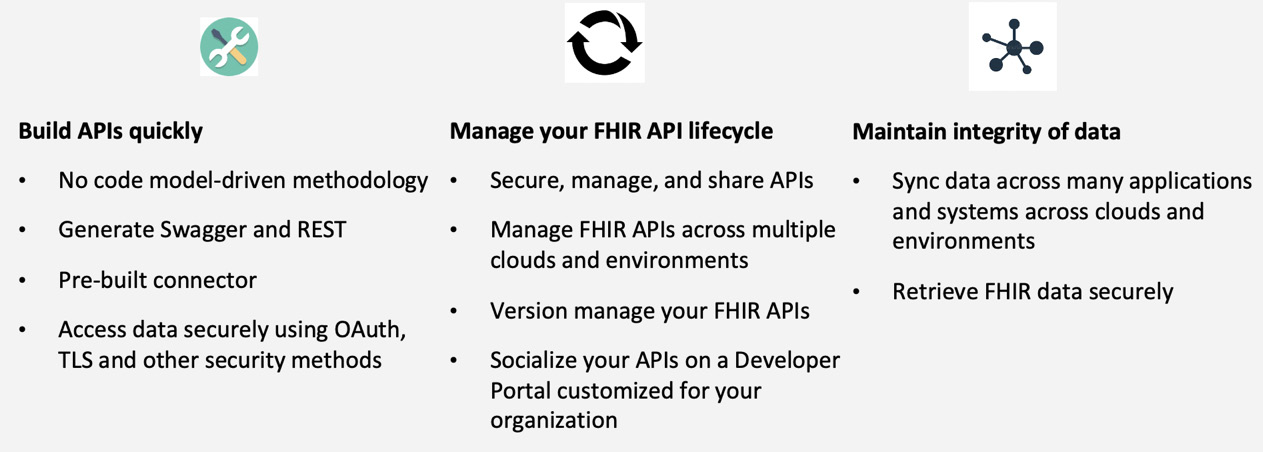
Figure 6.4 – FHIR and API Connect synergy
You now have a good overview of FHIR and how CMS mandates implementing capabilities for the Patient Access and the Provider Directory using FHIR. It's time to start playing with FHIR.
Creating a RESTful FHIR API
As you may recall, your APIs will be accessing an FHIR server that provides healthcare resources. Given that, when you create your FHIR RESTful API, you will need an endpoint. For the examples provided in this section, you will be referencing the online HAPI Test FHIR server that is at this location:
http://hapi.fhir.org/baseR4/swagger-ui/
You have learned to use the LTE and have been introduced to the API Manager Drafts Designer. You'll be using the LTE initially and then switch to the API Manager so that you can learn the other capabilities of the API Manager.
If you haven't already downloaded the chapter files from the URL mentioned in the Technical requirements section of this chapter, you should do that now and place them in a directory/folder on your local device.
Now that you have the files, you can log in and begin developing APIs.
Playing with FHIR
Everyone has a lot of fun utilizing FHIR in puns, but when it gets down to interoperability in healthcare, utilizing FHIR APIs is just what the doctor ordered. What you will be creating is the FHIR Patient resource as an API and retrieving data from an FHIR server on the web. The endpoint you will be calling is http://hapi.fhir.org/baseR4/Patient?_pretty=true.
If you were to call this from your browser, you would see all the patients in JSON data format returned, as shown in Figure 6.5:

Figure 6.5 – Patient resource data
You will be working with the Patient-swagger.json file that you downloaded from the book's GitHub repository.
To create the FHIR, perform these steps:
- Start the LTE environment:
apic-lte start
With a successful start of the LTE, you will receive some valuable information that you will need to log in to API Connect. They are shown as follows:

Figure 6.6 – apic-lte startup output
For now, that is all you will be needing to log in.
- Launch the API Designer by double-clicking on the API Designer app that you installed previously:

Figure 6.7 – Starting the API Designer
- Choose the directory/folder where you have downloaded the Swagger files previously. Most likely you already have logged on previously:

Figure 6.8 – Logged-on environment
- Click on the localhost:2000 listing. You may get prompted to log in again, so you should use the information that was output when you started the LTE.
- Select the Develop APIs and products tile. You should see the Patient API title and perhaps other APIs from prior chapters:

Figure 6.9 – Imported Patient API
Notice that the Version is 4.0.1. This represents the version of FHIR that this API supports. You can also see that it supports OpenAPI 2.0 specifications.
Tip
If you do not find the patient API file loaded, please download it from the GitHub site and use the LTE to add a new API using the existing OpenAPI import. You will find these files in GitHub using this URL: https://github.com/PacktPublishing/Digital-Transformation-and-Modernization-with-IBM-API-Connect. Once completed, you can continue with these steps.
- Select Patient API to bring up the designer so you can review the FHIR API and make modifications. You should explore the following sections to gain a better understanding of what FHIR requires.
Click on Design and then the General drop-down menu. Click on Base Path to review the base path. This is shown in Figure 6.10:

Figure 6.10 – Patient API Base Path
Another important section relating to the URL is the parameters. Click on Design | Parameter Definitions. This is where you will see all the parameters defined within the API. Figure 6.11 shows some of the parameters:

Figure 6.11 – Patient API Parameter Definitions
Another important section is your schema definitions. Click on Design | Definitions to observe what is already defined. These are the elements for the FHIR resource. This is shown in Figure 6.12:
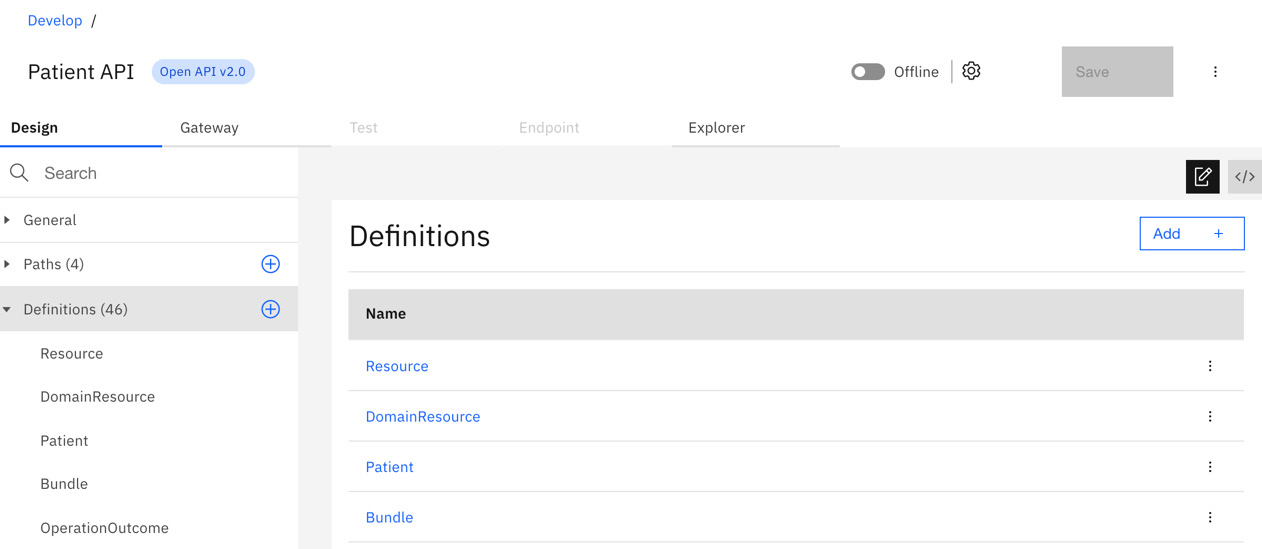
Figure 6.12 – Definitions shows the FHIR data elements
Next, you can review how API Connect provides the ability to enhance the runtime of the API.
Click on the Gateway tab and then select Gateway and portal settings. Scroll until you see the Gateway (option) label. Notice the two gateway types (datapower-api-gateway and datapower-gateway). Figure 6.13 shows the location of the Gateway dropdown:

Figure 6.13 – Gateway selections on the Gateway tab
The two gateways allow the API developer to choose which implementation of gateway will satisfy the type of API developed. For APIs migrated from the previous version 5 release of API Connect, datapower-gateway provides version 5 compatibility. For newly developed APIs, datapower-api-gateway provides additional functionality and an increase in the API performance.
Also on the Gateway tab is the Properties section. Notice the default endpoint. It is named target-url and its associated value is https://hapi.fhir.org:

Figure 6.14 – Properties displays references to variable fields
As you can see, a lot has already been defined for you and there are places where you can add documentation about your API. If you were doing this with an empty OpenAPI Swagger file, you would have had to create all of those details. Luckily for you, it was all handled previously.
- Locate the Policy menu item on the left. Notice how the page just shows the invoke policy. When we start applying logic to the API, this screen will be updated to show visually how the flow will be executed:

Figure 6.15 – Default policies for FHIR API
Now that you have familiarized yourself with the default implementation, it's time to make some updates so we can test our API. The changes you will make will be adjusting the target URL and the basepath, so it adheres to the endpoint: http://hapi.fhir.org/baseR4/Patient?_pretty=true:
- Navigate to the Design tab and select Base Path. Change /fhir-server/api/v4 to /baseR4 and click on Save:

Figure 6.16 – Updating the base path
Figure 6.16 shows the results of your change. What you just did was adjust the base path to match the target endpoint URI to specify /baseR4 versus the default that was provided in the download. When the API executes, API Connect will then append the new base path to the host endpoint. Next, you'll update the target host within the targetURL property.
- Navigate to the Gateway tab and select Properties. You will notice targetURL. Click on the link to allow for changes.
Notice that the default value is https://localhost/fhir-server/api/v4/. You will be changing this to http://hapi.fhir.org. Make that change and click Update, and then click Save once again.
- While still on the Gateway tab, you need to adjust the invoke policy that you saw in the Policies section.
You should see the single invoke policy. Click on the policy itself to open the property editor:
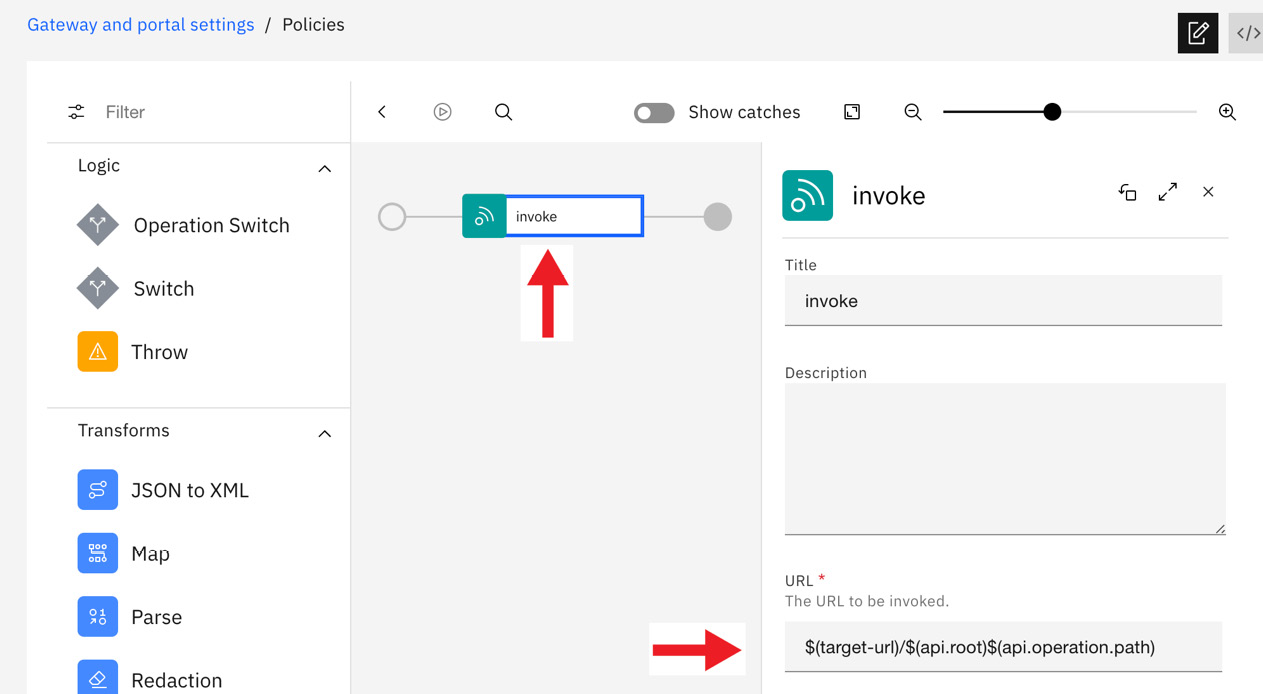
Figure 6.17 – Invoke property editor
As you can see in Figure 6.17, the URL property has the following replacement properties:
$(targeturl)$(api.operation.path)$(request.search)
You are already familiar with target-url. The other two are context variables. You were introduced to context variables in Chapter 4, API Creation. When you want to utilize the submitted path to an operation, you reference the api.operation.path context variable. If you reference request.search, you are essentially taking the request details after the question mark. An example would be http://hapi.fhir.org/baseR4/Patient?_pretty=true.
You will adjust these to reflect the changes you want to make. In the URL property, change the value of $(targeturl)$(api.operation.path)$(request.search) to $(targeturl)$(api.root)$(api.operation.path).
This will now call the backend API using the values you changed. You should test it to verify it is working. Ensure your API is online. If it shows offline, slide the button to online.
Once your API is online, click on the Test tab and perform the following steps:
- On the Test panel, use the Request dropdown to see GET https://localhost:9444/localtest/sandbox/baseR4/Patient. This is shown in Figure 6.18.
You may have noticed that API Connect had all of the HTTP methods support – a real timesaver. Click Send to invoke the API.
- If all goes well, you will be returned the JSON payload from the FHIR server (shown in Figure 6.18). If any errors occur, you will need to research the errors. If you make corrections to the API, ensure you save it, and then execute these steps again:

Figure 6.18 – Successful patient results from the test
You have successfully created and tested an FHIR GET request and have seen data returned. You did that with very minimal steps.
Before you learn about adding logic policies, let's first move your API up to the API Manager so you can experience development and testing on that platform.
Important Note
It is an assumption that you have access to the API Manager and belong to a provider organization. If you have yet to get access to the API Manager, please request access from the provider organization owner. To get to the API Manager user interface, use this URL: https://[api-manager-server-ui]/auth/manager/sign-in/.
- Next, log in to the API Manager and select Develop APIs and products:

Figure 6.19 – Using the API Manager for development
You will be presented with a list of existing APIs. This is a list of all the APIs within the provider organization.
- Click on the Add button and choose API (from REST, GraphQL, or SOAP) so you can import the Patient API file you created with the LTE. Drag and drop your API or click to upload the file using a file browser that pops up to select the API.
- Choose Existing OpenAPI and select your Patient API file:

Figure 6.20 – Importing the Patient API file to the API Manager
Your API is now available for additional development in the API Manager. You might notice that the page display is very similar to the LTE environment:

Figure 6.21 – Patient API viewed on the API Manager
Now, it's time to add some logic constructs to your API to allow greater flexibility.
Applying logic policies to your FHIR API
When you were working within the Gateway policies, you may have noticed the logic policies that were listed in the left panel under Logic. While the options are specific to conditional operation, the Throw policy is also provided for conditional error handling. Depending upon the gateway, the number of options differs. Actually, the logic policies have been simplified between the DataPower V5 Compatible Gateway and DataPower API Gateway. The If logic policy is implemented within the Switch logic policy of the DataPower API Gateway. Figure 6.22 shows that change:

Figure 6.22 – The If policy is replaced with Switch in the new API Gateway
If you are confused about how these options change within the Gateway policies, simply click on the Gateway tab and then Gateway and portal settings:

Figure 6.23 – Navigating to the Gateway tab
On the Gateway and portal settings, scroll down and you will see the Gateway (optional) label, showing what you have selected for this API:

Figure 6.24 – Gateway type selected
Now that you are aware of the types of logic you can add, we'll put that into practice. You'll start with If and Switch.
The If and Switch logic policy
In the near future, the DataPower Gateway V5 Compatible offering will be used very little, as the DataPower API Gateway is touted to perform 10x faster. That being said, since the DataPower API Gateway supports If logic, with the Switch policy, you'll learn how to do both logics with the Switch policy.
Let's add some simple logic that is actually useful while you are doing development. The scenario would be that whenever you are testing your API, you would like to have the endpoint changed based on the APIm_Debug header value. You only want to debug if you are executing your test case data. So how would you do that?
- On the API Manager, select Develop APIs and products and click on Patient API.
- Select the Gateway tab and then Policies. From the left side, drag and drop a Switch logic policy just before invoke. The drop area is a small square on the line before invoke:

Figure 6.25 – Using Switch logic in the API
- The Properties pane will appear and you can begin providing the relevant information. Type in a description. You can use any description or use the description in Figure 6.25.
- The $header context variable will be referenced in Case 0 to determine the value of APIm_Debug. If its value is not true, we will take a different path for our endpoint. Click on the pencil sign next to Case 0 and a new panel will display.
- Using the dropdowns, choose $header. Then, enter the header name as APIm_Debug. Choose the equal (=) operator and then type the true value. Click Done.
You just specified that if the APIm_Debug flag is not on, process as normal. This is representing the If statement. Now, we can create the Add otherwise case, as shown here:

Figure 6.26 – Creating an If statement
- If you scroll down, you can see the Add otherwise button. Click that button and you will see the switch logic update showing the Otherwise branch:

Figure 6.27 – Adding the Otherwise branch
It is within the Otherwise branch that you will add a new invoke policy, specifying a patient that you will be allowed to debug.
- Drag an invoke policy from the left pane and drop it on the line below Otherwise:
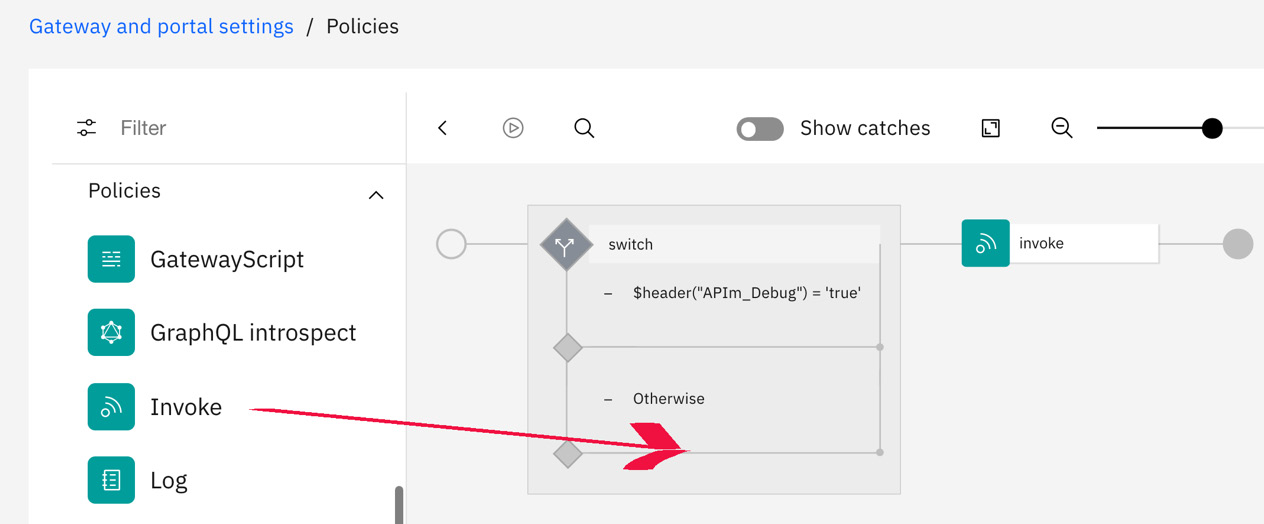
Figure 6.28 – Dragging an invoke policy and dropping on the line
- Now, you will update the properties for the invoke policy to specify the URL and patient ID to act as our default test user. In the Properties pane, enter this in the URL field: http://hapi.fhir.org/baseR4/Patient?_id=1263576.

Figure 6.29 – Adding values to the URL
- Lastly, we want to ensure that we don't run the same invoke policy for both cases, so we will drag the first invoke policy to our case, checking for the header. Drag and drop the invoke policy to the left and drop on the switch case for our header check:

Figure 6.30 – Drag the invoke policy to the first switch case
- Your final assembly is complete. Click on the Save button.

Figure 6.31 – Final switch completed
You have updated your API to apply some logic that will run debugging only if the debug header is set to true. You are ready to run a test. You will accomplish that by using the Test tab, as shown here:

Figure 6.32 – Navigating to the Test tab
Perform the following steps here:
- Click on the Test tab and use the dropdown to select Get patient operation. Change the Value of the APIm-Debug parameter to false:

Figure 6.33 – Running a test using the Test tab
- Click on the Send button and review the response. You should see information about the single patient you set within the Otherwise case:

Figure 6.34 – Response returned from the test
Now you have successfully applied If logic to an API. While that was a simple example to introduce you to logic switches, you will probably be more interested in seeing how to apply a switch that routes to the proper operations you have created for your API. You will do that next.
The operation switch logic policy
The operation switch policy is used to separate the programming logic by the HTTP operation verb (POST, GET, PUT, DELETE, and so on). By splitting it this way, it provides you with the opportunity to supplement each operation with additional policies, such as security or transformations. Before we implement the operational switch, let's review where the operations are set up by looking at a completed example:
- Log in to your API Manager.
- Choose the Develop APIs and products title.
- Click the Add button and choose the API.
- Click on Import Existing OpenAPI and select Evidence-swagger.json.
Your file will be uploaded as follows:

Figure 6.35 – Uploaded Evidence API
- Now click on Evidence API and navigate to Paths. It is under Paths that you can create a new path and assign HTTP methods:

Figure 6.36 – Paths are where you add HTTP methods
You can see the paths already created in this API. These RESTful paths were created using the FHIR specifications on how you interact with an FHIR server.
- Locate /Evidence{id} in the Paths menu list, and expand it and Operations to see what operations have been set:
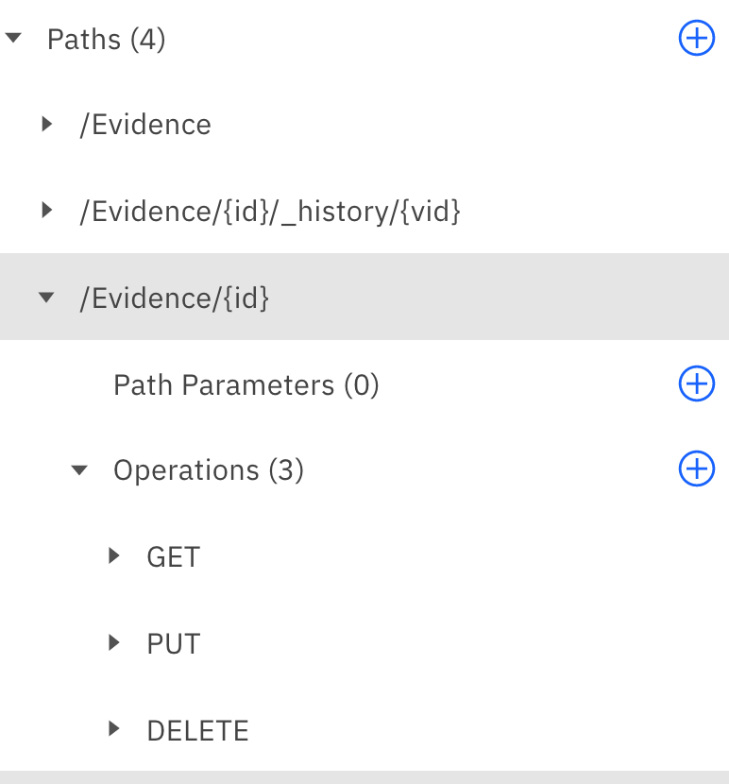
Figure 6.37 – Operations defined for /Evidence{id}
In Figure 6.37, you can see the plus sign (next to Operations) button visible on the right. This is how you will add new operations. Go ahead and click on the button to see how you would accomplish it:

Figure 6.38 – Adding an operation
As you can see, there is a dropdown that has all the operations not currently added. You can choose any of the other operations and provide a description of that operation.
- Choose patch and click Create:

Figure 6.39 – patch added to the operations
You will now see PATCH added on the left menu under Operations. You are required to add a response for the PATCH operation. Expand PATCH and you will see Responses.
- Click on the plus sign (next to Responses) to add a response.
This pops up a new page to add details about the operation:

Figure 6.40 – A response code is required for patch
The default is the 200 HTTP response code. You'll accept this default and click Create. Ensure you enter a descriptive message, such as Success. Click Create to create the response code.
- Next, you will define the response schema returned with your 200 response code:

Figure 6.41 – Create a new schema for the 200 HTTP code
In the Schema section, click on Create to define a new schema. There are two method tabs to choose from. The first is Definition. When you choose Definition, you create the schema from scratch. You can add a title and a description, but you must select a type. Since the response is a simple text response, you will select string. The other option is Reference. Since our imported API already has existing definitions, we want to choose this. Click on Reference:

Figure 6.42 – Choose an existing schema definition
- Click Create to create the schema. To go along with your PATCH operation, you'll require some parameters. One parameter (idParam) and definition (Evidence) were already created for you when you uploaded the API. Click the plus sign within the PATCH operation to add a new parameter:
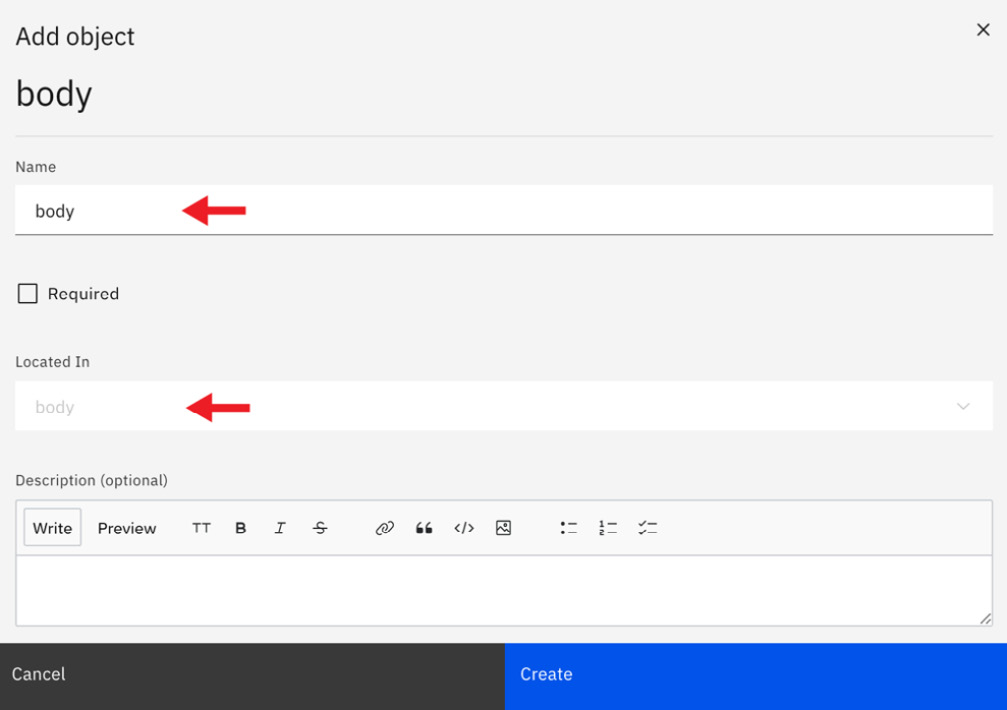
Figure 6.43 – Operation parameters and response setup
- You will type in body as the name, set it as required, and use the dropdowns to select body in the Located In dropdown. Then click on Create.
The screen refreshes and you will notice that the schema shows an error. You can choose Fix Reference or Create.
- Choose Create and follow the same procedure of selecting Reference and selecting the #/definition/Evidence choice. It will look exactly like Figure 6.42.
You'll notice you still have one error:

Figure 6.44 – Error show need for more parameters
You also need to reference the {id} parameter for the PATCH operation. Click on the parameter plus sign again and add the idParam reference. Figure 6.45 shows that you select Reference and #/parameters/idParam:
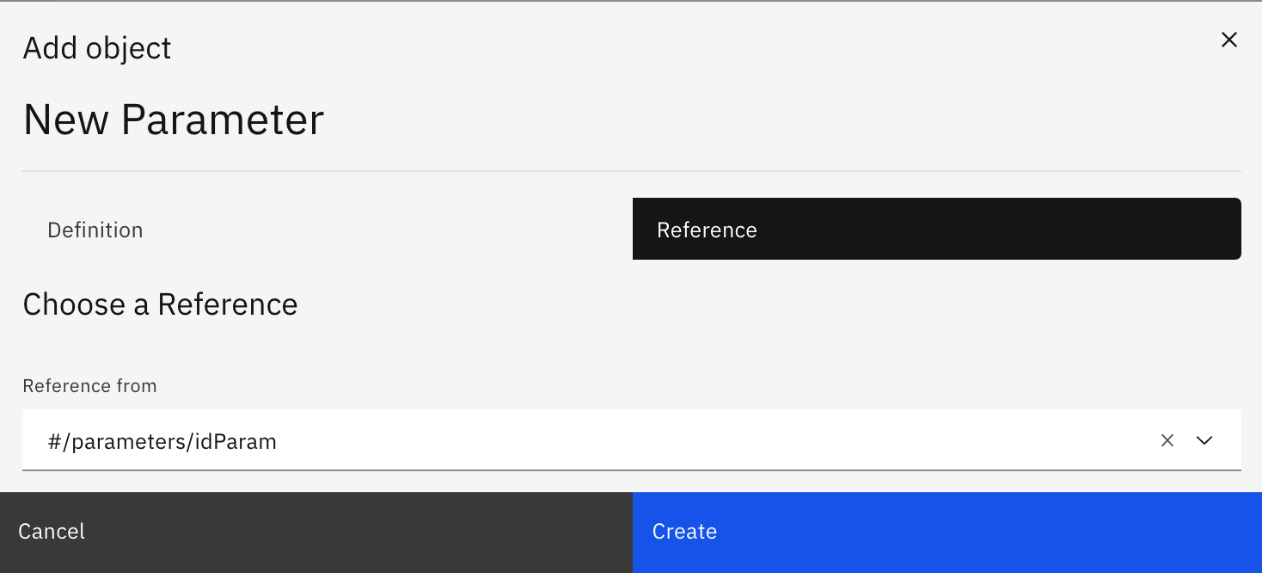
Figure 6.45 – Add the idParam parameter
- Click Create to add your parameter. Your error should disappear, with the results shown in Figure 6.46:

Figure 6.46 – Successful reference of idParam
- Save your API. Next, navigate to the PUT operation and review Responses:

Figure 6.47 – The Evidence PUT operation settings
As you can see in Figure 6.47, similar to the PATCH operation we just created, a body of Evidence type was required for this API, and it is allowing two status codes that represent what actually happened in the FHIR server. Before we return to the operation-switch example, let's first review the Evidence schema:
- Click on Definitions so that we can review how Evidence is constructed. Click on Evidence and then switch to the Source icon. This is shown in Figure 6.48:
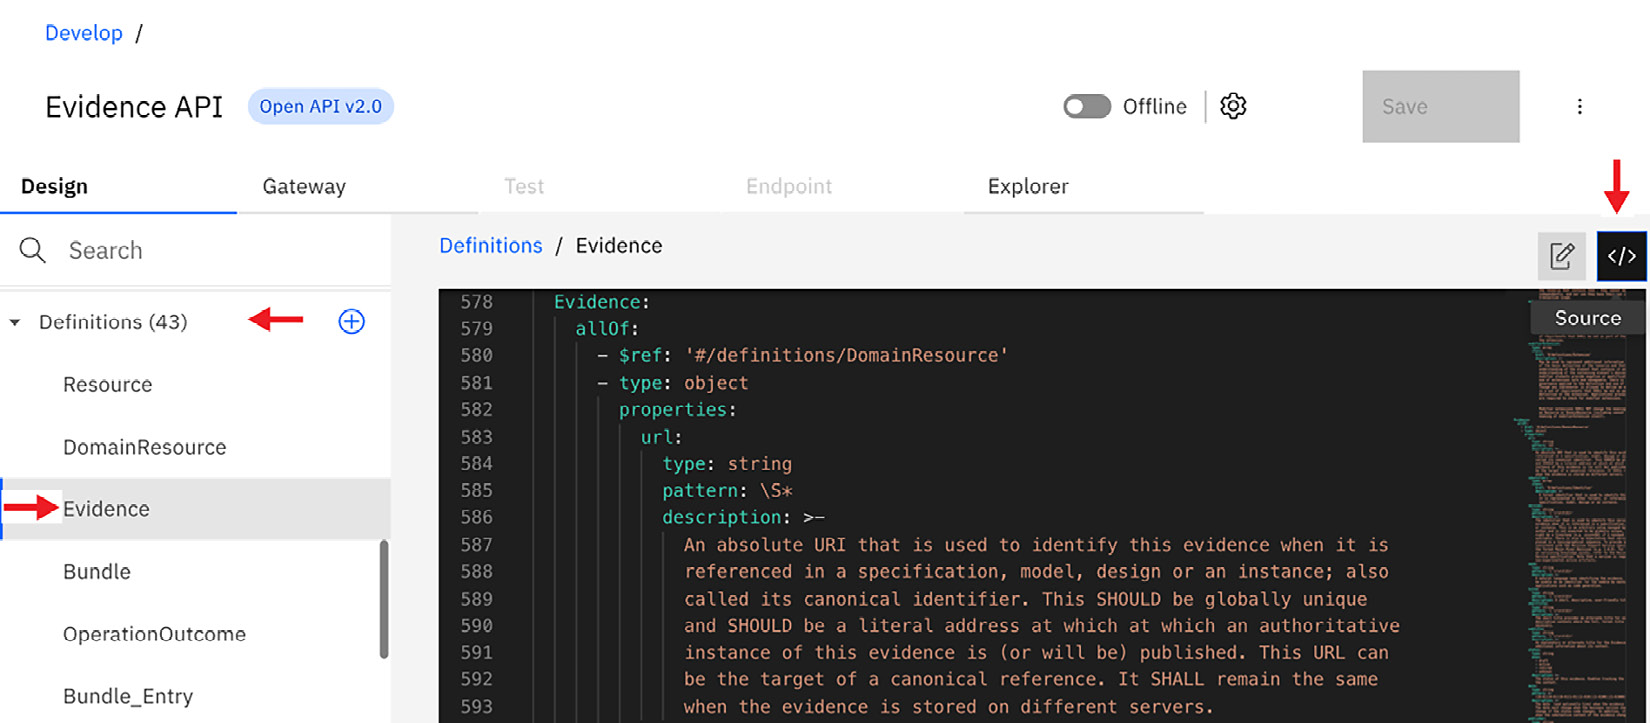
Figure 6.48 – Definitions will show how data is organized
- The OpenAPI definition is very lengthy and complex. The benefit of using the form icon to navigate to Definitions and choose Evidence is that when you click on the Source icon, it places you on the line number where Evidence is defined. As you learned before with updating parameters using the Source icon, you can also make updates to your Definitions in the same manner.
Now, you should have a good understanding of what is contained within the path and how operations are part of it, as well as references to definitions and how to add items using the Source icon. Let's return to operation-switch to show how we implement those paths.
Updating the Evidence API with operation-switch
You have learned that the Evidence API has four operations within the /Evidence/{id} path. Since each may have different requirements upon execution, it would be good to separate those in the assembly so that you can apply different policies to them. We'll use operation-switch to set that demarcation.
Warning
Nesting an operation-switch component inside an if or switch construct, or another operation-switch component, is not supported.
To use the operation-switch, perform the following steps:
- Make sure you are in the API Manager and have chosen the Develop APIs and products tile. Locate Evidence API and click on it:
- Locate the Gateway tab and select it. Ensure you are in the Policies section. You will see an invoke policy, as shown in Figure 6.49:

Figure 6.49 – Evidence invoke policy
- Drag and drop an Operation Switch component just before the invoke policy on the canvas.
From the Logic menu, drag and drop the Operation Switch component and release it before invoke, as shown in the following screenshot:

Figure 6.50 – Dragging the Operation Switch component to the canvas
The operation-switch component will then show before invoke, as shown in Figure 6.50. You will notice that there is an empty case displayed. You will start providing those cases:

Figure 6.51 – operation-switch
- You already know that there are operations set for Evidence API. They were GET, PUT, DELETE, and PATCH.
- On the operation-switch property panel and scroll down until you see case 0. Click on where it says search operations… and a list of operations will be displayed:

Figure 6.52 – Operations display for GET, PUT, DELETE, and so on
What you may have noticed is the operators you thought would show up (GET, PUT, DELETE, and so on) are not there. Instead, there are various values, such as readEvidence, updateEvidence, and so on. How did they get there? You'll learn shortly, but you should finish this first.
- Select readEvidence and click on Save.
- Now, click on the Design tab. Then find the /Evidence/{id} path.
- Scroll down to see Operations and expand it to choose GET, as shown in the following screenshot:

Figure 6.53 – Navigating to review operation details
Continue to scroll down the page until you see the Operation (optional) label:

Figure 6.54 – Adding an operation is good for readability and documentation
Notice how the Operation (optional) field is showing readEvidence. You saw this optional field when you added the PATCH method earlier, but you left it blank. Since you didn't supply any Operation (optional) fields to PATCH, it will create a default name and list it on the case properties field on the invoke policy. Now you know how an Operation (optional) field works, you can continue.
- Click on the Gateway tab so that we can finish our operation-switch cases.
- Click on operation-switch to bring up the Properties pane. Your screen should show your Case 0 selection of readEvidence.
- Finally, click on the Add case button, as follows:

Figure 6.55 – Adding more cases to operation-switch
When you click on Add case, it will add a new case field ready for your selection:
- Then, click on search operations…. Notice the difference between an Operation (optional) field with data or left blank:

Figure 6.56 – The search operations… dropdown
You will choose updateEvidence to assign the PUT method to Case 1. Notice how readEvidence is not shown and the PATCH method you added is displayed in the dropdown. It shows your PATCH method and the path, instead of a readable operation (optional) name.
Tip
Having an Operation (optional) name makes your visual programming more readable.
- Repeat step 11 to add the deleteEvidence case. Your updates should reflect on the canvas as three total cases, as follows:

Figure 6.57 – Three operations are set up
As you can see, operation-switch shows readable cases so that you can understand what they will be doing. We can make it more readable by changing the invoke policy to a more descriptive name. To do so, perform the following steps:
- Click on invoke to bring up its property pane. Change Title from invoke to get Evidence by id:

Figure 6.58 – Updating the title from invoke to get Evidence by id
After you make that change, operation-switch will be updated:

Figure 6.59 – Updating the title for the invoke policy
It is definitely more readable. Now, you will need to place the get Evidence by id invocation under the readEvidence case. Drag and drop the get Evidence by id invoke policy on the line under readEvidence:

Figure 6.60 – Drag Evidence by id to readEvidence
Now, whenever a readEvidence operation (GET) is called, get Evidence by Id will be invoked.
You will now need to test the conditional switch, but first, you need to update the base path and invoke URL. Since you are still on the Invoke pane, you should update the invoke properties now.
- On the invoke pane (now called get Evidence by id), find the URL field and change the current value from $(target-url)$(api.operation.path)$(request.search) to $(target-url)$(request.path).
- Click Save to save your assembly work. You'll update the target-url property base path next. Click on the Design tab.
- Scroll down and select General | Base Path. Change the base path from /fhir-server/api/v4 to /baseR4:

Figure 6.61 – Update base path to FHIR path
- With the base path updated, you next need to update the target-url endpoint. Make sure to save the API by pressing the Save button.
- Click on the Gateway tab and locate the Properties menu item. Click on Properties and select the target-url link. Change the property value from https://localhost/fhir-server/api/v4/ to http://hapi.fhir.org/.
- Save your changes and then click on the Test tab. If the Test tab is disabled, change the slider from Offline to Online.
You'll be presented with a page that will allow testing. One of the benefits of using the Test facility is it already has all of your operations available for execution – a real timesaver. It also knows the parameters that are required and displays them:
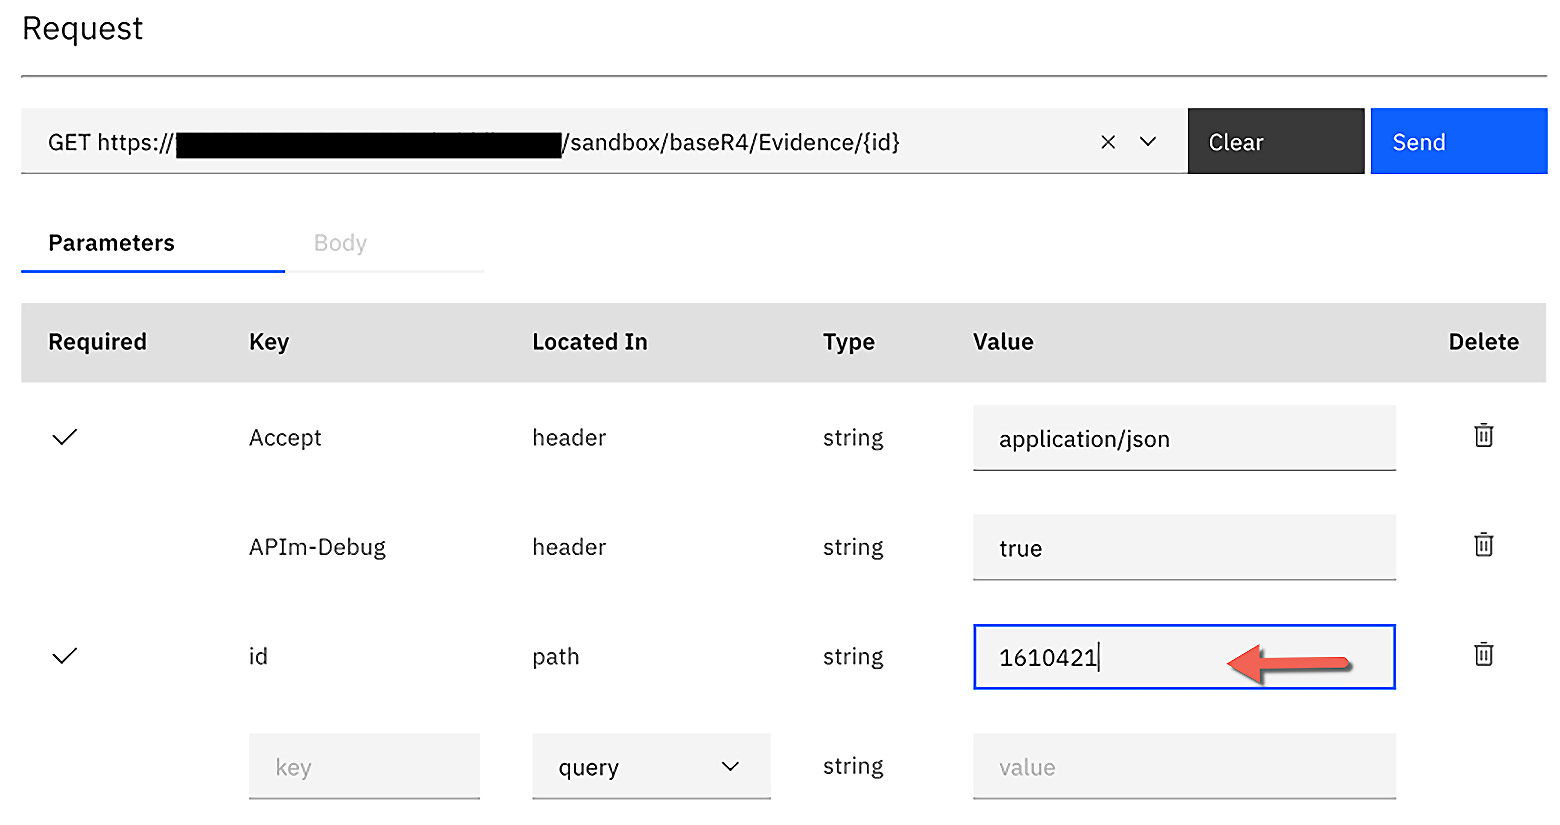
Figure 6.62 – The test tab is used to test the API
- On the Test page, use the dropdown to select the GET request that is calling https://<host>/sandbox/baseR4/Evidence/{id}.
- In the Parameters section, update the required id field and enter 1610421 as the value.
- Click Send to initiate the request to the FHIR server. The response will return the Evidence FHIR resource with the ID of 1610421, as shown here:

Figure 6.63 – A successful test
You have successfully executed one of the operation-switch cases. But what about the other two that you set up? If you test them, nothing happens. It's because we need to add invoke policies to the other two. You'll do that next:
- Return to the Gateway tab and drag and drop an invoke policy on the updateEvidence case. The properties will display invoke, and you should update the title and URL. Change the invoke title from invoke to put Evidence by id.
- Replace the URL with $(targeturl)$(request.path). Your screen should look like Figure 6.64:

Figure 6.64 – Adding a new invoke policy for updateEvidence
- Now, perform the same steps you just did but instead drop the invoke policy on the deleteEvidence case and change the title of the invoke policy to delete Evidence by id. Finally, you will also update the URL with $(target-url)$(request.path).
After saving your changes, your final operation-switch should look like Figure 6.65:

Figure 6.65 – Completed operation-switch with three operations
You have now successfully implemented an operation-switch. With this pattern of developing with the operation-switch, you can now add additional policies before and after your new invokes (get Evidence by id, put Evidence by id, and delete Evidence by id).
Information
The HAPI FHIR server is available for testing online. If you will be testing using operations that update and delete resources, it is suggested that you create a new resource first, save the return identifier, and use that identifier in future operations.
This concludes the steps to creating RESTful services using API Connect. You've learned a lot, so let's review the key skills learned.
Summary
While this chapter was rather lengthy, it was packed with good information. You were introduced to FHIR and how that digital framework is helping healthcare companies successfully exchange information securely. You even learned with actual FHIR resources defined with data definitions.
You learned more about how RESTful services are created in API Connect and utilized the API Manager drafts to perform the visual development. Within the Develop APIs and products tile, you learned how to add existing APIs, modify those APIs with the designer, and add logic to flows such as operation-switch. The skills you learned in this chapter will make you very comfortable adding new or existing APIs, and then enhancing the flow of the API using logic constructs.
Finally, you were introduced to the Test facility where you can run a test directly from API Connect and how that facility improved your agility by generating your operation calls.
Your knowledge is building rapidly. The next chapter will build on this one by adding security to your APIs.