
Chapter 7: Securing APIs
In the modern world of technology, security is one of the most essential non-functional characteristics of any platform or solution. It is especially true of an API as an API's outreach is the defining feature of its success. More the number of consumers of an API greater will be its footprint. A secure API supports broader outreach and increases consumers' confidence. A secure API's consumers can fully leverage that API confidence about their data confidentiality and privacy.
In the previous few chapters, you looked at methods of building APIs using various features and functions available within API Connect (APIC). Chapter 4, API Creation, helped you understand and explore multiple API building constructs, and in Chapter 5, Modernizing SOAP Services, you learned methods to expose your existing SOAP assets as RESTful APIs. One of the primary goals of both chapters was to make you comfortable with the idea of API development and help you start your modernization journey using APIC. The success of digital modernization efforts hinges upon how the entire security requirements of the enterprise, system, application, API, function/method, or even a line of code (LOC) are addressed. Security encompasses everything from the enterprise to LOC. The focus of this chapter will be to coach you on techniques for securing the APIs on the APIC platform.
In this chapter, you will be learning about:
- Out-of-the-box (OOTB) security capabilities of APIC
- Protecting APIs with Basic authentication and Client ID (API key) methods
- Applying the OAuth2 security method to secure APIs
- Implementing OpenID Connect (OIDC) to secure APIs
- Using JWT policies
- Adding additional security measures
After you have finished going through each of the preceding topics, you should become comfortable with the following:
- Understanding the full spectrum of API security capabilities of the APIC platform
- Choosing between different methods of API security and understanding the key advantages and disadvantages of each method
- Applying various security methods to secure your APIs
- Developing an understanding of the methods to test API security
Technical requirements
Unlike Chapter 4, API Creation, and Chapter 5, Modernizing SOAP Services, which utilized local development tools such as API Designer and Local Test Environment (LTE), this chapter will require you to have access to an existing APIC cloud implementation. This APIC cloud access can be provided by your company's APIC cloud administrator.
The exercises in this chapter will require you to have the following access:
- API Manager UI.
- Access to the mock authentication URL service: http://httpbin.org/basic-auth/user/passwd. This service returns HTTP Response Code 200 for the username=user and password=pass credentials. For any other username and password values, this service returns HTTP Response Code 401.
- Access to https://stu3.test.pyrohealth.net/fhir/Patient/d75f81b6-66bc-4fc8-b2b4-0d193a1a92e0 from your API Gateway.
- Access to a curl tool for executing tests.
Once you have access to these, you are ready to start exploring various API security features available in APIC.
Out-of-the-box security capabilities of APIC
When securing APIs with APIC, you are provided with three out-of-the-box security capabilities that can be applied. These are as follows:
- API key: This method involves configuring Client ID and Client Secret security definitions as part of defining an API. Once defined in the API's Security definition, a consumer may pass values for these API keys as part of a request's query (X-IBM-Client-Id, X-IBM-Client-Secret) or header (client_id, client_secret).
- Basic authentication: This option allows you to perform API authentication by validating the supplied credentials against an Authentication URL or an LDAP-based user registry.
- OAuth: The OAuth option allows us to secure APIs utilizing the standards set forth for OAuth2 (and OIDC).
These three capabilities should generally solve most of your API security concerns. When choosing between these security capabilities, you utilize a two-step process within an API definition. Figure 7.1 identifies these two steps:

Figure 7.1 – Out-of-the-box security options
Step 1 is where you either choose or create a new security scheme. In step 2, you apply one or more of the security schemes to your API. The OpenAPI Specifications (OAS) terminology identifies these steps as Security Definition and Security Enforcement (or Security).
Of these three OOTB security options, the utilization of the API key method requires implementing only steps 1 and 2 described here. There is no further setup needed for the API key, whereas Basic authentication (Basic) and OAuth2 methods require you to separately create security providers before these can be utilized in the security scheme step. You will learn how to accomplish this next.
Preparing for the APIC security implementation
Basic authentication and OAuth2 require integration with various servers. They require configuring resources (user registries and OAuth providers) in the Cloud Manager or API Manager. As an architect or administrator, you will need to know how these resources are accomplished. As a developer, you will only be concerned about having access to the configured and functioning resources. This section will give a high-level introduction on how resources are configured for utilization by the provider organization's developers. Figure 7.2 shows you the Resources configuration page:

Figure 7.2 – Configuring Resources
This page is available in API Manager and Cloud Manager interfaces under Home | Manage resources. It allows creation of the user registries (Local, LDAP, Authentication URL, and OIDC), TLS references, OAuth providers, and Billing. The security components described in this chapter revolve around user registries and OAuth providers. You will be creating these resources in the API Manager interface.
While there are many variations on how you can create these resources, here you will learn how to configure a simple user registry and an OAuth provider. You will learn to define a user registry next.
Note
You must have the necessary permissions to the API Manager to perform these tasks. Typically, you should belong to either of the following two roles to be able to manage user registries: Organization Owner or Administrator.
Creating a user registry
You can create a new user registry by logging in to the API Manager and navigating to Home | Manage resources | User registries | Create. You will be presented with the screen shown in Figure 7.3:

Figure 7.3 – Selecting a new user registry type
As shown in Figure 7.3, there are four types of user registries. Local user registry (LUR) is the first user registry created when you install APIC. The LUR type is used to provide simple registries for Catalogs. Each catalog (sometimes called an environment) has its own LUR that contains the authorized users for that catalog. Refer to Figure 7.2 for the default LUR created for the Sandbox catalog.
LUR is the most basic type of user registry provided by APIC. From Figure 7.3, you can appreciate the range of user registry types that are supported by APIC.
Next, you will learn to provide some of the common user registry types, starting with an Authentication URL user registry.
Configuring an Authentication URL user registry
There are instances when a user's credentials are stored outside of an LDAP system, for example, in a user table in a database, a CRM or third-party authentication system, or a simple file-based repository. A simple REST authentication endpoint can be made available that can authenticate a user against such repositories. From APIC's perspective, the HTTP response code from such an authentication endpoint decides whether a user's authentication is successful (HTTP response code 200) or a failure (HTTP response code <> 200). APIC supports a user registry type called an Authentication URL user registry to utilize such an authentication endpoint.
You will now learn to build an Authentication URL user registry that will use a mock authentication endpoint, http://httpbin.org/basic-auth/user/pass. Here is how it goes:
- Navigate to the Home | Manage resources | User registries page. Click Create and then choose the Authentication URL user registry tile (refer to Figure 7.3). Enter the information shown in the following Table 7.1:

Table 7.1 – Creating a new Authentication URL user registry
Your screen should look like the left-hand section 1 of Figure 7.4:

Figure 7.4 – Authentication URL user registry configuration
- Click Save and you are ready to use it. You will certainly appreciate the ease of creating a user registry. You will be able to see your newly created Authentication URL user registry as HttpBin user registry in the list of User registries. Refer to section 2 of Figure 7.4.
- The last step is to make the HttpBin user registry available to the Sandbox catalog. Click on the Home screen | Manage catalogs tile | Sandbox tile | Catalog settings tab | API user registries section | Edit button. In the Edit API user registries view, click the checkbox for HttpBin user registry and then click Save. Refer to section 3 in Figure 7.4.
This completes the creation of an Authentication URL user registry and making it available to the APIs deployed on the Sandbox catalog.
Another scenario you will often encounter is to interface with an LDAP system for authentication purposes. You will next see the method of configuring an LDAP user registry to perform such an authentication.
Introducing the LDAP user registry
Most corporations maintain their system login credentials (employee, applications) in an LDAP repository. They do this for multiple good reasons, such as the systematic organization of records in a hierarchical structure, data security, and platform neutrality.
For such scenarios, APIC supports an LDAP user registry type. Creating an LDAP user registry requires many details and is dependent on your LDAP server configuration. You will most likely need to work with your LDAP administrator in setting up an LDAP user registry. You can still review the sample configuration in the following screenshot to see some of the information that is required to set up an LDAP user registry:

Figure 7.5 – LDAP user registry configuration
As you can see in Figure 7.5, setting up such a user registry requires significantly more information, including, the bind method, Prefix, Suffix, Base DN, and so forth. You should consult your LDAP administrator before embarking on this configuration.
There is one more user registry type that is supported by APIC, and that is the OIDC user registry. Since this chapter is about API security (instead of user security), OIDC is only briefly covered here.
Introducing OpenID Connect (user registry)
APIC also supports creating a user registry connected to an OIDC Identity Provider (IdP). It can only be used for onboarding and authenticating Cloud Manager, API Manager, and developer portal users. You cannot use it for securing your APIs, though.
The OIDC user registry will generally be connected to a primary OIDC provider such as Google, Slack, or GitHub (among many others). APIC makes it convenient for you to integrate with the main IdPs, such as Google, by automatically populating many key configuration parameters. You will need to get your client/application registered with your IdP to get a unique set of Client ID and Client secret credentials that you will need to provide on the Create OIDC user registry form. Refer to Figure 7.6:
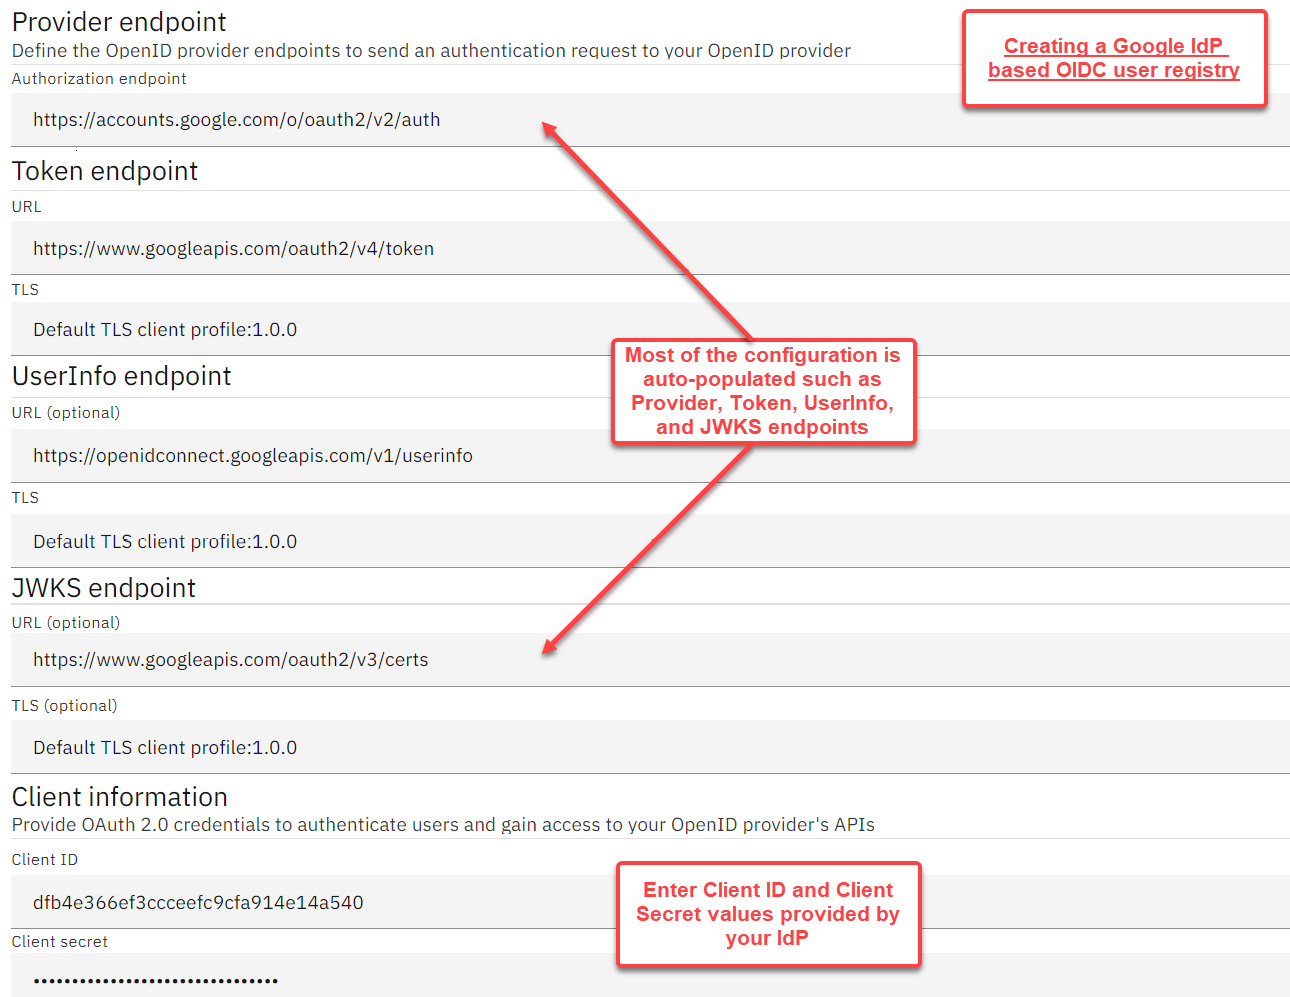
Figure 7.6 – Creating an OIDC user registry
Having covered all the user registry types supported by APIC, your next goal is to learn the OAuth provider configuration. With this OAuth provider configuration, you will complete the main setup required to secure the APIs.
Configuring native OAuth providers
Just what is an OAuth provider? An OAuth provider is a service provider that provides authorization services via an Authorization Server to the Resource Owner (typically the end user) and to the Client (typically the applications trying to access the Resources on the resource owner's behalf). An OAuth provider is a third party that is trusted by the resource owner and the client alike. To facilitate this OAuth-based communication, the provider provides an authorization code and access token.
You will use API Manager to create a native OAuth provider. After completing the provider configuration, you will enable this provider in the Sandbox catalog. A native OAuth provider allows the use of native capabilities of APIC to perform OAuth authorization tasks. Of course, APIC allows you to utilize third-party OAuth providers such as Amazon Cognito, Google OAuth 2, Okta, and Facebook Log. The integration with such third-party providers will not be covered here. You will instead create a native OAuth provider by utilizing APIC's OOTB capabilities. Follow these steps:
- Log in to API Manager. Go to Home | Manage resources | OAuth providers. Click on the Add button and select Native OAuth provider.
- On the Create native OAuth provider page and provide the following values. You can leave the rest of the fields as their defaults.
Title: api-security-native-oauth-provider
Gateway Type: DataPower API Gateway
- Click Next. On the Configuration page, keep the default values for Authorization path and Token path.
Under Supported grant types, choose Access Code and Resource owner – password.
Under Supported client types, keep the Confidential checkbox selected. Refer to section 1 of Figure 7.7:

Figure 7.7 – OAuth provider configuration
Here are some important details about the various fields in section 1 of Figure 7.7:
- Authorize path is the standard OAuth endpoint for authorization. It is a path on the authorization server invoked by the client to retrieve the initial authorization code.
- Token path is also a standard OAuth endpoint. It is a path on the authorization server invoked by the client to retrieve the final access token in exchange for the authorization code. The access token is then used by the application to call the protected resource/API.
- Access code (also known as an authorization code grant type) is a preferred choice when there is a low degree of trust between the resource owner and the client. The resource owner performs an independent login with the authorization server and receives an authorization code. The client then exchanges that authorization code for an access token from the authorization server.
- When you choose the Resource owner - Password grant type, you are specifying that the client has access to the resource owner's credentials (username and password) and that there is no need for an extra fetch authorization code step. It is typically used in scenarios where there is a high degree of trust between the resource owner and the client.
- You do not have to choose both grant types. You can choose either of the grant types to adjust how OAuth is executed. For your OAuth testing in this section, you must keep the Access code option selected. For more details on the other grant types, visit https://www.ibm.com/docs/en/api-connect/10.0.1.x?topic=authentication-configuring-native-oauth-provider.
Note
You can apply the following rules of thumb when selecting one of the preceding grant types:
Access code: Use when the resource owner does not want to share the user credentials with the client.
Resource owner - Password: Use when the resource owner is willing to share the user credentials with the client.
- Click Next. On the Scopes page (section 2 of Figure 7.7), overwrite the default scope, sample_scope_1, with patient-detail. Do the same for Description. A scope is an access control mechanism enforced by the authorization server on the client. It provides the authorization server with a way to notify the resource owner about the resources that are accessed by the client on the resource owner's behalf. After updating the default scope, click Next.
- On the Authorization endpoint page, keep the values as shown in section 3 of Figure 7.7. Although you are selecting the default values, the Identity extraction and Authorization values can also be an HTTP (default or custom) HTML form. This form provides for the ability to customize the resource owner's interaction (generally, the login form and the scope permissions pages) with the OAuth process. This form is not available in the case of a third-party OAuth provider as in that case, the interaction between the resource owner and the authorization server is controlled by that third-party provider itself. Click Next.
- You will be presented with a native OAuth provider summary. Review the summary information. You will notice that the Base path value is empty. APIC will automatically generate this value for you after you click on the Finish button. The Base path value will be used to construct the complete URLs for the Authorization URL and the Token URL. You will see this later in Figure 7.15 when you apply the OAuth security definition to your API. Click Finish.
With the OAuth provider now created, the next step in the process is to make the OAuth provider available to the catalog where the OAuth protected resource(s) will be deployed. Here is how it is done:
- Click the Manage icon on the left navigation of API Manager and select the Sandbox catalog.
- Click the Catalog Settings tab | OAuth providers. Click on the Edit button to add your newly created OAuth provider. Your newly created OAuth provider, api-security-native-oauth-provider, will be displayed on the screen. Select the checkbox and click Save. Refer to the following screenshot:

Figure 7.8 – Adding the OAuth provider to the Sandbox catalog
With the preceding configuration, you are now ready to use the OAuth provider to protect the API resources using OAuth2 security.
This concludes the section on User Registry and OAuth provider preparation. The following sections of this chapter will guide you through the process of applying the security to your APIs, using the various resources you just created. You will begin by protecting an API using Basic authentication with the Authentication URL method.
Protecting APIs with Basic authentication and Client ID (API key)
In this section, you will begin developing APIs that use the security features you have just set up. Using Basic authentication with an API key is among the easiest methods of applying authentication security to an API. This method of applying API key security (client ID and client secret) to an API was covered in detail with an example earlier in Chapter 4, API Creation, in the Enabling API Security section.
To briefly refresh the API key concepts that you have covered earlier, an API key is the most basic level and quickest method of applying authentication security to your APIs. This method involves configuring client ID and client secret (together referred to as an API key) security definitions as part of defining an API. Once security schemes are defined, you simply select those definitions in the security section of your API. A consumer can then send these values as part of either a request's query (X-IBM-Client-Id and X-IBM-Client-Secret parameters) or its header (client_id, client_secret). Refer to Figure 7.1 for details of defining a security scheme and then applying the scheme to the API security.
On the other hand, Basic authentication using the Authentication URL method validates the username and password values passed in the Basic auth headers of the request against the Authentication URL user registry.
You will now develop an API that will be secured by the API key and Basic authentication methods.
Implementing Basic authentication and ClientID in API security
You recently created an Authentication URL user registry entitled HttpBin user registry. It is time to use this registry and a client ID to secure your API:
- Navigate to Home | Develop API and Products and click Add to create a new API. Choose a new From target service REST proxy and click Next. Use the information in Table 7.2 to complete the wizard entry of your API:

Table 7.2 – Proxy for Basic auth and ClientID
- Your API already has an API key security definition, clientID. You will now add a Basic auth security definition. Refer to Figure 7.9:

Figure 7.9 – Security definitions for API
- Go to the Design tab | Security Schemes | Add. Provide the values as per Table 7.3 and then save the scheme.

Table 7.3 – Basic auth security definition
You should now see two security schemes available for your API. Refer to Figure 7.10:

Figure 7.10 – API Security Schemes for Basic auth and API keys
- To use the http-auth-url security scheme, you will need to add this scheme to the security of the API. Go to the Design tab | General | Security | clientID in the navigation menu. Select the http-auth-url scheme. Refer to Figure 7.11. Click on the Submit button. Then, click on the Save button:

Figure 7.11 – API Security for Basic Auth and API keys
- Go ahead and publish the API. Click the Offline slider to publish the API to the Sandbox catalog. Refer to Figure 7.12:

Figure 7.12 – Publishing API changes
- Click on the Test tab. You will need to set the API's Authentication and Parameters tabs as highlighted in Figure 7.13. In the Authentication tab, set the Username to user and Password to pass. Review the Parameters tab to check how APIC has pre-filled the X-IBM-Client-id value for testing.

Figure 7.13 – Setting Basic Auth and Client ID parameters in the Test facility
- Click Send to execute the test. You should receive a successful response as shown in the following screenshot:

Figure 7.14 – Basic Auth and Client ID successful response
How easy that was! You completed the testing of your API proxy secured using two security methods: API key (client ID) and Basic auth (Authentication URL). As a learning exercise, you can consider modifying your REST proxy by removing one of the security definitions from its security and then re-executing the test (remember to save and publish after any REST proxy changes. Use the toggle facility for quick republishing to the Sandbox catalog). You can also run some negative tests by changing the authentication values of username, password, and X-IBM-Client-Id parameters in the Test facility.
One of the goals of this section was to get you familiar with the process of creating and using the security definitions. To that extent, Basic auth and API keys served a great purpose. But as the reach of your APIs expands beyond the realm of your internal organization and its trusted partners, you will certainly need to apply more advanced security modes. OAuth is one such security method, and you will learn this next.
Applying OAuth 2.0
In this section, you will learn about the specifics of OAuth, and later you will learn about OIDC (another similar security standard). Because of similarities between OAuth and OIDC, it might be helpful to know at a high level what is what. It is important to know that while OIDC deals with authentication, OAuth deals with authorization. OIDC gives you a single login for multiple sites. OAuth provides you with the ability to control access to your data on a single site, by multiple sites.
So, what is exactly OAuth?
OAuth 2.0 is a security standard that allows one service (for example, a healthcare provider) to securely access limited data (for example, some lab results) from another service provider (for example, a medical lab) without ever having access to the person's account credentials (username and password) shared with the other (medical lab provider). OAuth solves the authorization problem. Because of OAuth, a patient can now delegate limited account access (lab details) to their healthcare provider.
In the context of APIC, the implementation of OAuth security involves the following main steps:
- Create an OAuth provider.
- Make the OAuth provider available to a catalog.
- Enable OAuth security in an API.
- Create a test client that will invoke the API.
- Test the OAuth from the resource owner's perspective.
In the Configuring native OAuth providers section, you already took care of the first two steps. We will now build upon the work you have done thus far and complete the remaining steps.
Enabling API with an OAuth security definition
OAuth is one of the security definitions types available to secure an API. You will now secure your patient-information API using the OAuth provider api-security-native-oauth-provider:
- In API Manager, open the patient-information API proxy. Navigate to its Design tab | Security Schemes. You can keep the existing security schemes.
- Click the Add + button in the Security Schemes section.
- Create an OAuth oauth-secdef security definition as per Table 7.4. Leave the default values for the Authorization URL, Token URL, and Scope fields.

Table 7.4 – OAuth security definition
Your completed security definition should resemble Figure 7.15:

Figure 7.15 – OAuth Security Definition
You will use Authorization URL and Token URL to test the OAuth flow in the Testing of OAuth flow section. Notice that the Scopes field of the OAuth provider is pre-populated. In the case of multiple scopes, keep the scope that is relevant for the API on which the security definition is applied. In this example, your OAuth provider only manages the patient-detail scope. Therefore, you do not need to make any changes to Scopes.
- Click on the Save button to save the oauth-secdef security definition.
- Apply the oauth-secdef security definitions to the security of your API. Go to the Security section. You will find clientID, oauth-secdef, and http-auth-url security schemes listed under the Security view. You should now be able to select oauth-secdef as the security scheme and the patient-details scope. Unselect the http-auth-url definition. Refer to Figure 7.16:

Figure 7.16 – Client ID and OAuth Security
Save your API.
- Since you removed the http-auth-url security from your API, you must republish your changes. Use the toggle facility (refer to Figure 7.12) to republish your changes.
From the resource's (API) perspective, what you have done so far applies the OAuth security to your REST proxy. These steps of creating the OAuth provider, assigning the provider to the catalog, and attaching the OAuth security definition to the API make the API OAuth safe. The API provider's role generally finishes after these steps.
There is much that happens from the client's (API's consumer) perspective, though. You should get an understanding of the client's configuration as well. OAuth providers grant type configuration, which you did earlier (refer to Figure 7.7), and this directly impacts the client's interaction with the API. Next, you will see the client-side configuration and the steps to register the client with the API.
Creating a client
As previously stated, the client (typically an application) interacts with the resource (API) on the resource owner's (typically the end user) behalf. From the earlier example, the client is the application developed/owned by the healthcare provider. The resource is the service, exposed by the medical lab, that fetches the resource owner's lab results from the lab provider's backend systems. Before a client can attempt to access resource(s) on the resource owner's behalf, the following needs to happen:
- Registration of the client with the resource server.
- The client should have a unique client ID and client secret for authenticating with the authorization server.
- The client should subscribe to the resources that it intends to access on the resource owner's behalf.
You will perform the client's configuration in the Sandbox catalog. Typically, a client belongs to a Consumer Organization. Client creation is managed by the consumer organization's administrators. Since you do not have a consumer organization set up yet on the developer portal, you will use the API Manager functionality to perform the required configuration:
- Go to the Home screen | Manage catalogs | Sandbox | Consumers. Click the Add button. Choose the Create organization option.
- Create a new consumer organization by providing values as per Table 7.5 and click Create:

Table 7.5 – Consumer organization creation
Once an organization is created, you can refresh the Consumers tab to view your newly created organization. Refer to Figure 7.17:

Figure 7.17 – Consumer organizations and applications
- You will now perform the important step of creating a client (application) and assigning it to the sandbox-corg consumer organization. In APIC, a client is also called an application. Creating an application registers that application with the resource server. Go to the Applications tab (refer to Figure 7.18). Click Add. Provide values as per Table 7.6 and click Create:

Table 7.6 – Client (application) creation
The system will provide a unique set of Client ID and Client secret values (refer to Figure 7.18). Ensure that you copy and store them safely. It is not possible to retrieve the client secret value after this. Close the Credentials view.

Figure 7.18 – Client/Application credentials
Once the application is created, you can refresh the Applications tab to view your newly created application.
You will now need to create a Subscription for the corg-app application to the resources that it is going to access.
- On the Applications tab, open the corg-app application menu (the three dots) and select the Create Subscription option from the menu. Refer to item 1 of Figure 7.19:

Figure 7.19 – Creating an Application Subscription
- On the next screen, select the Plan that corresponds to your API (patient-information 1.0.0) and click Create Subscription. Refer to Figure 7.20:

Figure 7.20 – Select a Plan to create an application subscription
Click on the Refresh button on the Application tab. You can view the corg-app application's subscription through the View Subscriptions menu option. Refer to item 4 of Figure 7.20.
You have completed all the necessary configurations for securing your API with OAuth security. The configuration involved steps for creating an OAuth provider, assigning the provider to a catalog, enabling API with the OAuth security definition, and finally configuring a client that can access the API. After all these steps, the API is ready to be tested and you are now going do so.
Testing OAuth flow
Like other OAuth configuration steps, testing the OAuth flow is also a multi-step process. This is due to the nature of multiple interactions between all the parties involved in OAuth processing. Apart from the complexity of the multiple parties, OAuth flow also changes based on the configured grant type in the OAuth provider.
You will be performing testing for the access code, sometimes referred to as the three-legged flow. You will remember that in the case of the access code or three-legged flow, the client does not have any access to the resource owner's credentials. The resource owner is directly authenticated by the authorization server before the control is returned to the client along with the authorization code. The client then makes a separate call to the authorization server to request the access token and to access the resource on the resource owner's behalf. Let's see how we can begin with testing.
Prerequisites for OAuth testing
The following are these steps that are required to be performed for conducting a successful test of the OAuth flow:
- In the absence of a testable client/application, you will be simulating the client functionality using a combination of a web browser and a REST API testing tool (for example, Curl) to test the OAuth flows. Make sure you have access to any standard web browser and a testing tool such as Curl.
- You will also need access to the gateway service URL of your catalog to invoke the authorization path, token path, and API path. To get to the Gateway service URL of your catalog, navigate to the Home screen | Manage catalogs tile | Sandbox tile | Catalog settings tab | Gateway services section. Refer to Figure 7.21:

Figure 7.21 – Gateway services URL
The required URLs for testing the OAuth flow should look like the URLs provided in Table 7.7:

Table 7.7 – OAuth testing URLs
Replace $(catalog.url) with the captured Gateway URL value (refer to Figure 7.22).
- You will need the client ID and client secret values that you copied earlier.
- You will need the scope value of the patient-information API/resource. The scope value is patient-detail.
- Lastly, you will need valid Basic Auth user credentials: user and pass.
Now that you have gathered all the required prerequisites, it is time for you to test your OAuth flow.
Access Code or three-legged flow
This flow is known by multiple names: access code, authorization code, or a three-legged flow. As was discussed earlier, this flow involves all the participants, that is, the resource owner, client (application), and resource server/authorization server. The basic steps to test this flow are as follows:
- First, we fetch the authorization code. The client initiates access to a protected resource on behalf of the resource owner. It uses the authorization path for fetching the authorization code. A sample authorization path will look like this: https://$(catalog.url)/api-security-native-oauth-provider/oauth2/authorize?&client_id=dfb4e366ef3ccceefc9cfa914e14a540&response_type=code&scope=patient-detail.
- Replace the $(catalog.url) and client_id values as per your environment. Notice scope=patient-detail. There could be multiple scopes (each scope could be attached to numerous APIs) that the same client could access from the resource server. Therefore, the client needs to let the resource server know about the scope to which the current access is requested.
- After replacing the values of $(catalog.url) and client_id, copy the authorization path in your browser window and press Enter. The resource server's OAuth security kicks into action. It utilizes the facilities of an authorization server to initiate a resource owner authentication process. Your browser should challenge you with an authentication prompt. Fill in the fields in the authentication prompt as Username=user and Password=pass. Refer to Figure 7.23:

Figure 7.22 – Authorization path and authentication challenge
- Press Enter. Once successfully authenticated, your browser URL should change to the redirect URL you supplied while configuring the client. The authorization server will present an authorization code. Notice the code query parameter along with the long authorization code value that you have received from the authorization server. The address in your browser should look similar to https://example.com/redirect?code=AAIHooRpu0WL3Zf6EhueWlKEuhT5p8G7I81UhmfoymKwS2BcVEfzlMH-O966EvS-1FKY8NVeeLd9uXcwPVGG93r3CGolnXqCkuP8HdulBD0fqQ.
- Copy the value of the code query parameter. You will be using this value to fetch the access token in the next step.
- Then, fetch the access token. After successfully getting the authorization code, the next step in the OAuth flow is to fetch the access token. The access token is a validation of the client by the authorization server. You will use the Curl tool to test this part of the flow. The sample curl command should look like the following:
curl -v -k
-X POST "$(catalog.url)/api-security-native-oauth-
provider/oauth2/token"
-u $(client_id):$(client_secret)
-d "grant_type=authorization_code&code=$(Authorization
Code)"
-H "Content-Type: application/x-www-form-urlencoded"
Build your Curl command along similar lines (sample command):
curl -v -k
-X POST "$(catalog.url)/api-security-native-oauth-
provider/oauth2/token"
-u dfb4e366ef3ccceefc9cfa914e14a540:3ce9e2601e7b296115
d6b60207f707af
-d "grant_type=authorization_code&code=AALU6PpJBTnG
GC2w7pcY14fiM1A3JewkBHT0a7HzDY5aVtUvzJIMvpFOq8V
CX41eARGSmy7sw6kykqvn-DKIJVrUz1Uli3pkGNl9E9T78GUm4A"
-H "Content-Type: application/x-www-form-urlencoded"
- Replace $(catalog.url), $(client_id), and $(client_secret) as per your environment. $(Authorization Code) should be replaced by the authorization code value you fetched in the Fetch Authorization Code step.
- Next, send your curl request. The Curl command should return an access token in the access_token field. The sample response should resemble the following:
{
"token_type": "Bearer",
"access_token": "AAIgZGZiNGUzNjZlZjNjY2NlZWZjOW
NmYTkxNGUxNGE1NDC757l_QNkH9DGjU23GqRx58N
96SeRDccX9RwbLmt5y5locz0Y-ww4K_DFGEqFqELa_
nfELawWuJiTmRQ_L8ouqjTQ_bghbz1QClkrlhEtIZg",
"scope": "patient-detail",
"expires_in": 3600,
"consented_on": 1623919415
}
The returned access_token value can be used by the client to access the resource. This access_token is only valid until the duration specified in the expires_in response parameter. The default expiry is set to 3600 seconds that is, 60 minutes. The client can make multiple resource calls within this duration using the same access_token. This default value of 3600 seconds can be changed while configuring the OAuth provider.
- Then, make a resource/API call. This is the last step in your testing process. You (acting as the client) will now make the resource/API call using the access token (access_token) that was retrieved in the previous step. In the Curl tool, create a new request as per the following Curl request example:
Curl command
curl -v -k
-X GET "$(catalog.url)/patient-information/patient"
-H "Authorization: Bearer $(Access Token)"
-H "Accept: application/fhir+json"
-H "X-IBM-Client-Id: $(client_id)"
Sample command
curl -v -k
-X GET "$(catalog.url)/patient-information/patient"
-H "Authorization: Bearer AAIgZGZiNGUzNjZlZjNjY2NlZW
ZjOWNmYTkxNGUxNGE1NDD_QpPhIKzfdr-vZ79lqShm
4ZGWLXKP2dJBc9YV3OgJguP6d_vz9mZ_nJ_Iy_MdQ
rDQIr_Q6XJWxD0PuU6_jFz3XtAjgoDc6VFo5KCPuJmnfg"
-H "Accept: application/fhir+json"
-H "X-IBM-Client-Id: dfb4e366ef3ccceefc9cfa914e14a540"
Replace $(client_id) as per your environment. $(Access Token) should be replaced by the Access Token value you fetched in the Fetch Access Token step.
- Finally, send the curl request. You should receive a valid response back from your patient-information API.
This concludes the testing of the access code or three-legged OAuth flow.
In this section, you learned how OAuth can be used to secure the APIs. At its core, OAuth is an authorization mechanism. It still leverages an external authentication framework for carrying out user authentication without any means to fetch meta-information about the user itself. This is where OIDC comes into the picture. It is a layer that sits on top of OAuth and enhances the OAuth flow by closing some of these user information-related gaps. You will now look in detail at how APIC supports the OIDC standard.
Implementing OpenId Connect (OIDC)
OAuth was built for authorization and cared most about the permissions and scopes of the protected resources. These permissions were then assigned to a client on a resource owner's behalf. OAuth's fundamental limitation was that it did not provide any standard way for the client to fetch any meta-information about the logged-in user. The client application was oblivious to information such as the resource owner's email ID, name, account creation date, last logged-in date, and profile picture. The OIDC standard was built on top of OAuth to solve some of these limitations of OAuth.
Most of the steps related to enhancing a resource's security using OIDC remain identical to the OAuth implementation that you just covered in detail. Some of those steps (OAuth) are enhanced to add OIDC capability to an API. This section will cover those changes to the OAuth configuration. These changes to the OAuth flow to accommodate OIDC can be classified into two main categories: OAuth provider configuration changes and OAuth flow changes. Let's take a quick look at these:
- OAuth provider configuration changes involve the following:
- OAuth flow changes have the following effect:
- Adding OIDC scope to the Fetch Authorization Code request.
- Adding OIDC scope to the Fetch Access Token call. This call then returns an ID token (JWT format) along with an access token.
The ID token is the main addition to the existing OAuth flow. The client can then use this ID token to fetch more details about the logged-in resource owner/user. You will notice that there are no changes in the resource configuration. The only requirement is to republish the resource/API once the OAuth provider configuration changes are done.
To understand the OIDC functionality and the ways in which it can be used in APIC to further complement the API's security, you will be building upon the work done in the Applying OAuth 2.0 section of this chapter. You will modify the existing OAuth provider and will make modifications to the testing flow that was covered in the Testing OAuth flow section.
OAuth provider changes
There are a few provider changes required to accommodate OIDC. Let's walk through those changes:
- Log in to API Manager. Go to Home | Manage resources | OAuth providers section. Click on the api-security-native-oauth-provider OAuth provider.
- Click on OpenID Connect. Select Enable OIDC. Clear all the selections under Support hybrid response types. Select Auto Generate OIDC API Assembly. Refer to Figure 7.23:

Figure 7.23 – Enable OpenID Connect in an OAuth provider
- In the OpenID Connect view, you will either need to provide an ID token signing crypto object or an ID token signing key (a JSON Web Key or JWK) to sign the ID token generated by APIC. The reason to sign the ID token is so that the receiver of this token (the client) can be sure of the validity of the token generator. For the purposes of this tutorial, you will generate a JWK using https://mkjwk.org/. Refer to Figure 7.24:

Figure 7.24 – JWK generation
JSON Web Key (JWK)
JWK is a JSON object representing the cryptographic key used for signing. You can generate a JWK using publicly available open source libraries (for example, https://openid.net/developers/jwt/), public websites (for example, https://mkjwk.org/), or the libraries/methods approved by your company's security department. The use of an online tool such as https://mkjwk.org/ is for demonstration purposes only. It is not a recommendation. Please consult your organization's security administrator for the approved method of JWK generation and usage.
- Copy the generated JWK to the ID token signing key field. You can consider using a text editor to convert the generated JWK into a single line so that it can be copied easily to this field.
- Select HS256 in the ID token signing algorithm field. Refer to the following screenshot. Click Save.

Figure 7.25 – ID token signing
JWK versus Crypto Object
ID token can be signed using two mechanisms: Using a JWK (like you just configured), or by using crypto objects available in the DataPower appliance (in which case you will need to supply the crypto object's name in the ID token signing crypto object field). Crypto objects take precedence over JWK, in case both are specified. These crypto objects must be in the APIC domain on the DataPower appliance. Crypto objects can either use a shared secret key or a crypto key (private key) to encrypt or sign the ID token. Refer to the IBM documentation for algorithm support for a shared secret key and crypto key: https://www.ibm.com/docs/en/api-connect/10.0.1.x?topic=policies-generate-jwt.
From the OAuth provider configuration perspective, these are the only required changes to enable OIDC security. Make sure that you do the following:
- Republish your patient-information API to ensure that you are testing against the latest API version. Refer to Figure 7.26:

Figure 7.26 – Republishing the API changes
Next, you will cover the testing of OIDC security.
OAuth flow changes
OIDC security testing follows along the same path as OAuth flow testing, with some minor changes. From the resource owner's standpoint, the overall interaction flow looks identical to OAuth. The notable differences rest in the following:
- Fetch Authorization Code: Instead of a single scope value, the client sends two scope values to the authorization server; for example, in the case of OAuth flow, the scope=patient-detail value is used. In the case of OIDC flow, the same authorization code call is made with scope=patient-detail+openid. Notice the plus (+) symbol used between the two scope values. A sample authorization path URL will look like this: https://$(catalog.url)/api-security-native-oauth-provider/oauth2/authorize?&client_id=dfb4e366ef3ccceefc9cfa914e14a540&response_type=code&scope=patient-detail+openid.
OpenID scopes
Notice the two scope values sent as part of the OIDC call. The primary scope value is patient-detail. The other scope value is openid. The scope value of openid is part of OIDC's list of built-in scopes. These scope identifiers, as they are called, have different purposes. Some of these are briefly explained here:
openid (required): This indicates that the client intends to use OIDC to verify the user's identity.
profile: The client wants to request access to name, family_name, given_name, middle_name, picture, and such.
phone: The client wants to request access to phone_number and other phone number-related information.
Replace the $(catalog.url) and client_id values as per your environment. Copy the authorization path URL to your browser window and press Enter. After logging in, you will be redirected to a URL that contains the authorization code.
- Fetch Access Token: There is only one difference between the access token call that you had earlier constructed while testing the OAuth flow and the access token call for OIDC. In the case of OIDC, the client sends two scope values as part of the Fetch Access Token call. Notice the space (%20) between the two scope values of openid and patient-detail. It is different from the Fetch Access/Authorization Code where the two scope values had a plus (+) between them:
Curl command
curl -v -k
-X POST "$(catalog.url)/api-security-native-oauth-
provider/oauth2/token"
-u $(client_id):$(client_secret)
-d "grant_type=authorization_code&code=$(Authorization
Code)&scope=openid%20patient-details"
-H "Content-Type: application/x-www-form-urlencoded"
Sample command
curl -v -k
-X POST "$(catalog.url)/api-security-native-oauth-
provider/oauth2/token"
-u dfb4e366ef3ccceefc9cfa914e14a540:3ce9e2601e7b2961
15d6b60207f707af
-d "grant_type=authorization_code&code=AAKwNX_f-
GuOfdx17N78HYCkyj1p7YiW7A886zOK6uM3yMywG1ZWza37P
pu7PYI7igKFejXxsgiYwYKnfpKmZuVdQbNy9eF-caNPS2L7vw
Lh8w&scope=openid%20patient-detail"
-H "Content-Type: application/x-www-form-urlencoded"
Replace $(catalog.url), $(client_id), and $(client_secret) as per your environment. $(Authorization Code) should be replaced by the authorization code value you fetched in the Fetch Authorization Code step earlier.
- Send your Curl request. The Curl command should return an access token. The sample response should resemble the following:
{
"token_type": "Bearer",
"access_token":
"AAIgZGZiNGUzNjZlZjNjY2NlZWZjOWNmYTkx
NGUxNGE1NDBxVgVhACO5Tl7OZg_yS1QbBZ5Wl8-
31A_mudnPS3VuY8YP31jQ783oSyPXlFJZrdf3E5
ucboDL9dl39AmEQ4oz7NHjulTWJBMJZ7vrCArhWA",
"scope": "patient-detail openid",
"expires_in": 3600,
"consented_on": 1624007362,
"id_token": "eyJraWQiOiJ5d1BYM0FlWE9JRDh3OHZVRzNBM
2NvVVhOdkNMQzRSTjF3Ykw3ZGotSkd3IiwiYWxnIjoi
SFMyNTYifQ.eyJqdGkiOiI5ODk2NTcwNS1mNmNmLTQ1NDct
YTYxMS02NTU1NmMxOTg5Y2QiLCJpc3MiOiJJQk0gQVBJQ29
ubmVjdCIsInN1YiI6InVzZXIiLCJhdWQiOiJkZmI0ZTM2Nm
VmM2NjY2VlZmM5Y2ZhOTE0ZTE0YTU0MCIsImV4cCI6MTYy
NDAxMDk2MywiaWF0IjoxNjI0MDA3MzYzLCJhdF9oYXNoIj
oiLWJUVVFJSXBDMXF4QjNUZmY1V0ZWZyJ9.NnTcb92WQp2
RNWMwjk6SNd75ODLwQWRdnxAFqhE0Cxk"
}
id_token is a JSON Web Token (JWT) format token value. access_token can be used by the client to access the resource (just like you did in the Access Code or three-legged flow section, in step 9, Make a resource/API call). id_token contains standard user information (email, name, and some other meta-information) from the identity provider and the signature of the authorization server (so that it can be independently verified by the client).
This section was an introduction to OIDC support in APIC. OAuth and OIDC together provide a formidable standards-based authentication and authorization framework. The last few sections demonstrated, with the help of theory and examples, that they both are comprehensively supported in APIC. You should leverage them to secure your APIs as much as possible.
The next section will introduce you, in detail, to the method of applying JWT-based security to APIs.
Using JWT policies
JWT (pronounced jot) is one of the methods of defining the identity information of a user/system (a client) in a JSON format. It is primarily used in authorization scenarios where its usage is employed to pass an authenticated client's meta-information (identity and claims) to the server in a secure and verifiable format. JWT removes the burden of storage of an authenticated client's information on the server in such a use case. Generally, without JWT, websites use cookies to pass an authenticated client's access information to the server and rely on the server to store cookies on the server side. The use of cookies is discouraged for the reasons of privacy and security.
In the authorization scenario, the client and server interaction works as follows:
- The client performs its initial authentication with the authentication system.
- The authentication system generates a JWT that contains various meta-information, such as the client's identity and claims, signed by the authentication system using a JWK. A limited validity JWT is then returned to the client.
- The client then passes this JWT, along with its resource access request, to the resource server.
- The resource server extracts the JWT and performs the verification of the signed information before allowing access to the protected resource.
Now that you have learned about JWT's primary usage in general, you will be eager to know about its support in APIC. Not only does APIC support JWT verification, but it also lets you generate a JWT. As you learned here, JWT's authorization use case requires two parts – JWT generation and JWT validation. You will learn how to perform these steps next.
JWT generation
JWT generation primarily involves three steps: client authentication, token generation, and token signing.
There are two methods for generating a token—using APIC's Generate JWT policy or by using your organization's identity provider. You will learn the method of using the Generate JWT policy to generate a JWT token. Configuration of your organization's identity provider to support JWT token generation is outside the scope of this book. Here are the steps for the JWT policy method:
- Log in to API Manager. Go to Home | Develop APIs and products | Add | API (from REST, Graph QL or SOAP).
- On the Select API type page, ensure that Open API 2.0 is selected. Select New OpenAPI. Then, click Next.
- On the Create new OpenAPI page, provide the details as per Table 7.8 to create a new API that you will enhance shortly for the purpose of generating a JWT:

Table 7.8 – JWT generation proxy
- The Security Schemes and Security sections of your API should look similar to Figure 7.27:

Figure 7.27 – JWT generate proxy security definitions and security
- Now that your base API proxy's structure is set up, you will now enable this API to generate a JWT. Modify the API's default Path (/):
- Path name: /generate
- Operations: GET (remove all the other operations by using the three vertical dots menu)
Click the Save button after making the modifications.
- Next, define the parameters for the GET operation. You will send these parameters in the request's headers. Here you will define two important required headers. Navigate to Paths | /generate | Operations | GET | Path Parameters in the navigation menu. Click the Add button to add the parameters. Add the iss-claim and aud-claim parameters. These parameters are located in header, have a string type, and are required. Refer to Figure 7.28 for this:

Figure 7.28 – Claim headers for JWT generation
These headers specify the Issuer (iss) and Audience (aud) claims. The JWT needs to contain verifiable claims. iss-claim should contain the identification information of the server that issued the JWT. aud-claim should contain the identification information of the resource server or the resource that the client/application will access using the generated JWT. You will pass these claim values in the request to the jwt-generate API. The jwt-generate API will then insert these header values in the JWT that it returns to you. This is a method of generating dynamic claims. Save your changes.
- Then, go to the Gateway tab and delete any existing policies from the flow by hovering over the policy and clicking the garbage can. You will now add three new policies to your message processing flow.
- Drag and drop the Set Variable, Generate JWT, and GatewayScript policies onto your message processing flow as per Figure 7.29. Rename each policy's Title property as per Figure 7.29:

Figure 7.29 – JWT generation message processing flow
- Set the set-signature-jwk policy's property values as per Table 7.9. Click the Add action button to set these values. Click on the Save button after setting the property values.

Table 7.9 – set-signature-jwk property values
- Set the jwt-generate policy's property values as per the value in Table 7.10. Click on the Save button after setting the property values:

Table 7.10 – jwt-generate property values
- Lastly, set the generated JWT in the message response body. Copy the code named setjwtresponse.js from the GitHub repository into the set-jwt-response policy as follows:
var jwt = context.get('generated.jwt');
var accessToken =
{
"jwt": jwt,
};
context.message.header.set('Content-
Type',"application/json");
context.message.body.write(accessToken);
- Save and publish your API (remember to use the toggle facility). This completes the configuration of your jwt-generate API.
You will now run a quick test to test the configuration. Go to the Test tab of your API. You will see that the platform has already pre-filled many header values. Enter the iss-claim and aud-claim values as per Figure 7.30. Send the request. You should receive a JWT in the Response section.

Figure 7.30 – JWT Request and Response
The JWT Generation section covered details about using the APIC framework for JWT generation. You must consult your organization's security administrator to confirm the usage of the APIC framework for JWT generation. Many organizations use external identity providers to generate JWT. If that is the case, then please use the approved method for JWT generation.
Now that you are familiar with the process of JWT generation, next, you will learn the method of performing JWT verification to protect your API resources.
JWT verification
Verification of a JWT is an authorization process. It assumes that the JWT presented has been issued to an authenticated client (within the confines of the token's validity period). Thus, JWT verification concerns itself with ensuring that the client is authorized to access the protected resource and that the JWT has been signed by a verifiable and approved identity provider.
You will now configure a new API to use the Validate JWT policy to verify a presented JWT before allowing access to the backend service, as follows:
- Create a new patient-jwt-information REST API proxy using the information provided in Table 7.11:

Table 7.11 – JWT Verification Proxy configuration
Click the Save button after making the modifications.
- Open the Gateway tab. Drag and drop Set Variable and Validate JWT policies in front of the Invoke policy as per the following screenshot. Also, implement a Default catch flow to handle any JWT verification failures. Drag and drop a GatewayScript policy on the Default catch block. Rename each policy's Title property as per Figure 7.31:

Figure 7.31 – JWT verification message processing flow
- Set the set-verification-jwk policy's property values as per Table 7.12. Click the Add action button to set these values.

Table 7.12 – set-verification-jwk property values
- Set the jwt-validate policy's property values as per Table 7.13:

Table 7.13 – jwt-validate property values
- Lastly, set up a default catch block to handle any JWT verification errors. Set the JWT verification error in the message response body. Copy the code named jwtverification-errorresponse.js from the GitHub repository into the set-error-response policy:
var errorName = 'JWT Validation Error';
var errorMessage = context.get('jwt-validate.error-
message');
var errorResponse = {
"name": errorName,
"message": errorMessage};
context.message.header.set('Content-
Type',"application/json");
context.message.body.write(errorResponse);
- Save and publish your API. (Use the toggle facility for publishing to the Sandbox catalog.)
This completes the configuration of your patient-jwt-information API.
Having completed this proxy configuration, let's test the JWT verification process. You generated your JWT in the last part of the JWT Generation section, which was a while ago (remember that in your JWT generation configuration, you have set the validity period as 300 seconds). Hence, before testing the verification of the JWT, you will want to generate a new JWT. Refer to Figure 7.31 for the steps to generate a new JWT. Once you have generated the new JWT, use it in the Test tab of your patient-jwt-information proxy to send a verification request. Refer to Figure 7.32. You should get a successful response.

Figure 7.32 – JWT verification successful request
Wait for around 5 minutes and execute the same test again. You should receive a JWT validation error, as shown in Figure 7.33:

Figure 7.33 – JWT verification failure
You just learned about the comprehensive support for JWT in the APIC framework. The APIC framework provides the ability for JWT generation and JWT verification. These facilities can be used independently of each other. There might be cases where you will want to use the JWT generation capabilities of your organization's central identity provider. That is a perfectly acceptable use case. In such scenarios, you will simply use the Validate JWT policy in your API proxy to validate the JWT.
In the last few sections, you learned in detail about the techniques for Basic authentication (LDAP and custom repository), Client ID (API key), OAuth, OIDC, and JWT policies to secure your APIs. The following section will briefly describe the many capabilities of APIC that you can employ to secure your APIs through additional methods.
Adding additional security measures
The last few sections provided a comprehensive overview of APIC's OOTB security features to secure APIs. But by no means are these the only security features that you can use. You can build almost any security mechanism using a combination of user-defined policies and GatewayScript policy. You can further secure your services using Transport Layer Security (TLS) profiles, a User Security policy (for authentication and authorization), a Client Security policy, and even apply a SAML-based authentication to your OAuth provider. SAML and OAuth integration can be achieved by modifying your OAuth provider implementation to include a GatewayScript policy (to extract the SAML assertion from a request), a Client Security policy (to pass the SAML assertion to an authentication registry), and a custom authentication registry endpoint to validate the SAML assertion. You can build your authentication endpoint (for SAML assertion validation) within DataPower and expose it to APIC. Refer to Figure 7.34:

Figure 7.34 – Overview of SAML and OAuth integration
Again, the possibilities of expanding upon OOTB features are limitless because of the built-in flexibility of the APIC components. As the saying goes, "The sky's the limit".
Summary
This chapter covered multiple methods provided by APIC to secure the APIs (or resources, as they are often called). Security is a vast and multi-layered subject, one of the most critical layers being authentication of parties seeking access to these Resources. These parties could be a typical user, a Resource Owner, or a Client/Application that intends to access these Resources. A comprehensive platform, such as APIC, provides many techniques to apply security to its protected Resources, and authenticate various parties that are trying to access these Resources.
This chapter was about exploring details of many such API security methods provided by APIC. All the security methods, except for the API Keys method, depend upon the setup of a user registry. If the security mechanism is OAuth and OIDC, then the setup also requires setting up an OAuth provider resource first. You covered these setups in the early part of this chapter. In the Preparing for the APIC security implementation section, you reviewed the LUR and performed the detailed steps for setting up an Authentication URL registry. You were also introduced to the LDAP user registry and OIDC user registry (this is only used for APIC user authentication).
The rest of the chapter was dedicated to exploring various security methods to secure the APIs through examples. You built examples to secure the APIs using the API key (client ID and client secret) method, Basic authentication using the Authentication URL user registry, OAuth/OIDC security, and by using JWT policies.
In each of these examples, you also learned the testing methodology to test secured APIs.
With all this information, you can appreciate the lengths and depths the APIC framework goes to in order to fulfill the API security needs of various audiences while keeping up with the latest industry security standards. Hopefully, by applying this knowledge, you can now secure your APIs and protect them from any kind of unsolicited access from rogue actors out there. Let's all of us do our part to "keep it safe" out there! You will next learn one of the other critical aspects of APIs – message transformations.