Beyond having the necessary hardware and software to perform forensic imaging, it is critical to prestage a location to hold the image or evidence file. For incident response teams, the best thing to utilize as an evidence repository is an external USB or FireWire disk drive. This allows for a degree of portability as incident responders may have to investigate an incident offsite or at a variety of locations without the benefit of a forensic laboratory.
There are two tasks that need to be performed on evidence drives prior to their use. The first is to ensure that the repository is free of any data. Incident response teams should have a policy and procedure that dictate that an evidence drive be wiped prior to each use. This includes drives that are new in box. This is due to the fact that a number of manufacturers ship drives with backup software or other data that needs to be removed prior to use. Wiping further ensures that previously utilized drives are free of any trace data from another incident. This ensures that the evidence collected on a properly wiped drive is not contaminated with unrelated data.
This is easily accomplished through a wiping program. There are a number of programs, both free and commercial, that can be utilized for this. For example, the Eraser program from Heidi Computers is a freeware wiping utility that can be utilized for both file and volume wiping (Eraser can be downloaded at https://eraser.heidi.ie/).
In the following example, a 2 TB external hard drive will be erased and prepared for use as an evidence drive. The following sequence should be repeated every time a drive is going to be placed into a state that can be utilized for incident investigation:
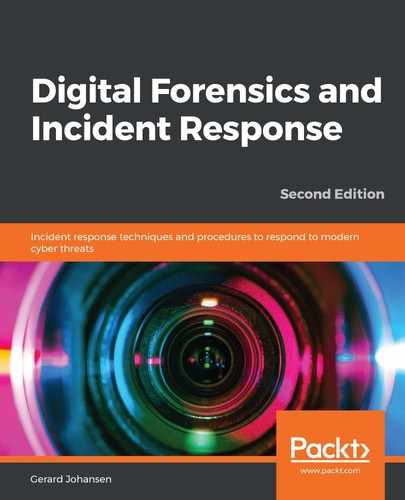
- Start the Eraser application. In the GUI, click Erase Schedule and then New Task:
- Now, a task name can be assigned. This is helpful when you wish to properly document the erasure of the evidence drive. Click the Add Data button. This will open another window:

- For Target type, select Drive/Partition. In the Settings area, there will be a drop-down list of partitions and drive letters. Pay very close attention to the drive letters that are assigned to the various drives and ensure that the external drive that requires wiping is selected. In this case, a new Seagate external HDD is being utilized. Finally, select an Erasure method. There are several different options for wiping drives. In this case, the US DoD 5220.22-M (8-306./E) (3 Pass) wiping option is selected:

- Click OK. Now the wiping task will be listed in the Erase Schedule:

- Right-click the Partition: Seagate Expansion Drive (E:) task and click Run Now. This will start the wiping process. As we mentioned previously, ensure that the correct evidence drive is being wiped:

Depending on the size of the drive and the system that is performing the wipe, this process can take hours or even days. Once completed, the incident response analyst should capture any wiping information that verifies that the evidence drive has been properly wiped. This is important information to include in a written forensic analysis report as it demonstrates that the incident response analyst took appropriate measures to ensure that any evidence files were free from corruption or commingling with other files on the evidence drive.
It is recommended that incident response analysts have several drives available and that these drives be pre-wiped before any incident. This will allow incident response analysts to immediately utilize a wiped drive instead of having to wipe a drive onsite, which wastes time that would be better spent on incident-related activities.
A second preparation step that can be undertaken is to encrypt the evidence drive. Software such as VeraCrypt or another disk encryption platform can be utilized to encrypt the partition of the evidence drive that contains the evidence files. Incident response analysts dealing with confidential information such as credit cards or medical records should encrypt the evidence drive, regardless of whether it leaves the facility or not.
There are two methods that can be leveraged to encrypt the evidence drive. The first is to utilize encryption software on the forensic workstation that is utilized in the imaging process. This approach is limited to imaging on drives that have been removed from the system and imaged on dedicated systems that have the encryption software installed. A second option is to include the encryption software on the evidence drive. In the previous section, an evidence drive was divided into two partitions. One partition is set aside for evidence files, while the second partition is utilized for tools such as those used for dumping memory files or imaging. In this scenario, the encryption software can be loaded in the tools partition and the drive can be encrypted during the evidence imaging process. This limits the number of changes that are made to the system under investigation.
Once a drive is prepared, another layer of protection is needed to ensure that no changes are made to the suspect system during the imaging process. To ensure that no changes are made, responders should be familiar with and know how to use write blockers.