
9
Writing Tests and Setting Up GitHub Actions
Taking care of rebuilding widgets only when needed, using the latest version of each package, and following Flutter’s best coding practices will surely point you toward success. However, there’s more you need to take into account if you want your product to be of the highest possible quality. In this chapter, we’re going to provide an overview of how testing works in Flutter and which tools should you use to create rock-solid apps.
Other than writing tests, another important part of setting up is having a CI pipeline that automatically checks your code’s health, executes tests, compares results, and shows reports to the developer. For this reason, we will dive into GitHub to set up actions, PR templates, and much more.
After that, we’re going to take an existing project and improve it with unit, widget, and golden tests. Then, we will take care of the GitHub repository and make sure that all of our tests and analysis rules are systematically checked by the repository.
In this chapter, we are going to cover the following topics:
- Strategies for good unit and widget testing in Flutter
- Writing golden tests
- Setting up GitHub actions
Let’s get started!
Technical requirements
Make sure that your Flutter environment has been updated to the latest version in the stable channel. Since we’re going to be working on the application that we made in Chapter 1, Building a Counter App with History Tracking to Establish Fundamentals, please clone our repository and use your favorite IDE to open the Flutter project we built at chapter_1/with_inherited_widget.
As always, the complete code for this chapter can be found in this book’s GitHub repository at https://github.com/PacktPublishing/Cross-Platform-UIs-with-Flutter/tree/main/chapter_9. Note that GitHub’s settings, including workflows for using GitHub actions, will be located at the root of the repository, so you’ll find the .github folder at https://github.com/PacktPublishing/Cross-Platform-UIs-with-Flutter.
Setting up the project
First of all, you need to create a top-level folder called test; this is where we’re going to spend most of our time. Then, you need to add a new dependency to the pubspec.yaml file since we’re going to use it in the next section. Once you’ve done this, your dev_dependencies should be as follows (if it’s the case, make sure that you update them to their latest versions):
dev_dependencies:
  dart_code_metrics: ^4.8.1
  flutter_lints: ^1.0.4
  flutter_test:
    sdk: flutter
  golden_toolkit: ^0.12.0
Finally, we need to create a useful widget that wraps a common configuration that’s required by all the widgets we’re going to test. Since the app is based on a material design, our class is going to wrap a MaterialApp and a Scaffold widget. Place this widget inside the test folder and name it whatever you want; for example, mock_wrapper.dart:
class MockWrapper extends StatelessWidget {
  final Widget child;
  const MockWrapper({
    Key? key,
    required this.child,
  }) : super(key: key);
  @override
  Widget build(BuildContext context) {
    return MaterialApp(
      debugShowCheckedModeBanner: false,
      home: Scaffold(
        body: child,
      ),
    );
  }
}
With that, we can start writing some tests!
Writing tests for the Flutter app
For the sake of consistency, we generally recommend keeping the same file organization in both the lib and test folders. This will guarantee a better mental order and allow you to quickly search for the tests when you need to work on them.
To get started, let’s create the main_test.dart file in the test folder and ensure it has the following contents:
import 'package:chapter_1/main.dart' as app_main;
void main() {
  group('Testing the root widget', () {
    testWidgets(      “Making sure that 'main()' doesn't throw”,
        (tester) async {
        var throws = false;
        try {
          app_main.main();
        } catch (_) {
          throws = true;
        }
        expect(throws, isFalse);
      },
    );
    testWidgets('Making sure that the root widget is
      rendered', (tester) async {
      await tester.pumpWidget(const
        app_main.EnhancedCounterApp());
      expect(find.byType(CounterAppBody), findsOneWidget);
      expect(find.byType(MaterialApp), findsOneWidget);
    });
  });
}
In the first test, we ensure that the app can correctly start without raising any exceptions, even if there isn’t much value for it in this specific project since we don’t have any startup initialization tasks. If we did some preliminary work before calling runApp() instead, such as setting up a crash report tool or some platform-specific API calls, then this test would become very important.
In the second test, we simply check that the root widget instantiates some fundamental widgets we always expect to have. To be more precise, this is a smoke test because its purpose is to reveal simple failures that would compromise the health of the app.
Warning
Don’t underestimate the value of smoke tests! Their purpose is to make sure that some fundamental pieces of a component are there and in the right place. Anything is destined to collapse without some solid basis to stand on, including software, so ensuring that the foundations are there is always a good practice to follow!
Now, let’s create the counter_app folder inside test to emulate the structure we have inside lib. Before moving on, we need to create the test/flutter_test_config.dart file:
Future<void> testExecutable(FutureOr<void> Function()
  testMain) async {
  // Loading fonts for golden tests
  setUpAll(() async {
    await loadAppFonts();
  });
  // Tests' main body
  await testMain();
}
In the Writing widget and golden tests section, you will understand why this function is so important to define. Make sure that you use the same name we’ve given because Flutter looks for this specific file, if any, before setting up the testing engine.
Now, let’s move on to the next testing phase!
Writing unit tests
We’re testing classes while following the order in which we encounter them in lib, so let’s create a model folder that contains a new file called counter_test.dart. Since the Counter class is not a Flutter widget, we’re going to write a unit test rather than a widget test:
test('Making sure that the class is correctly initialized', () {
  final counter = Counter();
  expect(counter.history.length, isZero);
  expect(counter.counter, isZero);
});
Here, we’ve made sure that the state variables we care about are initialized to zero – this is a smoke test. Now, we can test the behavior of the class to verify that the counter and the history list are updated correctly whenever we call increase() or decrease():
test('Making sure that values can be increased', () {
  final counter = Counter()
    ..increase()
    ..increase();
  expect(counter.history, orderedEquals(<int>[1, 2]));
  expect(counter.counter, equals(2));
});
test('Making sure that values can be decreased', () {
  final counter = Counter()
    ..increase()
    ..increase()
    ..decrease();
  expect(counter.history, orderedEquals(<int>[1, 2]));
  expect(counter.counter, equals(1));
});
Since our Counter class mixes with a ChangeNotifier, we also need to make sure that both increase() and decrease() also notify listeners when called. We can add a listener with a custom counter to check whether notifyListeners() calls have been executed or not:
test('Making sure that listeners are notified', () {
  var listenerCount = 0;
  final counter = Counter()
    ..addListener(() => ++listenerCount);
  // Increase
  counter.increase();
  expect(listenerCount, equals(1));
  // Decrease
  counter.decrease();
  expect(listenerCount, equals(2));
});
At this point, we’ve covered all the behaviors of the Counter class with unit tests. Since the model folder doesn’t contain anything else to test, let’s create a new folder called test/counter_app/widgets so that we can start writing widgets and tests.
Writing widget and golden tests
Writing golden tests is part of the widget testing process and in this section, we’re going to learn how to write them. The only widget we have to test in the widgets folder is CounterAppBody, so let’s write a smoke test to ensure that basic widgets are rendered in the tree:
testWidgets('Making sure that the widget is rendered', (tester) async {
  await tester.pumpWidget(const MockWrapper(
    child: CounterAppBody(),
  ));
  expect(find.byType(CounterAppBody), findsOneWidget);
  expect(find.byType(AppTitle), findsOneWidget);
  expect(find.byType(HistoryWidget), findsOneWidget);
  expect(find.byType(ElevatedButton), findsNWidgets(2));
});
This is not enough, of course! We need to make sure that this widget behaves as expected. When tapping one of the two buttons, the Text widget at the center (representing the current count) must update alongside the history list.
Let’s use tester.tap() to simulate a finger (or a cursor) pressing on a button:
testWidgets('Making sure that the counter can be updated',
  (tester) async {
  await tester.pumpWidget(const MockWrapper(
    child: CounterAppBody(),
  ));
  final decreaseKey =
    find.byKey(const Key('ElevatedButton-Decrease'));
  final increaseKey =
    find.byKey(const Key('ElevatedButton-Increase'));
  // 0 is the default counter value
  expect(find.text('0'), findsOneWidget);
  // Increasing by 2
  await tester.tap(increaseKey);
  await tester.pumpAndSettle();
  // Finds the counter text and the entry in the history
  // list
  expect(find.text('1'), findsNWidgets(2));
  // Decreasing by 2
  await tester.tap(decreaseKey);
  await tester.tap(decreaseKey);
  await tester.pumpAndSettle();
  // Only the counter has negative values, the history
  // doesn't
  expect(find.text('-1'), findsOneWidget);
});
Using keys is a very common testing strategy to easily get a reference to a specific widget in the tree. When there are multiple widgets of the same type, it may be hard to get a reference to the specific widget you want without keys. In this case, we could have also done this:
final decreaseKey = find.byType(ElevatedButton).first;
final increaseKey = find.byType(ElevatedButton).last;
No keys have been used here because we know that this widget only has two buttons. But what if we needed to add one more ElevatedButton later? We would need to update the test and keep track of which widget is at a certain index. This would be very time-consuming and unstable. Maintaining tests is not ideal, so we want to make sure we only update them in the case of breaking behavior changes.
Note
If you forget to call tester.pumpAndSettle() after a gesture or anything that requires multiple frames to advance, you may not get the desired result because not all the scheduled frames may be executed.
Now that we have both smoke and behavior tests for our widget, we’re just missing a golden test. A golden test is a screenshot of a widget, stored in a PNG file, that is used later to detect visual changes. Let’s take a look at how they work:
- When you write a golden test, make sure that you run the first test with flutter test --update-goldens. Note that a new PNG image will be generated alongside your test file.
- Run subsequent tests using flutter test (without the update-goldens flag) so that Flutter will compare the golden image (the screenshot you took of the widget) with the widget that’s being rendered in the tree. If they don’t look the same, the test will fail.
You should use golden tests to produce a master image of how a widget must always look in the UI. Not only will this be helpful for the developer, but it makes UI change testing much easier. In this way, you won’t have to manually look for colors, shadows, border radiuses, elevations, and more because Flutter will compare the image with the actual widget.
Let’s write a golden test for our CounterAppBody widget:
testGoldens('CounterAppBody no history – golden', (tester)
  async {
  final builder = GoldenBuilder.column()
    ..addScenario(
      'No history',
      const SizedBox(
        width: 400,
        height: 400,
        child: MockWrapper(
          child: CounterAppBody(),
        ),
      ),
    );
  await tester.pumpWidgetBuilder(
    builder.build(),
    surfaceSize: const Size(400, 460),
  );
  await screenMatchesGolden(tester,
    'counter_app_body_no_history');
});
Here, we’re taking a screenshot of the CounterAppBody widget when it’s first created, meaning that no buttons have been tapped. For this reason, we expect the counter to be at zero and the number history to be empty. The testGoldens method and the GoldenBuilder class come from the golden_toolkit package we depend on. Running flutter test --update-goldens will result in the following output:

Figure 9.1 – Golden of the CounterAppBody widget, without history
This is now considered the source of truth by Flutter for what the widget has to look like when rendered. For example, if you try to change the text color and run flutter test, you will get an error because the widget won’t produce the result that’s shown in the preceding screenshot.
Note
You should only use the --update-goldens flag when you need to refresh a golden test or generate a new one. Regular tests, such as the ones you set up in CI, should always use a simple Flutter test command.
To make our widget test even more valuable, let’s make a golden test of the body, even when the counter has been tapped. To do so, we are going to use the customPump parameter, which allows us to execute some more code before generating the image:
testGoldens('CounterAppBody with history - golden',
  (tester) async {
  final builder = GoldenBuilder.column()
    ..addScenario(
      'With history',
      const SizedBox(
        width: 400,
        height: 400,
        child: MockWrapper(
          child: CounterAppBody(),
        ),
      ),
    );
    await tester.pumpWidgetBuilder(
    builder.build(),
    surfaceSize: const Size(400, 500),
  );
  await screenMatchesGolden(
    tester,
    'counter_app_body_with_history',
    customPump: (tester) async {
      final increaseKey =
        find.byKey(const Key('ElevatedButton-Increase'));
      await tester.tap(increaseKey);
      await tester.tap(increaseKey);
      await tester.pumpAndSettle();
    },
  );
});
Thanks to the tester.tap(increaseKey) calls, we can alter the widget’s status and since we’re making them in customPump, we’re ensuring they’re executed right before the image is generated. Here, we’ve used a key to get a reference to the increase button.
This is the final result:
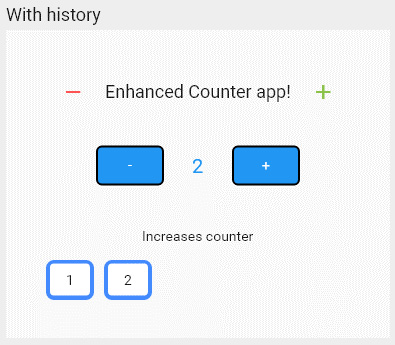
Figure 9.2 – Golden of the CounterAppBody widget, with history
As you can see, golden images (the widget’s screenshots) don’t perfectly match the result you’d get when running on a device. They are very similar, but not identical, and that’s fine! They’re used by the testing framework to look for changes, not to aesthetically please the developer.
Golden tests can also be made without the golden_toolkit package but they don’t look as good due to the weird default font. For example, we could test CounterAppBody with Flutter’s native commands:
await expectLater(
  find.byType(CounterAppBody),
  matchesGoldenFile('counter_app_body_no_history.png'),
);
Golden files are still generated in the usual way – that is, by appending the --update-goldens flag. While fully functional, the image is not very valuable:
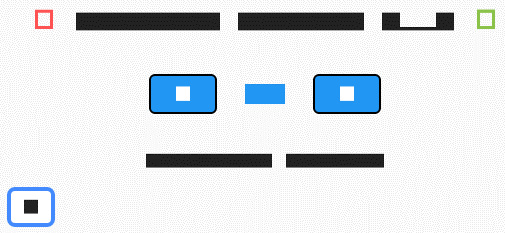
Figure 9.3 – A golden file created with “vanilla” Flutter commands
This result is expected! By default, Flutter uses a font called Ahem, which shows squares instead of actual characters and there is no way to change the font. The golden file still works as expected but it would be nicer if the font had human-readable characters.
That’s the reason why we decided to use golden_toolkit! It has the useful loadAppFont() method, which loads the Roboto font and applies it to the golden image. This method is called every time a golden test is run because, at the end of the Writing tests for the Flutter app section, we created the flutter_test_config.dart file:
Future<void> testExecutable(FutureOr<void> Function()
  testMain) async {
  // Do something before ANY test executes here
  // Then run the actual test body
  await testMain();
  // Do something after ANY test executes here
}
You must name the file in the same way we did. The Flutter testing environment looks for this configuration file at startup. The testMain callback is the body of the test function you’ve written, so you can add custom test setups before or after executing it. Make sure that you call await testMain(); somewhere in this method; otherwise, the tests won’t run correctly!
Now, let’s see how we’ve tested the AppTitle widget, which doesn’t have behaviors (no buttons to be pressed, no listeners, no actions to be triggered, and so on). Here, we’ve just made a smoke test and created a golden test:
testWidgets('Making sure that the widget is rendered',
  (tester) async {
  await tester.pumpWidget(const MockWrapper(
    child: AppTitle(),
  ));
  expect(find.byType(AppTitle), findsOneWidget);
  expect(find.text('Enhanced Counter app!'),
    findsOneWidget);
  expect(find.byType(Icon), findsNWidgets(2));
});
testGoldens('AppTitle - golden', (tester) async {
  final builder = GoldenBuilder.column()
    ..addScenario(
      'AppTitle widget',
      const SizedBox(
        width: 300,
        height: 60,
         child: MockWrapper(
           child: AppTitle(),
         ),
      ),
    );
  await tester.pumpWidgetBuilder(
    builder.build(),
    surfaceSize: const Size(300, 120),
  );
  await screenMatchesGolden(tester, 'app_title_widget');
});
We’re not showing all the tests we’ve written for the other widgets of the app since the strategy is always the same. When you need to test a widget, try to follow this guideline:
- Write a smoke test first.
- Test the behavior of the widget or class by writing widget or unit tests, respectively.
- Create at least one golden test per widget.
Now that we’ve provided an overview of the testing phase, we can start using GitHub to set up our repository and automatically execute our workflows using GitHub actions!
Exploring GitHub actions and repository quality
To keep our project healthy, we want to make sure that our tests always pass and the best Dart/Flutter guidelines are respected. We cannot always make these checks manually since it would be error-prone, time-consuming, and not systematic – after all, we’re all human and we can forget about tasks!
For this reason, we are going to set up a CI configuration in GitHub that systematically performs a series of checks in our code. GitHub actions, as the name suggests, are a series of actions that automate your workflows. In our case, we will use a Flutter action to install the framework in our server and another action to check the code coverage.
Let’s get started!
Creating the GitHub workflow file
We need to create a folder called .github at the root of the repository, which is the same place where the .git file is located. If you check our online repository, you’ll see a variety of content:
- A pull_request_template.md file, which ensures that contributors will automatically see the template’s contents in the pull request body. This is very nice to have because it provides consistency across PRs and helps the user submit the request with the data you expect.
- An ISSUE_TEMPLATE folder, which ensures that contributors will automatically see the template’s contents in the issue body. This generally contains a few questions the user should answer to provide as many details as possible.
- A workflows directory, which contains the GitHub actions we want to use.
You aren’t forced to define a pull request and an issue template, but they are really helpful for external contributors, so consider them! However, the main focus is on the workflows folder, where we’re going to create a project_ci.yml file with the following content:
name: chapter_9_ci
on:
  push:
    branches:
      - main
      - develop
  pull_request:
    types:
      - opened
jobs:
  verify_project_health:
    name: Chapter 9 project - CI
    runs-on: windows-latest
    defaults:
      run:
        working-directory: chapter_9
    steps:
      - name: Checkout
        uses: actions/checkout@v2
      - uses: subosito/[email protected]
      - name: Installing dependencies
        run: flutter pub get
      - name: Making sure the code is formatted
        run: flutter format --set-exit-if-changed .
      - name: Making sure the analyzer doesn't report
              problems
        run: flutter analyze --fatal-infos --fatal-warnings
             && flutter pub run dart_code_metrics:metrics
             analyze lib test
      - name: Runing unit and widget tests
        run: flutter test --coverage
      - name: Making sure that code coverage is at least 95
        uses: VeryGoodOpenSource/[email protected]
        with:
          path: chapter_9/coverage/lcov.info
          min_coverage: 95
And that’s it! In particular, the workflow we’ve just created does the following:
- First, it uses the on directive to determine when the workflow should start. In this case, we want the actions to run whenever we push to the main or develop branches or whenever a new PR is created.
- The operating system that the goldens for this project have been created in is Windows. Since the output PNG images of flutter test --update-goldens have slightly different results based on the OS that’s used (but still notable), we need to run our tests in the same OS. For example, if you generated goldens on a Linux machine and then you tested them on Windows, they would fail. This is expected because different OSs create images using different strategies so, even if it’s subtle, there are differences and Flutter detects them.
- We must install the popular subosito/flutter-action action to make the Flutter commands available in the environment.
- We must make sure that the code is formatted as Flutter would expect using the --set-exit-if-changed . flag, which breaks the workflow in case one or more files haven’t been formatted.
- We must ensure no analysis errors are found. Since we are using the dart_code_metrics package, we also need to run its specific analysis command to ensure that we follow the guidelines we declared in the analysis_options.yaml file.
- We must run our tests using the --coverage flag because we want to make sure that our code is covered above a certain threshold.
- Finally, we can use the VeryGoodOpenSource/very_good_coverage action, which ensures that code coverage is above a certain value and raises an error otherwise.
You just need to place a YAML file in .github/workflows to create an automated workflow using GitHub actions. Every time we open a PR or we push to either main or develop, these checks run and report their statuses in the dedicated GitHub tab. For example, if we forget to format our code or there were some analysis warnings we forgot to clear, the action will fail:
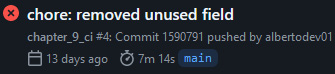
Figure 9.4 – A failing GitHub action report
When the code is formatted, no analysis warnings will be found and all of the tests will pass, so the action will be completed:

Figure 9.5 – A successful GitHub action report
Now, let’s learn about code coverage and why it matters!
Code coverage
Everyone agrees that writing a lot of tests is important for various reasons, some of which are as follows:
- They may save hours of debugging and maintenance.
- They help prevent undesired regressions.
- They provide productivity increases because there is no longer a need to manually test features over and over again.
- Tests provide documentation for how the code must behave.
The more tests we write, the less risk we are at of encountering bugs. Code coverage is a testing metric that describes the number of lines of code we have validated using tests. 100% code coverage indicates that our entire code has been verified by at least one test, so we can expect a lower chance of encountering bugs.
In Android Studio, for example, you can easily see the code coverage of your Flutter project by clicking on the shield next to the Run button. This will show you the coverage percentages of the files in each directory:
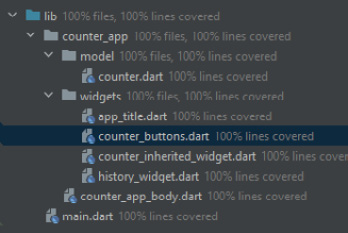
Figure 9.6 – Coverage report in Android Studio
As you can see, our project has 100% code coverage. VS Code has various coverage plugins you can get from its store that allow you to nicely see the coverage percentages as well.
As you’ve already seen in the workflow file, we can also use the flutter test --coverage command to manually generate the coverage report in an LCOV file. The GitHub action we’re using parses this file and makes sure that code coverage is higher than 95%.
The LCOV file format is not human readable, so we need some external tools, such as codecov.io, to generate a nice visual report. Alternatively, macOS and Linux systems have the genhtml utility, which produces a nice HTML overview of the coverage. Run the following command in your Flutter project root directory:
genhtml coverage/lcov.info --output-directory=coverage
You will find an index.html page in the coverage folder, which also has clickable paths so that you can see its details in a very user-friendly way:

Figure 9.7 – The HTML coverage report that’s generated by the genhtml tool
In real-world applications, 100% code coverage may be really hard to achieve, but you should aim for the highest value possible.
Summary
In this chapter, we learned what smoke and golden tests are, as well as how to test behaviors with unit or widget tests. We also learned what golden files are – that is, PNG images that are used as a reference on how a widget must look. These must be tested against the same operating system.
Then, we created an automated workflow that checks our app’s formatting, whether we follow various analyzer rules, and ensures that all our tests run correctly. We also made sure that the overall coverage is above a certain threshold using the VeryGoodOpenSource/very_good_coverage action.
You can also check your code coverage locally by either using your IDE or the genhtml tool, which produces a series of HTML pages.
That’s all, folks! In this book, we tried to cover the most important Flutter topics, hoping they will help improve your skillset. We hope you’ve enjoyed reading this book as much as we did writing it!
Further reading
To learn more about the topics that were covered in this chapter, take a look at the following resources:
- Testing Flutter apps: https://docs.flutter.dev/testing
- golden_toolkit package: https://pub.dev/packages/golden_toolkit
- GitHub actions: https://docs.github.com/en/actions