
3
Building a Todo Application Using Inherited Widgets and Provider
Quite often, when building an application, developers must also figure out how to share information in multiple places in the application. A common pattern for sharing data is to pass information down as a property top-down from parent to child, and through each nested child until you reach the widget that depends on that information. While this pattern is certainly fine for small applications, it can become quite cumbersome in large applications. In this chapter, we’ll explore this pattern and alternative solutions for sharing dependencies in an application.
In this chapter, we will cover the following topics:
- Sharing dependencies in a Flutter application
- Setting up the project
- Creating the Todo application
Let’s begin!
Technical requirements
Make sure that your Flutter environment has been updated to the latest version in the stable channel. Clone our repository and use your favorite IDE to open the Flutter project we’ve built at chapter_3/start.
The project that we’ll build upon in this chapter can be found on GitHub: https://github.com/PacktPublishing/Flutter-UI-Projects-for-iOS-Android-and-Web/tree/main/chapter_3/start.
The complete source code can be found on GitHub as well: https://github.com/PacktPublishing/Flutter-UI-Projects-for-iOS-Android-and-Web/tree/main/chapter_3/end.
Sharing dependencies in a Flutter application
As mentioned previously, one common pattern for sharing information in a Flutter application is to pass information down as a property from the top down from parent to child, and through each nested child until you reach the widget that depends on that information. We will refer to this process as property forwarding.
While this strategy is certainly fine in limited instances, it is not ideal when sharing information in several components or several nested tree layers. It is also not efficient because if it’s not handled properly, a state change in one of the properties can potentially trigger a rebuild of large portions of the widget tree.
Let’s look at the following diagram to get a better understanding of this problem:
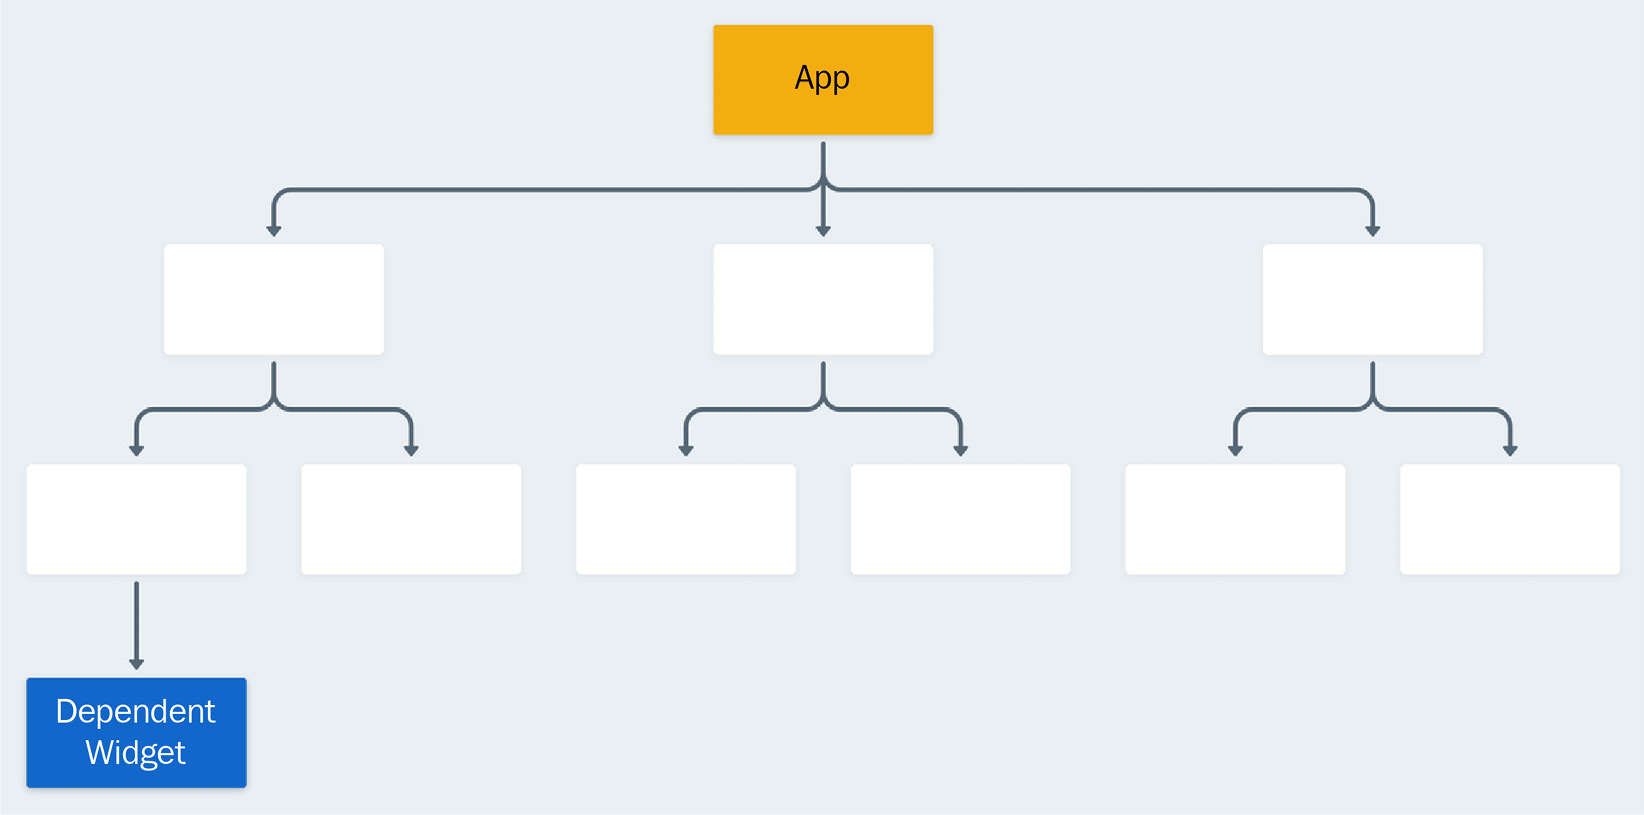
Figure 3.1 – A Flutter application widget tree
Here, we have several nested layers of widgets. At the top level, our App widget contains some business data that a descendant three levels below cares about. Using property forwarding, we can propagate that data down the widget tree through each descendant until the data has reached the Dependent Widget.
Let’s review how this would look:
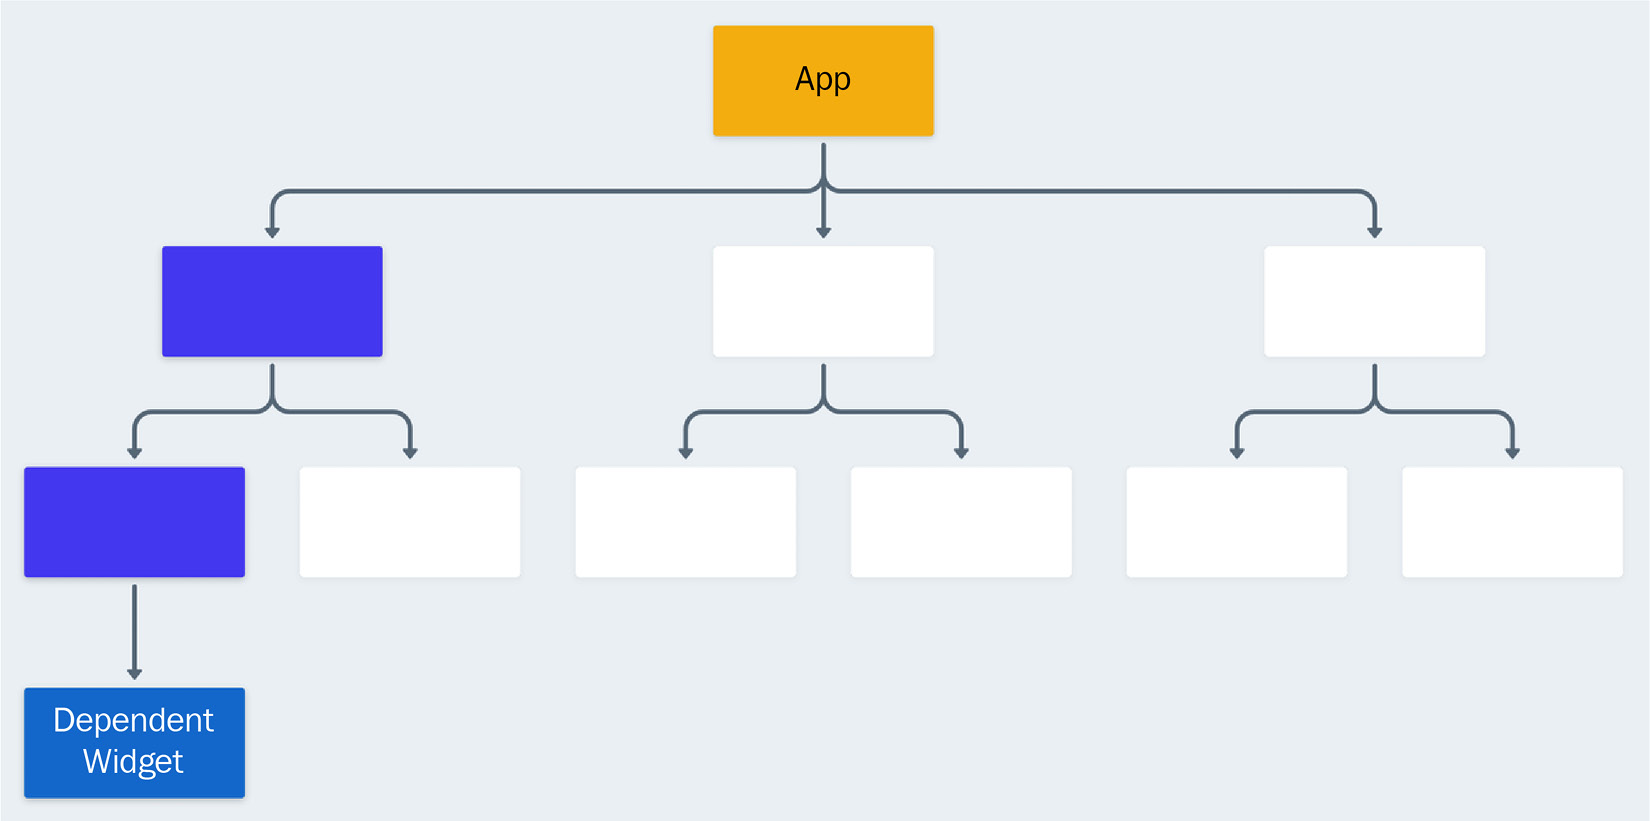
Figure 3.2 – A Flutter application widget tree with property forwarding
The preceding diagram shows the data that has been defined in the App widget is forwarded down to the widget that depends on it and that we have solved our problem, albeit in a very cumbersome way. But what happens if another widget has the same dependency? Take a look at the following diagram:
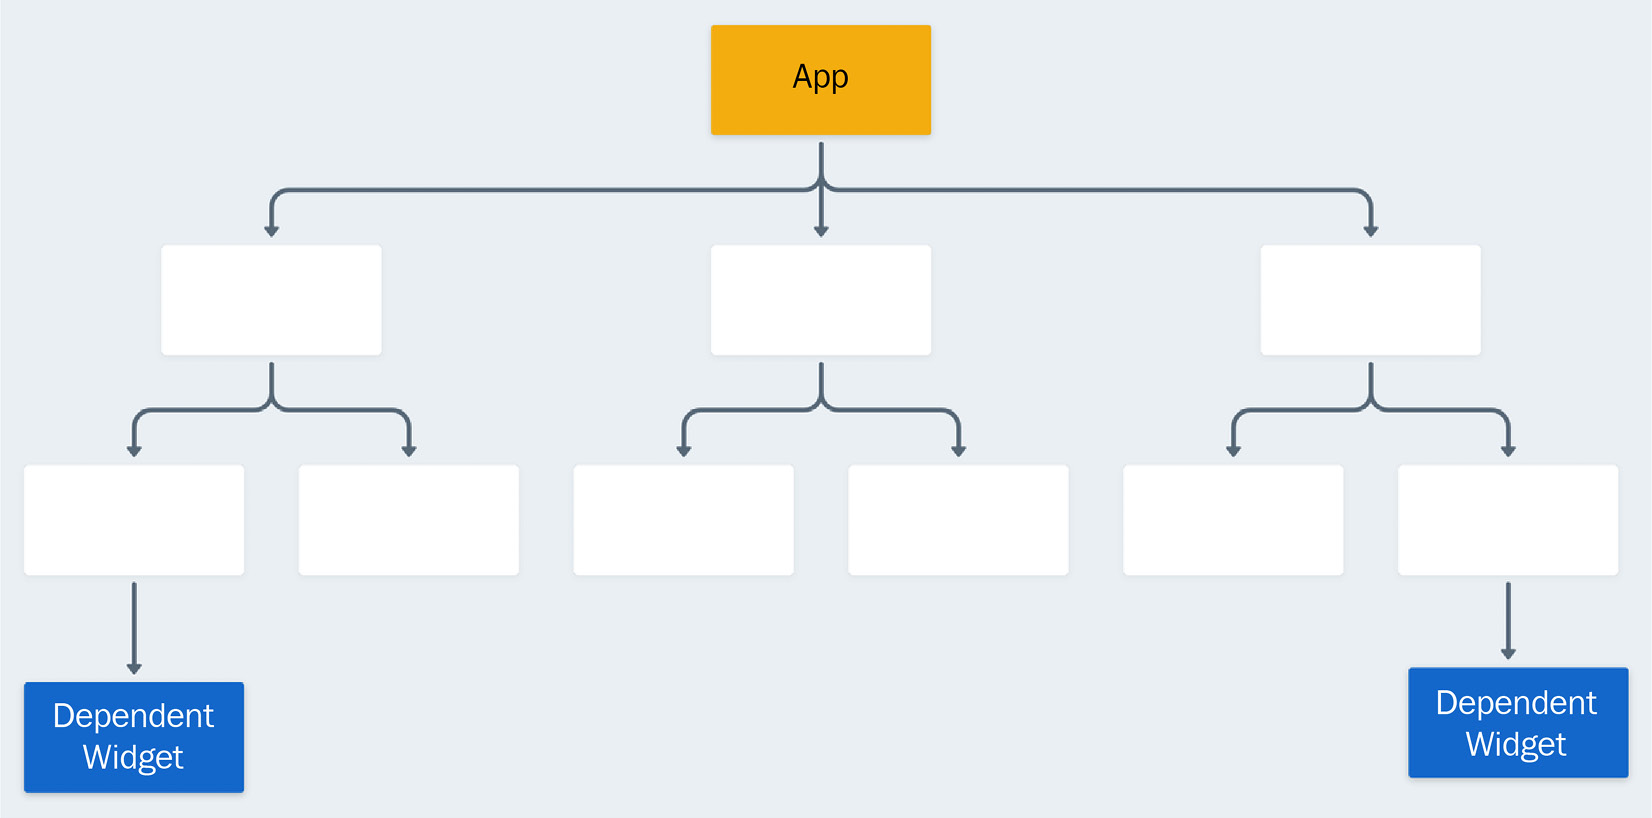
Figure 3.3 – A Flutter application tree with property forwarding with multiple dependent widgets
The preceding diagram shows a widget tree with multiple dependencies in deeply nested child widgets. Now, we must pass the application data through two completely independent trees. The effort that we put forth to maintain dependencies using property forwarding will continue to grow.
Ideally, we would prefer to define data in our App widget and reference it without forwarding the information down multiple layers of uninterested widgets. The following diagram represents our ideal solution, where we can define a Data Provider in our App widget and reference that Data Provider further down the tree in our Dependent Widget:

Figure 3.4 – A Flutter application tree without property forwarding
To handle the propagation of dependencies in a less cumbersome and more efficient way, we should define these properties in a single location and reference them without property forwarding. For this, we can turn to Flutter’s InheritedWidget base class.
An InheritedWidget allows information to be propagated down Flutter’s widget tree. Put another way, this special widget allows descendants in the tree to access its values without using property passing, while also allowing those descendants to subscribe to changes to the InheritedWidget, causing them to be rebuilt.
The InheritedWidget class is used throughout the Flutter framework. If you have referenced Theme.of to retrieve global application styles, or MediaQuery.of to retrieve the size of the current media (for example, the window containing your app), then you have already experienced some of the capabilities of InheritedWidget.
An InheritedWidget is not the same as state management, but it is often used in conjunction with other types of classes, such as ChangeNotifier and ValueNotifier, which allow you to manage application state and business logic.
Think of InheritedWidget as a tool for dependency injection rather than state management: a technique in which an object receives other objects that it depends on from another object.
Now that we understand the value of InheritedWidget in providing dependencies, let’s set up our project.
Setting up the project
In this chapter, we will learn how to use inherited widgets by refactoring a simple Todo application. The application has an input field to create new tasks, or todos, and a list that will display todos and allow a user to either complete them or delete them.
Here is how our example should look when it is running:
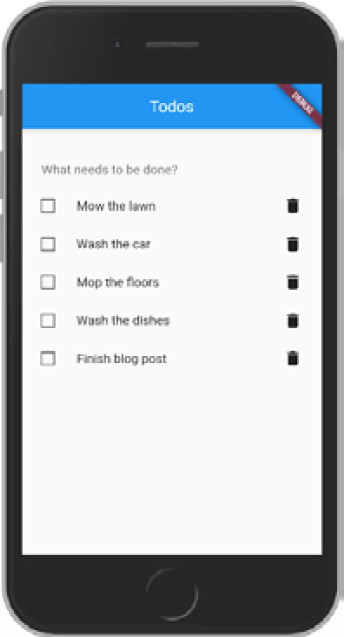
Figure 3.5 – A simple Todo application
We will start with an example that shares dependencies by forwarding application data down the widget tree as properties. We will change this example to propagate those same dependencies using InheritedWidget rather than using property forwarding. Then, we will refactor that same example to use the Provider package, which is endorsed by the Flutter community and Google as a pragmatic solution to dependency injection and state management.
After downloading the initial application from GitHub, we can start by moving into its root directory and running the flutter pub get command from the terminal. This will install any package dependencies that the application needs. Additionally, opening the project in an IDE will also cause the project to be installed when it’s loaded and when the pubspec.yaml file is updated.
This project uses Flutter’s new skeleton template, which is the Flutter team’s take on the best practices and structure of a complete application. This template can be used to generate new projects by executing flutter create -t skeleton in your terminal, but we will start from a baseline that already includes a ChangeNotifier.
After installing the application’s dependencies, execute the flutter run command from the same terminal window and view the project either in your browser or on your currently running emulator.
Because this application uses a template that has a different folder structure, it may be much more advanced than the versions in previous chapters. Here is the folder structure:
lib
|-- src:
   |-- controllers: Controllers glue data to Flutter
       Widgets.  Controllers defined at this level will be
       used in multiple features, or globally throughout
       the application.
   |-- todos_vanilla
   |-- widgets
|-- main.dart
Let’s briefly explore the purpose of each folder:
- src: The source folder contains implementation details of our application that, unless exposed, will be hidden from consumers.
- controllers: Controllers glue data to Flutter widgets. Controllers defined at this level will be used in multiple features, or globally throughout the application.
- todos_vanilla: A feature folder, normally defined as a top-level folder that represents major parts of the application. Features can include their own controllers, models, services, and UI and can import from shared folders but not other features.
- widgets: Widgets defined at this level will be used in multiple features, or globally throughout the application.
- main.dart: The entry point of the application.
One Flutter class that we have not touched on so far is ChangeNotifier, which we are using as a mixin for our TodoController. A ChangeNotifier, which inherits from Listenable, is a class that can be used to tell parts of the application that information has been changed. It operates very similarly to StatefulWidget, with a notifyListeners function that can be used to trigger updates, much like setState.
In the next section, we will examine the starter application and refactor it so that it uses InheritedWidget instead of property forwarding.
Creating the Todo application
In this section, we’ll build a Todo application that relies on an InheritedWidget – specifically, InheritedNotifier – to share and modify a list of todos using a ChangeNotifier. You will be able to create a Todo, mark it as completed, or delete it.
The starting point of this section is an application that already contains TodoController, which we will be sharing with our InheritedNotifier. Once we have dealt with InheritedWidget and have a clear understanding of how everything works, we will move on to the Provider exercise.
Using InheritedWidget for state management
Before we begin refactoring our starting application to use InheritedWidget to share data, let’s get familiar with the process of sharing information by forwarding properties down the widget tree.
Starting with property passing
Open the main.dart file; you will discover that we are creating our TodosController and passing it into our TodosApp:
void main() async {
  final todoController = TodosController();
  runApp(TodosApp(todoController: todoController));
}
In this code block, we run the application and pass TodosController. The app will listen to TodosController for changes.
Next, navigate to TodosApp; in the onGenerateRoute function of MaterialApp, you will notice that we are passing the controller into our TodosView:
class TodosApp extends StatelessWidget {
  const TodosApp({
    Key? key,
    required this.todoController,
  }) : super(key: key);
  final TodosController todoController;
  @override
  Widget build(BuildContext context) {
    return MaterialApp(
      //...
      onGenerateRoute: (RouteSettings routeSettings) {
        return MaterialPageRoute<void>(
          settings: routeSettings,
          builder: (BuildContext context) {
            switch (routeSettings.name) {
              case TodosView.routeName:
                return TodosView(controller:
                                 todoController);
              default:
                return TodosView(controller:
                                 todoController);
            }
          },
        );
      },
    );
  }
}
In the preceding code, we are defining a TodoController as a required parameter to the TodosApp widget, and then forwarding the property to TodosView.
We haven’t even begun to use the controller – we are just passing it down the widget tree. Once we inspect the TodosView widget, we can finally see how TodosController is being used:
class TodosView extends StatelessWidget {
  const TodosView({Key? key, required this.controller}) :
                   super(key: key);
  static const routeName = '/todos';
  final TodosController controller;
  ...
}
To start, observe that the controller is, once again, defined as a required parameter of TodosView. Now, let’s take a closer look at the build function to see how TodosController is utilized:
class TodosView extends StatelessWidget {
  ...
  @override
  Widget build(BuildContext context) {
    return Scaffold(
      ...
      body: Container(
        ...
        child: ConstrainedBox(
          constraints: const BoxConstraints(maxWidth: 550),
          child: Column(
            children: [
              Padding(
                ...
                child: TodoTextField(
                  onSubmitted: (value) {
                    controller.createTodo(Todo(
                      id: controller.todos.length + 1,
                      task: value,
                    ));
                  },
                ),
              ),
              AnimatedBuilder(
                animation: controller,
                builder: (BuildContext context,
                          Widget? child) {
                  return ListView.builder(
                    shrinkWrap: true,
                    itemBuilder: (context, index) {
                      final todo = controller.todos[index];
                      return TodoListTile(
                        todo: todo,
                        onToggleComplete: (bool? value) {
                          controller.update(todo.copyWith(
                            complete: value));
                        },
                        onDelete: () {
                          controller.deleteTodo(todo);
                        },
                      );
                    },
                    itemCount: controller.todos.length,
                  );
                },
              ),
            ],
          ),
        ),
      ),
    );
  }
}
Notice that the controller is passed as a value to AnimatedBuilder. We also have several calls to functions that will create, update, and delete todos in our controller class.
Using AnimatedBuilder may seem strange because we are passing a ChangeNotifier as an animation, but upon inspecting the property, you will notice that the animation property is just a Listenable, which ChangeNotifier inherits from. Any time that the TodosController.notifyListeners method notifies its listeners of changes, the builder method of AnimatedBuilder will be re-rendered, ensuring that these changes only trigger efficient UI updates.
This process probably feels cumbersome because we had to add boilerplate code to get to the interesting parts of our code base – the business logic. Understanding the cumbersome nature of property passing will allow us to understand the benefits of InheritedWidget. Next, we’ll refactor the same example to work with InheritedNotifier.
Creating an InheritedNotifier
To provide our TodoController without passing it down the tree manually, we will create a class that extends from InheritedWidget. Specifically, we will use a special type of InheritedWidget called InheritedNotifier that accepts a Listenable as its main parameter.
An InheritedNotifier is a special variant of InheritedWidget that accepts a Listenable subclass and updates its dependencies whenever the notifier is triggered.
To create a custom InheritedNotifier, create a class called TodoScope and add the following code:
class TodosScope extends InheritedNotifier<TodoController> {
 const TodosScope({
    Key? key,
    TodoController? notifier,
    required Widget child,
  }) : super(key: key, notifier: notifier, child: child);
  static TodoController of(BuildContext context) {
    return context.dependOnInheritedWidgetOfExactType
      <TodosScope>()!.notifier!;
  }
}
InheritedNotifier takes two parameters besides the key: a child widget and a notifier property. The latter inherits from Listenable. In the preceding code, we passed those three variables up to the parent constructor of TodosScope using the super keyword. Then, we defined a static method called TodosScope.of to retrieve our InheritedNotifier.
Inside this method, we use a function on BuildContext called dependOninheritedWidgetOfExactType. This is a special function that obtains the nearest widget in the tree that matches the type we define, which must be the type of a concrete InheritedWidget subclass. Additionally, the function registers BuildContext so that changes to our TodoScope will trigger a rebuild to provide the new values to the widget.
Now that we have created our custom InheritedWidget, let’s learn how to use our newly created TodoScope.
Getting information from TodosController using TodosScope
Next, let’s refactor the logic in the TodosView widget so that it relies on TodoScope and remove the instances where TodosController is being passed as a prop. First, remove the TodosController property definition and delete it from the constructor:
class TodosView extends StatelessWidget {
  const TodosView({Key? key}) : super(key: key);
  static const routeName = '/todos';
  ...
}
Next, change AnimatedBuilder to Builder and add the following code to access TodosController from TodosScope:
  @override
  Widget build(BuildContext context) {
    return Scaffold(
      ...
      body: Container(
        alignment: Alignment.topCenter,
        child: ConstrainedBox(
          constraints: const BoxConstraints(maxWidth: 550),
          child: Column(
            children: [
              Builder(
                builder: (BuildContext context) {
                  final controller =
                    TodosScope.of(context);
                  ...
                },
              ),
            ],
          ),
        ),
      ),
    );
  }
Finally, wrap ListView.builder with a Column and move TodoTextField into Column. Additionally, add shrinkWrap: true to ListView.builder so that there are no rendering errors from nesting a ListView inside a Column:
                  return Column(
                    children: [
                      Padding(
                        padding:
                          const EdgeInsets.symmetric(
                          horizontal: 24,
                          vertical: 16,
                        ),
                        child: TodoTextField(
                          onSubmitted: (value) {
                            controller.createTodo(Todo(
                              id:
                              controller.todos.length + 1,
                              task: value,
                            ));
                          },
                        ),
                      ),
                        ...
                    ],
                  );
Let’s look at the changes we’ve made in this refactor:
- We’ve moved the TodosController property from the TodosView constructor.
- We’ve refactored AnimatedBuilder to Builder to access TodosController from the TodosScope inherited widget.
- We’ve wrapped ListView.builder with a Column and added TodoTextField to Column.children to reuse TodosController.
If we run the following sample now, we will be met with a null check operator error, as shown here:
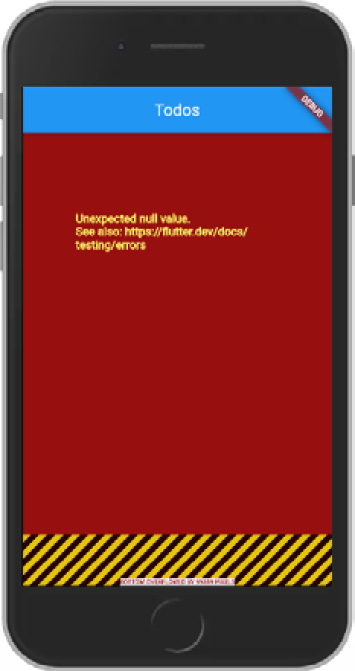
Figure 3.6 – A simple Todo application
The somewhat cryptic error displayed in Figure 3.6 happened because Flutter failed to find an instance of TodosScope in the application’s widget tree.
Since we have not provided this widget anywhere in the tree, the error we are seeing makes sense, but we could make the error a bit more descriptive. Before moving on to the next step, let’s clean this up a bit. Change the TodosController.of method to the following:
  static TodosController of(BuildContext context) {
    final TodosScope? result =
        context.dependOnInheritedWidgetOfExactType<TodosScope>();
    assert(result != null,
           'No TodosScope found in context');
    assert(result!.notifier != null,
          'No TodosController found in context');
    return result!.notifier!;
  }
Here, we have changed our helper method to display an error message when TodosScope is not found in the widget tree or when it does not include our notifier. Now, run the example and observe a message similar to what is shown here:

Figure 3.7 – A simple Todo application
Here, we can see the new, more descriptive error that’s displayed when we run the application: “No TodosScope found in context”.
Next, let’s provide our dependencies in the Todo application.
Providing TodosController in the widget tree
Finally, we should add our TodoController to our widget tree so that our TodosScope can correctly retrieve the controller inside TodosView. Inside the main.dart file, change the main function to the following:
void main() async {
  final todoController = TodosController();
  runApp(TodosScope(
    notifier: todoController,
    child: const TodosApp(),
  ));
}
Notice that we no longer pass the controller in as a property of TodosApp. Instead, we wrap the TodosApp widget in the TodosScope widget that we previously defined while passing in our instance of TodosController.
Now, upon running our application, we will no longer see the error messages from the previous steps and should be met with our Todo application running like it was previously!
Next, let’s take a look at the popular Provider package and refactor our application to reduce some of the boilerplate introduced by InheritedWidget.
Refactoring with Provider
InheritedWidget and its associated classes work great, but hopefully, the previous section of this chapter has shown you that while it is a useful tool in our utility belt, it is a low-level widget that also requires some boilerplate.
What if, instead of using a Listenable, we wanted to use a Stream or a Future or even multiple Listenable classes? What if we wanted to make changes to specific properties to trigger rebuilds in different places throughout the application? The logic we would need to provide in our TodosScope (or any other InheritedWidget) would become much more complex and unwieldy. Even worse, this logic takes us away from the business functionality of our application.
Fortunately, there is an outstanding library that exists called provider that is promoted by the Flutter team. The Provider package includes several wrappers around InheritedWidget called Providers that handle each of the aforementioned use cases.
Installing Provider
First, let’s install provider by running the following command in a terminal in the project’s root directory:
flutter pub add provider
This command will add the latest version of the provider package from https://pub.dev/, Dart’s package registry. Now, we can import the Provider package where needed.
Getting information from TodosController using Provider
As Provider is just a wrapper around InheritedWidget, refactoring is a breeze; our previously defined TodosController works without any additional effort.
Let’s refactor the logic in the TodosView widget to rely on Provider rather than TodosScope. First, change TodosView so that it accesses TodosController using the following code:
class TodosView extends StatelessWidget {
  ...
  @override
  Widget build(BuildContext context) {
    final TodosController controller = context.read();
    ...
  }
}
Using context.read() allows us to access the controller without rebuilding the entire TodosView widget tree if TodosController changes. Finally, refactor Builder.builder to access the controller by using context.select() instead of ProviderScope:
              Builder(
                builder: (BuildContext context) {
                  final todos = context.select(
                     (TodosController m) => m.todos);
                },
              ),
Here, we are using context.select()to subscribe to changes to TodosController.todos. With these two refactors, we are done updating TodosView. To recap, the two changes we have made use special extension methods that are defined on BuildContext by the Provider package:
- At the beginning of the build function, we use a special context.read to retrieve a non-rebuilding instance of TodosController.
- At the beginning of our Builder widget’s builder function, we use a special select function only to retrieve the todos from TodosController and subscribe to their changes.
The use of these two methods demonstrates the power of the Provider package since it allows us to efficiently retrieve references to both TodosController and its values.
To further demonstrate Provider’s benefits, when running this code, we are met with an extremely helpful and verbose error because TodosController cannot be found in the application’s widget tree:
The following ProviderNotFoundException was thrown building TodosView(dirty):
Error: Could not find the correct Provider above this TodosView Widget
This happens because you used a BuildContext that does not include the provider
of your choice. There are a few common scenarios:
You added a new provider in your main.dart and performed a hot-reload.
To fix, perform a hot-restart.
The provider you are trying to read is in a different route.
Providers are “scoped”. So if you insert of provider inside a route, then
other routes will not be able to access that provider.
You used a BuildContext that is an ancestor of the provider you are trying to read.
Make sure that TodosView is under your MultiProvider/Provider.
This usually happens when you are creating a provider and trying to read it immediately.
This error message provides the developer with the information that they would need to debug all of the scenarios in which a provider might be incorrectly accessed without first being provided in the widget tree.
Providing TodosController in the widget tree
Finally, let’s resolve the errors from the previous step by using Provider to provide the widget in the application’s widget tree.
In the main.dart file, change the main function to the following:
void main() async {
  final todoController = TodosController();
  runApp(ChangeNotifierProvider.value(
    value: todoController,
    child: const TodosApp(),
  ));
}
As you may have guessed, ChangeNotifierProvider is a special widget that accepts a ChangeNotifier as a property and provides that class to descendant BuildContext references.
The value method allows you to pass in a previously defined value, but if for some reason you needed to dynamically create providers – for instance, if providers are dynamically changing based on a property or a route – there is a create property method that can be provided to the default constructor of ChangeNotifierProvider.
Let’s see what that would look like:
void main() async {
  runApp(ChangeNotifierProvider(
    create: (_) => TodosController(),
    child: const TodosApp(),
  ));
}
The change we’ve made here will now dynamically create a new instance of TodosController whenever the widget tree changes. This feature would be useful if TodosController had a dynamic dependency.
This example only grazes the surface of the powerful abstractions of the Provider package, which includes a long list of features:
- Simplified allocation/disposal of resources
- Lazy loading
- A vastly reduced boilerplate over making a new class every time
- Developer tooling friendly – using Provider, the state of your application will be visible in Flutter’s developer tools
- A common way to consume these inherited widgets (see Provider.of/Consumer/Selector)
- Increased scalability for classes with a listening mechanism that grows exponentially in complexity (such as ChangeNotifier, which is O(N) for dispatching notifications).
We have successfully refactored our Todo application to use Provider! In doing so, we eliminated the boilerplate that we introduced by using InheritedWidget, while also using a library that handles many edge cases that come up when using InheritedWidget.
Now that we have wrapped up our application, let’s review what we have learned.
Summary
In this chapter, we reviewed a simple Todo application that used property passing to share business logic. Then, we refactored the application to use InheritedWidgets to share dependencies. Finally, we used the popular Provider package to reduce the boilerplate that was introduced with inherited widgets.
By learning how to use inherited widgets and Provider, you now know how to store and share dependencies that can be retrieved further down the tree, eliminating some of the issues of property drilling.
In the next chapter, you will learn how to build platform-specific user interfaces using the Material and Cupertino libraries.
Further reading
To learn more about the topics that were covered in this chapter, take a look at the following resources:
- State management: https://flutter.dev/docs/development/data-and-backend/state-mgmt/simple
- Flutter: Creating your own Inherited Widgets: https://blog.gskinner.com/archives/2021/04/flutter-creating-your-own-inherited-widgets.html
- Making sense of all those Flutter Providers: https://medium.com/flutter-community/making-sense-all-of-those-flutter-providers-e842e18f45dd
- What is InheritedWidget and How it works in a Flutter??: https://flutteragency.com/inheritedwidget-in-flutter/