Previously in this book you have seen some general facts about hard drives and operating systems. In this chapter, we will go into more depth. It cannot be overemphasized that the more you know about hardware and operating systems, the more effective you will be as a cyber forensic analyst. In this chapter, you will also see how to recover deleted files in both Windows and Linux.
Hard Drive Specifications
In previous chapters, we discussed the specifications of hard drives in a general manner. In this chapter, we will get a bit more specific. It is important to understand how the hard drive is functioning in order to effectively perform a forensic analysis.
General Hard Drive Facts
Hard drives (with the exception of solid-state hard drives) are literally platters that are stacked up like plates on a spindle. A read/write head is used to read the data from the platters or to write data to the platters. This is shown in Figure 6-1.

Figure 6-1 Hard drive structure
The platters are made of a ferromagnetic material. It is usually a bad idea to open a hard drive, as the one in Figure 6-1 is opened. Any dust that gets between the read/write head and the platters or any scratches on the platters can create problems when attempting to read or write data.
The data on the platters is divided into sectors (we discussed this in previous chapters) that are usually 512 bytes in size. Those sectors are arranged in circles around the platter called tracks. The data itself is in clusters that comprise anywhere from 1 to 128 sectors. Data is recorded by magnetizing the material of the platter to represent either a 0 or 1 (binary numbers).
The platters inside a hard disk drive are usually made of glass or aluminum. It is the polished magnetic material on the surface that makes the platter appear shiny like a mirror. You can see the track/cluster structure in Figure 6-2.

Figure 6-2 Hard drive data structure
Partitions
A computer could have one or more hard drives, often called physical drives. The reason they are termed “physical drives” is because it is possible to divide a single physical drive into multiple logical drives. Think of a large office being divided into four cubicles. Physically, there is just one room, but there are four logical offices. This is essentially what partitioning your drive does. There are four types of partitions:
• Primary partition This type of partition has an operating system and is bootable. You must have at least one primary partition to boot up the system, but you can have as many as four. For example, you might have one partition for Windows 8 and another for Ubuntu Linux.
• Active partition Simply put, this is the particular primary partition you have currently booted up. For example, if you have two primary partitions (one for Windows 8 and one for Ubuntu Linux), then when you boot into Windows 8, that primary partition is the active one. If you reboot the machine into Ubuntu Linux, then the Linux partition is now the active partition. You can only have one for each machine.
• Extended partition You can only have one per physical disk. This is essentially the space on your hard drive that you have chosen to divide into subspaces for use.
• Logical partitions These are the aforementioned subspaces. When you divide a physical disk into C drive, D drive, etc., these are logical partitions. The various partitions on my own laptop are shown in Figure 6-3 as they appear in Windows 8.

Figure 6-3 Windows 8 partitions
These four partition types are the standard partitions found on modern computers. You might find a few other nonstandard partitions:
• Encrypted partitions A variety of tools allow you to encrypt either the entire disk or just a partition. TrueCrypt1 is one such tool. There are many others. We will discuss encrypted drives in detail later in this chapter.
• Hidden partitions When dividing a physical disk into partitions, it is possible to have a partition that is not visible to most users. Hidden partitions are of interest in forensic investigations because they provide an excellent way for someone to hide data. There are several ways to determine if a hidden partition exists. The most obvious is to see if there is a difference between the actual specified disk size and the total size of visible partitions. If you see a difference, this could indicate a hidden partition. There are also tools such as Raw Disk Viewer2 that will show hidden partitions.
• Unallocated space This is an area of a hard drive that is not allocated for a specific partition. It is often called free space. This is not the same as a hidden partition because there has been no attempt to hide it—it simply is not allocated for use. This may not seem interesting forensically, but it is possible that currently unallocated space was previously part of a partition. If that is the case, there could still be data fragments there.
• Slack space This is space between the data and the cluster size.3 For example, if the cluster size is 10 sectors, that means a cluster size of 5,120 bytes, and if you save a file that is 2,000 bytes in size, there are 3,120 bytes of unused space in that cluster that cannot be used by any other file. This is slack space, and it is a great place to look for hidden data. The tool Autopsy from SleuthKit that you have seen previously in this book can detect data in slack space.4 Autopsy uses the strings and grep tools:
“Strings is first run on the image and the data is passed to grep to do the actual search. This process will find ASCII and UNICODE strings that are consecutive anywhere in the file. This is frequently referred to as the physical layout. For example, it will find strings in the middle of an allocated sector, in an unallocated sector, in slack space, and in meta data structures. This will find a string that crosses sectors, which is good if the two sectors are for the same file.”5
Finding Data
The next issue to discuss is how the hard drive finds data. Essentially, the read/write head is moved over the correct track and then the disk spins until the correct sector is right under the head. There are a few terms that are important here. The first is seek time. This is the time it takes for the head to be positioned over the track. Then we have the term latency period. That defines how long it takes for the desired sector to be moved under the head. Access time is equal to the seek time plus latency time.
Once data has been located, there is still the issue of transferring the data from the hard drive to the CPU and RAM so it can be utilized. This is usually measured in the amount of data one can transfer in one second. There are actually two transfer rates that are combined into what is normally called “the transfer rate.” The first is the internal data transfer rate. That is the speed at which the hard disk can physically read or write data to or from the surface of the hard drive platter and then transfer it to the internal read buffer/cache. The external transfer rate is how fast the data can be communicated from that read buffer/cache to system memory (RAM).
RAID
Many readers may already understand RAID, but in case you don’t, let’s begin with a brief description. RAID is an acronym for Redundant Array of Independent Disks. The concept is simple. We all know that hard drives fail, but what if you had a backup hard drive in the machine, with a complete duplicate of all the information on the main drive? Then, if the main drive fails, the system could just switch over to the backup drive and keep going. This is actually one of the most common RAID implementations. The common RAID levels are listed here:
• RAID 0, also called disk striping, distributes data across multiple disks in a way that gives improved speed for data retrieval. This doesn’t do much for backup, but since the data is stored in multiple drives, it can be retrieved faster. Imagine you had a large book, perhaps the complete works of William Shakespeare, and you needed to search for a specific quote. If that book was spread across three drives and each was searching simultaneously, the search would be much faster. This is the idea behind RAID 0.
• RAID 1 mirrors the contents of the disks. The disk is completely mirrored so there is an identical copy of the drive running on the machine. Essentially, your computer is using one drive, but everything that happens on that drive (saving data, moving data, deleting data, etc.) is simultaneously executed on the backup drive. This provides a good failsafe should the primary drive fail. Of course, you can perform mirroring with more than one drive—you just need an equal number of backup drives. So if you have three drives you actually use, you need three drives of at least the same size to mirror them.
• RAID 3 or 4 (striped disks with dedicated parity) combines three or more disks in a way that protects data against loss of any one disk. Fault tolerance is achieved by adding an extra disk to the array and dedicating it to storing parity information. The storage capacity of the array is reduced by one disk, the parity disk. That dedicated disk has information that would help you reconstruct the data (yes, for you hardware engineers, this is a simplification of the process!). So if you took the complete works of William Shakespeare and divided it among three drives (drives C, D, and E) and then one drive (drive D) fails, you still have two-thirds of the data. The parity bits on the parity drive will allow the system to rebuild the missing third.
• RAID 5 (striped disks with distributed parity) also combines three or more disks in a way that protects data against the loss of any one disk. It is similar to RAID 3, but the parity is not stored on one dedicated drive. Instead, parity information is interspersed across the drive array. For example, what if one of the drives fails AND the parity drive fails? That would be a disaster for RAID 3 or 4. So RAID 5 also distributes the parity drive.
• RAID 6 (striped disks with dual parity) combines four or more disks in a way that protects data against loss of any two disks. It is basically RAID 5 expanded.
• RAID 1+0 (or 10) is a mirrored data set (RAID 1) that is then striped (RAID 0)—hence, the “1+0” name. A RAID 1+0 array requires a minimum of four drives: two mirrored drives to hold half of the striped data, plus another two mirrored for the other half of the data.
These are the essentials of RAID. There are a few other types of RAID; however, the most common you will see are levels 1, 1+0, and 5. Acquiring a RAID for forensics purposes has some challenges that are not encountered when acquiring a single drive. Some people recommend acquiring each disk separately. This will work just fine for RAID 1 or 1+0—simply image each disk as if it were a single disk. However, with RAID 0, 3, 4, 5, and 6 there is data striping. The data is striped across multiple disks. In these situations, acquiring the disks separately is not recommended. The recommended way to handle this is to image the entire RAID array. Now that means your target forensic drive is either an equal size (or greater) RAID or a very large drive!
Both Forensic Toolkit (FTK)6 and EnCase provide built-in tools for acquiring RAID arrays. For example, in EnCase the steps are as follows:
1. Open the case of the suspect computer and document the RAID setup. Leave the cover open because you will need access to the hard drives later on.
2. Download and create a network boot disk (because it contains many popular SCSI drivers and also supports parallel port and network crossover acquisitions).
3. Unplug the power and data connectors to each hard drive (noting where they were connected because we will need to reconnect later).
4. Boot the suspect computer and configure the BIOS to boot to floppy only.
5. Save the settings and power down the computer.
6. Reconnect the hard drives in the same way that they were connected in step 4.
7. If performing a DOS drive to drive acquisition, connect your partitioned and FAT-32 formatted storage drive to a spare hard drive connector on the suspect computer. If there are no more connectors, you may use one from the CD-ROM drive, or connect it to an add-on IDE controller card and insert the controller card into a free PCI slot on the motherboard.
8. Now insert your boot floppy and boot the computer using it. If you are working with a SCSI RAID array, choose the options to Auto Detect and load the SCSI drivers using the network boot disk. If you intend to perform a network crossover acquisition, allow the computer to detect and load drivers for the network card.
9. Launch EnCase for DOS. Remember, the BIOS sees the RAID as one drive, so you will only see one large physical drive in EnCase.
10. Acquire the RAID array as you would acquire a single IDE hard drive.
11. When the acquisition is finished, the RAID array will appear as one physical disk in EnCase.7
Recovering from Damaged Media
What happens when your forensic investigation involves damaged media? I am sure you have seen hard drives that were dropped, CDs that were scratched, and other similar problems. In a forensic investigation, this is even more likely. It is not uncommon for a suspect, if he or she has the opportunity, to purposefully attempt to destroy evidence. This means you are probably going to encounter damaged media at some point in your career.
It is a nontrivial task to repair physical damage. It usually requires specialized tools and expertise. However, for forensic purposes, you don’t need to fix the broken media—you just need to recover as much data from it as you can. It is possible that the drive is even operable and can be booted. So we have a few steps you should take.
1. The first step is to just remove the drive from the system it is in and connect it to a test system. The damaged drive should be configured as a secondary drive so the system boots to its own drive.
2. Attempt to connect to the drive. It is possible that the system will recognize the drive; then you can image the drive as you normally would.
3. If the test system recognizes the drive but cannot read from it, you can try open-source tools such as DCFLdd (an enhanced version of the dd utility) to try to image it.
4. If the test system does not recognize the drive, check to see if the hard drive is even spinning. If it is not spinning and all previous measures have failed, you will need to send it to a specialist to repair.

NOTE This poses an issue for chain of custody. You will need to work with a vendor that specializes in forensic hard drive recovery and who understands the issues of chain of custody. You cannot simply mail a drive to any repair person. If you do, any evidence you collect will be inadmissible in court.
Aside from physical damage, there can be logical damage. This means that the drive itself is intact and functioning, but something is making the data unrecoverable. For example, a sudden power outage can damage the file system. Most operating systems provide a basic repair tool for their own file systems. Microsoft Windows has chkdsk, Linux comes with the fsck utility, and Mac OS X provides Disk Utility. You should first attempt one of these utilities to see if it can repair the file system. If that fails, you may need to seek out third-party file system repair software.
In some desperate situations where you have already tried everything else, you can simply do a high-level format and then try to recover data using undelete tools (we will be discussing these later in this chapter). This is a last resort, as you will undoubtedly lose some data. But it is possible to recover some data in this fashion.
CMOS/BIOS
By now, you are well aware of hard drives and have a basic understanding of operating systems (we will get into more depth on operating systems later in this chapter). But we have not discussed BIOS/CMOS yet. Consider this: If a computer is off, there is a boot process that starts up the machine and eventually loads the operating system. What process gives the computer instructions between the time power is turned on until the operating system is loaded? That process is the Basic Input Output System, or BIOS. BIOS is what is called firmware. That means software that is embedded in a chip.
CMOS is closely related. CMOS is an acronym for Complementary Metal-Oxide Semiconductor. The chip stores information such as the system time and date and the system hardware settings for your computer that are used during startup. CMOS is responsible for the quick power on self test (often termed POST).
There have been innovations designed to replace BIOS. The Advanced Configuration and Power Interface (ACPI) specification provides an open standard for replacing BIOS. ACPI, first released in December 1996, defines platform-independent interfaces for discovering what hardware is in a machine, configuration, power management, and monitoring. The specification is central to Operating System−directed configuration and Power Management (OSPM). ACPI and OSPM are improvements to the BIOS concept. Where BIOS has to be programmed with what hardware a computer has, however, ACPI will automatically discover it.

EXAM TIP The CCFP won’t ask you deep details about BIOS, CMOS, ACPI, or OSPM. However, this information will be useful to you when examining a suspect PC or laptop.
The Swap File
You have probably heard the term swap file or virtual memory before. Some operating systems, such as Windows, utilize a sort of temporary memory to augment RAM. The basic premise is that there is a finite amount of RAM and we need to maximize its usage. Consider a user who has several programs open at one time (Firefox web browser, Outlook e-mail, Microsoft Word, and Adobe Photoshop). While all of these are open, the user is probably only interacting with one or two at any given time. So operating system moves the program that has the longest time since the user interacted with it to the swap file. The least used program is “swapped” in and out of the swap file and RAM. This allows the system to make more efficient use of RAM.
The size of swap files is usually about 1.5 times the size of the physical RAM in the machine. Swap files contain remnants of whatever programs the user has been working with. In other words, the user might have been working with an Excel spreadsheet and not saved it, but part of it is still in the swap file. This brings up an important forensic fact. Swap files are not erased when the system shuts down. They work on a queue system, which means data is not erased until that space is needed again. This means it is very likely you will be able to find data in the swap file.
On Windows machines before XP, the swap file had an .swp extension (for swap). From XP on, the file has been named pagefile.sys. You can examine this file’s contents with any standard hex editor. Some forensic analysts like to use a favorite general-purpose tool, such as Scalpel (which you saw earlier in this book).
NOTE You should also be aware that there are a number of tools available on the Internet for wiping the swap file. If you find the swap file has no content at all, this would be an indication of two things. The first is that someone took care to wipe evidence from this computer. The second is that the perpetrator has a significant level of computer skill.
Operating System Specifics
The computer hardware is obviously important, but the bulk of your forensic analysis will involve examining the operating system for evidence. Usually, most users don’t interact directly with the hardware; they interact with the operating system. In previous chapters, you saw brief descriptions of major operating systems and file systems. In this section, we will delve deeper into operating system concepts.
Operating System Essentials
Let’s begin by defining what an operating system is. The operating system is a program that is responsible for basic computer functionality. Operating systems perform basic tasks, such as processing input from the keyboard or mouse, managing memory, sending output to the display screen, maintaining and accessing files, and controlling external devices such as printers and scanners.
Operating systems also provide the framework that applications interact with. A word processor does not need to know how to process input from the keyboard or how to send data to the printer. It simply needs to know what operating system functions to call. This is one reason why a program written for Windows won’t run on Linux. The operating system calls that a program depends on are different from one operating system to another. It should be clear that the operating system is the most important program on any given computer. As you might suspect, operating systems come in various types. They can be broadly classified as seen in Table 6-1.

Table 6-1 Operating System Types
An operating system might actually fit into multiple categories. For example, Windows, Unix, and Linux all support multiprocessing and multithreading, but only Unix (and Unix variants) support multiple users.
The Kernel
The core of all operating systems is the kernel. Some experts might even argue that the kernel actually is the operating system and other associated utilities are just supporting programs. I don’t take quite such an extreme view.
Users don’t interact directly with the kernel. Most of the programs you interact with and may think of as the operating system are simply additional programs being run by the operating system. For example, the shell in Linux or the command window in Windows are both utilities and are not part of the operating system kernel. The kernel is responsible for basic functionality like low-level input/output, hardware interfacing, and memory management. One of the primary tasks of the kernel is to facilitate the execution of applications and provide those applications with features such as hardware access and process management.
NOTE A process defines which memory portions the application can access. In short, a process is a separate space in memory.
One of the most important functions of the kernel is memory management. Unlike most other programs on the computer, the kernel has full and unfettered access to the memory. So one of the kernel’s functions is to allow processes to access memory in a safe way. Modern operating systems allocate a portion of memory as “protected” and don’t allow programs other than the operating system to access them. One way this can be accomplished is with techniques such as virtual addressing. Virtual addressing allows the kernel to make a given physical address appear to be another address—the virtual address. Virtual address spaces may be different for different processes; the memory that one process accesses at a particular (virtual) address may be different memory from what another process accesses at the same address. This allows every program to behave as if it is the only one (apart from the kernel) running, and thus prevents applications from crashing each other.
There are two types of kernels: monolithic and micro-kernel. In micro-kernel architecture, the kernel provides basic services such as communication, I/O, and memory and process management. Other functions are provided by utilities associated with the kernel, but not actually part of it. In a monolithic architecture, all of these services are included as part of the kernel itself.
EXAM TIP The CCFP won’t delve into details about the kernel. We are discussing just a basic overview here so that your understanding of operating systems is more complete. I actually recommend that you, at a minimum, read at least one good operating system book. There is a chapter excerpt from a very good introduction to operating systems book you can read online: http://highered.mcgraw-hill.com/sites/dl/free/0073518174/910027/Chapter01_final.pdf.
The GUI
The graphical user interface, or GUI, is not the operating system. That simple fact escapes many users. It is more obvious with operating systems like Linux, where one can select from a number of GUIs. In Windows systems, the separation may not seem so clear. But in essence, the GUI is a user-friendly interface that allows the end user to interact with the operating system more easily.
Quite a few programs come with any modern operating system that is not actually part of the operating system. For example, if you purchase Windows 8, you also get a web browser, an e-mail client, a paint program, games, etc. These are simply applications that the vendor is shipping with the operating system. Even items like network utilities, shells, and general utilities are not part of the kernel, but are instead additional applications that have been included in the operating system. Think about it this way: If the system could run effectively without it, then it is not part of the operating system.
Interrupts
Interrupts are an important part of an operating system. The various hardware devices or programs can communicate with the operating system by these pathways. A more technical definition would be that an interrupt is an asynchronous signal indicating the need for attention. Hardware devices and programs can both access interrupts in order to request the attention of the operating system. When a hardware device triggers an interrupt, the operating system’s kernel decides how to deal with this event. This is usually accomplished by the operating system executing some code designed to process input from that hardware. For example, if there is input from the keyboard, that interrupt will cause a specific operating system utility to function in order to process the incoming keyboard signals. An application can also trigger an interrupt to the operating system. For example, if an application needs to access hardware, it will send an interrupt to the operating system’s kernel.
Device drivers are simply programs that provide an interface between the operating system and some hardware, such as a printer. These can be quite important from a forensic point of view. One reason these drivers can be interesting is that the presence of nonstandard drivers for equipment you don’t see when the computer is seized may indicate there is additional equipment that needs to be found and examined. Normally, operating systems ship with a number of device drivers. It is also common practice for hardware vendors to include drivers as part of their installation programs. So, for example, if you find a Windows machine with drivers for a printer and those drivers don’t normally ship with Windows, that is an indication a printer was once attached to that computer.
API
All operating systems must also provide some sort of application programming interface (API) whereby programs can interact with the operating system. Without an API, programs would not be able to communicate with the operating system. These are the core functions of any operating system. However, just these functions would make a very bare-bones operating system with limited usefulness. Microsoft heavily documents the Windows API.8 The Windows API will not be useful to you in all forensic cases. In fact, it is most useful in cases involving malware. The better you understand the API, the more likely you are to understand what sophisticated malware might be capable of.
Extracting Deleted Files
One very important thing to remember is that deleting files does not really destroy them. They are recoverable. This is important, because criminals are likely to delete incriminating files if they get a chance. So understanding how you can recover those files is important. In this section, we will first examine the theory behind recovering deleted files and then look at some specific tools.
Windows
We will start with Windows because it is the most common operating system, and you will undoubtedly encounter it routinely. It is also very easy to recover deleted files in Windows. Let’s explore a way.
Microsoft Windows will use one of two file systems. Older versions use FAT (either FAT16 or FAT32) and newer versions (since Windows 2000) use primarily NTFS. Both file systems were introduced briefly earlier in this book, so you should have some basic understanding of how they function. In both file systems, a table is used to map files to specific clusters where they are stored.
FAT
In FAT16 and FAT32, the table used to store cluster/file information is the File Allocation Table—thus the name of the file system. The File Allocation Table (FAT) is just a list of entries that map to each cluster on the partition. Each entry records one of five things:
• The cluster number of the next cluster for this file. If the file occupies more than one cluster, it is important to know where the next cluster is.
• If this cluster is the end of a chain of clusters in a file, it must be marked with an end of chain (EOC) character.
• Bad clusters are marked in FAT so they don’t get used.
• Reserved clusters have a special entry in the File Allocation Table.
• Finally, any clusters that are open and available are marked.
When a file is deleted, the data is not actually removed from the drive. The bits are still there on the disk. All that happens is that the File Allocation Table is updated to reflect that those clusters are now available for use. If new information is saved to the drive, it may be saved to those clusters, or it may not. It also is possible that the old, deleted file occupied more clusters than the new file; thus, the deleted file was only partially overwritten, and a fragment remains. For forensic analysis, this means that the more recently a file was deleted, the more likely you will be to recover the file. Over time, it becomes more likely that those clusters have had other data saved in them and less likely that you will be able to recover data. In fact, the cluster may have been deleted and saved over several times.
NTFS
Starting with Windows 2000 through the current (as of this writing) Windows 8 and Windows Server 2012, NTFS is the preferred file system for Windows operating systems. NFTS is an acronym for New Technology File System. Two files in NTFS are related to locating files/clusters. These are the MFT (Master File Table; some sources call it the Meta File Table) file and the cluster bitmap. The MFT describes all files on the disk, including filenames, timestamps, security identifiers, and file attributes such as “read only,” “compressed,” “encrypted,” etc. There is one record in the MFT for each file or folder on the drive. The MFT is analogous to the File Allocation Table in FAT and FAT32. The cluster bitmap file is a map of all the clusters on the hard drive. This is an array of bit entries, where each bit indicates whether its corresponding cluster is allocated/used or free/unused.
When files are deleted from an NTFS system, the process is similar to what occurs in FAT. However, there is one difference. Before the cluster is marked as available, it is first marked as deleted, which effectively moves it to the Recycle Bin. Before Windows Vista, the Recycle Bin resided in a hidden directory called RECYCLER. In Vista and beyond, the name of the directory has changed to $Recycle.bin. Only when you empty the Recycle Bin is the cluster marked as fully available.
EXAM TIP The test won’t ask you about what tools to use; we discuss those later for your practical use. However, the test will ask you why files can be recovered, and the preceding section is critical information in that regard.
Windows Tools
A number of tools are available to recover deleted files from Windows computers. In this section, you will be introduced to several of these tools. Most are easy to use and either free or very low cost. You can also simply do a web search on “Windows undelete” and find a number of tools that way.
DiskDigger
DiskDigger is a widely used tool that is quite easy to use. It’s available at http://diskdigger.org/. It can be downloaded for free and is fully functional. When recovering files with the free version, you will have to recover one at a time; the commercial version allows you to recover multiple files at once. When you launch the program, you will see a screen like the one shown in Figure 6-4.

Figure 6-4 DiskDigger main screen
You just select the drive or partition you wish to recover deleted files from and select Dig Deep or Dig Deeper, as shown in Figure 6-5. The difference is that Dig Deeper takes longer, but does a more thorough job of file recovery.

Figure 6-5 DiskDigger − Dig Deeper
Once the file recovery process is complete, DiskDigger presents you with a list of files it found, as shown in Figure 6-6. You then select the file(s) you wish to recover.
Once recovery is done, you will see a screen like the one shown in Figure 6-6. You can select any file and recover it. The files are color coded. A green dot by a file means the file can be recovered in its entirety, red means there is a problem (you likely won’t recover any of the file), and gray indicates a partial recovery is possible. As you can see, this is a very easy-to-use tool.

Figure 6-6 DiskDigger results
WinUndelete
WinUndelete can be downloaded from www.winundelete.com/download.asp. The program begins by launching a wizard that will guide you through file recovery. Step 1 is shown in Figure 6-7.

Figure 6-7 WinUndelete Step 1
One of the things I like best about this tool can be seen in Step 2, shown in Figure 6-8. In Step 2, you can direct WinUndelete to simply scan for certain file types. This can speed up the search, particularly if you know what you are looking for.

Figure 6-8 WinUndelete Step 2
When it has finished running the recovery process, the files will be placed in a folder for you to view.
NTFS Undelete
This is another easy-to-use tool for Windows undeletion. You can download it from http://ntfsundelete.com/download. Simply select the partition you wish to run NTFS Undelete on and then click the Start Scan button, as shown in Figure 6-9.
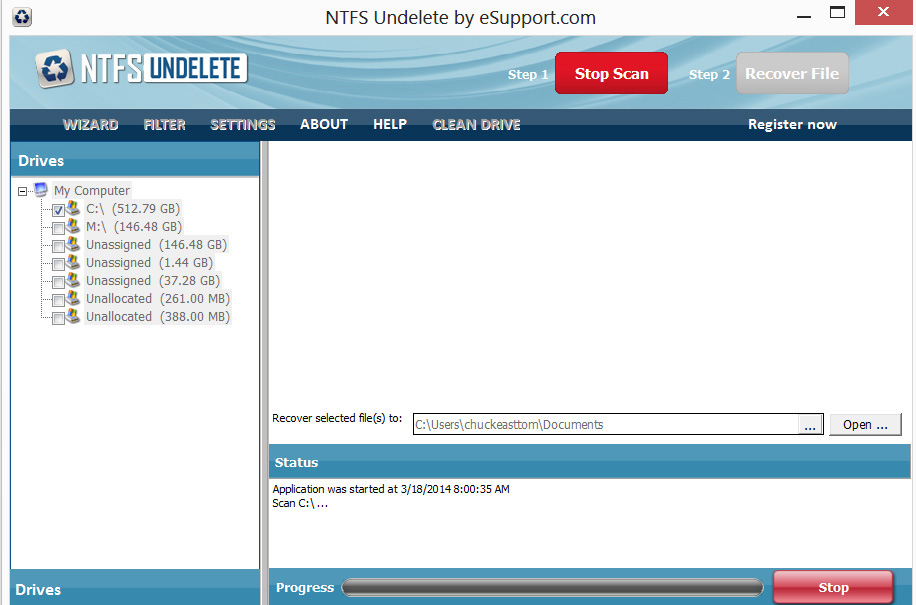
Figure 6-9 NFTS Undelete
When the scan is done, NTFS Undelete will present its results, as shown in Figure 6-10. You simply select the file you want to recover, and click the Recover File button.
Figure 6-10 NTFS Undelete results
Scrubbing Files
Many people believe the Department of Defense recommends overwriting data seven times to ensure it is completely deleted. The actual standard is DOD 5220.22-M. However, the DoD standard does not have a set recommendation of seven passes to securely delete. Instead, the DoD recommends a matrix of how to sanitize different types of media.9 If one follows this matrix, the data will be unrecoverable by undelete techniques. The seven times rule is, however, a good rule of thumb.
Linux
Files can be undeleted in Linux, just like in Windows. The file storage is a bit different. First, consider how Linux stores files. The content of files is stored in contiguous blocks. The exact size of these blocks depends on the parameters used when the partition was created. The blocks are analogous to clusters in Windows and normally have sizes of 1,024, 2,048, or 4,096 bytes. You can think of these blocks as something similar to the clusters in NTFS, though they are not exactly the same thing, just a related concept. The specific block size is stored in the superblock. The entire partition is divided into an integral number of blocks, starting at zero.
The blocks are divided into groups. Each group uses one block as a bitmap to keep track of which block inside that group is allocated (used). So the group has a block for tracking other blocks’ status. Another block is used as a bitmap for the number of allocated inodes. An inode is a data structure in the file system that stores information about a file—for example, file size, location, last time accessed, etc.
An inode can refer to a file or a folder/directory. In either case, the inode is really a link to the file. This is important because there are basically two types of links. The first type is the hard link . A hard link is an inode that links directly to a specific file. The operating system keeps a count of references to this link. When the reference count reaches zero, the file is deleted. In other words, you can have any number of names referencing a file, but if that number of references reaches zero (i.e., there is no name that references that file), then the file is deleted.
The second type of file link is called a soft link or symbolic link . In this case, the link is not actually a file itself, but rather a pointer to another file or directory. You can think of this as the same thing as a shortcut, such as you might find in Windows.
Unlike Windows, Linux also has some built-in commands that can be used to undelete files, and there are also some tools that can be used. We will examine both. Remember that Linux can run on multiple file systems, including EXT, ReiserFS, FAT, and others, but EXT—specifically EXT3 and EXT 4—are the most common.
Manual
You can use some commands built into Linux to recover files. Unfortunately, some of these may vary from one Linux distribution to another, but the steps given here will work on a wide variety of Linux distributions.
The first step is to move the system to single-user mode using the init command:
init 1
Linux Run Levels
If you are not familiar with the init command, Linux uses this to initialize different run levels. A run level determines what level the operating system is running, as shown in this table:

The Linux/Unix command grep can be used to search for files, and even the contents of files. The grep command is very popular, and frankly, if you are working with Linux at all, you are probably already familiar with it. Here is a generic example of searching for a file on a partition:
![]()
NOTE A few grep flags of use in these searches:
-i: Ignore case.
-B: Print number lines/size of leading context before matching lines.
-A: Print number lines/size of trailing context after matching lines.
To recover a text file starting with the word “mypic” on /dev/sda1, you can try the following command:
![]()
What is happening in this command is that grep is searching for this phrase, ignoring case (thus, the -i), looking through binary files, even if they are deleted, and finding any with the name “mypic” anywhere in them. If found, they are sent to output.txt.
ExtUndelete
This tool works with both EXT3 and EXT4 partitions. You can download it from http://extundelete.sourceforge.net/. This product uses some rather simple shell commands. For example, if you want to restore all deleted files from the sda1 partition, use this command:
![]()
The website documents all the various options you can utilize with this tool.
Macintosh
With the advent of OS X, Macintosh is actually based on FreeBSD, which is a Unix clone, much like Linux. In fact, if you go to a terminal window in Mac OSX, what you see is a shell where you can run Unix commands. This means that some of the techniques that work for Linux will also work with Macintosh. Again, some tools will help automate this process for you.
MacKeeper
This is a Macintosh file recovery tool available from http://mackeeper.zeobit.com/recover-deleted-files-on-mac. There is a free, fully functional trial version, and it is relatively easy to use. Open MacKeeper and select the volume you want to search for deleted files on; then select Scan. Then select Undelete. That’s all there is to it.
Certainly, other tools can recover deleted Macintosh files as well. You should experiment with various tools and find the one(s) that are most useful for you. As always, you should be comfortable with a given operating system before attempting forensic analysis of it.
Encrypted Files
Many tools can be used to encrypt files and hard drives. Windows has the Encrypting File System that started with the use of NTFS with Windows 2000.10 We will dive into the details of how cryptography works, including actual algorithms used, later in this book, but in this section, you will be introduced to some file and drive encryption tools.
EFS
Since Windows 2000, Microsoft has implemented the Encrypting File System (EFS) as part of the NTFS file system. This provides a simple way to encrypt and decrypt files or folders. Simply right-click a file, choose Properties, then choose Advanced, and select Encrypt, as shown in Figure 6-11.

Figure 6-11 EFS
The file or folder will now appear in green lettering in Windows Explorer. The key is tied to the user name and password, so when that user logs in, the file or folder will open normally, but will not open for other uses.
If your hard drive crashes and you restore a backup with EFS-encrypted files to a new drive, even if you create the exact same user name and password, the EFS files won’t open. This is why you need to back up your EFS key and store it in a safe place. The steps are simple:11
• In the search box, type Command Prompt, and then, in the list of results, click Command Prompt.
• Insert the removable media that you’re using to store your certificate.
• Navigate to the directory on the removable media drive where you want to store the recovery certificate by typing the drive letter and then pressing ENTER.
• Type cipher /r:file name (where “file name” is the name that you want to give to the recovery certificate), and then press ENTER. If you’re prompted for an administrator password or confirmation, type the password or provide confirmation.
To restore the key:
• Insert the removable media that contains your recovery certificate.
• Click the Start button. In the search box, type secpol.msc, and then press ENTER. If you’re prompted for an administrator password or confirmation, type the password or provide confirmation.
• In the left pane, double-click Public Key Policies, right-click Encrypting File System, and then click Add Data Recovery Agent. This opens the Add Recovery Agent wizard.
• Click Next, and then navigate to your recovery certificate.
• Click the certificate, and then click Open.
• When you are asked if you want to install the certificate, click Yes, click Next, and then click Finish.
• Open the Command Prompt window by clicking the Start button. In the search box, type Command Prompt, and then, in the list of results, click Command Prompt.
• At the command prompt, type gpupdate, and then press ENTER.
TrueCrypt
TrueCrypt is a free, open-source product that is available for Windows, Linux, or Macintosh and utilizes 256-bit AES encryption.12 It allows you to encrypt volumes, partitions, or entire disks. When you first install the program, it will prompt you to view a tutorial. The interface is reasonably simple, and can be seen in Figure 6-12.

Figure 6-12 TrueCrypt
How to Deal with Encrypted Drives and Files
Later in this book, we will discuss cryptography in some depth, including cryptanalysis. The fact is that, unlike what you see in television dramas, it is very difficult to “break” the cryptography of a drive, file, or partition. You may be able to guess the passcode, but if it is encrypted properly, you simply won’t break the encryption. It is also a good idea to learn as much as you can about the person who encrypted the drive or file. There may be a passphrase that is related to them. For example, a fan of Star Trek might use NCC 1701 as a passcode. Another avenue is to see if you can retrieve any other passwords the user has, for example an email password. People frequently reuse the same password in different environments. If none of these work, you can attempt to use the cryptanalysis techniques we discuss in Chapter 7, but as you will see their efficacy is not always practical to use.
Chapter Review
In this chapter, we have discussed the details of hard drives and operating systems. These concepts are key to forensics. The CCFP exam will only touch on these topics briefly, but you will use them throughout your career. We delved a bit deeper into operating system specifics, and you learned about swap files, hidden files, and slack space, all of which are covered on the CCFP exam. We also discussed how to recover deleted files. You will need to understand these principles for the CCFP, although specific tools won’t be covered.
Questions
1. When a Windows 8 machine is shut down, what happens to the data in the swap file?
A. It is lost when the power supply ends.
B. It is on the hard drive and can be viewed with a hex editor.
C. It is automatically deleted.
D. It is stored in the registry.
2. What happens when a file is sent to the Recycle Bin in NTFS?
A. The file is deleted.
B. The file is removed from the File Allocation Table.
C. The cluster is marked as deleted in the MFT.
D. The cluster is marked as available.
3. When a file is saved to an NTFS partition and it occupies less than an entire cluster, what is done with the remaining space?
A. It is unused.
B. It is available for other files.
C. It is reclaimed by the operating system.
D. It is treated as used.
4. Which RAID level uses disk striping with distributed parity?
A. 1
B. 2
C. 3
D. 5
5. How many times should you overwrite a cluster to ensure the file(s) are truly deleted?
A. 3
B. 7
C. 10
D. 43
Answers
1. B. The swap file is literally a file on the hard drive (modern Windows systems have it as pagefile.sys) and can be viewed with a hex editor.
2. C. The cluster is marked as deleted in the MFT. When the Recycle Bin is emptied, the cluster will be marked as available.
3. A. If a file takes up less than the full cluster, the remaining space cannot be used by other files.
4. D. RAID 5 is disk striping with distributed parity. RAID 3 is disk striping with dedicated parity. RAID 1 is disk mirroring.
5. B. A good rule of thumb is to overwrite seven times.
References
2. http://www.osforensics.com/faqs-and-tutorials/hidden-partitions-drive.html.
3. http://www.pcmag.com/encyclopedia/term/56995/slack-space.
4. http://www.giac.org/paper/gsec/3133/introduction-hiding-finding-data-linux/105105.
5. http://www.sleuthkit.org/autopsy/help/grep_lim.html.
6. http://digital-forensics.sans.org/blog/2009/06/18/forensics-101-acquiring-an-image-with-ftk-imager/.
7. http://encasefinal.blogspot.com/2010/12/how-to-acquire-raids-encase.html.
8. http://msdn.microsoft.com/en-us/library/ff818516(v=vs.85).aspx.
9. http://recycleyourmedia.com/webuytape/compliance/d-o-d-data-sanitization-matrix/.
10. http://windows.microsoft.com/en-us/windows/what-is-encrypting-file-system.
11. http://windows.microsoft.com/en-us/windows/back-up-efs-certificate#1TC=windows-7.