C# allows you to execute code in parallel through multithreading.
A thread is analogous to the operating system process in which your application runs. Just as processes run in parallel on a computer, threads run in parallel within a single process. Processes are fully isolated from each other; threads have just a limited degree of isolation. In particular, threads share (heap) memory with other threads running in the same application. This, in part, is why threading is useful: one thread can fetch data in the background, for instance, while another thread can display the data as it arrives.
This chapter describes the language and Framework features for
creating, configuring, and communicating with threads, and how to
coordinate their actions through locking and signaling. It also covers the
basic predefined types that assist threading, such as BackgroundWorker and the Timer classes.
Multithreading has many uses; here are the most common:
- Maintaining a responsive user interface
By running time-consuming tasks on a parallel “worker” thread, the main UI thread is free to continue processing keyboard and mouse events.
- Making efficient use of an otherwise blocked CPU
Multithreading is useful when a thread is awaiting a response from another computer or piece of hardware. While one thread is blocked while performing the task, other threads can take advantage of the otherwise unburdened computer.
- Parallel programming
Code that performs intensive calculations can execute faster on multicore or multiprocessor computers if the workload is shared among multiple threads in a “divide-and-conquer” strategy (the following chapter is dedicated to this).
- Speculative execution
On multicore machines, you can sometimes improve performance by predicting something that might need to be done, and then doing it ahead of time. LINQPad uses this technique to speed up the creation of new queries. A variation is to run a number of different algorithms in parallel that all solve the same task. Whichever one finishes first “wins”—this is effective when you can’t know ahead of time which algorithm will execute fastest.
- Allowing requests to be processed simultaneously
On a server, client requests can arrive concurrently and so need to be handled in parallel (the .NET Framework creates threads for this automatically if you use ASP.NET, WCF, Web Services, or Remoting). This can also be useful on a client (e.g., handling peer-to-peer networking—or even multiple requests from the user).
With technologies such as ASP.NET and WCF, you may be unaware that multithreading is even taking place—unless you access shared data (perhaps via static fields) without appropriate locking, running afoul of thread safety.
Threads also come with strings attached. The biggest is that multithreading can increase complexity. Having lots of threads does not in and of itself create much complexity; it’s the interaction between threads (typically via shared data) that does. This applies whether or not the interaction is intentional, and can cause long development cycles and an ongoing susceptibility to intermittent and nonreproducible bugs. For this reason, it pays to keep interaction to a minimum, and to stick to simple and proven designs wherever possible. This chapter focuses largely on dealing with just these complexities; remove the interaction and there’s much less to say!
Note
A good strategy is to encapsulate multithreading logic into reusable classes that can be independently examined and tested. The Framework itself offers many higher-level threading constructs, which we cover in this and the following chapter.
Threading also incurs a resource and CPU cost in scheduling and switching threads (when there are more active threads than CPU cores)—and there’s also a creation/tear-down cost. Multithreading will not always speed up your application—it can even slow it down if used excessively or inappropriately. For example, when heavy disk I/O is involved, it can be faster to have a couple of worker threads run tasks in sequence than to have 10 threads executing at once. (In Signaling with Wait and Pulse, we describe how to implement a producer/consumer queue, which provides just this functionality.)
A client program (Console, WPF, or Windows Forms) starts in a single thread that’s created automatically by the CLR and operating system (the “main” thread). Here it lives out its life as a single-threaded application, unless you do otherwise, by creating more threads (directly or indirectly).[13]
You can create and start a new thread by instantiating a Thread object and calling its Start method. The simplest constructor for
Thread takes a ThreadStart delegate: a parameterless method
indicating where execution should begin. For example, see the code
listing following the note.
class ThreadTest
{
static void Main()
{
Thread t = new Thread (WriteY); // Kick off a new thread
t.Start(); // running WriteY()
// Simultaneously, do something on the main thread.
for (int i = 0; i < 1000; i++) Console.Write ("x");
}
static void WriteY()
{
for (int i = 0; i < 1000; i++) Console.Write ("y");
}
}
// Output:
xxxxxxxxxxxxxxxxyyyyyyyyyyyyyyyyyyyyyyyyyyyyyyyyyyyyy
xxxxxxxxxxxxxxxxxxxxxxxxxxxxxxxxxxxxxxxxyyyyyyyyyyyyy
yyyyyyyyyyyyyyyyyyyyyyyyyyyyyyyxxxxxxxxxxxxxxxxxxxxxx
xxxxxxxxxxxxxxxxxxxxxxyyyyyyyyyyyyyyyyyyyyyyyyyyyyyyy
yyyyyyyyyyyyyxxxxxxxxxxxxxxxxxxxxxxxxxxxxxxxxxxxxxxxx
...The main thread creates a new thread t on which it runs a method that repeatedly
prints the character “y”. Simultaneously, the main thread repeatedly
prints the character “x”, as shown in Figure 21-1. On a single-core computer, the
operating system must allocate “slices” of time to each thread
(typically 20 ms in Windows) to simulate concurrency, resulting in
repeated blocks of “x” and “y”. On a multicore or multiprocessor
machine, the two threads can genuinely execute in parallel (subject to
competition by other active processes on the computer), although you
still get repeated blocks of “x” and “y” because of subtleties in the
mechanism by which Console handles
concurrent requests.

Note
A thread is said to be preempted at the points where its execution is interspersed with the execution of code on another thread. The term often crops up in explaining why something has gone wrong!
Once started, a thread’s IsAlive property returns true, until the point where the thread ends. A
thread ends when the delegate passed to the Thread’s constructor finishes executing. Once
ended, a thread cannot restart.
You can wait for another thread to end by calling its Join method. Here’s an example:
static void Main()
{
Thread t = new Thread (Go);
t.Start();
t.Join();
Console.WriteLine ("Thread t has ended!");
}
static void Go() { for (int i = 0; i < 1000; i++) Console.Write ("y"); }This prints “y” 1,000 times, followed by “Thread t has ended!”
immediately afterward. You can include a timeout when calling Join, either in milliseconds or as a TimeSpan. It then returns
true if the thread ended or false if it timed out.
Thread.Sleep pauses the current thread for a
specified period:
Thread.Sleep (TimeSpan.FromHours (1)); // sleep for 1 hour Thread.Sleep (500); // sleep for 500 milliseconds
Note
While a thread waits during a Sleep or Join, it’s said to be blocked. We describe blocking in more detail
in Synchronization.
Thread.Sleep(0) relinquishes
the thread’s current time slice immediately, voluntarily handing over
the CPU to other threads. Framework 4.0’s new Thread.Yield() method does the same
thing—except that it relinquishes only to threads running on the
same processor.
Note
Sleep(0) or Yield is occasionally useful in production
code for advanced performance tweaks. It’s also an excellent
diagnostic tool for helping to uncover thread safety issues: if
inserting Thread.Yield() anywhere
in your code makes or breaks the program, you almost certainly have a
bug.
Each thread has a Name property
that you can set for the benefit of debugging. This is particularly
useful in Visual Studio, since the thread’s name is displayed in the
Threads Window and Debug Location toolbar. You can set a thread’s name
just once; attempts to change it later will throw an exception.
The static Thread.CurrentThread
property gives you the currently executing thread:
Console.WriteLine (Thread.CurrentThread.Name);
The easiest way to pass arguments to a thread’s target method is to execute a lambda expression that calls the method with the desired arguments:
static void Main()
{
Thread t = new Thread ( () => Print ("Hello from t!") );
t.Start();
}
static void Print (string message) { Console.WriteLine (message); }With this approach, you can pass in any number of arguments to the method. You can even wrap the entire implementation in a multistatement lambda:
new Thread (() =>
{
Console.WriteLine ("I'm running on another thread!");
Console.WriteLine ("This is so easy!");
}).Start();You can do the same thing almost as easily in C# 2.0 with anonymous methods:
new Thread (delegate()
{
...
}).Start();Another technique is to pass an argument into Thread’s Start method:
static void Main()
{
Thread t = new Thread (Print);
t.Start ("Hello from t!");
}
static void Print (object messageObj)
{
string message = (string) messageObj; // We need to cast here
Console.WriteLine (message);
}This works because Thread’s
constructor is overloaded to accept either of two delegates:
public delegate void ThreadStart(); public delegate void ParameterizedThreadStart (object obj);
The limitation of ParameterizedThreadStart is that it accepts
only one argument. And because it’s of type object, it usually needs to be cast.
As we saw, a lambda expression is the most powerful way to pass data to a thread. However, you must be careful about accidentally modifying captured variables after starting the thread. For instance, consider the following:
for (int i = 0; i < 10; i++) new Thread (() => Console.Write (i)).Start();
The output is nondeterministic! Here’s a typical result:
0223557799
The problem is that the i
variable refers to the same memory location
throughout the loop’s lifetime. Therefore, each thread calls
Console.Write on a variable whose
value may change as it is running! The solution is to use a
temporary variable as follows:
for (int i = 0; i < 10; i++)
{
int temp = i;
new Thread (() => Console.Write (temp)).Start();
}Note
This is analogous to the problem we described in Captured Variables in Chapter 8. The problem is less about
multithreading and more about C#’s rules for capturing variables
(which are somewhat undesirable in the case of for and foreach loops).
Variable temp is now local
to each loop iteration. Therefore, each thread captures a different
memory location and there’s no problem. We can illustrate the
problem in the earlier code more simply with the following
example:
string text = "t1"; Thread t1 = new Thread ( () => Console.WriteLine (text) ); text = "t2"; Thread t2 = new Thread ( () => Console.WriteLine (text) ); t1.Start(); t2.Start();
t2 t2
The preceding example demonstrated that captured variables are shared between threads. Let’s take a step back and examine what happens with local variables in the simpler case where no lambda expressions or anonymous methods are involved. Consider this program:
static void Main()
{
new Thread (Go).Start(); // Call Go() on a new thread
Go(); // Call Go() on the main thread
}
static void Go()
{
// Declare and use a local variable - 'cycles'
for (int cycles = 0; cycles < 5; cycles++) Console.Write (cycles);
}
// OUTPUT: 0123401234Each thread gets a separate copy of the cycles variable as it enters the Go method and so is unable to interfere with
another concurrent thread. The CLR and operating system achieve this
by assigning each thread its own private memory stack for local
variables.
If threads do want to share data, they do so via a common reference. This can be a captured variable as we saw previously—but much more often it’s a field. Here’s an example:
static void Main()
{
Introducer intro = new Introducer();
intro.Message = "Hello";
var t = new Thread (intro.Run);
t.Start(); t.Join();
Console.WriteLine (intro.Reply);
}
class Introducer
{
public string Message;
public string Reply;
public void Run()
{
Console.WriteLine (Message);
Reply = "Hi right back!";
}
}
// Output:
Hello
Hi right back!Shared fields allow both for passing data to a new thread and for receiving data back from it later on. Moreover, they allow threads to communicate with each other as they’re running. Shared fields can be either instance or static.
Warning
Shared data is the primary cause of complexity and obscure errors in multithreading. Although often essential, it pays to keep it as simple as possible. Sometimes it’s possible to avoid shared state altogether—in which case, you entirely avoid the complexities and overhead of synchronization (which we’ll describe later).
By default, threads you create explicitly are foreground threads. Foreground threads keep the application alive for as long as any one of them is running, whereas background threads do not. Once all foreground threads finish, the application ends, and any background threads still running abruptly terminate.
Note
A thread’s foreground/background status has no relation to its priority or allocation of execution time.
You can query or change a thread’s background status using its
IsBackground property. Here’s an
example:
class PriorityTest
{
static void Main (string[] args)
{
Thread worker = new Thread ( () => Console.ReadLine() );
if (args.Length > 0) worker.IsBackground = true;
worker.Start();
}
}If this program is called with no arguments, the worker thread
assumes foreground status and will wait on the ReadLine statement for the user to press
Enter. Meanwhile, the main thread exits, but the application keeps
running because a foreground thread is still alive.
On the other hand, if an argument is passed to Main(), the worker is assigned background
status, and the program exits almost immediately as the main thread
ends (terminating the ReadLine).
When a process terminates in this manner, any finally blocks in the execution stack of
background threads are circumvented. This is a problem if your program
employs finally (or using) blocks to perform cleanup work such
as releasing resources or deleting temporary files. To avoid this, you
can explicitly wait out such background threads upon exiting an
application. There are two ways to accomplish this:
If you’ve created the thread yourself, call
Joinon the thread.If you’re on a pooled thread (see Thread Pooling) use an event wait handle (see Signaling with Event Wait Handles).
In either case, you should specify a timeout, so you can abandon a renegade thread should it refuse to finish for some reason. This is your backup exit strategy: in the end, you want your application to close—without the user having to enlist help from the Task Manager!
Note
If a user uses the Task Manager to forcibly end a .NET process, all threads “drop dead” as though they were background threads. This is observed rather than documented behavior, and it could vary depending on the CLR and operating system version.
Foreground threads don’t require this treatment, but you must take care to avoid bugs that could cause the thread not to end. A common cause for applications failing to exit properly is the presence of active foreground threads.
A thread’s Priority property
determines how much execution time it gets relative to other active
threads in the operating system, on the following scale:
enum ThreadPriority { Lowest, BelowNormal, Normal, AboveNormal, Highest }This becomes relevant only when multiple threads are simultaneously active.
Warning
Think carefully before elevating a thread’s priority—it can lead to problems such as resource starvation for other threads.
Elevating a thread’s priority doesn’t make it capable of
performing real-time work,
because it’s still throttled by the application’s process
priority. To perform real-time work, you must also elevate the process
priority using the Process class in
System.Diagnostics (we didn’t tell you
how to do this):
using (Process p = Process.GetCurrentProcess()) p.PriorityClass = ProcessPriorityClass.High;
ProcessPriorityClass.High is
actually one notch short of the highest priority: Realtime. Setting a
process priority to Realtime
instructs the OS that you never want the process to yield CPU time to
another process. If your program enters an accidental infinite loop,
you might find even the operating system locked out, with nothing
short of the power button left to rescue you! For this reason,
High is usually the best choice for
real-time applications.
Warning
If your real-time application has a user interface, elevating the process priority gives screen updates excessive CPU time, slowing down the entire computer (particularly if the UI is complex). Lowering the main thread’s priority in conjunction with raising the process’s priority ensures that the real-time thread doesn’t get preempted by screen redraws, but doesn’t solve the problem of starving other applications of CPU time, because the operating system will still allocate disproportionate resources to the process as a whole. An ideal solution is to have the real-time worker and user interface run as separate applications with different process priorities, communicating via Remoting or memory-mapped files. Memory-mapped files are ideally suited to this task; we explain how they work in Chapters 14 and 25.
Even with an elevated process priority, there’s a limit to the suitability of the managed environment in handling hard real-time requirements. In Chapter 12, we described the issues of garbage collection and the workarounds. Further, the operating system may present additional challenges—even for unmanaged applications—that are best solved with dedicated hardware or a specialized real-time platform.
Any try/catch/finally blocks in scope when a thread is created are of no
relevance to the thread when it starts executing. Consider the
following program:
public static void Main()
{
try
{
new Thread (Go).Start();
}
catch (Exception ex)
{
// We'll never get here!
Console.WriteLine ("Exception!");
}
}
static void Go() { throw null; } // Throws a NullReferenceExceptionThe try/catch statement in this example is
ineffective, and the newly created thread will be encumbered with an
unhandled NullReferenceException.
This behavior makes sense when you consider that each thread has an
independent execution path.
The remedy is to move the exception handler into the Go method:
public static void Main()
{
new Thread (Go).Start();
}
static void Go()
{
try
{
...
throw null; // The NullReferenceException will get caught below
...
}
catch (Exception ex)
{
Typically log the exception, and/or signal another thread
that we've come unstuck
...
}
}You need an exception handler on all thread entry methods in production applications—just as you do (usually at a higher level, in the execution stack) on your main thread. An unhandled exception causes the whole application to shut down. With an ugly dialog!
Note
In writing such exception handling blocks, rarely would you ignore the error: typically, you’d log the details of the exception, and then perhaps display a dialog allowing the user to automatically submit those details to your web server. You then might shut down the application—because it’s possible that the error corrupted the program’s state. However, the cost of doing so is that the user will lose his recent work—open documents, for instance.
Warning
The “global” exception handling events for WPF and Windows
Forms applications (Application.DispatcherUnhandledException
and Application.ThreadException)
fire only for exceptions thrown on the main UI thread. You still
must handle exceptions on worker threads manually.
AppDomain.CurrentDomain.UnhandledException
fires on any unhandled exception, but provides no means of
preventing the application from shutting down afterward.
There are, however, some cases where you don’t need to handle exceptions on a worker thread, because the .NET Framework does it for you. These are covered in upcoming sections, and are:
Whenever you start a thread, a few hundred microseconds are spent organizing such things as a fresh private local variable stack. Each thread also consumes (by default) around 1 MB of memory. The thread pool cuts these overheads by sharing and recycling threads, allowing multithreading to be applied at a very granular level without a performance penalty. This is useful when leveraging multicore processors to execute computationally intensive code in parallel in “divide-and-conquer” style.
The thread pool also keeps a lid on the total number of worker threads it will run simultaneously. Too many active threads throttle the operating system with administrative burden and render CPU caches ineffective. Once a limit is reached, jobs queue up and start only when another finishes. This makes arbitrarily concurrent applications possible, such as a web server. (The asynchronous method pattern takes this further by making highly efficient use of the pooled threads; see Chapter 23.)
There are a number of ways to enter the thread pool:
Via the Task Parallel Library or PLINQ (from Framework 4.0)
By calling
ThreadPool.QueueUserWorkItemVia asynchronous delegates
Via
BackgroundWorker
Note
The following constructs use the thread pool indirectly:
WCF, Remoting, ASP.NET, and ASMX Web Services application servers
System.Timers.TimerandSystem.Threading.TimerFramework methods that end in Async, such as those on
WebClient(the event-based asynchronous pattern), and mostBeginXXXmethods (the asynchronous programming model pattern)
The Task Parallel Library (TPL) and PLINQ are sufficiently powerful and high-level that
you’ll want to use them to assist in multithreading even when thread
pooling is unimportant. We discuss this fully in the following chapter.
Right now, we’ll look briefly at how you can use the Task class as a simple means of running a
delegate on a pooled thread.
Note
There are a few things to be wary of when using pooled threads:
You cannot set the
Nameof a pooled thread, making debugging more difficult (although you can attach a description when debugging in Visual Studio’s Threads window).Pooled threads are always background threads (this is usually not a problem).
Blocking a pooled thread may trigger additional latency in the early life of an application unless you call
ThreadPool.SetMinThreads(see the section Optimizing the Thread Pool).
You are free to change the priority of a pooled thread—it will be restored to normal when released back to the pool.
You can query if you’re currently executing on a pooled thread via
the property Thread.CurrentThread.IsThreadPoolThread.
You can enter the thread pool easily using the Task classes in the Task Parallel Library.
These were introduced in Framework 4.0: if you’re familiar with the
older constructs, consider the nongeneric Task class a replacement for ThreadPool.QueueUserWorkItem, and the
generic Task<TResult> a
replacement for asynchronous delegates. The newer constructs are
faster, more convenient, and more flexible than the old.
To use the nongeneric Task
class, call Task.Factory.StartNew,
passing in a delegate of the target method:
static void Main() // The Task class is in System.Threading.Tasks
{
Task.Factory.StartNew (Go);
}
static void Go()
{
Console.WriteLine ("Hello from the thread pool!");
}Task.Factory.StartNew returns
a Task object, which you can then
use to monitor the task—for instance, you can wait for it to complete
by calling its Wait method.
Note
Any unhandled exceptions are conveniently rethrown onto the
host thread when you call a task’s Wait method. (If you don’t call Wait and abandon the task, an unhandled
exception will shut down the process, as with an ordinary
thread.)
The generic Task<TResult> class is a subclass of
the nongeneric Task. It lets you
get a return value back from the task after it finishes executing. In
the following example, we download a web page using Task<TResult>:
static void Main()
{
// Start the task executing:
Task<string> task = Task.Factory.StartNew<string>
( () => DownloadString ("http://www.linqpad.net") );
// We can do other work here and it will execute in parallel:
RunSomeOtherMethod();
// When we need the task's return value, we query its Result property:
// If it's still executing, the current thread will now block (wait)
// until the task finishes:
string result = task.Result;
}
static string DownloadString (string uri)
{
using (var wc = new System.Net.WebClient())
return wc.DownloadString (uri);
}(The <string> type
argument in boldface is for clarity: it would be
inferred if we omitted it.)
Any unhandled exceptions are automatically rethrown when you
query the task’s Result property,
wrapped in an AggregateException.
However, if you fail to query its Result property (and don’t call Wait), any unhandled exception will take the
process down.
The Task Parallel Library has many more features, and is particularly well suited to leveraging multicore processors. We’ll resume our discussion of TPL in the following chapter.
You can’t use the Task Parallel Library if you’re targeting
an earlier version of the .NET Framework (prior to 4.0). Instead, you
must use one of the older constructs for entering the thread pool:
ThreadPool.QueueUserWorkItem and
asynchronous delegates. The difference between the two is that
asynchronous delegates let you return data from the thread.
Asynchronous delegates also marshal any exception back to the
caller.
To use QueueUserWorkItem,
simply call this method with a delegate that you want to run
on a pooled thread:
static void Main()
{
ThreadPool.QueueUserWorkItem (Go);
ThreadPool.QueueUserWorkItem (Go, 123);
Console.ReadLine();
}
static void Go (object data) // data will be null with the first call.
{
Console.WriteLine ("Hello from the thread pool! " + data);
}
// Output:
Hello from the thread pool!
Hello from the thread pool! 123Our target method, Go, must
accept a single object argument
(to satisfy the WaitCallback delegate). This provides
a convenient way of passing data to the method, just like with
ParameterizedThreadStart. Unlike
with Task, QueueUserWorkItem doesn’t return an object
to help you subsequently manage execution. Also, you must explicitly
deal with exceptions in the target code—unhandled exceptions will
take down the program.
ThreadPool.QueueUserWorkItem doesn’t provide an easy mechanism for getting return
values back from a thread after it has finished executing.
Asynchronous delegate invocations (asynchronous delegates for short)
solve this, allowing any number of typed arguments to be passed in
both directions. Furthermore, unhandled exceptions on asynchronous
delegates are conveniently rethrown on the original thread (or more
accurately, the thread that calls EndInvoke), and so they don’t need
explicit handling.
Warning
Don’t confuse asynchronous delegates with asynchronous
methods (methods starting with Begin or
End, such as File.BeginRead/File.EndRead). Asynchronous methods
follow a similar protocol outwardly, but they exist to solve a
much more difficult problem, which we describe in Chapter 23.
Here’s how you start a worker task via an asynchronous delegate:
Instantiate a delegate targeting the method you want to run in parallel (typically one of the predefined
Funcdelegates).Call
BeginInvokeon the delegate, saving itsIAsyncResultreturn value.BeginInvokereturns immediately to the caller. You can then perform other activities while the pooled thread is working.When you need the results, call
EndInvokeon the delegate, passing in the savedIAsyncResultobject.
In the following example, we use an asynchronous delegate invocation to execute concurrently with the main thread, a simple method that returns a string’s length:
static void Main()
{
Func<string, int> method = Work;
IAsyncResult cookie = method.BeginInvoke ("test", null, null);
//
// ... here's where we can do other work in parallel...
//
int result = method.EndInvoke (cookie);
Console.WriteLine ("String length is: " + result);
}
static int Work (string s) { return s.Length; }EndInvoke does three
things. First, it waits for the asynchronous delegate to finish
executing, if it hasn’t already. Second, it receives the return
value (as well as any ref or
out parameters). Third, it throws
any unhandled worker exception back to the calling thread.
Warning
If the method you’re calling with an asynchronous delegate
has no return value, you are still (technically) obliged to call
EndInvoke. In practice, this is
open to debate; there are no EndInvoke police to administer
punishment to noncompliers! If you choose not to call EndInvoke, however, you’ll need to
consider exception handling on the worker method to avoid silent
failures.
You can also specify a callback delegate when calling BeginInvoke—a method accepting an IAsyncResult object that’s automatically
called upon completion. This allows the instigating thread to
“forget” about the asynchronous delegate, but it requires a bit of
extra work at the callback end:
static void Main()
{
Func<string, int> method = Work;
method.BeginInvoke ("test", Done, method);
// ...
//
}
static int Work (string s) { return s.Length; }
static void Done (IAsyncResult cookie)
{
var target = (Func<string, int>) cookie.AsyncState;
int result = target.EndInvoke (cookie);
Console.WriteLine ("String length is: " + result);
}The final argument to BeginInvoke is a user state object that
populates the AsyncState property of IAsyncResult. It can contain anything you
like; in this case, we’re using it to pass the method delegate to the completion
callback, so we can call EndInvoke on it.
The thread pool starts out with one thread in its pool. As tasks are assigned, the pool manager “injects” new threads to cope with the extra concurrent workload, up to a maximum limit. After a sufficient period of inactivity, the pool manager may “retire” threads if it suspects that doing so will lead to better throughput.
You can set the upper limit of threads that the pool will create
by calling ThreadPool.SetMaxThreads; the defaults
are:
1023 in Framework 4.0 in a 32-bit environment
32768 in Framework 4.0 in a 64-bit environment
250 per core in Framework 3.5
25 per core in Framework 2.0
(These figures may vary according to the hardware and operating system.) The reason for there being that many is to ensure progress should some threads be blocked (idling while awaiting some condition, such as a response from a remote computer).
You can also set a lower limit by calling ThreadPool.SetMinThreads. The role of the
lower limit is subtler: it’s an advanced optimization technique that
instructs the pool manager not to delay in the
allocation of threads until reaching the lower limit. Raising the
minimum thread count improves concurrency when there are blocked
threads (see sidebar).
Note
The default lower limit is one thread per processor core—the minimum that allows full CPU utilization. On server environments, though (such ASP.NET under IIS), the lower limit is typically much higher—as much as 50 or more.
So far, we’ve described how to start a task on a thread, configure a thread, and pass data in both directions. We’ve also described how local variables are private to a thread and how references can be shared among threads, allowing them to communicate via common fields.
The next step is synchronization: coordinating the actions of threads for a predictable outcome. Synchronization is particularly important when threads access the same data; it’s surprisingly easy to run aground in this area.
Synchronization constructs can be divided into four categories:
- Simple blocking methods
These wait for another thread to finish or for a period of time to elapse.
Sleep,Join, andTask.Waitare simple blocking methods.- Locking constructs
These limit the number of threads that can perform some activity or execute a section of code at a time. Exclusive locking constructs are most common—these allow just one thread in at a time, and allow competing threads to access common data without interfering with each other. The standard exclusive locking constructs are
lock(Monitor.Enter/Monitor.Exit),Mutex, andSpinLock. The nonexclusive locking constructs areSemaphore,SemaphoreSlim, andReaderWriterLockSlim(we cover reader/writer locks later in this chapter).- Signaling constructs
These allow a thread to pause until receiving a notification from another, avoiding the need for inefficient polling. There are two commonly used signaling devices: event wait handles and
Monitor’sWait/Pulsemethods. Framework 4.0 introduces theCountdownEventandBarrierclasses.- Nonblocking synchronization constructs
These protect access to a common field by calling upon processor primitives. The CLR and C# provide the following nonblocking constructs:
Thread.MemoryBarrier,Thread.VolatileRead,Thread.VolatileWrite, thevolatilekeyword, and theInterlockedclass.
Blocking is essential to all but the last category. Let’s briefly examine this concept.
A thread is deemed blocked when its
execution is paused for some reason, such as when Sleeping or waiting for another to end via
Join or EndInvoke. A blocked thread immediately
yields its processor time slice, and from then on
consumes no processor time until its blocking condition is satisfied.
You can test for a thread being blocked via its ThreadState property:
bool blocked = (someThread.ThreadState & ThreadState.WaitSleepJoin) != 0;
Note
ThreadState is a flags
enum, combining three “layers” of data in a bitwise fashion. Most
values, however, are redundant, unused, or deprecated. The following
code strips a ThreadState to one
of four useful values: Unstarted,
Running, WaitSleepJoin, and Stopped:
public static ThreadState SimpleThreadState (ThreadState ts)
{
return ts & (ThreadState.Unstarted |
ThreadState.WaitSleepJoin |
ThreadState.Stopped);
}The ThreadState property is
useful for diagnostic purposes, but unsuitable for synchronization,
because a thread’s state may change in between testing ThreadState and acting on that information.
When a thread blocks or unblocks, the operating system performs a context switch. This incurs an overhead of a few microseconds.
Sometimes a thread must pause until a certain condition is met. Signaling and locking constructs achieve this efficiently by blocking until a condition is satisfied. However, there is a simpler alternative: a thread can await a condition by spinning in a polling loop. For example:
while (!proceed);
or:
while (DateTime.Now < nextStartTime);
In general, this is very wasteful on processor time: as far as the CLR and operating system are concerned, the thread is performing an important calculation, and so gets allocated resources accordingly!
Sometimes a hybrid between blocking and spinning is used:
while (!proceed) Thread.Sleep (10);
Although inelegant, this is (in general) far more efficient than
outright spinning. Problems can arise, though, due to concurrency
issues on the proceed flag. Proper
use of locking and signaling avoids this.
Note
Spinning very briefly can be effective when you expect a condition to be satisfied soon (perhaps within a few microseconds) because it avoids the overhead and latency of a context switch. The .NET Framework provides special methods and classes to assist—these are covered in the following chapter (see SpinLock and SpinWait).
Exclusive locking is used to ensure that only one thread can enter
particular sections of code at a time. The two main exclusive locking constructs are lock and Mutex. Of the two, the lock construct is faster and more convenient.
Mutex, though, has a niche in that
its lock can span applications in different processes on the
computer.
In this section, we’ll start with the lock construct and then move on to Mutex and semaphores (for nonexclusive
locking). Later in the chapter we’ll cover reader/writer locks.
Note
From Framework 4.0, there is also the SpinLock struct for high-concurrency
scenarios, which we cover in the following chapter.
Let’s start with the following class:
class ThreadUnsafe
{
static int _val1 = 1, _val2 = 1;
static void Go()
{
if (_val2 != 0) Console.WriteLine (_val1 / _val2);
_val2 = 0;
}
}This class is not thread-safe: if Go was called by two threads simultaneously,
it would be possible to get a division-by-zero error, because _val2 could be set to zero in one thread right
as the other thread was in between executing the if statement and Console.WriteLine.
Here’s how lock can fix the
problem:
class ThreadSafe
{
static readonly object _locker = new object();
static int _val1, _val2;
static void Go()
{
lock (_locker)
{
if (_val2 != 0) Console.WriteLine (_val1 / _val2);
_val2 = 0;
}
}
}Only one thread can lock the synchronizing object (in this case,
_locker) at a time, and any
contending threads are blocked until the lock is released. If more than
one thread contends the lock, they are queued on a “ready queue” and
granted the lock on a first-come, first-served basis.[14] Exclusive locks are sometimes said to enforce
serialized access to whatever’s protected by the
lock, because one thread’s access cannot overlap with that of another.
In this case, we’re protecting the logic inside the Go method, as well as the fields _val1 and _val2.
A thread blocked while awaiting a contended lock has a ThreadState of WaitSleepJoin. In Interrupt and Abort, we describe how a blocked thread can
be forcibly released via another thread. This is a fairly heavy-duty
technique that might be used in ending a thread.
C#’s lock statement is in fact a syntactic shortcut for a call to the methods Monitor.Enter and
Monitor.Exit, with a try/finally block. Here’s (a simplified version
of) what’s actually happening within the Go method of the preceding example:
Monitor.Enter (_locker);
try
{
if (_val2 != 0) Console.WriteLine (_val1 / _val2);
_val2 = 0;
}
finally { Monitor.Exit (_locker); }Calling Monitor.Exit without
first calling Monitor.Enter on the
same object throws an exception.
The code that we just demonstrated is exactly what the C# 1.0,
2.0, and 3.0 compilers produce in translating a lock statement.
There’s a subtle vulnerability in this code, however. Consider
the (unlikely) event of an exception being thrown within the
implementation of Monitor.Enter,
or between the call to Monitor.Enter and the try block (due, perhaps, to Abort being called on that thread—or an
OutOfMemoryException being
thrown). In such a scenario, the lock may or may not be taken. If
the lock is taken, it won’t be released—because
we’ll never enter the try/finally block. This will result in a
leaked lock.
To avoid this danger, CLR 4.0’s designers added the following
overload to Monitor.Enter:
public static void Enter (object obj, ref bool lockTaken);lockTaken is false after
this method if (and only if) the Enter method throws an exception and the
lock was not taken.
Here’s the correct pattern of use (which is exactly how C# 4.0
translates a lock
statement):
bool lockTaken = false; try { Monitor.Enter (_locker,ref lockTaken); // Do your stuff... } finally {if (lockTaken)Monitor.Exit (_locker); }
Monitor also provides a TryEnter method
that allows a timeout to be specified, either in milliseconds or as
a TimeSpan. The method then
returns true if a lock was
obtained, or false if no lock was
obtained because the method timed out. TryEnter can also be called with no
argument, which “tests” the lock, timing out immediately if the lock
can’t be obtained right away.
As with the Enter method,
it’s overloaded in CLR 4.0 to accept a lockTaken argument.
Any object visible to each of the partaking threads can be
used as a synchronizing object, subject to one hard rule: it must be a
reference type. The synchronizing object is typically private (because
this helps to encapsulate the locking logic) and is typically an
instance or static field. The synchronizing object can double as the
object it’s protecting, as the _list field does in the following
example:
class ThreadSafe
{
List <string> _list = new List <string>();
void Test()
{
lock (_list)
{
_list.Add ("Item 1");
...A field dedicated for the purpose of locking (such as _locker, in the example prior) allows
precise control over the scope and granularity of the lock. The
containing object (this)—or even
its type—can also be used as a synchronization object:
lock (this) { ... }or:
lock (typeof (Widget)) { ... } // For protecting access to staticsThe disadvantage of locking in this way is that you’re not encapsulating the locking logic, so it becomes harder to prevent deadlocking and excessive blocking. A lock on a type may also seep through application domain boundaries (within the same process—see Chapter 24).
You can also lock on local variables captured by lambda expressions or anonymous methods.
Note
Locking doesn’t restrict access to the synchronizing object
itself in any way. In other words, x.ToString() will not block because
another thread has called lock(x); both threads must call lock(x) in order for blocking to
occur.
As a basic rule, you need to lock around accessing
any writable shared field. Even in the simplest
case—an assignment operation on a single field—you must consider
synchronization. In the following class, neither the Increment nor the Assign method is thread-safe:
class ThreadUnsafe
{
static int _x;
static void Increment() { _x++; }
static void Assign() { _x = 123; }
}Here are thread-safe versions of Increment and Assign:
class ThreadSafe
{
static readonly object _locker = new object();
static int _x;
static void Increment() { lock (_locker) _x++; }
static void Assign() { lock (_locker) _x = 123; }
}In Nonblocking Synchronization, we explain
how this need arises, and how the memory barriers and the Interlocked class can provide alternatives
to locking in these situations.
If a group of variables are always read and written within the
same lock, you can say the variables are read and written
atomically. Let’s suppose fields x and y
are always read and assigned within a lock on object locker:
lock (locker) { if (x != 0) y /= x; }One can say x and y are accessed atomically, because the code
block cannot be divided or preempted by the actions of another thread
in such a way that it will change x
or y and invalidate its
outcome. You’ll never get a division-by-zero error,
providing x and y are always accessed within this same
exclusive lock.
Warning
The atomicity provided by a lock is violated if an exception
is thrown within a lock block.
For example, consider the following:
decimal _savingsBalance, _checkBalance;
void Transfer (decimal amount)
{
lock (_locker)
{
_savingsBalance += amount;
_checkBalance -= amount + GetBankFee();
}
}If an exception was thrown by GetBankFee(), the bank would lose money.
In this case, we could avoid the problem by calling GetBankFee earlier. A solution for more
complex cases is to implement “rollback” logic within a catch or finally block.
Instruction atomicity is a different, although analogous concept: an instruction is atomic if it executes indivisibly on the underlying processor (see Nonblocking Synchronization).
A thread can repeatedly lock the same object in a nested (reentrant) fashion:
lock (locker)
lock (locker)
lock (locker)
{
// Do something...
}or:
Monitor.Enter (locker); Monitor.Enter (locker); Monitor.Enter (locker); // Do something... Monitor.Exit (locker); Monitor.Exit (locker); Monitor.Exit (locker);
In these scenarios, the object is unlocked only when the
outermost lock statement has
exited—or a matching number of Monitor.Exit statements have
executed.
Nested locking is useful when one method calls another within a lock:
static readonly object _locker = new object();
static void Main()
{
lock (_locker)
{
AnotherMethod();
// We still have the lock - because locks are reentrant.
}
}
static void AnotherMethod()
{
lock (_locker) { Console.WriteLine ("Another method"); }
}A thread can block on only the first (outermost) lock.
A deadlock happens when two threads each wait for a resource held by the other, so neither can proceed. The easiest way to illustrate this is with two locks:
object locker1 = new object();
object locker2 = new object();
new Thread (() => {
lock (locker1)
{
Thread.Sleep (1000);
lock (locker2); // Deadlock
}
}).Start();
lock (locker2)
{
Thread.Sleep (1000);
lock (locker1); // Deadlock
}More elaborate deadlocking chains can be created with three or more threads.
Warning
The CLR, in a standard hosting environment, is not like SQL Server and does not automatically detect and resolve deadlocks by terminating one of the offenders. A threading deadlock causes participating threads to block indefinitely, unless you’ve specified a locking timeout. (Under the SQL CLR integration host, however, deadlocks are automatically detected and a [catchable] exception is thrown on one of the threads.)
Deadlocking is one of the hardest problems in multithreading—especially when there are many interrelated objects. Fundamentally, the difficulty is that you can’t be sure what locks your caller has taken out.
So, you might innocently lock private field a within your class x, unaware that your caller (or caller’s
caller) has already locked field b
within class y. Meanwhile, another
thread is doing the reverse—creating a deadlock. Ironically, the
problem is exacerbated by (good) object-oriented design patterns,
because such patterns create call chains that are not determined until
runtime.
The popular advice, “lock objects in a consistent order to avoid deadlocks,” although helpful in our initial example, is hard to apply to the scenario just described. A better strategy is to be wary of locking around calling methods in objects that may have references back to your own object. Also, consider whether you really need to lock around calling methods in other classes (often you do—as we’ll see in Thread Safety—but sometimes there are other options). Relying more on declarative and data parallelism (Chapter 22), immutable types, and nonblocking synchronization constructs (later in this chapter) can lessen the need for locking.
Note
Here is an alternative way to perceive the problem: when you call out to other code while holding a lock, the encapsulation of that lock subtly leaks. This is not a fault in the CLR or .NET Framework, but a fundamental limitation of locking in general. The problems of locking are being addressed in various research projects, including Software Transactional Memory.
Another deadlocking scenario arises when calling Dispatcher.Invoke (in a WPF application) or
Control.Invoke (in a Windows Forms
application) while in possession of a lock. If the UI happens to be
running another method that’s waiting on the same lock, a deadlock
will happen right there. This can often be fixed simply by calling
BeginInvoke instead of Invoke. Alternatively, you can release your
lock before calling Invoke,
although this won’t work if your caller took out
the lock. We explain Invoke and BeginInvoke in the section Rich Client Applications and Thread Affinity.
Locking is fast: you can expect to acquire and release a lock in
less than 100 nanoseconds on a 2010-era computer if the lock is
uncontended. If it is contended, the consequential context switch
moves the overhead closer to the microsecond region, although it may
be longer before the thread is actually rescheduled. You can avoid the
cost of a context switch with the SpinLock class described in the following
chapter—if you’re locking very
briefly.
If used excessively, locking can degrade concurrency by causing other threads to wait unnecessarily. This can also increase the chance of deadlock.
A Mutex is like a C# lock,
but it can work across multiple processes. In other words, Mutex can be
computer-wide as well as
application-wide.
Note
Acquiring and releasing an uncontended Mutex takes a few microseconds—about 50
times slower than a lock.
With a Mutex class, you call
the WaitOne method to lock and
ReleaseMutex to unlock. Closing or
disposing a Mutex automatically
releases it. Just as with the lock
statement, a Mutex can be released
only from the same thread that obtained it.
A common use for a cross-process Mutex is to ensure that only one instance of
a program can run at a time. Here’s how it’s done:
class OneAtATimePlease
{
static void Main()
{
// Naming a Mutex makes it available computer-wide. Use a name that's
// unique to your company and application (e.g., include your URL).
using (var mutex = new Mutex (false, "oreilly.com OneAtATimeDemo"))
{
// Wait a few seconds if contended, in case another instance
// of the program is still in the process of shutting down.
if (!mutex.WaitOne (TimeSpan.FromSeconds (3), false))
{
Console.WriteLine ("Another instance of the app is running. Bye!");
return;
}
RunProgram();
}
}
static void RunProgram()
{
Console.WriteLine ("Running. Press Enter to exit");
Console.ReadLine();
}
}Note
If running under Terminal Services, a computer-wide Mutex is ordinarily visible only to
applications in the same terminal server session. To make it visible
to all terminal server sessions, prefix its name with
Global.
A semaphore is like a nightclub: it has a certain capacity, enforced by a bouncer. Once it’s full, no more people can enter, and a queue builds up outside. Then, for each person that leaves, one person enters from the head of the queue. The constructor requires a minimum of two arguments: the number of places currently available in the nightclub and the club’s total capacity.
A semaphore with a capacity of one is similar to a Mutex or lock, except that the semaphore has no
“owner”—it’s thread-agnostic. Any thread can call Release on a Semaphore, whereas with Mutex and lock, only the thread that obtained the lock
can release it.
Note
There are two functionally similar versions of this class:
Semaphore
and SemaphoreSlim. The latter was
introduced in Framework 4.0 and has been optimized to meet the
low-latency demands of parallel programming. It’s also useful in
traditional multithreading because it lets you specify a
cancellation token when waiting (see Safe Cancellation). It cannot, however, be used for
interprocess signaling.
Semaphore incurs about 1
microsecond in calling WaitOne or
Release; SemaphoreSlim incurs about a quarter of
that.
Semaphores can be useful in limiting concurrency—preventing too many threads from executing a particular piece of code at once. In the following example, five threads try to enter a nightclub that allows only three threads in at once:
class TheClub // No door lists!
{
static SemaphoreSlim _sem = new SemaphoreSlim (3); // Capacity of 3
static void Main()
{
for (int i = 1; i <= 5; i++) new Thread (Enter).Start (i);
}
static void Enter (object id)
{
Console.WriteLine (id + " wants to enter");
_sem.Wait();
Console.WriteLine (id + " is in!"); // Only three threads
Thread.Sleep (1000 * (int) id); // can be here at
Console.WriteLine (id + " is leaving"); // a time.
_sem.Release();
}
}
1 wants to enter
1 is in!
2 wants to enter
2 is in!
3 wants to enter
3 is in!
4 wants to enter
5 wants to enter
1 is leaving
4 is in!
2 is leaving
5 is in!If the Sleep statement was
instead performing intensive disk I/O, the Semaphore would improve overall performance
by limiting excessive concurrent hard-drive activity.
A Semaphore, if named, can
span processes in the same way as a Mutex.
A program or method is thread-safe if it has no indeterminacy in the face of any multithreading scenario. Thread safety is achieved primarily with locking and by reducing the possibilities for thread interaction.
General-purpose types are rarely thread-safe in their entirety, for the following reasons:
The development burden in full thread safety can be significant, particularly if a type has many fields (each field is a potential for interaction in an arbitrarily multithreaded context).
Thread safety can entail a performance cost (payable, in part, whether or not the type is actually used by multiple threads).
A thread-safe type does not necessarily make the program using it thread-safe, and often the work involved in the latter makes the former redundant.
Thread safety is hence usually implemented just where it needs to be, in order to handle a specific multithreading scenario.
There are, however, a few ways to “cheat” and have large and complex classes run safely in a multithreaded environment. One is to sacrifice granularity by wrapping large sections of code—even access to an entire object—within a single exclusive lock, enforcing serialized access at a high level. This tactic is, in fact, essential if you want to use thread-unsafe third-party code (or most Framework types, for that matter) in a multithreaded context. The trick is simply to use the same exclusive lock to protect access to all properties, methods, and fields on the thread-unsafe object. The solution works well if the object’s methods all execute quickly (otherwise, there will be a lot of blocking).
Warning
Primitive types aside, few .NET Framework types, when
instantiated, are thread-safe for anything more than concurrent
read-only access. The onus is on the developer to superimpose thread
safety, typically with exclusive locks. (The collections in System.Collections.Concurrent are an
exception; we’ll cover them in the next chapter.)
Another way to cheat is to minimize thread interaction by minimizing shared data. This is an excellent approach and is used implicitly in “stateless” middle-tier application and web page servers. Since multiple client requests can arrive simultaneously, the server methods they call must be thread-safe. A stateless design (popular for reasons of scalability) intrinsically limits the possibility of interaction, since classes do not persist data between requests. Thread interaction is then limited just to the static fields one may choose to create, for such purposes as caching commonly used data in memory and in providing infrastructure services such as authentication and auditing.
The final approach in implementing thread safety is to use an
automatic locking regime. The .NET Framework does exactly this, if you
subclass ContextBoundObject and apply
the Synchronization attribute to the
class. Whenever a method or property on such an object is then called,
an object-wide lock is automatically taken for the whole execution of
the method or property. Although this reduces the thread-safety burden,
it creates problems of its own: deadlocks that would not otherwise
occur, impoverished concurrency, and unintended reentrancy. For these
reasons, manual locking is generally a better option—at least until a
less simplistic automatic locking regime becomes available.
Locking can be used to convert thread-unsafe code into
thread-safe code. A good application of this is the .NET Framework:
nearly all of its nonprimitive types are not thread-safe (for anything
more than read-only access) when instantiated, and yet they can be
used in multithreaded code if all access to any given object is
protected via a lock. Here’s an example, where two threads
simultaneously add an item to the same List collection, then enumerate the
list:
class ThreadSafe
{
static List <string> _list = new List <string>();
static void Main()
{
new Thread (AddItem).Start();
new Thread (AddItem).Start();
}
static void AddItem()
{
lock (_list) _list.Add ("Item " + _list.Count);
string[] items;
lock (_list) items = _list.ToArray();
foreach (string s in items) Console.WriteLine (s);
}
}In this case, we’re locking on the _list object itself. If we had two
interrelated lists, we would have to choose a common object upon which
to lock (we could nominate one of the lists, or better: use an
independent field).
Enumerating .NET collections is also thread-unsafe in the sense that an exception is thrown if the list is modified during enumeration. Rather than locking for the duration of enumeration, in this example we first copy the items to an array. This avoids holding the lock excessively if what we’re doing during enumeration is potentially time-consuming. (Another solution is to use a reader/writer lock; see Reader/Writer Locks.)
Sometimes you also need to lock around accessing thread-safe
objects. To illustrate, imagine that the Framework’s List class was, indeed, thread-safe, and
we want to add an item to a list:
if (!_list.Contains (newItem)) _list.Add (newItem);
Whether or not the list was thread-safe, this statement is
certainly not! The whole if
statement would have to be wrapped in a lock in order to prevent
preemption in between testing for containership and adding the new
item. This same lock would then need to be used everywhere we
modified that list. For instance, the following statement would also
need to be wrapped in the identical lock:
_list.Clear();
to ensure that it did not preempt the former statement. In
other words, we would have to lock exactly as with our thread-unsafe
collection classes (making the List class’s hypothetical thread safety
redundant).
Note
Locking around accessing a collection can cause excessive blocking in highly concurrent environments. To this end, Framework 4.0 provides a thread-safe queue, stack, and dictionary, which we describe in the following chapter.
Wrapping access to an object around a custom lock works only
if all concurrent threads are aware of—and use—the lock. This may
not be the case if the object is widely scoped. The worst case is
with static members in a public type. For instance, imagine if the
static property on the DateTime
struct, DateTime.Now, was not
thread-safe, and that two concurrent calls could result in garbled
output or an exception. The only way to remedy this with external
locking might be to lock the type itself—lock(typeof(DateTime))—before calling
DateTime.Now. This would work
only if all programmers agreed to do this (which is unlikely).
Furthermore, locking a type creates problems of its own.
For this reason, static members on the DateTime struct have been carefully
programmed to be thread-safe. This is a common pattern throughout
the .NET Framework: static members are thread-safe; instance members are
not. Following this pattern also makes sense when writing
types for public consumption, so as not to create impossible
thread-safety conundrums. In other words, by making static methods
thread-safe, you’re programming so as not to
preclude thread safety for consumers of that
type.
Note
Thread safety in static methods is something that you must explicitly code: it doesn’t happen automatically by virtue of the method being static!
Making types thread-safe for concurrent read-only access (where possible) is advantageous because it means that consumers can avoid excessive locking. Many of the .NET Framework types follow this principle: collections, for instance, are thread-safe for concurrent readers.
Following this principle yourself is simple: if you document a
type as being thread-safe for concurrent read-only access, don’t
write to fields within methods that a consumer would expect to be
read-only (or lock around doing so). For instance, in implementing a
ToArray() method in a collection,
you might start by compacting the collection’s internal structure.
However, this would make it thread-unsafe for consumers that
expected this to be read-only.
Read-only thread safety is one of the reasons that enumerators are separate from “enumerables”: two threads can simultaneously enumerate over a collection because each gets a separate enumerator object.
Note
In the absence of documentation, it pays to be cautious in
assuming whether a method is
read-only in nature. A good example is the Random class: when you call Random.Next(), its internal implementation requires
that it update private seed values. Therefore, you must either
lock around using the Random
class, or maintain a separate instance per thread.
Application servers need to be multithreaded to handle simultaneous client requests. WCF, ASP.NET, and Web Services applications are implicitly multithreaded; the same holds true for Remoting server applications that use a network channel such as TCP or HTTP. This means that when writing code on the server side, you must consider thread safety if there’s any possibility of interaction among the threads processing client requests. Fortunately, such a possibility is rare; a typical server class either is stateless (no fields) or has an activation model that creates a separate object instance for each client or each request. Interaction usually arises only through static fields, sometimes used for caching in memory parts of a database to improve performance.
For example, suppose you have a RetrieveUser method that queries a
database:
// User is a custom class with fields for user data
internal User RetrieveUser (int id) { ... }If this method was called frequently, you could improve
performance by caching the results in a static Dictionary. Here’s a solution that takes
thread safety into account:
static class UserCache
{
static Dictionary <int, User> _users = new Dictionary <int, User>();
internal static User GetUser (int id)
{
User u = null;
lock (_users)
if (_users.TryGetValue (id, out u))
return u;
u = RetrieveUser (id); // Method to retrieve from database;
lock (_users) _users [id] = u;
return u;
}
}We must, at a minimum, lock around reading and updating the
dictionary to ensure thread safety. In this example, we choose a
practical compromise between simplicity and performance in locking.
Our design actually creates a very small potential for inefficiency:
if two threads simultaneously called this method with the same
previously unretrieved id, the
RetrieveUser method would be called
twice—and the dictionary would be updated unnecessarily. Locking once
across the whole method would prevent this, but would create a worse
inefficiency: the entire cache would be locked up for the duration of
calling RetrieveUser, during which
time other threads would be blocked in retrieving
any user.
Both the Windows Presentation Foundation (WPF) and Windows Forms libraries follow models based on thread affinity. Although each has a separate implementation, they are both very similar in how they function.
The objects that make up a rich client are based primarily on
DependencyObject in the case of
WPF, or Control in the case of
Windows Forms. These objects have thread
affinity, which means that only the thread that
instantiates them can subsequently access their members. Violating
this causes either unpredictable behavior, or an exception to be
thrown.
On the positive side, this means you don’t need to lock around accessing a UI object. On the negative side, if you want to call a member on object X created on another thread Y, you must marshal the request to thread Y. You can do this explicitly as follows:
In WPF, call
InvokeorBeginInvokeon the element’sDispatcherobject.In Windows Forms, call
InvokeorBeginInvokeon the control.
Invoke and BeginInvoke both accept a delegate, which
references the method on the target control that you want to run.
Invoke works
synchronously: the caller blocks until the
marshal is complete. BeginInvoke
works asynchronously: the caller returns
immediately and the marshaled request is queued up (using the same
message queue that handles keyboard, mouse, and timer events).
Assuming we have a window that contains a text box called
txtMessage, whose content we wish a
worker thread to update, here’s an example for WPF:
public partial class MyWindow : Window
{
public MyWindow()
{
InitializeComponent();
new Thread (Work).Start();
}
void Work()
{
Thread.Sleep (5000); // Simulate time-consuming task
UpdateMessage ("The answer");
}
void UpdateMessage (string message)
{
Action action = () => txtMessage.Text = message;
Dispatcher.Invoke (action);
}
}The code is similar for Windows Forms, except that we call the
(Form’s) Invoke method instead:
void UpdateMessage (string message)
{
Action action = () => txtMessage.Text = message;
this.Invoke (action);
}Note
The Framework provides two constructs to simplify this process:
BackgroundWorker(see the section BackgroundWorker)Taskcontinuations (see Continuations)
It’s helpful to think of a rich client application as having two distinct categories of threads: UI threads and worker threads. UI threads instantiate (and subsequently “own”) UI elements; worker threads do not. Worker threads typically execute long-running tasks such as fetching data.
Most rich client applications have a single UI thread (which
is also the main application
thread) and periodically spawn worker threads—either directly or
using BackgroundWorker. These workers then
marshal back to the main UI thread in order to update controls or
report on progress.
So, when would an application have multiple UI threads? The main scenario is when you have an application with multiple top-level windows, often called a Single Document Interface (SDI) application, such as Microsoft Word. Each SDI window typically shows itself as a separate “application” on the taskbar and is mostly isolated, functionally, from other SDI windows. By giving each such window its own UI thread, the application can be made more responsive.
An immutable object is one whose state cannot be altered—externally or internally. The fields in an immutable object are typically declared read-only and are fully initialized during construction.
Immutability is a hallmark of functional programming—where instead of mutating an object, you create a new object with different properties. LINQ follows this paradigm. Immutability is also valuable in multithreading in that it avoids the problem of shared writable state—by eliminating (or minimizing) the writable.
One pattern is to use immutable objects to encapsulate a group of related fields, to minimize lock durations. To take a very simple example, suppose we had two fields as follows:
int _percentComplete; string _statusMessage;
and we wanted to read/write them atomically. Rather than locking around these fields, we could define the following immutable class:
class ProgressStatus // Represents progress of some activity
{
public readonly int PercentComplete;
public readonly string StatusMessage;
// This class might have many more fields...
public ProgressStatus (int percentComplete, string statusMessage)
{
PercentComplete = percentComplete;
StatusMessage = statusMessage;
}
}Then we could define a single field of that type, along with a locking object:
readonly object _statusLocker = new object(); ProgressStatus _status;
We can now read/write values of that type without holding a lock for more than a single assignment:
var status = new ProgressStatus (50, "Working on it");
// Imagine we were assigning many more fields...
// ...
lock (_statusLocker) _status = status; // Very brief lockTo read the object, we first obtain a copy of the object (within a lock). Then we can read its values without needing to hold on to the lock:
ProgressStatus status;
lock (_locker ProgressStatus) status = _status; // Again, a brief lock
int pc = statusCopy.PercentComplete;
string msg = statusCopy.StatusMessage;
...Note
Technically, the last two lines of code are thread-safe by virtue of the preceding lock performing an implicit memory barrier. We’ll discuss this in the next section.
Note that this lock-free approach prevents inconsistency within a group of related fields. But it doesn’t prevent data from changing while you subsequently act on it—for this, you usually need a lock. In Chapter 22, we’ll see more examples of using immutability to simplify multithreading—including PLINQ.
Note
It’s also possible to safely assign a new ProgressStatus object based on its
preceding value (e.g., it’s possible to “increment” the PercentComplete value)—without locking
over more than one line of code. In fact, we can do this without
using a single lock, through the use of explicit memory barriers,
Interlocked.CompareExchange, and
spin-waits. This is an advanced technique, which we demonstrate in
the final section of Chapter 22.
Earlier, we said that the need for synchronization arises even in the simple case of assigning or incrementing a field. Although locking can always satisfy this need, a contended lock means that a thread must block, suffering the overhead of a context switch and the latency of being descheduled, which can be undesirable in highly concurrent and performance-critical scenarios. The .NET Framework’s nonblocking synchronization constructs can perform simple operations without ever blocking, pausing, or waiting.
Warning
Writing nonblocking or lock-free multithreaded code properly is
tricky! Memory barriers, in particular, are easy to get wrong (the
volatile keyword is even easier to
get wrong). Think carefully whether you really need the performance
benefits before dismissing ordinary locks.
The nonblocking approaches also work across multiple processes. An example of where this might be useful is in reading and writing process-shared memory.
Consider the following example:
class Foo
{
int _answer;
bool _complete;
void A()
{
_answer = 123;
_complete = true;
}
void B()
{
if (_complete) Console.WriteLine (_answer);
}
}If methods A and B ran concurrently on different threads,
might it be possible for B to write
“0”? The answer is yes—for the following reasons:
The compiler, CLR, or CPU may reorder your program’s instructions to improve efficiency.
The compiler, CLR, or CPU may introduce caching optimizations such that assignments to variables won’t be visible to other threads right away.
C# and the runtime are very careful to ensure that such optimizations don’t break ordinary single-threaded code—or multithreaded code that makes proper use of locks. Outside of these scenarios, you must explicitly defeat these optimizations by creating memory barriers (also called memory fences) to limit the effects of instruction reordering and read/write caching.
The simplest kind of memory barrier is a full memory barrier (full fence), which prevents any
kind of instruction reordering or caching around that fence. Calling
Thread.MemoryBarrier generates a
full fence; we can fix our example by applying four full fences as
follows:
class Foo
{
int _answer;
bool _complete;
void A()
{
_answer = 123;
Thread.MemoryBarrier(); // Barrier 1
_complete = true;
Thread.MemoryBarrier(); // Barrier 2
}
void B()
{
Thread.MemoryBarrier(); // Barrier 3
if (_complete)
{
Thread.MemoryBarrier(); // Barrier 4
Console.WriteLine (_answer);
}
}
}Barriers 1 and 4 prevent this example from writing “0”.
Barriers 2 and 3 provide a freshness guarantee:
they ensure that if B ran after A, reading _complete would evaluate to true.
A full fence takes a few tens of nanoseconds.
Note
The following implicitly generate full fences:
C#’s
lockstatement (Monitor.Enter/Monitor.Exit)All methods on the
Interlockedclass (we’ll cover these soon)Asynchronous callbacks that use the thread pool—these include asynchronous delegates, APM callbacks (Chapter 23), and
Taskcontinuations (Chapter 22)Setting and waiting on a signaling construct
Anything that relies on signaling, such as starting or waiting on a
Task
By virtue of that last point, the following is thread-safe:
int x = 0; Task t = Task.Factory.StartNew (() => x++); t.Wait(); Console.WriteLine (x); // 1
You don’t necessarily need a full fence with every individual read or write. If we had three answer fields, our example would still need only four fences:
class Foo
{
int _answer1, _answer2, _answer3;
bool _complete;
void A()
{
_answer1 = 1; _answer2 = 2; _answer3 = 3;
Thread.MemoryBarrier();
_complete = true;
Thread.MemoryBarrier();
}
void B()
{
Thread.MemoryBarrier();
if (_complete)
{
Thread.MemoryBarrier();
Console.WriteLine (_answer1 + _answer2 + _answer3);
}
}
}Note
A good approach is to start by putting memory barriers before and after every instruction that reads or writes a shared field, and then strip away the ones that you don’t need. If you’re uncertain of any, leave them in. Or better: switch back to using locks!
Another (more advanced) way to solve this problem is to apply
the volatile keyword to the
_complete field:
volatile bool _complete;The volatile keyword
instructs the compiler to generate an
acquire-fence on every read from that field,
and a release-fence on every write to that
field. An acquire-fence prevents other reads/writes from being moved
before the fence; a release-fence prevents
other reads/writes from being moved after the
fence. These “half-fences” are faster than full fences because they
give the runtime and hardware more scope for optimization.
Warning
As it happens, Intel’s X86 and X64 processors always apply
acquire-fences to reads and
release-fences to writes—whether or not you use the volatile keyword—so this keyword has no
effect on the hardware if you’re using these
processors. However, volatile
does have an effect on optimizations
performed by the compiler and the CLR—as well as on 64-bit AMD and
(to a greater extent) Itanium processors. This means that you
cannot be more relaxed by virtue of your clients running a
particular type of CPU.
(And even if you do use volatile, you should still maintain a
healthy sense of anxiety, as we’ll see shortly!)
The effect of applying volatile to fields can be summarized as
follows:
First instruction | Second instruction | Can they be swapped? |
|---|---|---|
Read | Read | No |
Read | Write | No |
Write | Write | No[a] |
Write | Read | Yes! |
[a] The CLR ensures that write-write operations are
never swapped, even without the | ||
Notice that applying volatile doesn’t prevent a write followed
by a read from being swapped, and this can create brainteasers. Joe
Duffy illustrates the problem well with the following example: if
Test1 and Test2 run simultaneously on different
threads, it’s possible for a and
b to both end up with a value of
0 (despite the use of volatile on
both x and y):
class IfYouThinkYouUnderstandVolatile
{
volatile int x, y;
void Test1() // Executed on one thread
{
x = 1; // Volatile write (release-fence)
int a = y; // Volatile read (acquire-fence)
...
}
void Test2() // Executed on another thread
{
y = 1; // Volatile write (release-fence)
int b = x; // Volatile read (acquire-fence)
...
}
}Warning
The MSDN documentation states that use of the volatile keyword ensures that the most
up-to-date value is present in the field at all times. This is
incorrect, since as we’ve seen, a write followed by a read
can be reordered.
This presents a strong case for avoiding volatile: even if you understand the
subtlety in this example, will other developers working on your code
also understand it? A full fence between each of the two assignments
in Test1 and Test2 (or a lock) solves the
problem.
The volatile keyword is not
supported with pass-by-reference arguments or captured local variables: in these
cases, you must use the VolatileRead and VolatileWrite methods.
The static VolatileRead and
VolatileWrite methods in the
Thread class read/write a
variable while enforcing (technically, a superset of) the guarantees
made by the volatile keyword.
Their implementations are relatively inefficient, though, in that
they actually generate full fences. Here are their complete
implementations for the integer type:
public static void VolatileWrite (ref int address, int value)
{
MemoryBarrier(); address = value;
}
public static int VolatileRead (ref int address)
{
int num = address; MemoryBarrier(); return num;
}You can see from this that if you call VolatileWrite followed by VolatileRead, no barrier is generated in
the middle: this enables the same brainteaser scenario that we saw
earlier.
Use of memory barriers is not always enough when reading or
writing fields in lock-free code. Operations on 64-bit fields,
increments, and decrements require the heavier approach of using the
Interlocked helper class. Interlocked also provides the Exchange and CompareExchange methods, the latter enabling
lock-free read-modify-write operations, with a little additional
coding.
A statement is intrinsically atomic if it executes as a single indivisible instruction on the underlying processor. Strict atomicity precludes any possibility of preemption. A simple read or write on a field of 32 bits or less is always atomic. Operations on 64-bit fields are guaranteed to be atomic only in a 64-bit runtime environment, and statements that combine more than one read/write operation are never atomic:
class Atomicity
{
static int _x, _y;
static long _z;
static void Test()
{
long myLocal;
_x = 3; // Atomic
_z = 3; // Nonatomic on 32-bit environs (_z is 64 bits)
myLocal = _z; // Nonatomic on 32-bit environs (_z is 64 bits)
_y += _x; // Nonatomic (read AND write operation)
_x++; // Nonatomic (read AND write operation)
}
}Reading and writing 64-bit fields is nonatomic on 32-bit environments because it requires two separate instructions: one for each 32-bit memory location. So, if thread X reads a 64-bit value while thread Y is updating it, thread X may end up with a bitwise combination of the old and new values (a torn read).
The compiler implements unary operators of the kind x++ by reading a variable, processing it,
and then writing it back. Consider the following class:
class ThreadUnsafe
{
static int _x = 1000;
static void Go() { for (int i = 0; i < 100; i++) _x--; }
}Putting aside the issue of memory barriers, you might expect
that if 10 threads concurrently run Go, _x
would end up as 0. However, this is
not guaranteed, because a race condition is
possible whereby one thread preempts another in between retrieving
_x’s current value, decrementing
it, and writing it back (resulting in an out-of-date value being
written).
Of course, you can address these issues by wrapping the
nonatomic operations in a lock
statement. Locking simulates atomicity if consistently applied, but
the Interlocked class provides an easier
and faster solution for such simple operations:
class Program
{
static long _sum; static void Main()
{ // _sum
// Simple increment/decrement operations:
Interlocked.Increment (ref _sum); // 1
Interlocked.Decrement (ref _sum); // 0
// Add/subtract a value:
Interlocked.Add (ref _sum, 3); // 3
// Read a 64-bit field:
Console.WriteLine (Interlocked.Read (ref _sum)); // 3
// Write a 64-bit field while reading previous value:
// (This prints "3" while updating _sum to 10)
Console.WriteLine (Interlocked.Exchange (ref _sum, 10)); // 10
// Update a field only if it matches a certain value (10):
Console.WriteLine (Interlocked.CompareExchange (ref _sum,
123, 10); // 123
}
}Note
All of Interlocked’s
methods generate a full fence. Therefore, fields that you access via
Interlocked don’t need additional
fences—unless they’re accessed in other places in your program
without Interlocked or a lock.
Interlocked’s mathematical
operations are restricted to Increment, Decrement, and Add. If you want to multiply—or perform any
other calculation—you can do so in lock-free style by using the
CompareExchange method (typically
in conjunction with spin-waiting). We give an example in the final
section in the following chapter.
Interlocked works by making
its need for atomicity known to the operating system and virtual
machine.
Note
Interlocked’s methods have
a typical overhead of 50 ns—half that of an uncontended lock. Further, they can never suffer the
additional cost of context switching due to blocking. The flip side
is that using Interlocked within
a loop with many iterations can be less efficient than obtaining a
single lock around the loop (although Interlocked enables greater
concurrency).
Event wait handles are used for signaling. Signaling is when one thread waits until it receives notification
from another. Event wait handles are the simplest of the signaling
constructs, and they are unrelated to C# events. They come in three
flavors: AutoResetEvent, ManualResetEvent, and (from Framework 4.0)
CountdownEvent. The former two are
based on the common EventWaitHandle class, where they derive all their
functionality.
An AutoResetEvent is like a ticket turnstile: inserting a ticket lets exactly
one person through. The “auto” in the class’s name refers to the fact
that an open turnstile automatically closes or “resets” after someone
steps through. A thread waits, or blocks, at the turnstile by calling
WaitOne (wait at this “one”
turnstile until it opens), and a ticket is inserted by calling the
Set method. If a number of threads
call WaitOne,
a queue[15] builds up behind the turnstile. A ticket can come from
any thread; in other words, any (unblocked) thread with access to the
AutoResetEvent object can call
Set on it to release one blocked
thread.
You can create an AutoResetEvent in two ways. The first is via
its constructor:
var auto = new AutoResetEvent (false);
(Passing true into the
constructor is equivalent to immediately calling Set upon it.) The second way to create an
AutoResetEvent is as
follows:
var auto = new EventWaitHandle (false, EventResetMode.AutoReset);
In the following example, a thread is started whose job is simply to wait until signaled by another thread (see Figure 21-2):
class BasicWaitHandle
{
static EventWaitHandle _waitHandle = new AutoResetEvent (false);
static void Main()
{
new Thread (Waiter).Start();
Thread.Sleep (1000); // Pause for a second...
_waitHandle.Set(); // Wake up the Waiter.
}
static void Waiter()
{
Console.WriteLine ("Waiting...");
_waitHandle.WaitOne(); // Wait for notification
Console.WriteLine ("Notified");
}
}
// Output:
Waiting... (pause) Notified.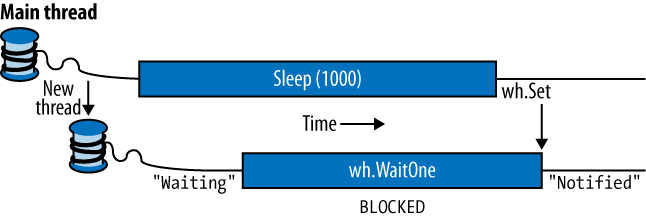
If Set is called when no
thread is waiting, the handle stays open for as long as it takes until
some thread calls WaitOne. This
behavior helps avoid a race between a thread heading for the
turnstile, and a thread inserting a ticket (“Oops, inserted the ticket
a microsecond too soon, bad luck, now you’ll have to wait
indefinitely!”). However, calling Set repeatedly on a turnstile at which no
one is waiting doesn’t allow a whole party through when they arrive:
only the next single person is let through and the extra tickets are
“wasted.”
Calling Reset on an AutoResetEvent closes the turnstile (should
it be open) without waiting or blocking.
WaitOne accepts an optional
timeout parameter, returning false
if the wait ended because of a timeout rather than obtaining the
signal.
Note
Calling WaitOne with a
timeout of 0 tests whether a wait
handle is “open,” without blocking the caller. Bear in mind, though,
that doing this resets the AutoResetEvent if it’s open.
Let’s say we want the main thread to signal a worker thread
three times in a row. If the main thread simply calls Set on a wait handle several times in
rapid succession, the second or third signal may get lost, since the
worker may take time to process each signal.
The solution is for the main thread to wait until the worker’s
ready before signaling it. This can be done with another AutoResetEvent, as follows:
class TwoWaySignaling
{
static EventWaitHandle _ready = new AutoResetEvent (false);
static EventWaitHandle _go = new AutoResetEvent (false);
static readonly object _locker = new object();
static string _message;
static void Main()
{
new Thread (Work).Start();
_ready.WaitOne(); // First wait until worker is ready
lock (_locker) _message = "ooo";
_go.Set(); // Tell worker to go
_ready.WaitOne();
lock (_locker) _message = "ahhh"; // Give the worker another message
_go.Set();
_ready.WaitOne();
lock (_locker) _message = null; // Signal the worker to exit
_go.Set();
}
static void Work()
{
while (true)
{
_ready.Set(); // Indicate that we're ready
_go.WaitOne(); // Wait to be kicked off...
lock (_locker)
{
if (_message == null) return; // Gracefully exit
Console.WriteLine (_message);
}
}
}
}
// Output:
ooo
ahhhFigure 21-3 shows this process visually.

Here, we’re using a null message to indicate that the worker should end. With threads that run indefinitely, it’s important to have an exit strategy!
A ManualResetEvent functions like an ordinary gate. Calling Set opens the gate, allowing
any number of threads calling WaitOne to be let through. Calling Reset closes the gate. Threads that call
WaitOne on a closed gate will
block; when the gate is next opened, they will be released all at
once. Apart from these differences, a ManualResetEvent functions like an AutoResetEvent.
As with AutoResetEvent, you
can construct a ManualResetEvent in
two ways:
var manual1 = new ManualResetEvent (false); var manual2 = new EventWaitHandle (false, EventResetMode.ManualReset);
Note
From Framework 4.0, there’s another version of ManualResetEvent called ManualResetEventSlim. The latter is
optimized for short waiting times—with the ability to opt into
spinning for a set number of iterations. It also has a more
efficient managed implementation and allows a Wait to be canceled via a CancellationToken (see Cancellation). It cannot, however, be used for
interprocess signaling. ManualResetEventSlim doesn’t subclass
WaitHandle; however, it exposes a
WaitHandle property that returns
a WaitHandle-based object when
called (with the performance profile of a traditional wait
handle).
A ManualResetEvent is useful
in allowing one thread to unblock many other threads. The reverse
scenario is covered by CountdownEvent.
CountdownEvent lets you wait on more than one thread. The class is new
to Framework 4.0 and has an efficient, fully managed implementation.
To use the class, instantiate it with the number of threads or
“counts” that you want to wait on:
var countdown = new CountdownEvent (3); // Initialize with "count" of 3.
Calling Signal decrements the
“count”; calling Wait blocks until
the count goes down to zero. For example:
static CountdownEvent _countdown = new CountdownEvent (3);
static void Main()
{
new Thread (SaySomething).Start ("I am thread 1");
new Thread (SaySomething).Start ("I am thread 2");
new Thread (SaySomething).Start ("I am thread 3");
_countdown.Wait(); // Blocks until Signal has been called 3 times
Console.WriteLine ("All threads have finished speaking!");
}
static void SaySomething (object thing)
{
Thread.Sleep (1000);
Console.WriteLine (thing);
_countdown.Signal();
}Note
Problems for which CountdownEvent is effective can sometimes
be solved more easily using the structured
parallelism constructs that we’ll cover in the following
chapter (PLINQ and the Parallel class).
You can reincrement a CountdownEvent’s count by calling AddCount. However, if it has already reached
zero, this throws an exception: you can’t “unsignal” a CountdownEvent by calling AddCount. To avoid the possibility of an
exception being thrown, you can instead call TryAddCount, which returns false if the countdown is zero.
To unsignal a countdown event, call Reset: this both unsignals the construct and
resets its count to the original value.
Like ManualResetEventSlim,
CountdownEvent exposes a WaitHandle property for scenarios where some
other class or method expects an object based on WaitHandle.
EventWaitHandle’s constructor allows a “named” EventWaitHandle to be created, capable of
operating across multiple processes. The name is simply a string, and
it can be any value that doesn’t unintentionally conflict with someone
else’s! If the name is already in use on the computer, you get a
reference to the same underlying EventWaitHandle; otherwise, the
operating system creates a new one. Here’s an example:
EventWaitHandle wh = new EventWaitHandle (false, EventResetMode.AutoReset,
"MyCompany.MyApp.SomeName");If two applications each ran this code, they would be able to signal each other: the wait handle would work across all threads in both processes.
If your application has lots of threads that spend most of their
time blocked on a wait handle, you can reduce the resource burden by
calling ThreadPool.RegisterWaitForSingleObject. This
method accepts a delegate that is executed when a wait handle is
signaled. While it’s waiting, it doesn’t tie up a thread:
static ManualResetEvent _starter = new ManualResetEvent (false);
public static void Main()
{
RegisteredWaitHandle reg = ThreadPool.RegisterWaitForSingleObject
(_starter, Go, "Some Data", −1, true);
Thread.Sleep (5000);
Console.WriteLine ("Signaling worker...");
_starter.Set();
Console.ReadLine();
reg.Unregister (_starter); // Clean up when we're done.
}
public static void Go (object data, bool timedOut)
{
Console.WriteLine ("Started - " + data);
// Perform task...
}
// Output:
(5 second delay)
Signaling worker...
Started - Some DataWhen the wait handle is signaled (or a timeout elapses), the delegate runs on a pooled thread.
In addition to the wait handle and delegate, RegisterWaitForSingleObject accepts a “black
box” object that it passes to your delegate method (rather like
ParameterizedThreadStart), as well
as a timeout in milliseconds (−1 meaning no timeout), and a boolean
flag indicating whether the request is one-off rather than
recurring.
RegisterWaitForSingleObject
is particularly valuable in an application server that must handle many concurrent
requests. Suppose you need to block on a ManualResetEvent and simply call
WaitOne:
void AppServerMethod()
{
_wh.WaitOne();
// ... continue execution
}If 100 clients called this method, 100 server threads would be
tied up for the duration of the blockage. Replacing _wh.WaitOne with RegisterWaitForSingleObject allows the
method to return immediately, wasting no threads:
void AppServerMethod
{
RegisteredWaitHandle reg = ThreadPool.RegisterWaitForSingleObject
(_wh, Resume, null, −1, true);
...
}
static void Resume (object data, bool timedOut)
{
// ... continue execution
}The data object passed to Resume allows continuance of any transient
data.
In addition to the Set,
WaitOne, and Reset methods, there are static methods on
the WaitHandle class to crack more
complex synchronization nuts. The WaitAny, WaitAll, and SignalAndWait methods perform atomic signaling
and waiting operations on multiple handles. The wait handles can be of
differing types (including Mutex
and Semaphore, since these also
derive from the abstract WaitHandle
class). ManualResetEventSlim and
CountdownEvent can also partake in
these methods via their WaitHandle
properties.
Warning
WaitAll and SignalAndWait have a weird connection to
the legacy COM architecture: these methods require that the caller
be in a multithreaded apartment, the model least suitable for
interoperability. The main thread of a WPF or Windows application,
for example, is unable to interact with the clipboard in this mode.
We’ll discuss alternatives shortly.
WaitHandle.WaitAny waits for
any one of an array of wait handles; WaitHandle.WaitAll waits on all of the given
handles, atomically. This means that if you wait on two AutoResetEvents:
WaitAnywill never end up “latching” both events.WaitAllwill never end up “latching” only one event.
SignalAndWait calls Set on one WaitHandle, and then calls WaitOne on another WaitHandle. The atomicity
guarantee is that after signaling the first handle, it will jump to
the head of the queue in waiting on the second handle: you can think
of it as “swapping” one signal for another. You can use this method on
a pair of EventWaitHandles to set
up two threads to rendezvous or “meet” at the same point in time.
Either AutoResetEvent or ManualResetEvent will do the trick. The
first thread executes the following:
WaitHandle.SignalAndWait (wh1, wh2);
whereas the second thread does the opposite:
WaitHandle.SignalAndWait (wh2, wh1);
WaitAll and SignalAndWait
won’t run in a single-threaded apartment. Fortunately, there are
alternatives. In the case of SignalAndWait, it’s rare that you need its
atomicity guarantee: in our rendezvous example, for instance, you
could simply call Set on the
first wait handle, and then WaitOne on the other. In The Barrier Class, we’ll explore yet another option for
implementing a thread rendezvous.
In the case of WaitAll, an
alternative in some situations is to use the Parallel class’s Invoke method, which we’ll cover in the
following chapter. (In that chapter we’ll also cover Tasks and continuations, and see how
TaskFactory’s ContinueWhenAny
provides an alternative to WaitAny.)
In all other scenarios, the answer is to take the low-level
approach that solves all signaling problems: Wait and Pulse.
The Monitor class provides a low-level signaling construct via the static methods
Wait and Pulse (and PulseAll). The principle is that you write the
signaling logic yourself using custom flags and fields (enclosed in
lock statements), and then introduce
Wait and Pulse commands to prevent spinning. With just
these methods and the lock statement,
you can achieve the functionality of AutoResetEvent, ManualResetEvent, and Semaphore, as well as (with some caveats)
WaitHandle’s static methods WaitAll and WaitAny. Furthermore, Wait and Pulse can be amenable in situations where all
of the wait handles are parsimoniously challenged.
Wait and Pulse signaling, however, has a number of
disadvantages over event wait handles:
Wait/Pulsecannot span application domains or processes on a computer.Wait/Pulsecannot be used in the asynchronous method pattern (see Chapter 23) because the thread pool offersMonitor.Waitno equivalent ofRegisterWaitForSingleObject, so a blockedWaitcannot avoid monopolizing a thread.You must remember to protect all variables related to the signaling logic with locks.
Wait/Pulseprograms may confuse developers relying on Microsoft’s documentation.
The documentation problem arises because it’s not obvious how
Wait and Pulse are supposed to be used, even when
you’ve read up on how they work. Wait
and Pulse also have a peculiar
aversion to dabblers: they will seek out any holes in your understanding
and then delight in tormenting you! Fortunately, there is a simple
pattern of use that tames Wait and
Pulse.
In terms of performance, calling Pulse takes a few hundred nanoseconds—about
half the time it takes to call Set on
a wait handle. Calling Wait will
always block and incur the overhead of a context switch—but you don’t
necessarily need to Wait if you
follow our suggested pattern of use.
Here’s how to use Wait and
Pulse:
Define a single field for use as the synchronization object, such as:
readonly object _locker = new object();
Define field(s) for use in your custom blocking condition(s). For example:
bool _go;
or:int _semaphoreCount;Whenever you want to block, include the following code:
lock (_locker) while (
<blocking-condition>) Monitor.Wait (_locker);Whenever you change (or potentially change) a blocking condition, include this code:
lock (_locker) {< alter the field(s) or data that mightimpact the blocking condition(s) >Monitor.Pulse (_locker); //or:Monitor.PulseAll (_locker) }(If you change a blocking condition and want to block, you can incorporate steps 3 and 4 in a single
lockstatement.)
This pattern allows any thread to wait at any time for any
condition. Here’s a simple example, where a worker thread waits until
the _go field is set to true:
class SimpleWaitPulse
{
static readonly object _locker = new object();
static bool _go;
static void Main()
{ // The new thread will block
new Thread (Work).Start(); // because _go==false.
Console.ReadLine(); // Wait for user to hit Enter
lock (_locker) // Let's now wake up the thread by
{ // setting _go=true and pulsing.
_go = true;
Monitor.Pulse (_locker);
}
}
static void Work()
{
lock (_locker)
while (!_go)
Monitor.Wait (_locker); // Lock is released while we're waiting
Console.WriteLine ("Woken!!!");
}
}
// Output
Woken!!! (after pressing Enter)For thread safety, we ensure that all shared fields are accessed
within a lock. Hence, we add lock
statements around both reading and updating the _go flag. This is essential (unless you’re
willing to follow the nonblocking synchronization principles).
The Work method is where we
block, waiting for the _go flag to
become true. The Monitor.Wait method does the following, in
order:
Releases the lock on
_locker.Blocks until
_lockeris “pulsed.”Reacquires the lock on
_locker. If the lock is contended, then it blocks until the lock is available.
Note
This means that despite appearances, no
lock is held on the synchronization object while Monitor.Wait awaits a pulse:
lock (_locker)
{
while (!_go)
Monitor.Wait (_locker); // _lock is released
// lock is regained
...
}Execution then continues at the next statement. Monitor.Wait is designed for use within a
lock statement; it throws an
exception if called otherwise. The same goes for Monitor.Pulse.
In the Main method, we signal
the worker by setting the _go flag
(within a lock) and calling Pulse.
As soon as we release the lock, the worker
resumes execution, reiterating its while loop.
The Pulse and PulseAll methods release threads blocked on
a Wait statement. Pulse releases a maximum of one thread;
PulseAll releases them all. In our
example, just one thread is blocked, so their effects are identical.
If more than one thread is waiting, calling PulseAll is usually
safest with our suggested pattern of use.
Note
In order for Wait to
communicate with Pulse or
PulseAll, the synchronizing
object (_locker, in our case)
must be the same.
In our pattern, pulsing indicates that something might
have changed, and that waiting threads should recheck their
blocking conditions. In the Work
method, this check is accomplished via the while loop. The waiter
then decides whether to continue, not the
notifier. If pulsing by itself is taken as instruction to
continue, the Wait construct is
stripped of any real value; you end up with an inferior version of an
AutoResetEvent.
If we abandon our pattern, removing the while loop, the _go flag, and the ReadLine, we get a bare-bones Wait/Pulse example:
static void Main()
{
new Thread (Work).Start();
lock (_locker) Monitor.Pulse (_locker);
}
static void Work()
{
lock (_locker) Monitor.Wait (_locker);
Console.WriteLine ("Woken!!!");
}It’s not possible to display the output, because it’s
nondeterministic! A race ensues between the main thread and the
worker. If Wait executes first, the
signal works. If Pulse executes
first, the pulse is lost and the worker remains
forever stuck. This differs from the behavior of an AutoResetEvent, where its Set method has a memory or “latching”
effect, so it is still effective if called before WaitOne.
Pulse has no latching effect
because you’re expected to write the latch yourself, using a “go” flag
as we did before. This is what makes Wait and Pulse versatile: with a boolean flag, we can
make it function as an AutoResetEvent; with an integer field, we
can imitate a Semaphore. With more
complex data structures, we can go further and write such constructs
as a producer/consumer queue.
A producer/consumer queue is a common requirement in threading. Here’s how it works:
A queue is set up to describe work items—or data upon which work is performed.
When a task needs executing, it’s enqueued, allowing the caller to get on with other things.
One or more worker threads plug away in the background, picking off and executing queued items.
The advantage of this model is that you have precise control over how many worker threads execute at once. This can allow you to limit consumption of not only CPU time, but other resources as well. If the tasks perform intensive disk I/O, for instance, you might have just one worker thread to avoid starving the operating system and other applications. Another type of application may have 20. You can also dynamically add and remove workers throughout the queue’s life. The CLR’s thread pool itself is a kind of producer/consumer queue.
A producer/consumer queue typically holds items of data upon which (the same) task is performed. For example, the items of data may be filenames, and the task might be to encrypt those files. By making the item a delegate, however, we can write a very general-purpose producer/consumer queue where each item can do anything. Here’s an example that does exactly that:
Note
Framework 4.0 provides a new class called BlockingCollection<T> that
implements the functionality of a producer/consumer queue. We’ll
cover this in Concurrent Collections in the
following chapter.
Our manually written producer/consumer queue is still
valuable—not only to illustrate Wait/Pulse and thread safety, but also as a
basis for more sophisticated structures. For instance, if you wanted
a bounded blocking queue (limiting the number
of enqueued elements) that allowed cancellation (and removal) of
enqueued work items, the following code would provide an excellent
starting point.
using System;
using System.Threading;
using System.Collections.Generic;
public class PCQueue : IDisposable
{
readonly object _locker = new object();
Thread[] _workers;
Queue<Action> _itemQ = new Queue<Action>();
public PCQueue (int workerCount)
{
_workers = new Thread [workerCount];
// Create and start a separate thread for each worker
for (int i = 0; i < workerCount; i++)
(_workers [i] = new Thread (Consume)).Start();
}
public void Dispose()
{
// Enqueue one null item per worker to make each exit.
foreach (Thread worker in _workers) EnqueueItem (null);
}
public void EnqueueItem (Action item)
{
lock (_locker)
{
_itemQ.Enqueue (item); // We must pulse because we're
Monitor.Pulse (_locker); // changing a blocking condition.
}
}
void Consume()
{
while (true) // Keep consuming until
{ // told otherwise.
Action item;
lock (_locker)
{
while (_itemQ.Count == 0) Monitor.Wait (_locker);
item = _itemQ.Dequeue();
}
if (item == null) return; // This signals our exit.
item(); // Execute item.
}
}
}Again we have an exit strategy: enqueuing a null item signals a consumer to finish after completing any outstanding items (if we want it to quit sooner, we could use an independent “cancel” flag). Because we’re supporting multiple consumers, we must enqueue one null item per consumer to completely shut down the queue.
Here’s a Main method that
starts a producer/consumer queue, specifying two concurrent consumer
threads, and then enqueues 10 delegates to be shared among the two
consumers:
static void Main()
{
  using (PCQueue q = new PCQueue (2))
  {
    for (int i = 0; i < 10; i++)
    {
      int itemNumber = i;      // To avoid the captured variable trap
      q.EnqueueItem (() =>
      {
        Thread.Sleep (1000);          // Simulate time-consuming work
        Console.Write (" Task" + itemNumber);
      });
    }

    Console.WriteLine ("Enqueued 10 items");
    Console.WriteLine ("Waiting for items to complete...");
  }

  // Exiting the using statement runs PCQueue's Dispose method, which
  // tells the consumers to end when outstanding items are complete.
}

// Output:
Enqueued 10 items
Waiting for items to complete...
 Task1 Task0 (pause...) Task2 Task3 (pause...) Task4 Task5 (pause...)
 Task6 Task7 (pause...) Task8 Task9 (pause...)
Let’s revisit PCQueue and
examine the Consume method, where a
worker picks off and executes an item from the queue. We want the
worker to block while there’s nothing to do; in other words, when
there are no items on the queue. Hence, our blocking condition is
_itemQ.Count == 0:
      Action item;
      lock (_locker)
      {
        while (_itemQ.Count == 0) Monitor.Wait (_locker);
        item = _itemQ.Dequeue();
      }
      if (item == null) return;         // This signals our exit
      item();                           // Perform task.
The while loop exits when
_itemQ.Count is nonzero, meaning
that (at least) one item is outstanding. We must dequeue the item
before releasing the lock—otherwise, the item may
not be there for us to dequeue; the presence of other threads means
things can change while you blink. In particular, another consumer
just finishing a previous job could sneak in and dequeue our item if
we weren’t meticulous with locking.
After the item is dequeued, we release the lock immediately. If we held on to it while performing the task, we would unnecessarily block other consumers and producers. We don’t pulse after dequeuing, as no other consumer can ever unblock by there being fewer items on the queue.
Warning
Locking briefly is advantageous when using Wait and Pulse (and
in general), as it avoids unnecessarily blocking other
threads. Locking across many lines of code is fine—providing they
all execute quickly. Remember
that you’re helped by Monitor.Wait’s releasing the
underlying lock while awaiting a pulse!
For the sake of efficiency, we call Pulse instead of PulseAll when enqueuing an item. This is
because (at most) one consumer needs to be woken per item. If you had
just one ice cream, you wouldn’t wake a class of 30 sleeping children
to queue for it; similarly, with 30 consumers, there’s no benefit in
waking them all—only to have 29 spin a useless iteration on their
while loop before going back to
sleep. We wouldn’t break anything functionally, however, by replacing
Pulse with PulseAll.
You can specify a timeout when calling Wait, either in milliseconds or as a
TimeSpan. The
Wait method then returns false if it gave up because of a timeout.
The timeout applies only to the waiting phase.
Hence, a Wait with a timeout does
the following:
Releases the underlying lock
Blocks until pulsed, or the timeout elapses
Reacquires the underlying lock
Specifying a timeout is like asking the CLR to give you a
“virtual pulse” after the timeout interval. A timed-out Wait will still perform step 3 and reacquire
the lock—just as if pulsed.
Warning
Should Wait block in step 3
(while reacquiring the lock), any timeout is ignored. This is rarely
an issue, though, because other threads will lock only briefly in a
well-designed Wait/Pulse application. So, reacquiring the
lock should be a near-instant operation.
Wait timeouts have a useful
application. Sometimes it may be unreasonable or impossible to
Pulse whenever an unblocking
condition arises. An example might be if a blocking condition involves
calling a method that derives information from periodically querying a
database. If latency is not an issue, the solution is simple—you can
specify a timeout when calling Wait, as follows:
lock (_locker) while (<blocking-condition>) Monitor.Wait (_locker,<timeout>);
This forces the blocking condition to be rechecked at the
interval specified by the timeout, as well as when pulsed. The simpler
the blocking condition, the smaller the timeout can be without
creating inefficiency. In this case, we don’t care whether the
Wait was pulsed or timed out, so we
ignore its return value.
The same system works equally well if the pulse is absent due to
a bug in the program. It can be worth adding a timeout to all Wait commands in programs where
synchronization is particularly complex, as an ultimate backup for
obscure pulsing errors. It also provides a degree of bug immunity if
the program is modified later by someone not on the Pulse!
Note
Monitor.Wait returns a
bool value indicating whether it
got a “real” pulse. If this returns false, it means that it timed out:
sometimes it can be useful to log this or throw an exception if the
timeout was unexpected.
We can use Wait and
Pulse to simulate a ManualResetEvent as follows:
readonly object _locker = new object();
bool _signal;

void WaitOne()
{
  lock (_locker)
  {
    while (!_signal) Monitor.Wait (_locker);
  }
}

void Set()
{
  lock (_locker) { _signal = true; Monitor.PulseAll (_locker); }
}

void Reset() { lock (_locker) _signal = false; }
We used PulseAll because
there could be any number of blocked waiters. Simulating an AutoResetEvent is simply a matter of
replacing the code in WaitOne with
this:
lock (_locker)
{
  while (!_signal) Monitor.Wait (_locker);
  _signal = false;
}
and replacing PulseAll with
Pulse in the Set method:
lock (_locker) { _signal = true; Monitor.Pulse (_locker); }Note
Use of PulseAll would forgo
fairness in the queuing of backlogged waiters, because each call to
PulseAll would result in the
queue breaking and then re-forming.
Replacing _signal with an
integer field would form the basis of a Semaphore.
Simulating the static methods that work across a set of wait
handles is easy in simple scenarios. The equivalent of calling
WaitAll is nothing more than a
blocking condition that incorporates all the flags used in place of
the wait handles:
lock (_locker)
  while (!_flag1 && !_flag2 && !_flag3...)
    Monitor.Wait (_locker);
This can be particularly useful given that WaitAll is often unusable due to COM legacy
issues. Simulating WaitAny is
simply a matter of replacing the && operator with the || operator.
The Barrier class is a
signaling construct new to Framework 4.0. It implements a
thread execution barrier, which allows many
threads to rendezvous at a point in time. The class is very fast and
efficient, and is built upon Wait,
Pulse, and spinlocks.
To use this class:
Instantiate it, specifying how many threads should partake in the rendezvous (you can change this later by calling
AddParticipants/RemoveParticipants).Have each thread call
SignalAndWaitwhen it wants to rendezvous.
Instantiating Barrier with a
value of 3 causes SignalAndWait to block until that method has
been called three times. It then starts over: calling SignalAndWait again blocks until called
another three times. This keeps each thread “in step” with every other
thread.
In the following example, each of three threads writes the numbers 0 through 4, while keeping in step with the other threads:
static Barrier _barrier = new Barrier (3);

static void Main()
{
  new Thread (Speak).Start();
  new Thread (Speak).Start();
  new Thread (Speak).Start();
}

static void Speak()
{
  for (int i = 0; i < 5; i++)
  {
    Console.Write (i + " ");
    _barrier.SignalAndWait();
  }
}

OUTPUT:  0 0 0 1 1 1 2 2 2 3 3 3 4 4 4
A really useful feature of Barrier is that you can also specify a
post-phase action when constructing it. This is a
delegate that runs after SignalAndWait has been called
n times, but before the
threads are unblocked (as shown in the shaded area in Figure 21-4). In our example, if we instantiate our barrier as
follows:
static Barrier _barrier = new Barrier (3, barrier => Console.WriteLine());then the output is:
0 0 0
1 1 1
2 2 2
3 3 3
4 4 4

A post-phase action can be useful for coalescing data from each of the worker threads. It doesn’t have to worry about preemption, because all workers are blocked while it does its thing.
The event-based asynchronous pattern (EAP) provides a simple means by which classes can offer multithreading capability without consumers needing to explicitly start or manage threads. It also provides the following features:
A cooperative cancellation model
The ability to safely update WPF or Windows Forms controls when the worker completes
Forwarding of exceptions to the completion event
The EAP is just a pattern, so these features must be written by
the implementer. Just a few classes in the Framework follow this
pattern, most notably BackgroundWorker (which we’ll cover next), and
WebClient in System.Net. Essentially the pattern is this: a
class offers a family of members that internally manage multithreading,
similar to the following.
// These members are from the WebClient class: public byte[] DownloadData (Uri address); // Synchronous version public void DownloadDataAsync(Uri address); public void DownloadDataAsync(Uri address,object userToken); public event DownloadDataCompletedEventHandlerDownloadDataCompleted; public void CancelAsync (object userState); // Cancels an operation public bool IsBusy { get; } // Indicates if still running
The *Async methods execute
asynchronously: in other words, they start an operation on another
thread and then return immediately to the caller. When the operation
completes, the *Completed event fires—automatically calling
Invoke if required by a WPF
application. This event passes back an event arguments object that
contains:
A flag indicating whether the operation was canceled (by the consumer calling
CancelAsync)An
Errorobject indicating an exception that was thrown (if any)The
userTokenobject if supplied when calling theAsyncmethod
Here’s how we can use WebClient’s EAP members to download a web
page:
var wc = new WebClient();
wc.DownloadStringCompleted += (sender, args) =>
{
  if (args.Cancelled)
    Console.WriteLine ("Canceled");
  else if (args.Error != null)
    Console.WriteLine ("Exception: " + args.Error.Message);
  else
  {
    Console.WriteLine (args.Result.Length + " chars were downloaded");
    // We could update the UI from here...
  }
};
wc.DownloadStringAsync (new Uri ("http://www.linqpad.net"));  // Start it
A class following the EAP may offer additional groups of asynchronous methods. For instance:
public string DownloadString (Uri address);
public void DownloadStringAsync (Uri address);
public void DownloadStringAsync (Uri address, object userToken);
public event DownloadStringCompletedEventHandler DownloadStringCompleted;
However, these will share the same CancelAsync and IsBusy members. Therefore, only one
asynchronous operation can happen at once.
Note
The EAP offers the possibility of economizing on threads, if its internal implementation follows the APM (see Chapter 23).
We’ll see in the next chapter how Tasks offer similar capabilities—including
exception forwarding, continuations, cancellation tokens, and support
for synchronization contexts. This makes
implementing the EAP less attractive—except in
simple cases where BackgroundWorker
will do.
BackgroundWorker is a helper class in the System.ComponentModel namespace for managing a
worker thread. It can be considered a general-purpose implementation of
the EAP, and provides the following features:
A cooperative cancellation model
The ability to safely update WPF or Windows Forms controls when the worker completes
Forwarding of exceptions to the completion event
A protocol for reporting progress
An implementation of
IComponentallowing it to be sited in Visual Studio’s designer
BackgroundWorker uses the
thread pool, which means you should never call Abort on a BackgroundWorker thread.
Here are the minimum steps in using BackgroundWorker:
Instantiate
BackgroundWorkerand handle theDoWorkevent.Call
RunWorkerAsync, optionally with anobjectargument.
This then sets it in motion. Any argument passed to RunWorkerAsync will be forwarded to DoWork’s event handler, via the event
argument’s Argument property.
Here’s an example:
class Program
{
  static BackgroundWorker _bw = new BackgroundWorker();

  static void Main()
  {
    _bw.DoWork += bw_DoWork;
    _bw.RunWorkerAsync ("Message to worker");
    Console.ReadLine();
  }

  static void bw_DoWork (object sender, DoWorkEventArgs e)
  {
    // This is called on the worker thread
    Console.WriteLine (e.Argument);        // writes "Message to worker"
    // Perform time-consuming task...
  }
}
BackgroundWorker has a
RunWorkerCompleted event that fires
after the DoWork event handler has
done its job. Handling RunWorkerCompleted is not mandatory, but you
usually do so in order to query any exception that was thrown in
DoWork. Further, code within a
RunWorkerCompleted event handler is
able to update user interface controls without explicit marshaling;
code within the DoWork event
handler cannot.
To add support for progress reporting:
Set the
WorkerReportsProgressproperty totrue.Periodically call
ReportProgressfrom within theDoWorkevent handler with a “percentage complete” value, and optionally, a user-state object.Handle the
ProgressChangedevent, querying its event argument’sProgressPercentageproperty.Code in the
ProgressChangedevent handler is free to interact with UI controls just as withRunWorkerCompleted. This is typically where you will update a progress bar.
To add support for cancellation:
Set the
WorkerSupportsCancellationproperty totrue.Periodically check the
CancellationPendingproperty from within theDoWorkevent handler. If it’strue, set the event argument’sCancelproperty totrue, and return. (The worker can also setCanceland exit withoutCancellationPendingbeingtrueif it decides that the job is too difficult and it can’t go on.)Call
CancelAsyncto request cancellation.
Here’s an example that implements all the preceding features:
using System;
using System.Threading;
using System.ComponentModel;class Program
{
  static BackgroundWorker _bw;

  static void Main()
  {
    _bw = new BackgroundWorker
    {
      WorkerReportsProgress = true,
      WorkerSupportsCancellation = true
    };
    _bw.DoWork += bw_DoWork;
    _bw.ProgressChanged += bw_ProgressChanged;
    _bw.RunWorkerCompleted += bw_RunWorkerCompleted;

    _bw.RunWorkerAsync ("Hello to worker");

    Console.WriteLine ("Press Enter in the next 5 seconds to cancel");
    Console.ReadLine();
    if (_bw.IsBusy) _bw.CancelAsync();
    Console.ReadLine();
  }

  static void bw_DoWork (object sender, DoWorkEventArgs e)
  {
    for (int i = 0; i <= 100; i += 20)
    {
      if (_bw.CancellationPending) { e.Cancel = true; return; }
      _bw.ReportProgress (i);
      Thread.Sleep (1000);      // Just for the demo... don't go sleeping
    }                           // for real in pooled threads!

    e.Result = 123;    // This gets passed to RunWorkerCompleted
  }

  static void bw_RunWorkerCompleted (object sender,
                                     RunWorkerCompletedEventArgs e)
  {
    if (e.Cancelled)
      Console.WriteLine ("You canceled!");
    else if (e.Error != null)
      Console.WriteLine ("Worker exception: " + e.Error.ToString());
    else
      Console.WriteLine ("Complete: " + e.Result);      // from DoWork
  }

  static void bw_ProgressChanged (object sender,
                                  ProgressChangedEventArgs e)
  {
    Console.WriteLine ("Reached " + e.ProgressPercentage + "%");
  }
}

// Output:
Press Enter in the next 5 seconds to cancel
Reached 0%
Reached 20%
Reached 40%
Reached 60%
Reached 80%
Reached 100%
Complete: 123

Press Enter in the next 5 seconds to cancel
Reached 0%
Reached 20%
Reached 40%

You canceled!All blocking methods (such as Sleep, Join, EndInvoke, and Wait) block forever if the unblocking
condition is never met and no timeout is specified. Occasionally, it can
be useful to release a blocked thread prematurely; for instance, when
ending an application. Two methods accomplish this:
Thread.InterruptThread.Abort
The Abort method is also
capable of ending a nonblocked thread—stuck, perhaps, in an infinite
loop. Abort is occasionally useful in
niche scenarios; Interrupt is almost never needed.
Warning
Interrupt and Abort can cause considerable trouble: it’s
precisely because they seem like obvious choices
in solving a range of problems that it’s worth examining their
pitfalls.
Calling Interrupt on a
blocked thread forcibly releases it, throwing a ThreadInterruptedException, as
follows:
static void Main()
{
  Thread t = new Thread (delegate()
  {
    try { Thread.Sleep (Timeout.Infinite); }
    catch (ThreadInterruptedException) { Console.Write ("Forcibly "); }
    Console.WriteLine ("Woken!");
  });
  t.Start();
  t.Interrupt();
}

// Output:
Forcibly Woken!
Interrupting a thread does not cause the thread to end, unless
the ThreadInterruptedException is
unhandled.
If Interrupt is called on a
thread that’s not blocked, the thread continues executing until it
next blocks, at which point a ThreadInterruptedException is thrown. This
avoids the need for the following test:
if ((worker.ThreadState & ThreadState.WaitSleepJoin) > 0)
  worker.Interrupt();
which is not thread-safe because of the possibility of
preemption between the if statement
and worker.Interrupt.
Interrupting a thread arbitrarily is dangerous, however, because
any framework or third-party methods in the calling stack could
unexpectedly receive the interrupt rather than your intended code. All
it would take is for the thread to block briefly on a simple lock or
synchronization resource, and any pending interruption would kick in.
If the method isn’t designed to be interrupted (with appropriate
cleanup code in finally blocks),
objects could be left in an unusable state or resources incompletely
released.
Moreover, Interrupt is
unnecessary: if you are writing the code that blocks, you can achieve
the same result more safely with a signaling construct—or Framework
4.0’s cancellation tokens (see Safe Cancellation).
And if you want to “unblock” someone else’s code, Abort is nearly always more useful.
A blocked thread can also be forcibly released via its
Abort method. This has an effect
similar to calling Interrupt,
except that a ThreadAbortException
is thrown instead of a ThreadInterruptedException. Furthermore, the
exception will be rethrown at the end of the catch block (in an attempt to terminate the
thread for good) unless Thread.ResetAbort is called within the
catch block. In the interim, the
thread has a ThreadState of
AbortRequested.
Note
An unhandled ThreadAbortException is one of only two
types of exception that does not cause application shutdown (the
other is AppDomainUnloadException).
The big difference between Interrupt and Abort is what happens when it’s called on a
thread that is not blocked. Whereas Interrupt waits until the thread next blocks
before doing anything, Abort throws
an exception on the thread right where it’s executing (unmanaged code
excepted). This is a problem because .NET Framework code might be
aborted; code that is not abort-safe. For example, if an abort occurs
while a FileStream is being
constructed, it’s possible that an unmanaged file handle will remain
open until the application domain ends. This rules out using Abort in almost any nontrivial
context.
Note
For a discussion as to why aborting .NET Framework code is not safe, see the topic “Aborting Threads” at http://www.albahari.com/threading/.
There are two cases, though, where you can safely use Abort. One is if you are willing to tear
down a thread’s application domain after it is aborted. A good example
of when you might do this is in writing a unit-testing framework. (We
discuss application domains fully in Chapter 24.) Another case where you can call
Abort safely is on your own thread
(because you know exactly where you are). Aborting your own thread
throws an “unswallowable” exception: one that gets rethrown after each
catch block. ASP.NET does exactly this when you call Redirect.
Note
LINQPad aborts threads when you cancel a runaway query. After aborting, it dismantles and re-creates the query’s application domain to avoid the potentially polluted state that could otherwise occur.
As we saw in the preceding section, calling Abort on a thread is dangerous in most
scenarios. The alternative, then, is to implement a
cooperative pattern whereby the worker periodically
checks a flag that indicates whether it should abort (like in BackgroundWorker). To cancel, the instigator
simply sets the flag, and then waits for the worker to comply. This
BackgroundWorker helper class
implements such a flag-based cancellation pattern, and you easily
implement one yourself.
The obvious disadvantage is that the worker method must be written explicitly to support cancellation. Nonetheless, this is one of the few safe cancellation patterns. To illustrate this pattern, we’ll first write a class to encapsulate the cancellation flag:
class RulyCanceler
{
  object _cancelLocker = new object();
  bool _cancelRequest;
  public bool IsCancellationRequested
  {
    get { lock (_cancelLocker) return _cancelRequest; }
  }

  public void Cancel() { lock (_cancelLocker) _cancelRequest = true; }

  public void ThrowIfCancellationRequested()
  {
    if (IsCancellationRequested) throw new OperationCanceledException();
  }
}
Note
OperationCanceledException is
a Framework type intended for just this purpose. Any exception class
will work just as well, though.
We can use this as follows:
class Test
{
  static void Main()
  {
    var canceler = new RulyCanceler();
    new Thread (() => {
                        try { Work (canceler); }
                        catch (OperationCanceledException)
                        {
                          Console.WriteLine ("Canceled!");
                        }
                      }).Start();
    Thread.Sleep (1000);
    canceler.Cancel();               // Safely cancel worker.
  }

  static void Work (RulyCanceler c)
  {
    while (true)
    {
      c.ThrowIfCancellationRequested();
      // ...
      try      { OtherMethod (c); }
      finally  { /* any required cleanup */ }
    }
  }

  static void OtherMethod (RulyCanceler c)
  {
    // Do stuff...
    c.ThrowIfCancellationRequested();
  }
}
We could simplify our example by eliminating the RulyCanceler class and adding the static
boolean field _cancelRequest to the
Test class. However, doing so would
mean that if several threads called Work at once, setting _cancelRequest to true would cancel all workers. Our RulyCanceler class is therefore a useful
abstraction. Its only inelegance is that when we look at the Work method’s signature, the intention is
unclear:
static void Work (RulyCanceler c)
Might the Work method itself
intend to call Cancel on the RulyCanceler object? In this instance, the
answer is no, so it would be nice if this could be enforced in the type
system. Framework 4.0 provides cancellation tokens
for this exact purpose.
Framework 4.0 provides two types that formalize the cooperative
cancellation pattern that we just demonstrated: CancellationTokenSource and CancellationToken. The two types work in
tandem:
A
CancellationTokenSourcedefines aCancelmethod.A
CancellationTokendefines anIsCancellationRequestedproperty andThrowIfCancellationRequestedmethod.
Together, these amount to a more sophisticated version of the
RulyCanceler class in our previous
example. But because the types are separate, you can isolate the
ability to cancel from the ability to check the cancellation
flag.
To use these types, first instantiate a CancellationTokenSource object:
var cancelSource = new CancellationTokenSource();
Then, pass its Token property
into a method for which you’d like to support cancellation:
new Thread (() => Work (cancelSource.Token)).Start();Here’s how Work would be
defined:
void Work (CancellationToken cancelToken)
{
  cancelToken.ThrowIfCancellationRequested();
  ...
}
When you want to cancel, simply call Cancel on cancelSource.
Note
CancellationToken is
actually a struct, although you can treat it like a class. When
implicitly copied, the copies behave identically and reference the
original CancellationTokenSource.
The CancellationToken struct
provides two additional useful members. The first is WaitHandle, which returns a wait handle
that’s signaled when the token is canceled. The second is Register, which lets you register a callback
delegate that will be fired upon cancellation.
Cancellation tokens are used within the .NET Framework itself, most notably in the following classes:
ManualResetEventSlimandSemaphoreSlimCountdownEventBarrierBlockingCollection(see Chapter 22)PLINQ and the Task Parallel Library (see Chapter 22)
Most of these classes’ use of cancellation tokens is in their
Wait methods. For example, if you
Wait on a ManualResetEventSlim and specify a
cancellation token, another thread can Cancel its wait. This is much tidier and
safer than calling Interrupt on the blocked thread.
A common problem in threading is how to lazily initialize a shared field in a thread-safe fashion. The need arises when you have a field of a type that’s expensive to construct:
class Foo
{
  public readonly Expensive Expensive = new Expensive();
  ...
}
class Expensive {  /* Suppose this is expensive to construct */  }
The problem with this code is that instantiating Foo incurs the performance cost of
instantiating Expensive—whether or
not the Expensive field is ever
accessed. The obvious answer is to construct the instance on
demand:
class Foo
{
  Expensive _expensive;
  public Expensive Expensive                 // Lazily instantiate Expensive
  {
    get
    {
      if (_expensive == null) _expensive = new Expensive();
      return _expensive;
    }
  }
  ...
}
The question then arises, is this thread-safe? Aside from the fact
that we’re accessing _expensive
outside a lock without a memory barrier, consider what would happen if
two threads accessed this property at once. They could both satisfy the
if statement’s predicate and each
thread might end up with a different instance of
Expensive. As
this may lead to subtle errors, we would say, in general, that this code
is not thread-safe.
The solution to the problem is to lock around checking and initializing the object:
Expensive _expensive;
readonly object _expenseLock = new object();

public Expensive Expensive
{
  get
  {
    lock (_expenseLock)
    {
      if (_expensive == null) _expensive = new Expensive();
      return _expensive;
    }
  }
}Framework 4.0 provides a new class called Lazy<T> to help with lazy
initialization. If instantiated with an argument of true, it implements the thread-safe
initialization pattern just described.
Note
Lazy<T> actually
implements a slightly more efficient version of this pattern, called
double-checked locking. Double-checked locking
performs an additional volatile read to avoid the cost of obtaining
a lock if the object is already initialized.
To use Lazy<T>,
instantiate the class with a value factory delegate that tells it how
to initialize a new value, and the argument true. Then access its value via the Value property:
Lazy<Expensive> _expensive = new Lazy<Expensive>
  (() => new Expensive(), true);

public static Expensive Expensive { get { return _expensive.Value; } }
If you pass false into
Lazy<T>’s constructor, it
implements the thread-unsafe lazy initialization pattern that we
described at the start of this section—this makes sense when you want
to use Lazy<T> in a
single-threaded context.
LazyInitializer is a static class that works exactly like Lazy<T> except:
Its functionality is exposed through a static method that operates directly on a field in your own type. This avoids a level of indirection, improving performance in cases where you need extreme optimization.
It offers another mode of initialization that has multiple threads race to initialize.
To use LazyInitializer, call
EnsureInitialized before accessing
the field, passing a reference to the field and the factory
delegate:
Expensive _expensive;
public Expensive Expensive
{
  get          // Implement double-checked locking
  {
    LazyInitializer.EnsureInitialized (ref _expensive,
                                      () => new Expensive());
    return _expensive;
  }
}
You can also pass in another argument to request that competing threads race to initialize. This sounds similar to our original thread-unsafe example, except that the first thread to finish always wins—and so you end up with only one instance. The advantage of this technique is that it’s even faster (on multicores) than double-checked locking—because it can be implemented entirely without locks. This is an extreme optimization that you rarely need, and one that comes at a cost:
It’s slower when more threads race to initialize than you have cores.
It potentially wastes CPU resources performing redundant initialization.
The initialization logic must be thread-safe (in this case, it would be thread-unsafe if
Expensive’s constructor wrote to static fields, for instance).If the initializer instantiates an object requiring disposal, the “wasted” object won’t get disposed without additional logic.
For reference, here’s how double-checked locking is implemented:
volatile Expensive _expensive;
public Expensive Expensive
{
  get
  {
    if (_expensive == null)
    {
      var expensive = new Expensive();
      lock (_expenseLock) if (_expensive == null) _expensive = expensive;
    }
    return _expensive;
  }
}
And here’s how the race-to-initialize pattern is implemented:
volatile Expensive _expensive;
public Expensive Expensive
{
  get
  {
    if (_expensive == null)
    {
      var instance = new Expensive();
      Interlocked.CompareExchange (ref _expensive, instance, null);
    }
    return _expensive;
  }
}Much of this chapter has focused on synchronization constructs and the issues arising from having threads concurrently access the same data. Sometimes, however, you want to keep data isolated, ensuring that each thread has a separate copy. Local variables achieve exactly this, but they are useful only with transient data.
The solution is thread-local storage. You might be hard-pressed to think of a requirement: data you’d want to keep isolated to a thread tends to be transient by nature. Its main application is for storing “out-of-band” data—that which supports the execution path’s infrastructure, such as messaging, transaction, and security tokens. Passing such data around in method parameters is extremely clumsy and alienates all but your own methods; storing such information in ordinary static fields means sharing it among all threads.
Note
Thread-local storage can also be useful in optimizing parallel code. It allows each thread to exclusively access its own version of a thread-unsafe object without needing locks—and without needing to reconstruct that object between method calls.
There are three ways to implement thread-local storage.
The easiest approach to thread-local storage is to mark a static field with the
ThreadStatic
attribute:
[ThreadStatic] static int _x;
Each thread then sees a separate copy of _x.
Unfortunately, [ThreadStatic]
doesn’t work with instance fields (it simply does nothing), nor does
it play well with field initializers—they execute only
once on the thread that’s running when the static
constructor executes. If you need to work with instance fields—or
start with a nondefault value—ThreadLocal<T> provides a better
option.
ThreadLocal<T>
is new to Framework 4.0. It provides thread-local
storage for both static and instance fields—and allows you to specify
default values.
Here’s how to create a ThreadLocal<int> with a default value
of 3 for each thread:
static ThreadLocal<int> _x = new ThreadLocal<int> (() => 3);
You then use _x’s Value property to get or set its
thread-local value. A bonus of using ThreadLocal is that values are lazily
evaluated: the factory function evaluates on the first call (for each
thread).
ThreadLocal<T> is
also useful with instance fields and captured local variables. For
example, consider the problem of generating random numbers in a
multithreaded environment. The Random class is not thread-safe, so we
have to either lock around using Random (limiting concurrency) or generate
a separate Random object for each
thread. ThreadLocal<T>
makes the latter easy:
var localRandom = new ThreadLocal<Random>(() => new Random());
Console.WriteLine (localRandom.Value.Next());
Our factory function for creating the Random object is a bit simplistic, though,
in that Random’s parameterless
constructor relies on the system clock for a random number seed.
This may be the same for two Random objects created within ~10 ms of
each other. Here’s one way to fix it:
var localRandom = new ThreadLocal<Random>
 ( () => new Random (Guid.NewGuid().GetHashCode()) );
We use this in the following chapter (see the parallel spellchecking example in PLINQ).
The third approach is to use two methods in the Thread class: GetData and SetData. These store data in thread-specific
“slots.” Thread.GetData reads from
a thread’s isolated data store; Thread.SetData writes to it. Both methods
require a LocalDataStoreSlot object
to identify the slot. The same slot can be used across all threads and
they’ll still get separate values. Here’s an example:
class Test
{
  // The same LocalDataStoreSlot object can be used across all threads.
  LocalDataStoreSlot _secSlot = Thread.GetNamedDataSlot ("securityLevel");

  // This property has a separate value on each thread.
  int SecurityLevel
  {
    get
    {
      object data = Thread.GetData (_secSlot);
      return data == null ? 0 : (int) data;    // null == uninitialized
    }
    set { Thread.SetData (_secSlot, value); }
  }
  ...
In this instance, we called Thread.GetNamedDataSlot, which creates a
named slot—this allows sharing of that slot across the application.
Alternatively, you can control a slot’s scope yourself by
instantiating a LocalDataStoreSlot
explicitly—without providing any name:
class Test
{
  LocalDataStoreSlot _secSlot = new LocalDataStoreSlot();
  ...
Thread.FreeNamedDataSlot will
release a named data slot across all threads, but only once all
references to that LocalDataStoreSlot have dropped out of scope
and have been garbage-collected. This ensures that threads don’t get
data slots pulled out from under their feet, as long as they keep a
reference to the appropriate LocalDataStoreSlot object while the
slot is needed.
Quite often, instances of a type are thread-safe for concurrent read
operations, but not for concurrent updates (nor for a concurrent read
and update). This can also be true with resources such as a file.
Although protecting instances of such types with a simple exclusive lock
for all modes of access usually does the trick, it can unreasonably
restrict concurrency if there are many readers and just occasional
updates. An example of where this could occur is in a business
application server, where commonly used data is cached for fast
retrieval in static fields. The ReaderWriterLockSlim class is designed to
provide maximum-availability locking in just this scenario.
Note
ReaderWriterLockSlim was
introduced in Framework 3.5 and is a replacement for the older “fat”
ReaderWriterLock class. The latter
is similar in functionality, but it is several times slower and has an
inherent design fault in its mechanism for handling lock
upgrades.
When compared to an ordinary lock (Monitor.Enter/Exit), ReaderWriterLockSlim is still twice as slow,
though.
With both classes, there are two basic kinds of lock—a read lock and a write lock:
A write lock is universally exclusive.
A read lock is compatible with other read locks.
So, a thread holding a write lock blocks all other threads trying to obtain a read or write lock (and vice versa). But if no thread holds a write lock, any number of threads may concurrently obtain a read lock.
ReaderWriterLockSlim defines
the following methods for obtaining and releasing read/write
locks:
public void EnterReadLock();
public void ExitReadLock();
public void EnterWriteLock();
public void ExitWriteLock();
Additionally, there are “Try” versions of all EnterXXX methods
that accept timeout arguments in the style of Monitor.TryEnter (timeouts can occur quite
easily if the resource is heavily contended). ReaderWriterLock provides similar methods,
named AcquireXXX and
ReleaseXXX. These
throw an ApplicationException if a
timeout occurs, rather than returning false.
The following program demonstrates ReaderWriterLockSlim. Three threads
continually enumerate a list, while two further threads append a random
number to the list every second. A read lock protects the list readers,
and a write lock protects the list writers:
class SlimDemo
{
  static ReaderWriterLockSlim _rw = new ReaderWriterLockSlim();
  static List<int> _items = new List<int>();
  static Random _rand = new Random();

  static void Main()
  {
    new Thread (Read).Start();
    new Thread (Read).Start();
    new Thread (Read).Start();

    new Thread (Write).Start ("A");
    new Thread (Write).Start ("B");
  }

  static void Read()
  {
    while (true)
    {
      _rw.EnterReadLock();
      foreach (int i in _items) Thread.Sleep (10);
      _rw.ExitReadLock();
    }
  }

  static void Write (object threadID)
  {
    while (true)
    {
      int newNumber = GetRandNum (100);
      _rw.EnterWriteLock();
      _items.Add (newNumber);
      _rw.ExitWriteLock();
      Console.WriteLine ("Thread " + threadID + " added " + newNumber);
      Thread.Sleep (100);
    }
  }

  static int GetRandNum (int max) { lock (_rand) return _rand.Next(max); }
}
Note
In production code, you’d typically add try/finally blocks to ensure that locks were
released if an exception was thrown.
Here’s the result:
Thread B added 61
Thread A added 83
Thread B added 55
Thread A added 33
...
ReaderWriterLockSlim allows
more concurrent Read activity than a
simple lock would. We can illustrate this by inserting the following
line in the Write method, at the
start of the while loop:
Console.WriteLine (_rw.CurrentReadCount + " concurrent readers");
This nearly always prints “3 concurrent readers” (the Read methods spend most of their time inside
the foreach loops). As well as
CurrentReadCount, ReaderWriterLockSlim provides the following
properties for monitoring locks:
public bool IsReadLockHeld            { get; }
public bool IsUpgradeableReadLockHeld { get; }
public bool IsWriteLockHeld           { get; }

public int  WaitingReadCount          { get; }
public int  WaitingUpgradeCount       { get; }
public int  WaitingWriteCount         { get; }

public int  RecursiveReadCount        { get; }
public int  RecursiveUpgradeCount     { get; }
public int RecursiveWriteCount { get; }Sometimes it’s useful to swap a read lock for a write lock in a single atomic operation. For instance, suppose you want to add an item to a list only if the item wasn’t already present. Ideally, you’d want to minimize the time spent holding the (exclusive) write lock, so you might proceed as follows:
Obtain a read lock.
Test if the item is already present in the list, and if so, release the lock and
return.Release the read lock.
Obtain a write lock.
Add the item.
The problem is that another thread could sneak in and modify the
list (e.g., adding the same item) between steps 3 and 4. ReaderWriterLockSlim addresses this through
a third kind of lock called an upgradeable lock.
An upgradeable lock is like a read lock except that it can
later be promoted to a write lock in an atomic operation. Here’s how
you use it:
Call
EnterUpgradeableReadLock.Perform read-based activities (e.g., test whether the item is already present in the list).
Call
EnterWriteLock(this converts the upgradeable lock to a write lock).Perform write-based activities (e.g., add the item to the list).
Call
ExitWriteLock(this converts the write lock back to an upgradeable lock).Perform any other read-based activities.
Call
ExitUpgradeableReadLock.
From the caller’s perspective, it’s rather like nested or
recursive locking. Functionally, though, in step 3, ReaderWriterLockSlim releases your read lock
and obtains a fresh write lock, atomically.
There’s another important difference between upgradeable locks and read locks. While an upgradeable lock can coexist with any number of read locks, only one upgradeable lock can itself be taken out at a time. This prevents conversion deadlocks by serializing competing conversions—just as update locks do in SQL Server:
SQL Server | ReaderWriterLockSlim |
|---|---|
Share lock | Read lock |
Exclusive lock | Write lock |
Update lock | Upgradeable lock |
We can demonstrate an upgradeable lock by changing the Write method in the preceding example such
that it adds a number to list only if not already present:
while (true)
{
  int newNumber = GetRandNum (100);
  _rw.EnterUpgradeableReadLock();
  if (!_items.Contains (newNumber))
  {
    _rw.EnterWriteLock();
    _items.Add (newNumber);
    _rw.ExitWriteLock();
    Console.WriteLine ("Thread " + threadID + " added " + newNumber);
  }
  _rw.ExitUpgradeableReadLock();
  Thread.Sleep (100);
}
Note
ReaderWriterLock can also
do lock conversions—but unreliably because it doesn’t support the
concept of upgradeable locks. This is why the designers of ReaderWriterLockSlim had to start afresh
with a new class.
Ordinarily, nested or recursive locking is prohibited with
ReaderWriterLockSlim. Hence, the
following throws an exception:
var rw = new ReaderWriterLockSlim();
rw.EnterReadLock();
rw.EnterReadLock();
rw.ExitReadLock();
rw.ExitReadLock();
It runs without error, however, if you construct ReaderWriterLockSlim as follows:
var rw = new ReaderWriterLockSlim (LockRecursionPolicy.SupportsRecursion);This ensures that recursive locking can happen only if you plan for it. Recursive locking can create undesired complexity because it’s possible to acquire more than one kind of lock:
rw.EnterWriteLock();
rw.EnterReadLock();
Console.WriteLine (rw.IsReadLockHeld);     // True
Console.WriteLine (rw.IsWriteLockHeld);    // True
rw.ExitReadLock();
rw.ExitWriteLock();
The basic rule is that once you’ve acquired a lock, subsequent recursive locks can be less, but not greater, on the following scale:
| Read Lock→Upgradeable Lock→Write Lock |
A request to promote an upgradeable lock to a write lock, however, is always legal.
If you need to execute some method repeatedly at regular intervals, the easiest way is with a timer. Timers are convenient and efficient in their use of memory and resources—compared with techniques such as the following:
new Thread (delegate() {
                         while (enabled)
                         {
                           DoSomeAction();
                           Thread.Sleep (TimeSpan.FromHours (24));
                         }
                       }).Start();
Not only does this permanently tie up a thread resource, but
without additional coding, DoSomeAction will happen at a later time each
day. Timers solve these problems.
The .NET Framework provides four timers. Two of these are general-purpose multithreaded timers:
System.Threading.TimerSystem.Timers.Timer
The other two are special-purpose single-threaded timers:
System.Windows.Forms.Timer(Windows Forms timer)System.Windows.Threading.DispatcherTimer(WPF timer)
The multithreaded timers are more powerful, accurate, and flexible; the single-threaded timers are safer and more convenient for running simple tasks that update Windows Forms controls or WPF elements.
System.Threading.Timer
is the simplest multithreaded timer: it has just a constructor and two
methods (a delight for minimalists, as well as book authors!). In the
following example, a timer calls the Tick method, which writes “tick...” after
five seconds have elapsed, and then every second after that, until the
user presses Enter:
using System;
using System.Threading;

class Program
{
  static void Main()
  {
    // First interval = 5000ms; subsequent intervals = 1000ms
    Timer tmr = new Timer (Tick, "tick...", 5000, 1000);
    Console.ReadLine();
    tmr.Dispose();         // This both stops the timer and cleans up.
  }

  static void Tick (object data)
  {
    // This runs on a pooled thread
    Console.WriteLine (data);          // Writes "tick..."
  }
}
You can change a timer’s interval later by calling its Change method. If you want a timer to fire
just once, specify Timeout.Infinite
in the constructor’s last argument.
The .NET Framework provides another timer class of the same name
in the System.Timers namespace. This simply
wraps the System.Threading.Timer,
providing additional convenience while using the identical underlying
engine. Here’s a summary of its added features:
A
Componentimplementation, allowing it to be sited in Visual Studio’s designerAn
Intervalproperty instead of aChangemethodAn
Elapsedevent instead of a callback delegateAn
Enabledproperty to start and stop the timer (its default value beingfalse)StartandStopmethods in case you’re confused byEnabledAn
AutoResetflag for indicating a recurring event (default value istrue)A
SynchronizingObjectproperty withInvokeandBeginInvokemethods for safely calling methods on WPF elements and Windows Forms controls
Here’s an example:
using System;
using System.Timers;   // Timers namespace rather than Threading

class SystemTimer
{
  static void Main()
  {
    Timer tmr = new Timer();       // Doesn't require any args
    tmr.Interval = 500;
    tmr.Elapsed += tmr_Elapsed;    // Uses an event instead of a delegate
    tmr.Start();                   // Start the timer
    Console.ReadLine();
    tmr.Stop();                    // Stop the timer
    Console.ReadLine();
    tmr.Start();                   // Restart the timer
    Console.ReadLine();
    tmr.Dispose();                 // Permanently stop the timer
  }

  static void tmr_Elapsed (object sender, EventArgs e)
  {
    Console.WriteLine ("Tick");
  }
}
Multithreaded timers use the thread pool to allow a few threads
to serve many timers. This means that the callback method or Elapsed event may fire on a different thread
each time it is called. Furthermore, an Elapsed always fires (approximately) on
time—regardless of whether the previous Elapsed has finished executing. Hence,
callbacks or event handlers must be thread-safe.
The precision of multithreaded timers depends on the operating
system, and is typically in the 10–20 ms region. If you need greater
precision, you can use native interop and call the Windows multimedia
timer. This has precision down to 1 ms and it is defined in winmm.dll. First call timeBeginPeriod to inform the operating
system that you need high timing precision, and then call timeSetEvent to start a multimedia timer.
When you’re done, call timeKillEvent to stop the timer and timeEndPeriod to inform the OS that you no
longer need high timing precision. Chapter 25 demonstrates calling
external methods with P/Invoke. You can find complete examples on the
Internet that use the multimedia timer by searching for the keywords
dllimport winmm.dll timesetevent.
The .NET Framework provides timers designed to eliminate thread-safety issues for WPF and Windows Forms applications:
System.Windows.Threading.DispatcherTimer(WPF)System.Windows.Forms.Timer(Windows Forms)
Warning
The single-threaded timers are not designed to work outside
their respective environments. If you use a Windows Forms timer in a
Windows Service application, for instance, the Timer event won’t fire!
Both are like System.Timers.Timer in the members that they
expose (Interval, Tick, Start, and Stop) and are used in a similar manner.
However, they differ in how they work internally. Instead of using the
thread pool to generate timer events, the WPF and Windows Forms timers
rely on the message pumping mechanism of their underlying user
interface model. This means that the Tick event always fires on the same thread
that originally created the timer—which, in a normal application, is
the same thread used to manage all user interface elements and
controls. This has a number of benefits:
You can forget about thread safety.
A fresh
Tickwill never fire until the previousTickhas finished processing.You can update user interface elements and controls directly from
Tickevent handling code, without callingControl.InvokeorDispatcher.Invoke.
It sounds too good to be true, until you realize that a program employing these timers is not really multithreaded—there is no parallel execution. One thread serves all timers—as well as the processing UI events. This brings us to the disadvantage of single-threaded timers:
Unless the
Tickevent handler executes quickly, the user interface becomes unresponsive.
This makes the WPF and Windows Forms timers suitable for only small jobs, typically those that involve updating some aspect of the user interface (e.g., a clock or countdown display). Otherwise, you need a multithreaded timer.
In terms of precision, the single-threaded timers are similar to the multithreaded timers (tens of milliseconds), although they are typically less accurate, because they can be delayed while other user interface requests (or other timer events) are processed.
[13] The CLR creates other threads behind the scenes for garbage collection and finalization.
[14] Nuances in the behavior of Windows and the CLR mean that the fairness of the queue can sometimes be violated.
[15] As with locks, the fairness of the queue can sometimes be violated due to nuances in the operating system.