
The Framework offers a variety of classes in the System.Net.* namespaces for communicating via
standard network protocols, such as HTTP, TCP/IP, and FTP. Here’s a summary of the key components:
A
WebClientfaçade class for simple download/upload operations via HTTP or FTPWebRequestandWebResponseclasses for more control over client-side HTTP or FTP operationsHttpListenerfor writing an HTTP serverSmtpClientfor constructing and sending mail messages via SMTPDnsfor converting between domain names and addressesTcpClient,UdpClient,TcpListener, andSocketclasses for direct access to the transport and network layers
The Framework supports primarily Internet-based protocols, although this doesn’t limit applicability to the Internet; protocols such as TCP/IP also dominate local area networks.
The types described in this chapter are defined mostly in the
System.Net and System.Net.Sockets namespaces; however,
many of the examples also use types in System.IO.
Figure 15-1 illustrates the .NET networking types and the communication layers in which they reside. Most types reside in the transport layer or application layer. The transport layer defines basic protocols for sending and receiving bytes (TCP and UDP); the application layer defines higher-level protocols designed for specific applications such as retrieving web pages (HTTP), transferring files (FTP), sending mail (SMTP), and converting between domain names and IP addresses (DNS).
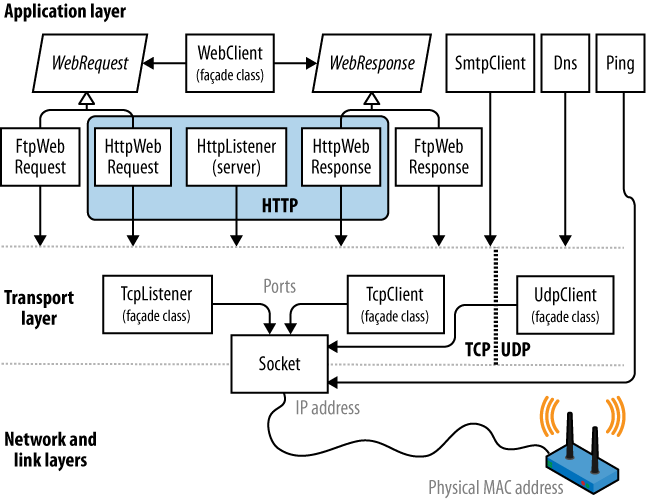
It’s usually most convenient to program at the application layer; however, there are a couple of reasons you might want to work directly at the transport layer. One is if you need an application protocol not provided in the Framework, such as POP3 for retrieving mail. Another is if you want to invent a custom protocol for a special application, such as a peer-to-peer client.
Of the application protocols, HTTP is special in that its use has extended to general-purpose communication. Its basic mode of operation—“give me the web page with this URL”—adapts nicely to “give me the return value from calling this method with these arguments.” HTTP has a rich set of features that are useful in multitier business applications and service-oriented architectures, such as protocols for authentication and encryption, message chunking, extensible headers and cookies, and the ability to have many server applications share a single port and IP address. For these reasons, HTTP is well supported in the Framework—both directly, as described in this chapter, and at a higher level, through such technologies as WCF, Web Services, and ASP.NET.
The Framework provides client-side support for FTP, the popular Internet protocol for sending and receiving files. Server-side support comes in the form of IIS or Unix-based server software.
As the preceding discussion makes clear, networking is a field that is awash in acronyms. Table 15-1 is a handy Network TLA (three-letter and more acronym buster).
Table 15-1. Network TLA (three-letter acronym) buster
Acronym | Expansion | Notes |
|---|---|---|
DNS | Domain Name Service | Converts between domain names (e.g., ebay.com) and IP addresses (e.g., 199.54.213.2) |
FTP | File Transfer Protocol | Internet-based protocol for sending and receiving files |
HTTP | Hypertext Transfer Protocol | Retrieves web pages and runs web services |
IIS | Internet Information Services | Microsoft’s web server software |
IP | Internet Protocol | Network-layer protocol below TCP and UDP |
LAN | Local Area Network | Most LANs use Internet-based protocols such as TCP/IP |
POP | Post Office Protocol | Retrieves Internet mail |
SMTP | Simple Mail Transfer Protocol | Sends Internet mail |
TCP | Transmission and Control Protocol | Transport-layer Internet protocol on top of which most higher-layer services are built |
UDP | Universal Datagram Protocol | Transport-layer Internet protocol used for low-overhead services such as VoIP |
UNC | Universal Naming Convention | \computersharenamefilename |
URI | Uniform Resource Identifier | Ubiquitous resource naming system (e.g., http://www.amazon.com or mailto:[email protected]) |
URL | Uniform Resource Locator | Technical meaning (fading from use): subset of URI; popular meaning: synonym of URI |
For communication to work, a computer or device requires an address. The Internet uses two addressing systems:
- IPv4
Currently the dominant addressing system; IPv4 addresses are 32 bits wide. When string-formatted, IPv4 addresses are written as four dot-separated decimals (e.g., 101.102.103.104). An address can be unique in the world—or unique within a particular subnet (such as on a corporate network).
- IPv6
The newer 128-bit addressing system. Addresses are string-formatted in hexadecimal with a colon separator (e.g., [3EA0:FFFF:198A:E4A3:4FF2:54f-A:41BC:8D31]). The .NET Framework requires that you add square brackets around the address.
The IPAddress class in the System.Net namespace represents an address in
either protocol. It has a constructor accepting a byte array, and a
static Parse method accepting a
correctly formatted string:
IPAddress a1 = new IPAddress (new byte[] { 101, 102, 103, 104 });
IPAddress a2 = IPAddress.Parse ("101.102.103.104");
Console.WriteLine (a1.Equals (a2));                     // True
Console.WriteLine (a1.AddressFamily);                   // InterNetwork

IPAddress a3 = IPAddress.Parse
  ("[3EA0:FFFF:198A:E4A3:4FF2:54fA:41BC:8D31]");
Console.WriteLine (a3.AddressFamily);   // InterNetworkV6
The TCP and UDP protocols break out each IP address into 65,535 ports, allowing a computer on a single address to run multiple applications, each on its own port. Many applications have standard port assignments; for instance, HTTP uses port 80; SMTP uses port 25.
Note
The TCP and UDP ports from 49152 to 65535 are officially unassigned, so they are good for testing and small-scale deployments.
An IP address and port combination is represented in the .NET
Framework by the IPEndPoint class:
IPAddress a = IPAddress.Parse ("101.102.103.104");
IPEndPoint ep = new IPEndPoint (a, 222);           // Port 222
Console.WriteLine (ep.ToString());                 // 101.102.103.104:222
Note
Firewalls block ports. In many corporate environments, only a few ports are in fact open—typically, port 80 (for unencrypted HTTP) and port 443 (for secure HTTP).
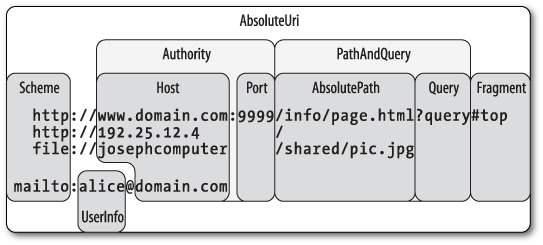
A URI is a specially formatted string that describes a resource on the Internet or a LAN, such as a web page, file, or email address. Examples include http://www.ietf.org, ftp://myisp/doc.txt, and mailto:[email protected]. The exact formatting is defined by the Internet Engineering Task Force (http://www.ietf.org/).
A URI can be broken up into a series of elements—typically,
scheme, authority, and path. The Uri class in the System namespace performs just this division,
exposing a property for each element. This is illustrated in Figure 15-2.
Note
The Uri class is useful when
you need to validate the format of a URI string or to split a URI into
its component parts. Otherwise, you can treat a URI simply as a
string—most networking methods are overloaded to accept either a
Uri object or a string.
You can construct a Uri object
by passing any of the following strings into its constructor:
A URI string, such as http://www.ebay.com or file://janespc/sharedpics/dolphin.jpg
An absolute path to a file on your hard disk, such as c:myfilesdata.xls
A UNC path to a file on the LAN, such as \janespcsharedpicsdolphin.jpg
File and UNC paths are automatically converted to URIs: the
“file:” protocol is added, and backslashes are converted to forward
slashes. The Uri constructors also
perform some basic cleanup on your string before creating the Uri, including converting the scheme and
hostname to lowercase and removing default and blank port numbers. If
you supply a URI string without the scheme, such as
“www.test.com”, a UriFormatException is thrown.
Uri has an IsLoopback property, which indicates whether
the Uri references the local host (IP
address 127.0.0.1), and an IsFile
property, which indicates whether the Uri references a local or UNC (IsUnc) path. If IsFile returns true, the LocalPath property returns a version of
AbsolutePath that is friendly to the
local operating system (with backslashes), on which you can call
File.Open.
Instances of Uri have read-only
properties. To modify an existing Uri, instantiate a UriBuilder object—this has writable properties
and can be converted back via its Uri
property.
Uri also provides methods for
comparing and subtracting paths:
Uri info = new Uri ("http://www.domain.com:80/info/");
Uri page = new Uri ("http://www.domain.com/info/page.html");

Console.WriteLine (info.Host);     // www.domain.com
Console.WriteLine (info.Port);     // 80
Console.WriteLine (page.Port);     // 80  (Uri knows the default HTTP port)

Console.WriteLine (info.IsBaseOf (page));         // True
Uri relative = info.MakeRelativeUri (page);
Console.WriteLine (relative.IsAbsoluteUri);       // False
Console.WriteLine (relative.ToString());          // page.html
A relative Uri, such as
page.html in this example, will
throw an exception if you call almost any property or method other than
IsAbsoluteUri and ToString(). You can instantiate a relative
Uri directly as follows:
Uri u = new Uri ("page.html", UriKind.Relative);Warning
A trailing slash is significant in a URI and makes a difference as to how a server processes a request if a path component is present.
For instance, given the URI http://www.albahari.com/nutshell/, you can expect an HTTP web server to look in the nutshell subdirectory in the site’s web folder and return the default document (usually index.html).
Without the trailing slash, the web server will instead look for a file called nutshell (without an extension) directly in the site’s root folder—which is usually not what you want. If no such file exists, most web servers will assume the user mistyped and will return a 301 Permanent Redirect error, suggesting the client retries with the trailing slash. A .NET HTTP client, by default, will respond transparently to a 301 in the same way as a web browser—by retrying with the suggested URI. This means that if you omit a trailing slash when it should have been included, your request will still work—but will suffer an unnecessary extra round trip.
The Uri class also provides
static helper methods such as EscapeUriString(), which converts a string to
a valid URL by converting all characters with an ASCII value greater
than 127 to hexadecimal representation. The CheckHostName() and CheckSchemeName() methods accept a string
and check whether it is syntactically valid for the given property
(although they do not attempt to determine whether a host or URI
exists).
WebRequest and WebResponse are the common base classes for managing both HTTP and FTP
client-side activity, as well as the “file:” protocol. They encapsulate
the “request/response” model that these protocols all share: the client
makes a request, and then awaits a response from a server.
WebClient is simply a façade
class that does the work of calling WebRequest and WebResponse, saving you some coding. WebClient gives you a choice of dealing in
strings, byte arrays, files, or streams; WebRequest and WebResponse support just streams.
Unfortunately, you cannot rely entirely on WebClient; some features (such as cookies) are
available only through WebRequest and
WebResponse.
Here are the steps in using WebClient:
Instantiate a
WebClientobject.Assign the
Proxyproperty.Assign the
Credentialsproperty if authentication is required.Call a
DownloadXXXorUploadXXXmethod with the desired URI.
Its download methods are as follows:
public void   DownloadFile   (string address, string fileName);
public string DownloadString (string address);
public byte[] DownloadData   (string address);
public Stream OpenRead       (string address);
Each is overloaded to accept a Uri object instead of a string address. The
upload methods are similar; their return values contain the response
(if any) from the server:
public byte[] UploadFile  (string address, string fileName);
public byte[] UploadFile  (string address, string method, string fileName);
public string UploadString(string address, string data);
public string UploadString(string address, string method, string data);
public byte[] UploadData  (string address, byte[] data);
public byte[] UploadData  (string address, string method, byte[] data);
public byte[] UploadValues(string address, NameValueCollection data);
public byte[] UploadValues(string address, string method,
                                            NameValueCollection data);
public Stream OpenWrite    (string address);
public Stream OpenWrite    (string address, string method);
The UploadValues methods can
be used to post values to an HTTP form, with a method argument of “POST”. WebClient also has a BaseAddress property; this allows you to
specify a string to be prefixed to all addresses, such as
http://www.mysite.com/data/.
Here’s how to download the code samples page for this book to a file in the current folder, and then display it in the default web browser:
WebClient wc = new WebClient();
wc.Proxy = null;
wc.DownloadFile ("http://www.albahari.com/nutshell/code.aspx", "code.htm");
System.Diagnostics.Process.Start ("code.htm");
Note
WebClient implements
IDisposable under
duress—by virtue of deriving from Component (this allows it to be sited in
Visual Studio’s designer). Its
Dispose method does nothing
useful at run-time, however, so you don’t need to dispose WebClient instances.
You can use the same WebClient object to perform many tasks in
sequence. It will crash, however, if you try to make it do two things
at once with multithreading. Instead, you must create a separate
WebClient object for each
thread.
WebRequest and WebResponse are more complex to use than WebClient, but also more flexible.
Here’s how to get started:
Call
WebRequest.Createwith a URI to instantiate a web request.Assign the
Proxyproperty.Assign the
Credentialsproperty if authentication is required.
To upload data:
Call
GetRequestStreamon the request object, and then write to the stream. Go to step 5 if a response is expected.
To download data:
Call
GetResponseon the request object to instantiate a web response.Call
GetResponseStreamon the response object, and then read the stream (aStreamReadercan help!).
The following downloads and displays the code samples web page (a rewrite of the preceding example):
WebRequest req = WebRequest.Create
                ("http://www.albahari.com/nutshell/code.html");
req.Proxy = null;
using (WebResponse res = req.GetResponse())
using (Stream s = res.GetResponseStream())
using (StreamReader sr = new StreamReader(s))
  File.WriteAllText ("code.html", sr.ReadToEnd());

System.Diagnostics.Process.Start ("code.html");
Warning
The web response object has a ContentLength property, indicating the
length of the response stream in bytes, as reported by the server.
This value comes from the response headers and may be missing or
incorrect. In particular, if an HTTP server chooses the “chunked”
mode to break up a large response, the ContentLength value is usually −1. The
same can apply with dynamically generated pages.
The static Create method
instantiates a subclass of the WebRequest type, such as HttpWebRequest or FtpWebRequest. Its choice of subclass
depends on the URI’s prefix, and is shown in Table 15-2.
Table 15-2. URI prefixes and web request types
Prefix | Web request type |
|---|---|
http: or https: |
|
ftp: |
|
file: |
|
Note
Casting a web request object to its concrete type (HttpWebRequest or
FtpWebRequest) allows you to
access its protocol-specific
features.
You can also register your own prefixes by calling WebRequest.RegisterPrefix. This requires a
prefix along with a factory object with a Create method that instantiates an
appropriate web request object.
The “https:” protocol is for secure (encrypted) HTTP, via Secure
Sockets Layer or SSL. Both WebClient and WebRequest activate SSL transparently upon
seeing this prefix (see SSL under HTTP-Specific Support, later in this chapter). The
“file:” protocol simply forwards requests to a FileStream object. Its purpose is in meeting
a consistent protocol for reading a URI, whether it be a web page, FTP
site, or file path.
WebRequest has a Timeout property, in milliseconds. If a
timeout occurs, a WebException is thrown with a Status property of WebExceptionStatus.Timeout. The default timeout is 100 seconds for
HTTP and infinite for FTP.
You cannot recycle a WebRequest object for multiple
requests—each instance is good for one job only.
A proxy server is an intermediary through which HTTP and FTP requests can be routed. Organizations sometimes set up a proxy server as the only means by which employees can access the Internet—primarily because it simplifies security. A proxy has an address of its own and can demand authentication so that only selected users on the local area network can access the Internet.
You can instruct a WebClient
or WebRequest object to route
requests through a proxy server with a WebProxy object:
// Create a WebProxy with the proxy's IP address and port. You can
// optionally set Credentials if the proxy needs a username/password.

WebProxy p = new WebProxy ("192.178.10.49", 808);
p.Credentials = new NetworkCredential ("username", "password");
// or:
p.Credentials = new NetworkCredential ("username", "password", "domain");

WebClient wc = new WebClient();
wc.Proxy = p;
  ...

// Same procedure with a WebRequest object:
WebRequest req = WebRequest.Create ("...");
req.Proxy = p;
If you supply a domain when constructing the NetworkCredential, Windows-based
authentication protocols are used. To use the currently authenticated
Windows user, assign the static CredentialCache.DefaultNetworkCredentials
value to the proxy’s Credentials
property.
Warning
If you don’t have a proxy, you must set the Proxy property to null on all WebClient and WebRequest objects. Otherwise, the
Framework may attempt to “auto-detect” your proxy settings, adding
up to 30 seconds to your request. If you’re wondering why your web
requests execute slowly, this is probably it!
As an alternative to setting the Proxy on every WebClient and WebRequest object, you can set the global
default as follows:
WebRequest.DefaultWebProxy = myWebProxy;
or:
WebRequest.DefaultWebProxy = null;
Whatever you set applies for the life of the application domain (unless some other code changes it!).
You can supply a username and password to an HTTP or FTP site by
creating a NetworkCredential object
and assigning it to the Credentials
property of WebClient or WebRequest:
WebClient wc = new WebClient();
wc.Proxy = null;
wc.BaseAddress = "ftp://ftp.albahari.com";

// Authenticate, then upload and download a file to the FTP server.
// The same approach also works for HTTP and HTTPS.

string username = "nutshell";
string password = "oreilly";
wc.Credentials = new NetworkCredential (username, password);

wc.DownloadFile ("guestbook.txt", "guestbook.txt");

string data = "Hello from " + Environment.UserName + "!
";
File.AppendAllText ("guestbook.txt", data);

wc.UploadFile ("guestbook.txt", "guestbook.txt");
This works with dialog-based authentication protocols, such as
Basic and Digest, and is extensible through the AuthenticationManager class. It also
supports Windows NTLM and Kerberos (if you include a domain name when
constructing the NetworkCredential object). If you want
to use the currently authenticated Windows user, you can leave the
Credentials property null and instead set UseDefaultCredentials true.
Note
Assigning Credentials is
useless for getting through forms-based authentication. We discuss
forms-based authentication separately, in HTTP-Specific Support.
The authentication is ultimately handled by a WebRequest subtype (in this case, FtpWebRequest), which automatically
negotiates a compatible protocol. In the case of HTTP, there can be a
choice: if you examine the initial response from a Microsoft Exchange
server web mail page, for instance, it might contain the following
headers:
HTTP/1.1 401 Unauthorized
Content-Length: 83
Content-Type: text/html
Server: Microsoft-IIS/6.0
WWW-Authenticate: Negotiate
WWW-Authenticate: NTLM
WWW-Authenticate: Basic realm="exchange.somedomain.com"
X-Powered-By: ASP.NET
Date: Sat, 05 Aug 2006 12:37:23 GMT
The 401 code signals that authorization is required; the
“WWW-Authenticate” headers indicate what authentication protocols are
understood. If you configure a WebClient or WebRequest object with the correct username
and password, however, this message will be hidden from you because
the Framework responds automatically by choosing a compatible
authentication protocol, and then resubmitting the original request
with an extra header. For example:
Authorization: Negotiate TlRMTVNTUAAABAAAt5II2gjACDArAAACAwACACgAAAAQ
ATmKAAAAD0lVDRdPUksHUq9VUA==
This mechanism provides transparency, but generates an extra
round trip with each request. You can avoid the extra round trips on
subsequent requests to the same URI by setting the PreAuthenticate property to true. This property is defined on the
WebRequest class (and works only in
the case of HttpWebRequest).
WebClient doesn’t support this
feature at all.
You can force a particular authentication protocol with a
CredentialCache object. A
credential cache contains one or more NetworkCredential objects, each keyed to a
particular protocol and URI prefix. For example, you might want to
avoid the Basic protocol when logging into an Exchange Server, as it
transmits passwords in plain text:
CredentialCache cache = new CredentialCache();
Uri prefix = new Uri ("http://exchange.somedomain.com");
cache.Add (prefix, "Digest",  new NetworkCredential ("joe", "passwd"));
cache.Add (prefix, "Negotiate", new NetworkCredential ("joe", "passwd"));

WebClient wc = new WebClient();
wc.Credentials = cache;
...
An authentication protocol is specified as a string. The valid values are as follows:
Basic, Digest, NTLM, Kerberos, Negotiate
In this particular example, WebClient will choose Negotiate, because
the server didn’t indicate that it supported Digest in its
authentication headers. Negotiate is a Windows protocol that boils down to
either Kerberos or NTLM, depending on the capabilities of the
server.
The static CredentialCache.DefaultNetworkCredentials
property allows you to add the currently authenticated Windows user
to the credential cache without having to specify a password:
cache.Add (prefix, "Negotiate", CredentialCache.DefaultNetworkCredentials);
Because communicating across a network can be time-consuming, it
makes sense to run WebClient or
WebRequest on a parallel execution
path. This allows you to do other things at the same time, and also
maintain a responsive user interface. There are a number of ways to
achieve parallel execution:
Create a new thread.
Use the Task Parallel Library’s
Taskclass.Use asynchronous delegates.
Use
BackgroundWorker.
We describe each in Chapter 21. Creating a new thread is simplest, although you must deal with exceptions explicitly on the worker thread:
using System;
using System.Net;
using System.Threading;

class ThreadTest
{
  static void Main()
  {
    new Thread (Download).Start();
    Console.WriteLine ("I'm still here while the download's happening!");
    Console.ReadLine();
  }

  static void Download()
  {
    WebClient wc = new WebClient();
    try
    {
      wc.Proxy = null;
      wc.DownloadFile ("http://www.oreilly.com", "oreilly.html");
      Console.WriteLine ("Finished!");
    }
    catch (Exception ex)
    {
      // Process exception...
    }
  }
}
You can cancel an active WebClient operation from another thread by
calling CancelAsync. (This works whether or not
you used an “asynchronous” method to initiate the download or upload.)
You can cancel a WebRequest in a
similar manner, by calling its Abort method from another thread.
Warning
Another way to achieve parallel execution is to call the
asynchronous event methods on WebClient (ending in “Asynch”), such as
DownloadFileAsynch. In theory,
these methods return instantly, allowing the caller to do other
things while they run. Unfortunately, these methods are flawed—they
block the caller for a portion of the download or upload.
The asynchronous methods on WebRequest and WebResponse (starting in “Begin” and
“End”) should also be avoided if you’re simply after parallel
execution—these methods serve a subtly different purpose, described
in Chapter 23.
When a WebClient or WebRequest is canceled, a WebException is thrown on its thread. The
exception has a Status property of
WebExceptionStatus.RequestCanceled.
You can catch and deal with this exception just as you would any
other, such as an invalid domain name.
WebRequest, WebResponse, WebClient, and their streams all throw a WebException in the case of a network or
protocol error. You can determine the specific error via the WebException’s Status property; this returns a WebExceptionStatus enum that has the following
members:
|
|
|
An invalid domain name causes a NameResolutionFailure; a dead network causes
a ConnectFailure; a request
exceeding WebRequest.Timeout
milliseconds causes a Timeout.
Errors such as “Page not found,” “Moved Permanently,” and “Not
Logged In” are specific to the HTTP or FTP protocols, and so are all
lumped together under the ProtocolError status. To get a more specific
code:
Cast the
WebException’sResponseproperty toHttpWebResponseorFtpWebResponse.Examine the response object’s
Statusproperty (anHttpStatusCodeorFtpStatusCodeenum) and/or itsStatusDescriptionproperty (string).
For example:
WebClient wc = new WebClient();
try
{
  wc.Proxy = null;
  string s = wc.DownloadString ("http://www.albahari.com/notthere");
}
catch (WebException ex)
{
  if (ex.Status == WebExceptionStatus.NameResolutionFailure)
    Console.WriteLine ("Bad domain name");
  else if (ex.Status == WebExceptionStatus.ProtocolError)
  {
    HttpWebResponse response = (HttpWebResponse) ex.Response;
    Console.WriteLine (response.StatusDescription);      // "Not Found"
    if (response.StatusCode == HttpStatusCode.NotFound)
      Console.WriteLine ("Not there!");                  // "Not there!"
  }
  else throw;
}
Note
If you want the three-digit status code, such as 401 or 404,
simply cast the HttpStatusCode or FtpStatusCode enum to an integer.
By default, you’ll never get a redirection error because
WebClient
and WebRequest automatically
follow redirection responses. You can switch off this behavior in a
WebRequest object by setting
AllowAutoRedirect to false.
The redirection errors are 301 (Moved Permanently), 302 (Found/Redirect), and 307 (Temporary Redirect).
If an exception is thrown because you’ve incorrectly used the
WebClient or WebRequest classes, it
will more likely be an InvalidOperationException or ProtocolViolationException than a WebException.
This section describes HTTP-specific request and response features.
Both WebClient and WebRequest allow you to add custom HTTP
headers, as well as enumerate the headers in a response. A header is
simply a key/value pair containing metadata, such as the message
content type or server software. Here’s how to add a custom header to
a request, then list all headers in a response message:
WebClient wc = new WebClient();
wc.Proxy = null;
wc.Headers.Add ("CustomHeader", "JustPlaying/1.0");
wc.DownloadString ("http://www.oreilly.com");

foreach (string name in wc.ResponseHeaders.Keys)
  Console.WriteLine (name + "=" + wc.ResponseHeaders [name]);

Age=51
X-Cache=HIT from oregano.bp
X-Cache-Lookup=HIT from oregano.bp:3128
Connection=keep-alive
Accept-Ranges=bytes
Content-Length=95433
Content-Type=text/html
...A query string is simply a string appended to a URI with a question mark, used to send simple data to the server. You can specify multiple key/value pairs in a query string with the following syntax:
?key1=value1&key2=value2&key3=value3...
WebClient provides an easy
way to add query strings through a dictionary-style property. The
following searches Google for the word “WebClient”, displaying the
result page in French:
WebClient wc = new WebClient(); wc.Proxy = null;wc.QueryString.Add ("q", "WebClient");// Search for "WebClient"wc.QueryString.Add ("hl", "fr");// Display page in French wc.DownloadFile ("http://www.google.com/search", "results.html"); System.Diagnostics.Process.Start ("results.html");
To achieve the same result with WebRequest, you must manually append a
correctly formatted string to the request URI:
string requestURI = "http://www.google.com/search?q=WebClient&hl=fr";WebClient provides UploadValues
methods for posting data to an HTML form. Here’s how to query the
Safari website for books containing the term “WebClient”:
WebClient wc = new WebClient();
wc.Proxy = null;

var data = new System.Collections.Specialized.NameValueCollection();
data.Add ("searchtextbox", "webclient");
data.Add ("searchmode", "simple");

byte[] result = wc.UploadValues ("http://my.safaribooksonline.com/search",
                                 "POST", data);

System.IO.File.WriteAllBytes ("SearchResults.html", result);
System.Diagnostics.Process.Start ("SearchResults.html");
The keys in the NameValueCollection, such as searchtextbox and searchMode, correspond to the names of input
boxes on the HTML form.
Uploading form data is more work via WebRequest. (You’ll need to take this route
if you need to use features such as cookies.) Here’s the
procedure:
Convert the string to a byte array, with
Encoding.UTF8.GetBytes.Set the web request’s
ContentLengthproperty to the byte array length.Call
GetRequestStreamon the web request and write the data array.Call
GetResponseto read the server’s response.
Here’s the previous example written with WebRequest:
WebRequest req = WebRequest.Create ("http://safari.oreilly.com/search");

req.Proxy = null;
req.Method = "POST";
req.ContentType = "application/x-www-form-urlencoded";

string reqString = "searchtextbox=webclient&searchmode=simple";
byte[] reqData = Encoding.UTF8.GetBytes (reqString);
req.ContentLength = reqData.Length;

using (Stream reqStream = req.GetRequestStream())
  reqStream.Write (reqData, 0, reqData.Length);

using (WebResponse res = req.GetResponse())
using (Stream resSteam = res.GetResponseStream())
using (StreamReader sr = new StreamReader (resSteam))
  File.WriteAllText ("SearchResults.html", sr.ReadToEnd());

System.Diagnostics.Process.Start ("SearchResults.html");A cookie is a name/value string pair that an HTTP server sends to a client in a response header. A web browser client typically remembers cookies, and replays them to the server in each subsequent request (to the same address) until their expiry. A cookie allows a server to know whether it’s talking to the same client it was a minute ago—or yesterday—without needing a messy query string in the URI.
By default, HttpWebRequest
ignores any cookies received from the server. To accept cookies,
create a CookieContainer object and
assign it to the WebRequest. The
cookies received in a response can then be enumerated:
var cc = new CookieContainer();

var request = (HttpWebRequest) WebRequest.Create ("http://www.google.com");
request.Proxy = null;
request.CookieContainer = cc;
using (var response = (HttpWebResponse) request.GetResponse())
{
  foreach (Cookie c in response.Cookies)
  {
    Console.WriteLine (" Name:   " + c.Name);
    Console.WriteLine (" Value:  " + c.Value);
    Console.WriteLine (" Path:   " + c.Path);
    Console.WriteLine (" Domain: " + c.Domain);
  }
  // Read response stream...
}

 Name:   PREF
 Value:  ID=6b10df1da493a9c4:TM=1179025486:LM=1179025486:S=EJCZri0aWEHlk4tt
 Path:   /
 Domain: .google.com
Note
The WebClient façade class
does not provide direct support for cookies.
To replay the received cookies in future requests, simply assign
the same CookieContainer object to
each new WebRequest object.
(CookieContainer is serializable,
so it can be written to disk—see Chapter 16.) Alternatively, you can start with a
fresh CookieContainer, and then add
cookies manually as follows:
Cookie c = new Cookie ("PREF",
                       "ID=6b10df1da493a9c4:TM=1179...",
                       "/",
                       ".google.com");
freshCookieContainer.Add (c);
The third and fourth arguments indicate the path and domain of
the originator. A CookieContainer on the client can
house cookies from many different places; WebRequest sends only those cookies
whose path and domain match those of the server.
We saw in the previous section how a NetworkCredentials object can satisfy
authentication systems such as Basic or NTLM (that pop up a dialog in
a web browser). Most websites requiring authentication, however, use
some type of forms-based approach. Enter your username and password
into text boxes that are part of an HTML form decorated in appropriate
corporate graphics, press a button to post the data, and then receive
a cookie upon successful authentication. The cookie allows you greater
privileges in browsing pages in the website. With WebRequest, you can do all this with the
features discussed in the preceding two sections.
A typical website that implements forms authentication will contain HTML like this:
<form action="http://www.somesite.com/login" method="post"> <input type="text" id="user"name="username"> <input type="password" id="pass"name="password"> <button type="submit" id="login-btn">Log In</button> </form>
Here’s how to log into such a site:
string loginUri = "http://www.somesite.com/login"; string username = "username"; string password = "password"; string reqString = "username=" + username + "&password=" + password; byte[] requestData = Encoding.UTF8.GetBytes (reqString); CookieContainer cc = new CookieContainer(); var request = (HttpWebRequest)WebRequest.Create (loginUri); request.Proxy = null; request.CookieContainer = cc; request.Method = "POST"; request.ContentType = "application/x-www-form-urlencoded"; request.ContentLength = requestData.Length; using (Stream s = request.GetRequestStream()) s.Write (requestData, 0, requestData.Length); using (var response = (HttpWebResponse) request.GetResponse()) foreach (Cookie c in response.Cookies) Console.WriteLine (c.Name + " = " + c.Value); // We're now logged in. As long as we assignccto subsequent WebRequest // objects, we'll be treated as an authenticated user.
Both WebClient and
WebRequest use SSL automatically when you specify an “https:” prefix.
The only complication that can arise relates to bad X.509
certificates. If the server’s site certificate is invalid in any way
(for instance, if it’s a test certificate), an exception is thrown
when you attempt to communicate. To work around this, you can attach a
custom certificate validator to the static ServicePointManager class:
using System.Net;
using System.Net.Security;
using System.Security.Cryptography.X509Certificates;
...
static void ConfigureSSL()
{
  ServicePointManager.ServerCertificateValidationCallback = CertChecker;
}
ServerCertificateValidationCallback is a
delegate. If it returns true, the
certificate is accepted:
static bool CertChecker (object sender, X509Certificate certificate,
                         X509Chain chain, SslPolicyErrors errors)
{
  // Return true if you're happy with the certificate
  ...
}You can write your own HTTP server with the HttpListener class. The following is a simple
server that listens on port 51111, waits for a single client request,
and then returns a one-line reply.
Warning
HttpListener does not work on
operating systems prior to Windows XP.
static void Main()
{
  new System.Threading.Thread (Listen).Start(); // Run server in parallel.
  Thread.Sleep (500);                           // Wait half a second.

  WebClient wc = new WebClient();               // Make a client request.
  Console.WriteLine (wc.DownloadString
    ("http://localhost:51111/MyApp/Request.txt"));
}

static void Listen()
{
  HttpListener listener = new HttpListener();
  listener.Prefixes.Add ("http://localhost:51111/MyApp/");  // Listen on
  listener.Start();                                         // port 51111.

  // Wait for a client request:
  HttpListenerContext context = listener.GetContext();

  // Respond to the request:
  string msg = "You asked for: " + context.Request.RawUrl;
  context.Response.ContentLength64 = Encoding.UTF8.GetByteCount (msg);
  context.Response.StatusCode = (int) HttpStatusCode.OK;

  using (Stream s = context.Response.OutputStream)
  using (StreamWriter writer = new StreamWriter (s))
    writer.Write (msg);

  listener.Stop();
}

OUTPUT: You asked for: /MyApp/Request.txt
Note
In this example, we sleep for 500 ms to give the server time to
start before connecting to it. A better solution would be for the
server to signal that it’s ready with an EventWaitHandle (described in Chapter 21). An example of when you might consider doing
this in real life is if writing a unit testing framework for your HTTP
server.
HttpListener does not
internally use .NET Socket objects;
it instead calls the Windows HTTP Server API. This is supported on
Windows XP and above and allows many applications on a computer to
listen on the same IP address and port—as long as each registers
different address prefixes. In our example, we registered the prefix
http://localhost/myapp, so another application
would be free to listen on the same IP and port on another prefix such
as http://localhost/anotherapp. This is of value
because opening new ports on corporate firewalls can be politically
arduous.
HttpListener waits for the next
client request when you call GetContext, returning an object with Request and Response properties. Each is analogous to a
WebRequest and WebResponse object, but from the server’s
perspective. You can read and write headers and cookies, for instance,
to the request and response objects, much as you would at the client
end.
You can choose how fully to support features of the HTTP protocol, based on your anticipated client audience. At a bare minimum, you should set the content length and status code on each request.
Here’s a very simple web page server that handles up to 50 concurrent requests:
using System;
using System.IO;
using System.Net;
using System.Text;
using System.Threading;

class WebServer
{
  HttpListener _listener;
  string _baseFolder;      // Your web page folder.

  public WebServer (string uriPrefix, string baseFolder)
  {
    System.Threading.ThreadPool.SetMaxThreads (50, 1000);
    System.Threading.ThreadPool.SetMinThreads (50, 50);
    _listener = new HttpListener();
    _listener.Prefixes.Add (uriPrefix);
    _baseFolder = baseFolder;
  }

  public void Start()          // Run this on a separate thread, as
  {                            // we did before.
    _listener.Start();
    while (true)
      try
      {
        HttpListenerContext request = _listener.GetContext();
        ThreadPool.QueueUserWorkItem (ProcessRequest, request);
      }
      catch (HttpListenerException)     { break; }   // Listener stopped.
      catch (InvalidOperationException) { break; }   // Listener stopped.
  }

  public void Stop() { _listener.Stop(); }

  void ProcessRequest (object listenerContext)
  {
    try
    {
      var context = (HttpListenerContext) listenerContext;
      string filename = Path.GetFileName (context.Request.RawUrl);
      string path = Path.Combine (_baseFolder, filename);
      byte[] msg;
      if (!File.Exists (path))
      {
        context.Response.StatusCode = (int) HttpStatusCode.NotFound;
        msg = Encoding.UTF8.GetBytes ("Sorry, that page does not exist");
      }
      else
      {
        context.Response.StatusCode = (int) HttpStatusCode.OK;
        msg = File.ReadAllBytes (path);
      }
      context.Response.ContentLength64 = msg.Length;
      using (Stream s = context.Response.OutputStream)
        s.Write (msg, 0, msg.Length);
    }
    catch (Exception ex) { Console.WriteLine ("Request error: " + ex); }
  }
}
Here’s a main method to set things in motion:
static void Main()
{
  // Listen on the default port (80), serving files in e:mydocswebroot:
  var server = new WebServer ("http://localhost/", @"e:mydocswebroot");

  // Start the server on a parallel thread:
  new System.Threading.Thread (server.Start).Start();

  Console.WriteLine ("Server running... press Enter to stop");
  Console.ReadLine();
  server.Stop();
}
You can test this at the client end with any web browser; the URI in this case will be http://localhost/ plus the name of the web page.
Calling SetMinThreads instructs
the thread pool not to delay the allocation of threads in an attempt to
save memory. This results in a responsive and performant server, up to
its limit of 50 requests. If you want to go higher, you can—much higher,
and without needing more threads—by following the asynchronous method
pattern. This means calling BeginRead
and BeginWrite on the request and
response streams, each time exiting with a callback (bringing the
investment in programming time almost on par with configuring IIS!). We
describe this in detail in Chapter 23.
For simple FTP upload and download operations, you can use WebClient as we did previously:
WebClient wc = new WebClient();
wc.Proxy = null;
wc.Credentials = new NetworkCredential ("nutshell", "oreilly");
wc.BaseAddress = "ftp://ftp.albahari.com";
wc.UploadString ("tempfile.txt", "hello!");
Console.WriteLine (wc.DownloadString ("tempfile.txt"));   // hello!
There’s more to FTP, however, than just uploading and downloading files.
The protocol also lists a set of commands or “methods,” defined as string constants in WebRequestMethods.Ftp:
|
|
|
To run one of these commands, you assign its string constant to
the web request’s Method property,
and then call GetResponse(). Here’s
how to get a directory listing:
var req = (FtpWebRequest) WebRequest.Create ("ftp://ftp.albahari.com");
req.Proxy = null;
req.Credentials = new NetworkCredential ("nutshell", "oreilly");
req.Method = WebRequestMethods.Ftp.ListDirectory;

using (WebResponse resp = req.GetResponse())
using (StreamReader reader = new StreamReader (resp.GetResponseStream()))
  Console.WriteLine (reader.ReadToEnd());

RESULT:
.
..
guestbook.txt
tempfile.txt
test.doc
In the case of getting a directory listing, we needed to read the
response stream to get the result.
Most other commands, however, don’t require this step. For instance, to
get the result of the GetFileSize
command, just query the response’s ContentLength property:
var req = (FtpWebRequest) WebRequest.Create (
                          "ftp://ftp.albahari.com/tempfile.txt");
req.Proxy = null;
req.Credentials = new NetworkCredential ("nutshell", "oreilly");

req.Method = WebRequestMethods.Ftp.GetFileSize;

using (WebResponse resp = req.GetResponse())
  Console.WriteLine (resp.ContentLength);            // 6
The GetDateTimestamp command
works in a similar way, except that you query the response’s LastModified property. This requires that you
cast to FtpWebResponse:
...
req.Method = WebRequestMethods.Ftp.GetDateTimestamp;

using (var resp = (FtpWebResponse) req.GetResponse() )
  Console.WriteLine (resp.LastModified);
To use the Rename command, you
must populate the request’s RenameTo
property with the new filename (without a directory prefix). For
example, to rename a file in the incoming directory from tempfile.txt to deleteme.txt:
var req = (FtpWebRequest) WebRequest.Create (
                          "ftp://ftp.albahari.com/tempfile.txt");
req.Proxy = null;
req.Credentials = new NetworkCredential ("nutshell", "oreilly");

req.Method = WebRequestMethods.Ftp.Rename;
req.RenameTo = "deleteme.txt";

req.GetResponse().Close();        // Perform the rename
Here’s how to delete a file:
var req = (FtpWebRequest) WebRequest.Create (
                          "ftp://ftp.albahari.com/deleteme.txt");
req.Proxy = null;
req.Credentials = new NetworkCredential ("nutshell", "oreilly");

req.Method = WebRequestMethods.Ftp.DeleteFile;

req.GetResponse().Close();        // Perform the deletion
Note
In all these examples, you would typically use an exception
handling block to catch network and protocol errors. A typical
catch block looks like this:
catch (WebException ex)
{
   if (ex.Status == WebExceptionStatus.ProtocolError)
   {
     // Obtain more detail on error:
     var response = (FtpWebResponse) ex.Response;
     FtpStatusCode errorCode = response.StatusCode;
     string errorMessage = response.StatusDescription;
     ...
   }
   ...
}The static Dns class
encapsulates the Domain Name Service, which converts between a raw IP
address, such as 66.135.192.87, and a human-friendly domain name, such
as ebay.com.
The GetHostAddresses method converts from domain
name to IP address (or addresses):
foreach (IPAddress a in Dns.GetHostAddresses ("albahari.com"))
  Console.WriteLine (a.ToString());     // 208.43.7.176
The GetHostEntry method goes the other way around,
converting from address to domain name:
IPHostEntry entry = Dns.GetHostEntry ("208.43.7.176");
Console.WriteLine (entry.HostName);                    // si-eios.com
GetHostEntry also accepts an
IPAddress object, so you can specify
an IP address as a byte array:
IPAddress address = new IPAddress (new byte[] { 208, 43, 7, 176 });
IPHostEntry entry = Dns.GetHostEntry (address);
Console.WriteLine (entry.HostName);                    // si-eios.com
Domain names are automatically resolved to IP addresses when you
use a class such as WebRequest or
TcpClient. If you plan to make many
network requests to the same address over the life of an application,
however, you can sometimes improve performance by first using Dns to explicitly convert the domain name into
an IP address, and then communicating directly with the IP address from
that point on. This avoids repeated round-tripping to resolve the same
domain name, and it can be of benefit when dealing at the transport
layer (via TcpClient, UdpClient, or Socket).
The DNS class also provides asynchronous methods for high-concurrency applications (see Chapter 23).
The SmtpClient class in the System.Net.Mail namespace allows you to send mail messages through the
ubiquitous Simple Mail Transfer Protocol. To send a simple text message,
instantiate SmtpClient, set its
Host property to your SMTP server
address, and then call Send:
SmtpClient client = new SmtpClient();
client.Host = "mail.myisp.net";
client.Send ("[email protected]", "[email protected]", "subject", "body");
To frustrate spammers, most SMTP servers on the Internet will accept connections only from the ISP’s subscribers, so you need the SMTP address appropriate to the current connection for this to work.
Constructing a MailMessage
object exposes further options, including the ability to add
attachments:
SmtpClient client = new SmtpClient();
client.Host = "mail.myisp.net";
MailMessage mm = new MailMessage();

mm.Sender = new MailAddress ("[email protected]", "Kay");
mm.From   = new MailAddress ("[email protected]", "Kay");
mm.To.Add  (new MailAddress ("[email protected]", "Bob"));
mm.CC.Add  (new MailAddress ("[email protected]", "Dan"));
mm.Subject = "Hello!";
mm.Body = "Hi there. Here's the photo!";
mm.IsBodyHtml = false;
mm.Priority = MailPriority.High;

Attachment a = new Attachment ("photo.jpg",
                               System.Net.Mime.MediaTypeNames.Image.Jpeg);
mm.Attachments.Add (a);
client.Send (mm);
SmtpClient allows you to
specify Credentials for servers
requiring authentication, EnableSsl
if supported, and change the TCP Port
to a nondefault value. By changing the DeliveryMethod property, you can instruct the
SmtpClient to instead use IIS to send
mail messages or simply to write each message to an .eml file in a specified directory:
SmtpClient client = new SmtpClient();
client.DeliveryMethod = SmtpDeliveryMethod.SpecifiedPickupDirectory;
client.PickupDirectoryLocation = @"c:mail";
TCP and UDP constitute the transport layer protocols on top of which most Internet—and local area network—services are built. HTTP, FTP, and SMTP use TCP; DNS uses UDP. TCP is connection-oriented and includes reliability mechanisms; UDP is connectionless, has a lower overhead, and supports broadcasting. BitTorrent uses UDP, as does Voice over IP.
The transport layer offers greater flexibility—and potentially improved performance—over the higher layers, but it requires that you handle such tasks as authentication and encryption yourself.
Note
The good news with the TCP and UDP classes is that you don’t
have to worry about setting Proxy
to null. The bad news is that if your only access to the Internet is
through a web proxy, you can forget about working directly at the TCP
or UDP layer!
With TCP, you have a choice of either the easier-to-use TcpClient and TcpListener façade
classes, or the feature-rich Socket
class. (In fact, you can mix and match, because TcpClient exposes the underlying Socket object through the Client property.) The
Socket class exposes more
configuration options and allows direct access to the network layer (IP)
and non-Internet-based protocols such as Novell’s SPX/IPX.
As with other protocols, TCP differentiates a client and server: the client initiates a request, while the server waits for a request. Here’s the basic structure for a TCP client request:
using (TcpClient client = new TcpClient ("address", port))
using (NetworkStream n = client.GetStream())
{
  // Read and write to the network stream...
}
TcpClient immediately
establishes a connection upon construction to a server at the given IP
or domain name address and port. The constructor blocks until a
connection is established. The NetworkStream then provides a means of two-way
communication, for both transmitting and receiving bytes of data from a
server.
A simple TCP server looks like this:
TcpListener listener = new TcpListener (<ip address>, port);
listener.Start();

while (keepProcessingRequests)
  using (TcpClient c = listener.AcceptTcpClient())
  using (NetworkStream n = c.GetStream())
  {
    // Read and write to the network stream...
  }

listener.Stop();
TcpListener requires the local
IP address on which to listen (a computer with two network cards, for
instance, may have two addresses). You can use IPAddress.Any to tell it to listen on all (or
the only) local IP addresses. AcceptTcpClient blocks until a client request
is received, at which point we call GetStream, just as on the client side.
When working at the transport layer, you need to decide on a protocol for who talks when, and for how long—rather like with a walkie-talkie. If both parties talk or listen at the same time, communication breaks down!
Let’s invent a protocol where the client speaks first, saying “Hello,” and then the server responds by saying “Hello right back!” Here’s the code:
using System;
using System.IO;
using System.Net;
using System.Net.Sockets;
using System.Threading;

class TcpDemo
{
  static void Main()
  {
    new Thread (Server).Start();       // Run server method concurrently.
    Thread.Sleep (500);                // Give server time to start.
    Client();
  }

  static void Client()
  {
    using (TcpClient client = new TcpClient ("localhost", 51111))
    using (NetworkStream n = client.GetStream())
    {
      BinaryWriter w = new BinaryWriter (n);
      w.Write ("Hello");
      w.Flush();
      Console.WriteLine (new BinaryReader (n).ReadString());
    }
  }

  static void Server()     // Handles a single client request, then exits.
  {
    TcpListener listener = new TcpListener (IPAddress.Any, 51111);
    listener.Start();
    using (TcpClient c = listener.AcceptTcpClient())
    using (NetworkStream n = c.GetStream())
    {
      string msg = new BinaryReader (n).ReadString();
      BinaryWriter w = new BinaryWriter (n);
      w.Write (msg + " right back!");
      w.Flush();                      // Must call Flush because we're not
    }                                 // disposing the writer.
    listener.Stop();
  }
}

Hello
Hello right back!
In this example, we’re using the localhost loopback to run the client and
server on the same machine. We’ve arbitrarily chosen a port in the
unallocated range (above 49152) and used a BinaryWriter and BinaryReader to encode the text messages.
We’ve avoided closing or disposing the readers and writers in order to
keep the underlying NetworkStream
open until our conversation completes.
BinaryReader and BinaryWriter might seem like odd choices for
reading and writing strings. However, they have a major advantage over
StreamReader and StreamWriter: they prefix strings with an
integer indicating the length, so a BinaryReader always knows exactly how many
bytes to read. If you call StreamReader.ReadToEnd you might block
indefinitely—because a NetworkStream
doesn’t have an end! As long as the connection is open, the network
stream can never be sure that the client isn’t going to send more
data.
Note
StreamReader is in fact
completely out of bounds with NetworkStream, even if you plan only to
call ReadLine. This is because
StreamReader has a read-ahead
buffer, which can result in it reading more bytes than are currently
available, blocking indefinitely (or until the socket times out).
Other streams such as FileStream
don’t suffer this incompatibility with StreamReader because they have a
definite end—at which point Read returns immediately with a value of
0.
You’ll often want to do other things at the same time as
reading or writing a TCP stream. If you need to manage just a few
concurrent activities, any multithreading option described in Chapters
21 and 22 is
viable: a new thread, a TPL Task,
asynchronous delegates, ThreadPool.QueueUserWorkItem or BackgroundWorker. On a highly concurrent
server, however, you need to be choosier. As a simple rule of
thumb:
For less than 50 concurrent connections, think simplicity and use the Task Parallel Library or
ThreadPool.QueueUserWorkItem.For more than 50 concurrent connections, think efficiency and go for asynchronous methods.
Chapter 23 describes how to write a TCP server using each of these models.
The .NET Framework provides no application-layer support for POP3, so you have to write at the TCP layer in order to receive mail from a POP3 server. Fortunately, this is a simple protocol; a POP3 conversation goes like this:
Client | Mail server | Notes |
|---|---|---|
Client connects... |
| Welcome message |
|
| |
|
| |
|
| Lists the ID and file size of each message on the server |
|
Content of message #1...
| Retrieves the message with the specified ID |
|
| Deletes a message from the server |
|
|
Each command and response is terminated by a new line (CR + LF)
except for the multiline LIST and RETR commands, which are terminated by
a single dot on a separate line. Because we can’t use StreamReader with NetworkStream, we can start by writing a
helper method to read a line of text in a nonbuffered fashion:
static string ReadLine (Stream s)
{
  List<byte> lineBuffer = new List<byte>();
  while (true)
  {
    int b = s.ReadByte();
    if (b == 10 || b < 0) break;
    if (b != 13) lineBuffer.Add ((byte)b);
  }
  return Encoding.UTF8.GetString (lineBuffer.ToArray());
}
We also need a helper method to send a command. Because we always expect to receive a response starting with “+OK,” we can read and validate the response at the same time:
static void SendCommand (Stream stream, string line)
{
  byte[] data = Encoding.UTF8.GetBytes (line + "
");
  stream.Write (data, 0, data.Length);
  string response = ReadLine (stream);
  if (!response.StartsWith ("+OK"))
    throw new Exception ("POP Error: " + response);
}
With these methods written, the job of retrieving mail is easy. We establish a TCP connection on port 110 (the default POP3 port), and then start talking to the server. In this example, we write each mail message to a randomly named file with an .eml extension, before deleting the message off the server:
using (TcpClient client = new TcpClient ("mail.isp.com", 110))
using (NetworkStream n = client.GetStream())
{
  ReadLine (n);                             // Read the welcome message.
  SendCommand (n, "USER username");
  SendCommand (n, "PASS password");
  SendCommand (n, "LIST");                  // Retrieve message IDs
  List<int> messageIDs = new List<int>();
  while (true)
  {
    string line = ReadLine (n);             // e.g.,  "1 1876"
    if (line == ".") break;
    messageIDs.Add (int.Parse (line.Split (' ')[0] ));   // Message ID
  }

  foreach (int id in messageIDs)         // Retrieve each message.
  {
    SendCommand (n, "RETR " + id);
    string randomFile = Guid.NewGuid().ToString() + ".eml";
    using (StreamWriter writer = File.CreateText (randomFile))
      while (true)
      {
        string line = ReadLine (n);      // Read next line of message.
        if (line == ".") break;          // Single dot = end of message.
        if (line == "..") line = ".";    // "Escape out" double dot.
        writer.WriteLine (line);         // Write to output file.
      }
    SendCommand (n, "DELE " + id);       // Delete message off server.
  }
  SendCommand (n, "QUIT");
}