

This chapter shows how to combine basic C++ with the functionality provided by Qt to create a few small graphical user interface (GUI) applications. This chapter also introduces two key Qt ideas: “signals and slots” and layouts. In Chapter 2, we will go into more depth, and in Chapter 3, we will start building a more realistic application.
If you already know Java or C# but have limited experience with C++, you might want to start by reading the C++ introduction in Appendix D.
Let’s start with a very simple Qt program. We will first study it line by line, and then see how to compile and run it.
1 #include <QApplication>
2 #include <QLabel>

3 int main(int argc, char *argv[])
4 {
5     QApplication app(argc, argv);
6     QLabel *label = new QLabel("Hello Qt!");
7     label->show();
8     return app.exec();
9 }
Lines 1 and 2 include the definitions of the QApplication and QLabel classes. For every Qt class, there is a header file with the same name (and capitalization) as the class that contains the class’s definition.
Line 5 creates a QApplication object to manage application-wide resources. The QApplication constructor requires argc and argv because Qt supports a few command-line arguments of its own.
Line 6 creates a QLabel widget that displays “Hello Qt!”. In Qt and Unix terminology, a widget is a visual element in a user interface. The term stems from “window gadget” and is the equivalent of both “control” and “container” in Windows terminology. Buttons, menus, scroll bars, and frames are all examples of widgets. Widgets can contain other widgets; for example, an application window is usually a widget that contains a QMenuBar, a few QToolBars, a QStatusBar, and some other widgets. Most applications use a QMainWindow or a QDialog as the application window, but Qt is so flexible that any widget can be a window. In this example, the QLabel widget is the application window.
Line 7 makes the label visible. Widgets are always created hidden so that we can customize them before showing them, thereby avoiding flicker.
Line 8 passes control of the application on to Qt. At this point, the program enters the event loop. This is a kind of stand-by mode where the program waits for user actions such as mouse clicks and key presses. User actions generate events (also called “messages”) to which the program can respond, usually by executing one or more functions. For example, when the user clicks a widget, a “mouse press” and a “mouse release” event are generated. In this respect, GUI applications differ drastically from conventional batch programs, which typically process input, produce results, and terminate without human intervention.
For simplicity, we don’t bother calling delete on the QLabel object at the end of the main() function. This memory leak is harmless in such a small program, since the memory will be reclaimed by the operating system when the program terminates.
It is now possible to try the program on your own machine. It should look like the one shown in Figure 1.1. First, you will need to install Qt 4.3.2 (or a later Qt 4 release), a process that is explained in Appendix A. From now on, we will assume that you have a correctly installed copy of Qt 4 and that Qt’s bin directory is in your PATH environment variable. (On Windows, this is done automatically by the Qt installation program.) You will also need the program’s code in a file called hello.cpp in a directory called hello. You can type in hello.cpp yourself or copy it from the examples that accompany this book, where it is available as examples/chap01/hello/hello.cpp. (All the examples are available from the book’s web site, http://www.informit.com/title/0132354160.)

From a command prompt, change the directory to hello, and type
qmake -project
to create a platform-independent project file (hello.pro), and then type
qmake hello.pro
to create a platform-specific makefile from the project file. (The qmake tool is covered in more detail in Appendix B.) Type make to build the program. Run it by typing hello on Windows, ./hello on Unix, and open hello.app on Mac OS X. To terminate the program, click the close button in the window’s title bar.
If you are using Windows and have installed the Qt Open Source Edition and the MinGW compiler, you will have a shortcut to an MS-DOS Prompt window that has all the environment variables correctly set up for Qt. If you start this window, you can compile Qt applications within it using qmake and make as described previously. The executables produced are put in the application’s debug or release folder (e.g., C:exampleschap01hello
eleasehello.exe).
If you are using Microsoft Visual C++ with a commercial version of Qt, you will need to run nmake instead of make. Alternatively, you can create a Visual Studio project file from hello.pro by typing
qmake -tp vc hello.pro
and then build the program in Visual Studio. If you are using Xcode on Mac OS X, you can generate an Xcode project using the command
qmake -spec macx-xcode hello.pro
Before we go on to the next example, let’s have some fun: Replace the line
QLabel *label = new QLabel("Hello Qt!");with
QLabel *label = new QLabel("<h2><i>Hello</i> "
                           "<font color=red>Qt!</font></h2>");
and rebuild the application. When run, it should look like Figure 1.2. As the example illustrates, it’s easy to brighten up a Qt application’s user interface using some simple HTML-style formatting.

The second example shows how to respond to user actions. The application consists of a button that the user can click to quit. The source code is very similar to Hello, except that we are using a QPushButton instead of a QLabel as our main widget, and we are connecting a user action (clicking a button) to a piece of code.
This application’s source code is in the book’s examples, in the file examples/ chap01/quit/quit.cpp; the running application is shown in Figure 1.3. Here’s the contents of the file:
 1 #include <QApplication>
 2 #include <QPushButton>

 3 int main(int argc, char *argv[])
 4 {
 5     QApplication app(argc, argv);
 6     QPushButton *button = new QPushButton("Quit");
 7     QObject::connect(button, SIGNAL(clicked()),
 8                      &app, SLOT(quit()));
 9     button->show();
10    return app.exec();
11 }

Qt’s widgets emit signals to indicate that a user action or a change of state has occurred.[*] For instance, QPushButton emits a clicked() signal when the user clicks the button. A signal can be connected to a function (called a slot in that context) so that when the signal is emitted, the slot is automatically executed. In our example, we connect the button’s clicked() signal to the QApplication object’s quit() slot. The SIGNAL() and SLOT() macros are part of the syntax.
We will now build the application. We assume that you have created a directory called quit containing quit.cpp. Run qmake in the quit directory to generate the project file, and then run it again to generate a makefile, as follows:
qmake -project
qmake quit.pro
Now build the application, and run it. If you click Quit, or press Space (which presses the button), the application will terminate.
In this section, we will create a small example application that demonstrates how to use layouts to manage the geometry of widgets in a window and how to use signals and slots to synchronize two widgets. The application—shown in Figure 1.4—asks for the user’s age, which the user can enter by manipulating either a spin box or a slider.

The application consists of three widgets: a QSpinBox, a QSlider, and a QWidget. The QWidget is the application’s main window. The QSpinBox and the QSlider are rendered inside the QWidget; they are children of the QWidget. Alternatively, we can say that the QWidget is the parent of the QSpinBox and the QSlider. The QWidget has no parent itself because it is being used as a top-level window. The constructors for QWidget and all of its subclasses take a QWidget * parameter that specifies the parent widget.
Here’s the source code:
 1 #include <QApplication>
 2 #include <QHBoxLayout>
 3 #include <QSlider>
 4 #include <QSpinBox>

 5 int main(int argc, char *argv[])
 6 {
 7     QApplication app(argc, argv);

 8     QWidget *window = new QWidget;
 9     window->setWindowTitle("Enter Your Age");

10     QSpinBox *spinBox = new QSpinBox;
11     QSlider *slider = new QSlider(Qt::Horizontal);
12     spinBox->setRange(0, 130);
13     slider->setRange(0, 130);

14     QObject::connect(spinBox, SIGNAL(valueChanged(int)),
15                      slider, SLOT(setValue(int)));
16     QObject::connect(slider, SIGNAL(valueChanged(int)),
17                      spinBox, SLOT(setValue(int)));
18     spinBox->setValue(35);

19     QHBoxLayout *layout = new QHBoxLayout;
20     layout->addWidget(spinBox);
21     layout->addWidget(slider);
22     window->setLayout(layout);

23     window->show();

24     return app.exec();
25 }
Lines 8 and 9 set up the QWidget that will serve as the application’s main window. We call setWindowTitle() to set the text displayed in the window’s title bar.
Lines 10 and 11 create a QSpinBox and a QSlider, and lines 12 and 13 set their valid ranges. We can safely assume that the user is at most 130 years old. We could pass window to the QSpinBox and QSlider constructors, specifying that these widgets should have window as their parent, but it isn’t necessary here because the layout system will figure this out by itself and automatically set the parent of the spin box and the slider, as we will see shortly.
The two QObject::connect() calls shown in lines 14 to 17 ensure that the spin box and the slider are synchronized so that they always show the same value. Whenever the value of one widget changes, its valueChanged(int) signal is emitted, and the setValue(int) slot of the other widget is called with the new value.
Line 18 sets the spin box value to 35. When this happens, the QSpinBox emits the valueChanged(int) signal with an int argument of 35. This argument is passed to the QSlider’s setValue(int) slot, which sets the slider value to 35. The slider then emits the valueChanged(int) signal because its own value changed, triggering the spin box’s setValue(int) slot. But at this point, setValue(int) doesn’t emit any signal, since the spin box value is already 35. This prevents infinite recursion. Figure 1.5 summarizes the situation.

In lines 19 to 22, we lay out the spin box and slider widgets using a layout manager. A layout manager is an object that sets the size and position of the widgets that lie under its responsibility. Qt has three main layout manager classes:
QHBoxLayoutlays out widgets horizontally from left to right (right to left for some cultures).QVBoxLayoutlays out widgets vertically from top to bottom.Widget Styles
The screenshots we have seen so far have been taken on Linux, but Qt applications look native on every supported platform. Qt achieves this by emulating the platform’s look and feel, rather than wrapping a particular platform or toolkit’s widget set.
The Plastique style is the default style for Qt/X11 applications running under KDE, and Cleanlooks is the default under GNOME. These styles use gradients and anti-aliasing to provide a modern look and feel. Qt application users can override the default style by using the
-stylecommand-line option. For example, to launch the Age application using the Motif style on X11, simply type the following command:./age -style motif
Unlike the other styles, the Windows XP, Windows Vista, and Mac styles are available only on their native platforms, since they rely on the platforms’ theme engines.
An additional style, QtDotNet, is available from Qt Solutions. It is also possible to create custom styles, as explained in Chapter 19.

The call to QWidget::setLayout() on line 22 installs the layout manager on the window. Behind the scenes, the QSpinBox and QSlider are “reparented” to be children of the widget on which the layout is installed, and for this reason we don’t need to specify an explicit parent when we construct a widget that will be put in a layout.

Even though we didn’t set the position or size of any widget explicitly, the QSpinBox and QSlider appear nicely laid out side by side. This is because QHBoxLayout automatically assigns reasonable positions and sizes to the widgets for which it is responsible, based on their needs. The layout managers free us from the chore of hard-coding screen positions in our applications and ensure that windows resize smoothly.
Qt’s approach to building user interfaces is simple to understand and very flexible. The most common pattern that Qt programmers use is to instantiate the required widgets and then set their properties as necessary. Programmers add the widgets to layouts, which automatically take care of sizing and positioning. User interface behavior is managed by connecting widgets together using Qt’s signals and slots mechanism.
Qt’s reference documentation is an essential tool for any Qt developer, since it covers every class and function in Qt. This book makes use of many Qt classes and functions, but it does not cover all of them, nor does it provide every detail of those that are mentioned. To get the most benefit from Qt, you should familiarize yourself with the Qt reference documentation as quickly as possible.
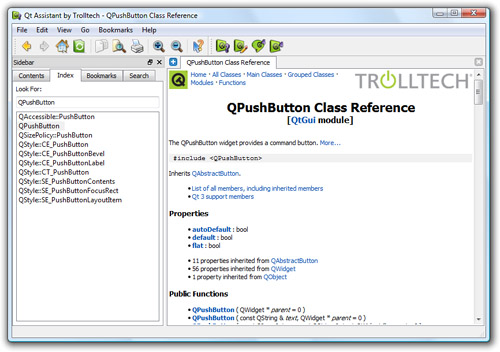
The documentation is available in HTML format in Qt’s doc/html directory and can be read using any web browser. You can also use Qt Assistant, the Qt help browser, which has powerful searching and indexing features that make it quicker and easier to use than a web browser.
To launch Qt Assistant, click Qt by Trolltech v4.x.y|Assistant in the Start menu on Windows, type assistant on the command line on Unix, or double-click Assistant in the Mac OS X Finder. The links in the “API Reference” section on the home page provide different ways of navigating Qt’s classes. The “All Classes” page lists every class in Qt’s API. The “Main Classes” page lists only the most commonly used Qt classes. As an exercise, you might want to look up the classes and functions that we have used in this chapter.
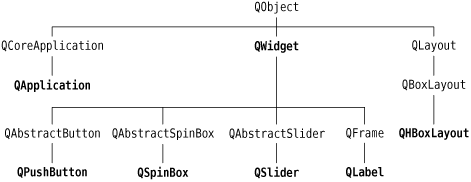
Note that inherited functions are documented in the base class; for example, QPushButton has no show() function of its own, but it inherits one from QWidget. Figure 1.9 shows how the classes we have seen so far relate to each other.
The reference documentation for the current version of Qt and for some earlier versions is available online at http://doc.trolltech.com/. This site also has selected articles from Qt Quarterly, the Qt programmers’ newsletter sent to all commercial licensees.
This chapter introduced the key concepts of signal–slot connections and layouts. It also began to reveal Qt’s consistent and fully object-oriented approach to the construction and use of widgets. If you browse through Qt’s documentation, you will find a uniformity of approach that makes it straightforward to learn how to use new widgets, and you will also find that Qt’s carefully chosen names for functions, parameters, enums, and so on, make programming in Qt surprisingly pleasant and easy.
The following chapters of Part I build on the fundamentals covered here, showing how to create complete GUI applications with menus, toolbars, document windows, a status bar, and dialogs, along with the underlying functionality to read, process, and write files.