When things go wrong, it’s important that information is available to aid in diagnosing the problem. An IDE or debugger can assist greatly to this effect—but it is usually available only during development. Once an application ships, the application itself must gather and record diagnostic information. To meet this requirement, the .NET Framework provides a set of facilities to log diagnostic information, monitor application behavior, detect runtime errors, and integrate with debugging tools if available.
From Framework 4.0, there are also a new set of types to enforce code contracts. These allow methods to interact through a set of mutual obligations, and fail early if those obligations are violated.
The types in this chapter are defined primarily in the System.Diagnostics and System.Diagnostics.Contracts
namespaces.
You can conditionally compile any section of code in C# with
preprocessor directives. Preprocessor
directives are special instructions to the compiler that begin with the
# symbol (and, unlike other C# constructs, must
appear on a line of their own). The preprocessor directives for
conditional compilation are #if,
#else, #endif, and #elif.
The #if directive instructs the
compiler to ignore a section of code unless a specified
symbol has been defined. You can define a symbol
with either the #define directive or
a compilation switch. #define applies
to a particular file; a compilation switch applies
to a whole assembly:
#define TESTMODE            // #define directives must be at top of file
                            // Symbol names are uppercase by convention.
using System;

class Program
{
  static void Main()
  {
#if TESTMODE
    Console.WriteLine ("in test mode!");     // OUTPUT: in test mode!
#endif
  }
}
If we deleted the first line, the program would compile with the
Console.WriteLine statement
completely eliminated from the executable.
The #else statement is
analogous to C#’s else statement, and
#elif is equivalent to #else followed by #if. The ||, &&, and ! operators can be used to perform or, and,
and not operations:
#if TESTMODE && !PLAYMODE      // if TESTMODE and not PLAYMODE
  ...
Bear in mind, however, that you’re not building an ordinary C# expression, and the symbols upon which you operate have absolutely no connection to variables—static or otherwise.
To define a symbol assembly-wide, specify the /define switch when compiling:
csc Program.cs /define:TESTMODE,PLAYMODEVisual Studio provides an option to enter conditional compilation symbols under Project Properties.
If you’ve defined a symbol at the assembly level and then want to
“undefine” it for a particular file, you can do so with the #undef directive.
The preceding example could instead be implemented with a simple static field:
static internal bool TestMode = true;

static void Main()
{
  if (TestMode) Console.WriteLine ("in test mode!");
}
This has the advantage of allowing runtime configuration. So, why choose conditional compilation? The reason is that conditional compilation can take you places variable flags cannot, such as:
You can even perform major refactoring under a conditional compilation directive, so you can instantly switch between old and new versions, and write libraries that can compile against multiple Framework versions, leveraging the latest Framework features where available.
Another advantage of conditional compilation is that debugging code can refer to types in assemblies that are not included in deployment.
The Conditional attribute instructs the compiler
to ignore any calls to a particular class or method, if the specified
symbol has not been defined.
To see how this is useful, suppose you write a method for logging status information as follows:
static void LogStatus (string msg)
{
  string logFilePath = ...
  System.IO.File.AppendAllText (logFilePath, msg + "
");
}
Now imagine you wanted this to execute only if the LOGGINGMODE symbol is defined. The first
solution is to wrap all calls to LogStatus around an #if directive:
#if LOGGINGMODE
LogStatus ("Message Headers: " + GetMsgHeaders());
#endif
This gives an ideal result, but it is tedious. The second
solution is to put the #if directive inside the LogStatus method. This, however, is
problematic should LogStatus be called as follows:
LogStatus ("Message Headers: " + GetComplexMessageHeaders());GetComplexMessageHeaders
would always get called—which might incur a performance hit.
We can combine the functionality of the first solution with the
convenience of the second by attaching the Conditional attribute (defined in System.Diagnostics) to the LogStatus method:
[Conditional ("LOGGINGMODE")]
static void LogStatus (string msg)
{
  ...
}
This instructs the compiler to implicitly wrap any calls to
LogStatus in an #if LOGGINGMODE directive. If the symbol is
not defined, any calls to LogStatus
get eliminated entirely in compilation—including their argument
evaluation expressions. This works even if LogStatus and the caller are in different
assemblies.
Note
Another benefit of [Conditional] is that the conditionality
check is performed when the caller is compiled,
rather than when the called method is compiled.
This is beneficial because it allows you to write a library
containing methods such as LogStatus—and build just one version
of that library.
The Conditional attribute is
ignored at runtime—it’s purely an instruction to the compiler.
The Conditional attribute is useless if you need
to dynamically enable or disable functionality at runtime: instead,
you must use a variable-based approach. This leaves the question of
how to elegantly circumvent the evaluation of arguments when calling
conditional logging methods. A functional approach solves
this:
using System;
using System.Linq;

class Program
{
  public static bool EnableLogging;

  static void LogStatus (Func<string> message)
  {
    string logFilePath = ...
    if (EnableLogging)
      System.IO.File.AppendAllText (logFilePath, message() + "
");
  }
}
A lambda expression lets you call this method without syntax bloat:
LogStatus ( () => "Message Headers: " + GetComplexMessageHeaders() );
If EnableLogging is
false, GetComplexMessageHeaders is never
evaluated.
Debug and Traceare static classes that provide basic logging and
assertion capabilities. The two classes are very similar; the main
differentiator is their intended use. The Debug class is intended for debug builds; the
Trace class is intended for both
debug and release builds. To this effect:
All methods of the Debug
class are defined with [Conditional("DEBUG")]. |
All methods of the Trace
class are defined with [Conditional("TRACE")]. |
This means that all calls that you make to Debug or Trace are eliminated by the compiler unless
you define DEBUG or TRACE symbols. By default, Visual Studio
defines both DEBUG and TRACE symbols in a project’s
debug configuration—and just the TRACE symbol in the
release configuration.
Both the Debug and Trace classes provide Write, WriteLine, and WriteIf methods. By default, these send
messages to the debugger’s output window:
Debug.Write     ("Data");
Debug.WriteLine (23 * 34);
int x = 5, y = 3;
Debug.WriteIf   (x > y, "x is greater than y");
The Trace class also provides
the methods TraceInformation,
TraceWarning, and TraceError. The difference in behavior between
these and the Write methods depends
on the active TraceListeners (we will
cover this in the section TraceListener).
The Debug and Trace classes both provide Fail and Assert methods. Fail sends the message to each TraceListener in the Debug or Trace class’s Listeners collection (see the following
section), which by default writes the message to the debug output as
well as displaying it in a dialog:
Debug.Fail ("File data.txt does not exist!");The dialog that appears asks you whether to ignore, abort, or retry. The latter then lets you attach a debugger, which is useful in instantly diagnosing the problem.
Assert simply calls Fail if the bool argument is false—this is called making an
assertion. Specifying a failure message is optional:
Debug.Assert (File.Exists ("data.txt"), "File data.txt does not exist!");
var result = ...
Debug.Assert (result != null);
The Write, Fail, and Assert methods are also overloaded to accept
a string category in addition to
the message, which can be useful in processing the output.
An alternative way to make an assertion is to throw an exception if the opposite condition is true. This is a common practice when validating method arguments:
public void ShowMessage (string message)
{
  if (message != null) throw new ArgumentNullException ("message");
  ...
}
Assertions made in this way are compiled unconditionally and are
less flexible in that you can’t control the outcome of a failed
assertion via TraceListeners.
Note
We’ll see soon how code contracts extend
the principles of Fail and
Assert, providing more power and
flexibility.
The Debug and Trace classes each have a Listeners property, comprising a static
collection of TraceListener instances. These are responsible
for processing the content emitted by the Write, Fail, and Trace methods.
By default, the Listeners
collection of each includes a single listener (DefaultTraceListener). The default listener
has two key features:
When connected to a debugger such as Visual Studio, messages are written to the debug output window; otherwise, message content is ignored.
When the
Failmethod is called (or an assertion fails), a dialog appears asking the user whether to continue, abort, or retry (attach/debug)—regardless of whether a debugger is attached.
You can change this behavior by (optionally) removing the
default listener, and then adding one or more of your own. You can
write trace listeners from scratch (by subclassing TraceListener) or use one of the predefined
types:
TextWriterTraceListenerwrites to aStreamorTextWriteror appends to a file.EventLogTraceListenerwrites to the Windows event log.EventProviderTraceListenerwrites to the Event Tracing for Windows (ETW) subsystem in Windows Vista and later.WebPageTraceListenerwrites to an ASP.NET web page.
TextWriterTraceListener is
further subclassed to ConsoleTraceListener, DelimitedListTraceListener, XmlWriterTraceListener, and EventSchemaTraceListener.
Note
None of these listeners display a dialog when Fail is called—only DefaultTraceListener has this
behavior.
The following example clears Trace’s default listener, then adds three
listeners—one that appends to a file, one that writes to the console,
and one that writes to the Windows event log:
// Clear the default listener:
Trace.Listeners.Clear();

// Add a writer that appends to the trace.txt file:
Trace.Listeners.Add (new TextWriterTraceListener ("trace.txt"));

// Obtain the Console's output stream, then add that as a listener:
System.IO.TextWriter tw = Console.Out;
Trace.Listeners.Add (new TextWriterTraceListener (tw));

// Set up a Windows Event log source and then create/add listener.
// CreateEventSource requires administrative elevation, so this would
// typically be done in application setup.
if (!EventLog.SourceExists ("DemoApp"))
  EventLog.CreateEventSource ("DemoApp", "Application");

Trace.Listeners.Add (new EventLogTraceListener ("DemoApp"));
In the case of the Windows event log, messages that you write
with the Write, Fail, or Assert method always display as
“Information” messages in the Windows event viewer. Messages that you
write via the TraceWarning and
TraceError methods, however, show
up as warnings or errors.
TraceListener also has a
Filter of type TraceFilter that you can set to control whether a message gets written
to that listener. To do this, you either instantiate one of the predefined
subclasses (EventTypeFilter or
SourceFilter), or subclass TraceFilter and
override the ShouldTrace method.
You could use this to filter by category, for instance.
TraceListener also defines
IndentLevel and IndentSize properties for controlling
indentation, and the TraceOutputOptions property for writing
extra data:
TextWriterTraceListener tl = new TextWriterTraceListener (Console.Out);
tl.TraceOutputOptions = TraceOptions.DateTime | TraceOptions.Callstack;
TraceOutputOptions are
applied when using the Trace
methods:
Trace.TraceWarning ("Orange alert");

DiagTest.vshost.exe Warning: 0 : Orange alert
     DateTime=2007-03-08T05:57:13.6250000Z
     Callstack=   at System.Environment.GetStackTrace(Exception e, Boolean
needFileInfo)
at System.Environment.get_StackTrace() at ...Some listeners, such as TextWriterTraceListener, ultimately write to
a stream that is subject to caching. This has two implications:
A message may not appear in the output stream or file immediately.
You must close—or at least flush—the listener before your application ends; otherwise, you lose what’s in the cache (up to 4 KB, by default, if you’re writing to a file).
The Trace and Debug classes provide static Close and Flush methods that call Close or Flush on all listeners (which in turn calls
Close or Flush on any underlying writers and
streams). Close implicitly calls
Flush, closes file handles, and
prevents further data from being written.
As a general rule, call Close
before an application ends and call Flush anytime you want to ensure that
current message data is written. This applies if you’re using stream-
or file-based listeners.
Trace and Debug also provide an AutoFlush property, which, if true, forces a Flush after every message.
We mentioned previously the concept of an assertion, whereby you check that certain conditions are met throughout your program. If a condition fails, it indicates a bug, which should typically be handled by invoking a debugger (in debug builds) or throwing an exception (in release builds).
Assertions follow the principle that if something goes wrong, it’s best to fail early and close to the source of the error. This is usually better than trying to continue with invalid data—which can result in incorrect results or an exception later on in the program (which is harder to diagnose).
Historically, there have been two ways to enforce assertions:
By calling the
Assertmethod onDebugorTraceBy throwing exceptions (such as
ArgumentNullException)
Framework 4.0 provides a new feature called code contracts, which replaces both of these approaches with a unified system. That system allows you to make not only simple assertions but also more powerful contract-based assertions.
Code contracts derive from the principle of “Design by Contract” from the Eiffel programming language, where functions interact with each other through a system of mutual obligations and benefits. Essentially, a function specifies preconditions that must be met by the client (caller), and in return guarantees postconditions which the client can depend on when the function returns.
The types for code contracts live in the System.Diagnostics.Contracts namespace.
Note
Although the types that support code contracts are built into .NET Framework 4.0, the binary rewriter and the static checking tools are available as a separate download at the Microsoft DevLabs site. You must install these tools before you can use code contracts in Visual Studio 2010.
To illustrate, we’ll write a method that adds an item to a list only if it’s not already present—with two preconditions and a postcondition:
public static bool AddIfNotPresent<T> (IList<T> list, T item)
{
  Contract.Requires (list != null);          // Precondition
  Contract.Requires (!list.IsReadOnly);      // Precondition
  Contract.Ensures (list.Contains (item));   // Postcondition
  if (list.Contains(item)) return false;
  list.Add (item);
  return true;
}
The preconditions are defined by Contract.Requires and are verified when the
method starts. The postcondition is defined by Contract.Ensures and is verified not where
it appears in the code, but when the method
exits.
Preconditions and postconditions act like assertions and, in this case, detect the following errors:
Calling the method with a null or read-only list
A bug in the method whereby we forgot to add the item to the list
Note
Preconditions and postconditions must appear at the start of the method. This is conducive to good design: if you fail to fulfill the contract in subsequently writing the method, the error will be detected.
Moreover, these conditions form a discoverable
contract for that method. AddIfNotPresent
advertises to consumers:
“You must call me with a non-null writable list.”
“When I return, that list will contain the item you specified.”
These facts can be emitted into the assembly’s XML documentation file (you can do this in Visual Studio by going to the Code Contracts tab of the Project Properties window, enabling the building of a contracts reference assembly, and checking “Emit Contracts into XML doc file”). Tools such as SandCastle can then incorporate contract details into documentation files.
Contracts also enable your program to be analyzed for
correctness by static contract validation tools. If you try to call
AddIfNotPresent with a list whose value might be null, for example,
a static validation tool could warn you before you even run the
program.
Another benefit of contracts is ease of use. In our example, it’s easier to code the postcondition upfront than at both exit points. Contracts also support object invariants—which further reduce repetitive coding and make for more reliable enforcement.
Conditions can also be placed on interface members and abstract methods, something that is impossible with standard validation approaches. And conditions on virtual methods cannot be accidentally circumvented by subclasses.
Yet another benefit of code contracts is that contract violation
behavior can be customized easily and in more ways than if you rely on
calling Debug.Assert or throwing
exceptions. And it’s possible to ensure that contract violations are
always recorded—even if contract
violation exceptions are swallowed by exception handlers higher in the
call stack.
The disadvantage of using code contracts is that the .NET
implementation relies on a binary rewriter—a tool
that mutates the assembly after compilation. This slows the build
process, as well as complicating services that rely on calling the C#
compiler (whether explicitly or via the CSharpCodeProvider class).
The enforcing of code contracts may also incur a runtime performance hit, although this is easily mitigated by scaling back contract checking in release builds.
Warning
Another limitation of code contracts is that you can’t use
them to enforce security-sensitive checks, because they can be
circumvented at runtime (by handling the ContractFailed event).
Code contracts comprise preconditions, postconditions, assertions, and object invariants. These are all discoverable assertions. They differ based on when they are verified:
Preconditions are verified when a function starts.
Postconditions are verified before a function exits.
Assertions are verified wherever they appear in the code.
Object invariants are verified after every public function in a class.
Code contracts are defined entirely by calling (static) methods
in the Contract class. This makes
contracts language-independent.
Contracts can appear not only in methods, but in other functions as well, such as constructors, properties, indexers, and operators.
Almost all methods in the Contract class are defined with the
[Conditional("CONTRACTS_FULL")]
attribute. This means that unless you define the CONTRACTS_FULL symbol, (most) contract
code is stripped out. Visual Studio defines the CONTRACTS_FULL symbol
automatically if you enable contract checking in the Code Contracts
tab of the Project Properties page. (For this tab to appear, you
must download and install the Contracts tools from the Microsoft
DevLabs site.)
Warning
Removing the CONTRACTS_FULL symbol might seem like an
easy way to disable all contract checking. However, it doesn’t
apply to Requires<TException> conditions
(which we’ll describe in detail soon).
The only way to disable contracts in code that uses Requires<TException> is to enable
the CONTRACTS_FULL symbol and
then get the binary rewriter to strip out contract code by
choosing an enforcement level of “none”.
After compiling code that contains contracts, you must call
the binary rewriter tool, ccrewrite.exe (Visual Studio does this automatically if contract
checking is enabled). The binary rewriter moves postconditions (and
object invariants) into the right place, calls any conditions and
object invariants in overridden methods, and replaces calls to
Contract with calls to a
contracts runtime class. Here’s a
(simplified) version of what our earlier example would look like
after rewriting:
static bool AddIfNotPresent<T> (IList<T> list, T item)
{
  __ContractsRuntime.Requires (list != null);
  __ContractsRuntime.Requires (!list.IsReadOnly);
  bool result;
  if (list.Contains (item))
    result = false;
  else
  {
    list.Add (item);
    result = true;
  }
  __ContractsRuntime.Ensures (list.Contains (item));   // Postcondition
  return result;
}
If you fail to call the binary rewriter, Contract won’t get replaced with __ContractsRuntime
and the former will end up throwing exceptions.
Note
The __ContractsRuntime
type is the default contracts runtime class. In advanced
scenarios, you can specify your own contracts runtime class via
the /rw switch or Visual
Studio’s Code Contracts tab in Project Properties.
Because __ContractsRuntime is shipped with the
binary rewriter (which is not a standard part of the .NET
Framework), the binary rewriter actually injects the __ContractsRuntime class into your
compiled assembly. You can examine its code by disassembling any
assembly that enables code contracts.
The binary rewriter also offers switches to strip away some or all contract checking: we describe these in Selectively Enforcing Contracts. You typically enable full contract checking in debug build configurations and a subset of contract checking in release configurations.
The binary rewriter also lets you choose between displaying a
dialog and throwing a ContractException upon contract failure.
The former is typically used for debug builds; the latter for
release builds. To enable the latter, specify /throwonfailure when calling the binary
rewriter, or uncheck the “Assert on contract failure” checkbox in
Visual Studio’s Code Contracts tab in Project Properties.
See Dealing with Contract Failure for more detail.
All functions that you call from arguments passed to
contract methods (Requires,
Assumes, Assert, etc.) must be
pure—that is, side-effect-free (they must not
alter the values of fields). You must signal to the binary rewriter
that any functions you call are pure by applying the [Pure] attribute:
[Pure]
public static bool IsValidUri (string uri) { ... }
This makes the following legal:
Contract.Requires (IsValidUri (uri));
The contract tools implicitly assume that all property get
accessors are pure, as are all C# operators (+, *,
%, etc.) and members on selected
Framework types, including string, Contract, Type, System.IO.Path, and LINQ’s query
operators. It also assumes that methods invoked via delegates marked
with the [Pure] attribute are
pure (the Comparison<T> and
Predicate<T> attributes are
marked with this attribute).
You can define code contract preconditions by calling Contract.Requires, Contract.Requires<TException>, or
Contract.EndContractBlock.
Calling Contract.Requires at the start of a function
enforces a precondition:
static string ToProperCase (string s)
{
  Contract.Requires (!string.IsNullOrEmpty(s));
  ...
}
This is like making an assertion, except that the precondition
forms a discoverable fact about your function that can be extracted
from the compiled code and consumed by documentation or static
checking tools (so that they can warn you should they see some code
elsewhere in your program that tries to call ToProperCase with a null or empty
string).
A further benefit of preconditions is that subclasses that override virtual methods with preconditions cannot prevent the base class method’s preconditions from being checked. And preconditions defined on interface members will be implicitly woven into the concrete implementations (see Contracts on Interfaces and Abstract Methods).
Warning
Preconditions should access only members that are at least as accessible as the function itself—this ensures that callers can make sense of the contract. If you need to read or call less accessible members, it’s likely that you’re validating internal state rather than enforcing the calling contract, in which case you should make an assertion instead.
You can call Contract.Requires as many times as necessary
at the start of the method to enforce different conditions.
The introduction of code contracts challenges the following deeply entrenched pattern established in the .NET Framework from version 1.0:
static void SetProgress (string message, int percent) //Classic approach{ if (message == null) throw new ArgumentNullException ("message"); if (percent < 0 || percent > 100) throw new ArgumentOutOfRangeException ("percent"); ... } static void SetProgress (string message, int percent) //Modern approach{ Contract.Requires (message != null); Contract.Requires (percent >= 0 && percent <= 100); ... }
If you have a large assembly that enforces classic argument
checking, writing new methods with preconditions will create an
inconsistent library: some methods will throw argument exceptions
whereas others will throw a ContractException. One solution is to update
all existing methods to use contracts, but this has two
problems:
It’s time-consuming.
Callers may have come to depend on an exception type such as
ArgumentNullExceptionbeing thrown. (This almost certainly indicates bad design, but may be the reality nonetheless.)
The solution is to call the generic version of Contract.Requires. This lets you specify an
exception type to throw upon failure:
Contract.Requires<ArgumentNullException>(message != null, "message"); Contract.Requires<ArgumentOutOfRangeException>(percent >= 0 && percent <= 100, "percent");
(The second argument gets passed to the constructor of the exception class).
This results in the same behavior as with old-fashioned argument checking, while delivering the benefits of contracts (conciseness, support for interfaces, implicit documentation, static checking, and runtime customization).
Note
The specified exception is thrown only if you specify /throwonfailure when
rewriting the assembly (or uncheck the
Assert on Contract Failure checkbox in Visual
Studio). Otherwise, a dialog
appears.
It’s also possible to specify a contract-checking level of
ReleaseRequires in the binary rewriter (see Selectively Enforcing Contracts). Calls to the generic
Contract.Requires<TException>
then remain in place while all other checks are stripped away: this
results in an assembly that behaves just as in the past.
The Contract.EndContractBlock method lets you
get the benefit of code contracts with traditional argument-checking
code—avoiding the need to refactor code that you wrote prior to
Framework 4.0. All you do is call this method after performing manual
argument checks:
static void Foo (string name)
{
  if (name == null) throw new ArgumentNullException ("name");
  Contract.EndContractBlock();
  ...
}
The binary rewriter then converts this code into something equivalent to:
static void Foo (string name)
{
  Contract.Requires<ArgumentNullException> (name != null, "name");
  ...
}
The code that precedes EndContractBlock must comprise simple
statements of the form:
if<condition>throw<expression>;
You can mix traditional argument checking with code contract calls: simply put the latter after the former:
static void Foo (string name)
{
  if (name == null) throw new ArgumentNullException ("name");
  Contract.Requires (name.Length >= 2);
  ...
}
Calling any of the contract-enforcing methods implicitly ends the contract block.
The point is to define a region at the beginning of the method
where the contract rewriter knows that every if statement is part of a contract. Calling
any of the contract-enforcing
methods implicitly extends the contract block, so you don’t need to
use EndContractBlock if you use
another method such as Contract.Ensures, etc.
An overridden method cannot add preconditions, because doing so would change the contract (by making it more restrictive)—breaking the principles of polymorphism.
(Technically, the designers could have allowed overridden methods to weaken preconditions; they decided against this because the scenarios weren’t sufficiently compelling to justify adding this complexity).
Contract.Ensures enforces a postcondition: something which must be true when the
method exits. We saw an example earlier:
static bool AddIfNotPresent<T> (IList<T> list, T item)
{
  Contract.Requires (list != null);          // Precondition
  Contract.Ensures (list.Contains (item));   // Postcondition
  if (list.Contains(item)) return false;
  list.Add (item);
  return true;
}
The binary rewriter moves postconditions to the exit points of the method. Postconditions are checked if you return early from a method (as in this example)—but not if you return early via an unhandled exception.
Unlike preconditions, which detect misuse by the caller, postconditions detect an error in the function itself (rather like assertions). Therefore, postconditions may access private state (subject to the caveat stated shortly, in Postconditions and Overridden Methods).
Occasionally, it’s useful to ensure that a certain condition holds should a
particular type of exception be thrown. The EnsuresOnThrow method does exactly
this:
Contract.EnsuresOnThrow<WebException> (this.ErrorMessage != null);
Because postconditions are not evaluated until a function ends,
it’s reasonable to want to access the return value of a method. The
Contract.Result<T> method
does exactly that:
Random _random = new Random();
int GetOddRandomNumber()
{
  Contract.Ensures (Contract.Result<int>() % 2 == 1);
  return _random.Next (100) * 2 + 1;
}
The Contract.ValueAtReturn<T> method
fulfills the same function—but for ref and out parameters.
Contract.OldValue<T>
returns the original value of a method parameter. This
is useful with postconditions because the latter are checked at the
end of a function. Therefore, any expressions in
postconditions that incorporate parameters will read the
modified parameter values.
For example, the postcondition in the following method will always fail:
static string Middle (string s)
{
  Contract.Requires (s != null && s.Length >= 2);
  Contract.Ensures (Contract.Result<string>().Length < s.Length);
  s = s.Substring (1, s.Length - 2);
  return s.Trim();
}
Here’s how we can correct it:
static string Middle (string s)
{
  Contract.Requires (s != null && s.Length >= 2);
  Contract.Ensures (Contract.Result<string>().Length <
                    Contract.OldValue (s).Length);
  s = s.Substring (1, s.Length - 2);
  return s.Trim();
}In addition to preconditions and postconditions, the code contracts API lets you make assertions and define object invariants.
You can make assertions anywhere in a function by calling
Contract.Assert. You can
optionally specify an error message if the assertion fails:
...
int x = 3;
...
Contract.Assert (x == 3);                 // Fail unless x is 3
Contract.Assert (x == 3, "x must be 3");
...
The binary rewriter doesn’t move assertions around. There are
two reasons for favoring Contract.Assert over Debug.Assert:
You can leverage the more flexible failure-handling mechanisms offered by code contracts
Static checking tools can attempt to validate
Contract.Asserts
Contract.Assume behaves exactly like Contract.Assert at runtime, but has
slightly different implications for static checking tools.
Essentially, static checking tools won’t
challenge an assumption, whereas they may
challenge an assertion. This is useful in that there will always be
things a static checker is unable to prove, and this may lead to it
“crying wolf” over a valid assertion. Changing the assertion to an
assumption keeps the static checker quiet.
For a class, you can specify one or more object invariant methods. These methods run automatically after every public function in the class, and allow you to assert that the object is in an internally consistent state.
Note
Support for multiple object invariant methods was included to make object invariants work well with partial classes.
To define an object invariant method, write a parameterless void
method and annotate it with the [ContractInvariantMethod] attribute. In that
method, call Contract.Invariant to enforce each
condition that should hold true if your object is a valid
state:
class Test
{
  int _x, _y;

  [ContractInvariantMethod]
  void ObjectInvariant()
  {
    Contract.Invariant (_x >= 0);
    Contract.Invariant (_y >= _x);
  }

  public int X { get { return _x; } set { _x = value; } }
  public void Test1() { _x = −3; }
  void Test2()        { _x = −3; }
}
The binary rewriter translates the X property, Test1 method, and Test2 method to something equivalent to
this:
public void X { get { return _x; } set { _x = value; ObjectInvariant(); } }
public void Test1() { _x = −3; ObjectInvariant(); }
void Test2()        { _x = −3; }    // No change because it's private
Note
Object invariants don’t prevent an object from entering an invalid state: they merely detect when that condition has occurred.
Contract.Invariant is rather
like Contract.Assert, except that
it can appear only in a method marked with the [ContractInvariantMethod] attribute. And
conversely, a contract invariant method can only contain calls to
Contract.Invariant.
A subclass can introduce its own object invariant method, too, and this will be checked in addition to the base class’s invariant method. The caveat, of course, is that the check will take place only after a public method is called.
A powerful feature of code contracts is that you can attach conditions to interface members and abstract methods. The binary rewriter then automatically weaves these conditions into the members’ concrete implementations.
A special mechanism lets specify a separate contract class for interfaces and abstract methods, so that you can write method bodies to house the contract conditions. Here’s how it works:
[ContractClass (typeof (ContractForITest))]
interface ITest
{
  int Process (string s);
}

[ContractClassFor (typeof (ITest))]
sealed class ContractForITest : ITest
{
  int ITest.Process (string s)     // Must use explicit implementation.
  {
    Contract.Requires (s != null);
    return 0;                      // Dummy value to satisfy compiler.
  }
}
Notice that we had to return a value when implementing ITest.Process to satisfy the compiler. The
code that returns 0 will not run, however. Instead, the binary rewriter
extracts just the conditions from that method, and weaves them into the
real implementations of ITest.Process. This means that the contract
class is never actually instantiated (and any constructors that you
write will not execute).
You can assign a temporary variable within the contract block to
make it easier to reference other
members of the interface. For instance, if our ITest interface also defined a Message property of type string, we could write the following in
ITest.Process:
int ITest.Process (string s)
{
  ITest test = this;
  Contract.Requires (s != test.Message);
  ...
}
This is easier than:
Contract.Requires (s != ((ITest)this).Message);(Simply using this.Message
won’t work because Message must be
explicitly implemented.) The process of defining contract classes for
abstract classes is exactly the same, except that the contract class
should be marked abstract instead of
sealed.
The binary rewriter lets you specify what happens when a
contract condition fails, via the /throwonfailure switch (or the
Assert on Contract Failure checkbox in Visual
Studio’s Contracts tab in Project
Properties).
If you don’t specify /throwonfailure—or check Assert on
Contract Failure—a dialog appears upon contract failure,
allowing you to abort, debug or ignore the error.
Note
There are a couple of nuances to be aware of:
If the CLR is hosted (i.e., in SQL Server or Exchange), the host’s escalation policy is triggered instead of a dialog appearing.
Otherwise, if the current process can’t pop up a dialog box to the user,
Environment.FailFastis called.
The dialog is useful in debug builds for a couple of reasons:
It makes it easy to diagnose and debug contract failures on the spot—without having to re-run the program. This works regardless of whether Visual Studio is configured to break on first-chance exceptions. And unlike with exceptions in general, contract failure almost certainly means a bug in your code.
It lets you know about contract failure—even if a caller higher up in the stack “swallows” exceptions as follows:
try
{
  // Call some method whose contract fails
}
catch { }
Note
The code above is considered an antipattern in most scenarios because it masks failures, including conditions that the author never anticipated.
If you specify the /throwonfailure switch—or uncheck
Assert on Contract Failure in Visual Studio—a
ContractException is thrown upon failure. This
is desirable for:
Release builds—where you would let the exception bubble up the stack and be treated like any other unexpected exception (perhaps by having a top-level exception handler log the error or invite the user to report it).
Unit testing environments— where the process of logging errors is automated.
Note
ContractException cannot
appear in a catch block because
this type is not public. The rationale is that there’s no reason that
you’d want to specifically catch a ContractException—you’d want to catch it
only as part of a general exception backstop.
When a contract fails, the static Contract.ContractFailed event fires before any
further action is taken. If you handle this event, you can query the
event arguments object for details of the error. You can also call
SetHandled to prevent a ContractException from being subsequently
thrown (or a dialog appearing).
Handling this event is particularly useful when /throwonfailure is specified, because it
lets you log all contract failures—even if code
higher in the call stack swallows exceptions as we described just
before. A great example is with automated unit testing:
Contract.ContractFailed += (sender, args) =>
{
  string failureMessage = args.FailureKind + ": " + args.Message;
  // Log failureMessage with unit testing framework:
  // ...
  args.SetUnwind();
};
This handler logs all contract failures, while allowing the
normal ContractException (or
contract failure dialog) to run its course after the event handler has
finished. Notice that we also call SetUnwind: this neutralizes the effect of
any calls to SetHandled from other event
subscribers. In other words, it ensures that a ContractException (or
dialog) will always follow after all event handlers have run.
If you throw an exception from within this handler, any other
event handlers will still execute. The exception that you threw then
populates the InnerException
property of the ContractException
that’s eventually thrown.
If an exception is thrown within a contract condition itself,
then that exception propagates like any other—regardless of whether
/throwonfailure is specified. The
following method throws a NullReferenceException if called with a null
string:
string Test (string s)
{
  Contract.Requires (s.Length > 0);
  ...
}
This precondition is essentially faulty. It should instead be:
Contract.Requires (!string.IsNullOrEmpty (s));
The binary rewriter offers two switches that strip away some
or all contract checking: /publicsurface and /level. You can control these from Visual
Studio via the Code Contracts tab of
Project Properties. The /publicsurface switch tells the rewriter to
check contracts only on public members. The /level switch has the following
options:
- None (Level 0)
Strips out all contract verification
- ReleaseRequires (Level 1)
Enables only calls to the generic version of
Contract.Requires<TException>- Preconditions (Level 2)
Enables all preconditions (Level 1 plus normal preconditions)
- Pre and Post (Level 3)
Enables Level2 checking plus postconditions
- Full (Level 4)
Enables Level 3 checking plus object invariants and assertions (i.e., everything)
You typically enable full contract checking in debug build configurations.
When it comes to making release builds, there are two general philosophies:
Favor safety and enable full contract checking
Favor performance and disable all contract checking
If you’re building a library for public consumption, though, the second approach creates a problem. Imagine that you compile and distribute library L in release mode with contract checking disabled. A client then builds project C in debug mode that references library L. Assembly C can then call members of L incorrectly without contract violations! In this situation, you actually want to enforce the parts of L’s contract that ensure correct usage of L—in other words, the preconditions in L’s public members.
The simplest way to resolve this is to enable /publicsurface checking in L with a level of
Preconditions or
ReleaseRequires. This ensures that the essential
preconditions are enforced for the benefit of consumers, while
incurring the performance cost of only those preconditions.
In extreme cases, you might not want to pay even this small performance price—in which case, you can take the more elaborate approach of call-site checking.
Call-site checking moves precondition validation from called methods into calling methods (call sites). This solves the problem just described—by enabling consumers of library L to perform L’s precondition validation themselves in debug configurations.
To enable call-site checking, you must first build a separate contracts reference assembly—a supplementary assembly that contains just the preconditions for the referenced assembly. To do this, you can either use the ccrefgen command-line tool, or proceed in Visual Studio as follows:
In the release configuration of the referenced library (L), go to the Code Contracts tab of Project Properties and disable runtime contract checking while ticking “Build a Contract Reference Assembly”. This then generates a supplementary contracts reference assembly (with the suffix .contracts.dll).
In the release configuration of the referencing assemblies, disable all contract checking.
In the debug configuration of the referencing assemblies, tick “Call-site Requires Checking.”
The third step is equivalent to calling ccrewrite with the /callsiterequires switch. It reads the
preconditions from the contracts reference assembly and weaves them
into the calling sites in the referencing assembly.
Code contracts permit static contract checking, whereby a tool analyzes contract conditions to find potential bugs in your program before it’s run. For example, statically checking the following code generates a warning:
static void Main()
{
  string message = null;
  WriteLine (message);     // Static checking tool will generate warning
}

static void WriteLine (string s)
{
  Contract.Requires (s != null);
  Console.WriteLine (s);
}
You can run Microsoft’s static contracts tool either from the command line via cccheck, or by enabling static contract checking in Visual Studio’s project properties dialog (the commercial version is supported with Visual Studio Premium and Ultimate editions only).
For static checking to work, you may need to add preconditions and postconditions to your methods. To give a simple example, the following will generate a warning:
static void WriteLine (string s, bool b)
{
  if (b)
    WriteLine (s);    // Warning: requires unproven
}

static void WriteLine (string s)
{
  Contract.Requires (s != null);
  Console.WriteLine (s);
}
Because we’re calling a method that requires the parameter to be non-null, we must prove that the argument is non-null. To do this, we can add a precondition to the first method as follows:
static void WriteLine (string s, bool b)
{
  Contract.Requires (s != null);
  if (b)
    WriteLine (s);    // OK
}Static checking is easiest if instigated from the beginning of a project’s lifecycle—otherwise you’re likely to get overwhelmed with warnings.
If you do want to apply static contract checking to an existing
codebase, it can help by initially applying it just to selective parts
of a program—via the ContractVerification attribute (in System.Diagnostics.Contracts). This
attribute can be applied at the assembly, type, and member level. If
you apply it at multiple levels, the more granular wins. Therefore, to
enable static contract verification just for a particular class, start
by disabling verification at the assembly-level as follows:
[assembly: ContractVerification (false)]
and then enable it just for the desired class:
[ContractVerification (true)]
class Foo { ... }Another tactic in applying static contract verification to an existing codebase is to run the static checker with the Baseline option checked in Visual Studio. All the warnings that are produced are then written to a specified XML file. Next time you run static verification, all the warnings in that that file are ignored—so you see only messages generated as a result of new code that you’ve written.
You can also tell the static checker to ignore certain types
of warnings via the SuppressMessage attribute (in System.Diagnostics.CodeAnalysis):
[SuppressMessage ("Microsoft.Contracts", warningFamily)]where warningFamily is one of the
following values:
Requires Ensures Invariant NonNull DivByZero MinValueNegation
ArrayCreation ArrayLowerBound ArrayUpperBound
Sometimes it’s useful for an application to interact with a debugger if one is available. During development, the debugger is usually your IDE (e.g., Visual Studio); in deployment, the debugger is more likely to be:
DbgCLR
One of the lower-level debugging tools, such as WinDbg, Cordbg, or Mdbg
DbgCLR is Visual Studio stripped of everything but the debugger, and it is a free download with the .NET Framework SDK. It’s the easiest debugging option when an IDE is not available, although it requires that you download the whole SDK.
The static Debugger class in System.Diagnostics provides basic functions
for interacting with a debugger—namely Break, Launch, Log, and IsAttached.
A debugger must first attach to an application in order to debug it. If you start an application from within an IDE, this happens automatically, unless you request otherwise (by choosing “Start without debugging”). Sometimes, though, it’s inconvenient or impossible to start an application in debug mode within the IDE. An example is a Windows Service application or (ironically) a Visual Studio designer. One solution is to start the application normally, and then choose Debug Process in your IDE. This doesn’t allow you to set breakpoints early in the program’s execution, however.
The workaround is to call Debugger.Break from within your application.
This method launches a debugger, attaches to it, and suspends
execution at that point. (Launch
does the same, but without suspending execution.) Once attached, you
can log messages directly to the debugger’s output window with the
Log method. You can tell whether
you’re attached to a debugger with the IsAttached property.
The DebuggerStepThrough and
DebuggerHidden attributes provide suggestions to the debugger on how to
handle single-stepping for a particular method, constructor, or
class.
DebuggerStepThrough requests
that the debugger step through a function without any user
interaction. This attribute is useful in automatically generated
methods and in proxy methods that forward the real work to a method
somewhere else. In the latter case, the debugger will still show the
proxy method in the call stack if a breakpoint is set within the
“real” method—unless you also add the DebuggerHidden attribute. These two
attributes can be combined on proxies to help the user focus on
debugging the application logic rather than the plumbing:
[DebuggerStepThrough, DebuggerHidden]
void DoWorkProxy()
{
  // setup...
  DoWork();
  // teardown...
}

void DoWork() {...} // Real method...In the last section of Chapter 6, we described how to launch a new
process with Process.Start. The
Process class also allows you to query and
interact with other processes running on the same, or another,
computer.
The Process.GetProcessXXX
methods retrieve a specific process by name or process ID, or all
processes running on the current or nominated computer. This includes
both managed and unmanaged processes. Each Process instance has a wealth of properties
mapping statistics such as name, ID, priority, memory and processor
utilization, window handles, and so on. The following sample
enumerates all the running processes on the current computer:
foreach (Process p in Process.GetProcesses())
using (p)
{
  Console.WriteLine (p.ProcessName);
  Console.WriteLine ("   PID:      " + p.Id);
  Console.WriteLine ("   Memory:   " + p.WorkingSet64);
  Console.WriteLine ("   Threads:  " + p.Threads.Count);
}
Process.GetCurrentProcess
returns the current process. If you’ve created additional application
domains, all will share the same process.
You can terminate a process by calling its Kill method.
You can also enumerate over the threads of other processes,
with the Process.Threads property. The objects
that you get, however, are not System.Threading.Thread objects, but rather
ProcessThread objects, and are
intended for administrative
rather than synchronization tasks. A ProcessThread object provides diagnostic information about
the underlying thread and allows you to control some aspects of it such as its
priority and processor affinity:
public void EnumerateThreads (Process p)
{
  foreach (ProcessThread pt in p.Threads)
  {
    Console.WriteLine (pt.Id);
    Console.WriteLine ("   State:    " + pt.ThreadState);
    Console.WriteLine ("   Priority: " + pt.PriorityLevel);
    Console.WriteLine ("   Started:  " + pt.StartTime);
    Console.WriteLine ("   CPU time: " + pt.TotalProcessorTime);
  }
}The StackTrace and StackFrame classes provide a read-only view of
an execution call stack. You can obtain stack traces for the current
thread, another thread in the same process, or an Exception object. Such information is useful
mostly for diagnostic purposes, though it can also be used in
programming (hacks). StackTrace
represents a complete call stack; StackFrame represents a single method call
within that stack.
If you instantiate a StackTrace
object with no arguments—or with a
bool argument—you get a snapshot of the current
thread’s call stack. The bool
argument, if true, instructs StackTrace to read the assembly .pdb (project debug) files if they are
present, giving you access to filename, line number, and column offset
data.
Note
Project debug files are generated when you compile with the
/debug switch.
Visual Studio compiles with this switch unless you request otherwise
via Advanced Build
Settings.
Once you’ve obtained a StackTrace, you can examine a particular frame
by calling GetFrame—or obtain the
whole lot with GetFrames:
static void Main() { A (); }
static void A()    { B (); }
static void B()    { C (); }
static void C()
{
  StackTrace s = new StackTrace (true);

  Console.WriteLine ("Total frames:   " + s.FrameCount);
  Console.WriteLine ("Current method: " + s.GetFrame(0).GetMethod().Name);
  Console.WriteLine ("Calling method: " + s.GetFrame(1).GetMethod().Name);
  Console.WriteLine ("Entry method:   " + s.GetFrame
                                       (s.FrameCount-1).GetMethod().Name);
  Console.WriteLine ("Call Stack:");
  foreach (StackFrame f in s.GetFrames())
    Console.WriteLine (
      "  File: "   + f.GetFileName() +
      "  Line: "   + f.GetFileLineNumber() +
      "  Col: "    + f.GetFileColumnNumber() +
      "  Offset: " + f.GetILOffset() +
      "  Method: " + f.GetMethod().Name);
}
Here’s the output:
Total frames:   4
Current method: C
Calling method: B
Entry method: Main
Call stack:
  File: C:TestProgram.cs  Line: 15  Col: 4  Offset: 7  Method: C
  File: C:TestProgram.cs  Line: 12  Col: 22  Offset: 6  Method: B
  File: C:TestProgram.cs  Line: 11  Col: 22  Offset: 6  Method: A
  File: C:TestProgram.cs  Line: 10  Col: 25  Offset: 6  Method: Main
A shortcut to obtaining the essential information for an entire
StackTrace is to call ToString on it. Here’s what the result looks
like:
   at DebugTest.Program.C() in C:TestProgram.cs:line 16
   at DebugTest.Program.B() in C:TestProgram.cs:line 12
   at DebugTest.Program.A() in C:TestProgram.cs:line 11
   at DebugTest.Program.Main() in C:TestProgram.cs:line 10
To obtain the stack trace for another thread, pass the other
Thread into StackTrace’s constructor. This can be a
useful strategy for profiling a program. The one proviso is that you
suspend the thread first, by calling its Suspend method (and Resume when you’re done). This is the one
valid use for Thread’s deprecated
Suspend and
Resume methods!
You can also obtain the stack trace for an Exception object (showing what led up to the
exception being thrown) by passing the Exception into StackTrace’s constructor.
Note
Exception already has a
StackTrace property; however, this
property returns a simple string—not a StackTrace object. A StackTrace object is far more useful in
logging exceptions that occur after deployment—where no .pdb files are available—because you can log the IL
offset in lieu of line and column numbers. With an IL
offset and ildasm, you can
pinpoint where within a method an error occurred.
The Win32 platform provides a centralized logging mechanism, in the form of the Windows event logs.
The Debug and Trace classes we used earlier write to a
Windows event log if you register an EventLogTraceListener. With the EventLog class, however, you can write
directly to a Windows event log without using Trace or Debug. You can also use this class to read and
monitor event data.
Note
Writing to the Windows event log makes sense in a Windows Service application, because if something goes wrong, you can’t pop up a user interface directing the user to some special file where diagnostic information has been written. Also, because it’s common practice for services to write to the Windows event log, this is the first place an administrator is likely to look if your service falls over.
There are three standard Windows event logs, identified by these names:
Application
System
Security
The Application log is where most applications normally write.
To write to a Windows event log:
Choose one of the three event logs (usually Application).
Decide on a source name and create it if necessary.
Call
EventLog.WriteEntrywith the log name, source name, and message data.
The source name is an
easily identifiable name for your application. You must register a
source name before you use it—the CreateEventSource method performs this
function. You can then call WriteEntry:
const string SourceName = "MyCompany.WidgetServer";

// CreateEventSource requires administrative permissions, so this would
// typically be done in application setup.
if (!EventLog.SourceExists (SourceName))
  EventLog.CreateEventSource (SourceName, "Application");

EventLog.WriteEntry (SourceName,
  "Service started; using configuration file=...",
  EventLogEntryType.Information);
EventLogEntryType can be
Information, Warning, Error, SuccessAudit, or FailureAudit. Each displays with a different
icon in the Windows event viewer. You can also optionally specify a
category and event ID (each is a number of your own choosing) and
provide optional binary data.
CreateEventSource also allows
you to specify a machine name: this is to write to another computer’s
event log, if you have sufficient permissions.
To read an event log, instantiate the EventLog class with the name of the log you
wish to access and optionally the name of another computer on which
the log resides. Each log entry can then be read via the Entries collection property:
EventLog log = new EventLog ("Application");

Console.WriteLine ("Total entries: " + log.Entries.Count);

EventLogEntry last = log.Entries [log.Entries.Count - 1];
Console.WriteLine ("Index:   " + last.Index);
Console.WriteLine ("Source:  " + last.Source);
Console.WriteLine ("Type:    " + last.EntryType);
Console.WriteLine ("Time:    " + last.TimeWritten);
Console.WriteLine ("Message: " + last.Message);
You can enumerate over all logs for the current (or another)
computer with the static method EventLog.GetEventLogs (this requires
administrative privileges):
foreach (EventLog log in EventLog.GetEventLogs())
  Console.WriteLine (log.LogDisplayName);
This normally prints, at a minimum, Application, Security, and System.
You can be alerted whenever an entry is written to a Windows
event log, via the EntryWritten
event. This works for event logs on the local computer, and it fires
regardless of what application logged the event.
To enable log monitoring:
Instantiate an
EventLogand set itsEnableRaisingEventsproperty totrue.Handle the
EntryWrittenevent.
static void Main()
{
  using (var log = new EventLog ("Application"))
  {
    log.EnableRaisingEvents = true;
    log.EntryWritten += DisplayEntry;
    Console.ReadLine();
  }
}

static void DisplayEntry (object sender, EntryWrittenEventArgs e)
{
  EventLogEntry entry = e.Entry;
  Console.WriteLine (entry.Message);
}The logging mechanisms we’ve discussed to date are useful for capturing information for future analysis. However, to gain insight into the current state of an application (or the system as a whole), a more real-time approach is needed. The Win32 solution to this need is the performance-monitoring infrastructure, which consists of a set of performance counters that the system and applications expose, and the Microsoft Management Console (MMC) snap-ins used to monitor these counters in real time.
Performance counters are grouped into categories such as “System,” “Processor,” “.NET CLR Memory,” and so on. These categories are sometimes also referred to as “performance objects” by the GUI tools. Each category groups a related set of performance counters that monitor one aspect of the system or application. Examples of performance counters in the “.NET CLR Memory” category include “% Time in GC,” “# Bytes in All Heaps,” and “Allocated bytes/sec.”
Each category may optionally have one or more instances that can be monitored independently. For example, this is useful in the “% Processor Time” performance counter in the “Processor” category, which allows one to monitor CPU utilization. On a multiprocessor machine, this counter supports an instance for each CPU, allowing one to monitor the utilization of each CPU independently.
The following sections illustrate how to perform commonly needed tasks, such as determining which counters are exposed, monitoring a counter, and creating your own counters to expose application status information.
Warning
Reading performance counters or categories may require administrator privileges on the local or target computer, depending on what is accessed.
The following example enumerates over all of the available performance counters on the computer. For those that have instances, it enumerates the counters for each instance:
PerformanceCounterCategory[] cats =
  PerformanceCounterCategory.GetCategories();

foreach (PerformanceCounterCategory cat in cats)
{
  Console.WriteLine ("Category: " + cat.CategoryName);

  string[] instances = cat.GetInstanceNames();
  if (instances.Length == 0)
  {
    foreach (PerformanceCounter ctr in cat.GetCounters())
      Console.WriteLine ("  Counter: " + ctr.CounterName);
  }
  else   // Dump counters with instances
  {
    foreach (string instance in instances)
    {
      Console.WriteLine ("  Instance: " + instance);
      if (cat.InstanceExists (instance))
        foreach (PerformanceCounter ctr in cat.GetCounters (instance))
          Console.WriteLine ("    Counter: " + ctr.CounterName);
    }
  }
}
Warning
The result is more than 10,000 lines long! It also takes a
while to execute because PerformanceCounterCategory.InstanceExists
has an inefficient implementation. In a real system, you’d want to
retrieve the more detailed information only on demand.
The next example uses a LINQ query to retrieve just .NET performance counters, writing the result to an XML file:
var x =
  new XElement ("counters",
    from PerformanceCounterCategory cat in
         PerformanceCounterCategory.GetCategories()
    where cat.CategoryName.StartsWith (".NET")
    let instances = cat.GetInstanceNames()
    select new XElement ("category",
      new XAttribute ("name", cat.CategoryName),
      instances.Length == 0
      ?
        from c in cat.GetCounters()
        select new XElement ("counter",
          new XAttribute ("name", c.CounterName))
      :
        from i in instances
        select new XElement ("instance", new XAttribute ("name", i),
          !cat.InstanceExists (i)
          ?
            null
          :
            from c in cat.GetCounters (i)
            select new XElement ("counter",
              new XAttribute ("name", c.CounterName))
        )
    )
  );
x.Save ("counters.xml");To retrieve the value of a performance counter, instantiate
a PerformanceCounter object and
then call the NextValue or NextSample method. NextValue returns a simple float value; NextSample returns a CounterSample object that exposes a more
advanced set of properties, such as CounterFrequency, TimeStamp, BaseValue, and RawValue.
PerformanceCounter’s
constructor takes a category name, counter name, and optional
instance. So, to display the current processor utilization for all
CPUs, you would do the following:
using (PerformanceCounter pc = new PerformanceCounter ("Processor",
                                                       "% Processor Time",
                                                       "_Total"))
  Console.WriteLine (pc.NextValue());
Or to display the “real” (i.e., private) memory consumption of the current process:
string procName = Process.GetCurrentProcess().ProcessName;
using (PerformanceCounter pc = new PerformanceCounter ("Process",
                                                       "Private Bytes",
                                                       procName))
  Console.WriteLine (pc.NextValue());
PerformanceCounter doesn’t
expose a ValueChanged event, so if
you want to monitor for changes, you must poll. In the next example,
we poll every 200 ms—until signaled to quit by an EventWaitHandle:
// need to import System.Threading as well as System.Diagnostics

static void Monitor (string category, string counter, string instance,
                     EventWaitHandle stopper)
{
  if (!PerformanceCounterCategory.Exists (category))
    throw new InvalidOperationException ("Category does not exist");

  if (!PerformanceCounterCategory.CounterExists (counter, category))
    throw new InvalidOperationException ("Counter does not exist");

  if (instance == null) instance = "";   // "" == no instance (not null!)
  if (instance != "" &&
      !PerformanceCounterCategory.InstanceExists (instance, category))
    throw new InvalidOperationException ("Instance does not exist");

  float lastValue = 0f;
  using (PerformanceCounter pc = new PerformanceCounter (category,
                                                      counter, instance))
    while (!stopper.WaitOne (200, false))
    {
      float value = pc.NextValue();
      if (value != lastValue)         // Only write out the value
      {                               // if it has changed.
        Console.WriteLine (value);
        lastValue = value;
      }
    }
}
Here’s how we can use this method to simultaneously monitor processor and hard-disk activity:
static void Main()
{
  EventWaitHandle stopper = new ManualResetEvent (false);

  new Thread (() =>
    Monitor ("Processor", "% Processor Time", "_Total", stopper)
  ).Start();

  new Thread (() =>
    Monitor ("LogicalDisk", "% Idle Time", "C:", stopper)
  ).Start();

  Console.WriteLine ("Monitoring - press any key to quit");
  Console.ReadKey();
  stopper.Set();
}Before writing performance counter data, you need to create a performance category and counter. You must create the performance category along with all the counters that belong to it in one step, as follows:
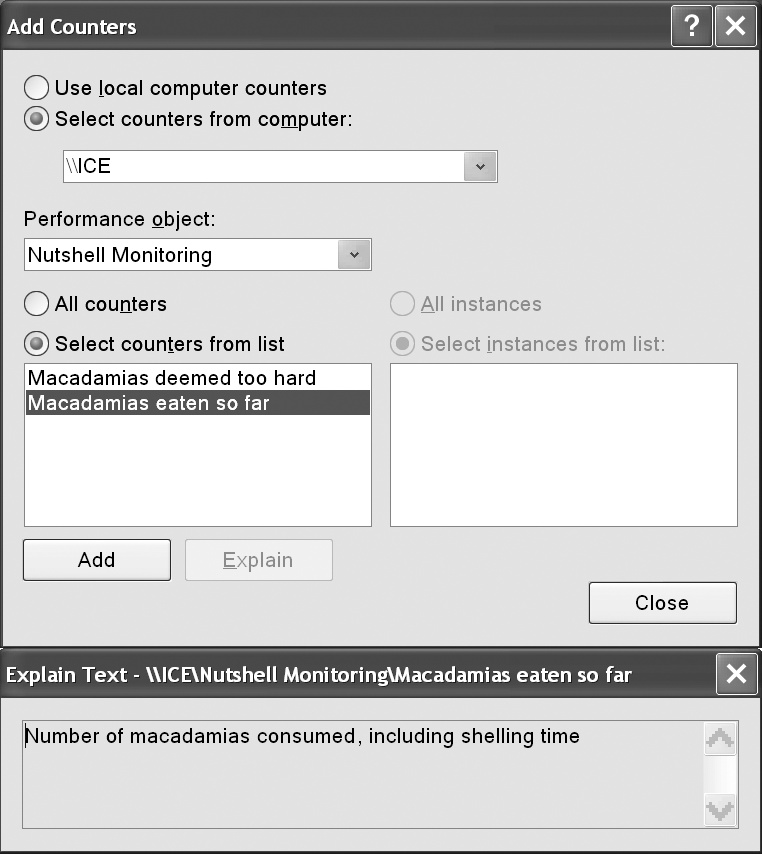
string category = "Nutshell Monitoring";

// We'll create two counters in this category:
string eatenPerMin = "Macadamias eaten so far";
string tooHard = "Macadamias deemed too hard";

if (!PerformanceCounterCategory.Exists (category))
{
  CounterCreationDataCollection cd = new CounterCreationDataCollection();

  cd.Add (new CounterCreationData (eatenPerMin,
          "Number of macadamias consumed, including shelling time",
          PerformanceCounterType.NumberOfItems32));

  cd.Add (new CounterCreationData (tooHard,
          "Number of macadamias that will not crack, despite much effort",
          PerformanceCounterType.NumberOfItems32));

  PerformanceCounterCategory.Create (category, "Test Category",
    PerformanceCounterCategoryType.SingleInstance, cd);
}
The new counters then show up in the Windows performance-monitoring tool when you choose Add Counters, as shown in Figure 13-1.
If you later want to define more counters in the same category,
you must first delete the old category by calling PerformanceCounterCategory.Delete.
Note
Creating and deleting performance counters requires administrative privileges. For this reason, it’s usually done as part of the application setup.
Once a counter is created, you can update its value by
instantiating a PerformanceCounter,
setting ReadOnly to false, and setting RawValue. You can also use the Increment and IncrementBy methods to update the existing
value:
string category = "Nutshell Monitoring";
string eatenPerMin = "Macadamias eaten so far";

using (PerformanceCounter pc = new PerformanceCounter (category,
                                                       eatenPerMin, ""))
{
  pc.ReadOnly = false;
  pc.RawValue = 1000;
  pc.Increment();
  pc.IncrementBy (10);
  Console.WriteLine (pc.NextValue());    // 1011
}
The Stopwatch class provides a convenient mechanism
for measuring execution times. Stopwatch uses the highest-resolution
mechanism that the operating system and hardware provide, which is
typically less than a microsecond. (In contrast, DateTime.Now and Environment.TickCount have a resolution of
about 15 ms.)
To use Stopwatch, call StartNew—this instantiates a Stopwatch and starts it ticking.
(Alternatively, you can instantiate it manually and then call Start.) The Elapsed property returns the elapsed interval
as a TimeSpan:
Stopwatch s = Stopwatch.StartNew();
System.IO.File.WriteAllText ("test.txt", new string ('*', 30000000));
Console.WriteLine (s.Elapsed);       // 00:00:01.4322661
Stopwatch also exposes an
ElapsedTicks property, which returns
the number of elapsed “ticks” as a long. To convert from ticks to seconds, divide
by StopWatch.Frequency. There’s also
an ElapsedMilliseconds property,
which is often the most convenient.
Calling Stop freezes Elapsed and ElapsedTicks. There’s no background activity
incurred by a “running” Stopwatch, so
calling Stop is optional.