
APPENDIX A
![]()
Fast Track to Feature Generation
Tricks and Tips for Speeding Up SharePoint Development Time–a Lot
Writing CAML is like being an alcoholic–it's not writing XML that's the big problem; it is when you stop writing and look at what you have done that you realize how much trouble you're in. Sadly, no “Recovering CAML Abusers” support group exists as far as I know.
I will share with you a technique I use a lot when developing custom features for SharePoint. Actually, there are several techniques, but they are based on the same topic, namely, getting SharePoint to do most of the work for you.
Tools of the Trade
Being an efficient developer is not about having the most tools but about having the right tools. More important, it is about learning how to apply those tools in the right fashion. I'll give you a few tips here–tips that enable me to create features that have complex columns, content types, and list views within minutes rather than hours.
I am going to assume that you have a copy of Visual Studio that you like. Visual Studio 2005 or 2008 will do; I'll use Visual Studio 2005 here to make sure I support you either way. If you don't have Visual Studio, you should get that now; the Express versions will do.
The following sections show what you'll need in addition.
WSPBuilder
WSPBuilder is the coolest little tool for SharePoint developers. The main function of WSPBuilder, as the name implies, is to build WSP files. If you do not know already, WSP files are installable solution packages for SharePoint.
WSPBuilder makes building WSP files a lot easier, but its true beauty lies in an extension that you can install to Visual Studio. Doing so gives you a set of tools that we will explore in a moment. If you have not already done so during the previous chapters, get WSPBuilder and its Visual Studio Extensions plug-in from CodePlex at http://www.codeplex.com/WSPBuilder.
SharePoint Manager 2007
SharePoint Manager 2007, or SPM for short, is a SharePoint object model browser that allows you to inspect your SharePoint installation. Not just that, but SPM allows you to perform basic manipulation of your SharePoint sites, lists, content types, and columns.
Oh, and to make SPM even more perfect, it is absolutely free. You can download it from http://www.codeplex.com/spm. Don't wait. Go get it now. I'll wait right here until you get back.
Let's start learning how to utilize these tools to become a SharePoint development superstar.
WSPBuilder
I covered a bit of WSPBuilder's Visual Studio Extensions in Chapter 1, so consider this a short refresh before I show you a bit more on how this tool can improve your development experience.
WSPBuilder extends Visual Studio by adding several new project and item types. You will see this when you create a new project in Visual Studio after installing WSPBuilder. Figure A-1 shows the New Project dialog box in Visual Studio.
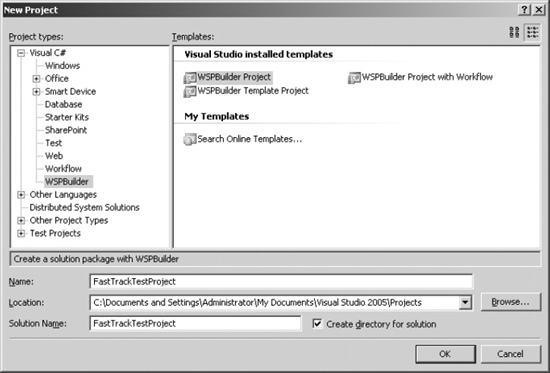
Figure A-1. WSPBuilder project types
You will develop most of your projects based on the default WSPBuilder Project template. Start by creating a new project based on this template, and give it a nice name, such as FastTrackTextProject. We will use this project for the rest of the demonstrations and exercises in this appendix. The project name will be used as the solution name for your SharePoint solution as well.
![]() Note You should also know that using the WSPBuilder Project with Workflow project template requires MOSS, or at least references the MOSS DLLs. If you want to use the workflow template with WSS, you need to remove these references, including the related
Note You should also know that using the WSPBuilder Project with Workflow project template requires MOSS, or at least references the MOSS DLLs. If you want to use the workflow template with WSS, you need to remove these references, including the related using statements.
Once your project is created, you will see that you get a few items in your Solution Explorer. Most notably, you have a 12 folder. This 12 folder will map to the [12] hive when you deploy your solution later. This in itself will save you a lot of time when deploying components that are not features, such as custom application pages, images, site definitions, and custom field types. (We explored adding content to the 12 folder and thus to the [12] hive in Part 3 of the book.)
For our demonstrations here, we will focus on creating features. After all, this is a fast track to feature generation, right?
Your first task is to create a feature with an event handler attached. Of course, feature receivers require you to deploy an assembly to the GAC, meaning you need to strong name your assembly, which entails setting the project to be signed, creating a new signing key, and building the assembly. Then, to tie the assembly to the feature receiver, you need to build the feature.xml file, reflect on that assembly to get the strong name, and get the right class name before you pass all that stuff into the feature.xml file. Then you need to build your solution and deploy the assembly to the GAC before you copy all your feature files into the 12 hive. Or you could build a DDF file and create a WSP solution file, which is about as fun as watching grass grow in real time–and that's before you create your class file and remember the correct assemblies to reference and the class from which to inherit.
Or, you could simply right-click your WSPBuilder project, add a new item, and select Feature with Receiver from the WSPBuilder node as your item type. Select which scope your feature should have, optionally give it a nice name and description, and hit OK. In one single and short operation, you have done the following:
- Created a new feature
- Configured your project to be signed (which, by the way, WSPBuilder did even before you added the feature)
- Extracted the strong name from the assembly
- Written the
feature.xmlfile - Created the class file that inherits from the correct class
- Overridden all the right methods in the class
- Created an empty, ready-to-use, just-add-water
elements.xmlfile.
I get exhausted just telling you about all the time you saved, but Figure A-2 speaks volumes.
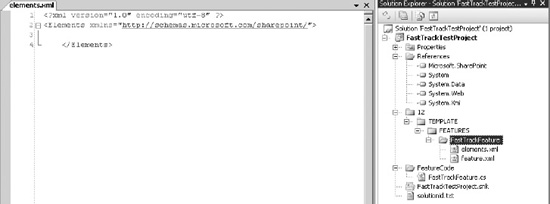
Figure A-2. Feature created
Neat, eh? Oh, you ain't seen anything yet.
![]() Note By default, WSPBuilder will create a class file that just throws an exception whenever you try to do anything with the feature in SharePoint, so your first order of business is usually to open the class file and remove the exception throwing from all four methods.
Note By default, WSPBuilder will create a class file that just throws an exception whenever you try to do anything with the feature in SharePoint, so your first order of business is usually to open the class file and remove the exception throwing from all four methods.
Of course, creating the feature is only the first part of the job. Next you need to actually deploy the feature. This, it is rumored, is a very complex operation, requiring you to master the art of DDF file building. That in itself may be a useful skill, but if you're not in the mood, it can be a tiresome exercise.
With WSPBuilder, however, all you need to do is right-click your project and choose WSPBuilder ![]() Build WSP, and you suddenly have a WSP file ready to deploy. And if you can't be bothered to actually install and deploy the solution yourself, WSPBuilder handles that for you as well by simply giving you a Deploy menu item inside the same WSPBuilder menu you used to build the WSP file. Figure A-3 shows the WSPBuilder menu options.
Build WSP, and you suddenly have a WSP file ready to deploy. And if you can't be bothered to actually install and deploy the solution yourself, WSPBuilder handles that for you as well by simply giving you a Deploy menu item inside the same WSPBuilder menu you used to build the WSP file. Figure A-3 shows the WSPBuilder menu options.
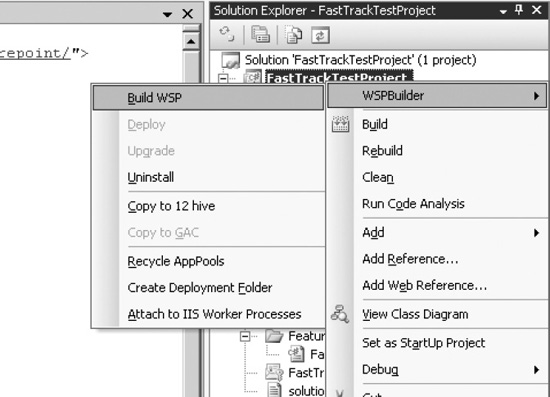
Figure A-3. WSPBuilder context menu
You will also notice that you have several other options on the WSPBuilder menu. Upgrading and uninstalling your solution is quite a time-saver, but you can also very easily copy files to [12] or deploy your assembly to the GAC if you need to do these steps manually for some reason. Also, what really saves me time when debugging SharePoint code is the ability to quickly attach the debugger to the IIS Worker processes. I know, this is quite fast using the regular menu in Visual Studio, but I just like to have this option a bit more conveniently located.
The only thing I'm missing from this menu is IIS Reset. Some changes are not picked up by AppPool recycling alone, so Carsten, if you are reading this, please add IIS Reset to the WSPBuilder context menu.
![]() Note Carsten Keutmann is still a genius. And still Danish, which is sad, since Norway is so much better.
Note Carsten Keutmann is still a genius. And still Danish, which is sad, since Norway is so much better.
I am tempted to take a few pages and explain about all the different features of the command- line WSPBuilder as well, but we are here to speed up things, and frankly, starting up cmd.exe takes about one second too long. However, I strongly, strongly encourage you to look in the install folder for WSPBuilder and look through the documentation for all the wonderful things WSPBuilder can do for you.
Now, let's see how fast we can create a new feature that actually contains something.
Make SharePoint Work for You
You may not know this, but most SharePoint objects, such as columns, content types, and lists, can export the CAML used to create them. To get this XML, you would grab the contents of the SchemaXml property of the object using code. So, for instance, if you want to extract the XML used to define a certain column, you would call SPField.SchemaXml, and for a content type you would call SPContentType.SchemaXml.
This is very useful because it allows you to create an object, such as a column, in the web interface of SharePoint and then extract the CAML and put it in your feature for later deployment.
And this is fine, but it's a little awkward because you need to write code to extract the code. Or, you can have someone create a program that makes this a lot easier.
Enter our overly generous Dane again, Carsten Keutmann. Carsten has created another nice program, the SharePoint Manager, which you should have downloaded by now. SPM allows you to browse your entire SharePoint installation and view all the properties of all the objects, which is exactly what we need. I'll walk you through creating and deploying a custom site column in three easy steps:
- Start by creating a site column in any of your sites. Make it something a bit complex, such as a multichoice column (check boxes).
- Using SharePoint Manager, browse to your site where you created the column, and open the Fields note to locate your column.
- Copy whatever XML is in the Schema Xml tab of SPM, less the XML declaration, and paste it into your
elements.xmlfile of the feature you created earlier. Check out Figure A-4 to see how SPM displays the XML for you.
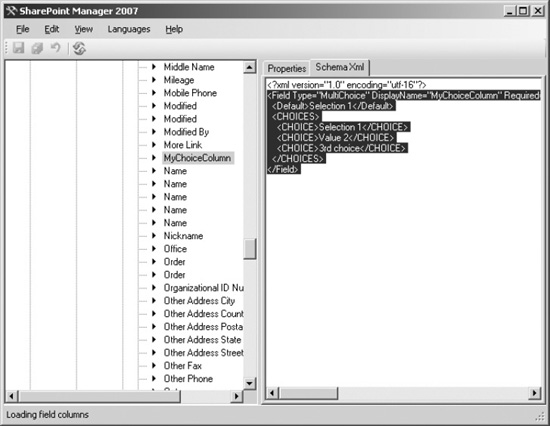
Figure A-4. SharePoint Designer shows the Schema Xml tab.
Deploy, and you're done.
Content Type Generation
Around this moment, some wise guy will storm up to the microphone and state that this little exercise is indeed possible with other tools as well. And that wise guy would be correct. So, why use the WSPBuilder+SPM combination? Let's take our exercise a bit further and tackle content types:
- Create a new site content type, and add some columns.
- Open SharePoint Manager again, and browse to the site in which you created the content type. Open the content type you created.
- Copy the content of the Schema Xml tab again into your
elements.xml file.
This would have been a perfect story if I could now just tell you to build and deploy, but alas, it's not that simple with content types. The schema that SharePoint uses, which is the one you see in SharePoint Manager or by calling the SPContentType.SchemaXml method, is not the same schema used for defining new content types.
That was the bad news. The good news is that the changes you need to make are simple. First, notice that the copied CAML contains a Fields element with several Field child elements. However, as you learned in Chapter 8, content types contain only references to fields, not the actual fields. As such, the first change is to change the Fields element to a FieldRefs and the Field elements to FieldRef elements. Figure A-5 shows how this looks for my sample content type.
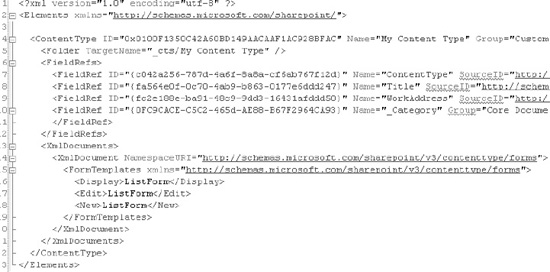
Figure A-5. Sample content type after field correction
When you change the Field elements to FieldRef elements, you will notice that several of the remaining attributes in the former Field elements are invalid. Your next task will thus be to remove all invalid attributes from the FieldRef elements.
While you are at it, you should also delete the entire ContentType FieldRef element as well as any references to Fields inherited from the parent from which your content type inherits. Of course, as you remember from Chapter 12, you need at least the empty FieldRefs element for inheritance to work. If you have not added any columns to your content type and you have opted to remove the parent columns, leave at least the empty FieldRefs element.
Finally, you may optionally want to remove the XmlDocument element containing the FormTemplates element. The downside to leaving the FormTemplates element in place is that you will override the parent settings for content type forms. Removing is completely optional, though, and if you want to make changes to the content type forms, you should leave it in place.
Next you are ready to build and deploy if you like. Simple, eh?
The Fast Track to Custom Views
Let's take this technique a bit further and go for gold by simplifying the most complex task known to SharePoint developers: custom view development. Yeah, that dragon again. Although I am fairly certain that your newly acquired skills will more than suffice to create custom views from scratch, there is no reason not to save development time when we can.
Before going into the details, however, notice that as we start working with more complex features, we require more manual labor to get our feature working. This is the case also for custom view development, which requires quite a bit of manual labor.
In this demonstration, I will show you how you can create a custom view for lists templates in minutes. I'll use the most basic of lists, the Custom List template, since it is a good starting point when you want to create your own list templates later. As such, you should create a copy of the CustomList feature in your Visual Studio solution or create a new list template as explained in Chapter 13 and copy the schema.xml file from the [12]FEATURESCustomListCustList folder.
- First, create a new list based on the Custom List template.
- To your newly created list, add a view, and customize it as you want. This is key–you want to design your view in the web interface.
- Open up your trusty SharePoint Manager again, and browse to your site in question. In the Lists node you will find your list, and under the list you will find the Views node, including the view you just created.
- This time, rather than copying the contents of the Schema Xml tab, go to the CAML tab, and you will find your entire view code, ready to be added to your Custom List copy. Just paste the entire contents into the Views section of your
schema.xmlfile.
As with content types, you need to make some corrections to the view you just copied. Several of the attributes are plain wrong, while some attributes must be added.
Start by changing the BaseViewId attribute into a unique value. Second, change the URL into the list-relative URL where you want your new view created. Third, you need to specify the web part zone to which the view will be added using the WebPartZoneId attribute. For the default view page, this would be WebPartZoneID="Main".
Finally, add the Path or SetupPath attribute pointing to the file from which the list page should be created. For the default custom views, the attribute would be SetupPath="pagesviewpage.aspx", but you may want to create your own page and use that instead.
You should now be able to deploy your list template and create new lists from that template, including the new custom list view you just created.
Time to Slow Down
I hope the techniques shown in this chapter will help you speed up your development time. True, you will not get 100 percent perfect results, but you might get 90 percent, and that leaves a lot more time to fiddle around with final tuning and configuration.