
C H A P T E R 8
![]()
The Liquid Nitrogen of SharePoint
Content Types: The Coolest Thing Since…Cold
I may have mentioned once or twice that the concept of content types is incredibly cool. It is time to see whether you agree, because we are about to enter the fascinating land of the user experience.
You may also recall that everything in SharePoint is a content type. Either directly or indirectly, you are working with content types whenever you add, edit, upload, or in any shape or form manipulate data. So, besides being cool, content types are also fundamental to you understanding SharePoint.
The phrase content types means different things in different technologies. In SharePoint, content types are a method of gathering different columns, behaviors, and appearances under a single name, and they have nothing to do with MIME content types.
The concept of content types is nothing new and to a large extent mimics the idea of object orientation in programming languages. In fact, if you read on, you will see how content types in SharePoint are really powerful.
Content Type Basics
Content types are just that—types of content. Consider a solution in which you store accounting and other financial data. You may have different types of content such as invoices, accounts, transactions, employee salaries, and so on. Each of these types requires different sets of data. An invoice would have products or services rendered as well as amounts payable, transactions would require a source and recipient, an employee salary object would have an employee reference, and the salary would have a currency amount.
![]() Note I know very little about accounting and considerably less about accounting in other countries, especially compared to what I know about SharePoint.
Note I know very little about accounting and considerably less about accounting in other countries, especially compared to what I know about SharePoint.
Information about these types of data can be encapsulated in SharePoint content types. You would have a content type for each type of content, and the content type would hold fields and columns to describe the information to be stored in each item.
You may be tempted then to compare content types to database schemas. You should yield to that temptation, but keep in mind that content types are far more powerful and have plenty of other features besides just describing pieces of data.
You can also connect behavior to different content types in SharePoint, meaning that you can have a certain piece of data behave in a certain fashion. For instance, if you add an invoice to your invoice collection, you might want to have that automatically trigger updating an account somewhere or asking for approval from someone. Or, when a new employee enters the building, you might want to automatically add them to the payroll.
This may not seem revolutionary—we all probably know that we can have a list of invoices and attach workflow and feature receivers to that list—but the cool thing about a content type is that the behavior follows the type, not the list. If you move an invoice from one library to another, the functionality follows the invoice with no concern for the list in which it is stored.
When it comes to appearance, you can also connect forms such as a display form and edit form to content types. We looked briefly at this in Chapter 6 when we examined the ListForm rendering template, so you probably knew that. However, the forms and visual appearance of content types follow the type again, not the list, meaning that where you store the item is of no concern; the appearance remains. For example, you can have an employee salary record displayed in a fancy visual interface, regardless of the list in which the salary record is stored.
As you saw in Chapter 5, on evolving the default experience, you can also attach custom actions that connect user interface elements to certain content types.
In addition, content types are cross-list and cross-site, meaning you can define them independently of any single list or site. If you create a content type once, you can use the same content type several places.
And, now that you are beginning to drool over all the power you will get when you learn how to use content types, here’s an added bonus, just for you: content types support inheritance. If you create a base Document type to which you add several columns, you can create child content types that inherit from the Document base type and thus also all the columns. Add a column to the parent Document content type, and you can have every child get that same column added.
Note the word can. You don’t have to inherit anything. In fact, it is quite difficult to actually get inheritance to work if you manage content types yourself, but we will get back to why in a little while.
But wait, there’s more. You can customize a single content type instance as well. If you add a content type X to lists A and B, you can customize X on list A but leave X on B unmodified. This happens for the very same reason that inheritance is a bit fuzzy. Be patient, I will explain shortly.
OK, I need a break and so do you. Sit down, try to calm your mind from exploding, and just relax. By the end of this chapter, you will know plenty about content types.
![]() Note Until now I have avoided explaining what is already adequately explained in other books or widely known. Content types are so cool I just have to explain how they work, even if that includes some well-known stuff.
Note Until now I have avoided explaining what is already adequately explained in other books or widely known. Content types are so cool I just have to explain how they work, even if that includes some well-known stuff.
List vs. Site Content Types
There is one very important thing that you must understand. If you do not, pain will mark your advanced content type experience, and you do not want that.
To explain what this means, I need to take a quick trip to the future (in other words, jump ahead to a topic covered later in the chapter) and explain that content type inheritance is based on the content type ID. To inherit from a content type, you just add a formatted value to the content type ID from which you will inherit. For instance, the Document content type (0x0101) inherits from the Item content type (0x01). The same applies to folders (0x0120). We will look deeper into inheritance later in the chapter, but for now this is all you need to know.
Based on this, it is logical to assume that when you add a content type, such as Item, to a list, the content type would have ID 0x01, right? Well, take a look at what SharePoint Manager thinks—see Figure 8-1.

Figure 8-1. Not exactly what you’d expect
So, what is going on here?
When you add a content type to a list, you are actually adding a copy of the content type to the list. This introduces several issues and can cause problems if you do not realize that this is happening. Or rather, it can cause opportunities, if you are the “glass is half full” kind of person like me.
The effect of this copying is that you are in fact creating a separate content type that can be manipulated independently from the source. This is actually an absolute requirement if content types are going to be any good. Think of the basic Item content type, which you use for every list you create. If you were to modify the Title field of the content type of a single list, you would in effect modify every Item content type, which would be bad. Copying the source content type to the list prevents this and allows you to modify a single content type instance rather affect the whole site collection. Check out the following exercise if you want to investigate this for yourself:
- Start with your Team Site lab, and create a new list. I’ve called mine
testlist. - On the List Settings page of your new list, go to Advanced Settings, and allow the management of content types.
- Back on the List Settings page, you now see that both the
ItemandFoldercontent types have been added. Actually, they’ve been there all along, but now you see them in the interface. - Click the
Itemcontent type, and change the name of the content type; I’ve usedTestlist Item. - Verify that your change has taken effect.
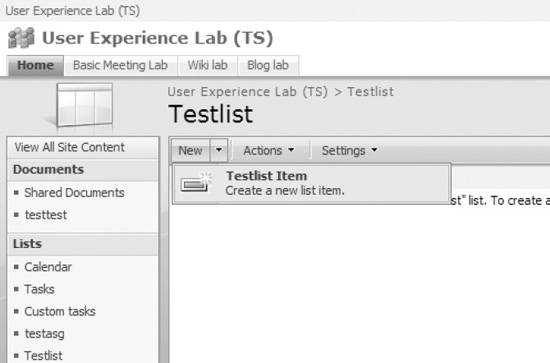
At this point, you might think that since you updated the name of the Item content type, the changes should be reflected wherever the Item content type is used. However, if you create a new list by following steps 1–3, you will see that the new list will get the original name of Item on the content type. The same thing would have happened even if you had created both lists before changing the name.
So, if you want to change all the Item content types, how would you do that? Simple! The source Item content type is a site content type, meaning that you need to modify it from the site settings. In the Galleries column of the Site Settings page, you will find site content types. If you want to modify every instance of a content type, this is where you would go.
There are also some things to know about site content types. Again, confusion will be certain if you don’t get these seemingly minor concepts, so, please, pay attention.
The first thing to note is that site content types use direct references to site columns; you cannot add any columns except for site columns. When editing columns in a site content type, you are editing the site column. Thus, if you change the name of the Title column in the Item site content type, you will actually be changing every occurrence of the Title column throughout the site. That may not be what you want.
![]() Caution If you change the site column
Caution If you change the site column Title by mistake, you may be unable to change it back without some extra work. Check out the sidebar “Ouch! My Title Has Changed” for one method of changing this back.
The second thing to note is that when you make changes to a site content type, you have the option of propagating changes to child content types. This choice is important because some changes may not easily be propagated again later. For instance, if you add a site column and do not propagate the changes to child content types, you need to remove and add the column again from the parent to be able to propagate again.
This may or may not be what you want. You can use this to your advantage, for instance, when you want to differentiate which child content types inherit all or only some columns. If you are not aware of this, however, this feature may bite you in the butt. In fact, when you add columns through the object model, be prepared to do the propagation yourself; there is no automatic propagation from parent to child in code.
To be honest, I like to control my own propagation. That way, I remain in complete control over what and how propagation works, and I can be much more granular than “everything or nothing.” We will look more into inheritance later, so for now, let’s move on.
OUCH! MY TITLE HAS CHANGED
Have you ever modified the default title by mistake (or on purpose) and wanted to change it back? You face a couple of problems.
First, the Title column is stored in the _Hidden group, which is not shown on the Site Columns page at all. You can circumvent this problem by going to the Item site content type, clicking the Title column there, and then clicking “Edit site column in new window.”
However, when you try to set the column name back to Title, you may be faced with an error message stating that “The column name that you entered is already in use or reserved. Choose another name.”

D’oh!
This is caused by the SharePoint web interface checking every InternalName property of existing fields to see whether there will be a conflict with the new name.
A workaround here requires modifying the column through the object model. The shortcut is to use a tool such as SharePoint Manager 2007 to edit the column directly. Doing so will update the column to Title. Start SPM, navigate to your site, and open the Fields node. Then follow these steps:
- Find the
Titlefield that has itsInternalNameproperty set toTitle. - Modify the
Titleproperty back toTitle. - Hit the Save button in SPM.
This circumvents the JavaScript-based error checking in the web interface.
Next you might want to propagate this change to every list to completely reverse the effects. To do so, go back to editing the site column Title from the Item content type as described earlier. This time, since you have changed the title outside of the web interface, the existing fields check is not performed. Make sure the Update Lists option is set to Yes, and hit OK.
Voilà—problem solved.
So, in short, set the Title property of the Title field to Title. And if I ever hear the word Title again I think my head will explode.
Keep Your Parents Happy
Content types support inheritance, with a bit of a peculiar method of defining inheritance. In simple terms, this means you can create a hierarchy of content types, just like a class hierarchy, and have child content types inherit properties from parents and grandparents.
![]() Caution Do not confuse content type inheritance with content type scope. These are very different. Misunderstandings may be your doom should you choose to ignore this warning.
Caution Do not confuse content type inheritance with content type scope. These are very different. Misunderstandings may be your doom should you choose to ignore this warning.
Let’s say that you want to create a document management system in which company documents are organized into legal, customer, and financial reports, with the financial documents being separated further into quarterly financial reports and annual reports.
There may be commonalities to all the documents. For instance, who is responsible for the document? What kind of company policy applies to the document? These common information details may be stored in a root company document type.
In turn, the financial documents, regardless of whether it is an annual or a quarterly report, will be relevant to a reporting period, while a time period makes no sense to a customer document. Thus, you can have the financial report type, from which the quarterly and annual reports inherit, have a period metadata column.
Finally, for the quarterly report, you might want to include the quarter as separate meta-data. With my vast financial expertise, I have no idea why you would want this, but play along and take a look at the chart in Figure 8-2.
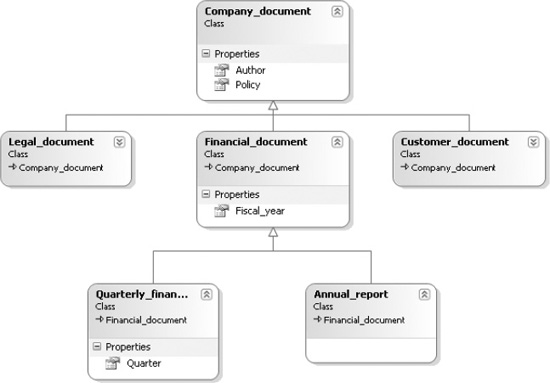
Figure 8-2. Content type inheritance diagram
You noticed that I used the class diagram of Visual Studio to make this figure, did you? Well, that is because content type inheritance works very much like class inheritance. It makes you want to create a class to mimic a SharePoint content type, doesn’t it? The joys, the joys….
What differs significantly from other hierarchical systems is a rather awkward method for describing inheritance in SharePoint content types. Every content type in SharePoint has a unique identifier, the content type ID. You may remember that we touched briefly on this in the “Form Templates” section in Chapter 6 when talking about lists.
When you create a content type, you define a content type ID that is of the format 0xNNNNNNN, where NNNNNNN is a number. That number not only identifies this content type but also identifies from which parent content type we should inherit. That’s right, no kidding—inheritance is hidden inside the identifier string.
All you need to do to inherit from a content type is to include the parent content type ID in your content type ID and then add a few numbers. I will explain what these numbers may be in the “Content Type Authoring” section a bit later.
![]() Caution Content type ID crafting is a delicate art, so pay attention.
Caution Content type ID crafting is a delicate art, so pay attention.
To investigate content type IDs and inheritance further, start by opening your site content types in your Team Site lab. You will find the site content types on the Site Settings page. On the Site Content Type Gallery page, you should see several out-of-the-box content types. For now, click the Item content type, and look at the URL. You will notice the ManageContentType. aspx file has a parameter ctype=0x01. Yeah, the ctype part is the content type ID.
![]() Tip You can also hover your mouse pointer over the link to the content type to get the
Tip You can also hover your mouse pointer over the link to the content type to get the ctype parameter in the status bar. Or you can use a tool such as SharePoint Manager to investigate the content type. Do what thou wilt—the important thing is to pay attention to the content type IDs.
The Item content type, with its ID of 0x01, is the basic content type from which most other content types inherit. I say most, because in theory there is no absolute rule that you must inherit from the Item content type, so you are free to create, for example, a content type MyItem with a content type ID of 0x02.
In any case, the Item content type inherits from a root content type called System that has a content type ID of 0x. On the other hand, if you examine the Document content type, you will see that it has a content type ID of 0x0101. Compared to Item, being 0x01, you now know that Document inherits from Item since its ID includes 0x01. Table 8-1 shows the most commonly used content types.
Table 8-1. Common Content Types
| ID | Content Type |
0x |
System |
0x01 |
Item |
0x0101 |
Document |
0x0120 |
Folder |
Folders Are Content Types?
Yes, folders are content types. I am happy you are paying attention to details. Now, be patient for a few more moments, and I will explain. First, we need to complete the description of content type inheritance.
OK, Back to Content Type Inheritance
The concept of inheritance becomes a bit more complex when you realize that not all properties of a content type are actually inherited by children. In fact, the only things that are inherited are columns and forms. As you will learn later in this chapter, content types can be set up with behavior as well as appearance, but neither workflows nor event receivers are inherited.
Also, remember what I said about propagation of changes. If you make a change to a parent content type, you need to decide whether you want those changes to be propagated to the children. If you do not propagate your changes, the changes will need to be manually added to the children later.
Let’s see how this could look in your site content type gallery—see Figure 8-3.
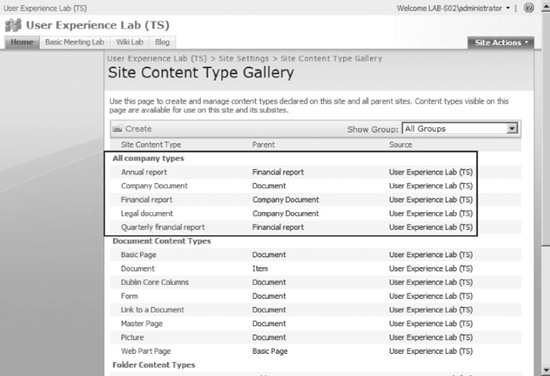
Figure 8-3. Content type hierarchy implemented
The Site Content Type Gallery page provides a less than optimal overview of the hierarchy. Now you see another reason why I opted to illustrate the inheritance using the class designer in Visual Studio.
So, how do the content type IDs look? Look at Table 8-2, and keep in mind that these are my results and that your actual codes may be different.
Table 8-2. Content Type ID Inheritance Samples
| Content Type | ID |
| Company document | 0x010100B88CA477A46A6146A1E82817745A8915 |
| Legal document | 0x010100B88CA477A46A6146A1E82817745A891501 |
| Financial report | 0x010100B88CA477A46A6146A1E82817745A891502 |
| Quarterly financial report | 0x010100B88CA477A46A6146A1E82817745A89150201 |
| Annual report | 0x010100B88CA477A46A6146A1E82817745A89150202 |
Notice that company document inherits from Document (0x0101) by the “00 + GUID” method, while the other types inherit from the respective parents using the two-digit method.
![]() Note Yeah, I know, there is no customer document there. This example is for illustrative purposes, but it’s nice to see that you are still paying attention.
Note Yeah, I know, there is no customer document there. This example is for illustrative purposes, but it’s nice to see that you are still paying attention.
So, What About Those Folders?
When working with a SharePoint list or library, you can sort your items and documents in folders and subfolders. On the surface, it may then seem that items are stored inside folders in some manner.
However, this is not the case. Folders are in fact little more than regular list items. Granted, they are treated differently than normal items, but they do not store items in any way. There is no actual hierarchical storage mechanism in lists or libraries. All items are stored on the same level, regardless of whether items appear to be stored inside a complex folder structure.
The easiest way to realize this is to open SharePoint Manager 2007 and see how a list with folders appears. In Figure 8-4 I have created a simple custom list and added a folder on the root (Test folder 1) and another folder inside that folder (Subfolder 1). Inside each level folder, including the root, I have added an item.
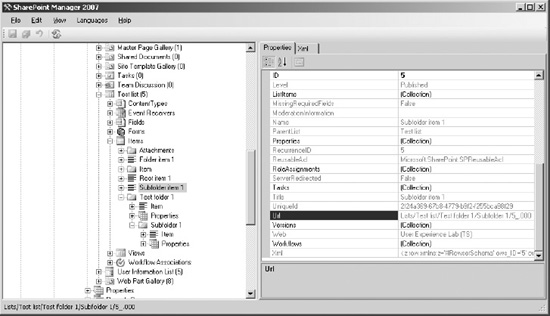
Figure 8-4. Folder structure as displayed in SPM 2007
Notice that the folders I created are displayed with a folder icon. If you were to check, you would see that the folders are actually represented by SPFolder objects. However, don’t let that fool you. If you look really closely at Figure 8-4, you will see that the ID property of the Subfolder item 1 is 5, even though there are only three items in the list. You may still think that I’ve just deleted two items to make it appear like folders get their own IDs in the list. Care to make that bet again?
To check whether I am just pulling your leg here, re-create the folder structure I did, and then run the following code in a console application where you have referenced Microsoft.SharePoint.dll:
class Program

{

    static void Main(string[] args)

    {

        using (SPSite site = new SPSite("http://lab-s02:10000/"))

        {

            using (SPWeb web = site.OpenWeb())

            {

                SPList testlist = web.Lists["Test list"];

                SPListItemCollection items = testlist.Items;


                foreach (SPListItem item in items)

                {

                    Console.WriteLine(item.Title);

                }

                Console.ReadKey();

            }

        }

    }

}
You should not be surprised that iterating a list such as this will give you all items, regardless of where in the folder structure they are seemingly stored. But we don’t get any folder items here, so how would I be able to prove to you that folders are actually items?
Try exchanging the foreach loop with a for loop as such:
for (int i = 1; i<=testlist.ItemCount; i++)

{

    SPListItem item = testlist.GetItemById(i);

    Console.WriteLine(item.DisplayName);

}
This time, rather than using the SPListItemCollection, which contains only “regular” items, we pick the item ID from a counter, running up to the max number of items in the list. The result? Take a look:
Test folder 1

Folder item 1

Root item 1

Subfolder 1

Subfolder item 1
I won’t go into too much detail here, but take with you a few pointers:
- Folder types can be created just like any other content type, including adding columns.
- Because folders are items, you can treat them as items, including updating column values, setting permissions, and attaching workflows.
Yes, you can attach workflows to folders. No, folder-attached workflows are not inherited by items that seemingly are stored in the folder. Check out Figure 8-5. Because there is no default interface, you would have to associate the workflow using other means, such as .NET code.
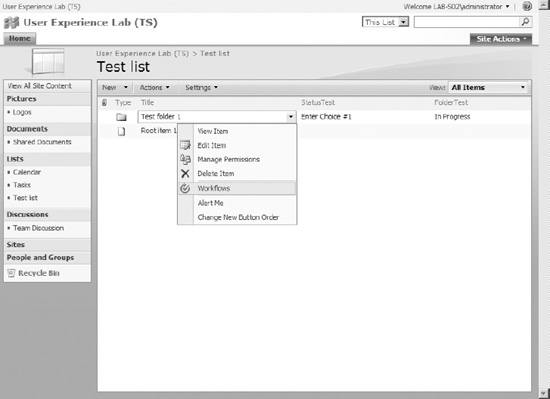
Figure 8-5. Workflow attached to a folder
I told you content types were cool!
Content Type Scope
![]() Caution Do not confuse content type scope with content type inheritance. These are very different. Misunderstandings may be your doom should you choose to ignore this warning.
Caution Do not confuse content type scope with content type inheritance. These are very different. Misunderstandings may be your doom should you choose to ignore this warning.
Content types are scoped, meaning that they are available from the site in which they are defined and any child site below that site. If you create your content type at the root site of a site collection, every site in the site collection can use the content type. However, if you add the content type to a subsite—for instance, the Basic Meeting Lab if you are using the setup I suggested in Chapter 1—only sites below the Basic Meeting Lab will have access to the content type.
There are two issues with this—one simple workaround issue and one major bummer class issue. Check out the sidebar “Subsites in Meeting Workspaces?” for the simple workaround issue.
SUBSITES IN MEETING WORKSPACES?
Although it has absolutely nothing to do with content types, I thought I would mention this anyway. You may have noticed that on the Create page of a meeting workspace there is no “Sites and workspaces” listed where it should be.
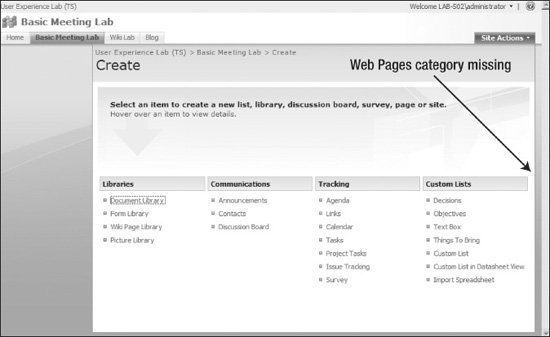
I do not know why Microsoft has chosen to not include web sites and pages on this list, but I suspect it has to do with pages being managed differently in meeting workspaces than other site definitions.
The sad thing, of course, is that in Microsoft’s eagerness to remove the option to add pages like we are used to, creating subsites has been removed as well. Talk about tossing the baby out with the bath water. Luckily, you can still add sites from the Site Settings page. Just check out Site Administration and click the “Sites and workspaces” link; or just go to http://yoursite/_layouts/mngsubwebs.aspx where you will find a Create link to add new subsites.
“Scoping Content Types for Webs? Hah, That’s Not Possible!”
Oh, I beg to differ, and I’ll take your $5 bet on that also.
There is a major issue with deploying content types using features or site definitions. You see, the only feature scope that allows content types is the site scope. As you certainly remember from Chapter 3, site scope means site collection. Web scope is what we need when we want to deploy a feature scoped for a site. And of course, web-scoped features cannot include content types.
So, we face a bit of a problem. If we want a content type to be available only for a certain web, we are actually out of luck deploying content types in features. That’s a major bummer! It’s such a nice feature, but there’s no way to implement it, at least not without deploying the content types across the entire site collection.
There is a very good reason for this. Content type inheritance works across the entire site collection, so content types need an ID that is unique to the entire site collection. What would happen if you deployed a web content–type feature on two different subsites? You would deploy your content type twice but with the same ID. And SharePoint would have no way of knowing from which content type a child content type would inherit. So, web-scoped content type features don’t seem possible.
So, have I lost the bet? No way! Content types can be created in more ways than one. My approach is to use a feature event receiver attached to a web-scoped feature and create the content type using code:
public override void FeatureActivated(SPFeatureReceiverProperties properties)

{

 using (SPWeb web = (SPWeb)properties.Feature.Parent)

 {

  SPContentType parentType = web.AvailableContentTypes["Company document"];

  SPContentType newType =

   new SPContentType(parentType, web.ContentTypes, "Basic meeting web scoped type");

  web.ContentTypes.Add(newType);

  …

  newType.Update();

 }

}
By creating the content type in code, SharePoint generates a unique ID for us, so the problem of conflicting IDs is solved.
Of course, you may want to do more with your content type, perhaps even reading in an elements file and mimicking the complete content type creation experience in code, but I will leave that to your experimentation.
This is somewhat more cumbersome than just creating a content type in CAML but shows that you can indeed create web-scoped content type features. I believe that puts you back another $5.
Your Best Behavior
Another cool aspect of content types is the ability to attach behavior to a content type. This allows you to have an item derived from a content type behave in a certain manner. You can do this in one of two ways, event receivers or workflows.
Event receivers are pieces of code that get fired when something happens. We looked briefly at event receivers earlier, but I would like to take a moment to go a bit deeper here.
![]() Note I will not be covering workflows in this book. Sorry.
Note I will not be covering workflows in this book. Sorry.
Event receivers are fired by SharePoint during specific events. You can attach an event receiver to a certain object, such as a site, list, or content type.
For content types, the most relevant event receivers are the item event receivers located in the SPItemEventReceiver class. By having your class inherit from SPItemEventReceiver, you can override the methods you want to handle. The method names match the event being fired. The following are the available method names:
ItemAdded

ItemItemAdding

ItemAttachmentAdded

ItemItemAttachmentAdding

ItemItemAttachmentDeleted

ItemItemAttachmentDeleting

ItemItemCheckedIn

ItemItemCheckedOut

ItemItemCheckingIn

ItemItemCheckingOut

ItemItemDeleted

ItemItemDeleting

ItemItemFileConverted

ItemItemFileMoved

ItemItemFileMoving

ItemItemUncheckedOut

ItemItemUncheckingOut

ItemItemUpdated

ItemItemUpdating
The method names should be self-explanatory, but you may notice that there are matching ed and ing method names, for example ItemAdded and ItemAdding. The difference is because of when the event is fired. ed events are fired after the fact and are called asynchronous events, while ing events are fired during the fact and are called synchronous events.
The difference is important. If you want to prevent an item from being added if certain criteria are not met, you need to use an ItemAdding event receiver and cancel the adding of the item. You would do so by setting properties.Cancel to true as such:
public override void ItemAdding(SPItemEventProperties properties)

{

 if (SomeCriteriaDoesNotMatch())

 {

  properties.Cancel = true;

 }

}![]() Caution Although you could delete the item again in an
Caution Although you could delete the item again in an ItemAdded event, doing so is messy. Consider what would happen if you have an automatically launched workflow that alerts users of a new item and the item itself is deleted right after the workflow is started.
We will get back to how we actually attach our event receiver when we examine crafting content types.
Content Type Authoring
At this point, you should have enough information about how content types work to be able to understand the details of how content types are created.
You already saw the programmatic method of adding a content type, and you will revisit that method in Part 3 of the book. At this point, we should explore using CAML in features to create content types.
Let’s start with a content type that is provided for us by SharePoint, the Document content type. Open the [12]FEATURESctypesctypeswss.xml elements file, and scroll down past the System and Item content types until you reach the Document content type at around line 32.
![]() Tip Check out the comments. These comments give a glimpse into SharePoint development thinking.
Tip Check out the comments. These comments give a glimpse into SharePoint development thinking.
Figure 8-6 shows the XmlDocuments element closed. We will look at XmlDocuments more shortly.
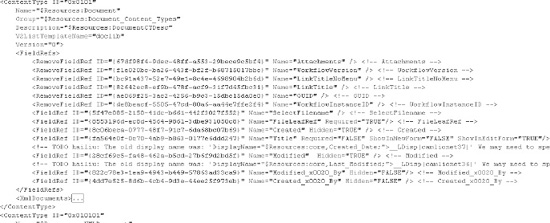
Figure 8-6. Document content type definition
To add a content type using a feature, we would add a ContentType element to the elements.xml file of our feature. Then we would fill that ContentType element with all sorts of goodies, just like a Christmas stocking.
ContentType Element
The ContentType element has several attributes and child elements. The only required attributes are Name and ID. Name is the name you want to give your content type. ID is a unique string that defines not only content type inheritance, as you just learned, but also identifies each content type uniquely in a site collection. Getting the ID value right requires a bit of knowledge.
You can craft your content type ID in two ways. You may start to see a pattern in the examples you have examined so far. Looking at the parent and child content type IDs, the inherited IDs of Item and Document added the number 01 to the parent type. Adding two numbers—for example, 01, 02, or 99—is one way of inheriting from a parent type. If you wanted to inherit directly from Item, you could have your content type have an ID of 0x0102, 0x0193, and so on.
The other method for crafting content type IDs is to add 00 and then a GUID string without the hyphens. For example, you may have an ID that inherits directly from Item as such:
0x01001A48C1A2B071432EACA85A0A35FF5185Break that ID down, and you will see Item (0x01), two zeros (00), and a GUID.
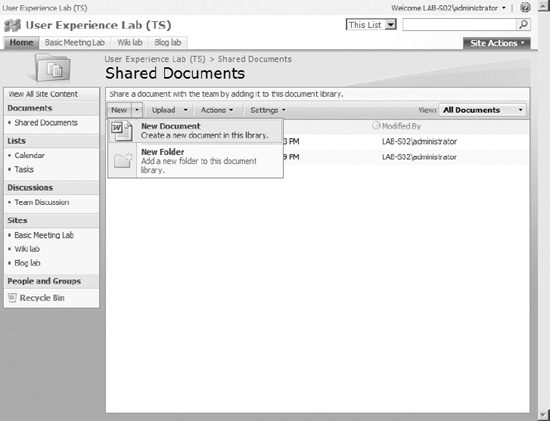
The Description attribute is rather simple. The text you add here is displayed below the name on the New button. If you look at Figure 8-7, you will see that the description for the Document content type is “Create a new document in this library.”
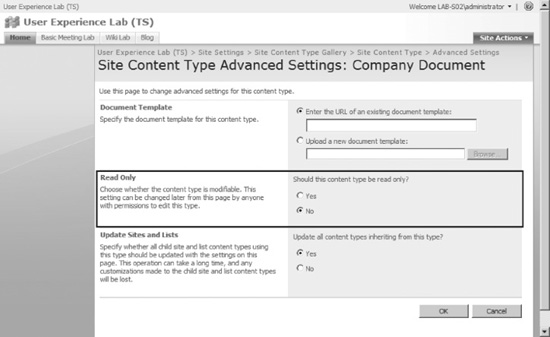
Figure 8-7. Advanced settings of the content type settings
Content types can optionally be arranged into groups. Most notably this is used in the Site Content Type Gallery. The Group attribute states under which subheading the content type should appear. The string value of Group is just an arbitrary value. You can enter whatever you like, and SharePoint will create a new group for you; or you can use an existing group name to group content types together.
![]() Tip If you remove all content types from a group, the group is automatically deleted.
Tip If you remove all content types from a group, the group is automatically deleted.
V2ListTemplateName is used to map our content type to a WSS 2 list template and is rarely used in new sites. On the other hand, Version is not used at all, since the attribute is reserved for future use.
OK, we have looked at the attributes used in the document content type, but there are still more attributes we can use in our own content types.
If you set the ReadOnly attribute to True and note that its default value is False, you cannot make changes to the content type after it has been deployed—at least not until you change the ReadOnly attribute to False. You can set or unset this value in the advanced settings of the content type settings. Actually, you would need to have list management permissions to change the setting, but if you do, you can turn on and off ReadOnly from the interface.
The Sealed attribute is related to ReadOnly but is more permanent. First, you need to be a site collection administrator to unseal a sealed content type. Second, you would need to do so either using a tool such as SPM 2007 or using your own code. There is no web interface by default that will allow you to change the Sealed attribute.
There is an important thing to note regarding these attributes. If ReadOnly or Sealed is set, you cannot propagate changes from a parent content type. If you need to make changes to a parent type and update the descendant content types, you must make sure that no child content type has ReadOnly or Sealed set to True.
Of course, being as adventurous as we are, we can create a custom function to change whatever we like.
Oh, and the default value is False for both attributes.
The Hidden attribute is a bit strange. If you read the documentation, you will learn that you can set this attribute to True if you want to prevent the availability of the content type in the New button in the list.
This is true but only part of the truth. In fact, setting a content type to Hidden has no effect unless you actually enable management of content types as well. As I explained in Chapter 6, content types exist no matter if you disallow management of content types.
You can test this yourself if you’d like:
- Start SharePoint Manager 2007 or any other tool that allows you to easily modify content types.
- In SPM 2007, go to a list, such as the Shared Document list in your Team Site lab, and open the Content Types section. Make sure your list does not have content type management enabled.
- Locate the
Documentcontent type, and set theHiddenproperty toTrue. Note Do this on the
 Listcontent type to avoid affecting everyDocumentcontent type available. In any case, you can always revert this step to make the content type unhidden again. - Open your shared document in a web browser, and check out the options on the New button (see Figure 8-8).
- Go to the advanced settings on the Shared Documents list settings page, and allow the management of content types.
- Check out the New button again. Your
Documentcontent type should be gone.
ContentType Child Elements
With that little curiosity out of the way, let’s move on to the child elements. Staying true to our original plan, we should look at the child elements from the default Document content type.
FieldRefs
Usually your reason for using content types is to collect certain columns that are common to types of content, right? To configure which columns are connected to a content type, you use the FieldRefs element. The FieldRefs element contains either FieldRef or RemoveFieldRef child elements.
Content types can use only site columns, that is, columns that are defined on the site rather than on a list. Each if these site columns have a GUID that is unique to the site, and that GUID is what you use to add a reference to the site column to your content type.
![]() Note We will examine fields and columns more in the next chapter, so for now this is all you need to know.
Note We will examine fields and columns more in the next chapter, so for now this is all you need to know.
Take a look at the FieldRefs element of the Document content type excerpted here. Each FieldRef has an ID that points to a field defined somewhere in the site. The fields specified here are parts of the fields feature that gets installed with SharePoint.
<FieldRef ID="{5f47e085-2150-41dc-b661-442f3027f552}" Name="SelectFilename" />

<FieldRef ID="{8553196d-ec8d-4564-9861-3dbe931050c8}" Name="FileLeafRef"

 Required="TRUE"/>

<FieldRef ID="{8c06beca-0777-48f7-91c7-6da68bc07b69}" Name="Created"

 Hidden="TRUE" />

<FieldRef ID="{fa564e0f-0c70-4ab9-b863-0177e6ddd247}" Name="Title"

 Required="FALSE" ShowInNewForm="FALSE" ShowInEditForm="TRUE"/>

<FieldRef ID="{28cf69c5-fa48-462a-b5cd-27b6f9d2bd5f}" Name="Modified"

 Hidden="TRUE" />

<FieldRef ID="{822c78e3-1ea9-4943-b449-57863ad33ca9}" Name="Modified_x0020_By"

 Hidden="FALSE"/>

<FieldRef ID="{4dd7e525-8d6b-4cb4-9d3e-44ee25f973eb}" Name="Created_x0020_By"

 Hidden="FALSE" />
You may notice that the Title field is included here. Now, if you have been particularly attentive, you may remember that the Title field is also included in the Item content type, from which Document inherits. By virtue of inheritance, Title should already be included, so why is it added to the Document content type as well?
The reason is quite simple. FieldRef not only adds references to new columns but also modifies existing columns. If you examine the Title FieldRef from Item, located just above the Document content type in ctypes.xml, you will see that it is different from the Title FieldRef in Document.
Here’s the Item Title FieldRef:
<FieldRef ID="{fa564e0f-0c70-4ab9-b863-0177e6ddd247}" Name="Title"

 Required="TRUE" ShowInNewForm="TRUE" ShowInEditForm="TRUE"/>
Here’s the Document Title FieldRef:
<FieldRef ID="{fa564e0f-0c70-4ab9-b863-0177e6ddd247}" Name="Title"

 Required="FALSE" ShowInNewForm="FALSE" ShowInEditForm="TRUE"/>
As you can see, the Required attribute is False in Document, because you don’t need to title your documents, and the ShowInNewForm is also False, because you only need to upload a file, not give it a title, when you add a new Document to a library.
Thus, the Document Title FieldRef is used to modify the behavior and appearance of Title, not to add it.
You can override many attributes in this fashion. I will cover fields, columns, and field references in the next chapter.
RemoveFieldRef
If you decide you really do not need a column inherited from a parent, you can use the RemoveFieldRef element to get rid of the parent columns. The documentation is also a bit confusing here, since it lists plenty of attributes such as ReadOnly, ShowInNewForm, and Required, but in fact, none of these attributes is required or even used. The only attribute you need is the ID attribute, and that attribute references the ID of a parent field you want to remove.
Maybe the documentation is confusing, but the extra attributes are helpful. Tell me, which field is removed here?
<RemoveFieldRef ID="{922551b8-c7e0-46a6-b7e3-3cf02917f68a}"/>You may keep a record of all field IDs in your head, but for me, adding an extra attribute saves me some headache:
<RemoveFieldRef ID="{922551b8-c7e0-46a6-b7e3-3cf02917f68a}" Name="ImageSize"/>![]() Note For some unknown reason, the
Note For some unknown reason, the wss.xsd schema includes a DocumentTemplate entry in the FieldRefs element. You may see this when you use IntelliSense to author your content type. You may also forget the entry is there; it doesn’t do anything.
XmlDocuments
The next part of the document ContentType entry is XmlDocuments. Sadly, very little documentation exists on this element. Luckily, that has never stopped a determined developer like you, especially when you realize what the prize is. And it is grand. Let me just make sure you understand this: XmlDocuments, horribly underused in SharePoint custom development, redefines the definition of grand prize. From now on, every other use of the term grand prize should be reduced to “great prize—not as grand as SharePoint’s XmlDocuments.”
OK, I may be exaggerating a bit, but XmlDocuments can be really cool.
What the XmlDocuments element does, or rather, what its children XmlDocument elements do, is store custom information about your content type. You may actually store anything you like; as long as you follow correct XML syntax, you can add your own custom information to use however you see fit.
If that does not blow your mind, let me give you a few examples.
One use of XmlDocument is to customize the forms of content types. You may recall from Chapter 6 that new, edit, and display form templates are actually tied to the content type. The XmlDocument element to support custom form templates is FormTemplates and is laid out as such:
<FormTemplates xmlns="http://schemas.microsoft.com/sharepoint/v3/contenttype/forms">

 <Display>DocumentLibraryForm</Display>

 <Edit>DocumentLibraryForm</Edit>

 <New>DocumentLibraryForm</New>

</FormTemplates>
This is an XmlDocument type that is included with SharePoint and supported by the content type framework. You have another option as well, the FormUrls type of XmlDocument, which is used to redirect to a separate URL for the form, rather than just update the form template:
<FormUrls xmlns="http://schemas.microsoft.com/sharepoint/v3/contenttype/forms/url">

 <Display>$Resources:core,lists_Folder;/$Resources:core,blogpost_Folder;/Post.aspx

 </Display>

</FormUrls>
This is from the Blog content type, with content type ID 0x0110.
There is also a third included XmlDocument type, Receivers, which is used to attach event handlers to content types. You’ll learn more about that later in the chapter.
Oh, and XmlDocuments elements are inherited when you create a new child content type. If you further examine the other content types in ctypeswss.xml, you will notice that many, if not most, do not specify a FormTemplates XmlDocument at all. This is because they inherit from a parent content type, for example the Item or the Document content type, which defines the FormTemplates section.
![]() Caution Although
Caution Although XmlDocuments elements are inherited for new child content types, updates to existing child content types have a quirk. Basically, if a content type is in use—in other words, it is deployed to a list or items have been created based on the content type—updates to the parent XmlDocuments element are not propagated. To force updates, you can update the child content type manually or ensure that no lists or items currently use the child content type.
Of course, I am still a “glass is half full” kind of guy, so please read on for how you can use this to your advantage.
You may still not yet see how this is incredibly cool, so let me give you a custom example. Let’s say that you have a legal statement that you need to include with every item based on a certain content type, such as something about the release of liability to your financial documents in our hierarchy example. You have a few options.
First, you can modify the forms or pages to display a static legal disclaimer, but sadly, since a content type–based item can move around, you would need to modify every single page. Besides, if you have different legal statements for each content type you are out of luck.
Second, you can store the legal statement in the item itself. Of course, this would mean updating every single item if you change the statement, not to mention that you would be storing the statement about a gazillion times.
The perfect solution is to use a custom XmlDocument element. Not only would every child element get the statement, but you could have different statements for each child. When you add the information in the earlier caution to the mix (you did read that, right?), you know that updating the parent statement will not affect the children, unless you want it to do so.
![]() Tip To put this in a language programmers will understand, think of
Tip To put this in a language programmers will understand, think of XmlDocument elements as static properties of a content type class.
To add such a custom XmlDocument to your content type, you would add something like this:
<XmlDocuments>

 <XmlDocument NamespaceURI="http://example.com/legal/statements/document">

  <Statement NamespaceURI="http://example.com/legal/statements/document">

   <Text>Don't try this at home</Text>

   <Contact>[email protected]</Contact>

   <Version>1.0</Version>

  </Statement>

 </XmlDocument>

</XmlDocuments>
Then, when you want to use this information, you can access it like this:
SPList list = web.Lists[<YOUR LIST NAME>];

SPListItem item = list.GetItemById(<YOUR ITEM ID>);

string xmlString =

 item.ContentType.XmlDocuments["http://example.com/legal/statements/document"];

XmlDocument xmlDoc = new XmlDocument();

xmlDoc.LoadXml(xmlString);

string statementText = xmlDoc["Statement"]["Text"].InnerText;

string statementContact = xmlDoc["Statement"]["Contact"].InnerText;
How you actually get a hold of the SPListItem will of course vary, but once you have an SPListItem, you can easily get a hold of the XmlDocument of the content type of that item.
![]() Caution Pay careful attention to the use of the
Caution Pay careful attention to the use of the NamespaceURI. SharePoint relies heavily on having correct namespaces, and using the wrong NamespaceURI values can cause much grief.
I don’t know about you, but I think XmlDocuments is a really cool feature of an already cool feature, possibly making this thing the coolest thing on Earth. It is so cool it will make cold freeze.
Content Type Forms
A natural next step is to further explore content type forms. You have two options, both defined in the XmlDocuments node.
First there is the FormUrls type of XmlDocument, briefly mentioned earlier. You would use the FormUrls method if you want your content type to have completely separate pages for the user experience.
The second method is to use the FormTemplates type of XmlDocument which, in contrast to the FormUrls, will use the default list form pages and insert your respective FormTemplate into the web part zone specified in the list form page.
Both methods share the child elements Display, New, and Edit. The FormUrls child elements specify the URL of a form page, while the FormTemplates child elements specify just the name of a rendering template.
![]() Note See Chapter 5 for more information on
Note See Chapter 5 for more information on RenderingTemplates.
We will explore more details on how to actually build the forms and form templates in Part 3 of this book.
Remember that, like all XmlDocuments, both FormUrls and FormTemplates are inherited, but once a content type has been used, changes to the parent XmlDocument will not be automatically propagated.
Declaratively Adding Event Receivers to a Content Type
We need to attach the event receiver to our content type. This is a bit more complex than it needs to be, and I will take a short detour to explain why.
Attaching Event Receivers to List Templates Using Features
Yes, I said detour. Back into the forest we go, but no monsters this time.
When you want to attach an event receiver to a list, you can do so using a feature. Start with the basic feature as explained in Chapter 3. In the elements file, make sure you have the Elements root element in place, and then add a child element called Receiver. As you will notice, Receiver is indeed a supported child element, as evident in the IntelliSense support.
Now, in the newly create Receivers element, add an attribute. If you get IntelliSense, you will see that there are two legal attributes, called ListTemplateId and ListTemplateOwner. So, to add a receiver to a list template, simply set the value of the ListTemplateId attribute to the list template ID of your list template.
Then, inside your Receivers element, you add a Receiver child element and some more child elements to the Receiver element. Deploy your feature, activate, and boom—Bob’s your uncle.
A sample elements file to deploy an item event receiver to a list template may look like this:
<?xml version="1.0" encoding="utf-8" ?>

<Elements xmlns="http://schemas.microsoft.com/sharepoint/">

  <Receivers>

    <Receiver>

      <Assembly>YOUR STRONG NAME HERE</Assembly>

      <Class>YOUR CLASS NAME HERE</Class>

      <Data></Data>

      <Filter></Filter>

      <Name>My event receiver</Name>

      <Type>ItemAdded</Type>

      <SequenceNumber>10</SequenceNumber>

    </Receiver>

  </Receivers>

</Elements>
A few things are worth noticing about this element. You can add custom data to your receiver inside the Data element, which is useful if you want to have the same receiver code but make it behave differently. For example, you may have a verification receiver that checks whether values are valid for a wide range of lists. You can customize the error message or the verification procedure itself using custom data, while maintaining just a single piece of code.
There is also a Filter element in the Receiver schema. I have yet to find any documentation, information, or examples regarding this element.
Yes, this is indeed undocumented, but as far as anyone seems to know, it is also unused. It is safe to ignore this element completely; perhaps it is reserved for future use.
The Sequence element is used to decide the order in which multiple event receivers run. The Name element is just for your convenience, and you can call your event receiver element “Johnny Fartypants” if that makes you happy. As for Assembly and Class…well, I’ll leave you to figure out what those do.
Attaching Event Receivers to Content Types Using Features
The important thing with attaching event receivers like we just saw is to notice that there is no way to bind a receiver to a content type, only to a list template.
No, there are no ways to add receivers to individual lists either. However, as you saw in Chapter 6, you can programmatically add event receivers using code. You can use the same technique to add event receivers to a content type as well, but there should be a way to do this using CAML in a feature. After all, that is where you define the content type, as you will see later in the chapter.
The answer? Event receivers in content types are defined in a different section of the elements file.
Again, you can look to XmlDocuments and the third built-in XmlDocument type Receiver. The Receiver XmlDocument resides in the http://schemas.microsoft.com/sharepoint/events name-space. If you want to see a Receiver XmlDocument in your default SharePoint installation, search the ctypeswss.xml file for the content type 0x010107, the DocumentWorkflowItem:
<XmlDocument NamespaceURI="http://schemas.microsoft.com/sharepoint/events">

 <spe:Receivers xmlns:spe="http://schemas.microsoft.com/sharepoint/events">

  <Receiver>

   <Name>Workflow Library Item Added</Name>

   <Type>ItemAdded</Type>

   <SequenceNumber>1</SequenceNumber>

   <Assembly>Microsoft.SharePoint, Version=12.0.0.0, Culture=neutral,

    PublicKeyToken=71e9bce111e9429c</Assembly>

   <Class>Microsoft.SharePoint.Workflow.SPWorkflowLibraryEventReceiver</Class>

   <Data />

   <Filter />

  </Receiver>

… (snipped for space-saving purposes

 </Receivers>

</XmlDocument>![]() Note The example uses a prefix
Note The example uses a prefix spe: for the Receivers element. This is not necessary from a technical point of view but can add clarity to your code.
As you can see, the Receiver element follows the structure of a regular item event receiver as defined in elements—except, of course, that the receiver is defined in the XmlDocument section of the content type.
The End of the Ice Age
It is time to call it a night—or early morning if you stay up all night to read SharePoint stuff like I do. Some useful tips to take away are in order:
- Content types require some getting used to. However, as programmers, we should be familiar with the concept. What took the most time for me was wrapping my head around thinking of content types as classes, but once I realized that, the true power of content types was clear.
- Convincing your project manager about the usefulness of content types can also be a challenge. For nontechnical people, using the class analogy doesn’t work.
- As always, start simple when learning. Don’t try to implement a complex content type hierarchy with plenty of behavior, appearance, and metadata structures if you have never worked with them before. Inheritance, for example, can be a cruel beast until you learn all the quirks.
- Also, start thinking content types from the beginning. If you start out thinking which lists you want to implement, you are likely to have more problems later when you want to harness the power of content types.
- Managers as well love to hear that you can map business objects to content types; after all, thinking of a contact as a contact rather than a predefined set of columns makes more sense for a nontechnical user.
- And, when working with content types, always wear a sweater, because you will likely be the coolest spot in your entire team, and you risk getting a cold.
I’ll stop the bad jokes now.