
Chapter 12
Animating Object Deformations
Looking at the title of this chapter, you may find yourself wondering how this chapter is different from Chapter 10. Both chapters cover animation, but this chapter covers the cool things you can do in Blender if you're animating with a fully rigged mesh. Chapter 10 covers what is often referred to as object animation — that is, animating the attributes of a single object.
With an animation rig, you have more bits and pieces to manage, keep track of, and control. Managing all that additional complexity can be daunting if you have only the Outliner and the Graph Editor to work with. Fortunately, Blender offers a few more features that help make rigged character animation easier to wrap your head around.
Working with the Dope Sheet
So you have a rigged character that you want to animate. Awesome! Change your screen layout to the Animation layout (Ctrl+![]()
![]() Ctrl+
Ctrl+![]() ). After that, the first thing that you're probably going to want to do is change the primary 3D View to solid viewport shading (Z), change the Translate manipulator to the Rotate manipulator (Ctrl+Spacebar
). After that, the first thing that you're probably going to want to do is change the primary 3D View to solid viewport shading (Z), change the Translate manipulator to the Rotate manipulator (Ctrl+Spacebar![]() Rotate if you have the Pie Menus addon enabled), and set it to Normal orientation (Alt+Spacebar
Rotate if you have the Pie Menus addon enabled), and set it to Normal orientation (Alt+Spacebar![]() Normal). You should switch to Normal orientation because when you're animating with an armature, most of the time, you're animating bone rotations. By setting the Rotation manipulator to the Normal coordinate space, you can have quick, controlled transformation of bone rotations without having the 3D manipulator get in your way too much. These changes to your work environment in Blender, as well as a few others, are described in more detail in Chapter 10.
Normal). You should switch to Normal orientation because when you're animating with an armature, most of the time, you're animating bone rotations. By setting the Rotation manipulator to the Normal coordinate space, you can have quick, controlled transformation of bone rotations without having the 3D manipulator get in your way too much. These changes to your work environment in Blender, as well as a few others, are described in more detail in Chapter 10.
The next thing you need to pay attention to is the Dope Sheet. As nice as seeing the Graph Editor may be, seeing all the f-curves for each object and each bone in your scene can quickly get overwhelming. The Timeline shows keys for multiple objects in a simplified way, but you don't have a good way to see which key belongs to which object, and the Timeline provides no tools for actually editing keyframes. You need a different editor — one that gives you a big picture of the keyframes for multiple objects and bones in your animation. And, perhaps more important, this editor allows you to edit the timing of bones, objects, and properties individually. The Dope Sheet (Shift+F12), shown in Figure 12-1, fills those needs.
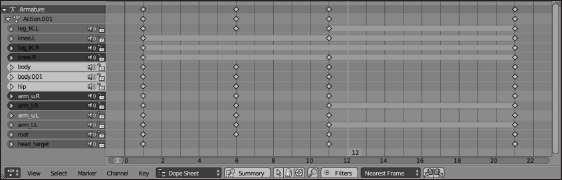
Figure 12-1: The Dope Sheet.
 In traditional animation, the dope sheet was the entire animation planned out, frame by frame on paper, prior to a single pencil line being drawn by the animator. In computer animation, it's taken on a slightly different meaning and purpose, but the core notion of being able to see your entire animation all at once is still there. When you have elements in your scene animated, the Dope Sheet shows a channel for each keyed bone, object, and property.
When it comes to editing the overall timing of a character's performance, the Dope Sheet is really the tool for the job.
 Like selecting in other parts of Blender, you can select individual keyframes in the Dope Sheet by right-clicking the diamond-shaped keyframe indicator. You can select multiple keyframes in a variety of ways. You can use the familiar Shift+right-click or Border Select (B) functions. However, another way to select keyframes is incredibly helpful. If you have a Dope Sheet open and a few keyframes inserted, right-click any keyframe to select it. Now, with that key selected, press K. This action selects any other key in the armature that's on the same frame as your selected key. This selection method is called a column key selection, and it's also available in the Graph Editor. You can get similar functionality with the time cursor. If you place your time cursor on a column of keys and press Ctrl+K, that column of keys is selected, rather than the column with your original selected keys.
 Initially, you may not think that column key selection is all that useful. However, if you think about the process used for animating — especially cartoon-style animation — it starts making more sense. The workflow for animation usually goes from one pose to the next. At each pose that you key, multiple bones are all keyed at the same time, forming a column in the Dope Sheet. In fact, unless you're doing some kind of frantic, shaky animations, it's a pretty good practice to make sure that you have nice columns in your Dope Sheet, at least to start. Uneven columns tend to indicate that your timing may be off on a specific part of the rig. Of course, this suggestion is a guideline more than a hard-and-fast rule. As your animation gets closer to being final, your columns will get necessarily messier.
After they're selected, you can manipulate keyframes with grabbing (G) and scaling (S). When performing these actions, there's something you should pay attention to. First of all, when you scale selected keyframes, the scale is relative to the position of the time cursor in the Dope Sheet. So if you want to increase the length of your animation by stretching out the keyframes, put your time cursor at frame 1 before scaling. If you place your time cursor in the middle or at the end, the keys at the beginning of your animation are arranged so that they take place before your animation starts — typically that's something you don't want, so be careful.
By default, the Dope Sheet has Nearest Frame snapping enabled. So when grabbing (G) or scaling (S), your keys snap to the frame to which they are closest. If you disable snapping from the snaps drop-down menu in the Dope Sheet's header by changing it to No Auto-Snap, Blender stops this behavior and allows you to place keys between frames. However, you normally don't want this behavior; usually, it weakens the poses that the audience actually sees.
However, if you do have keys located in-between frames, you can quickly fix that with the Snap Keys feature. Select the keys you want to fix in the Dope Sheet and press Shift+S.
You have four options in this menu:
Generally, though, it's best practice to use Blender's frame-based auto-snap feature that's enabled by default. You can change the auto-snap method by left-clicking the drop-down menu on the far right of the Dope Sheet's header. This menu has almost all the same options as the preceding list. The only difference is the Time Step option, which snap keys to one-frame increments from their initial locations rather than to exact frames.
Animating with Armatures
If you're already used to object animation, using armatures to animate in the Dope Sheet extends naturally from that base. When I animate, I like to use the following process:
- Plan the animation.
I can't emphasize this point enough: Know what you're going to animate and have an idea about the timing of the motion. Act out the action. If you can, record yourself acting it out. Video reference is key for seeing subtle movements. Sketch out a few quick thumbnail drawings of the sequence. Even stick-figure drawings can be really helpful for determining poses and figuring out camera framing.
- Set your Timeline at frame 1 and create the starting pose for your character by manipulating its rig.
- Select all visible bones (A) and Insert a LocRot keyframe for everything (I
 LocRot).
Granted, there's a good chance that most of the bones can't be grabbed, but only rotated, so setting a location keyframe for them is kind of moot. However, setting a keyframe for all the bones is faster than going through and figuring out which bones can be keyed for just rotation and which bones can be keyed for both rotation and location.
Alternatively, if you've set up a keying set for your character (see Chapter 10), you can pick that keying set by using Shift+Ctrl+Alt+I and then insert keyframes for every property in that keying set by pressing I.
- Move the timeline cursor forward to roughly when you think the next major pose should happen.
It doesn't really matter which editor you use to adjust the timeline cursor. It could be the Timeline, the Dope Sheet, or the Graph Editor. In fact, using
 ,
,  , Shift+
 , and Shift+
 , you can even adjust the timeline cursor from the 3D View.
 - Create your character's second pose.
If the next pose is a hold, or a pose where the character doesn't change position, you can duplicate the keys of the previous pose by selecting them in the Dope Sheet and pressing Shift+D.
- Select all visible bones (A) and Insert an Available keyframe (IAvailable).
Again, if you're using a keying set, you can just press I. If you wanted, you could also switch to the Available keying set (Shift+Ctrl+Alt+I
Available) before inserting keyframes. - Continue with Steps 4 through 6 until you complete the last major pose for your character.
- Using the Dope Sheet, play back the animation, paying close attention to timing.
At this point, hopefully your poses are acceptably refined, so you should pay even more attention to timing than to the accuracy of the poses.
- Go through the keys in the Dope Sheet and tweak the timing of the poses so that they look natural.
- Continuing to tweak, go back and start adding additional poses and keyframes for secondary motion between your major poses.
- Continue on this course, refining the timing and detail more and more with each pass.
One luxury of computer animation is the ability to continually go back and tweak things, make changes, and improve the animation. You can take advantage of this process by training yourself to work in passes. Animate your character's biggest, most pronounced motion first. Make sure that you have the timing down. Then move to the next pass, working on slightly more detailed parts of the performance. For example, animate your character's arm and hand bones before you get into the nitty-gritty details of animating the fingers. The biggest reason to work this way is time. It's much easier to go in and fix the timing on a big action if you do it earlier. Otherwise, you run into situations where you find yourself shuffling around a bunch of detail keys after you find out that your character doesn't get from Point A to Point B in the right amount of time.
Don't be afraid to break out a stopwatch and act out the action to find out exactly how long it takes to perform and what the action feels like. Animation is very much like acting, by proxy. So it helps to know what some actions actually feel like when they're performed. If you're fortunate enough to have friends, have them act out the action for you while you time it or even record it to video. Getting animation to look right is all about having the proper timing.
Principles of animation worth remembering
As you create your animations, try to pull from a variety of sources to really capture the essence of some action, motion, or character expression. My first and most emphatic recommendation is to keep your eyes open. Watch everything around you that moves. Study objects and try to get an idea of how their structure facilitates motion. Then think about how you would re-create that movement.
Of course, merely gawking at everything in the world isn't the only thing you should do (and you should be prepared for the fact that people will probably look at you funny). Studying early animation is also a good idea. Most of the principles that those wonderfully talented pioneers developed for animation are still relevant and applicable to computer animation. In fact, you should remember the classic 12 basic principles of animation that were established by some of the original Disney animators. These principles are a bit of divergence, but if your aim is to create good animation, you should know about them and try to use them in even the most simple of animations:
Those are the basic principles of animation, but not a single one of them is carved in stone. You can effectively break every one of them and still pull off some incredible animation. That said, more often than not, it's in the best interest of your work and your sanity that you at least start within these principles and then find ways where you can break them in the best way possible.
Making sense of quaternions (or, “Why are there four rotation curves?!”)
Even though the bulk of your time animating with armatures is spent working with the Dope Sheet, you still may frequently need to tweak things in the Graph Editor. If you go to the Graph Editor and view the f-curves for a bone with the intention of tweaking rotation, you may run into a particularly jarring shock. The X Rotation, Y Rotation, and Z Rotation channels that you would expect for rotation aren't there: They've been replaced with four channels to control rotation, called quaternions. Figure 12-2 shows a set of quaternions in the Graph Editor, describing the rotation of some bone.

Figure 12-2: Quaternions in action! They're nearly incompre hensible!
Quaternions are a different way of defining rotations in 3D space, and they're quite a bit different from the standard X, Y, and Z rotations, called Euler (pronounced “oiler”) rotations. Quaternions are used in the rotation of bones because Euler rotations can get into a nasty situation referred to as gimbal lock, which involves being mathematically unable to compensate for or adjust a rotation because you only have three axes to define it. Having that happen in an armature is unacceptable. Fortunately, quaternions don't suffer from gimbal lock. However, they do suffer from another affliction: They have virtually no intuitive relationship to rotation that non-mathematicians can understand.
To make a long story short, if you're using quaternion rotations, it may be easier for you to tweak a rotation by adding additional keyframes to the rotation. If you're not fond of mathematics, you may very well go crazy trying to figure out how they relate to your bone's rotation.
You aren't stuck with quaternions if you don't want them, though. You can control the rotation mode of any bone in an armature. To do so, select a bone and bring up its Bone Properties. At the bottom of the Transform panel is a drop-down menu labeled Rotation Mode. By default, its set to Quaternion (WXYZ), and in most cases, you want to use this setting. However, in a couple cases where you're sure that you won't run into gimbal lock problems (like, for example, if you rigged a bone to define the rotation of a wheel), it may be more helpful to use a different rotation mode like XYZ Euler or Axis Angle. The wheel example also is a good one to note, because quaternions don't “spin up” to allow multiple rotations like Euler or Axis Angle rotations can. So unless your wheel only spins once, it's in your best interest to switch.
Copying mirrored poses
One of the beauties of working in computer animation is the ability to take advantage of the computer's ability to calculate and process things so that you don't have to. In the animation world, animators love to find ways that the computer can do more work. Granted, you can (and should) always temper the computer's work with your own artistic eye, but there's nothing wrong with doing half the work and letting the computer do the other, boring, tedious, and repetitive half.
With the auspicious goal of getting the computer to do the work for you, Blender has three incredible little buttons, shown in Figure 12-3, located at the far-right end of the 3D View's header. They are visible only when you have selected an armature and it's in Pose mode. With these buttons, you can copy and paste poses from and back to the armature.

Figure 12-3: Pose Copy and Paste buttons in the 3D View's header.
From left to right, the buttons are Pose Copy, Pose Paste, and Pose Mirror Paste. Here's how to use them:
- Select all bones (A).
You can actually get away with just selecting a few bones, but selecting all the bones actually illustrates my point a little better.
- Left-click the Copy Pose button.
The armature's pose is stored into your computer's memory.
- Move to a different location in the timeline where you'd like your character to resume this pose.
- Paste the pose back to the character.
In pasting, you have two options:
- Paste Pose: This option takes the coordinates of all the bones you selected when copying the pose and applies those poses back to your character exactly as you copied them.
- Mirror Paste: This option does the same thing as the regular Paste Pose, except it takes advantage of Blender's built-in left/right naming convention (see Chapter 11 for more details) and pastes the mirrored version of the pose to your character. Mirror Paste is really handy if you're doing something like creating a walk cycle. You can create a left-foot-forward pose and then use Mirror Paste to instantly create a right-food-forward pose. Figure 12-4 shows a character posed one way and then mirror pasted to pose the other.
Note that after you paste the pose, you need to insert a keyframe for that pose at that location. Otherwise, the next time you scrub the timeline, the pose won't be there, and you'll have to copy and paste it all over again.

Figure 12-4: All you have to do is put one foot forward, and Blender handles the other for you.
Seeing the big picture with ghosting
Traditional animation has a process called onionskinning, which consists of drawing on relatively thin paper and working on a table with a light in it. With this setup, the animator can stack his drawings on top of each other and get an overall sense of the motion in the animation. Blender has a similar feature for rigs; it's called ghosting. The controls for ghosting are in the Ghost panel of Armature Properties.
To get the best sense of what the ghost feature does, increase the Range value in this panel to its maximum value of 30 ghosts. Now, for short animations or simple movement, having ghosting enabled may not be all that useful. However, the ghost feature is great for the more common forms of animation that are a bit longer and more complex. Having Ghost turned on is a great way to get a sense of where your character's coming from and where he's going. Think of ghosting as a way of having three-dimensional onionskinning, and it's certainly useful. Figure 12-5 shows a character jumping up and down, visualized with armature ghosting.
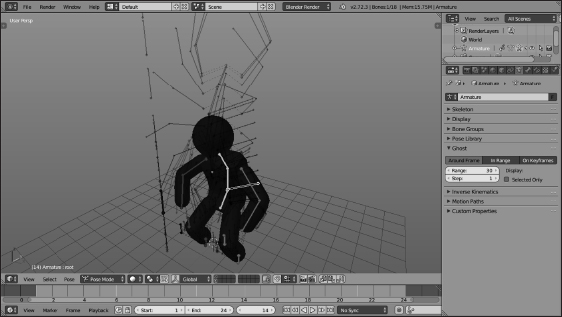
Figure 12-5: Increasing the Range value in the Ghost panel allows you to see a 3D onionskin of your rig's motion.
Visualizing motion with paths
As mentioned earlier in this chapter, one of the fundamental principles of animation is having arcs for movement. Smooth arcs are favorable for believable, natural-looking animated movement. To that end, Blender has a nice feature that makes it easier to analyze your animation and figure out whether you have acceptable arcs in your character's movement. This feature is called Motion Paths and is also available in Armature Properties, within the Motion Paths panel.
This feature isn't like ghosts, where you just increase the range and they display instantly. Motion paths may take a second to generate. In order to generate them, first select the bone or bones that you want to visualize and then left-click the Calculate Paths button on the bottom-right side of the Motion Paths panel. After left-clicking this button, it changes to read as Update Paths and also features a new button with an X on it for clearing your motion paths. An added bonus to this feature is the ability to show the location of the keys along the path as a bright dot by enabling the Keyframes check box. If you want, you can also show the numerical frame numbers along the curves by enabling the Frame Numbers feature in the same panel. Figure 12-6 shows the same jump animation, but this time with motion paths enabled.
One thing to note is that, although it might be nice, you can't currently change or edit the motion path directly. The path can reflect only the motion created by your keyframes. So if you notice that the curve isn't as smooth as you might like, you need to go back and tweak the motion using poses in the 3D View, keyframe timing in the Dope Sheet, or f-curve editing in the Graph Editor. Then when you recalculate the motion paths, hopefully you should have a cleaner result.
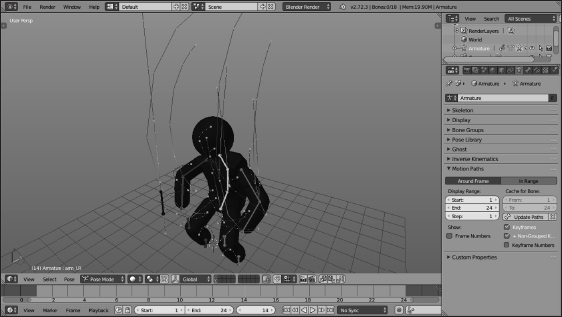
Figure 12-6: Motion paths help visualize the motion of bones in your armature.
Doing Nonlinear Animation
Animation is hard work, really hard work. So any time you can cut down the amount of work you have to do without detracting from the quality of the final animation, it's a good thing. Computer animation has given you another cool way to effectively and efficiently cut corners: nonlinear animation. Nonlinear animation, or NLA, is a way of animating that you can really do only with computers. The process of animating is typically very linear and straightforward (see preceding section). You may animate in passes, but you're still generally working forward in time with the full start-to-finish of your animation already planned out.
What if you didn't have to work this way? What if you could animate little chunks of character motion and then mix and match as you like? Imagine mixing a simple hand-waving motion with a simple jumping animation so that your character is both jumping and waving his arm? This is the basic concept behind nonlinear animation. Nonlinear animation takes many of the same principles used in nonlinear video editing and applies them to 3D computer animation. The idea is that you create a library of simple motions or poses and then combine them any way you like to create much more complex animated sequences. Using a library of motions is useful for background characters in larger productions and is also very handy for video games. Instead of trying to pull a specific set of frames from a single unified timeline, video game developers can now just make a call to one or more of these library animations and let the computer do the rest of the work.
In Blender, the basic building blocks for this library are Actions. Actions are collections of f-curves, and they are really cool because they have their own datablock. You can create multiple actions within a single .blend file, share the actions between armatures, and basically build up a library of movements.
To create a new action, first change the Dope Sheet from the default Dope Sheet editing context to the Action Editor context using the Mode drop-down menu in the header. Then you can use the Action datablock, also in the header of the Dope Sheet, to add a new action, as highlighted in Figure 12-7. This datablock widget is just like the one used for materials, textures, and even objects in other parts of Blender's interface. Create a new action by left-clicking the plus (+) icon on the right side of the datablock. After adding a new action, you can (and should) click in the text area of the datablock and give your new action a custom name.
With the new action created, you can create another core animation and start building up your character's action library. Animate waving each arm, a walk cycle, various facial expressions, a standing idle animation, and any other simple action that comes to mind.
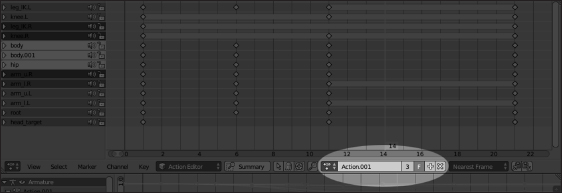
Figure 12-7: Using the Action datablock in the Dope Sheet to create a new action for your armature.
 Before you create a new action, be sure to left-click the Fake User button in the datablock widget for your action (it's the button with an F on it). Let me write that again: Give your actions a fake user.
Remember the way that Blender's datablocks work. If a datablock doesn't have any users, it gets destroyed when you close Blender or open a different .blend file. So if you go through and create a bunch of actions without giving them users, all of those userless actions will disappear when you close Blender, regardless of how frequently you saved while working. To ensure that this doesn't happen, you need to make sure that all of your actions have users. This is where the Fake User button comes it. When a datablock has that button enabled, it won't be obliterated when you close your file.
Eventually, your action library will be populated enough that you'll want to start mixing and matching them together. To do this, you're going to want to use the NLA Editor. Add the NLA Editor to the Animation screen layout with the following steps:
- In the Animation screen layout, left-click the seam at the top of the Timeline and drag it up, making more room for that editor.
Because the NLA Editor is covering the entire animation, it makes sense to forsake the Timeline and use the NLA Editor exclusively. But if you'd still like to use the Timeline, you can split it off of another area.
- Change the Timeline to a NLA Editor.
Your screen layout may look something like Figure 12-8.
The NLA is a very cool feature of Blender, but don't rely on it too much for animation. Blender has had the NLA Editor for a long time, but it could still use some refinement to be a truly effective tool. The good news is that the NLA is still being developed, and while it's likely to go through design iterations in future releases of Blender, the principles that I explain here should still apply.
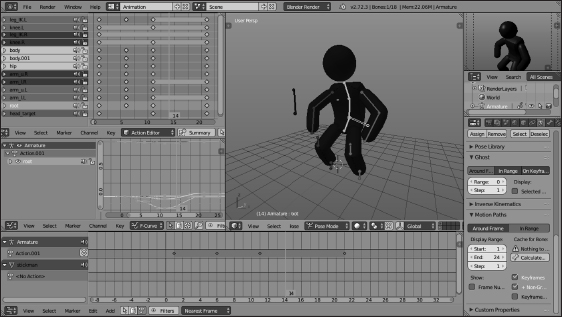
Figure 12-8: An animation screen layout with the NLA Editor added to it.
Mixing actions to create complex animation
When you have an action loaded in the Dope Sheet's Action Editor, you should notice a bright orange bar in the NLA Editor. This orange bar is the current active action on your armature, and you can push that action on the NLA stack to build your animation.
To add your actions to the NLA Editor:
- Push your current action into the stack by left-clicking the button with the double-downward arrow icon in the channel region on the left of the NLA.
A new NLA track is created, populated with your current action as a bright yellow strip. The text on the strip should match the name of your action. The track itself is named
NlaTrack, as indicated in the NLA Editor's channel region. Double-click that name to rename it to something more descriptive. - Add a new strip in the graph area of the NLA Editor (Shift+A).
You see a menu of all the actions you created.
- Choose the action you'd like to add to the NLA Editor.
The action is placed in the NLA Editor as a strip in the currently selected track (left-click the track name in the channel region to select a track), and its start position is wherever the time cursor is located.
If the timeline cursor is in the middle of an existing strip on your selected track, adding a new strip will create a new track. The existing strip doesn't get trimmed or removed. - Continue to add actions to the NLA.
Of course, unless you make the last frame of one Action strip match the pose at the head of the next frame, the animation looks pretty erratic.
The way to smooth out the animation is with the Properties region (N) in the NLA Editor. Figure 12-9 shows the Properties region of the NLA Editor. To make the transition from one strip to the next smoother, either make sure that the Auto Blend In/Out check box in the Active Strip panel for each strip is enabled (it should be by default) and let them overlap a bit or manually set the Blend In and Blend Out values in this panel.

Figure 12-9: Using the Properties region in the NLA Editor.
Taking advantage of looped animation
Another benefit of using the NLA is the ability to easily loop any action strip and rescale its timing. You can loop and rescale the timing in the NLA Editor from within the Properties region. In the Action Clip panel under the Playback Settings label are a pair of values: Scale and Repeat. The very first is Scale, with a default value of 1.0. However, you can increase or decrease this value as much as you like to adjust the timing on your action, speeding it up or slowing it down as necessary.
Below the Scale value is Repeat. Like Scale, the default value is 1.0, and you can increase or decrease the value to taste. As you do, you should see the strip increase in length proportional to the increase of the Repeat value. Now, to have an effective looping animation, it's definitely in your best interest to make the first and last poses in the action identical. The easiest way to do so would be to go into the Dope Sheet, column select the keys in the first frame (right-click one keyframe, press K), and duplicate (Shift+D) it to the last frame of the action. However, you can also use the copy and paste pose buttons in the 3D View:
- In the Dope Sheet, select (right-click) the action strip you want to loop from the Actions datablock.
- While still in the Dope Sheet, move the time cursor to the first pose in the action (left-click and drag).
- In the 3D View, select all bones (A) and left-click the Copy Pose button in the header.
- Back in the Dope Sheet or the Timeline, move the time cursor to some place after the last keyframe.
- In the 3D View, left-click the Paste Pose button in the header.
- Insert a new keyframe (IAvailable).
When you get to this step, all the bones should still be selected, so you don't need to reselect anything.
When you return to the NLA Editor, the action strip should automatically be longer to account for the additional frame at the end. Furthermore, the action strip should also loop seamlessly upon playback (Alt+A).
Figure 12-10 shows the NLA Editor with a looped strip.
Be careful when changing the scale of Action strips. More often than not, changing the scale results in a keyframe being placed at what's called a fractional frame or intraframe, a spot on the timeline that isn't a nicely rounded frame number. Fractional frames aren't necessarily a bad thing, but animations do tend to look a little bit better if the keyframes fall on full frames so that the audience has the chance to “read” the pose.

Figure 12-10: Action strips in the NLA Editor, looped and rescaled.
Many of these animation concepts, especially ones involving the NLA, are much easier to grasp if you can see them in motion. After all, this is animation, the art of motion. The .blend files on this book's website (www.blenderbasics.com) provide a stronger notion of how these things work together.