Chapter 5. Listening for NDEF Messages
Every well-designed application relies on good listening for relevant events, whether they’re user input events, network events, or some other form. NFC applications are no different. NFC applications are always listening for NDEF messages, parsing and filtering the message type and contents, and taking action accordingly. In Chapter 4, you got an introduction on how to write NDEF messages using the PhoneGap-NFC plug-in, but we didn’t dive deeply into the listening part.
There are two main ways to listen for NDEF messages: you can program your application to listen for them when it’s the app in the foreground, or you can let the operating system of your device do the listening, and call your application when it sees a message that’s relevant to your app. The PhoneGap-NFC plug-in offers several NFC events that you can program your app to listen for, and Android offers a tag dispatch system that allows you to tell the operating system which tags you’re most interested in. NFC apps can take advantage of the tag dispatch system by writing intent filters in the Android Manifest that tell the operating system which tags to route to the app. They can also explicitly listen for some or all tags, overriding the intent filters of other apps using the foreground dispatch system. In this chapter, you’ll learn a bit more about how to listen for and filter NDEF messages using PhoneGap-NFC’s event listeners and Android’s tag dispatch system.
PhoneGap-NFC’s Event Listeners
Up until now, you haven’t specified how Android should deal with tags, and you’ve used only one event listener, the tagDiscoveredListener. This event listener uses the foreground dispatch system to tell Android that you want your app to receive all NFC-related messages, and not to route them to other apps. It works well when you want everything to go through your app, and you’ve probably figured out already that some of the other apps you’ve seen, like TagWriter and TagInfo, also use the foreground dispatch system in this manner. When your app is in the foreground, it gets priority notification of all events, NFC and otherwise. That means it’s up to you to decide what you want to listen for and what to ignore.
The PhoneGap-NFC plug-in offers you four different NFC-related event listeners:
- Tag discovered listener
- Listens for all tags that are compatible with the reader hardware. This is the most general listener.
- NDEF-formatable listener
- Listens for all compatible tags that can be formatted to receive NDEF messages.
- NDEF listener
- Listens for any tags containing NDEF messages. If a legitimate NDEF message is received, this listener will generate an event.
- MIME-type listener
- Listens only for those NDEF messages containing a MIME-type. This is the most specific of all the event listeners, and often the most useful. You can use the MIME-type listener to filter for messages containing a specific MIME-type. It will then ignore messages containing other MIME-types. You can also use it to filter for messages containing no type at all. You can’t, however, register two MIME-type listeners for different types.
You can register multiple listeners in the same app, and Android will generate only the most specific event if a given tag satisfies more than one listener. For example, a tag with a plain-text message on it could potentially trigger all of these listeners. It’s a readable tag, it’s NDEF-formatable, it’s NDEF-formatted, and it has a legitimate MIME type (text/plain). However, since the MIME type is the most specific listener, that’s the event that would be generated.
You can use multiple cascading listeners. For example, if you knew that most of your tags would be plain-text tags, you could have a specific MIME-type listener that captures them, then use an NDEF listener to capture all other NFC types, and an NDEF-formatable listener to search for empty tags and prompt the user to put something on them.
The next application shows this in action. In this app, you’ll implement all four listeners, and use different tags to trigger each one.
An NDEF Reader Application
For this project, you need the following:
- An NFC-enabled Android phone
- At least four NFC tags (for best results across multiple devices, stick with the NFC Forum types; see Device-to-Tag Type Matching for more on which tags work with which devices).
We also expect that you’ve gone through Chapter 3 and installed all the software needed to complete the examples in that chapter.
Start by making a new project using the cordova create command:
$cordova create ~/NdefReader com.example.ndefreader NdefReader
$cd~/NdefReader
$cordova platform add android$cordova plugin add https://github.com/chariotsolutions/phonegap-nfc
-
Windows users should type
%userprofile%NdefReaderinstead of~/NdefReader.-
Windows users should type
/d %userprofile%NdefReaderinstead of~/NdefReader.
You can copy the index.html and index.js from the NFC Reader app as a base for this project:
$cp ~/NfcReader/www/index.html ~/NdefReader/www/.$cp ~/NfcReader/www/js/index.js ~/NdefReader/www/js/.
The index.html for this project should look like this:
<!DOCTYPE html><html><head><title>NDEF Reader</title></head><body><divclass="app"><p>NDEF Reader</p><divid="messageDiv"></div></div><scripttype="text/javascript"src="cordova.js"></script><scripttype="text/javascript"src="js/index.js"></script><scripttype="text/javascript">app.initialize();</script></body></html>
Listening for Multiple Events
The index.js file starts with the same base as the NFC Reader app. The initialize() and bindEvents() functions will remain the same as well as the display() and clear() functions. The onDeviceReady() function will start the same, but you’ll add three new listeners after the addTagDiscoveredListener. The new function will look like this:
/*this runs when the device is ready for user interaction:*/onDeviceReady:function(){nfc.addTagDiscoveredListener(app.onNonNdef,// tag successfully scannedfunction(status){// listener successfully initializedapp.display("Listening for NFC tags.");},function(error){// listener fails to initializeapp.display("NFC reader failed to initialize "+JSON.stringify(error));});nfc.addNdefFormatableListener(app.onNonNdef,// tag successfully scannedfunction(status){// listener successfully initializedapp.display("Listening for NDEF Formatable tags.");},function(error){// listener fails to initializeapp.display("NFC reader failed to initialize "+JSON.stringify(error));});nfc.addNdefListener(app.onNfc,// tag successfully scannedfunction(status){// listener successfully initializedapp.display("Listening for NDEF messages.");},function(error){// listener fails to initializeapp.display("NFC reader failed to initialize "+JSON.stringify(error));});nfc.addMimeTypeListener("text/plain",app.onNfc,// tag successfully scannedfunction(status){// listener successfully initializedapp.display("Listening for plain text MIME Types.");},function(error){// listener fails to initializeapp.display("NFC reader failed to initialize "+JSON.stringify(error));});app.display("Tap a tag to read data.");},
As you can see, these listeners are all mostly the same in their structure. The only change is the message they display when they’re successfully registered, and the callback function they invoke. Those that are likely to return an NDEF message call onNfc(), and those that are not call onNonNdef().
When the tag you read is not compatible with NDEF in any way, the listener doesn’t return a tag. For example, you might read 13.56MHz RFID tags that are not even Mifare tags (Philips ICODE or Texas Instruments Tag-it); your reader can read its UID but nothing else. If you’re using a device like the Nexus 4, which can’t read Mifare Classic tags, you’ll only be able to read the UID but no tag data. You need to handle these tags differently. The onNonNdef() handler takes care of this case.
The new onNfc() function will call clear() to clear the message div, then display the type of event that called it, and the details about the tag. The onNonNdef() function will read the tag UID and the tech types from the tag. Then add a showTag() function to show the tag details from onNfc():
/*Process NDEF tag data from the nfcEvent*/onNfc:function(nfcEvent){app.clear();// clear the message div// display the event type:app.display(" Event Type: "+nfcEvent.type);app.showTag(nfcEvent.tag);// display the tag details},/*Process non-NDEF tag data from the nfcEventThis includes* Non NDEF NFC Tags* NDEF-Formatable Tags* Mifare Classic Tags on Nexus 4, Samsung S4(because Broadcom doesn't support Mifare Classic)*/onNonNdef:function(nfcEvent){app.clear();// clear the message div// display the event type:app.display("Event Type: "+nfcEvent.type);vartag=nfcEvent.tag;app.display("Tag ID: "+nfc.bytesToHexString(tag.id));app.display("Tech Types: ");for(vari=0;i<tag.techTypes.length;i++){app.display(" * "+tag.techTypes[i]);}},/*writes @tag to the message div:*/showTag:function(tag){// display the tag properties:app.display("Tag ID: "+nfc.bytesToHexString(tag.id));app.display("Tag Type: "+tag.type);app.display("Max Size: "+tag.maxSize+" bytes");app.display("Is Writable: "+tag.isWritable);app.display("Can Make Read Only: "+tag.canMakeReadOnly);},
That gives you enough to run the app. Save all your files and run the app as usual:
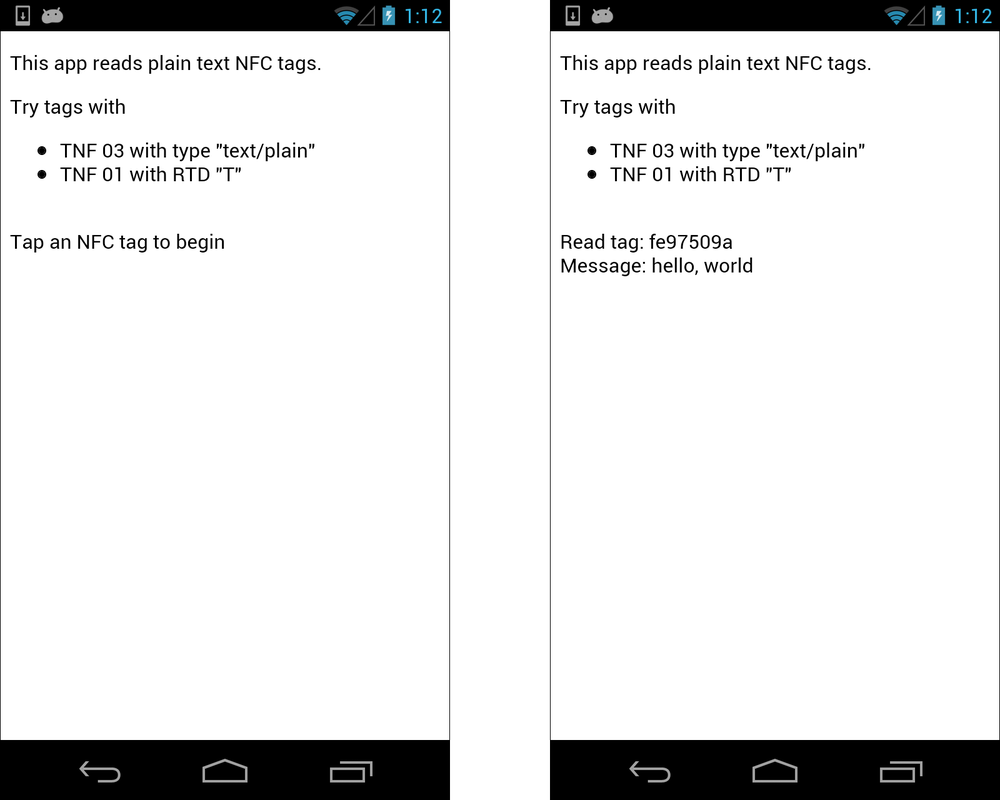
$ cordova runTry this app with the Foursquare check-in tags you made for Chapter 4. Then try making a new tag, with a plain-text message. You can do this using NXP TagWriter. Tap “Create, write, and store,” then “New,” then “Plain Text,” then enter a text message. Finally, tap “Next,” then tap a new tag to the back of your device to write to it. Then re-open the NDEF Reader app you just wrote, and read this tag. It should read as an ndef-mime event, unlike the others. Figure 5-1 shows a few different results you should get from this app so far.

You probably didn’t get any new events of type “tag.” That’s because it’s overridden by every other event listener. It’s rare you’ll run across a tag that’s compatible with the NFC reader, but not at least NDEF-formatable. Certain non-Mifare RFID tags will show up this way (including Texas Instrument Tag-it HF tags, and one of Don’s credit cards), but not much else. If you happen to write PhoneGap-NFC apps for BlackBerry 7, however, you’ll see that all the eligible listeners will fire when a given tag comes into range, so you’ll have to adapt your code for cross-platform use if you want BlackBerry users to get the same results as Android users. For more on cross-platform differences, see the PhoneGap-NFC plug-in README file.
Reading the NDEF Messages
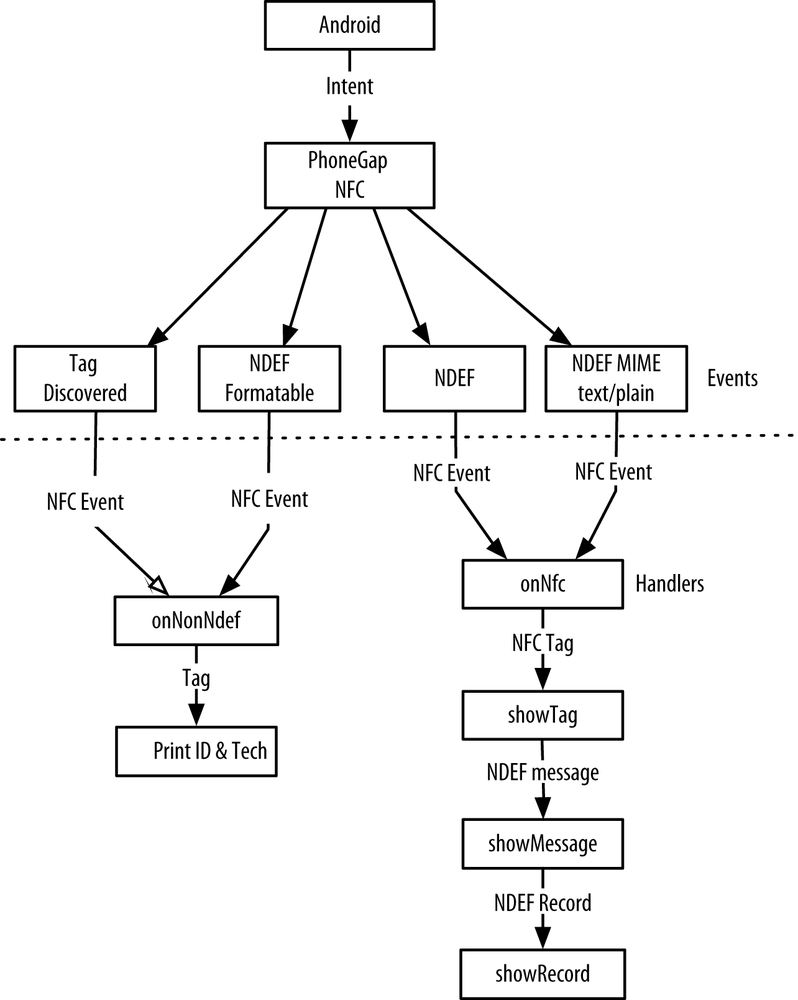
Now that you’ve got an app that can read any type of compatible tag, you might as well extend it to give you the details of the NDEF messages on each tag it reads. Keep in mind NDEF messages are made of NDEF records, and when the record is a Smart Poster, the contents of the record is itself an NDEF message. In order to handle this, you’ll need a showMessage() function that’s called by showTag(), and a showRecord() function that’s called by showMessage(). If the record is a Smart Poster, you’ll need to call showMessage() again. This is where recursion is your friend, as you’ll see. Figure 5-2 shows you the flow of the whole program.
Start by adding an if statement to the showTag() function that sends the NDEF message on the tag to the showMessage() function:
showTag:function(tag){// display the tag properties:app.display("Tag ID: "+nfc.bytesToHexString(tag.id));app.display("Tag Type: "+tag.type);app.display("Max Size: "+tag.maxSize+" bytes");app.display("Is Writable: "+tag.isWritable);app.display("Can Make Read Only: "+tag.canMakeReadOnly);// if there is an NDEF message on the tag, display it:varthisMessage=tag.ndefMessage;if(thisMessage!==null){// get and display the NDEF record count:app.display("Tag has NDEF message with "+thisMessage.length+" record"+(thisMessage.length===1?".":"s."));app.display("Message Contents: ");app.showMessage(thisMessage);}},
Next, add a function showMessage() to show the message. The message is just an array of records, so iterate over it to show each record using a second function, showRecord():
/*iterates over the records in an NDEF message to display them:*/showMessage:function(message){for(varthisRecordinmessage){// get the next record in the message array:varrecord=message[thisRecord];app.showRecord(record);// show it}},/*writes @record to the message div:*/showRecord:function(record){// display the TNF, Type, and ID:app.display(" ");app.display("TNF: "+record.tnf);app.display("Type: "+nfc.bytesToString(record.type));app.display("ID: "+nfc.bytesToString(record.id));// if the payload is a Smart Poster, it's an NDEF message.// read it and display it (recursion is your friend here):if(nfc.bytesToString(record.type)==="Sp"){varndefMessage=ndef.decodeMessage(record.payload);app.showMessage(ndefMessage);// if the payload's not a Smart Poster, display it:}else{app.display("Payload: "+nfc.bytesToString(record.payload));}}};// end of app
As you can see, showMessage() and showRecord() call each other recursively until all the contents of the tag are displayed.
Save these changes and run the app again. This app should read all compatible tags, and give you any NDEF messages on them. Besides showing the multiple NDEF event listeners, it’s also a handy app for general tag reading. It’s not the prettiest display of the records, because it’s very bare-bones, with just enough code to extract the information. In a more fully developed app, you could add elements to the DOM of the index.html page for each message and record, so that you could indent the records in a message, and so forth.
Figure 5-3 shows a few example tags read with the NDEF Reader app. The full listing can be found on GitHub.

Filtering Tags Using Record Types
If you’re making an app that needs to read multiple different types of messages, there are a number of ways to do it. You can separate them by TNF, but in most cases that won’t tell you a whole lot about the message’s purpose. Generally, the NFC Forum Record Type Definition will tell you more about a message. There are a few commonly used NFC RTDs that you’ll see frequently: “U” for URI, “T” for text record, and “Sp” for Smart Poster. There are some external ones you’ve seen as well: android.com:pkg for an Android Application Record, for example. And of course, you can use any of the Internet-standard MIME-types for your record type as well, the most common of which you’ll encounter is text/plain. You can even make up your own types if you so choose. Next is a modified version of the NDEF Reader app’s showRecord() function that filters records by type. This full source code can be found on GitHub:
showTag:function(tag){// display the tag properties:app.display("Tag ID: "+nfc.bytesToHexString(tag.id));app.display("Tag Type: "+tag.type);app.display("Max Size: "+tag.maxSize+" bytes");app.display("Is Writable: "+tag.isWritable);app.display("Can Make Read Only: "+tag.canMakeReadOnly);// if there is an NDEF message on the tag, display it:varthisMessage=tag.ndefMessage;if(thisMessage!==null){// get and display the NDEF record count:app.display("Tag has NDEF message with "+thisMessage.length+" record"+(thisMessage.length===1?".":"s."));vartype=nfc.bytesToString(thisMessage[0].type);switch(type){casenfc.bytesToString(ndef.RTD_TEXT):app.display("Looks like a text record to me.");break;casenfc.bytesToString(ndef.RTD_URI):app.display("That's a URI right there");break;casenfc.bytesToString(ndef.RTD_SMART_POSTER):app.display("Golly! That's a smart poster.");break;// add any custom types here,// such as MIME types or external types:case'android.com:pkg':app.display("You've got yourself an AAR there.");break;default:app.display("I don't know what "+type+" is, must be a custom type");break;}app.display("Message Contents: ");app.showMessage(thisMessage);}},
Filtering Using MIME-Types
Because MIME-type records are so useful, they get their own Type Name Format. They also get their own listener function in the NFC plug-in. Filtering by MIME-type is a quick way to make your app do what you want it to do with tags you care about, but ignore those tags that it doesn’t care about. Other messages can then be handled by the operating system’s tag dispatch system. As a demonstration of that, here’s how to write a small app that reads text messages, but ignores other messages. This app uses the MimeTypeListener to do its work.
Start by making a new project using the cordova create command:
$cordova create ~/MimeReader com.example.mimereader MimeReader$cd~/MimeReader$cordova platform add android$cordova plugin add https://github.com/chariotsolutions/phonegap-nfc
-
Windows users should type
%userprofile%MimeReaderinstead of~/MimeReader.-
Windows users should type
/d %userprofile%MimeReaderinstead of~/MimeReader.
You can copy the index.html and index.js from the NFC Reader app as a base for this project again:
$cp ~/NfcReader/www/index.html ~/MimeReader/www/.$cp ~/NfcReader/www/js/index.js ~/MimeReader/www/js/.
The index.html page is mostly the same (the only changes are cosmetic):
<!DOCTYPE html><html><head><title>NFC MIME Reader</title></head><body><divclass="app"><p>This app reads plain-text NFC tags.</p>Try tags with<ul><li>TNF 03 with type "text/plain"</li><li>TNF 01 with RTD "T"</li></ul><divid="messageDiv"></div></div><scripttype="text/javascript"src="cordova.js"></script><scripttype="text/javascript"src="js/index.js"></script><scripttype="text/javascript">app.initialize();</script></body></html>
You only need to make three changes to the index.js to make this app. First, the onDeviceReady() function will get only one listener function like so:
onDeviceReady:function(){nfc.addMimeTypeListener("text/plain",// listen for plain-text messagesapp.onNfc,// tag successfully scannedfunction(status){// listener successfully initializedapp.display("Tap an NFC tag to begin");},function(error){// listener fails to initializeapp.display("NFC reader failed to initialize "+JSON.stringify(error));});},
Second, you need to change the onNfc() function so that it reads the tag’s message and extracts the payload of the record inside it. Since you’re only listening for MIME media records, you know that the record in the message is a text record, so your checking can be fairly simple. You do need to extract the actual content from the language encoding that comes at the beginning of the payload, however. You can see how to do that, in the conditional statement that checks the first byte of the payload:
/*displays tag from @nfcEvent in message div:*/onNfc:function(nfcEvent){vartag=nfcEvent.tag,text="",payload;app.clear();app.display("Read tag: "+nfc.bytesToHexString(tag.id));// get the playload from the first messagepayload=tag.ndefMessage[0].payload;if(payload[0]<5){// payload begins with a small integer, it's encoded textvarlanguageCodeLength=payload[0];// chop off the language code and convert to stringtext=nfc.bytesToString(payload.slice(languageCodeLength+1));}else{// assume it's text without language infotext=nfc.bytesToString(payload);}app.display("Message: "+text);},
Third and finally, you can delete the onNonNdef() function.
Try this app with some of the tags you’ve got formatted already. The plain-text ones should show up in this app, while the others will open whatever app corresponds to the message they carry. Since most of your tags are formatted for Foursquare, they should automatically open the Foursquare app. You can see the advantage to MIME-type filtering here in action: your app only gets events generated by tags with the appropriate MIME-type. Figure 5-4 shows the results of this app. The full source code can be found on GitHub.
Android’s Tag Dispatch System
Thus far, you’ve used Android’s foreground dispatch system to capture all events; the PhoneGap-NFC plug-in uses this by default. In other words, your app that’s in the foreground gets all the NFC events received, and decides which ones it’s going to ignore and which ones it’s going to deal with. But if your app isn’t running, it doesn’t get the message; that’s not good interaction design.
Think about the ideal sequence of events when a user is interacting with a tag or another device: she sees the tag, taps her device to it, and the device takes action. She doesn’t open an app or mess with any configuration. The phone’s operating system should already be listening for tags, and then it should read the tag type and call the appropriate activity in the appropriate app. In order for this to happen, tag identification has to happen before your app is even opened. In fact, this is how Android’s tag dispatch system normally works.
The tag dispatch system reads scanned tags, and depending on their TNF and record type, it opens the appropriate app. This is done using intent filters. When Android successfully reads the TNF and record type, it tries to map it to a known MIME type or URI pattern. From there, it generates an intent with this data. Then it scans its database of apps to see which app can handle this intent. If more than one app can handle it, Android presents the user with a chooser to decide what to do. Ideally, though, NDEF messages for your app should be distinctive enough that no other app is appropriate to handle them. Intent filters are declared in your app’s AndroidManifest.xml file inside the <activity> element.
To configure your app to listen for a particular intent filter, you need to modify the app’s platforms/android/AndroidManifest.xml file, and for one intent type, you also need to add a file to the platforms/android/res/xml directory. You can try out all of the combinations that follow with the NDEF Reader project to see what happens. Start with your app not running. When you tap the appropriate tag, the app should open. Take note of your tag types before you do, so you know which tags should trigger your app to open and which shouldn’t.
Types of Intents
There are three possible intents that Android can generate in response to a tag, which we cover here.
TAG_DISCOVERED is the most general. This intent is generated for any tag the NFC reader recognizes that’s not one of the known RFID or NFC tag types. If you’re using any of the compatible RFID or NFC tag types, you generally won’t see this intent.
Here’s what the XML for this intent filter looks like:
<activity>... other stuff in the activity element goes here<intent-filter><actionandroid:name="android.nfc.action.TAG_DISCOVERED"/></intent-filter></activity>
TECH_DISCOVERED occurs when Android sees a compatible RFID or NFC tag. In order to use this intent, you have to declare a tech list of the types of tags for which you intend to listen. You declare the tech list in a separate file in the platforms/android/res/xml directory of your project. For example, if you plan to listen for Mifare Ultralight tags that are NDEF-formatable, you’d configure your intent filter to look for just those tag types. First you specify that you’re using the action.TECH_DISCOVERED intent filter in the AndroidManifest.xml:
<activity>... other stuff in the activity element goes here<intent-filter><actionandroid:name="android.nfc.action.TECH_DISCOVERED"/></intent-filter><meta-dataandroid:name="android.nfc.action.TECH_DISCOVERED"android:resource="@xml/nfc_tech_filter"/></activity>
Then you’d make a file called nfc_tech_filter.xml in the platforms/android/res/xml folder like so:
<resourcesxmlns:xliff="urn:oasis:names:tc:xliff:document:1.2"><tech-list><tech>android.nfc.tech.NdefFormatable</tech><tech>android.nfc.tech.MifareUltralight</tech></tech-list></resources>
Your tech list should specify only the types you want to filter for. The tag that it will filter for is the tag that matches all the specifications of the tech list. In this example, only tags that are Mifare Ultralight and NDEF-formatable will trigger this intent.
You can specify multiple tech lists so that you can scan for multiple combinations. For example, maybe you want tags that are either Mifare Ulralight and NDEF-formatable, NdefA and NDEF-formatable, or NdefB and NDEF-formatable. Your tech list file would look like this:
<resourcesxmlns:xliff="urn:oasis:names:tc:xliff:document:1.2"><tech-list><tech>android.nfc.tech.NdefFormatable</tech><tech>android.nfc.tech.MifareUlralight</tech></tech-list><tech-list><tech>android.nfc.tech.NdefFormatable</tech><tech>android.nfc.tech.NdefA</tech></tech-list><tech-list><tech>android.nfc.tech.NdefFormatable</tech><tech>android.nfc.tech.NdefB</tech></tech-list></resources>
For reference, here’s a tech list containing all the possible NFC-related tech types. This comes from the Android developer site’s NFC Basics page. You can choose any subset you need from it:
<resourcesxmlns:xliff="urn:oasis:names:tc:xliff:document:1.2"><tech-list><tech>android.nfc.tech.IsoDep</tech><tech>android.nfc.tech.NfcA</tech><tech>android.nfc.tech.NfcB</tech><tech>android.nfc.tech.NfcF</tech><tech>android.nfc.tech.NfcV</tech><tech>android.nfc.tech.Ndef</tech><tech>android.nfc.tech.NdefFormatable</tech><tech>android.nfc.tech.MifareClassic</tech><tech>android.nfc.tech.MifareUltralight</tech></tech-list></resources>
NDEF_DISCOVERED is the third type of intent filter, and generally the most used. It’s the most specific of the three. It looks for a tag that’s NDEF-formatted, and can filter for a particular MIME-type or URL. Here’s an NDEF_DISCOVERED intent that filters for the text/plain MIME-type:
<intent-filter><actionandroid:name="android.nfc.action.NDEF_DISCOVERED"/><categoryandroid:name="android.intent.category.DEFAULT"/><dataandroid:mimeType="text/plain"/></intent-filter>
In Android, tags with TNF 01 (Well-Known type) are not normally specified in an intent filter. However, there are a couple of exceptions built into the operating system. A record with a TNF 01 and an RTD of “T” (text) can be filtered using an NDEF_DISCOVERED intent filter set to look for mimeType="text/plain." So if you’re looking for plain-text records, use TNF 01, RTD “T,” then set your intent filter as shown previously. With this combination, text records will trigger an event whether you’re filtering in the background or foreground.
The NDEF_DISCOVERED intent also lets you filter for MIME-types and URLs, and even URLs of a specific type. For example, remember all those tags you formatted in Chapter 4 that had the m.foursquare.com/venue URL embedded in them? Here’s how you can filter for them:
<intent-filter><actionandroid:name="android.nfc.action.NDEF_DISCOVERED"/><categoryandroid:name="android.intent.category.DEFAULT"/><dataandroid:scheme="http"android:host="m.foursquare.com"android:pathPrefix="/venue"/></intent-filter>
Add this to the NDEF Reader app’s AndroidManifest.xml file, then build and deploy the app using cordova run as usual. Then close it and tap one of the Foursquare tags to your device. You should see a chooser that asks you to choose between the NDEF Reader and the Foursquare app. Why? Because both of them filter for this URI pattern.
The more specific you can make your intent filter, the better chance there is that your app and only your app will answer to it. In light of this fact, it now makes more sense why the Samsung TecTiles app and the NFC Task Launcher app in Chapter 4 formatted their tags the way they did. Recall how they formatted their calls to Foursquare:
NFC Task Launcher (two NDEF records):
- Record 1
-
Record type:
x/nfctl -
Payload:
enZ:Foursquare;c:4a917563f964a520401a20e3
-
Record type:
- Record 2
- TNF: External
-
Record type:
android.com:pkg -
Payload:
com.jwsoft.nfcactionlauncher
Samsung TecTiles:
- Record 1
- TNF: Well-Known
- Record Type: U
-
Payload:
tectile://www/samsung.com/tectiles
- Record 2
- TNF: Well-Known
- Record type: T
-
Payload:
·enTask····Foursquare·com.joelapenna…
Both apps filter for a unique MIME-type or URI. NFC Task Launcher defines its own MIME-type (x/nfctl). The second record is an Android Application Record. This launches the NFC Task Launcher app and then calls Foursquare using the information contained in the payload of the first record. Samsung TecTiles defines a URI that’s unique to their app (tectile://www/samsung.com/tectiles), so Android will open TecTiles. The TecTile task information for launching Foursquare is embedded in the second record.
Android Application Records
The Android Application Record (AAR) was introduced in Android version 4.0 (API version 14) as a way to give developers a surefire way to see to it that their apps were the ones that read a given tag. You’ve already seen Android Application Records in action; the NFC Task Launcher example uses an AAR. Android scans the whole NDEF message for an NDEF record containing an AAR as its record type, and if it finds one, it hands the intent to that app, overriding all other dispatch priorities. If you want to make absolutely sure your app is the one that gets a given intent, make sure the tag being read has an AAR that calls for your app. The only way to override AAR dispatch is to use the foreground dispatch system.
In the previous examples, it’s likely that the second record for NFC Task Launcher was added after Android version 4.0. The first record is unique enough that the tag dispatch system should be able to filter for the app in question, but adding the AAR ensures that this will happen. Furthermore, if the application mentioned in the AAR is not installed, then Android will open the Play Store and ask to download the application.
Conclusion
By the end of this chapter, you should have a good understanding of how to listen for NDEF messages. You can use the foreground dispatch system if your app is already running, and use PhoneGap’s event listeners to filter for the different events: tags discovered, NDEF-formatable tags, NDEF messages, or NDEF messages with specific MIME-types. You can also use the background dispatch system and let Android filter appropriate tag events to your app. You can filter for any recognizable tag using the action.TAG_DISCOVERED intent; you can filter for specific tag types using the action.TECH_DISCOVERED intent; or you can filter for specific MIME types, record types, or URI patterns using the action.NDEF_DISCOVERED intent. You can mix and match all of these to filter for a variety of tag types and content patterns as well.
Some applications of NFC might use multiple apps to achieve their end goals. In the next chapter, you’ll build a full NFC-based application that uses the various elements you’ve learned already.