Chapter 9. NFC on Embedded Systems
So far, we’ve seen the possibilities that NFC offers for mobile applications and physical interaction applications. There are other embedded device platforms besides Android, of course, and there are other physical interaction platforms besides Arduino. The most interesting at the moment are the embedded Linux systems like Texas Instruments’ BeagleBone and the Raspberry Pi project, supported by Broadcom. Both of these platforms provide the capability of running a Linux distribution on an ARM processor with a development board that’s less than $50. Both afford access to the physical input and output pins of the CPU as well. This makes them really fertile ground for projects that bridge the gap between the two platforms you’ve already seen. In this chapter, you’ll get an overview of the current state of NFC on these platforms, and get a brief introduction to programming NFC apps for them in Node.js.
Just as you saw with Arduino, the state of NFC tools on embedded Linux is somewhat less fully developed than the PhoneGap-NFC plug-in, or even than the standard APIs for Android, BlackBerry, or Windows Phone. The available libraries are generally lower level, providing access to the information at the lower end of the NFC stack. But there is a lot of interest in NFC from embedded developers, so the tools are developing quickly.
Warning
This chapter is not for those who are intimidated by the command line. You’ll see lots of CLI installs, configurations, and build instructions. If you haven’t spent a lot of time with CLI-based compilers and package managers, you may find some unfamiliar terms. You’ve gotten a small taste of that through Cordova CLI, but in this chapter you’ll get a whole lot more. Although we’ve done our best to explain it all, you may need other reference material if you’re new to Linux programming tools.
Introduction to Embedded Linux Devices and Package Managers
Texas Instruments’ Beagle boards, BeagleBone, BeagleBone Black, and BeagleBoard MX, based on TI’s ARM AM335x, AM35x, and AM37x processors, are embedded Linux boards designed for hobbyist projects. They’re compact, inexpensive, and the hardware designs are all available openly on the Web. They also come with a customized version of the Ångström Linux distribution for embedded development, but can run Ubuntu, Android, and other distributions as well. For the examples that follow, we recommend the BeagleBone Black.
The Raspberry Pi Foundation’s boards, model A and model B, are based on an ARM processor by Broadcom. Unlike the BeagleBone, the designs for the Pi are not open to the general public, but installation and purchase information can be found on the foundation’s website. The Pi models run a custom version of the Debian Linux distribution called Raspbian. For the examples in this book, we used Adafruit’s version of Raspbian called Occidentalis. Like the BeagleBoard boards, the Pi can run other embedded Linux distributions. The model A shipped after the model B and is the stripped-down version: one USB port, no Ethernet, half the memory. For best results, you want a model B.
Other than the sites listed previously, you can find material for getting started with the Raspberry Pi or the BeagleBone Black at Adafruit’s tutorials site. The books Getting Started with Raspberry Pi by Matt Richardson and Shawn Wallace, and Getting Started with BeagleBone by Matt Richardson, are also good introductions.
Network, USB, and NFC
There are three important things you need for your workflow in this chapter:
- Terminal access to your board (you can do this via a serial terminal session or an SSH terminal session)
- Internet access for your board (you’ll need this to download packages, and for SSH)
- A USB port on your board for the NFC adapter
The hardware features of the various Pi and BeagleBone models will affect how you get these things. Here’s what you need to consider:
- Neither Raspberry Pi nor BeagleBone have built-in WiFi. You’ll need a USB-to-WiFi adapter if you can’t connect via wired Ethernet.
- Raspberry Pi model A, BeagleBone, and BeagleBone Black have only one USB port. That means no WiFi USB adapter while you use the USB NFC Adapter.
- Raspberry Pi model A has no wired Ethernet port. So you need WiFi if you’re going to connect it to the Internet. The model A is the only one of the boards mentioned that can’t be simultaneously on the Internet and using an NFC adapter.
- Raspberry Pi (both models) does not have a built-in USB-to-serial interface. It requires a 3.3V USB-to-serial adapter to connect serially to your computer. Both BeagleBone models have USB-to-serial built into the USB mini-B connector.
- Raspberry Pi’s default setup interface is via keyboard and screen. You’ll need a monitor, HDMI cable, and keyboard if you follow the defaults. However, you can set it up with a USB-to-serial adapter instead, if you have one. You can also do it from the command line, with a little more work. See Raspberry Pi Peculiarities for more details.
- Raspberry Pi is generally easier to set up software for for NFC, but more complex for hardware. In our testing, we found the Raspberry Pi and the BeagleBone Black to be roughly equivalent in terms of ease of use, performance, and price, especially when factoring in necessary externalities like cables and power supplies.
The various embedded Linux boards on the market offer different hardware features and processors and they use different Linux distributions. But there are a few features they share in common. All of them are networkable, of course, and they’ll all give you a command-line interface, though it’s not always the simplest thing to get to right out of the box. They all support standard hardware interfaces like USB and UART serial. Most importantly, they can all run software that’s written for Linux, as long as they have the necessary storage space, memory, and hardware components. There are also a handful of programming languages that most of them support as well. All of them will support C++ at least, which is why many of the packages you’ve used have a C++ core, even if you didn’t use it. In order to facilitate code development, all mainstream operating systems, even the basic Linux distributions you’ll use here, support package management systems as well. You won’t be writing your own C++ code in this chapter, but you will be installing and compiling a lot of it using a few different tools.
Software developers rely on libraries and tools developed by their colleagues and predecessors to do their work, and different software projects have different dependencies. A project that allows you to use a USB-based NFC reader as you’ll see here will depend on other software libraries that support USB communication, among others. Good developers assume nothing and list all their dependencies, of course, but the job of managing that is made easier by automated build and install tools called package management systems. You’ve already been using one of them in this book, the node package manager, or npm. Cordova isn’t really a package manager, it’s more of an automated project-building tool, but is moving toward having a package manager with Cordova CLI’s plug-in tools. Tools like APT, opkg, npm, and even the app stores consumers use every day, like Apple’s Mac App Store and the Google Play store for Android, are all package managers. The difference between more consumer-facing app stores and the ones developers use is that the latter generally install source code and compile it on your machine, while the former download and install pre-compiled binaries.
Package management systems for Linux, Unix, and other POSIX operating systems make the process of installing and compiling software libraries more or less the same regardless of what flavor of the operating system you’re using. The file structures and APIs for all such operating systems are similar enough that the same code prepared for Linux on the Raspberry Pi will work (more or less) the same on Mac OS X, for example. As a result, we’re going to give you examples in this chapter in generic command-line Linux terms, and assume that you can make them work on your embedded Linux board. We’ve tested them on the Raspberry Pi and the BeagleBone Black, and we’ll note any particularities for those two platforms as needed.
Note
You won’t see any instructions for Mac OS X or Windows in this chapter. Although it’s possible to build these tools for those platforms, the focus here is on the embedded world.
For the remainder of this chapter, you’ll need the following:
- BeagleBone, Raspberry Pi, or other embedded Linux board
- 1 amp or greater power supply for your board
- SLC3711 Contactless USB Smart Card Reader (we’ll refer to this as an NFC adapter from here on)
- A few Mifare Classic NFC tags (for this chapter, Mifare Classic are the most compatible with the Linux libraries you’re using, even though they won’t work on some Android devices; see Device-to-Tag Type Matching for more on which tags work with which devices)
- A text editor
Optional but useful:
- A USB WiFi adapter for your board (Adafruit’s Miniature WiFi (802.11b/g/n) Module works well)
- A USB A-to-A extender for your NFC adapter
- A USB to TTL Serial Cable - Debug/Console Cable (make sure you get one that operates at 3.3 volts, not 5 volts)
Warning
The NFC reader mentioned here and the optional WiFi adapter both consume more current than the boards can draw from your computer’s USB port. When you try to read tags while your board’s powered from your computer’s USB port, you’ll get a lot of misreads. You should power your board from a separate power supply that can supply at least one amp of current, preferably two amps.
Since the setup for each board is idiosyncratic and sometimes complex, we’ll skip it here. You should follow your board’s particular instructions for setup and connection to the Internet, and familiarize yourself with logging into the command line. The rest of this chapter will assume you can get to the command line of your board on your own, and that you can connect to the Internet through your board.
The USB Smart Card reader mentioned here is an NFC reader with a USB interface. It’s running the same NXP PN53x chip that’s in the shields you used in Chapter 7. The antenna on it is weak, so you may find that it has trouble reading tags unless positioned carefully. We found that a USB extender cable was helpful in working with this reader, so you could get the reader near the tags easier.
NFC on Embedded Linux: The Overview
Since there are no embedded Linux boards on the market at the moment with built-in NFC, you’ll need a separate NFC controller. You could use the PN532 shields, but they’re not designed to interface with the BeagleBone or the Pi, so a USB-based module is easier to use. For this chapter, we chose the Identive SLC3711 Contactless USB Smart Card Reader. It works with many of the libraries we examined because it’s got a PN532 NFC controller as its heart.
There are a handful of NFC libraries available, in varying states of completeness. The best one as of this writing is libnfc, available from NFC Tools. Libnfc is a low-level library for NFC. It supports the control protocols ISO14443A and -B (used by most of the tag types), ISO-18092 (the protocol used for peer-to-peer) and JIS-X-6319-4 (used by FeliCa smart cards).
Libnfc’s roadmap for the project is quite helpful in understanding how it’s developed, and where it’s headed. It can be found on the libnfc Roadmap page. The layered abstraction model is based on NFC’s abstraction model, and leaves a lot of room for the project to increase in compatibility with other readers and in higher level functionality.
There are a few useful subprojects based on libnfc, including libfreefare, which adds an API for reading from and writing to Mifare tags. Libfreefare is available on the NFC Tools site. There is also an implementation of LLCP for libnfc. Libfreefare only offers limited support for NFC Forum tag types. It’s fully compatible with Mifare Classic tags, but as of this writing, it doesn’t offer support for all four NFC forum tag types. Its architecture could support them, however, when an enterprising programmer submits a patch to add that support.
Libnfc is cross-platform and will run on Windows, OS X, and other POSIX systems, including the various Linux distributions. You’ll see how it works on the Raspberry Pi and BeagleBone, but it should work fine on other embedded Linux boards as well.
We’ve built a Node.js library that uses libnfc and libfreefare to read to and write from Mifare Classic tags. At this point, like libfreefare, it does not offer support for the NFC Forum tag types (though patches are welcome). You’ll see this later on, but first, you need to install libnfc and libfreefare, and learn a little bit more about them.
Housekeeping Details
Before you install any NFC-specific tools, there are some housekeeping tasks you should take care of first. These are necessary tasks that you might overlook if you do them midstream, but if you do them at the start, things will go much smoother.
Get Comfortable with Your Editing Workflow
You’re going to be writing a lot of text that needs to live on your board, so you should use an editor that you’re comfortable with. If you like working in nano or vi, both of which are Linux-based editors available on the Pi and the BeagleBone, you’re all set. If you prefer a graphic editor on your personal computer though, you’ll need a way to move files from your computer to your embedded board. Any SFTP/FTP client will do the job, or you can use scp from the command line. If you have a workflow for writing files on a remote web server, that same workflow should work for this too.
Know Your Package Manager
There are two major differences you’ll encounter between the Raspberry Pi, which is running a variant of the Debian Linux distribution, and the BeagleBone Black, which is running a variant of Ångström. The first difference is that the BeagleBone runs as the administrator, known as root, by default. The Pi’s default user is called pi. In order to do many administrative tasks, you need to have administrator privileges. By running as root, you get these automatically. If you’re not running as root, you can get administrative privileges using the sudo command. The first time in a session that you use sudo, you will have to enter the root password, but after that, everything will be done as if you are an administrator. Whenever you type sudo before a command, you’re asking to execute that command as an administrator (or super-user, hence sudo: “su do”). Wherever you see sudo in the commands that follow, assume that this command needs to be run as an administrator.
Tip
Change your default password, whether you’re running as root on the BeagleBone Black, or whether you’re running as pi on the Raspberry Pi. Keeping your password unique and secure is just good operating system hygiene.
The second difference is that they use different package managers. The Pi uses APT, the advanced package tool. The BeagleBone uses the opkg package manager. The two are similar in many ways, but have different commands for some things. The most common commands you’ll use are listed in Table 9-1 for comparison.
APT function | opkg function | Description |
|
| Update list of available packages |
|
| Upgrade all installed packages to the latest version |
|
| Full text search of available packages |
|
| Install a package |
|
| Remove a package |
|
| List installed packages |
The first step before using any package manager is to make sure it has the most updated set of available packages. To do this for Raspberry Pi, run the following command:
$ sudo apt-get updateFor BeagleBone Black, run the following:
$ opkg updateSet the Date and Time
Make sure your board has the correct date and time. Without the date set correctly, some installers will not function correctly. The Raspberry Pi will set its clock automatically if it has a network connection, but a BeagleBone won’t. To check the time that the board thinks it is, type date. To set it, make sure you’re connected to a network, and type:
$ ntpdate -b -s -u pool.ntp.orgThis is a one-time update, which will sync your board’s clock with the network time servers at the Network Time Protocol. The Raspberry Pi will periodically sync to an NTP server by default. The BeagleBone won’t, but for good instructions on how to do this on the BeagleBone, see Derek Molloy’s page on setting the BeagleBone clock. Pi users who want to use ntpdate will have to sudo apt-get install ntpdate first.
Make a Downloads Directory
Next, make a directory in your home folder to store your downloads:
$cd~$mkdir downloads$cddownloads
You’ll do the rest of this installation in this directory or its subdirectories.
There are a few tools for compiling and installing that are used in most of the libraries you’ll install, so it’s best to make sure they are all there. When you install using apt-get (on Pi) or opkg (on BeagleBone), the package manager will inform you if you’ve already got the latest package, so there’s no harm in trying to install these even if they are there.
For Raspberry Pi, use the following:
$ sudo apt-get install autoconf automake libtool libusb-1.0-0-devAnd for BeagleBone Black, use this:
$ opkg install autoconf automake libtool libusb-1.0-devBeagleBone Peculiarities
You might have trouble with HTTPS requests from Git on the BeagleBone. To avoid this, make sure your board has the proper SSL certificates installed, and that Git is configured as follows.
You need to set up your Git config file to look for SSL certificates, like so:
$ opkg install ca-certificatesIf you get a response telling you that this package is already installed, that’s OK. Next you need to tell Git where to find SSL certificates:
$ git config --global http.sslCAinfo /etc/ssl/certs/ca-certificates.crt
Raspberry Pi Peculiarities
The Raspberry Pi setup installations require you to have an HDMI cable and a keyboard to set the board up for the first time, but you can avoid this in a couple ways. One way is connect to the serial port of your board to open a terminal connection. You can connect to the serial port with a 3.3V USB-to-serial cable like the USB to TTL Serial Cable - Debug/Console Cable available from Adafruit. The other way to connect is to connect to your board through an SSH connection. If you don’t want to buy a cable, you can connect your Pi to your local network and find it in the following way. On the command line, type the following:
$fori in 192.168.1.{1..254};doping -c 1 -W 3$i& > /dev/null;done$netstat -nr -f inet | grep -i"b8:27"
If your router doesn’t have the address 192.168.1.1, change the address here to the first three octets of your router.
The first command will query all the devices on your local network. The second will give you a list of all the devices that replied and that have MAC addresses that begin with the prefix B8:27. The Pi boards should all have MAC addresses starting with this prefix. If there’s a device on your network with that prefix, chances are it’s your Pi. Copy the IP address associated with it and type:
$ssh pi@ip-address
When you get a login prompt, login with the username pi and the default password raspberry.
Installing Node.js on the Raspberry Pi
The BeagleBone Black comes with Node.js pre-installed, but the Pi doesn’t. You’ll need to manually install it using the following steps. Make sure your Pi has Internet access first, then:
$cd~/downloads$curl -O http://nodejs.org/dist/v0.10.12/node-v0.10.12-linux-arm-pi.tar.gz
$cd/usr/local$sudo tar xzf ~/downloads/node-v0.10.12-linux-arm-pi.tar.gz
$cdbin$sudo ln -s ../node-v0.10.12-linux-arm-pi/bin/node
$sudo ln -s ../node-v0.10.12-linux-arm-pi/bin/npm
-
Download node.
-
Install it in /usr/local.
-
Make symlinks (aliases) to node and npm so you can call them from the command line easily.
Once you have Node installed for Pi, you’re ready to go with the rest of the chapter.
Installing the Tools for NFC
To install the libraries for the projects in this chapter, you’ll need to make sure your board has Internet access. You’ll also need a few software libraries:
- libusb compatibility library
- libnfc
- libfreefare
- ndef-mifare-classic-js
- ndef-js
These libraries all depend on each other, so the order in which you install them is important, as you’ll see. Once they’re all installed, you’ll be able to read from and write to your NFC reader. The installation details are similar on the BeagleBone and the Raspberry Pi, and the differences are noted.
Since you know that the NFC adapter you’re using connects via USB, you might not be surprised to learn that libnfc and libfreefare depend on a USB library, libusb. Installing these libraries starts with libusb.
Installing the Libusb Compatibility Library
Download libusb-compat-0.1.5.tar.bz2 from libusb, uncompress it, and install it like so:
$cd~/downloads$wget http://sourceforge.net/projects/libusb/files/libusb-compat-0.1/libusb-compat-0.1.5/libusb-compat-0.1.5.tar.bz2$tar xjf libusb-compat-0.1.5.tar.bz2$cdlibusb-compat-0.1.5$./configure$make$make install
-
Raspberry Pi users need to use
sudo make installhere.
Installing libnfc
Next, you’re going to download and install libnfc:
$cd~/downloads$git clone https://code.google.com/p/libnfc/$cdlibnfc$autoreconf -vis$exportPKG_CONFIG_PATH=/usr/local/lib/pkgconfig$./configure$make$make install
-
BeagleBone users will need to do this, but not Pi users; libfreefare’s configure tool needs to know where libnfc was installed.
-
Raspberry Pi users need to use
sudo make installhere.
Raspberry Pi
libnfc is installed to /usr/local/lib; running ldconfig will update configuration so the linker can find the libraries when required:
$ sudo ldconfigThere’s a little post-install configuration you need to do for libnfc. Create a new file:
$ sudo nano /etc/modprobe.d/blacklist-libnfc.confAnd add to the file:
    blacklist pn533
    blacklist nfc
Press Ctrl-X then press Y to save and exit nano. Then copy the PN53x rules file from the libnfc distribution as follows:
$ sudo cp contrib/udev/42-pn53x.rules /lib/udev/rules.d/Testing the Installation on Raspberry Pi or BeagleBone
At this point, you’ve got libnfc working on your board. Plug in your NFC reader and test that it shows up and is available with the nfc-list command, which will produce the following output:
$ nfc-list

nfc-list uses libnfc libnfc-1.7.0-rc7-40-gbb5b712
NFC device: SCM Micro / SCL3711-NFC&RW opened
If you get a result like this, your reader is working, and you’re ready to move on.
Installing libfreefare
Now that you have libnfc installed, download and install libfreefare:
$cd~/downloads$git clone https://code.google.com/p/libfreefare/$cdlibfreefare$autoreconf -vis$./configure$make$make install$sudo ldconfig
-
Raspberry Pi users need to use
sudo make installhere.-
BeagleBone Black users can skip this step.
Now that you’ve installed all the necessary packages, the following examples should run identically on the Raspberry Pi or the BeagleBone unless specifically stated otherwise.
If you’re simply interested in developing applications that read and write NDEF in JavaScript or another scripting language, you probably don’t want to know too many of the details about libnfc and libfreefare. They provide a C/C++ API to the NFC reader, and that’s it. The next section covers some of the highlights of both. Following that is an introduction to a Node.js library for reading and writing NDEF from Mifare Classic tags, so if you’re only interested in the high-level details, skip down to NDEF Reading and Writing in Node.js.
Libnfc and Libfreefare Command Line Tools
Libnfc provides some command line tools which you can find in the utils/ directory. These give you the tools to do a lot of low-level NFC tasks:
|
|
|
|
|
|
|
|
|
|
|
|
|
|
The most interesting tool of the lot is nfc-mfclassic, which will read a tag and dump the contents to a file. It gives you the raw byte stream from the tag, not differentiating between what’s content and what’s metadata at all. Plug in NFC reader and place it close to a Mifare Classic tag. The command works like this, producing the following output:
$nfc-mfclassic r b dump.mfd NFC reader: SCM Micro / SCL3711-NFC&RW opened Found MIFARE Classic card: ISO/IEC 14443A(106 kbps)target: ATQA(SENS_RES): 00 04 UID(NFCID1): 2d 10 18 07 SAK(SEL_RES): 08 Guessing size: seems to be a 1024-byte card Reading out 64 blocks |.......................................| Done, 64 of 64 blocks read. Writing data to file: dump.mfd ...Done.
The arguments for nfc-classic are:
- r
- Read a protected Mifare Classic tag
- b
- Use key b, the Mifare encryption scheme that NDEF uses
- dump.mfd
- The output file in which to dump the contents
Tip
The antenna on the SLC3711 reader responds best if you hold the tag about a centimeter away from the tag. You may find it easier to work with the reader if you have a USB A-to-female-A extender cable.
This and all the libnfc utilities are relatively low-level tools. Libfreefare provides some slightly higher level tools. It can read, write, and format Mifare Classic, Ultralight, and DESFire tags. It can read and write NDEF messages to these tags as well. The examples for libfreefare, written in C, can be found in the examples/ subdirectory of the libfreefare directory:
|
|
|
|
|
|
|
|
|
|
|
|
As an example, here’s the mifare-classic-format command in action:
$mifare-classic-format Found Mifare Classic 1k with UID 6b57ee65. Format[yN]yFormatting 16 sectors[...4...8...12...16]done.
One of the handy things you can do with libfreefare is to copy a tag. To do this, you read a tag, dump the results to a file on your board, and then write the file to another tag. Here’s how to write it to a file called ndef.bin:
$ mifare-classic-read-ndef -o ndef.binWhen the tag is written successfully, you can look at it with the xxd command. You may recognize the NDEF message from a previous chapter:
$ xxd ndef.bin

0000000: d101 3055 036d 2e66 6f75 7273 7175 6172  ..0U.m.foursquar
0000010: 652e 636f 6d2f 7665 6e75 652f 3461 3931  e.com/venue/4a91
0000020: 3735 3633 6639 3634 6135 3230 3430 3161  7563f964a520401a
0000030: 3230 6533                                20e3
Once you’ve got a file, you can write the message to another tag like so:
$ mifare-classic-write-ndef -i ndef.binLibfreefare provides the basis for the highest level tool in this chapter, the mifare-classic-js and ndef-js packages for Node.js.
NDEF Reading and Writing in Node.js
In order to give you a high-level tool to read and write NDEF messages, we’ve built two packages for Node.js to do this, ndef and mifare-classic. Using these packages, you can write node web apps like the one you wrote in Chapter 7. If you’re using a BeagleBone, you can also use these packages in combination with BoneScript, the BeagleBone’s Arduino-like JavaScript framework for controlling the physical I/O of the BeagleBone.
You can find the full sources for these two packages on GitHub, where Don has repositories for NDEF messages and Mifare classic tags. They’re both available through the node package manager npm as well, which is how you’ll load them for the following examples.
The NDEF package enables you to read and write NDEF messages in Node. The main functions in this package are encodeMessage(), for encoding an NDEF message into a byte stream to write to a tag, and decodeMessage(), which converts an incoming byte stream into an array of NDEF records. It contains most of the functions you’re familiar with from the NDEF object in the PhoneGap-NFC plug-in as well, as you’ll see in the examples that follow.
The mifare-classic package gives you a JavaScript interface to libfreefare. As such, it will only work with Mifare Classic tags, since it relies on libfreefare to do the reading. It has three functions as of this writing, read() and write() for reading and writing tags, and format(), which formats a tag as an NDEF tag.
There are a few basic examples included with both packages, in the examples/ directory. The steps to install and run these examples should be the same on the BeagleBone, Raspberry Pi, and other Linux-based boards, as long as you’ve installed libnfc and libfreefare successfully. You’ll use npm to install them after you make your project files.
Reading, writing, and formatting an NDEF-formatted tag is fairly simple using these two packages. To start with, make a new directory for your app and create a package.json file inside it:
$cd~$mkdir NodeNdefBasics$cdNodeNdefBasics$nano package.json
When nano’s open and ready for editing, add this to your file:
{"name":"NodeNdefBasics","author":"Your Name","version": "0.0.1","description": "Read, write, or format a tag","main": "read.js","keywords": ["NDEF","NFC"],"dependencies" : {"mifare-classic": "0.0.1","ndef" : ">=0.0.4"},"engines": {"node": ">=0.8"}}
Press Ctrl-X and then press Y to save this file. Then open a new file, read.js:
varndef=require('ndef'),// require ndef packagemifare=require('mifare-classic');// require mifare-classic packagemifare.read(function(error,buffer){// read tagif(error){// if there's an error resultconsole.log("Read failed ");// let user know about the errorconsole.log(error);}else{// you got an NDEF message// decode the message into a JSON object:varmessage=ndef.decodeMessage(buffer.toJSON());// print the message's records:console.log("Found NDEF message with "+message.length+// add "record" if there's only one, "records" if there's more:(message.length===1?" record":" records"));// print the message:console.log(ndef.stringify(message));}});
As you can see, the mifare.read() function from the mifare-classic package has a success callback as its parameter. When it’s read a tag successfully, you can use the ndef.decodeMessage() function to convert the buffer to an array of NDEF records.
To install the ndef and mifare-classic packages, make sure you’re connected to the Internet and type:
$ npm installOnce the packages have installed successfully, place your reader about a centimeter from a tag that you’ve already written NDEF messages to, then type:
$ node read.jsAfter a second or so, you should get a reply like this:
Found Mifare Classic 1k with UID bb60ee65.
NFC Forum application contains a "NDEF Message TLV".
Found NDEF message with 2 records
URI Record
http://nfc-tools.org

Text Record
Hello from nodejs
Formatting using the mifare-classic package is very similar to formatting with libfreefare, as you might expect. The package is just a light wrapper around that library. Create a new file, format.js:
varmifare=require('mifare-classic');// require mifare-classicmifare.format(function(error){// format tagif(error){// if there's an error,console.log("Format failed ");// report the errorconsole.log(error);}else{// if the format works out OKconsole.log("Tag formatted OK");// report that}});
Once you’ve installed with npm, place your reader near a tag you want to format, and run. You should get the following:
Found Mifare Classic 1k with UID 52d55be4. Formatting 16 sectors[...4...8...12...16]done. Tag formatted OK
It will take a few seconds to format, and if you move the reader before the formatting’s done, you’ll get an error, so hold still. Once it’s done, you’ve got a tag that’s ready for writing, so create a new file, write.js:
varndef=require('ndef'),// require ndef packagemifare=require('mifare-classic'),// require this packagemessage,// an NDEF messagebytes;// the bytes stream to writemessage=[ndef.uriRecord("http://nfc-tools.org"),// make a URI recordndef.textRecord("Hello from nodejs"),// make a text recordndef.emptyRecord()// make an empty record];bytes=ndef.encodeMessage(message);// encode record as a byte streammifare.write(bytes,function(error){// write functionif(error){// if there's an error,console.log("Write failed ");// report the errorconsole.log(error);}else{console.log("Tag written successfully");// report that tag was written}});
The full source code for these last three examples can be found on GitHub.
The mifare.write() function takes a byte stream and a callback function as parameters, like read(). If it succeeds, the callback doesn’t return anything. If there is an error, the callback returns that. When you install and run this with a tag in range, you should get the following if the write is successful:
NDEF file is 45 bytes long.
Found Mifare Classic 1k with UID 52d55be4.
Tag written successfully
If the tag isn’t written successfully, you’ll get something like this:
NDEF file is 45 bytes long.
Found Mifare Classic 1k with UID 52d55be4.
Write failed
mifare-classic-write-ndef: No known authentication key for sector 0x0e

mifare-classic-write-ndef: No known authentication key for sector 0x0a

mad_write: Mifare Authentication Failed
As with reading and formatting, the key to success is holding the tag near the reader and keeping it still while the write is in progress. If you read this with the reader example, you’ll get this output:
Found Mifare Classic 1k with UID 52d55be4.
NFC Forum application contains a "NDEF Message TLV".
Found NDEF message with 3 records
URI Record
http://nfc-tools.org

Text Record
Hello from nodejs

Empty Record
Now that you understand the main functions of these two node packages, it’s time for a few examples of what you can do with them.
Web Interface for Tag Writer
Node.js works easily as a web server, as you saw in Chapter 7, so it makes sense to create a web interface for a tag writer with the packages you’ve just learned (this is a variation on A Browser Interface for the Arduino NDEF Writer Device). In fact, you can use the same index.html page from that project.
Start off by making the directory and the package.json file as usual:
$cd~$mkdir NodeNdefWriterWeb$cdNodeNdefWriterWeb$nano package.json
The main difference between this package file and the one for the writer script is the addition of express.js as a dependency:
{"name":"NodeNdefWriterWeb","author":"username","version":"0.0.2","description":"Write a tag from a browser","main":"index.js","keywords":["NDEF","NFC"],"dependencies":{"express":">=3.0","mifare-classic":"0.0.1","ndef":">=0.0.4"},"engines":{"node":">=0.8"}}
The index.js file is very similar to the index.js from A Browser Interface for the Arduino NDEF Writer Device, but with a few changes, noted at the end of this script:
/*NodeNdefWriterWeb.js*/varndef=require('ndef'),// require ndef packagemifare=require('mifare-classic'),// require this packageexpress=require('express'),// make an instance of expressapp=express(),// start Express frameworkserver=require('http').createServer(app),// start an HTTP serverrecord={},// NDEF record to senddeviceMessage="";// messages from writer deviceapp.use(express.bodyParser());// use bodyParser middleware for expressserver.listen(8080);// listen for incoming requests on serverconsole.log("Listening for new clients on port 8080");// respond to web GET requests with the index.html page:app.get('/*',function(request,response){response.sendfile(__dirname+'/index.html');});// take anything that begins with /submit:app.post('/submit',function(request,response){vardays=request.body.days,// get the number of days from the bodytoday=newDate(request.body.checkin),// get the time from the body// calculate the checkout timeStamp:departure=newDate(today.valueOf()+(days*86400000)),nfcResponse,// the response from the NFC readermessage,// the NFC message to writebytes;// byte stream to write it withrecord.name=request.body.name;// get the name from the bodyrecord.room=request.body.room;// get the room number from the body// convert to unix time in seconds:record.checkin=Math.round(today.valueOf()/1000);record.checkout=Math.round(departure.valueOf()/1000);message=[ndef.textRecord(JSON.stringify(record)),// make a text record];bytes=ndef.encodeMessage(message);// encode record as a byte streammifare.write(bytes,function(error){// write functionif(error){// if there's an error,nfcResponse="Write failed";// report itnfcResponse+=error;}else{nfcResponse="Tag written successfully"+JSON.stringify(record);}console.log(nfcResponse);// report that the tag was written// write the HTML head back to the browser:response.writeHead(200,{'Content-Type':'text/html'});// send the data:response.write("Wrote the following to the card:<br>");response.write(nfcResponse+"<p>");// send the link back to the index and close the link:response.end("<a href="/">Return to form</a>");});// end of mifare.write()});// end of app.post()
-
You’re adding mifare-classic and ndef instead of serialport.
-
You’re creating a text record using the helper from the ndef package and encoding it as a byte stream.
-
You’re calling
mifare.write()to write the message to the tag, and waiting for the response.
The full source code can be found on GitHub.
The user interaction for this is identical to the browser interface project we mentioned before. You enter the data in the form, press the submit button while holding the guest’s card over the reader, and the NFC reader writes to the tag. You should get the NDEF record as a JSON string in the browser if the write succeeds, and a failure message if it doesn’t.
Tags Controlling Physical Output
One of the more interesting things you can do with an embedded Linux board like the BeagleBone or the Raspberry Pi is to use its general purpose I/O (GPIO) pins to sense and control the physical world. These are the physical input and output pins of the board. The hotel door lock in Chapter 7 is one possible application of this. Rather than reading the guest’s door key card on the Arduino and opening the lock, you could read it on a BeagleBone or Raspberry Pi.
The following example shows the bare minimum to connect the mifare-classic and ndef-js packages with the GPIO of your board. It turns on LEDs connected to the board’s GPIO to indicate how many records are in the NDEF message read from a tag.
On the BeagleBone, you’ll use the BoneScript package, which gives you control of the GPIO pins using an API that’s similar in style to the Arduino API. On the Raspberry Pi, you’ll use the onoff npm package.
BeagleBone Version
On the BeagleBone, the
general purpose IO pins (GPIO) can be controlled using BoneScript, a node package developed by Jason Kridner, the software architect of the BeagleBoard products. BoneScript has many commands that are similar to the Arduino commands for GPIO control, like pinMode(), digitalRead(), digitalWrite(), and so forth. It’s built into the BeagleBone distribution of Ångström. In fact, if you open up your web browser and go to “http://beaglebone.local:3000” while your board is on the same local network as your computer, you’ll get the built-in Cloud9 IDE for the BeagleBone. From it, you can run, stop, and debug any BoneScript projects you write.
The Cloud9 IDE stores all your projects by default in /var/lib/cloud9/. You won’t need to worry about a package.json file when you write in the Cloud9 IDE. That’s both convenient and inconvenient, as it means you can’t easily include modules that aren’t native to the IDE. You can, however, use BoneScript in your own packages, so for this project you’ll skip the Cloud9 IDE and work the same way you have been all along. Because BoneScript is installed in the distribution, you won’t need to put it in your package.json. Node will automatically use the local version.
This example is a variation on the tag reader you saw earlier. To get started, set up the directory as usual:
$cd~$mkdir NodeTagToLed$cdNodeTagToLed$nano package.json
Here’s the package.json file:
{"name":"NodeTagToLed","author":"username","version":"0.0.1","description":"Read a tag, light LEDs","main":"index.js","keywords":["NDEF","NFC","Bonescript"],"dependencies":{"mifare-classic":"0.0.1","ndef":">=0.0.4"// note: Bonescript is built into the BB distribution.// if you include it in your package.json, it will cause errors},"engines":{"node":">=0.8"}}
As you can see, not a lot changed from the read tag example. Even the keyword mention of BoneScript is optional. The index.js file starts just like the one from that project too, but you’re going to add four new pieces of code:
varndef=require('ndef'),// require ndef packagemifare=require('mifare-classic'),// require this packageio=require('bonescript');// bonescript is built into the BBio.pinMode('USR0','out');// set LED I/O pins as outputsio.pinMode('USR1','out');io.pinMode('USR2','out');io.pinMode('USR3','out');setInterval(readTags,2000);// read every 2 secondsfunctionreadTags(){mifare.read(function(error,buffer){// read tagif(error){// if there's an error resultconsole.log("Read failed ");// let user know about the errorconsole.log(error);}else{// you got an NDEF message// decode the message into a JSON object:varmessage=ndef.decodeMessage(buffer.toJSON());// print the message's records:console.log("Found NDEF message with "+message.length+// "record" if there's only one, "records" if there's more:(message.length===1?" record":" records"));// print the message:console.log(ndef.stringify(message));// loop over the LEDs and turn on one for each record:
for(varpinNum=0;pinNum<4;pinNum++){varpin='USR'+pinNum;// set pin name, USR0 - USR3if(pinNum<message.length){// USR0=1 record, USR1=2 records...io.digitalWrite(pin,1);// turn on pin}else{io.digitalWrite(pin,0);// turn off pin}}}});}
-
This is where you include BoneScript in your file.
-
The labels USR0 through USR3 refer to the four built-in LEDs on the BeagleBone Black. For more on the naming of the GPIO pins, open a browser and go to “http://beaglebone.local/Support/BoneScript/”. The reference material is on the board itself.
-
In order to keep the script running infinitely, you’re setting an interval to read for tags every two seconds. Then you’re wrapping
mifare.read()in a function calledreadTags()that gets called by the interval.-
This is where you loop over the four LEDs and turn on one for each record in the NDEF message you just read. First you concatenate the pin name (USR0 through USR3), and then you turn on or off the pin depending on the record count.
The full source code can be found on GitHub.
When you have this project installed on your board using npm, run it as usual. It should run infintely, so you can read multiple tags. When you read a tag, it will count the number of records and use that to turn on the appropriate number of LEDs. Any of the tags you’ve already written will do the job.
Raspberry Pi Version
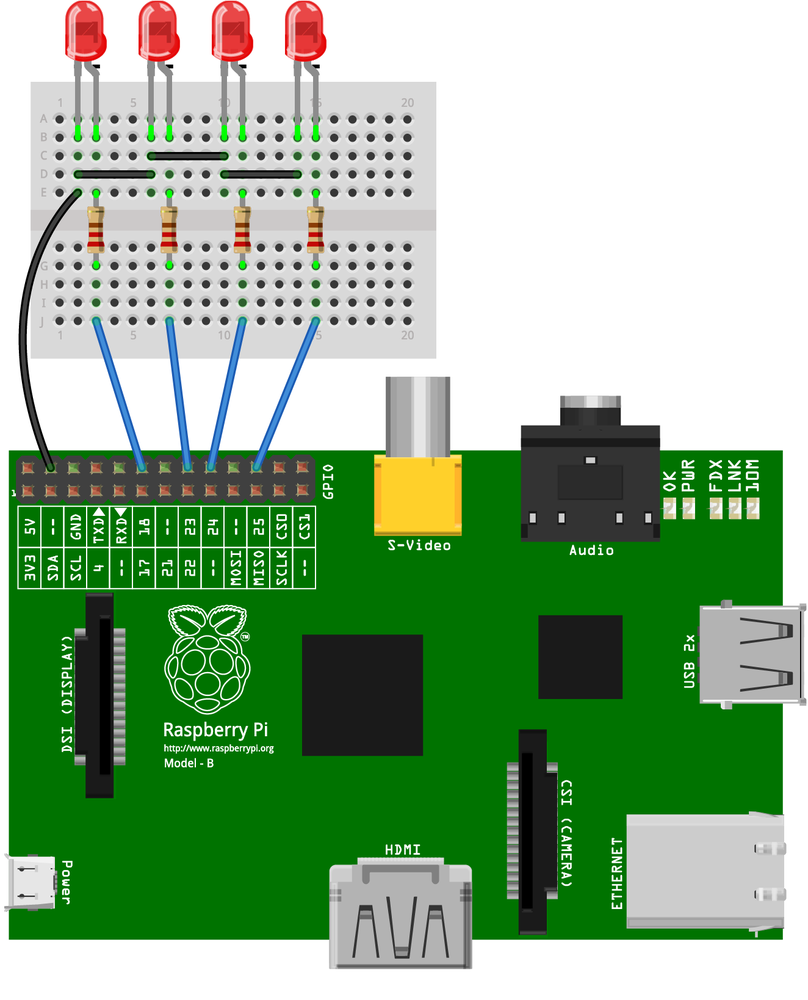
For this version, you’ll need:
- 4 LEDs
- 4 220Ω resistors
- 1 small solderless breadboard
- 4 female-to-male jumpers
- 4 header pins
Although BoneScript is not ported to the Pi as of this writing, there are a few alternative node libraries for controlling the GPIO. None of them are as fully featured as BoneScript, but they do allow you to turn on and off the GPIO pins. Here’s a variation on the BeagleBone example, but for the Pi, using the onoff npm package.
Set up the directory as you did for the BeagleBone Black. The package.json is the same except for one addition in the dependencies:
"dependencies":{"mifare-classic":"0.0.1","ndef":">=0.0.4""onoff":">=0.1.6"},
The onoff package works by writing to virtual files in the system directories that control the GPIO pins. For more details on it, see NPM’s onoff page. Since BoneScript does basically the same thing on the BeagleBone, the two libraries are similar, and the code for this example is similar.
The GPIO pins of the Pi are labeled as shown in Figure 9-1.
In order to make onoff work on the Pi, you’ll need to enable the pins as an administrator. To do this, here’s a short script that will do it:
varGpio=require('onoff').Gpio,led=[];led[0]=newGpio(18,'out'),// set LED I/O pins as outputsled[1]=newGpio(23,'out'),led[2]=newGpio(24,'out'),led[4]=newGpio(25,'out');
Save this as suexport.js, then install the whole project using npm install. Then run the script like so:
$ sudo node suexport.jsYou won’t see any output, but the script will enable the following script to run as a regular user.
Here’s the index.js for the Raspberry Pi version, with changes from the BoneScript version noted:
varndef=require('ndef'),// require ndef packagemifare=require('mifare-classic'),// require this packageGpio=require('onoff').Gpio,// require onoff packageled=[];// array of LEDsled[0]=newGpio(18,'out'),// set LED I/O pins as outputsled[1]=newGpio(23,'out'),led[2]=newGpio(24,'out'),led[3]=newGpio(25,'out'),setInterval(readTags,2000);// read every 2 secondsfunctionreadTags(){mifare.read(function(error,buffer){// read tagif(error){// if there's an error resultconsole.log("Read failed ");// let user know about the errorconsole.log(error);}else{// you got an NDEF message// decode the message into a JSON object:varmessage=ndef.decodeMessage(buffer.toJSON());// print the message's records:console.log("Found NDEF message with "+message.length+// "record" if there's only one, "records" if there's more:(message.length===1?" record":" records"));// print the message:console.log(ndef.stringify(message));// loop over the LEDs and turn on one for each record:for(varpinNum=0;pinNum<4;pinNum++){console.log(pinNum);if(pinNum<message.length){// LED0=1 record, LED1=2 records...led[pinNum].writeSync(1);// turn on pin}else{led[pinNum].writeSync(0);// turn off pin}}}});}
-
Require onoff instead of bonescript.
-
Use an array for the four LED pins. Make a GPIO object for each. Pin numbers come from the Pi GPIO header.
-
Use
Gpio.writeSync()instead ofdigitalWrite().
When you install and run this script, it will run identically to the BeagleBone version: one LED will light for every record you read in an NDEF message on a tag.
Although this example is relatively simple, it hints at the possibilities afforded by these embedded boards for physical interaction from NFC. For example, the hotel door lock in Chapter 7 could easily be duplicated for the Raspberry Pi or BeagleBone. The lighting control from Chapter 6, and even potentially the music playback, could be done from either of these boards, with some more work. For more on control of the GPIO for either of these boards, see Matt Richardson’s books mentioned previously, or Adafruit’s excellent tutorials on both boards.
NFC on embedded Linux is still rather nascent in its development, as you can see from these examples. Libnfc offers great potential as a basis for further development, however, and we hope to see further work on it and its spinoff projects. In particular, more development on broadening the range of compatible tag types, and on the peer-to-peer exchange libraries like libllcp will advance the technology considerably on this platform. The potential for NFC-driven physical applications using embedded boards is broad, and the platforms shown here provide a robust, inexpensive, and straightforward way to develop such applications.
Conclusion
You’ve seen NFC in action on three different platforms: Android, using PhoneGap; Arduino, using the NDEF library; and embedded Linux using libnfc. You’ve gotten to know the structure and affordances of NDEF, learned about the various tags that are compatible with NFC, and used peer-to-peer exchanges with NDEF. As you can see, the technology offers some interesting improvements on RFID, most notably a data format that’s independent of the tag technology and the ability for device-to-device communication without tags as well.
There is room for improvement in the various NFC APIs currently available. If you’re a low-level developer, we encourage you to get involved by helping to expand the range of tag types available to higher-level libraries, and to develop NDEF-level APIs for platforms where support for NDEF does not yet exist. If you’re more of a high-level interface designer, we encourage you to use NFC in a wide variety of applications as inspiration for others on the technology’s possibilities.