
CHAPTER 6
Building Domains and Services
KING ARTHUR. The Lady of the Lake, her arm clad in the purest shimmering samite held aloft Excalibur from the bosom of the water, signifying by divine providence that I, Arthur, was to carry Excalibur. THAT is why I am your king.
DENNIS, interrupting. Listen, strange women lyin' in ponds distributin' swords is no basis for a system of government. Supreme executive power derives from a mandate from the masses, not from some farcical aquatic ceremony.
Just as King Arthur and his knights embarked on a quest to find the Holy Grail in Monty Python and the Holy Grail, the next step in our discovery of Grails is to search for its very heart and soul . . . or in Java terms, its domain. Those of you familiar with Ruby on Rails and other web frameworks know the domain as a model. These synonymous terms are most often used in conjunction with the objects that are persisted against the database. Although the terms are interchangeable, for the purpose of this book, we will follow Grails' (and Java's) lead and refer to the domain.
You received your first taste of the domain in Chapter 4 when you learned how to scaffold the application. In Chapter 5, we broke out a few of those controllers to show actual calls against the domain. However, we didn't dive too much into the functionality of the domain. Well, here is where we take it up a notch. We'll show you the full power of Grails database persistence and explain all the options available to you. In addition, we'll discuss the idea of services—something that should be familiar to any enterprise developer. Unlike controllers, services don't contain any specific web knowledge like sessions and request parameters do.
GORM
We've shown you how to interact with the database, but we've left the process a bit nebulous until now. In this chapter, we'll go over the specifics behind how GORM works. Most frameworks, especially those straight out of the box, have their own mechanism for persisting to the database. Ruby on Rails uses ActiveRecord as the persistence mechanism. Java EE frameworks use the JPA (which, if you're on JBoss Application Server, is simply Hibernate underneath the covers).WebSphere uses iBATIS.
Grails uses GORM. However, GORM is not its own creation; under the covers, it uses Hibernate for its persistence implementation. GORM simply wraps Hibernate in Groovy layers. This is a blessing, because Hibernate gives GORM all of the necessary plumbing code, allowing GORM to focus on the usability instead. In fact, if you're familiar with ActiveRecord and Hibernate, then you should be about 95% good to go when it comes to writing domain objects in Grails. GORM truly is an amalgamation of the ActiveRecord and Hibernate, giving you the best of both worlds. As we move along with examples on how to use GORM, the similarities and differences will become more apparent.
Collab-Todo's Domain
Before going into depth about how to create domains in Groovy, let's start by explaining what you'll be creating. In Chapter 4, we gave you the base of the domain structure with the Todo, category, and User classes. However, this application wouldn't be that interesting if we kept just those three domain objects. We decided to wait to show you the entire domain for two major reasons:
- We didn't want to overwhelm you with the domain when you were just starting to learn the system.
- Without more background, you might not be entirely familiar with the way the domain is created.
However, now we're at that stage where we can introduce you to the entire domain. We'll start off by going over what the Java class domain looks like. Then we'll explain the options you have for creating and configuring the domain components. Finally, we'll show you the database you'll create with the domain configurations.
Figure 6-1 shows a class-level diagram filled with connectors and columns. This should give you an overview of the application you'll be building and explain what the individual parts mean. We suggest you also look at the source code to get an idea of how you'll transition from the diagram in Figure 6-1 to the actual code you'll be using throughout the book. (You can find the code samples for this chapter in the Source Code/Download area of the Apress web site [www.apress.com].) Please note that this diagram contains two domains that we'll use in the next chapter as part of the security apparatus.
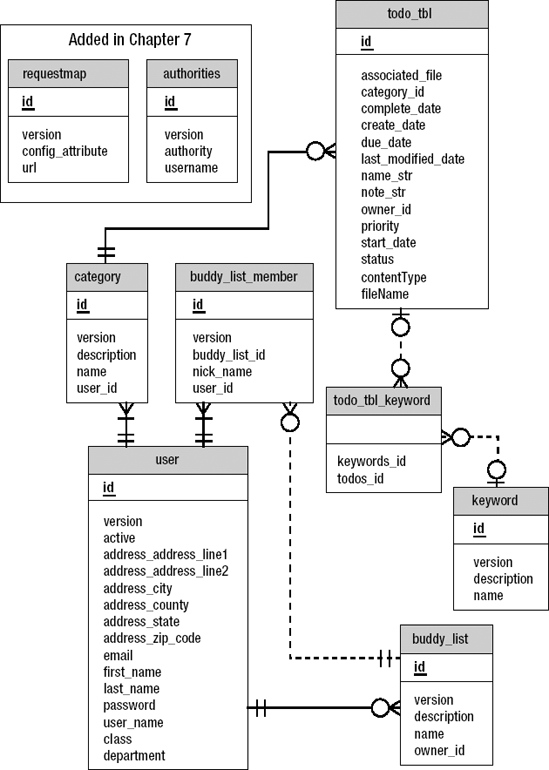
Figure 6-1. Class-level diagram of the domain
Note We're using the domain model to map the database; we're not using the database to map the domain model. This is becoming a fairly standard practice, although you're more than welcome to do the reverse.
A few of these tables should seem familiar to you. Table 6-1 provides a list of each domain object and a brief description of its purpose.
Table 6-1. Domain Classes Used for the Collab-Todo Application
| Domain Name | Description |
Address |
An inner domain object that we have stored inside the User.groovy file, because you'll use it as an embedded class anyway. |
Admin |
Extends the User class. You'll use it for administrators, where you'll track what department they are with. You will not use this class in permissioning, though. |
Authorities |
Used as part of the Acegi security plug-in that we'll get into in Chapter 7. |
BuddyList |
Defines the buddy lists for each of the users. |
BuddyListMember |
Each person the users want in their buddy lists must be referenced in this class. The other purpose of this class is to assign nicknames. |
Category |
Creates specific names to categorize to-dos by. |
Keyword |
Creates keywords to differentiate the individual to-dos. |
Requestmap |
Used as part of the Acegi plug-in discussed in Chapter 7. |
Todo |
The holder for all the to-dos. This is the main object of the application. |
User |
Stores information about the person creating the to-do. |
As we move through this chapter, we will add various relations and constraints to the domain model. Let's start with how you actually create the domain object.
Creating Domain Objects
Because we're discussing how to create the domain objects that create the database, it's best to start off small by examining just one table at first. In the previous two chapters, we showed you how to start the domain collection and add to it. Now we'll dive into all the options and the specifics of how domain creation works. Luckily, even if you've never worked with Hibernate or Java Data Objects (JDO), learning how to use GORM will be easy. For one, it's intuitive. For example, with normal JDOs, you have to memorize what many-to-one, one-to-one, and so on mean. With GORM, relationships are easier to define. The relationships are defined in a DSL syntax so that domain A belongs to domain B or domain A has many domain Bs associated with it. GORM was built with a DSL, so the terms you use to create the area sound like how you speak.
We're going to take a few steps back before we take a few steps forward. We'll start with basic domain creation, and we'll dive into the details of what's going on under the covers. Then we'll go into some more advanced settings for the domain, including how to create complex object types and how to overwrite the storage of the domain. By the end of this section, you should be ready to create and customize almost any domain object you need.
Basic Domain Creation
Figure 6-1 showed the domain model you'll be using, and in the previous chapters, you saw the implementation of a few domain objects. However, we have not detailed how you create a domain object of your own, your options in creating it, or even how it affects the underlying database. We have now come to that time. We'll detail two sets of concepts:
- Creating a fully functional domain model with constraints and relationships
- Understanding how these domain objects create and interact with the database
First, let's re-create the Todo domain object. We're doing this not because we want to waste more of your time, or because we get paid by the page (we don't). We're doing this because you should see what's occurring to the database under the covers when you create the tables we have defined for Collab-Todo application. While it's nice that the ORM tools isolate you from having to create the database tables directly with SQL commands, you still need to have a grasp on what happens behind the scenes.
If you have ever created a domain object in EJB3 or Hibernate, this will seem familiar. Let's refresh our memory of the Todo domain and see how it interacts with the database. Listing 6-1 contains a partial listing of the domain; we're only showing the domain properties.
Listing 6-1. Revisiting the Todo Domain
class Todo {


    static belongsTo = [User, Category]


    User owner

    Category category

    String name

    String note

    Date createdDate


    Date dueDate

    Date completedDate

    String priority

    String status


    ...

}
You might be wondering, "What is GORM doing when it stores the domain in the database?" Well, that's actually pretty simple. Figure 6-2 shows a snapshot of the table from a MySQL database. Note how it is the implementation of the todo table seen in Figure 4-17 from Chapter 4.

Figure 6-2. The todo table
If you compare this table to the domain, you'll notice a few differences. Let's break them down into a few areas.
New Columns
Probably the first things you'll notice are the auto-generated primary key ID and the version. The ID is always used as the reference for the primary key; you can access it off the domain object at any time. The ID ties the particular detached domain object to the persisted one. Hibernate also uses a version field for transactional integrity and to support optimistic locking. This works much like ActiveRecord in Rails, which allows you to have the primary key and version created for you; unfortunately, the downside is that you cannot overwrite the primary key by hand.
Note It may seem like a downside that the primary key is set for you by default, but in practice, using a single unique ID primary key with Hibernate allows for the best performance when interacting with the database. We'll show you how to use mappings to change the primary key in the "Changing the Primary Key" section of the chapter.
Naming
Next, notice that the table name and column names are assigned. The names that were in CamelCase before are now switched to snake_case (lowercased and separated by an underscore).
Foreign Keys
In most databases, foreign keys or foreign key indices are created between the User and Category tables. GORM sets up the foreign key by taking the class that has the belongsTo reserved word—in this case, the Category class has belongsTo = User—and saving the user_id column in the category table to the database. The user_id column is the concatenation of the belongsTo table name with _id.
Data Type
The last thing you'll notice is the data types. For the most part, they're derived from the types you set in the domain itself. So Strings become VARCHARs, Dates become DATETIMEs, and so on. Of course, the exact type is dependent on the actual database you're using and the constraints applied to the property.
Setting Default Values
Many applications have a default value to store in the database if you don't select one for them. Setting a default value is easy in GORM; simply set the value as you would to a normal domain object. In general, a status usually has a starting value. In the Collab-Todo application, your value will not be "Completed" from the get-go, so start the status at "Started". If the user wants to change this upon creation, he or she will be able to. Listing 6-2 showcases the updated change.
Listing 6-2. The Todo with a Default Value for Status
class Todo {


    static belongsTo = [User, Category]


    User owner

    Category category

    String name

    String note

    Date createdDate

    Date dueDate

    Date completedDate

    String priority

    String status = "Started"


    ...

}
Large Object Types
Before we move on to relationships, let's discuss the treatment of large object types. Large objects are generally binary large objects (BLOBs) and character large objects (CLOBs) that get persisted to the database. Although we're storing objects to the database as an example and will be using it to highlight features in Chapter 8 on downloading and uploading files, we don't necessarily suggest using a database to store files. Files can be very large, and unless you need to version those files, it is unwise to waste the database as a storage place. Instead, use the file system to keep files. Remember that the point of a file system is to store files.
Of course, there are legitimate reasons to store files in the database, so if you want to store BLOBs, simply set the datatype to byte[]. Note that we've added an item to Todo called associatedFile. When you update the database in MySQL, you will notice that the object type created is TINYBLOB. In addition, setting the maxSize on the constraints produces a longtext column in the database when using MySQL.
Creating Relationships
Unless you're building a domain structure with only a few classes, you're bound to have relations to other classes. For example, the Todo object belongs to one Category and one User. Conversely, a User can have many Todos. We'll discuss the following four relationship types:
Writing relationships in Grails is relatively easy. In fact, the syntax and usage are virtually identical to Ruby on Rails' ActiveRecord. Knowing that GORM is based on Hibernate, you might expect the syntax and usage to be more like Hibernate or JPA, but this isn't the case. With standard JPA, you can create relations using annotations solely on one side of the bean. However, these annotations can get entirely too complex. For example, take the many-to-many relationship in JPA shown in Listing 6-3.
Listing 6-3. Example of a Many-to-Many Relationship in JPA
@ManyToMany

@JoinTable(name="COURSE_TO_STUDENT_TBL",

    joinColumns=@JoinColumn(name="courseId"),

    inverseJoinColumns=@JoinColumn(name="studentId"))

private Collection<Student> students;
Note that there are different annotations for each type of relationship. In reality, JPA configures more from the database level, whereas GORM is programmed more from the verbal level. First, we'll review the players involved, then we'll show you how to create the relationships.
Players Involved
As you saw in Chapter 4, creating relationships is quite easy. However, we'll provide an example for those who need a refresher. You'll need to modify only two pieces of code in your classes. You'll use the following two keywords:
hasManybelongsTo
The next section shows examples of these in action.
One-to-One
A one-to-one relationship exists when one record in table A references exactly one record in table B, and vice versa. For example, the User table contains a reference to the Address table. There is exactly one user at one particular address. Listing 6-4 shows an example of each table.
Listing 6-4. Example of a One-to-One Relationship
class User {

    ...

    Address address

}

class Address {

    User user

}
Note The code for the book doesn't contain a reference to User in Address, because we're going to treat Address as an embedded class. This is merely one way of doing it. We actually have no pure one-to-one relationships in our code base.
One-to-Many
A one-to-many relationship exists when a record in table A can reference many records in table B, but when those records in table B can only reference one record in table A. Our application contains many examples of one-to-many relationships, one of which is the relationship between the user and the buddy lists. A user can have multiple buddy lists, but the buddy list can only be referenced to one user. Listing 6-5 shows an example of this in the code.
Listing 6-5. Example of a One-to-Many Relationship
class User {

    ...

    static hasMany = [buddyLists: BuddyList]

}

class BuddyList {

    static belongsTo = User

}
hasMany, which is put on the consuming domain, tells you that this domain "has many" of this domain. The belongsTo keyword is on the other side of the object—in this case, the BuddyList. The belongsTo keyword refers to what properties are referencing.
Let's look at another example in the BuddyList domain that has many BuddyListMembers, as shown in Listing 6-6.
Listing 6-6. Defining hasMany on BuddyListMember
class BuddyList {

    static hasMany = [members: BuddyListMember]

    ...

}
Here, members references the variable name you'll use to retrieve the BuddyListMembers from the BuddyList object. This is just one side of the relationship. The other side is actually the more important side and is what ties the constraints together in the database.
Listing 6-7 shows how to define belongsTo on the BuddyList object.
Listing 6-7. Defining belongsTo on BuddyListMember
class BuddyListMember {

    static belongsTo = BuddyList

}
Putting this static reference on belongs To tells the BuddyListMember class to put a reference to BuddyList in BuddyListMember's table upon database creation.
Managing Relationships
Adding to the relationships is quite easy and makes use of Groovy dynamic syntax. Listing 6-8 shows how to add and remove members from BuddyList.
Listing 6-8. Adding BuddyList to and Removing BuddyList from BuddyListMember
BuddyList myList

myList.addToMembers(someMember)

myList.removeFromMembers(someMember)
Many-to-One
As you've probably guessed, a many-to-one relationship is a complete inverse of the one-to-many relationship. Listing 6-5 shows a many-to-one relationship from the point of view of the buddy list. This is an example of what we meant when we said that GORM is more intuitive than JPA. JPA would have included an @ManyToOne annotation.
The many-to-many relationship further demonstrates the distinction between the way GORM and JPA implement relationships. A many-to-many relationship looks much different and is more readable than the many-to-many relationships in JPA. Readability is part of the goal of using dynamic languages such as Groovy and Ruby.
In a many-to-many relationship, a record in table A can reference multiple records in table B. Conversely, a record in table B can reference multiple records in table A. To set this up, you use the same keywords you used previously, so you have nothing new to learn. Both records contain hasMany, because they both reference many records in the other table. In addition, at least one class needs belongsTo to create the relation (it doesn't matter which one). Listing 6-9 shows an example of implementing a many-to-many relationship between the Todo and Keyword domains.
Listing 6-9. Example of a Many-to-Many Relationship
class Todo {

    static hasMany = [keywords: Keyword]

}

class Keyword {

    static belongsTo = Todo

    static hasMany = [todos: Todo]

}
Here, you can add and remove the keywords the same way you did in Listing 6-8.
Overwriting Default Settings
Now that we've established the basic rules of domain creation, you should be able to do everything you need to create your domain objects. There are a few items we have not covered yet, such as constraints, but we'll wait until the "Validation" section. In this section, we'll go over a few "advanced" settings for domain items. First, we'll show you how to fine-tune your tables, columns, and indexes for specific names and values. You could configure these items in a Hibernate configuration file, but we'll show you how to configure them in DSLs. In addition, we'll show you how to add properties to domains that are not persisted, and we'll explain how to fire events when inserting, updating, and deleting a table.
Adjusting the Mappings
One of the downsides to Ruby on Rails' ActiveRecord is the lack of ease in being able to adjust the names of the tables and columns on the database itself. This might seem like a trivial problem to have, but the truth is that if you've ever worked in any large corporate environment, you've probably encountered database administrators who want the database tables and columns to be named a certain way. Sometimes it's for good readability, and other times it's just they way they've been doing things for 30 years. The fact remains, you'll have to conform to their standards to push your application to production.
Luckily, GORM allows you to adjust these settings in a DSL way without the need for extra configuration files, as Hibernate requires. To demonstrate, we'll customize the Todo domain. By the end, you'll be able to see those changes reflected.
To make these adjustments, you need to add a static mapping closure to the domain object. The additional code simply adds to those static mappings. Check out the adjustment to Todo in Listing 6-10.
Listing 6-10. Todo with the Mapping Closure Defined
class Todo {

    ...

    static mapping = {

        // insert mappings here

    }

}
Now you can start adding to the static mappings, slowly growing the mapping for added functionality.
First, change the table name and a column name; these are common changes to those in an enterprise environment. To change the table name persisted from todo to todo_tbl, add the following line to the mapping:
table 'todo-tb1'
This simply tells GORM that the table is named todo_tbl.
That was easy enough. Now, let's update the column names. Because a table can have multiple columns, column names are grouped together under one subblock in the mapping. Change the name of the name and note to name_str and note_str. This naming convention is somewhat common for DBAs, who like to see the column type simply by glancing at the column name. To do this, add the following code to the mapping:
columns {

            name column:'name_str'

            note column:'note_str'

        }
GORM reads this as, "For columns, the name property references column name_str."
Changing the Primary Key
Earlier versions of Grails provided no easy way of changing the primary key that the column goes off of. Even worse, you couldn't change the generation method. While this probably didn't affect smaller shops, it likely affected large companies, many of which demanded that DBAs use stored procedures or other techniques to generate a primary key. First, we'll go over how to change the generator, then we'll discuss how to change the primary key itself.
By default, the generator uses the native implementation of the database. This could be an identity or a sequence, depending on the database. However, let's say you want to change it to use a high-low method of determining the number. You would add this entry to your mapping:
id generator:'hilo', params:[table:'hi_value',column:'next_value',max_lo:100]
This entry starts off with identifying itself by referencing to the id property, which is the default property on the domain. Next, generator defines the generator to be used, and params defines the parameters to pass into the generator. For a high-low calculation, the generator needs a table name, a column in the table, and a maximum low. Remember, this is all based off of what Hibernate expects as parameters for each of the generations. We're not going to go over them here, but you can view the Hibernate generator documentation1
__________
The other common approach to creating primary keys is to use a composite key, which has multiple attributes. In the example, this could be a combination of the name and the due date, the name and the user ID, and so on. Before we explain how to change the primary key to a composite key, we recommend that you don't do this unless you have to. Many would think of it as just poor design; however, the more important reason not to change it from a single ID is the fact that Hibernate performs best when using a primary key generated by one column.
This being said, let's take a look how to do it. Suppose you want the primary key to be the name plus the due date, because you cannot have the same named item due on the same date. Defining it is as simple as adding a composite ID entry in the mapping:
id composite:['name', 'dueDate]'Note You cannot define a composite ID with a generated ID. In addition, because you can't have two different primary key techniques on one table, we've only made use of the generated ID for this chapter's source code.
Disabling Versioning
By default, GORM uses versioning to help maintain a version number in the database. Having versions is Hibernate's way of checking to make sure that as you're updating a record, someone doesn't update it underneath you. Whenever you update a record in the table, the version number gets incremented. Before the actual save occurs, Hibernate checks the version for the record you're trying to save against the record in the database. If they're different, Hibernate doesn't allow the save to occur.
While this sounds great, there may be legitimate reasons you don't want to use versioning. In some applications, it may not matter if the record has been updated by two people at the same time. To turn off versioning, simply type this command in the mapping:
version false
This eliminates the column version from your table, and Hibernate will no longer perform any version checking.
Changing Eager Fetching and Locking
When you retrieve embedded domains from the database, GORM tells Hibernate to fetch them lazily. However, if you want to fetch them eagerly, you must disable lazy fetching for the column.
The Todo object offers no good example of this, so we'll use the User object, which has an embedded address property. In Listing 6-11, you can see an example of Todo with the embedded address domain being fetched eagerly.
Listing 6-11. Todo with the Embedded address Fetched Eagerly
class User {

    static mapping = {

        columns {

            address lazy:false

        }

    }

}
Creating Database Indices
You can also tune the database indices from the GORM domain level. DBAs can then these by hand in the database, but many people (especially those without full-time database architects) find it easier to tune them via the application framework. This ensures that if you're using the automatic update feature of the database, the indexes will also get updated.
In the example, you'll define the name and createDate indexes. You'll name the first index Name_Idx, and you'll name the createDate index Name_Create_Date_Idx. Listing 6-12 shows you how to define the index in the columns section.
Listing 6-12. Defining Indexes for the Todo Domain
class Todo {

    static mapping = {

        columns {

            name index:'Name_Idx, Name_Create_Date_Idx'

            createDate index:'Name_Create_Date_Idx'

        }

    }

}
Class Inheritance
It's typical of a domain diagram to have class inheritance, but this concept isn't always typical in database design. Luckily, with GORM, it's literally as easy as extending a class. For the data model, the Admin class extends the User class. Listing 6-13 shows the Admin class.
Listing 6-13. The Admin Class That Extends the User Class
class Admin extends User {

    String department

}
The real question is, "What goes on in the underlying database below?" By default, it keeps only one table for your entire hierarchy. So instead of having a User and an Admin table, it has only a User table with all the data in it for all the classes. Besides the combined columns and the other normal columns, you will also notice a class column in the database, which serves as the differentiator when creating an object so you can know exactly which object you're creating it from.
This situation works well for the example, but there are some drawbacks. To begin with, if you have complex inheritance with lots of properties in the child domains, you would be creating artificially big tables that aren't always getting the maximum use. Furthermore, you wouldn't be able to set non-null columns on the child objects. If that's the position you're in, you can set the following line in the static mapping:
tablePerHierarchy true
When set to true, this tells GORM to create a different table for each object in the class, so you'll have separate Admin and User tables. Of course, the drawback in this scenario is that they will both contain duplicate data from the base class. Furthermore, if you want to query all users, you'll have to join User and Admin.
Note Hibernate and JPA offer a few additional configurations that aren't implemented directly in GORM. So if having one table per hierarchy or having all the properties in one table don't fit what you're looking for, you can look at using Hibernate configuration files for these domains instead.
Turning on the Cache
One of the big pluses with Hibernate is its ability to use second-level caching, which stores data associated with the domain class to the Hibernate cache. The advantage to this is that if you retrieve the data, it will pull it from the cache instead of making a call to the database. This is a great mechanism for retrieving data that is accessed often and is rarely changed. To configure the second-level cache, you have to follow a few steps. First, update the DataSource.groovy file, then update the domain object in question.
Configuring the cache in the data source is easy. Add the code from Listing 6-14 into your DataSource.groovy file.
Listing 6-14. The Entry to Initialize the Hibernate Second-Level Cache
hibernate {

    cache.use_second_level_cache=true

    cache.use_query_cache=true

    cache.provider_class='org.hibernate.cache.EhCacheProvider'

}
This tells Hibernate that you want to use second-level caching and that the provider you're going to use is EhCacheProvider. You can swap this line out with another provider if you like; this just happens to be the de facto Hibernate cache.
Next, initialize the cache for the individual domain objects you want to associate it with. You initialize it for Todo by inserting the cache entry into the mapping constraints. Add the following line to your mapping:
cache true
When using true, it signals that the object should be stored in the cache. By default, this initializes the cache to read-only and non-lazy. However, you can further adjust the cache settings to be read-write, transactional, or even lazy. To do this, you use a similar entry to the previous one but with more specifics. You would create the following entry to make it read-write and lazy:
cache usage:'read-write', include:'lazy'
Besides configuring the cache at the class level, you can also configure it for embedded classes at the domain level. The configuration is virtually identical to what you did previously, except you specify the column that will be cached, as shown in Listing 6-15.
Listing 6-15. Configuring the Cache for the Address on the User
class User {

    static mapping = {

        address cache:true

    }
In addition, the same optional configurations (lazy, read-write) you applied previously can be applied to this configuration as well.
Transient Properties
In JPA and GORM, all the properties on your domain (or entity) objects are persisted to the database by default. This can be disadvantageous when you want to have properties on your domains that either are amalgamations of other properties or simply don't need to be persisted. Luckily, in GORM, you can easily mark properties to not be persisted.
In GORM and JPA, properties that you don't want to persist are called transient properties. In JPA, you mark each property with the @Transient annotation. In GORM, you create a transient mapping of all these properties.
For the example, you'll use the User table. Inside User, you want to have a comfirmPassword property, so you can make sure the user typed in the correct password. Obviously, you don't need the password persisted twice, so you mark it as transient. In Listing 6-16, you can see that you add confirmPassword to the transients mapping.
Listing 6-16. User Object with the Transient confirmPassword
class User {

     static transients = [ "confirmPassword" ]


    String firstName

    String lastName

    String userName

    String password

    String email

    String confirmPassword

}
As you can see, you still add the confirmPassword to the normal domain, but you also add it to a list of strings called transients, marking it as transient.
GORM Events
Often in normal domain and DAO architectures, you could have base save/update/delete methods. However, if you ever want to add a universal concept for a particular domain, such as updating timestamps or writing to a log, you could overwrite the method, add your own custom needs, and then call the parent method. However, GORM and some of these other more modern frameworks eliminate the need for the DAO classes and allow you to access the domain class directly. However, this can pose a problem, because now the individual developers are responsible for updating fields (such as a last-modified date) that always need to be run when updating, and writing to the log file. Yuck; this could lead to disaster.
Luckily, GORM has an answer to this problem. It gives you the ability to define these types of transitions at the domain level. Todo has lastModifiedDate and createDate. In GORM, you can add two methods to the domain that are called automatically before inserting and before updating the database. Obviously, the beforeInsert method is called before insertion, and beforeUpdate is called before updating. Listing 6-17 shows the code you need to add to Todo in order to have your dates modified at insertion and creation.
Listing 6-17. Code for Adding the Automatic Events for Todo
def beforeInsert = {

   createDate = new Date()

    lastModifiedDate = new Date()

   }

def beforeUpdate = {

   lastModifiedDate = new Date()

}
Now whenever a save or update is called, these two methods will be called regardless from where the save or update is called from. In addition, a beforeDelete event will be called before a deletion.
Do you detect a pattern here? Having create and modify dates is a fairly standard pattern. In order to have this same functionality on more than one class, you would have to add those seven lines of code plus the two lines to define the domains in each of your domain classes.
Luckily, as you may have guessed, GORM has a way around this. If you have lastUpdated and dateCreated named properties, you can configure GORM to automatically update them by adding the following line in the mapping:
autoTimestamp false
Note that the properties have to be named lastUpdated and dateCreated. In addition, lastUpdated only gets updated when the domain is actually updated and not on a creation like before.
Finally, there is one other way to adjust items, and that is on the actual loading of the item, or rather after the item has been loaded and all the properties have been set. Listing 6-18 contains a method that displays a message upon loading the domain object.
Listing 6-18. Method Called upon Loading the Domain
def onLoad = {

    print 'We have loaded the item'

}
Database Model
Before moving onto validation, let's see how all the updates to the domain model affect a MySQL database.
In Figure 6-3, you can see the output of the database structure after being created by GORM.
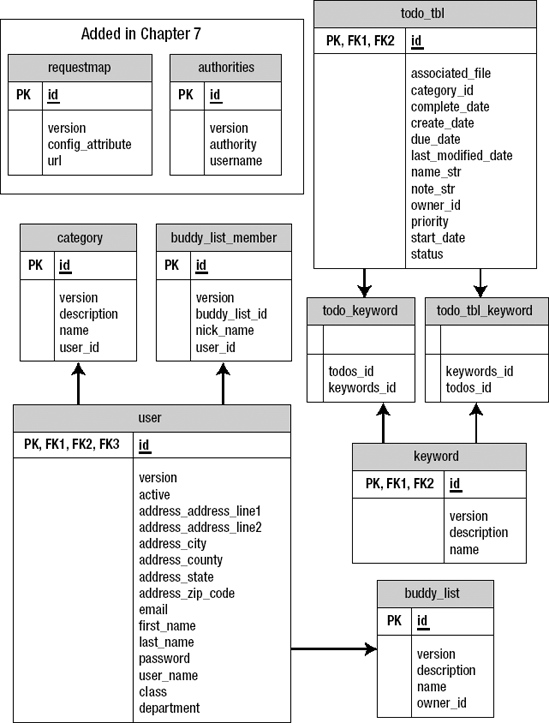
Figure 6-3. The database model after being created by GORM
Note We kept the modifications to the generator, and we included the lack of versioning and the name change, so Figure 6-3 includes some extra tables you might not have expected.
Validation
In the previous chapters, you saw that when you executed save() on the Todo instance, GORM would only persist the data if the validations (set in the constraints) passed for the domain. The save() would return a true or false depending on if persisting was successful or not. Now the real question is, "How do you know what to validate?"
Constraints are somewhat of a dual-use item. Their main functionality is to validate items before they're persisted to the database, but they also can adjust some of the settings on the database itself for the column. For example, if you mark a column in your constraints as nullable or set a maximum length, then these changes will be reflected at the database level as well. Out of the box, GORM comes with quite a few validations, and it even provides the framework for creating a few custom validations of your own.
For the purpose of the sample application, you only need a small subset of those validations, so while we will list all of them here, you'll only use a few. In addition, just like any application, it would be impossible for all the built-in validations to cover every situation, so we'll also introduce the idea of custom validations. We will then close with a discussion about how to change the messages to something a bit more meaningful.
Constraints
You've already seen constraints in Chapter 4. These were used to determine whether some properties had to be filled in on the domain object, and also to set the order of display when scaffolding the domain. Let's expand a bit and look at what other features you can use constraints for.
You have seen the nullable constraint, which not only verifies that the object is not null, but also sets the database property to "not null" (in Figure 6-2, you can see many properties are set to "not null"). Of course, this assumes you're using GORM to create or update your database.
Let's start with the familiar Todo object, since this is the object you're going to want to apply the most validations to. Start with the basic skeleton shown in Listing 6-19.
Listing 6-19. The Todo Object with the Validation Constraints
01 class Todo {

02     ...

03     static constraints = {

04         owner(nullable:false)

05         name(blank:false)

06     }

07 }
In line 3, static constraints = { starts the constraint area. This line makes sense when you think about it. Constraints are static because they span multiple instances. The next two lines define two of constraints for you. Line 4 tells you that the owner cannot be nullable; however, it could be a blank string. Line 5 not only doesn't allow for nulls, but it also doesn't allow the name to be blank.
Using Built-In Constraints
You can add quite a few different constraints to your domain object, including everything from null checking to credit-card validation. In our application, we will use quite a bit of these validations, although there's no way for us to use them all. Table 6-2, however, shows all the possible constraints provided by GORM.
Table 6-2. Constraints Built into GORM
| Name | Description |
blank |
Validates that the string either is or is not blank |
creditCard |
Validates that the string either is or is not a valid credit-card number |
email |
Validates that the string either is or is not a valid e-mail address |
inList |
Validates that the constraint is contained within the supplied list |
matches |
Validates that the object matches the supplied regular expression |
max |
Validates that the number is not larger than the supplied maximum value |
min |
Validates that the number is not smaller than the supplied minimum value |
minSize |
Validates that the object's string's length or collection's size is larger than the supplied amount |
maxSize |
Validates that the object's string's length or collection's size is smaller than the supplied amount |
notEqual |
Validates that the object is not equal to the supplied object |
nullable |
Validates that the object is not null |
range |
Validates that the object falls within the given range |
scale |
Constrains the supplied number to a particular decimal place |
size |
Validates that the object's string's length or collection's size is equal to the supplied amount |
url |
Validates that the supplied string is formatted as a valid URL |
Of course, it is impossible for the Grails team to predict all the possible constraints needed by an application. Using precreated constraints is the easy part. In the next section, we'll show you how to create your own customized constraints using closures.
Let's take another look at that Todo object and what other constraints you need to define for it. Let's start off by examining the startDate property and see what you need to constrain on it. For starters, you don't want to allow users to use start dates in the past. The purpose of this application is to create tasks that start now or in the future; in theory, this is something that is probably created at the beginning and never changed. Nothing in the built-in constraints shown in Table 6-2 do what you need, so you need to create your first custom constraint. You need to allow the constraint to be null, and if the constraint is filled in, you need to make sure the date doesn't occur in the past.
To define custom constraints in GORM, you will mark the custom constraint with validator. Take a look at this in action in Listing 6-20.
Listing 6-20. Applying a Simple Custom Validator to Todo
static constraints = {

    ...

    startDate(nullable:true,

        validator: {

            if (it?.compareTo(new Date()) < 0 ) {

                return false

            }

            return true

     })

}
As you can see, this starts off like normal validations with nullable:true, but then it adds custom validation. All custom validators start off with the word validator, followed by a closure. Inside the closure, you need to return true if the validation passes, and false if the validation doesn't pass. Of course, you cannot create a decent validation with a random closure that has no information. However, that is why you have access to the property, demarked with it, inside the validator closure. The it represents the item that is being validated. For our validation, we are going to check that the start date doesn't occur before the current date. As you can see, it's pretty easy to create a custom validation, but you can make it even more advanced.
For this next example of functionality, let's take a look at the completedDate field. It makes sense that completeDate has to occur after startDate. To create a custom validator to show this, you need to have access to the startDate object. No problem. Check out its implementation in Listing 6-21.
Listing 6-21. Applying a More Complex Validator to Todo
static constraints = {

    ...

    completeDate(nullable:true,

        validator: {

            val, obj ->

                if (val != null) {

                    return val.after(obj.createDate)

                }

                return true

        })

}
As you can see, this looks similar to the validator you defined in Listing 6-20, with one small change: you also pass in the variables val, obj ->. val is the variable that is passed in; the previous example used it to represent the value of startDate. In addition, you're now also passing in obj, which is the domain object you're using—in this case, the Todo object. This allows you to compare completeDate directly with that domain's createDate.
This gives you a fairly dynamic way of creating validations. In fact, you can even create queries inside the validator, allowing for some pretty slick validations. Let's take a look at the Keyword domain, which is one of the constraints. To reduce redundancy, you want to put a constraint on the name, because you don't want to have any names that are also used as names for the description. You can easily make the name a unique field, but you also want to make sure that no description is the same as the name. If there is, you're probably creating a name twice or not defining the other one properly. Listing 6-22 shows how to find all the instances of description to make sure it doesn't have the same text as the name property.
Listing 6-22. A Custom Constraint That Performs a Query
class Keyword {

    ...

    String name

    String description

    static constraints = {

        name(validator: {

            if (Keyword.findAllByDescription(it).size() > 0) {

                return false

            }

            return true

        })

    }

}
Calling the Validator
Validation is called behind the scenes when you do a save or when there is an update to the domain object. Of course, this prevents you from persisting objects that don't pass your own validations. However, there may be times when you'll want to call the validator manually, so you can do some additional checking on it or test that specific messages get returned. Listing 6-23 shows a simple check for a validation that is called twice. The first time it fails, and the second time it passes.
Listing 6-23. Example of a Validation Called Twice
void testValidationsOnTodo() {

    def todo = new Todo(

        owner: user1, name: "Validation Test", note:"Detailed web app description",

        createDate: new Date(), dueDate: new Date(), lastModifiedDate:

        new Date(), priority: '1', status: '1' )

    assert true == todo.validate()


    // shouldn't validate

    todo.completeDate = new Date() - 1

    todo.name = null

    assert false == todo.validate()


    // readjust the date to be in the future

    todo.completeDate = new Date() + 3

   assert true == todo.validate()

}
In this example, you can see that you set completedDate to the past, which is not allowed with the constraints. When the first validation fails, you update the completed date to the future; now, as you can see, the validation passes. This example shows you how you can use validation in your test cases to make sure you have an item works. This isn't as necessary for out-of-the-box validators, but for your custom validators, you're going to want to use this to make sure you wrote the validation correctly.
Validation Messages
In Chapters 4 and 5, we showed the error messages that Grails provides when a validation fails on a page. In Chapter 5, we went over more extensively how to write the error outputs to the page without using scaffolding. However, we haven't yet explained how those message names are derived. Now that we've gone over constraints, we'll explain the validation messages.
As you may have guessed from looking at the messages in messages.properties and looking at the constraints, there is a roughly one-to-one ratio between constraints and messages, with an added error message for the custom constraints.
Let's take a look at the Todo example. We'll be focusing on three constraints: name, priority, and completeDate. Listing 6-24 shows what those three validations look like.
Listing 6-24. The name, priority, and completeDate validations in Todo
name(blank:false)

priority(blank:false)

completeDate(nullable:true,

    validator: {

        val, obj ->

           if (val != null) {

               return val.after(obj.createDate)

           }

           return true

    }

)
If you run this on one of the Todo pages and don't fill in the name or a date that comes after the create date, Grails will display the page shown in Figure 6-4.
As you can see, it's a normal validation; however, the messages are ugly and not something you'd want to show to your end users. As we said in Chapter 5, you could easily change these error messages to something a bit less ugly, but they would still lack specificity. In other words, right now, the messages in the message bundles are geared toward the type of validation, as opposed to being tied to the screen they originated from.
Grails does something pretty interesting. It has a hierarchy lookup of messages, and that hierarchy is based on many things, including the name of the domain object, the column, the type of validation, and the type of object involved. Table 6-3 lists the order of the validation lookup for the Todo domain and name property having a blank validation.

Figure 6-4. The page after two failed validations
Table 6-3. Hierarchy Error-Messaging Lookup
As you may be able to tell by looking at the list, validation message lookup goes from most specific to least specific. At the end, if it doesn't find any matching messages, it will look up the default one originally in the messages.properties resource you saw previously.
Let's take a look at how to adjust these settings. As you saw in Listing 6-24, two were of the same type: blank. Let's start by changing that. Add the following line to messages.properties:
blank.java.lang.String=Blank strings are not good.
The result of changing this produces the errors shown in Figure 6-5.
Figure 6-5. The error message displayed after changing the first error
As you can see, that worked. Now let's be a bit more specific. Adjust the error message only for the name itself. Using the uppermost name will cut down on the time of the lookup, but some of the later ones look cleaner. Let's add line 9 from Table 6-3, which creates the following text to add to messages.properties:
blank.Todo.name=The name for your To Do must be filled in.
Figure 6-6 shows the results this change produced.
Figure 6-6. The final change with the two custom validators
Because the message is higher up in the hierarchy, both messages are now displayed: one for the priority being blank, and the other for the name being blank.
Note For the custom validator, the differentiator will be the term "validator." In the example, the top line would have todo.completeDate.validator.error.Todo.completeDate.
Querying the Database
Starting in Chapter 4, we gave you a fully functioning web site with database persistence. In this chapter, we have expanded that relatively crude database, and now you essentially have a fully functioning schema complete with constraints and relations. Now that you have this wonderful database to use, it's time to start using it. We're going to assume that if you're reading this book, you have at least cursory knowledge of creating SQL queries. However, if that's not the case, don't worry. Grails has made creating SQL queries extremely easy—in fact, it's almost too easy, if you ask us.
To begin, we'll go over four different ways to query the database. This might seem like an overly excessive way of querying the database, but in the end, you will find that you have the flexibility to create a query with as little or as much information as you need to provide.
We'll show you how to do simple CRUD operations. We demonstrated this in the previous two chapters, but we'll briefly rehash it so you can see how to build up your querying ability. We'll then explain how GORM really shows off its DSL capabilities by being able to create dynamic queries in the form of method names. You saw a bit of this in the earlier chapters when we did findBy, but now we'll show you all the options and parameters available to you. We'll cover this for both straight single retrievals and for retrieving multiple objects.
Finally, we'll show you how to use Hibernate Query Language (HQL) queries instead of the more dynamic DSL queries. Sometimes using HQL is the only way to get the query you want.
GORM's CRUD Support
When interacting with a database, you need to know how to do basic CRUD operations. Most Java developers reading this are probably used to the standard DAO domain model, where after you create the domain, you create a DAO with various operations. These DAO models usually have the standard void delete(Domain d) and get(String primaryKey) methods. Before Hibernate, these methods would usually interact with the database directly with straight SQL calls. This kind of methodology made a bit of sense when you had to write the SQL code directly, but with today's tools and a dynamic language like Groovy, these constraints are no longer necessary.
Hibernate helped eliminate the problem of having to hard-code SQL by allowing you to use more abstract terminology to persist to the database. But that solved only half the problem. Why do you even need DAO at that point? It's still a waste of programmers' time to create these DAO objects, and time is money.
Because we're using Groovy as the underlying language for Grails, we now have many more options available to us. We'll start off by looking at a test case that steps through the individual CRUD operations. Afterwards, we'll discuss the ease of operations. Listing 6-25 shows a test case for updating the User object.
Listing 6-25. Performing CRUD Operations on the User
void testCRUDOperations() {


   // Let's create the user

    def userTemp = new User(userName: 'testUser', firstName:'John',

                               lastName:'Smith', password:'pass',

                               email:"[email protected]")


    // Create - let's save it

    userTemp.save()

    // grab the user id

    def userId = userTemp.id


    // Update - since we are still within the session we caught it

    // we shouldn't need to do anything explicit

    userTemp.password = 'A new password'

    // let's see if it got updated

    userTemp = User.get(userId)

    assert "A new password" == userTemp.password

    assert "John" == userTemp.firstName


    // let's show the delete

    userTemp.delete()

    // let's make sure it got deleted

    assert null == User.get(userId)

}
As you can see, creating, updating, and deleting are as easy as pie. None of the domain objects have a get, delete, or save method, and there are no base classes. So how does this work? It's a simple method interception, as we discussed in Chapter 3. Grails has the ability to intercept methods and provide functionality for them. The same functionality of retrieving, deleting, and saving could be done in straight Java with aspects or dynamic proxies, but you wouldn't be able to get that far, because the previous tests wouldn't compile in straight Java. Using a dynamic language like Groovy really gives you the best of both worlds. It keeps the object a lightweight object for passing between layers and storing into HttpSession, and it gives you the functionality of a bloated object with the get, save, and delete methods on it.
CRUD operations don't give you everything you'll need to do in an application, so you still need to create some dynamic queries. You need the options to select one or more than one record. You also may want to select records based on parameters or by interacting with multiple tables. In the next section, we'll go over creating these dynamic queries.
Creating Queries
To create the code for the Collab-Todo project, you're going to have to create many dynamic queries throughout the book. You'll use these queries later on for a variety of things, from creating user-registration pages to creating the fancier Ajax items in Chapter 8. All of these actions require various types of dynamic support, and although the query portion will not be the focus of those chapters, you'll need to understand how those queries are created and how to create some of your own queries.
Queries in GORM are different than queries in ActiveRecord or in EJB3. Because we're using Hibernate as the back end, they're obviously more like Hibernate queries. Actually, GORM has more options than Hibernate, because it makes use of Groovy's dynamic ability to make some DSL-type queries. The amount of options you have are the same here. Each type serves its own purpose. If you want to become a Grails guru, it's important to understand the different types. In the next few sections, we'll show you how to create the following queries:
- GORM's dynamic queries
- HQL queries
- Hibernate's criteria queries
GORM's Dynamic Queries
As you just saw, creating dynamic CRUD queries is fairly easy. However, you're only able to do a simple retrieval based on the primary key (the ID). While this is necessary to most applications, you obviously need to do more than that. In the example application, you'll need to retrieve not only lists, but also lists of people and ever more specific queries.
In the upcoming sections, we'll go over multiple types of queries, ranging from fairly simple single finds to lists, criteria queries, and HQL queries. The criteria queries will make use of Groovy the most by allowing you to create a DSL of the query you want to create. This makes for some wonderfully easy queries to create. The downside is, unlike with the HQL queries, the criteria queries are limited to querying off only one class.
We'll start by showing you how to grow some single result-setqueries, then we'll go over how they work. We'll list out the options you have to create the queries, and finally, we'll show you how to create the query lists.
Note In these sections, we're going to go over many types of queries. Where we can, we'll reference code that we're actually using in our application. However, we can't show all the possible ways to create the queries. So to that extent, you'll also be able to find these queries in the code base integration tests in the Source Code/Download area of the Apress web site (http://wwww.apress.com).
Counts
Probably the easiest query to create a query is to do a simple count. The code in Listing 6-26 counts the amount of Todos.
Listing 6-26. Counting the Amount of Todos
Todo.count()
Besides the standard count, you can also count the amount of Todos where the columns equal a particular value. Listing 6-27 counts the amount of Todos that have a priority of "1".
Listing 6-27. Example of a countBy Query
Todo.countByPriority('1')
Single Result-Set Queries
Now we'll take a look at queries that return a single result set back to you. You use these when you want to find one item. We'll go over these two types in this section:
findByfindWhere
Although there are two different ways of performing a query, the end result and the usefulness are mostly equal. The main difference is how the query looks and how you pass the values into the query.
Let's take a look first at the findBy example, as shown in Listing 6-28. In this query, you find where Todo has a priority of "2" and a status of "3".
As you can imagine, there actually is no method called findByPriorityAndStatus on Todo. This is one of our first examples of a dynamic query. In Figure 6-7, we have broken up this query into its individual parts.
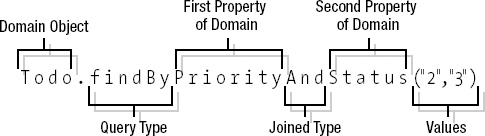
Figure 6-7. The dynamic query broken up into its parts
As you can see, the DSL method starts with a static findBy call. It then has a property name separated with an And and another property name. In fact, we could have added a few more Ands if we wanted to; you're only limited by the amount of properties on the domain object. Additionally, you can separate the properties with either an And or an Or.
This approach is very useful, especially if you want to mix Ands and Ors. However, if you want to build something simpler that contains only Ands, you can use the query shown in Listing 6-29.
Listing 6-29. Example of a findWhere Query
Todo.findWhere([ "priority": "1", status: "2"])
Although this is a bit simpler than the previous example, in this one you're passing the properties and values into the class as a map. You pass the name of the domain's property as the key, and you pass the item you want it to equal as the value. This query is also more useful if you received a map of name values from another call.
Multiple Results Queries
The previous queries were only able to return single results; they would have thrown errors much like Hibernate does if you returned multiple results. In this section, we'll show you how to return multiple results. The way these are written looks much like the previous examples, except they return much more. In this section, we'll also add a few more select types:
findAllBy The findAllBy call is similar in functionality and use to the findBy method we used earlier. Listing 6-30 shows an example of two findAllBys.
Listing 6-30. Two Examples of a findAllBy Query
Todo.findAllByName("Our First Web App")

Todo.findAllByPriorityOrStatus("2", "4")
In the first one, you're finding all records where the name equals one item; in the second, you're separating the retrieval with an Or, so that if a record has a status with a "2" or a "4". As with findBy, this query is able to use And or Or operations to separate the domain properties.
findAllWhere Again, findAllWhere is similar to findWhere defined previously. Listing 6-31 shows an example of using findAllWhere to retrieve all Todos that have a priority of "1" and a status of "2".
Listing 6-31. Example of a findAllWhere Query
Todo.findAllWhere([ "priority": "1", status: "2"])
getAll getAll is much like the get method we covered in the "GORM's CRUD Support" section. However, get retrieves one item for an ID, while this method allows multiple items to be passed through. This is a basic convenience method when you already have the IDs. Listing 6-32 shows an example of retrieving three Todos with the IDs of 1, 3, and 5.
Listing 6-32. Retrieving Three Todos
Todo.getAll(1,3,5)

Todo.getAll([1,3,5])
This code contains two examples, because you can pass in the objects either as a comma-separated list or as a map.
list The next method we are going to go over is probably the most basic type of retrieval: retrieving all records. This returns all the items of the domain. Listing 6-33 retrieves all the items in Todo.
Listing 6-33. Example of a list Query
Todo.list()
listOrderBy listOrderBy also retrieves the complete list of records from a domain, but it lets you arrange them by column. Listing 6-34 retrieves the entire list ordering by the name column.
Listing 6-34. Example of a listOrderBy Query
Todo.listOrderByName()
Filtering Queries
We haven't actually gone over all the options for queries, because there are some overlapping configurations. In this section, we'll look at those overlapping configurations, which provide the ability to set the maximum results, the fetch modes, what to sort on, and the ordering. We'll only show the code for one type, but you can use the query types equally with any of these options:
listlistOrderByfindAllByfindBy
Some of this code can be useful when you're attempting to get a partial set of records back—for example, when doing pagination. Listing 6-35 gets results that should be 20 through 30 back, sorting on priority and the order to be descending.
Listing 6-35. Example of Filtering the Results
Todo.list(max: 10, offset: 20, sort: "priority", order "desc")
The previous methods for query creation allowed you to use powerful DSLs to create simple user queries. However, using these queries is like eating sushi—an hour later, you're hungry for more. These GORM dynamic queries could not perform anything too complex, such as ranges, and more importantly, they were only querying off themselves.
In many applications, you not only need to query other tables to get the data, but you also often want bits and pieces of the data back—for example, a few columns from table A mixed with a few columns from table B. With HQL queries, you can perform this task easily.
Once again, if you're familiar with Hibernate, this is going to be second nature to you. However, if you're new to Hibernate, understanding HQL is simply realizing that you're creating a query based off of what the domain says as opposed to what is actually in the database (like in a SQL query).
In the "GORM's Dynamic Queries" section, we went over two sets of queries: returning one result set and returning multiple result sets. With HQL queries, you have the same scenario plus a more general query mechanism with executeQuery:
findfindAllexecuteQuery
find
The first query type we'll look at is find. Listing 6-36 shows a few examples of setting up a find query.
Listing 6-36. An HQL Query with find
01 Todo.find("From Todo as t order by t.priority asc")

02 Todo.find("From Todo as t

                       where t.name = ?

                       and t.priority = ?

                       order by t.priority asc", ["Test", "2"])

03 Todo.find("From Todo as t

                       where t.name = :name

                       and t.priority = :priority

                       order by t.priority asc", [priority :"2", name : "Test"])

04 def todo = new Todo()

    todo.name = "Test"

    todo = Todo.find(todo)
As you can see, the one thing they all have in common is an HQL query. In the first example, the find retrieves all the items in the database. However, being that this is only a find, you better hope you have only one item in the database. The next three queries are much more specific. In the second and third ones, you're searching for a query with the name "Test" and the priority of "2". The difference between the two is how you label the variables. In second one, you do it by the order of variables. This works well in the example, because we know the order. However, if you had more of a dynamic query coming in from another source, the key/value map of the third one might be a better fit. The fourth example is what is called a query by example. Basically, you pass in a partially completed Todo, and GORM finds a match based off the items passed in.
findAll
findAll looks the same as the examples in Listing 6-36, except this time, you're able to return multiple entries. As you were able to filter your list and other queries previously, now you will be able to do the same here with max, offset, and so on. For example, if you took the example in Listing 6-35 and converted it to a findAll HQL query, you would get the following code:
Todo.findAll("From Todo t", max: 10, offset: 20, sort: "priority", order "desc")
If you'd like, you could even add a selection based on priority with this query:
Todo.findAll("From Todo t where t.priority = ?",

                        ["1"], max: 10, offset: 20, sort: "priority", order "desc")
executeQuery
executeQuery is a bit different than the other queries, because you don't necessarily need to retrieve an actual domain object. You can simply return columns off the domain. For example, if you want to get the names of every Todo with a priority of "1", you would use the query shown in Listing 6-37.
Listing 6-37. Query to Find the Names of All the Todos with a Priority of "1"
Todo.executeQuery("select t.name from Todo t where t.priority = ?, "1")
In addition, all the normal rules of passing parameters work for executing the query.
Hibernate's Criteria Queries
If you've ever worked with Hibernate, you're probably familiar with Hibernate's Criteria API. Perhaps you tried to do some of the concepts of projections and so on, then got confused. Sometimes the simplest criteria query seems overly complex. For those of you not familiar with the Criteria API, it's a Hibernate API designed to provide elegance to creating dynamic queries. You might be wondering why this is necessary. Well, let's think back to the HQL queries we created previously.
What if you want to create a dynamic query? Doing so would require multiple dynamic where clauses, which would require you to do multiple string concatenations and a bunch of if-then-else statements. Yuck! That just gets messy fast, and lends itself to easy runtime SQL errors—and that's never a good thing. Using the Criteria object allows you to abstract away creating the query and make it in a readable DSL way.
As we said, creating the Criteria queries in pure Hibernate is a bit of a pain; however, with the Groovy language, GORM has created some fairly smooth ways for creating these queries. In this section, we'll go over how to create advanced Criteria queries. First, we'll show a small example that demonstrates the difference between creating a query with Criteria and creating a query with HQL.
Comparing HQL and Criteria
Our first example is a relatively simple problem that you could have with any web application—even ours. Take Todo—what if you want to search based on the note, the description, or whatever field you want? This requires you to create a dynamic query. You need to store the possible values in the map where the key is the name of the field and where the value is the value.
We'll build this in a few steps to make this as easy as possible. First, we'll create the base test methods for TodoTest. Next, we'll show you the implementation of this logic if we did it in HQL. Finally, we'll show you how to do this the proper way in Criteria.
You'll be creating a query that can take in this map and do multiple ands of it on the key/value pair. Listing 6-38 shows the parameters you're going to pass through to the query runners.
Listing 6-38. The Entry Test Case
void testFindingTodosWithHQL() {

    def params = [ name: '%Second%', status: '4' ]

    def todos = executeHQLQuery( params )

    assert todos[0].name == "Our Second Web App"

}


void testFindingTodosWithCriteria() {

    def params = [ name: '%Second%', status: '4' ]

    def todos = executeCriteriaQuery( params )

    assert todos[0].name == "Our Second Web App"

}
These tests are relatively simple; they look on the Todo list for a name with the word Second in it and a status of '4'. With our sample data, this should only return one record with the name "Our Second Web App". This is the easy part. Now let's take a look at how to implement this for an HQL query. Listing 6-39 defines executeHQLQuery.
Listing 6-39. The Dynamic HQL Query
List executeHQLQuery(def params) {


    def hqlQuery = "Select t From Todo t "


    if (params.size() > 0) {

        def first = true

        params.each { key, value ->

        if (first) {

            hqlQuery += ' where '

        } else {

            hqlQuery += ' and '

        }

        first = false

        hqlQuery += " t.${key} like :${key} "

        }

        }

        return Todo.executeQuery(hqlQuery, params)

    }
We won't try to claim that this is the only way of creating the necessary query, but it is one of the ways. The solution contains multiple steps:
- Create the
select—in this case,Select t From Todo t. - Check whether there are any parameters. This is necessary because you don't want a
whereclause if there are no parameters. - Add
whereoranddepending on whether it's the first or subsequent property you're electing. - Add the comparison. The
keyis the name of the property, and thevalueis the value to be compared to. You see the wordkeytwice, because the second instance will be replaced by a prepared statement whenexecuteQueryis called. - Execute the query, pass in the supplied parameters, and voilà.
If you look at that code and explanation, you'll see that it's not a pretty way of performing that query. Luckily, Hibernate has an easier solution: the Criteria query. With this, you can write dynamic queries without ever having to write any SQL or HQL code. And with Groovy, this gets even easier, because you get to use builders to create your Criteria query instead. Listing 6-40 defines the method you'll use for creating the Criteria query.
Listing 6-40. The Criteria Query
List executeCriteriaQuery(def params) {

        def todos = Todo.createCriteria().list {

            and {

                params.each {key, value ->

                    like(key, value)

              }

            }

        }

    }
Not only does this look better, but it's much easier to read as well. Here's the breakdown for this one:
- Create a dynamic query on the
Tododomain. - Use
andto define a closure that then allows you to iterate through a list of expressions. - Set
likewith a name/value pair without any formatting.
As you can see, this is much easier than creating a dynamic HQL query. Once you're familiar with creating Criteria queries in your average Java code, you'll see that the ability to use the Groovy builder with closures is cleaner and more robust. This will become even more apparent when we increase the complexity of our Criteria examples throughout the book.
Database Migration
Those of you familiar with Ruby on Rails are probably used to the migrations built into the Rails system. In Grails, the built-in system only allows for database creation or updates; there is no way to segregate out migrations when you remove columns, rename them, and so on. The step-like migration system of Rails is not built into Hibernate.
But don't fret; the Grails plug-in community has stepped up and offered two plug-ins that tackle database migrations. Our application doesn't really have much need for migrations, because we are creating and using the database in one shot. However, let's take a look at the power these two plug-ins can provide. Before we go on, it's important to note that although these have similar end results to Rails migrations, they're really nothing alike in execution. It's also wise to remember that if you're performing a step such as a column change, the scripts won't be able to detect this, and you should create a migration for this on your own.
The dbmigrate Plug-In
The dbmigrate plug-in is by far the simpler of the two; however, it still provides enough support so that most users could easily stick to this one without any problems. dbmigrate has two basic commands for completing the migration. The first one is:
grails create-migration
This inspects the current state of the database and the content of your domain objects. The plug-in then generates a SQL file that allows you to adjust the database to reflect what's in your domain. Then to actually update the database, dbmigrate calls the grails migrate command.
The LiquiBase Plug-In
LiquiBase is a bit more advanced in that it gives you many more options and allows for greater feedback if you need it. In addition, unlike the previous example that creates a SQL script for the migration, LiquiBase creates a more generic XML file that it has to reinterrupt to update the database.
You can install LiquiBase as a plug-in with the following command line:
grails install-plugin liquibase
Once installed, you have to create a change log file in grails-app/migrations/changelog.xml. Listing 6-41 shows an example.
Listing 6-41. Example of a changelog.xml File
<databaseChangeLog

        xmlns="http://www.liquibase.org/xml/ns/dbchangelog/1.4"

        xmlns:xsi="http://www.w3.org/2001/XMLSchema-instance"

        xsi:schemaLocation="http://www.liquibase.org/xml/ns/dbchangelog/1.4

        http://www.liquibase.org/xml/ns/dbchangelog/dbchangelog-1.4.xsd">

</databaseChangeLog>
Once the file is set up, you can then execute commands on it. You can find the commands at http://www.liquibase.org/manual/grails.
While this explanation has been brief, you can find much more detailed information about LiquiBase on its web site at http://www.liquibase.org/.
Services
If you're a Java developer who has spent the last few years doing "enterprise development" work, you'll have to get used to the idea of controllers. It can be hard sometimes to get used to putting so much business logic inside the controller. On top of that, sometimes it's not even the correct answer. Many times, it is necessary to send the code off to a service class where you can also control the transactioning of it, the scope, and so on.
Enter Grails services. These classes are stored in the grails-app/services directory. Like other Groovy objects in Grails, these classes are simple POJOs.
Of course, the next logical question is, "If they're Groovy POJO scripts, why use them instead of controllers? Is it segregation for segregation's sake?" As you can guess, the answer is no. Controllers differ by the fact that they are the only items accessible directly via the GSP UI. As such, they're where the bulk of your initial interactions should go. However, imagine something like e-mail, which needs to be reused over and over again. Why would you want it in a controller? The answer is, you wouldn't. (By the way, we mention an e-mail service as an example here, because that's exactly what we're going to build in Chapter 8.)
Besides the ability to segregate reusable data, services serve two other purposes as well: one is controlling transactioning, and the other is controlling the context for the service.
Creating a Service
Creating a service is a relatively simple task, and like other Grails items, there is a command-line call. If you want to make a todo service, you would type the following command:
grails create-service todo
This creates two classes, as always: the service class and a test case. Listing 6-42 lists both classes.
Listing 6-42. The TodoService and TodoServiceTests Classes
class TodoServiceService {


    boolean transactional = true


    def serviceMethod() {


    }

}


class TodoServiceTests extends GroovyTestCase {


    void testSomething() {


    }

}
This looks like a fairly normal class that defaults with transactioning turned on; we'll discuss that in a bit. In the service, you can do whatever you'd want to do in a controller; you can call other classes, access the domain, pass in parameters, and so on.
Calling the Service
As we said earlier, you still have to go through the controller first when calling from a web page. To access the service, you use simple injection. In Listing 6-43, the controller accesses the service you just created.
Listing 6-43. TodoController Accesses TodoService
class TodoController {


    def todoService


    def process = {

        todoService.serviceMethod()

    }

}
If you've used Spring, Seam, HiveMind, or any other injection framework out there, this concept should be familiar to you.
Injecting into the Service
In addition to being able to inject the service into the controller, you can inject other services into the service as well. If want to use Spring, or if you have some legacy Spring code, you can also inject Spring beans into the service.
If you had the following bean defined in spring
esources.xml:
<bean id="customBean" class="com.CustomBeanImpl"/>
you could inject this bean into your bean using the ID as the name. Simply define it as def customBean inside your service. This works by using Spring's functionality to auto-wire by name.
Initializing the Service
If you recall, Spring and EJB don't always rely on constructors for initialization. The main reason for this is because often a constructor might rely on items that need to be injected (like Spring services), but these items may not be available during instantiation. If you have any items that need to be looked up at creation, use Spring's InitializingBean, which calls the afterPropertiesSet() method. Listing 6-44 shows TodoService with a post-initialization method.
Listing 6-44. TodoService with a Post-Initialization Method
import org.springframework.beans.factory.InitializingBean


class TodoService implements InitializingBean

{


    boolean transactional = true


    void afterPropertiesSet()

    {

        println "Post Initialization"

    }


    def serviceMethod() {

        println "TodoService - serviceMethod"

    }

}
The bold areas are the new sections. As you can see, calling an initialize method is quite simple to do, and you have access to any other services that have been injected into that service.
Setting a Bean to Be Transactional
As you might have noticed, transactional = true exists everywhere. You can control the transaction boundaries of items inside the services. When set to true, Grails defaults the service to PROPAGATION_REQUIRED. Within the services, you can even inject the data sources and get even finer-grain control.
Service Context Available in the Service
The last subject we'll cover is service contexts. Contexts have been around for a while; for a long time, we've had application, request, session, and page contexts. However, in recent years with frameworks such as Seam and, more recently, Spring, contexts have expanded to include the conversation context and others.
You can think of the conversation context as more than a request and less than a session. The data has a start, a middle, and an end. For example, take a credit-card application, which can take multiple pages to complete. It contains data that you'll want to have until the end.
We won't cover conversation contexts (also known as flows) in this book. However, here we'll show you how you can set the service for these contexts. By default, every context is a singleton, meaning that the whole application shares this one instance. This means that you don't want to have any data as a global property with its state specific to the user. To adjust the context of a service, add the following line to your service:
static scope = "singleton"
The "singleton" is the default, and if you don't define the scope, the service will be automatically assumed to be a singleton. Table 6-4 provides a list of the available contexts.
Table 6-4. Available Contexts for Services
| Name | Description |
prototype |
Every time the service is injected in a new class, a new service is instantiated. |
request |
Each time a request to the server is made, a service is instantiated. |
flash |
The service is instantiated for the current and next requests only. |
flow |
The service lives for the lifetime of a controller's web flow. |
conversation |
The service lives for the lifetime of a controller's web flow and subflows. |
session |
The service is instantiated and kept for the life of the user's HttpSession. |
singleton |
This default service is treated like a singleton and shared across the application scope. |
Summary
In this chapter, we covered quite a bit of information in a relative short amount of space. Database interaction is an important piece of the framework puzzle, and many books and sites are devoted to it alone.
We showed you how to create domain objects, and we explained the options used to create them. This is important to understand, so you know how our domains operate. Hopefully, you'll be able to create some of your own.
From there, we showed you how to query the domains; as you saw, there are quite a few options. Throughout the rest of this book, we will use bits and pieces of each, basically picking the best one that suits our needs at the time. Hopefully, you've gotten an idea of when to use each, but be forewarned that for many, there is no one right answer.
We briefly covered the ability to use database migrations, which is useful on systems that can change from time to time in production and when you want accurate scripts to go from each level.
Lastly, we dove into services. We will use them in various forms as the book progresses. In future chapters, you'll see how services can be useful and also how the different scopes can boost your applications performance, especially when coupled with web flows.
Now that the domain is all ready to go, we'll start to dive into some more interesting code in the next few chapters. First, though, you need to secure the application so you don't have other people changing your ToDos. That's what we'll tackle next in Chapter 7.