Android Invaders: The Grand Finale
We are finally ready to create the last game for this book. This time we are going to develop a simple action/arcade game, adapting an old classic and giving it a nice 3D look, using the techniques discussed in the previous two chapters.
As you might have guessed from the title of this chapter, we are about to implement a variation of Space Invaders, a 2D game in its original form (illustrated in Figure 12-1).

Figure 12-1. The original Space Invaders arcade game
Here’s a little surprise: we’ll continue to stay in 2D, for the most part. All of our objects will have 3D bounds in the form of bounding spheres and positions in 3D space. However, movement will only happen in the x-z plane, which makes certain things a little easier. Figure 12-2 shows the adapted 3D Space Invaders world. The mock-up was created with Wings3D.

Figure 12-2. The 3D game field mock-up
Now to define the game mechanics:
- A ship is flying at the bottom of the playfield, capable of navigating only on the x axis.
- The movement is limited to the boundaries of the playfield. When the ship reaches the left or right boundary of the game field, it simply stops moving.
- We want to give the player the option to use either the accelerometer to navigate the ship, or the onscreen buttons, for left and right movement.
- The ship can fire one shot per second. The player shoots by pressing an onscreen button.
- At the bottom of the game field, there are three shields, each composed of five cubes.
- Invaders start off with the configuration shown in Figure 12-2, and then move to the left for some distance, then move some distance in the positive z direction, and then move to the right for some distance. There will be 32 invaders in total, making up four rows of eight invaders.
- Invaders will shoot randomly.
- When a shot hits the ship, the ship explodes and loses one life.
- When a shot hits a shield, the shield disappears permanently.
- When a shot hits an invader, the invader explodes and the score is increased by 10 points.
- When all invaders are destroyed, a new wave of invaders appears, moving slightly faster than the last wave.
- When an invader collides directly with a ship, the game is over.
- When the ship has lost all of its lives, the game is over.
That’s not an overwhelming list, is it? All operations can essentially be performed in 2D (in the x-z plane instead of the x-y plane). We’ll still use 3D bounding spheres, however. If you’d like to, you can extend the game to real 3D after we are done with the first iteration. For now, let’s move on to the backstory and art style.
Developing a Backstory and Choosing an Art Style
We’ll call the game Android Invaders, in deference to Android and Space Invaders. That’s cheap, but we don’t plan on producing an AAA title yet. In the tradition of classic shooters, like Doom, the backstory will be minimal. It goes like this:
Invaders from outer space attack Earth. You are the sole person capable of fending off the evil forces.
That was good enough for Doom and Quake, so it’s good enough for Android Invaders, too.
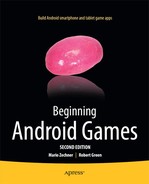
The art style will be a little retro when it comes to the GUI, using the same old-fashioned font we used in Chapter 9 for Super Jumper. Our game world itself will be displayed in fancy 3D, with textured and lighted 3D models. Figure 12-3 shows what the game screen will look like.
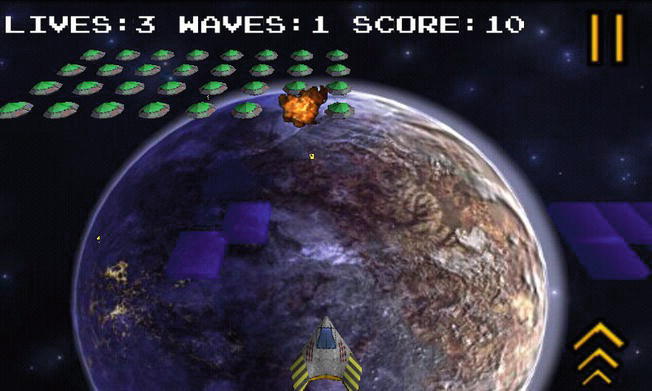
Figure 12-3. The Android Invaders mockup. Fancy!
The music will be a rock/metal mixture, and the sound effects will match the scenario.
Defining Screens and Transitions
Since we have already implemented help screens and high-scores screens twice, in Chapter 6’s Mr. Nom and in Chapter 9’s Super Jumper, we’ll refrain from doing so for Android Invaders; it’s always the same principle, and a player should immediately know what to do once he or she is presented with the game screen, anyway. Instead, we’ll add a settings screen that allows the player to select the type of input (multitouch or accelerometer) and to disable or enable sound. Here’s the list of screens for Android Invaders:
- A main screen with a logo and PLAY and SETTINGS options.
- A game screen that immediately starts with the game (no more READY? signal!) and also handles the paused state (with RESUME and QUIT options) and displays GAME OVER once the ship has no more lives.
- A settings screen that displays three icons representing the configuration options (multitouch, accelerometer, and sound).
This is very similar to what we had in the previous two games. Figure 12-4 shows all the screens and transitions.

Figure 12-4. Screens and transitions of Android Invaders
Defining the Game World
One of the joys of working in 3D is that we are free from the shackle of pixels. We can define our world in whatever units we want. The game mechanics that we outlined dictate a limited playing field, so let’s start by defining that field. Figure 12-5 shows the area of the playing field in our game’s world.
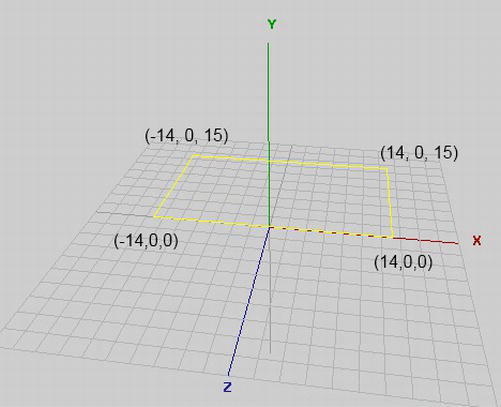
Figure 12-5. The playing field
Everything in our world will happen inside this boundary in the x-z plane. Coordinates will be limited on the x axis from −14 to 14 and on the z axis from 0 to −15. The ship will be able to move along the bottom edge of the playing field, from (−14,0,0) to (14,0,0).
Next, we define the sizes of the objects in our world:
- The ship will have a radius of 0.5 units.
- The invaders will have a slightly larger radius of 0.75 units. This makes them easier to hit.
- The shield blocks each have a radius of 0.5 units.
- The shots each have a radius of 0.1 units.
How did we arrive at these values? We simply divided up our game world in cells of 1 unit by 1 unit and determined how big each game element should be in relation to the size of the playing field. Usually, you’d arrive at these measurements through a little experimentation, or by using real-world units like meters. In Android Invaders, we’ll use nameless units.
The radii we just defined can be directly translated to bounding spheres, of course. In the case of the shield blocks and the ship, we can cheat a little, as those are clearly not spherical. Thanks to the 2D properties of our world, we can get away with this little trick. In the case of the invaders, the sphere is actually a pretty good approximation.
We also have to define the velocities of our moving objects:
- The ship can move with a maximum velocity of 20 units per second. As in Super Jumper, we’ll usually have a lower velocity, as it is dependent on the device’s tilt.
- The invaders initially move 1 unit per second. Each wave will slightly increase this speed.
- The shots move at 10 units per second.
With these definitions, we can start implementing the logic of our game world. Before we jump into implementing the logic, we’ll create our assets first.
Creating the Assets
As in our previous games, we have two kinds of graphical assets: UI elements, such as logos and buttons, and the models for the different types of objects in our game.
The UI Assets
We’ll again create our UI assets relative to some target resolution. Our game will be run in landscape mode, so we simply choose a target resolution of 480×320 pixels. The screens in Figure 12-4 show the elements we already have in our UI: a logo, different menu items, a couple of buttons, and some text. For the text, we’ll reuse the font from Super Jumper. We’ve already done the compositing for all these elements in previous games, and you’ve learned that putting them into a texture atlas can be beneficial for performance. The texture atlas we’ll use for Android Invaders, containing all the UI elements (as well as the font for all the screens in the game), is shown in Figure 12-6.

Figure 12-6. The UI element atlas, with buttons, logo, and font. It is stored in the file items.png, which is 512×512 pixels
This is essentially the same concept we used in Super Jumper. We also have a background that will be rendered in all screens. Figure 12-7 shows this image.

Figure 12-7. The background stored in background.jpg, 512×512 pixels
As previously shown in Figure 12-4, we only need to use the top-left region of this image to render a full frame (480×320 pixels).
Those are all the UI elements we need. Now we can look at our 3D models and their textures.
The Game Assets
As mentioned in Chapter 11, going into detail on how to create 3D models with software like Wings3D is beyond the scope of this book. If you want to create your own models, choose an application to work with and plow through some tutorials, which are often freely available on the Internet. For the models of Android Invaders, we used Wings3D and simply exported them to the OBJ format, which we can load with our framework. All models are composed of triangles only and have texture coordinates and normals. We won’t need texture coordinates for some of the models, but it doesn’t hurt to have them.
The ship model and its texture are illustrated in Figure 12-8.

Figure 12-8. The ship model in Wings3D (ship.obj) and its texture (ship.png, 256×256 pixels)
The crucial thing is that the ship in Figure 12-8 has roughly the “radius” outlined in the previous section. We don’t need to scale anything or transform sizes and positions from one coordinate system to the other. The ship’s model is defined with the same units as its bounding sphere!
Figure 12-9 shows the invader model and its texture.

Figure 12-9. The invader model (invader.obj) and its texture (invader.png, 256×256 pixels)
The invader model follows the same principles as the ship model. We have one OBJ file storing the vertex positions, texture coordinates, normals and faces, and a texture image.
The shield blocks and shots are modeled as cubes and are stored in the files shield.obj and shot.obj. Although they have texture coordinates assigned, we don’t actually use texture mapping when rendering them. We just draw them as (translucent) objects with a specific color (blue in the case of the shield blocks, yellow for the shots).
Finally, we have our explosions (see Figure 12-3 again). How do we model those? We don’t. We do what we did in 2D and simply draw a rectangle with a proper z position in our 3D world, texture mapping it with a frame from a texture image containing an explosion animation. It’s the same principle we used for the animated objects in Super Jumper. The only difference is that we draw the rectangle at a z position less than 0 (wherever the exploding object is located). We can even abuse the SpriteBatcher class to do this. Hurray for OpenGL ES! Figure 12-10 shows the texture.
Figure 12-10. The explosion animation texture (explode.png, 256×256 pixels)
Each frame of the animation is 64×64 pixels in size. All we need to do is generate texture regions for each frame and put them into an Animation instance we can use to fetch the correct frame for a given animation time, just as we did for the squirrel and Bob animations in Super Jumper.
Sound and Music
For the sound effects, we used as3sfxr again. We found the explosion sound effect on the Web. It’s a public domain sound effect, so we can use it in Android Invaders. For our own version of Android Invaders, we recorded the music ourselves with real instruments. Yes—that’s very old-school. Here’s the list of audio files for Android Invaders:
- click.ogg: A click sound used for the menu items/buttons
- shot.ogg: A shot sound
- explosion.ogg: An explosion sound
- music.mp3: The rock/metal song we wrote for Android Invaders
Plan of Attack
With our game mechanics, design, and assets in place, we can start coding. As usual, we create a new project, copy over all of our framework code, ensure that we have a proper manifest and icons, and so on. By now, you should have a pretty good grasp of how to set things up. All the code of Android Invaders will be placed in the package com.badlogic.androidgames.androidinvaders. The assets are stored in the assets/ directory of the Android project. We use the same general structure we used in Super Jumper: a default activity deriving from GLGame; a couple of GLScreen instances implementing the different screens and transitions, as shown in Figure 12-4; classes for loading assets and storing settings, as well as the classes for the game objects; and a rendering class that can draw our game world in 3D. Let’s start with the Assets class.
The Assets Class
Well, we’ve done this before in Mr. Nom and Super Jumper, so don’t expect any surprises. Listing 12-1 shows the code of the Assets class.
Listing 12-1. Assets.java, Loading and Storing Assets as Always
package com.badlogic.androidgames.androidinvaders;

import com.badlogic.androidgames.framework.Music;
import com.badlogic.androidgames.framework.Sound;
import com.badlogic.androidgames.framework.gl.Animation;
import com.badlogic.androidgames.framework.gl.Font;
import com.badlogic.androidgames.framework.gl.ObjLoader;
import com.badlogic.androidgames.framework.gl.Texture;
import com.badlogic.androidgames.framework.gl.TextureRegion;
import com.badlogic.androidgames.framework.gl.Vertices3;
import com.badlogic.androidgames.framework.impl.GLGame;

public class Assets {
    public static Texture background;
    public static TextureRegion backgroundRegion;
    public static Texture items;
    public static TextureRegion logoRegion;
    public static TextureRegion menuRegion;
    public static TextureRegion gameOverRegion;
    public static TextureRegion pauseRegion;
    public static TextureRegion settingsRegion;
    public static TextureRegion touchRegion;
    public static TextureRegion accelRegion;
    public static TextureRegion touchEnabledRegion;
    public static TextureRegion accelEnabledRegion;
    public static TextureRegion soundRegion;
    public static TextureRegion soundEnabledRegion;
    public static TextureRegion leftRegion;
    public static TextureRegion rightRegion;
    public static TextureRegion fireRegion;
    public static TextureRegion pauseButtonRegion;
    public static Font font;
We have several members storing the texture of the UI elements, as well as the background image. We also store a couple of TextureRegions, as well as a Font instance. This covers all of our UI needs.
    public static Texture explosionTexture;
    public static Animation explosionAnim;
    public static Vertices3 shipModel;
    public static Texture shipTexture;
    public static Vertices3 invaderModel;
    public static Texture invaderTexture;
    public static Vertices3 shotModel;
    public static Vertices3 shieldModel;
We use Texture instances and Vertices3 instances to store the models and textures of our game’s objects. We use an Animation instance to hold the frames of the explosion animation.
    public static Musicmusic;
    public static Sound clickSound;
    public static Sound explosionSound;
    public static Sound shotSound;
We use a Music instance and a few Sound instances to store our game’s audio.
    public static void load(GLGame game) {
        background = new Texture(game, "background.jpg",true );
        backgroundRegion = new TextureRegion(background, 0, 0, 480, 320);
        items = new Texture(game, "items.png",true );
        logoRegion = new TextureRegion(items, 0, 256, 384, 128);
        menuRegion = new TextureRegion(items, 0, 128, 224, 64);
        gameOverRegion = new TextureRegion(items, 224, 128, 128, 64);
        pauseRegion = new TextureRegion(items, 0, 192, 160, 64);
        settingsRegion = new TextureRegion(items, 0, 160, 224, 32);
        touchRegion = new TextureRegion(items, 0, 384, 64, 64);
        accelRegion = new TextureRegion(items, 64, 384, 64, 64);
        touchEnabledRegion = new TextureRegion(items, 0, 448, 64, 64);
        accelEnabledRegion = new TextureRegion(items, 64, 448, 64, 64);
        soundRegion = new TextureRegion(items, 128, 384, 64, 64);
        soundEnabledRegion = new TextureRegion(items, 190, 384, 64, 64);
        leftRegion = new TextureRegion(items, 0, 0, 64, 64);
        rightRegion = new TextureRegion(items, 64, 0, 64, 64);
        fireRegion = new TextureRegion(items, 128, 0, 64, 64);
        pauseButtonRegion = new TextureRegion(items, 0, 64, 64, 64);
        font = new Font(items, 224, 0, 16, 16, 20);
The load() method starts off by creating the UI-related stuff. It’s just some texture loading and region creation, as usual.
        explosionTexture = new Texture(game, "explode.png",true );
        TextureRegion[] keyFrames = new TextureRegion[16];
        int frame = 0;
        for (int y = 0; y < 256; y += 64) {
            for (int x = 0; x < 256; x += 64) {
                keyFrames[frame++] = new TextureRegion(explosionTexture, x, y, 64, 64);
            }
        }
        explosionAnim = new Animation(0.1f, keyFrames);
Next, we create the Texture for the explosion animation, along with the TextureRegions for each frame and the Animation instance. We simply loop from the top left to the bottom right in 64-pixel increments, and create one TextureRegion per frame. We then feed all the regions to an Animation instance, whose frame duration is 0.1 second.
        shipTexture = new Texture(game, "ship.png",true );
        shipModel  = ObjLoader.load(game, "ship.obj");
        invaderTexture = new Texture(game, "invader.png",true );
        invaderModel  = ObjLoader.load(game, "invader.obj");
        shieldModel  = ObjLoader.load(game, "shield.obj");
        shotModel  = ObjLoader.load(game, "shot.obj");
Next, we load the models and textures for the ship, the invaders, the shield blocks, and the shots. This is pretty simple with our mighty ObjLoader, isn’t it? Note that we use mipmapping for the Textures.
        music  = game.getAudio().newMusic("music.mp3");
        music.setLooping(true );
        music.setVolume(0.5f);
        if (Settings.soundEnabled)
            music.play();

        clickSound  = game.getAudio().newSound("click.ogg");
        explosionSound  = game.getAudio().newSound("explosion.ogg");
        shotSound  = game.getAudio().newSound("shot.ogg");
    }
Here, we load the music and sound effects for our game. The reference to the Settings class is essentially the same as in Super Jumper and Mr. Nom. This method will be called once when our game is started in the AndroidInvaders class that we’ll implement in a minute. Once all assets are loaded, we can forget about most of them, except for the Textures, which we need to reload if the game is paused and then resumed.
    public static void reload() {
        background.reload();
        items.reload();
        explosionTexture.reload();
        shipTexture.reload();
        invaderTexture.reload();
        if (Settings.soundEnabled)
            music.play();
    }
That’s where the reload() method comes in. We call this method in the AndroidInvaders.onResume() method so that our textures will be reloaded and the music will be unpaused.
    public static void playSound(Sound sound) {
        if (Settings.soundEnabled)
            sound.play(1);
    }
}
Finally, we have the same convenience method we used in Super Jumper to ease the pain of playing back a sound effect. When the user disables sound, we don’t play anything in this method.
Note Although this method of loading and managing assets is easy to implement, it can become a mess if you have more than a handful of assets. Another issue is that sometimes not all assets will fit into the memory all at once. For simple games, like the ones we’ve developed in this book, the method is fine. We often use it in our games, as well. For larger games, you have to consider a more elaborate asset management strategy.
The Settings Class
As with the Assets class, for the Settings class, we can again reuse what we wrote for the previous games, to some extent. We can now store an additional Boolean that tells us whether the user wants to use the touchscreen or the accelerometer for moving the ship. We can drop the high-score support, as we don’t need to keep track of this. (As an exercise, you can, of course, reintroduce both the high-scores screen and the saving of these scores to the SD card.) Listing 12-2 shows the code.
Listing 12-2. Settings.java, Same Old, Same Old
package com.badlogic.androidgames.androidinvaders;

import java.io.BufferedReader;
import java.io.BufferedWriter;
import java.io.IOException;
import java.io.InputStreamReader;
import java.io.OutputStreamWriter;

import com.badlogic.androidgames.framework.FileIO;

public class Settings {
    public static boolean soundEnabled =true ;
    public static boolean touchEnabled =true ;
    public final static Stringfile  = ".androidinvaders";
First, we store whether the sounds are enabled and whether the user wants to use touch input to navigate the ship. The settings will be stored in the file .androidinvaders on the SD card.
    public static void load(FileIO files) {
        BufferedReader in = null ;
        try {
            in = new BufferedReader(new InputStreamReader(files.readFile(file)));
            soundEnabled  = Boolean.parseBoolean(in.readLine());
            touchEnabled  = Boolean.parseBoolean(in.readLine());
        }catch (IOException e) {
            // :( It's ok we have defaults
        }catch (NumberFormatException e) {
            // :/ It's ok, defaults save our day
        }finally {
            try {
                if (in != null )
                    in.close();
            }catch (IOException e) {
            }
        }
    }
There is nothing in this section that we need to go over, really; we’ve done this before. We try to read the two Booleans from the file on the SD card. If that fails, we fall back to the default values.
    public static void save(FileIO files) {
        BufferedWriter out = null ;
        try {
            out = new BufferedWriter(new OutputStreamWriter(
                    files.writeFile(file)));
            out.write(Boolean.toString(soundEnabled));
            out.write("
");
            out.write(Boolean.toString(touchEnabled));
        }catch (IOException e) {
        }finally {
            try {
                if (out != null )
                    out.close();
            }catch (IOException e) {
            }
        }
    }
}
Saving is again very boring. We just store whatever we have, and if that fails, we ignore the error. This is another good place for improvement, as you’ll probably want to let the user know that something went wrong.
The Main Activity
As usual, we have a main activity that derives from the GLGame class. It is responsible for loading the assets through a call to Assets.load() on startup, as well as pausing and resuming the music when the activity is paused or resumed. As the start screen, we just return the MainMenuScreen, which we will implement shortly. One thing we need to remember is to set the orientation to landscape in the activity's definition in the manifest file. Listing 12-3 shows the code.
Listing 12-3. AndroidInvaders.java, the Main Activity
package com.badlogic.androidgames.androidinvaders;

import javax.microedition.khronos.egl.EGLConfig;
import javax.microedition.khronos.opengles.GL10;

import com.badlogic.androidgames.framework.Screen;
import com.badlogic.androidgames.framework.impl.GLGame;

public class AndroidInvaders extends GLGame {
    boolean firstTimeCreate =true ;

    public Screen getStartScreen() {
        return new MainMenuScreen(this );
    }

    @Override
    public void onSurfaceCreated(GL10 gl, EGLConfig config) {
        super.onSurfaceCreated(gl, config);
        if (firstTimeCreate) {
            Settings.load(getFileIO());
            Assets.load(this );
            firstTimeCreate =false ;
        }else {
            Assets.reload();
        }
    }

    @Override
    public void onPause() {
        super.onPause();
        if (Settings.soundEnabled)
            Assets.music.pause();
    }
}
This is exactly the same as in Super Jumper. On a call to getStartScreen(), we return a new instance of the MainMenuScreen that we’ll write next. In onSurfaceCreated(), we make sure our assets are reloaded, and in onPause(), we pause the music if it is playing.
As you can see, there are a lot of things that can be repeated once you have a good idea of how to approach the implementation of a simple game. Think about how you could reduce the boilerplate code even more by moving things to the framework!
The Main Menu Screen
We’ve already written many trivial screens for the previous games. Android Invaders also has some of these. The principle is always the same: offer some UI elements to click and trigger transitions or configuration changes, and display some information. The main menu screen presents only the logo and the PLAY and SETTINGS options, as shown earlier in Figure 12-4. Touching one of these buttons triggers a transition to the GameScreen or the SettingsScreen. Listing 12-4 shows the code.
Listing 12-4. MainMenuScreen.java, the Main Menu Screen
package com.badlogic.androidgames.androidinvaders;

import java.util.List;

import javax.microedition.khronos.opengles.GL10;

import com.badlogic.androidgames.framework.Game;
import com.badlogic.androidgames.framework.Input.TouchEvent;
import com.badlogic.androidgames.framework.gl.Camera2D;
import com.badlogic.androidgames.framework.gl.SpriteBatcher;
import com.badlogic.androidgames.framework.impl.GLScreen;
import com.badlogic.androidgames.framework.math.OverlapTester;
import com.badlogic.androidgames.framework.math.Rectangle;
import com.badlogic.androidgames.framework.math.Vector2;

public class MainMenuScreen extends GLScreen {
    Camera2D guiCam;
    SpriteBatcher batcher;
    Vector2 touchPoint;
    Rectangle playBounds;
    Rectangle settingsBounds;
As usual, we need a camera to set up our viewport and the virtual target resolution of 480×320 pixels. We use a SpriteBatcher to render the UI elements and background image. The Vector2 and Rectangle instances will help us decide whether a touch hit a button.
    public MainMenuScreen(Game game) {
        super(game);

        guiCam = new Camera2D(glGraphics, 480, 320);
        batcher = new SpriteBatcher(glGraphics, 10);
        touchPoint = new Vector2();
        playBounds = new Rectangle(240–112, 100, 224, 32);
        settingsBounds = new Rectangle(240–112, 100–32, 224, 32);
    }
In the constructor, we set up the camera and the SpriteBatcher, as we always do. We instantiate the Vector2 and the Rectangle instances using the position, width, and height of the two elements onscreen, in our 480×320 target resolution.
    @Override
    public void update(float deltaTime) {
        List<TouchEvent> events = game.getInput().getTouchEvents();
        int len = events.size();
        for (int i = 0; i < len; i++) {
            TouchEvent event = events.get(i);
            if (event.type != TouchEvent.TOUCH_UP)
                continue ;

            guiCam.touchToWorld(touchPoint.set(event.x, event.y));
            if (OverlapTester.pointInRectangle(playBounds, touchPoint)) {
                Assets.playSound(Assets.clickSound);
                game.setScreen(new GameScreen(game));
            }
            if (OverlapTester.pointInRectangle(settingsBounds, touchPoint)) {
                Assets.playSound(Assets.clickSound);
                game.setScreen(new SettingsScreen(game));
            }
        }
    }
In the update() method, we fetch the touch events and check for “touch-up” events. If there is such an event, we transform its real coordinates to the coordinate system the camera sets up. All that’s left to do is to check the touch point against the two rectangles bounding the menu entries. If one of them is hit, we play the click sound and transition to the respective screen.
    @Override
    public void present(float deltaTime) {
        GL10 gl = glGraphics.getGL();
        gl.glClear(GL10.GL_COLOR_BUFFER_BIT);
        guiCam.setViewportAndMatrices();

        gl.glEnable(GL10.GL_TEXTURE_2D);

        batcher.beginBatch(Assets.background);
        batcher.drawSprite(240, 160, 480, 320, Assets.backgroundRegion);
        batcher.endBatch();

        gl.glEnable(GL10.GL_BLEND);
        gl.glBlendFunc(GL10.GL_SRC_ALPHA, GL10.GL_ONE_MINUS_SRC_ALPHA);

        batcher.beginBatch(Assets.items);
        batcher.drawSprite(240, 240, 384, 128, Assets.logoRegion);
        batcher.drawSprite(240, 100, 224, 64, Assets.menuRegion);
        batcher.endBatch();

        gl.glDisable(GL10.GL_BLEND);
        gl.glDisable(GL10.GL_TEXTURE_2D);
    }
The present() method does the same thing it did in most of the screens for Super Jumper. We clear the screen and set up the projection matrix via our camera. We enable texturing and then immediately render the background via the SpriteBatcher and TextureRegion we defined in the Assets class. The menu items have translucent areas, so we enable blending before we render them.
    @Override
    public void pause() {
    }

    @Override
    public void resume() {
    }

    @Override
    public void dispose() {
    }
}
The rest of the class consists of boilerplate methods that don’t do anything. Texture reloading is done in the AndroidInvaders activity, so there isn’t anything left to take care of in the MainMenuScreen.
The Settings Screen
The settings screen offers the player options to change the input method and an option to enable or disable audio. We indicate these options with three different icons (see Figure 12-4). Touching either the hand icon or the tilted-device icon enables the respective input method. The icon for the currently active input method will have a gold color. For the audio icon, we do the same as in the previous games.
The choices of the user are reflected by setting the respective Boolean values in the Settings class. We also make sure these settings are instantly saved to the SD card each time one of them changes, via a call to Settings.save(). Listing 12-5 shows the code.
Listing 12-5. SettingsScreen.java, the Settings Screen
package com.badlogic.androidgames.androidinvaders;

import java.util.List;

import javax.microedition.khronos.opengles.GL10;

import com.badlogic.androidgames.framework.Game;
import com.badlogic.androidgames.framework.Input.TouchEvent;
import com.badlogic.androidgames.framework.gl.Camera2D;
import com.badlogic.androidgames.framework.gl.SpriteBatcher;
import com.badlogic.androidgames.framework.impl.GLScreen;
import com.badlogic.androidgames.framework.math.OverlapTester;
import com.badlogic.androidgames.framework.math.Rectangle;
import com.badlogic.androidgames.framework.math.Vector2;

public class SettingsScreen extends GLScreen {
    Camera2D guiCam;
    SpriteBatcher batcher;
    Vector2 touchPoint;
    Rectangle touchBounds;
    Rectangle accelBounds;
    Rectangle soundBounds;
    Rectangle backBounds;
As usual, we have a camera and a SpriteBatcher to render our UI elements and the background. To check whether a touch event hit a button, we store a Vector2 instance and four Rectangle instances for the four buttons onscreen.
    public SettingsScreen(Game game) {
        super(game);
        guiCam = new Camera2D(glGraphics, 480, 320);
        batcher = new SpriteBatcher(glGraphics, 10);
        touchPoint = new Vector2();

        touchBounds = new Rectangle(120–32, 160–32, 64, 64);
        accelBounds = new Rectangle(240–32, 160–32, 64, 64);
        soundBounds = new Rectangle(360–32, 160–32, 64, 64);
        backBounds = new Rectangle(32, 32, 64, 64);
    }
In the constructor, we set up all the members for the screen. No rocket science involved here.
    @Override
    public void update(float deltaTime) {
        List<TouchEvent> events = game.getInput().getTouchEvents();
        int len = events.size();
        for (int i = 0; i < len; i++) {
            TouchEvent event = events.get(i);
            if (event.type != TouchEvent.TOUCH_UP)
                continue ;

            guiCam.touchToWorld(touchPoint.set(event.x, event.y));
            if (OverlapTester.pointInRectangle(touchBounds, touchPoint)) {
                Assets.playSound(Assets.clickSound);
                Settings.touchEnabled =true ;
                Settings.save(game.getFileIO());
            }
            if (OverlapTester.pointInRectangle(accelBounds, touchPoint)) {
                Assets.playSound(Assets.clickSound);
                Settings.touchEnabled =false ;
                Settings.save(game.getFileIO());
            }
            if (OverlapTester.pointInRectangle(soundBounds, touchPoint)) {
                Assets.playSound(Assets.clickSound);
                Settings.soundEnabled  = !Settings.soundEnabled;
                if (Settings.soundEnabled) {
                    Assets.music.play();
                }else {
                    Assets.music.pause();
                }
                Settings.save(game.getFileIO());
            }
            if (OverlapTester.pointInRectangle(backBounds, touchPoint)) {
                Assets.playSound(Assets.clickSound);
                game.setScreen(new MainMenuScreen(game));
            }
        }
    }
The update() method fetches the touch events and checks whether a “touch-up” event has been registered. If so, it transforms the touch coordinates to the camera’s coordinate system. With these coordinates, it tests the various rectangles to decide what action to take.
    @Override
    public void present(float deltaTime) {
        GL10 gl = glGraphics.getGL();
        gl.glClear(GL10.GL_COLOR_BUFFER_BIT);
        guiCam.setViewportAndMatrices();

        gl.glEnable(GL10.GL_TEXTURE_2D);

        batcher.beginBatch(Assets.background);
        batcher.drawSprite(240, 160, 480, 320, Assets.backgroundRegion);
        batcher.endBatch();

        gl.glEnable(GL10.GL_BLEND);
        gl.glBlendFunc(GL10.GL_SRC_ALPHA, GL10.GL_ONE_MINUS_SRC_ALPHA);

        batcher.beginBatch(Assets.items);
        batcher.drawSprite(240, 280, 224, 32, Assets.settingsRegion);
        batcher.drawSprite(120, 160, 64, 64,
                Settings.touchEnabled? Assets.touchEnabledRegion: Assets.touchRegion);
        batcher.drawSprite(240, 160, 64, 64,
                Settings.touchEnabled? Assets.accelRegion
                        : Assets.accelEnabledRegion);
        batcher.drawSprite(360, 160, 64, 64,
                Settings.soundEnabled? Assets.soundEnabledRegion: Assets.soundRegion);
        batcher.drawSprite(32, 32, 64, 64, Assets.leftRegion);
        batcher.endBatch();

        gl.glDisable(GL10.GL_BLEND);
        gl.glDisable(GL10.GL_TEXTURE_2D);
    }
The present() method does the same thing as the MainMenuScreen.render() method. We render the background and buttons with texturing and blending where needed. Based on the current settings, we decide which TextureRegion to use to render the three settings buttons.
    @Override
    public void pause() {
    }

    @Override
    public void resume() {
    }

    @Override
    public void dispose() {
    }
}
The rest of the class is again composed of a few boilerplate methods with no functionality whatsoever.
Before we can create the GameScreen class, we first have to implement the logic and rendering of our world. Model-View-Controller to the rescue!
The Simulation Classes
As usual, we’ll create a single class for each object in our world:
- Shield blocks
- Shots
- A ship
- Invaders
The orchestration is performed by an all-knowing World class. As we saw in Chapter 11, there’s really not such a huge difference between 2D and 3D when it comes to object representation. Instead of GameObject and DynamicObject, we can now use GameObject3D and DynamicObject3D. The only differences are that we use Vector3 instances instead of Vector2 instances to store positions, velocities, and accelerations, and we use bounding spheres instead of bounding rectangles to represent the shapes of the objects. All that’s left to do is implement the behavior of the different objects in our world.
The Shield Block Class
From the game mechanics definition, we know the size and behavior of our shield blocks. They just sit there in our world at some location, waiting to be annihilated by a shot, either from the ship or from an invader. There’s not a lot of logic in them, so the code is rather concise. Listing 12-6 shows the internals of a shield block.
Listing 12-6. Shield.java, the Shield Block Class
package com.badlogic.androidgames.androidinvaders;

import com.badlogic.androidgames.framework.GameObject3D;

public class Shield extends GameObject3D {
    static float SHIELD_RADIUS  = 0.5f;

    public Shield(float x,float y,float z) {
        super(x, y, z,SHIELD_RADIUS);
    }
}
We define the shield’s radius and initialize its position and bounding sphere according to the constructor parameters. That’s all there is to it!
The Shot Class
The Shot class is equally simple. It derives from DynamicGameObject3D, as it is actually moving. Listing 12-7 shows the code.
Listing 12-7. Shot.java, the Shot Class
package com.badlogic.androidgames.androidinvaders;

import com.badlogic.androidgames.framework.DynamicGameObject3D;

public class Shot extends DynamicGameObject3D {
    static float SHOT_VELOCITY  = 10f;
    static float SHOT_RADIUS  = 0.1f;

    public Shot(float x,float y,float z,float velocityZ) {
        super(x, y, z,SHOT_RADIUS);
        velocity.z = velocityZ;
    }

    public void update(float deltaTime) {
        position.z += velocity.z * deltaTime;
        bounds.center.set(position);
    }
}
Here, we define some constants, namely the shot velocity and its radius. The constructor takes a shot’s initial position, as well as its velocity on the z axis. Wait, didn’t we just define the velocity as a constant? Yes, but that would let our shot travel only in the direction of the positive z axis. That’s fine for shots fired by the invaders, but the shots from the ship must travel in the opposite direction. When we create a shot (outside of this class), we know in which direction the shot should travel.
The update() method just does the usual point-mass physics. There is no acceleration involved, and thus we only need to add the constant velocity, multiplied by the delta time, to the shot’s position. The crucial part is that we also update the position of the bounding sphere’s center in accordance with the shot’s position. Otherwise, the bounding sphere would not move with the shot.
The Ship Class
The Ship class is responsible for updating the ship’s position, keeping it within the bounds of the game field, and keeping track of the state it is in. It can be either alive or exploding. In both cases, we keep track of the amount of time the ship has been in this state. We can then use the state time to do animations, for example, just as we did in Super Jumper and its WorldRenderer class. The ship will get its current velocity from the outside, based on the user input, either with accelerometer readings, as we did for Bob, or based on a constant, depending on what onscreen buttons are being pressed. Additionally, the ship will keep track of the number of lives it has, and offer us a way to tell it that it has been killed. Listing 12-8 shows the code.
Listing 12-8. Ship.java, the Ship Class
package com.badlogic.androidgames.androidinvaders;

import com.badlogic.androidgames.framework.DynamicGameObject3D;

public class Ship extends DynamicGameObject3D {
    static float SHIP_VELOCITY  = 20f;
    static int SHIP_ALIVE  = 0;
    static int SHIP_EXPLODING  = 1;
    static float SHIP_EXPLOSION_TIME  = 1.6f;
    static float SHIP_RADIUS  = 0.5f;
We start off with some constants to define the maximum ship velocity, two states (alive and exploding), the amount of time it takes the ship to explode fully, and the ship’s bounding sphere radius. Also, we let the class derive from DynamicGameObject3D, since it has a position and bounding sphere, as well as a velocity. The acceleration vector stored in a DynamicGameObject3D will again be unused.
    int lives;
    int state;
    float stateTime = 0;
Next we have the members, consisting of two integers, to keep track of the number of lives the ship has and its state (either SHIP_ALIVE or SHIP_EXPLODING). The last member keeps track of how many seconds the ship has been in its current state.
    public Ship(float x,float y,float z) {
        super(x, y, z,SHIP_RADIUS);
        lives = 3;
        state =SHIP_ALIVE;
    }
The constructor performs the usual super class constructor call and initializes some of the members. The ship will have a total of three lives.
    public void update(float deltaTime,float accelY) {
        if (state ==SHIP_ALIVE) {
            velocity.set(accelY / 10 *SHIP_VELOCITY, 0, 0);
            position.add(velocity.x * deltaTime, 0, 0);
            if (position.x < World.WORLD_MIN_X)
                position.x = World.WORLD_MIN_X;
            if (position.x > World.WORLD_MAX_X)
                position.x = World.WORLD_MAX_X;
            bounds.center.set(position);
        }else {
            if (stateTime >=SHIP_EXPLOSION_TIME) {
                lives--;
                stateTime = 0;
                state =SHIP_ALIVE;
            }
        }
        stateTime += deltaTime;
    }
The update() method is pretty simple. It takes the delta time and the current accelerometer reading on the y axis of the device (remember, we are in landscape mode, so the accelerometer y axis is our screen’s x axis). If the ship is alive, we set its velocity based on the accelerometer value (which will be in the range −10 to 10), just as we did for Bob in Super Jumper. Additionally, we update its position based on the current velocity. Next, we check whether the ship has left the boundaries of the playing field, using two constants that we’ll define later on in our World class. When the position is fixed, we can update the center of the bounding sphere for the ship.
If the ship is exploding, we check how long that’s been the case. After 1.6 seconds in the exploding state, the ship is finished exploding, loses one life, and goes back to the alive state.
Finally, we update the stateTime member based on the given delta time.
    public void kill() {
        state =SHIP_EXPLODING;
        stateTime = 0;
        velocity.x = 0;
    }
}
The last kill() method will be called by the World class if it determines a collision has occurred between the ship and either a shot or an invader. It will set the state to exploding, reset the state time, and make sure that the ship’s velocity is zero on all axes (we never set the y and z components of the velocity vector, since we only move on the x axis).
The Invader Class
Invaders are simply floating in space according to a predefined pattern. Figure 12-11 shows this pattern.
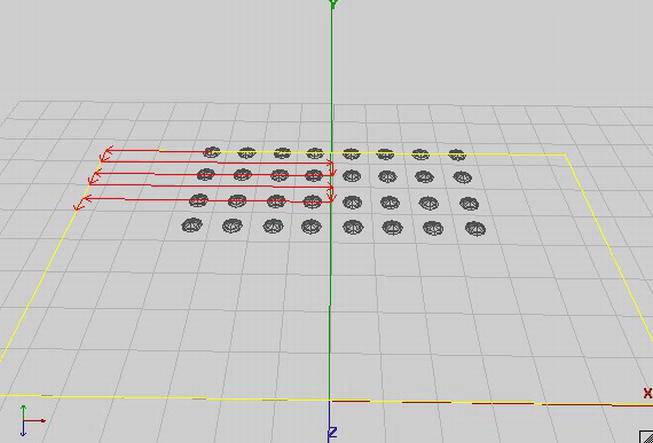
Figure 12-11. Movement of the invaders: left, down, right, down, left, down, right, down . . .
An invader follows an extremely simplistic movement pattern. From its initial position, it first moves to the right for some distance. Next, it moves downward (which means in the direction of the positive z axis on the playing field), again for a specified distance. Once it is done with that, it starts moving to the right, basically backtracking to the same x coordinate where it was before it started moving left.
The left and right movement distances are always the same, except in the beginning. Figure 12-11 illustrates the movement of the top-left invader. Its first left movement is shorter than all subsequent movements to the left or right. The horizontal movement distance is half the playing field width, 14 units in this case. For the first horizontal movement, the distance an invader has to travel is half this, or 7 units.
What we have to do is keep track of the direction in which an invader is moving, and how far it has already moved in that direction. If it reaches the movement distance for the given movement state (14 units for horizontal movement, 1 unit for vertical movement), it switches to the next movement state. All invaders will initially have their movement distance set to half the playing field’s width. Look again at Figure 12-11 to see why that works. This will make the invaders bounce off the edges of the playing field to the left and right.
Invaders also have a constant velocity. Well, the velocity will actually increase each time we generate a new wave of invaders if all the invaders from the current wave are dead. We can achieve this simply by multiplying this default velocity by some constant that is set from outside, namely the World class responsible for updating all invaders.
Finally, we have to keep track of the state of the invader, which can be alive or exploding. We’ll use the same mechanism as in the case of the ship, with a state and a state time. Listing 12-9 shows the code.
Listing 12-9. Invader.java, the Invader Class
package com.badlogic.androidgames.androidinvaders;

import com.badlogic.androidgames.framework.DynamicGameObject3D;

public class Invader extends DynamicGameObject3D {
    static final int INVADER_ALIVE  = 0;
    static final int INVADER_DEAD  = 1;
    static final float INVADER_EXPLOSION_TIME  = 1.6f;
    static final float INVADER_RADIUS  = 0.75f;
    static final float INVADER_VELOCITY  = 1;
    static final int MOVE_LEFT  = 0;
    static final int MOVE_DOWN  = 1;
    static final int MOVE_RIGHT  = 2;
We start with some constants that define the state of an invader, the duration of its explosion, its radius, and its default velocity, followed by three constants that allow us to keep track of the direction in which the invader is currently moving.
    int state =INVADER_ALIVE;
    float stateTime = 0;
    int move =MOVE_LEFT;
    boolean wasLastStateLeft =true ;
    float movedDistance = World.WORLD_MAX_X/ 2;
We keep track of an invader’s state, state time, movement direction, and movement distance, which should initially be set to half the playing field width. We also keep track of whether the last horizontal movement was to the left or not. This allows us to decide in which direction the invader should go once it has finished its vertical movement on the z axis.
    public Invader(float x,float y,float z) {
        super(x, y, z,INVADER_RADIUS);
    }
The constructor performs the usual setup of the invader’s position and bounding ship, via the super class constructor.
    public void update(float deltaTime,float speedMultiplier) {
        if (state ==INVADER_ALIVE) {
            movedDistance += deltaTime *INVADER_VELOCITY* speedMultiplier;
            if (move ==MOVE_LEFT) {
                position.x -= deltaTime *INVADER_VELOCITY* speedMultiplier;
                if (movedDistance > World.WORLD_MAX_X) {
                    move =MOVE_DOWN;
                    movedDistance = 0;
                    wasLastStateLeft =true ;
                }
            }
            if (move ==MOVE_RIGHT) {
                position.x += deltaTime *INVADER_VELOCITY* speedMultiplier;
                if (movedDistance > World.WORLD_MAX_X) {
                    move =MOVE_DOWN;
                    movedDistance = 0;
                    wasLastStateLeft =false ;
                }
            }
            if (move ==MOVE_DOWN) {
                position.z += deltaTime *INVADER_VELOCITY* speedMultiplier;
                if (movedDistance > 1) {
                    if (wasLastStateLeft)
                        move =MOVE_RIGHT;
                    else
                        move =MOVE_LEFT;
                    movedDistance = 0;
                }
            }

            bounds.center.set(position);
        }

        stateTime += deltaTime;
    }
The update() method takes the current delta time and speed multiplier to make the new waves of invaders move faster. We perform the movement only if the invader is alive, of course.
We start off by calculating how many units the invader will travel in this update and we increase the movedDistance member accordingly. If it moves to the left, we update the position directly by subtracting the movement velocity from the x coordinate of the position multiplied by the delta time and speed multiplier. If it has moved far enough, we tell it to start moving vertically by setting the move member to MOVE_DOWN. Also, we set wasLastStateLeft to true, so that we know that, after the down movement is finished, the invader has to move to the right.
We do exactly the same for handling movement to the right. The only difference is that we subtract the movement velocity from the position’s x coordinate and set wasLastStateLeft to false once the movement distance has been reached.
If the invader moves downward, we manipulate the z coordinate of the invader’s position and again check how far it has been moving in that direction. If it reached the movement distance for downward movement, we switch the movement state to either MOVE_LEFT or MOVE_RIGHT, depending on the last horizontal movement direction encoded in the wasLastStateLeft member. Once we are done updating the invader’s position, we set the position of the bounding sphere, as we did for the ship. Finally, we update the current state time and consider the update done.
    public void kill() {
        state =INVADER_DEAD;
        stateTime = 0;
    }
}
The kill() method here serves the same purpose as the kill() method for the Ship class. It allows us to tell the invader that it should start dying. We set its state to INVADER_DEAD and reset its state time. The invader will then stop moving, and only update its state time based on the current delta time.
The World Class
The World class is the mastermind in all of this. It stores the ship, the invaders, and the shots, and it is responsible for updating them and checking on collisions. It’s much the same as in Super Jumper, with a few minor differences. The initial placement of the shield blocks, as well as the invaders, is also a responsibility of the World class. We create a WorldListener interface to inform any outside parties of events within our world, such as an explosion or a shot that’s been fired. This will allow us to play sound effects, just like in Super Jumper. It helps to go through the code one method at a time. Listing 12-10 shows the code.
Listing 12-10. World.java, the World Class, Tying Everything Together
package com.badlogic.androidgames.androidinvaders;

import java.util.ArrayList;
import java.util.List;
import java.util.Random;

import com.badlogic.androidgames.framework.math.OverlapTester;

public class World {
    public interface WorldListener {
        public void explosion();

        public void shot();
    }
We want outside parties to know when an explosion takes place or when a shot is fired. For this, we define a listener interface, which we can implement and register with a World instance that will be called when one of these events happen. This is much like Super Jumper, just with different events.
    final static float WORLD_MIN_X  = −14;
    final static float WORLD_MAX_X  = 14;
    final static float WORLD_MIN_Z  = −15;
We also have a couple of constants that define the extents of the world, as discussed earlier in the “Defining the Game World” section.
    WorldListener listener;
    int waves = 1;
    int score = 0;
    float speedMultiplier = 1;
    final List<Shot> shots = new ArrayList<Shot>();
    final List<Invader> invaders = new ArrayList<Invader>();
    final List<Shield> shields = new ArrayList<Shield>();
    final Ship ship;
    long lastShotTime;
    Random random;
Our world keeps track of a couple of things. We have a listener that we invoke when an explosion happens or a shot is fired. Also, we keep track of how many waves of invaders the player has already destroyed. The score member keeps track of the current score, and the speedMultiplier member allows us to speed up the movement of the invaders (remember the Invaders.update() method). Also, we store lists of the shots, invaders, and shield blocks currently alive in the world. Finally, we have an instance of a Ship, and we store the last time a shot was fired by the ship. We store this time in nanoseconds, as returned by System.nanoTime()—hence the long data type. The Random instance will come in handy when we want to decide whether an invader should fire a shot or not.
    public World() {
        ship = new Ship(0, 0, 0);
        generateInvaders();
        generateShields();
        lastShotTime = System.nanoTime();
        random = new Random();
    }
In the constructor, we create the Ship at its initial position, generate the invaders and shields, and initialize the rest of the members.
    private void generateInvaders() {
        for (int row = 0; row < 4; row++) {
            for (int column = 0; column < 8; column++) {
                Invader invader = new Invader(−WORLD_MAX_X/ 2 + column * 2f,
                        0,WORLD_MIN_Z+ row * 2f);
                invaders.add(invader);
            }
        }
    }
The generateInvaders() method simply creates a grid of invaders, eight by four, arranged as shown in Figure 12-11.
    private void generateShields() {
        for (int shield = 0; shield < 3; shield++) {
            shields.add(new Shield(−10 + shield * 10–1, 0, -3));
            shields.add(new Shield(−10 + shield * 10 + 0, 0, -3));
            shields.add(new Shield(−10 + shield * 10 + 1, 0, -3));
            shields.add(new Shield(−10 + shield * 10–1, 0, -2));
            shields.add(new Shield(−10 + shield * 10 + 1, 0, -2));
        }
    }
The generateShields() method does pretty much the same: instantiating three shields composed of five shield blocks each, as laid out in Figure 12-2.
    public void setWorldListener(WorldListener worldListener) {
        this .listener = worldListener;
    }
We also have a setter method to set a listener on the world. We’ll use this to get informed about events in the world and react accordingly, e.g. play a sound effect.
    public void update(float deltaTime,float accelX) {
        ship.update(deltaTime, accelX);
        updateInvaders(deltaTime);
        updateShots(deltaTime);

        checkShotCollisions();
        checkInvaderCollisions();

        if (invaders.size() == 0) {
            generateInvaders();
            waves++;
            speedMultiplier += 0.5f;
        }
    }
The update() method is surprisingly simple. It uses the current delta time, as well as the reading on the accelerometer’s y axis, which we can pass to Ship.update(). Once the ship has updated, we call updateInvaders() and updateShots(), which are responsible for updating these two types of objects. After all the objects in the world have been updated, we start checking for a collision. The checkShotCollision() method will check collisions between any shots and the ship and/or invaders.
Finally, we check whether the invaders are dead. If they are, we generate a new wave of invaders. For love of the garbage collector (GC), we could reuse the old Invader instances, for example, via the Pool class. However, to keep things simple, we simply create new instances. The same is true for shots, by the way. Given the small number of objects we create in one game session, the GC is unlikely to fire. If you want to make the GC really happy, just use a Pool instance to reuse dead invaders and shots. Also, note that we increase the speed multiplier here!
    private void updateInvaders(float deltaTime) {
        int len = invaders.size();
        for (int i = 0; i < len; i++) {
            Invader invader = invaders.get(i);
            invader.update(deltaTime, speedMultiplier);

            if (invader.state == Invader.INVADER_ALIVE) {
                if (random.nextFloat() < 0.001f) {
                    Shot shot = new Shot(invader.position.x,
                                 invader.position.y,
                                                             invader.position.z,
                                 Shot.SHOT_VELOCITY);
                    shots.add(shot);
                    listener.shot();
                }
            }

            if (invader.state == Invader.INVADER_DEAD&&
                            invader.stateTime > Invader.INVADER_EXPLOSION_TIME) {
                invaders.remove(i);
                i--;
                len--;
            }
        }
    }
The updateInvaders() method has a couple of responsibilities. It loops through all invaders and calls their update() method. Once an Invader instance is updated, we check whether it is alive. If it is, we give it a chance to fire a shot by generating a random number. If that number is below 0.001, it fires a shot. This means that each invader has a 0.1% chance of firing a shot each frame. If that happens, we instantiate a new shot, set its velocity so that it moves in the direction of the positive z axis, and inform the listener of that event. If the invader is dead and has finished exploding, we simply remove it from the current list of invaders.
    private void updateShots(float deltaTime) {
        int len = shots.size();
        for (int i = 0; i < len; i++) {
            Shot shot = shots.get(i);
            shot.update(deltaTime);
            if (shot.position.z <WORLD_MIN_Z||
                shot.position.z > 0) {
                shots.remove(i);
                i--;
                len--;
            }
        }
    }
The updateShots() method is simple, as well. We loop through all shots, update them, and check whether each one has left the playing field, in which case we remove it from the shots list.
    private void checkInvaderCollisions() {
        if (ship.state == Ship.SHIP_EXPLODING)
            return ;

        int len = invaders.size();
        for (int i = 0; i < len; i++) {
            Invader invader = invaders.get(i);
            if (OverlapTester.overlapSpheres(ship.bounds, invader.bounds)) {
                ship.lives = 1;
                ship.kill();
                return ;
            }
        }
    }
In the checkInvaderCollisions() method, we check whether any of the invaders has collided with the ship. That’s a pretty simple affair, since all we need to do is loop through all invaders and check for overlap between each invader’s bounding sphere and the ship’s bounding sphere. According to our game mechanics definition, the game ends if the ship collides with an invader. This is why we set the ship’s lives to 1 before we call the Ship.kill() method. After that call, the ship’s lives member is set to 0, which we’ll use in another method to check for the game-over state.
    private void checkShotCollisions() {
        int len = shots.size();
        for (int i = 0; i < len; i++) {
            Shot shot = shots.get(i);
            boolean shotRemoved =false ;

            int len2 = shields.size();
            for (int j = 0; j < len2; j++) {
                Shield shield = shields.get(j);
                if (OverlapTester.overlapSpheres(shield.bounds, shot.bounds)) {
                    shields.remove(j);
                    shots.remove(i);
                    i--;
                    len--;
                    shotRemoved =true ;
                    break ;
                }
            }
            if (shotRemoved)
                continue ;

            if (shot.velocity.z < 0) {
                len2 = invaders.size();
                for (int j = 0; j < len2; j++) {
                    Invader invader = invaders.get(j);
                    if (OverlapTester.overlapSpheres(invader.bounds,
                            shot.bounds)
                            && invader.state == Invader.INVADER_ALIVE) {
                        invader.kill();
                        listener.explosion();
                        score += 10;
                        shots.remove(i);
                        i--;
                        len--;
                        break ;
                    }
                }
            }else {
                if (OverlapTester.overlapSpheres(shot.bounds, ship.bounds)
                        && ship.state == Ship.SHIP_ALIVE) {
                    ship.kill();
                    listener.explosion();
                    shots.remove(i);
                    i--;
                    len--;
                }
            }
        }
    }
The checkShotCollisions() method is a little bit more complex. It loops through each Shot instance and checks for overlap between it and a shield block, an invader, or the ship. Shield blocks can be hit by shots fired by the ship or by an invader. An invader can only be hit by a shot fired by the ship. And the ship can only be hit by a shot fired by an invader. To distinguish whether a shot was fired by a ship or an invader, all we need to do is look at its z velocity. If it is positive, it moves toward the ship, and was therefore fired by an invader. If it is negative, it was fired by the ship.
    public boolean isGameOver() {
        return ship.lives == 0;
    }
The isGameOver() method simply tells an outside party if the ship has lost all its lives.
    public void shoot() {
        if (ship.state == Ship.SHIP_EXPLODING)
            return ;

        int friendlyShots = 0;
        int len = shots.size();
        for (int i = 0; i < len; i++) {
            if (shots.get(i).velocity.z < 0)
                friendlyShots++;
        }

        if (System.nanoTime() - lastShotTime > 1000000000 || friendlyShots == 0) {
            shots.add(new Shot(ship.position.x, ship.position.y,
                    ship.position.z, -Shot.SHOT_VELOCITY));
            lastShotTime = System.nanoTime();
            listener.shot();
        }
    }
}
Finally, the shoot() method will be called from outside each time the Fire button is pressed by the user. As noted in the “Core Game Mechanics” section, a shot can be fired by the ship every second, or it can be fired if no ship has been shot on the field yet. The ship can’t fire if it explodes, of course, so that’s the first thing we check. Next, we run through all the Shot instances and check if one of them is a ship shot. If that’s not the case, we can shoot immediately. Otherwise, we check when the last shot was fired. If more than a second has passed since the last shot, we fire a new one. This time, we set the velocity to –Shot.SHOT_VELOCITY so that the shot moves in the direction of the negative z axis toward the invaders. As always, we invoke the listener to inform it of the event.
And that’s all the classes that make up our game world! Compare that to what we had in Super Jumper. The principles are nearly the same, and the code looks quite similar. Android Invaders is, of course, a very simple game, so we can get away with simple solutions, such as using bounding spheres for everything. For many simple 3D games, that’s all you’ll need. On to the last two parts of our game: the GameScreen class and the WorldRenderer class!
The GameScreen Class
Once the game transitions to the GameScreen class, the player can immediately start playing without having to state that he or she is ready. The only states we have are these:
- The running state, where we render the background, the world, and the UI elements, as shown in Figure 12-4
- The paused state, where we render the background, the world, and the paused menu, as shown in Figure 12-4
- The game-over state, where we render pretty much the same thing as for the pause state.
We’ll follow the same pattern we used in Super Jumper and have different update() and present() methods for each of the three states.
The most interesting part of this class is how we handle the user input to move the ship. We want our player to be able to control the ship with either onscreen buttons or the accelerometer. We can read the Settings.touchEnabled field to figure out what the user wants in regard to this. Depending on which input method is active, we decide on whether to render the onscreen buttons or not, and pass the proper accelerometer values to the World.update() method to move the ship.
If the player chooses the onscreen buttons, we don’t need to use the accelerometer values, of course; instead, we just pass a constant artificial acceleration value to the World.update() method. It has to be in the range −10 (left) to 10 (right). After a little experimentation, we arrived at a value of −5 for left movement and 5 for right movement via the onscreen buttons.
The other interesting part of this class is the way we combine the rendering of the 3D game world and the 2D UI elements. Let’s take a look at the code of the GameScreen class in Listing 12-11.
Listing 12-11. GameScreen.java, the Game Screen
package com.badlogic.androidgames.androidinvaders;

import java.util.List;

import javax.microedition.khronos.opengles.GL10;

import com.badlogic.androidgames.androidinvaders.World.WorldListener;
import com.badlogic.androidgames.framework.Game;
import com.badlogic.androidgames.framework.Input.TouchEvent;
import com.badlogic.androidgames.framework.gl.Camera2D;
import com.badlogic.androidgames.framework.gl.FPSCounter;
import com.badlogic.androidgames.framework.gl.SpriteBatcher;
import com.badlogic.androidgames.framework.impl.GLScreen;
import com.badlogic.androidgames.framework.math.OverlapTester;
import com.badlogic.androidgames.framework.math.Rectangle;
import com.badlogic.androidgames.framework.math.Vector2;

public class GameScreen extends GLScreen {
    static final int GAME_RUNNING  = 0;
    static final int GAME_PAUSED  = 1;
    static final int GAME_OVER  = 2;
As usual, we have a couple of constants for encoding the screen’s current state.
    int state;
    Camera2D guiCam;
    Vector2 touchPoint;
    SpriteBatcher batcher;
    World world;
    WorldListener worldListener;
    WorldRenderer renderer;
    Rectangle pauseBounds;
    Rectangle resumeBounds;
    Rectangle quitBounds;
    Rectangle leftBounds;
    Rectangle rightBounds;
    Rectangle shotBounds;
    int lastScore;
    int lastLives;
    int lastWaves;
    String scoreString;
    FPSCounter fpsCounter;
The members of the GameScreen are business as usual. We have a member keeping track of the state, a camera, a vector for the touch point, a SpriteBatcher for rendering the 2D UI elements, the World instance, along with the WorldListener, the WorldRenderer (which we are going to write in a minute), and a couple of Rectangles for checking whether a UI element was touched. In addition, three integers keep track of the last number of lives, waves, and score, so that we don’t have to update the scoreString each time in order to reduce GC activity. Finally, we have an FPSCounter so that later on we can figure out how well the game performs.
    public GameScreen(Game game) {
        super(game);

        state =GAME_RUNNING;
        guiCam = new Camera2D(glGraphics, 480, 320);
        touchPoint = new Vector2();
        batcher = new SpriteBatcher(glGraphics, 100);
        world = new World();
        worldListener = new WorldListener() {
            public void shot() {
                Assets.playSound(Assets.shotSound);
            }

            public void explosion() {
                Assets.playSound(Assets.explosionSound);
            }
        };
        world.setWorldListener(worldListener);
        renderer = new WorldRenderer(glGraphics);
        pauseBounds = new Rectangle(480–64, 320–64, 64, 64);
        resumeBounds = new Rectangle(240–80, 160, 160, 32);
        quitBounds = new Rectangle(240–80, 160–32, 160, 32);
        shotBounds = new Rectangle(480–64, 0, 64, 64);
        leftBounds = new Rectangle(0, 0, 64, 64);
        rightBounds = new Rectangle(64, 0, 64, 64);
        lastScore = 0;
        lastLives = world.ship.lives;
        lastWaves = world.waves;
        scoreString = "lives:" + lastLives + " waves:" + lastWaves + " score:"
                + lastScore;
        fpsCounter = new FPSCounter();
    }
In the constructor, we set up all the members, as we are now accustomed to doing. The WorldListener is responsible for playing the correct sound when an event occurs in our world. The rest is the same as for Super Jumper, though adapted slightly for the somewhat different UI elements.
    @Override
    public void update(float deltaTime) {
        switch (state) {
        case GAME_PAUSED:
            updatePaused();
            break ;
        case GAME_RUNNING:
            updateRunning(deltaTime);
            break ;
        case GAME_OVER:
            updateGameOver();
            break ;
        }
    }
The update() method delegates the real updating to one of the other three update methods, depending on the current state of the screen.
    private void updatePaused() {
        List<TouchEvent> events = game.getInput().getTouchEvents();
        int len = events.size();
        for (int i = 0; i < len; i++) {
            TouchEvent event = events.get(i);
            if (event.type != TouchEvent.TOUCH_UP)
                continue ;

            guiCam.touchToWorld(touchPoint.set(event.x, event.y));
            if (OverlapTester.pointInRectangle(resumeBounds, touchPoint)) {
                Assets.playSound(Assets.clickSound);
                state =GAME_RUNNING;
            }

            if (OverlapTester.pointInRectangle(quitBounds, touchPoint)) {
                Assets.playSound(Assets.clickSound);
                game.setScreen(new MainMenuScreen(game));
            }
        }
    }
The updatePaused() method loops through any available touch events and checks whether one of the two menu entries was pressed (Resume or Quit). In each case, we play the click sound. Nothing new here.
    private void updateRunning(float deltaTime) {
        List<TouchEvent> events = game.getInput().getTouchEvents();
        int len = events.size();
        for (int i = 0; i < len; i++) {
            TouchEvent event = events.get(i);
            if (event.type != TouchEvent.TOUCH_DOWN)
                continue ;

            guiCam.touchToWorld(touchPoint.set(event.x, event.y));

            if (OverlapTester.pointInRectangle(pauseBounds, touchPoint)) {
                Assets.playSound(Assets.clickSound);
                state =GAME_PAUSED;
            }
            if (OverlapTester.pointInRectangle(shotBounds, touchPoint)) {
                world.shoot();
            }
        }

        world.update(deltaTime, calculateInputAcceleration());
        if (world.ship.lives != lastLives || world.score != lastScore
                || world.waves != lastWaves) {
            lastLives = world.ship.lives;
            lastScore = world.score;
            lastWaves = world.waves;
            scoreString = "lives:" + lastLives + " waves:" + lastWaves
                    + " score:" + lastScore;
        }
        if (world.isGameOver()) {
            state =GAME_OVER;
        }
    }
The updateRunning() method is responsible for two things: checking whether the pause button was pressed (and reacting accordingly) and updating the world based on the user input. The first piece of the puzzle is trivial, so let’s take a look at the world updating mechanism. We delegate the acceleration value calculation to a method called calculateInputAcceleration(). Once the world is updated, we check whether any of the three states (lives, waves, or score) have changed and update the scoreString accordingly. Finally, we check whether the game is over, in which case we enter the GameOver state.
    private float calculateInputAcceleration() {
        float accelX = 0;
        if (Settings.touchEnabled) {
            for (int i = 0; i < 2; i++) {
                if (game.getInput().isTouchDown(i)) {
                    guiCam.touchToWorld(touchPoint.set(game.getInput()
                            .getTouchX(i), game.getInput().getTouchY(i)));
                    if (OverlapTester.pointInRectangle(leftBounds, touchPoint)) {
                        accelX = −Ship.SHIP_VELOCITY/ 5;
                    }
                    if (OverlapTester.pointInRectangle(rightBounds, touchPoint)) {
                        accelX = Ship.SHIP_VELOCITY/ 5;
                    }
                }
            }
        }else {
            accelX = game.getInput().getAccelY();
        }
        return accelX;
    }
The calculateInputAcceleration() method is where we actually interpret the user input. If touch is enabled, we check whether the left or right onscreen movement button was pressed and, if so, we set the acceleration value accordingly to either −5 (left) or 5 (right). If the accelerometer is used, we simply return its current value on the y axis (remember, we are in landscape mode).
    private void updateGameOver() {
        List<TouchEvent> events = game.getInput().getTouchEvents();
        int len = events.size();
        for (int i = 0; i < len; i++) {
            TouchEvent event = events.get(i);
            if (event.type == TouchEvent.TOUCH_UP) {
                Assets.playSound(Assets.clickSound);
                game.setScreen(new MainMenuScreen(game));
            }
        }
    }
The updateGameOver() method is again trivial and simply checks for a touch event, in which case we transition to the MainMenuScreen.
    @Override
    public void present(float deltaTime) {
        GL10 gl = glGraphics.getGL();
        gl.glClear(GL10.GL_COLOR_BUFFER_BIT| GL10.GL_DEPTH_BUFFER_BIT);
        guiCam.setViewportAndMatrices();

        gl.glEnable(GL10.GL_TEXTURE_2D);
        batcher.beginBatch(Assets.background);
        batcher.drawSprite(240, 160, 480, 320, Assets.backgroundRegion);
        batcher.endBatch();
        gl.glDisable(GL10.GL_TEXTURE_2D);

        renderer.render(world, deltaTime);

        switch (state) {
        case GAME_RUNNING:
            presentRunning();
            break ;
        case GAME_PAUSED:
            presentPaused();
            break ;
        case GAME_OVER:
            presentGameOver();
        }

        fpsCounter.logFrame();
    }
The present() method is actually pretty simple, as well. As always, we start off by clearing the framebuffer. Also, we clear the z buffer, since we are going to render some 3D objects for which we need z testing. Next, we set up the projection matrix so that we can render our 2D background image, just as we did in the MainMenuScreen or SettingsScreen classes. Once that is done, we tell the WorldRenderer member to render our game world. Finally, we delegate the rendering of the UI elements depending on the current state. Note that the WorldRenderer.render() method is responsible for setting up all things needed to render the 3D world!
    private void presentPaused() {
        GL10 gl = glGraphics.getGL();
        guiCam.setViewportAndMatrices();
        gl.glEnable(GL10.GL_BLEND);
        gl.glBlendFunc(GL10.GL_SRC_ALPHA, GL10.GL_ONE_MINUS_SRC_ALPHA);
        gl.glEnable(GL10.GL_TEXTURE_2D);

        batcher.beginBatch(Assets.items);
        Assets.font.drawText(batcher, scoreString, 10, 320–20);
        batcher.drawSprite(240, 160, 160, 64, Assets.pauseRegion);
        batcher.endBatch();

        gl.glDisable(GL10.GL_TEXTURE_2D);
        gl.glDisable(GL10.GL_BLEND);
    }
The presentPaused() method just renders the scoreString via the Font instance we stored in the Assets class, as well as the Pause menu. Note that, at this point, we have already rendered the background image, as well as the 3D world. All the UI elements will thus overlay the 3D world.
    private void presentRunning() {
        GL10 gl = glGraphics.getGL();
        guiCam.setViewportAndMatrices();
        gl.glEnable(GL10.GL_BLEND);
        gl.glBlendFunc(GL10.GL_SRC_ALPHA, GL10.GL_ONE_MINUS_SRC_ALPHA);
        gl.glEnable(GL10.GL_TEXTURE_2D);

        batcher.beginBatch(Assets.items);
        batcher.drawSprite(480–32, 320–32, 64, 64, Assets.pauseButtonRegion);
        Assets.font.drawText(batcher, scoreString, 10, 320–20);
        if (Settings.touchEnabled) {
            batcher.drawSprite(32, 32, 64, 64, Assets.leftRegion);
            batcher.drawSprite(96, 32, 64, 64, Assets.rightRegion);
        }
        batcher.drawSprite(480–40, 32, 64, 64, Assets.fireRegion);
        batcher.endBatch();

        gl.glDisable(GL10.GL_TEXTURE_2D);
        gl.glDisable(GL10.GL_BLEND);
    }
The presentRunning() method is also pretty straightforward. We render the scoreString first. If touch input is enabled, we render the left and right movement buttons. Finally, we render the Fire button and reset any OpenGL ES states we’ve changed (texturing and blending).
    private void presentGameOver() {
        GL10 gl = glGraphics.getGL();
        guiCam.setViewportAndMatrices();
        gl.glEnable(GL10.GL_BLEND);
        gl.glBlendFunc(GL10.GL_SRC_ALPHA, GL10.GL_ONE_MINUS_SRC_ALPHA);
        gl.glEnable(GL10.GL_TEXTURE_2D);

        batcher.beginBatch(Assets.items);
        batcher.drawSprite(240, 160, 128, 64, Assets.gameOverRegion);
        Assets.font.drawText(batcher, scoreString, 10, 320–20);
        batcher.endBatch();

        gl.glDisable(GL10.GL_TEXTURE_2D);
        gl.glDisable(GL10.GL_BLEND);
    }
The presentGameOver() method is more of the same—just some string and UI rendering.
    @Override
    public void pause() {
        state =GAME_PAUSED;
    }
Finally, the pause() method simply puts the GameScreen into the paused state.
    @Override
    public void resume() {

    }

    @Override
    public void dispose() {

    }
}
The rest is just empty stubs so that we fulfill the GLGame interface definition. On to our final class: WorldRenderer!
The WorldRender Class
Let’s recall what we have to render in 3D:
- The ship, using the ship model and texture, and applying lighting.
- The invaders, using the invader model and texture, again with lighting.
- Any shots on the playfield, based on the shot model, this time without texturing but with lighting.
- The shield blocks, based on the shield block model, again without texturing, but with lighting and transparency (see Figure 12-3).
- Explosions instead of the ship or invader model, in case the ship or invader is exploding. The explosion is not lit, of course.
We know how to code the first four items on this list. But what about the explosions?
It turns out that we can abuse the SpriteBatcher for this. Based on the state time of the exploding ship or invader, we can fetch a TextureRegion from the Animation instance holding the explosion animation (see Assets class). The SpriteBatcher can render textured rectangles only in the x-y plane, so we have to find a way to move such a rectangle to an arbitrary position in space (where the exploding ship or invader is located). We can easily achieve this by using glTranslatef() on the model-view matrix before rendering the rectangle via the SpriteBatcher!
The rendering setup for the other objects is pretty straightforward. We have a directional light coming from the top right, and we have an ambient light to light all the objects a little, no matter their orientation. The camera is located a little above and behind the ship, and it will look at a point a little ahead of the ship. We use our LookAtCamera for this. To let the camera follow the ship, we just need to keep the x coordinate of its position and the look-at point in sync with the ship’s x coordinate.
For some extra eye candy, we’ll rotate the invaders around the y axis, and we’ll rotate the ship around the z axis based on its current velocity, so that it appears to be leaning in the direction in which it is moving.
Let’s put this into code! Listing 12-12 shows the final class of Android Invaders.
Listing 12-12. WorldRenderer.java, the World Renderer
package com.badlogic.androidgames.androidinvaders;

import java.util.List;

import javax.microedition.khronos.opengles.GL10;

import com.badlogic.androidgames.framework.gl.AmbientLight;
import com.badlogic.androidgames.framework.gl.Animation;
import com.badlogic.androidgames.framework.gl.DirectionalLight;
import com.badlogic.androidgames.framework.gl.LookAtCamera;
import com.badlogic.androidgames.framework.gl.SpriteBatcher;
import com.badlogic.androidgames.framework.gl.TextureRegion;
import com.badlogic.androidgames.framework.impl.GLGraphics;
import com.badlogic.androidgames.framework.math.Vector3;

public class WorldRenderer {
    GLGraphics glGraphics;
    LookAtCamera camera;
    AmbientLight ambientLight;
    DirectionalLight directionalLight;
    SpriteBatcher batcher;
    float invaderAngle = 0;
The WorldRenderer keeps track of the GLGraphics instance from which we’ll fetch the GL10 instance. We also have a LookAtCamera, an AmbientLight, a DirectionLight, and a SpriteBatcher. Finally, we use a member to keep track of the current rotation angle for all invaders.
    public WorldRenderer(GLGraphics glGraphics) {
        this .glGraphics = glGraphics;
        camera = new LookAtCamera(67, glGraphics.getWidth()
                / (float ) glGraphics.getHeight(), 0.1f, 100);
        camera.getPosition().set(0, 6, 2);
        camera.getLookAt().set(0, 0, -4);
        ambientLight = new AmbientLight();
        ambientLight.setColor(0.2f, 0.2f, 0.2f, 1.0f);
        directionalLight = new DirectionalLight();
        directionalLight.setDirection(−1, -0.5f, 0);
        batcher = new SpriteBatcher(glGraphics, 10);
    }
In the constructor, we set up all members, as usual. The camera has a field of view of 67 degrees, a near clipping plane distance of 0.1 units, and a far clipping plane distance of 100 units. The view frustum will thus easily contain the entire game world. We position it above and behind the ship and let it look at (0,0,–4). The ambient light is just a faint gray, and the directional light is white and comes from the top-right side. Finally, we instantiate the SpriteBatcher so that we can render the explosion rectangles.
    public void render(World world,float deltaTime) {
        GL10 gl = glGraphics.getGL();
        camera.getPosition().x = world.ship.position.x;
        camera.getLookAt().x = world.ship.position.x;
        camera.setMatrices(gl);

        gl.glEnable(GL10.GL_DEPTH_TEST);
        gl.glEnable(GL10.GL_TEXTURE_2D);
        gl.glEnable(GL10.GL_LIGHTING);
        gl.glEnable(GL10.GL_COLOR_MATERIAL);
        ambientLight.enable(gl);
        directionalLight.enable(gl, GL10.GL_LIGHT0);

        renderShip(gl, world.ship);
        renderInvaders(gl, world.invaders, deltaTime);

        gl.glDisable(GL10.GL_TEXTURE_2D);
        renderShields(gl, world.shields);
        renderShots(gl, world.shots);

        gl.glDisable(GL10.GL_COLOR_MATERIAL);
        gl.glDisable(GL10.GL_LIGHTING);
        gl.glDisable(GL10.GL_DEPTH_TEST);
    }
In the render() method, we start off by setting the camera’s x coordinate to the ship’s x coordinate. Of course, we also set the x coordinate of the camera’s look-at point accordingly. This way, the camera will follow the ship. Once the position and look-at point are updated, we can set the projection and model-view matrix via a call to LookAtCamera.setMatrices().
Next, we set up all the states that we need for rendering. We’ll need depth testing, texturing, lighting, and the color material functionality so that we don’t have to specify a material for the objects via glMaterial(). The next two statements activate the ambient and directional light. With these calls, we have everything set up and can start rendering the objects.
The first thing we render is the ship, via a call to renderShip(). Next, we render the invaders with a call to renderInvaders().
Since the shield blocks and shots don’t need texturing, we simply disable that to save some computations. Once texturing is turned off, we render the shots and shields via calls to renderShots() and renderShields().
Finally, we disable the other states we set so that we return a clean OpenGL ES state to whoever called us.
    private void renderShip(GL10 gl, Ship ship) {
        if (ship.state == Ship.SHIP_EXPLODING) {
            gl.glDisable(GL10.GL_LIGHTING);
            renderExplosion(gl, ship.position, ship.stateTime);
            gl.glEnable(GL10.GL_LIGHTING);
        }else {
            Assets.shipTexture.bind();
            Assets.shipModel.bind();
            gl.glPushMatrix();
            gl.glTranslatef(ship.position.x, ship.position.y, ship.position.z);
            gl.glRotatef(ship.velocity.x / Ship.SHIP_VELOCITY* 90, 0, 0, -1);
            Assets.shipModel.draw(GL10.GL_TRIANGLES, 0,
                    Assets.shipModel.getNumVertices());
            gl.glPopMatrix();
            Assets.shipModel.unbind();
        }
    }
The renderShip() method starts off by checking the state of the ship. If it is exploding, we disable lighting, call renderExplosion() to render an explosion at the position of the ship, and enable lighting again.
If the ship is alive, we bind its texture and model, push the model-view matrix, move it to its position and rotate it around the z axis based on its velocity, and draw its model. Finally, we pop the model-view matrix again (leaving only the camera’s view) and unbind the ship model’s vertices.
    private void renderInvaders(GL10 gl, List<Invader> invaders,float deltaTime) {
        invaderAngle += 45 * deltaTime;

        Assets.invaderTexture.bind();
        Assets.invaderModel.bind();
        int len = invaders.size();
        for (int i = 0; i < len; i++) {
            Invader invader = invaders.get(i);
            if (invader.state == Invader.INVADER_DEAD) {
                gl.glDisable(GL10.GL_LIGHTING);
                Assets.invaderModel.unbind();
                renderExplosion(gl, invader.position, invader.stateTime);
                Assets.invaderTexture.bind();
                Assets.invaderModel.bind();
                gl.glEnable(GL10.GL_LIGHTING);
            }else {
                gl.glPushMatrix();
                gl.glTranslatef(invader.position.x, invader.position.y,
                        invader.position.z);
                gl.glRotatef(invaderAngle, 0, 1, 0);
                Assets.invaderModel.draw(GL10.GL_TRIANGLES, 0,
                        Assets.invaderModel.getNumVertices());
                gl.glPopMatrix();
            }
        }
        Assets.invaderModel.unbind();
    }
The renderInvaders() method is pretty much the same as the renderShip() method. The only difference is that bind the texture and mesh before we render each invader. This considerably reduces the number of binds and speeds up the rendering. For each invader, we check its state again and render either an explosion or the normal invader model. Since we bind the model and texture outside the for loop, we have to unbind and rebind them before we can render an explosion instead of an invader.
    private void renderShields(GL10 gl, List<Shield> shields) {
        gl.glEnable(GL10.GL_BLEND);
        gl.glBlendFunc(GL10.GL_SRC_ALPHA, GL10.GL_ONE_MINUS_SRC_ALPHA);
        gl.glColor4f(0, 0, 1, 0.4f);
        Assets.shieldModel.bind();
        int len = shields.size();
        for (int i = 0; i < len; i++) {
            Shield shield = shields.get(i);
            gl.glPushMatrix();
            gl.glTranslatef(shield.position.x, shield.position.y,
                    shield.position.z);
            Assets.shieldModel.draw(GL10.GL_TRIANGLES, 0,
                    Assets.shieldModel.getNumVertices());
            gl.glPopMatrix();
        }
        Assets.shieldModel.unbind();
        gl.glColor4f(1, 1, 1, 1f);
        gl.glDisable(GL10.GL_BLEND);
    }
The renderShields() method renders the shield blocks. We apply the same principle as in the case of rendering invaders. We only bind the model once. Since we have no texture, we don’t need to bind one. However, we need to enable blending. We set the global vertex color to blue, with the alpha component set to 0.4. This will make the shield blocks a little transparent.
    private void renderShots(GL10 gl, List<Shot> shots) {
        gl.glColor4f(1, 1, 0, 1);
        Assets.shotModel.bind();
        int len = shots.size();
        for (int i = 0; i < len; i++) {
            Shot shot = shots.get(i);
            gl.glPushMatrix();
            gl.glTranslatef(shot.position.x, shot.position.y, shot.position.z);
            Assets.shotModel.draw(GL10.GL_TRIANGLES, 0,
                    Assets.shotModel.getNumVertices());
            gl.glPopMatrix();
        }
        Assets.shotModel.unbind();
        gl.glColor4f(1, 1, 1, 1);
    }
Rendering the shots in renderShots() is the same as rendering the shields, except that we don’t use blending and we use a different vertex color (yellow).
    private void renderExplosion(GL10 gl, Vector3 position,float stateTime) {
        TextureRegion frame = Assets.explosionAnim.getKeyFrame(stateTime,
                Animation.ANIMATION_NONLOOPING);

        gl.glEnable(GL10.GL_BLEND);
        gl.glPushMatrix();
        gl.glTranslatef(position.x, position.y, position.z);
        batcher.beginBatch(Assets.explosionTexture);
        batcher.drawSprite(0, 0, 2, 2, frame);
        batcher.endBatch();
        gl.glPopMatrix();
        gl.glDisable(GL10.GL_BLEND);
    }
}
Finally, we have the mysterious renderExplosion() method. We get the position at which we want to render the explosion, as well as the state time of the object that is exploding. The latter is used to fetch the correct TextureRegion from the explosion Animation, just as we did for Bob in Super Jumper.
The first thing we do is fetch the explosion animation frame based on the state time. Next, we enable blending, since the explosion has transparent pixels that we don’t want to render. We push the current model-view matrix and call glTranslatef() so that anything we render after that call will be positioned at the given location. We tell the SpriteBatcher that we are about to render a rectangle using the explosion texture.
The next call is where the magic happens. We tell the SpriteBatcher to render a rectangle at (0,0,0) (the z coordinate is not given but implicitly zero, remember?), with a width and height of 2 units. Because we used glTranslatef(), that rectangle will be centered not around the origin, but rather around the position we specified to glTranslatef(), which is exactly the position of the ship or invader that exploded. Finally, we pop the model-view matrix and disable blending again.
That’s it. Twelve classes, forming a full 3D game, parroting the classic Space Invaders game. Try it out. When you come back, we’ll have a look at the performance characteristics.
Optimizations
Before we think about optimizing the game, we have to evaluate how well it performs. We put an FPSCounter in the GameScreen class, so let’s look at its output on a Hero, a Droid, and a Nexus One.
Hero (Android 1.5):
02–17 00:59:04.180: DEBUG/FPSCounter(457): fps: 25
02–17 00:59:05.220: DEBUG/FPSCounter(457): fps: 26
02–17 00:59:06.260: DEBUG/FPSCounter(457): fps: 26
02–17 00:59:07.280: DEBUG/FPSCounter(457): fps: 26

Nexus One (Android 2.2.1):
02–17 01:05:40.679: DEBUG/FPSCounter(577): fps: 41
02–17 01:05:41.699: DEBUG/FPSCounter(577): fps: 41
02–17 01:05:42.729: DEBUG/FPSCounter(577): fps: 41
02–17 01:05:43.729: DEBUG/FPSCounter(577): fps: 40

Droid (Android 2.1.1):
02–17 01:47:44.096: DEBUG/FPSCounter(1758): fps: 47
02–17 01:47:45.112: DEBUG/FPSCounter(1758): fps: 47
02–17 01:47:46.127: DEBUG/FPSCounter(1758): fps: 47
02–17 01:47:47.135: DEBUG/FPSCounter(1758): fps: 46
The Hero struggles quite a bit, but the game is playable at 25 FPS. The Nexus One achieves around 41 FPS, and the Droid also reaches 47 FPS, which is pretty playable. Can it get better?
In terms of state changes, this is not all that bad. We could reduce some redundant changes here and there, such as some glEnable()/glDisable() calls, but we know from previous optimization attempts that doing so won’t shave off a lot of overhead.
On the Hero, there’s one thing we can do: disable lighting. Once we remove the respective glEnable()/glDisable() calls in WorldRenderer.render(), as well as WorldRenderer.renderShip() and WorldRenderer.renderInvaders(), the Hero achieves the following frame rate:
Hero (Android 1.5):
02–17 01:14:44.580: DEBUG/FPSCounter(618): fps: 31
02–17 01:14:45.600: DEBUG/FPSCounter(618): fps: 31
02–17 01:14:46.610: DEBUG/FPSCounter(618): fps: 31
02–17 01:14:47.630: DEBUG/FPSCounter(618): fps: 31
That’s quite a bit of improvement, and all we have to do is turn off lighting. Special-casing the rendering code for a certain device is possible, but it’s good to avoid that. Is there anything else we can do?
The way we render explosions is suboptimal in the case of an exploding invader. We change the model and texture bindings in the middle of rendering all invaders, which makes the graphics pipeline a little unhappy. However, explosions don’t happen often, and don’t take a long time (1.6 seconds). Plus, the measurements just shown were taken without any explosions onscreen, so that’s not the culprit.
The truth is that we are rendering too many objects per frame, causing significant call overhead and stalling the pipeline a little. With our current knowledge of OpenGL ES, there’s nothing much we can do about that. However, given that the game “feels” rather playable on all devices, it’s not an absolute must to achieve 60 FPS. The Droid and Nexus One have a notoriously hard time rendering even mildly complex 3D scenes at 60 FPS. So, the final lesson to take away from this is: don’t get crazy if your game doesn’t run at 60 FPS. If it is visually smooth and plays well, you can even make do with 30 FPS.
Note Other common optimization strategies involve using culling, vertex buffer objects, and other more advanced topics that aren’t discussed here. We tried adding these to our Android Invaders—the effect: zero. None of these devices benefit from these optimizations. That does not mean these techniques are useless. That depends on a lot of factors and their side effects, and it’s hard to predict how certain configurations will behave. If you are interested, just search for those terms on the Web and try the techniques out yourself!
Summary
In this chapter, we completed our third game, a full-blown 3D Space Invaders clone. We employed all the techniques and tricks we learned on our way through this book, and the final outcome is rather satisfying. Of course, these are not AAA games. In fact, none of these are enjoyable for a long period of time. That’s where you come in. Get creative, extend these games, and make them fun! You have the tools at your disposal.