
Android for Game Developers
Android’s application framework is vast and can be confusing at times. For every possible task you can think of, there’s an API you can use. Of course, you have to learn the APIs first. Luckily, we game developers only need an extremely limited set of these APIs. All we want is a window with a single UI component that we can draw to, and from which we can receive input, as well as the ability to play back audio. This covers all of our needs for implementing the game framework that we designed in Chapter 3, and in a rather platform-agnostic way.
In this chapter, you’ll learn the bare minimum number of Android APIs that you need to make Mr. Nom a reality. You’ll be surprised at how little you actually need to know about these APIs to achieve that goal. Let’s recall what ingredients we need:
- Window management
- Input
- File I/O
- Audio
- Graphics
For each of these modules, there’s an equivalent in the application framework APIs. We’ll pick and choose the APIs needed to handle those modules, discuss their internals, and finally implement the respective interfaces of the game framework that we designed in Chapter 3.
If you happen to be coming from an iOS/Xcode background, we have a little section at the end of this chapter that will provide some translation and guidance. Before we can dive into window management on Android, however, we have to revisit something we discussed only briefly in Chapter 2: defining our application via the manifest file.
Defining an Android Application: The Manifest File
An Android application can consist of a multitude of different components:
- Activities: These are user-facing components that present a UI with which to interact.
- Services: These are processes that work in the background and don’t have a visible UI. For example, a service might be responsible for polling a mail server for new e-mails.
- Content providers: These components make parts of your application data available to other applications.
- Intents: These are messages created by the system or applications themselves. They are then passed on to any interested party. Intents might notify us of system events such as the SD card being removed or the USB cable being connected. Intents are also used by the system for starting components of our application, such as activities. We can also fire our own intents to ask other applications to perform an action, such as opening a photo gallery to display an image or starting the Camera application to take a photo.
- Broadcast receivers: These react to specific intents, and they might execute an action, such as starting a specific activity or sending out another intent to the system.
An Android application has no single point of entry, as we are used to having on a desktop operating system (for example, in the form of Java’s main() method). Instead, components of an Android application are started up or asked to perform a certain action by specific intents.
What components comprise our application and to which intents these components react are defined in the application’s manifest file. The Android system uses this manifest file to get to know what makes up our application, such as the default activity to display when the application is started.
Note We are only concerned about activities in this book, so we’ll only discuss the relevant portions of the manifest file for this type of component. If you want to make yourself dizzy, you can learn more about the manifest file on the Android Developers site (http://developer.android.com).
The manifest file serves many more purposes than just defining an application’s components. The following list summarizes the relevant parts of a manifest file in the context of game development:
- The version of our application as displayed and used on Google Play
- The Android versions on which our application can run
- Hardware profiles our application requires (that is, multitouch, specific screen resolutions, or support for OpenGL ES 2.0)
- Permissions for using specific components, such as for writing to the SD card or accessing the networking stack
In the following subsections we will create a template manifest file that we can reuse, in a slightly modified manner, in all the projects we’ll develop throughout this book. For this, we’ll go through all the relevant XML tags that we need to define our application.
The <manifest> Element
The <manifest> tag is the root element of an AndroidManifest.xml file. Here’s a basic example:
<manifest xmlns:android="http://schemas.android.com/apk/res/android"
      package="com.helloworld"
      android:versionCode="1"
      android:versionName="1.0"
      android:installLocation="preferExternal">
...
</manifest>
We are assuming that you have worked with XML before, so you should be familiar with the first line. The <manifest> tag specifies a namespace called android, which is used throughout the rest of the manifest file. The package attribute defines the root package name of our application. Later on, we’ll reference specific classes of our application relative to this package name.
The versionCode and versionName attributes specify the version of our application in two forms. The versionCode attribute is an integer that we have to increment each time we publish a new version of our application. It is used by Google Play to track our application’s version. The versionName attribute is displayed to users of Google Play when they browse our application. We can use any string we like here.
The installLocation attribute is only available to us if we set the build target of our Android project in Eclipse to Android 2.2 or newer. It specifies where our application should be installed. The string preferExternal tells the system that we’d like our application to be installed to the SD card. This will only work on Android 2.2 or newer, and this string is ignored by all earlier Android applications. On Android 2.2 or newer, the application will always get installed to internal storage where possible.
All attributes of the XML elements in a manifest file are generally prefixed with the android namespace, as shown previously. For brevity, we will not specify the namespace in the following sections when talking about a specific attribute.
Inside the <manifest> element, we then define the application’s components, permissions, hardware profiles, and supported Android versions.
The <application> Element
As in the case of the <manifest> element, let’s discuss the <application> element in the form of an example:
<application android:icon="@drawable/icon" android:label="@string/app_name">
...
</application>
Now doesn’t this look a bit strange? What’s up with the @drawable/icon and @string/app_name strings? When developing a standard Android application, we usually write a lot of XML files, where each defines a specific portion of our application. Full definition of those portions requires that we are also able to reference resources that are not defined in the XML file, such as images or internationalized strings. These resources are located in subfolders of the res/ folder, as discussed in Chapter 2 when we dissected the Hello World project in Eclipse.
To reference resources, we use the preceding notation. The @ specifies that we want to reference a resource defined elsewhere. The following string identifies the type of the resource we want to reference, which directly maps to one of the folders or files in the res/directory. The final part specifies the name of the resource. In the preceding case, this is an image called icon and a string called app_name. In the case of the image, it’s the actual filename we specify, as found in the res/drawable-xxx/ folders. Note that the image name does not have a suffix like .png or .jpg. Android will infer the suffix automatically based on what’s in the res/drawable-xxx/ folder. The app_name string is defined in the res/values/strings.xml file, a file where all the strings used by the application will be stored. The name of the string was defined in the strings.xml file.
Note Resource handling on Android is an extremely flexible, but also complex thing. For this book, we decided to skip most of resource handling for two reasons: it’s utter overkill for game development, and we want to have full control over our resources. Android has the habit of modifying resources placed in the res/ folder, especially images (called drawables). That’s something we, as game developers, do not want. The only use we’d suggest for the Android resource system in game development is internationalizing strings. We won’t get into that in this book; instead, we’ll use the more game development-friendly assets/ folder, which leaves our resources untouched and allows us to specify our own folder hierarchy.
The meaning of the attributes of the <application> element should become a bit clearer now. The icon attribute specifies the image from the res/drawable/ folder to be used as an icon for the application. This icon will be displayed in Google Play as well as in the application launcher on the device. It is also the default icon for all the activities that we define within the <application> element.
The label attribute specifies the string being displayed for our application in the application launcher. In the preceding example, this references a string in the res/values/string.xml file, which is what we specified when we created the Android project in Eclipse. We could also set this to a raw string, such as My Super Awesome Game. The label is also the default label for all of the activities that we define in the <application> element. The label will be shown in the title bar of our application.
We have only discussed a very small subset of the attributes that you can specify for the <application> element. However, these are sufficient for our game development needs. If you want to know more, you can find the full documentation on the Android Developers site.
The <application> element contains the definitions of all the application components, including activities and services, as well as any additional libraries used.
The <activity> Element
Now it’s getting interesting. Here’s a hypothetical example for our Mr. Nom game:
<activity android:name=".MrNomActivity"
          android:label="Mr.Nom"
          android:screenOrientation="portrait">
          android:configChanges="keyboard|keyboardHidden|orientation">
    <intent-filter>
        <action android:name="android.intent.action.MAIN" />
        <category android:name="android.intent.category.LAUNCHER" />
    </intent-filter>
</activity>
Let’s have a look at the attributes of the <activity> tag first:
- name: This specifies the name of the activity’s class relative to the package attribute we specified in the <manifest> element. You can also specify a fully qualified class name here.
- label: We already specified the same attribute in the <application> element. This label is displayed in the title bar of the activity (if it has one). The label will also be used as the text displayed in the application launcher if the activity we define is an entry point to our application. If we don’t specify it, the label from the <application> element will be used instead. Note that we used a raw string here instead of a reference to a string in the string.xml file.
- screenOrientation: This attribute specifies the orientation that the activity will use. Here we specified portrait for our Mr. Nom game, which will only work in portrait mode. Alternatively, we could specify landscape if we wanted to run in landscape mode. Both configurations will force the orientation of the activity to stay the same over the activity’s life cycle, no matter how the device is actually oriented. If we leave out this attribute, then the activity will use the current orientation of the device, usually based on accelerometer data. This also means that whenever the device orientation changes, the activity will be destroyed and restarted—something that’s undesirable in the case of a game. We usually fix the orientation of our game’s activity either to landscape mode or portrait mode.
- configChanges: Reorienting the device or sliding out the keyboard is considered a configuration change. In the case of such a change, Android will destroy and restart our application to accommodate the change. That’s not desirable in the case of a game. The configChanges attribute of the <activity> element comes to the rescue. It allows us to specify which configuration changes we want to handle ourselves, without destroying and re-creating our activity. Multiple configuration changes can be specified by using the | character to concatenate them. In the preceding case, we handle the changes keyboard, keyboardHidden, and orientation ourselves.
As with the <application> element, there are, of course, more attributes that you can specify for an <activity> element. For game development, we get away with the four attributes just discussed.
Now, you might have noticed that the <activity> element isn’t empty, but it houses another element, which itself contains two more elements. What are those for?
As we pointed out earlier, there’s no notion of a single main entry point to your application on Android. Instead, we can have multiple entry points in the form of activities and services that are started in response to specific intents being sent out by the system or a third-party application. Somehow, we need to communicate to Android which activities and services of our application will react (and in what ways) to specific intents. That’s where the <intent-filter> element comes into play.
In the preceding example, we specify two types of intent filters: an <action> and a <category>. The <action> element tells Android that our activity is a main entry point to our application. The <category> element specifies that we want that activity to be added to the application launcher. Both elements together allow Android to infer that, when the icon in the application launcher for the application is pressed, it should start that specific activity.
For both the <action> and <category> elements, the only thing that gets specified is the name attribute, which identifies the intent to which the activity will react. The intent android.intent.action.MAIN is a special intent that the Android system uses to start the main activity of an application. The intent android.intent.category.LAUNCHER is used to tell Android whether a specific activity of an application should have an entry in the application launcher.
Usually, we’ll only have one activity that specifies these two intent filters. However, a standard Android application will almost always have multiple activities, and these need to be defined in the manifest.xml file as well. Here’s an example definition of this type of a subactivity:
<activity android:name=".MySubActivity"
          android:label="Sub Activity Title"
          android:screenOrientation="portrait">
          android:configChanges="keyboard|keyboardHidden|orientation"/>
Here, no intent filters are specified—only the four attributes of the activity we discussed earlier. When we define an activity like this, it is only available to our own application. We start this type of activity programmatically with a special kind of intent; say, when a button is pressed in one activity to cause a new activity to open. We’ll see in a later section how we can start an activity programmatically.
To summarize, we have one activity for which we specify two intent filters so that it becomes the main entry point of our application. For all other activities, we leave out the intent filter specification so that they are internal to our application. We’ll start these programmatically.
Note As indicated earlier, we’ll only ever have a single activity in our game. This activity will have exactly the same intent filter specification as shown previously. The reason we discussed how to specify multiple activities is that we are going to create a special sample application in a minute that will have multiple activities. Don’t worry—it’s going to be easy.
The <uses-permission> Element
We are leaving the <application> element now and coming back to elements that we normally define as children of the <manifest> element. One of these elements is the <uses-permission> element.
Android has an elaborate security model. Each application is run in its own process and virtual machine (VM), with its own Linux user and group, and it cannot influence other applications. Android also restricts the use of system resources, such as networking facilities, the SD card, and the audio-recording hardware. If our application wants to use any of these system resources, we have to ask for permission. This is done with the <uses-permission> element.
A permission always has the following form, where string specifies the name of the permission we want to be granted:
<uses-permission android:name="string"/>
Here are a few permission names that might come in handy:
- android.permission.RECORD_AUDIO: This grants us access to the audio-recording hardware.
- android.permission.INTERNET: This grants us access to all the networking APIs so we can, for example, fetch an image from the Internet or upload high scores.
- android.permission.WRITE_EXTERNAL_STORAGE: This allows us to read and write files on the external storage, usually the SD card of the device.
- android.permission.WAKE_LOCK: This allows us to acquire a wake lock. With this wake lock, we can keep the device from going to sleep if the screen hasn’t been touched for some time. This could happen, for example, in a game that is controlled only by the accelerometer.
- android.permission.ACCESS_COARSE_LOCATION: This is a very useful permission as it allows you to get non-GPS-level access to things like the country in which the user is located, which can be useful for language defaults and analytics.
- android.permission.NFC: This allows applications to perform I/O operations over near field communication (NFC), which is useful for a variety of game features involving the quick exchange of small amounts of information.
To get access to the networking APIs, we’d thus specify the following element as a child of the <manifest> element:
<uses-permission android:name="android.permission.INTERNET"/>
For any additional permissions, we simply add more <uses-permission> elements. You can specify many more permissions; we again refer you to the official Android documentation. We’ll only need the set just discussed.
Forgetting to add a permission for something like accessing the SD card is a common source of error. It manifests itself as a message in the device log, so it might survive undetected due to all the clutter in the log. In a subsequent section we’ll describe the log in more detail. Think about the permissions your game will need, and specify them when you initially create the project.
Another thing to note is that, when a user installs your application, he or she will first be asked to review all of the permissions your application requires. Many users will just skip over these and happily install whatever they can get hold of. Some users are more conscious about their decisions and will review the permissions in detail. If you request suspicious permissions, like the ability to send out costly SMS messages or to get a user’s location, you may receive some nasty feedback from users in the Comments section for your application when it’s on Google Play. If you must use one of those problematic permissions, your application description also should tell the user why you’re using it. The best thing to do is to avoid those permissions in the first place or to provide functionality that legitimately uses them.
The <uses-feature> Element
If you are an Android user yourself and possess an older device with an old Android version like 1.5, you will have noticed that some awesome applications won’t show up in the Google Play application on your device. One reason for this can be the use of the <uses-feature> element in the manifest file of the application.
The Google Play application will filter all available applications by your hardware profile. With the <uses-feature> element, an application can specify which hardware features it needs; for example, multitouch or support for OpenGL ES 2.0. Any device that does not have the specified features will trigger that filter so that the end user isn’t shown the application in the first place.
A <uses-feature> element has the following attributes:
<uses-feature android:name="string" android:required=["true" | "false"]
android:glEsVersion="integer" />
The name attribute specifies the feature itself. The required attribute tells the filter whether we really need the feature under all circumstances or if it’s just nice to have. The last attribute is optional and only used when a specific OpenGL ES version is required.
For game developers, the following features are most relevant:
- android.hardware.touchscreen.multitouch: This requests that the device have a multitouch screen capable of basic multitouch interactions, such as pinch zooming and the like. These types of screens have problems with independent tracking of multiple fingers, so you have to evaluate if those capabilities are sufficient for your game.
- android.hardware.touchscreen.multitouch.distinct: This is the big brother of the last feature. This requests full multitouch capabilities suitable for implementing things like onscreen virtual dual sticks for controls.
We’ll look into multitouch in a later section of this chapter. For now, just remember that, when our game requires a multitouch screen, we can weed out all devices that don’t support that feature by specifying a <uses-feature> element with one of the preceding feature names, like so:
<uses-feature android:name="android.hardware.touchscreen.multitouch" android:required="true"/>
Another useful thing for game developers to do is to specify which OpenGL ES version is needed. In this book, we’ll be concerned with OpenGL ES 1.0 and 1.1. For these, we usually don’t specify a <uses-feature> element because they aren’t much different from each other. However, any device that implements OpenGL ES 2.0 can be assumed to be a graphics powerhouse. If our game is visually complex and needs a lot of processing power, we can require OpenGL ES 2.0 so that the game only shows up for devices that are able to render our awesome visuals at an acceptable frame rate. Note that we don’t use OpenGL ES 2.0, but we just filter by hardware type so that our OpenGL ES 1.x code gets enough processing power. Here’s how we can do this:
<uses-feature android:glEsVersion="0x00020000"android:required="true"/>
This will make our game only show up on devices that support OpenGL ES 2.0 and are thus assumed to have a fairly powerful graphics processor.
Note This feature is reported incorrectly by some devices out there, which will make your application invisible to otherwise perfectly fine devices. Use it with caution.
Let’s say you want to have optional support of USB peripherals for your game so that the device can be a USB host and have controllers or other peripherals connected to it. The correct way of handling this is to add the following:
<uses-feature android:name="android.hardware.usb.host" android:required="false"/>
Setting "android:required" to false says to Google Play, “We may use this feature, but it’s not necessary to download and run the game.” Setting usage of the optional hardware feature is a good way to future-proof your game for various pieces of hardware that you haven’t yet encountered. It allows manufacturers to limit the apps only to ones that have declared support for their specific hardware, and, if you declare optional support for it, you will be included in the apps that can be downloaded for that device.
Now, every specific requirement you have in terms of hardware potentially decreases the number of devices on which your game can be installed, which will directly affect your sales. Think twice before you specify any of the above. For example, if the standard mode of your game requires multitouch, but you can also think of a way to make it work on single-touch devices, you should strive to have two code paths—one for each hardware profile—so that your game can be deployed to a bigger market.
The <uses-sdk> Element
The last element we’ll put in our manifest file is the <uses-sdk> element. It is a child of the <manifest> element. We defined this element when we created our Hello World project in Chapter 2 and made sure our Hello World application works from Android 1.5 onward with some manual tinkering. So what does this element do? Here’s an example:
<uses-sdk android:minSdkVersion="3" android:targetSdkVersion="16"/>
As we discussed in Chapter 2, each Android version has an integer assigned, also known as an SDK version. The <uses-sdk> element specifies the minimum version supported by our application and the target version of our application. In this example, we define our minimum version as Android 1.5 and our target version as Android 4.1. This element allows us to deploy an application that uses APIs only available in newer versions to devices that have a lower version installed. One prominent example would be the multitouch APIs, which are supported from SDK version 5 (Android 2.0) onward. When we set up our Android project in Eclipse, we use a build target that supports that API; for example, SDK version 5 or higher (we usually set it to the latest SDK version, which is 16 at the time of writing). If we want our game to run on devices with SDK version 3 (Android 1.5) as well, we specify the minSdkVersion, as before, in the manifest file. Of course, we must be careful not to use any APIs that are not available in the lower version, at least on a 1.5 device. On a device with a higher version, we can use the newer APIs as well.
The preceding configuration is usually fine for most games (unless you can’t provide a separate fallback code path for the higher-version APIs, in which case you will want to set the minSdkVersion attribute to the minimum SDK version you actually support).
Android Game Project Setup in Eight Easy Steps
Let’s now combine all of the preceding information and develop a simple step-by-step method to create a new Android game project in Eclipse. Here’s what we want from our project:
- It should be able to use the latest SDK version’s features while maintaining compatibility with the lowest SDK version that some devices still run. That means that we want to support Android 1.5 and above.
- It should be installed to the SD card when possible so that we don’t fill up the internal storage of the device.
- It should have a single main activity that will handle all configuration changes itself so that it doesn’t get destroyed when the hardware keyboard is revealed or when the orientation of the device is changed.
- The activity should be fixed to either portrait or landscape mode.
- It should allow us to access the SD card.
- It should allow us to get a hold of a wake lock.
These are some easy goals to achieve with the information you just acquired. Here are the steps:
- Create a new Android project in Eclipse by opening the New Android Project wizard, as described in Chapter 2.
- Once the project is created, open the AndroidManifest.xml file.
- To make Android install the game on the SD card when available, add the installLocation attribute to the <manifest> element, and set it to preferExternal.
- To fix the orientation of the activity, add the screenOrientation attribute to the <activity> element, and specify the orientation you want (portrait or landscape).
- To tell Android that we want to handle the keyboard, keyboardHidden, and orientation configuration changes, set the configChanges attribute of the <activity> element to keyboard|keyboardHidden|orientation.
- Add two <uses-permission> elements to the <manifest> element, and specify the name attributes android.permission.WRITE_EXTERNALSTORAGE and android.permission.WAKE_LOCK.
- Set the minSdkVersion and targetSdkVersion attributes of the <uses-sdk> element (e.g., minSdkVersion is set to 3 and targetSdkVersion is set to 16).
- Create a folder called drawable/ in the res/ folder and copy the res/drawable-mdpi/ic_launcher.png file to this new folder. This is the location Android 1.5 will search for the launcher icon. If you don’t want to support Android 1.5, you can skip this step.
There you have it. Eight easy steps that will generate a fully defined application that will be installed to the SD card (on Android 2.2 and over), will have a fixed orientation, will not explode on a configuration change, will allow you to access the SD card and wake locks, and will work on all Android versions starting from 1.5 up to the latest version. Here’s the final AndroidManifest.xml content after executing the preceding steps:
<?xml version="1.0" encoding="utf-8"?>
<manifest xmlns:android="http://schemas.android.com/apk/res/android"
      package="com.badlogic.awesomegame"
      android:versionCode="1"
      android:versionName="1.0"
      android:installLocation="preferExternal">
    <application android:icon="@drawable/icon"
                 android:label="Awesomnium"
                 android:debuggable="true">
        <activity android:name=".GameActivity"
                  android:label="Awesomnium"
                  android:screenOrientation="landscape"
                  android:configChanges="keyboard|keyboardHidden|orientation">
            <intent-filter>
                <action android:name="android.intent.action.MAIN" />
                <category android:name="android.intent.category.LAUNCHER" />
            </intent-filter>
        </activity>
    </application>
    <uses-permission android:name="android.permission.WRITE_EXTERNAL_STORAGE"/>
    <uses-permission android:name="android.permission.WAKE_LOCK"/>
    <uses-sdk android:minSdkVersion="3" android:targetSdkVersion="16"/>
</manifest>
As you can see, we got rid of the @string/app_name in the label attributes of the <application> and <activity> elements. This is not really necessary, but having the application definition in one place is preferred. From now on, it’s all about the code! Or is it?
Google Play Filters
There are so many different Android devices, with so many different capabilities, that it’s necessary for the hardware manufacturers to allow only compatible applications to be downloaded and run on their device; otherwise, the user would have the bad experience of trying to run an application that’s just not compatible with the device. To deal with this, Google Play filters out incompatible applications from the list of available applications for a specific device. For example, if you have a device without a camera, and you search for a game that requires a camera, it simply won’t show up. For better or worse, it will appear to you, the user, as if the app just doesn’t exist.
Many of the previous manifest elements we’ve discussed are used as filters, including <uses-feature>, <uses-sdk>, and <uses-permission>. The following are three more elements that are specific to filtering that you should keep in mind:
- <supports-screens>: This allows you to declare the screen sizes and densities your game can run on. Ideally, your game will work on all screens, and we’ll show you how to make sure that it will. However, in the manifest file, you will want to declare support explicitly for every screen size you can.
- <uses-configuration>: This lets you declare explicit support for an input configuration type on a device, such as a hard keyboard, QWERTY-specific keyboard, touchscreen, or maybe trackball navigation input. Ideally, you’ll support all of the above, but if your game requires very specific input, you will want to investigate and use this tag for filtering on Google Play.
- <uses-library>: This allows for the declaration that a third-party library, on which your game is dependent, must be present on the device. For example, you might require a text-to-speech library that is quite large, but very common, for your game. Declaring the library with this tag ensures that only devices with that library installed can see and download your game. A common use of this is to allow GPS/map-based games to work only on devices with the Google Maps library installed.
As Android moves forward, more filter tags are likely to become available, so make sure to check the official Google Play filters page at http://developer.android.com/guide/google/play/filters.html to get up-to-date information before you deploy.
Defining the Icon of Your Game
When you deploy your game to a device and open the application launcher, you will see that its entry has a nice, but not really unique, Android icon. The same icon would be shown for your game on Google Play. How can you change it to a custom icon?
Have a closer look at the <application> element. There, we defined an attribute called icon. It references an image in the res/drawable-xxx directory called icon. So, it should be obvious what to do: replace the icon image in the drawable folder with your own icon image.
Following through the eight easy steps to create an Android project, you’ll see something similar to Figure 4-1 in the res/ folder.

Figure 4-1. What happened to my res/ folder?
We saw in Chapter 1 that devices come in different sizes, but we didn’t talk about how Android handles those different sizes. It turns out that Android has an elaborate mechanism that allows you to define your graphical assets for a set of screen densities. Screen density is a combination of physical screen size and the number of pixels of the screen. We’ll look into that topic in more detail in chapter 5. For now, it suffices to know that Android defines four densities: ldpi for low-density screens, mdpi for standard-density screens, hdpi for high-density screens, and xhdpi for extra-high-density screens. For lower-density screens, we usually use smaller images; and for higher-density screens, we use high-resolution assets.
So, in the case of our icon, we need to provide four versions: one for each density. But how big should each of those versions be? Luckily, we already have default icons in the res/drawable folders that we can use to re-engineer the sizes of our own icons. The icon in res/drawable-ldpi has a resolution of 36×36 pixels, the icon in res/drawable-mdpi has a resolution of 48×48 pixels, the icon in res/drawable-hdpi has a resolution of 72×72 pixels, and the icon in res/drawable-xhdpi has a resolution of 96×96 pixels. All we need to do is create versions of our custom icon with the same resolutions and replace the icon.png file in each of the folders with our own icon.png file. We can leave the manifest file unaltered as long as we call our icon image file icon.png. Note that file references in the manifest file are case sensitive. Always use all lowercase letters in resource files, to play it safe.
For true Android 1.5 compatibility, we need to add a folder called res/drawable/ and place the icon image from the res/drawable-mdpi/ folder there. Android 1.5 does not know about the other drawable folders, so it might not find our icon.
Finally, we are ready to get some Android coding done.
For Those Coming from iOS/Xcode
Android’s environment differs greatly from that of Apple’s. Where Apple is very tightly controlled, Android relies on a number of different modules from different sources that define many of the APIs, control the formats, and dictate which tools are best suited for a specific task, e.g. building the application.
Eclipse/ADT vs. Xcode
Eclipse is a multiproject, multidocument interface. You can have many Android applications in a single workspace, all listed together under your Package Explorer view. You can also have multiple files open from these projects all tabbed out in the Source Code view. Just like forward/back in Xcode, Eclipse has some toolbar buttons to help with navigation, and even a navigation option called Last Edit Location that will bring you back to the last change you made.
Eclipse has many language features for Java that Xcode does not have for Objective-C. Whereas in Xcode you have to click “Jump to definition,” in Eclipse you simple press F3 or click Open Declaration. Another favorite is the reference search feature. Want to find out what calls a specific method? Just click to select it and then either press Ctrl+Shift+G or choose Search ![]() References
References ![]() Workspace. All renaming or moving operations are classified as “Refactor” operations, so before you get frustrated by not seeing any way to rename a class or file, look at the Refactor options. Because Java does not have separate header and implementation files, there is no “jump to header/impl” shortcut. Compiling of Java files is automatic if you have Project
Workspace. All renaming or moving operations are classified as “Refactor” operations, so before you get frustrated by not seeing any way to rename a class or file, look at the Refactor options. Because Java does not have separate header and implementation files, there is no “jump to header/impl” shortcut. Compiling of Java files is automatic if you have Project ![]() Build Automatically enabled. With that setting enabled, your project will be compiled incrementally every time you make a change. To autocomplete, just press Ctrl+Space.
Build Automatically enabled. With that setting enabled, your project will be compiled incrementally every time you make a change. To autocomplete, just press Ctrl+Space.
One of the first things you’ll notice as a new Android developer is that to deploy on a device, you don’t have to do too much other than enabling a setting. Any executable code on Android still needs to be signed with a private key, just like in iOS, but the keys don’t need to be issued from a trusted authority like Apple, so the IDE actually creates a “debug” key for you when you run test code on your device. This key will be different from your production key, but not having to mess around with anything to get the application testing is very helpful. The key is located in the user home directory under a sub-directory called .android/debug.keystore.
Like Xcode, Eclipse supports Subversion (SVN), though you’ll need to install a plug-in. The most common plug-in is called Subclipse, which is available at http://subclipse.tigris.org. All SVN functionality is available either under the Team context menu option or by opening a view by choosing Window ![]() Show View
Show View ![]() Other
Other ![]() SVN. Check there first to get to your repositories and start checking out or sharing projects.
SVN. Check there first to get to your repositories and start checking out or sharing projects.
Most everything in Eclipse is contextual, so you will want to right-click (or double-click/Ctrl-click) the names of projects, files, classes, methods, and just about anything else to see what your options are. For instance, running a project for the first time is best done by just right-clicking the project name and choosing Run As ![]() Android Application.
Android Application.
Locating and Configuring Your Targets
Xcode can have a single project with multiple targets, like My Game Free and My Game Full, that have different compile-time options and can produce different applications based on these options. Android has no such thing in Eclipse, because Eclipse is project-oriented in a very flat manner. To do the same thing in Android, you will need to have two different projects that share all code except maybe one special piece of configuration code for that project. Sharing code is very easy and can be done using the simple “linked source” features of Eclipse.
If you’re used to Xcode plists and pages of configuration, you’ll be happy to hear that most everything you can possibly need in Android is located in one of two locations: AndroidManifest.xml (covered in this chapter) and the project’s Properties window. The Android manifest file covers things very specific to the app, just like Summary and Info for the Xcode target, and the project’s Properties window covers features of the Java language (such as which libraries are linked, where classes are located, etc.). Right-clicking the project and selecting Properties presents you with a number of categories to configure from. The Android and Java Build Path categories deal with libraries and source code dependencies, much like many of the Build Settings, Build Phases, and Build Rules tab options in Xcode. Things will surely be different, but understanding where to look can save a great deal of time.
Other Useful Tidbits
Of course there are more differences between XCode and Eclipse. The following list tells you about those that we find most useful.
- Eclipse shows the actual filesystem structure, but caches many things about it, so get good with the F5/refresh feature to get an up-to-date picture of your project files.
- File location does matter, and there is no virtualization of locations equivalent to groups. It’s as if all folders are folder references, and the only way to not include files is to set up exclusion filters.
- Settings are per-workspace, so you can have several workspaces each with different settings. This is very useful when you have both personal and professional projects and you want to keep them separate.
- Eclipse has multiple perspectives The current perspective is identified by the active icon in the upper-right area of the Eclipse window, which is Java by default. As discussed in Chapter 2, a perspective is a preconfigured set of views and some associated contextual settings. If things seem to get weird at any point, check to make sure you are in the correct perspective.
- Deploying is covered in this book, but it is not like changing the scheme or target as you do in Xcode. It’s an entirely separate operation that you do via the right-click context menu for the project (Android Tools
 Export Signed Application Package).
 - If code edits simply don’t seem to be taking effect, most likely your Build Automatically setting is turned off. You will usually want that enabled for desired behavior (Project Build Automatically).
- There is no direct equivalent to XIB. The closest thing is the Android layout, but Android doesn’t do outlets like XIB does, so just assume you’ll always use the ID convention. Most games don’t need to care about more than one layout, but it’s good to keep in mind.
- Eclipse uses mostly XML-based configuration files in the project directory to store project settings. Check for “dot” files like .project if you need to make changes manually or build automation systems. This plus AndroidManifest.xml is very similar to the project.pbxproj file in Xcode.
Android API Basics
In the rest of the chapter, we’ll concentrate on playing around with those Android APIs that are relevant to our game development needs. For this, we’ll do something rather convenient: we’ll set up a test project that will contain all of our little test examples for the different APIs we are going to use. Let’s get started.
Creating a Test Project
From the previous section, we already know how to set up all our projects. So, the first thing we do is to execute the eight steps outlined earlier. Create a project named ch04–android-basics, using the package name com.badlogic.androidgames with a single main activity called AndroidBasicsStarter. We are going to use some older and some newer APIs, so we set the minimum SDK version to 3 (Android 1.5) and the build SDK version to 16 (Android 4.1). You can fill in any values you like for the other settings, such as the title of the application. From here on, all we’ll do is create new activity implementations, each demonstrating parts of the Android APIs.
However, remember that we only have one main activity. So, what does our main activity look like? We want a convenient way to add new activities, and we want the ability to start a specific activity easily. With one main activity, it should be clear that that activity will somehow provide us with a means to start a specific test activity. As discussed earlier, the main activity will be specified as the main entry point in the manifest file. Each additional activity that we add will be specified without the <intent-filter> child element. We’ll start those programmatically from the main activity.
The AndroidBasicsStarter Activity
The Android API provides us with a special class called ListActivity, which derives from the Activity class that we used in the Hello World project. The ListActivity class is a special type of activity whose single purpose is to display a list of things (for example, strings). We use it to display the names of our test activities. When we touch one of the list items, we’ll start the corresponding activity programmatically. Listing 4-1 shows the code for our AndroidBasicsStarter main activity.
Listing 4-1. AndroidBasicsStarter.java, Our Main Activity Responsible for Listing and Starting All Our Tests
package com.badlogic.androidgames;

import android.app.ListActivity;
import android.content.Intent;
import android.os.Bundle;
import android.view.View;
import android.widget.ArrayAdapter;
import android.widget.ListView;

public class AndroidBasicsStarter extends ListActivity {
    String tests[] = { "LifeCycleTest", "SingleTouchTest", "MultiTouchTest",
            "KeyTest", "AccelerometerTest", "AssetsTest",
            "ExternalStorageTest", "SoundPoolTest", "MediaPlayerTest",
            "FullScreenTest", "RenderViewTest", "ShapeTest", "BitmapTest",
            "FontTest", "SurfaceViewTest" };

    public void onCreate(Bundle savedInstanceState) {
        super .onCreate(savedInstanceState);
        setListAdapter(new ArrayAdapter<String>(this ,
                android.R.layout.simple_list_item_1, tests));
    }

    @Override
    protected void onListItemClick(ListView list, View view, int position,
            long id) {
        super .onListItemClick(list, view, position, id);
        String testName = tests[position];
        try {
            Class clazz = Class
                    .forName("com.badlogic.androidgames." + testName);
            Intent intent = new Intent(this , clazz);
            startActivity(intent);
        }catch (ClassNotFoundException e) {
            e.printStackTrace();
        }
    }
}
The package name we chose is com.badlogic.androidgames. The imports should also be pretty self-explanatory; these are simply all the classes we are going to use in our code. Our AndroidBasicsStarter class derives from the ListActivity class—still nothing special. The field tests is a string array that holds the names of all of the test activities that our starter application should display. Note that the names in that array are the exact Java class names of the activity classes we are going to implement later on.
The next piece of code should be familiar; it’s the onCreate() method that we have to implement for each of our activities, and that will be called when the activity is created. Remember that we must call the onCreate() method of the base class of our activity. It’s the first thing we must do in the onCreate() method of our own Activity implementation. If we don’t, an exception will be thrown and the activity will not be displayed.
With that out of the way, the next thing we do is call a method called setListAdapter(). This method is provided to us by the ListActivity class we derived it from. It lets us specify the list items we want the ListActivity class to display for us. These need to be passed to the method in the form of a class instance that implements the ListAdapter interface. We use the convenient ArrayAdapter class to do this. The constructor of this class takes three arguments: the first is our activity, the second we’ll explain in the next paragraph, and the third is the array of items that the ListActivity should display. We happily specify the tests array we defined earlier for the third argument, and that’s all we need to do.
So what’s this second argument to the ArrayAdapter constructor? To explain this, we’d have to go through all the Android UI API stuff, which we are not going to use in this book. So, instead of wasting pages on something we are not going to need, we’ll give you the quick-and-dirty explanation: each item in the list is displayed via a View. The argument defines the layout of each View, along with the type of each View. The value android.R.layout.simple_list_item_1 is a predefined constant provided by the UI API for getting up and running quickly. It stands for a standard list item View that will display text. Just as a quick refresher, a View is a UI widget on Android, such as a button, a text field, or a slider. We introduced views in form of a Button instance while dissecting the HelloWorldActivity in Chapter 2.
If we start our activity with just this onCreate() method, we’ll see something that looks like the screen shown in Figure 4-2.

Figure 4-2. Our test starter activity, which looks fancy but doesn’t do a lot yet
Now let’s make something happen when a list item is touched. We want to start the respective activity that is represented by the list item we touched.
Starting Activities Programmatically
The ListActivity class has a protected method called onListItemClick() that will be called when an item is tapped. All we need to do is override that method in our AndroidBasicsStarter class. And that’s exactly what we did in Listing 4-1.
The arguments to this method are the ListView that the ListActivity uses to display the items, the View that got touched and that’s contained in that ListView, the position of the touched item in the list, and an ID, which doesn’t interest us all that much. All we really care about is the position argument.
The onListItemClicked() method starts off by being a good citizen and calls the base class method first. This is always a good thing to do if we override methods of an activity. Next, we fetch the class name from the tests array, based on the position argument. That’s the first piece of the puzzle.
Earlier, we discussed that we can start activities that we defined in the manifest file programmatically via an intent. The Intent class has a nice and simple constructor to do this, which takes two arguments: a Context instance and a Class instance. The latter represents the Java class of the activity we want to start.
Context is an interface that provides us with global information about our application. It is implemented by the Activity class, so we simply pass this reference to the Intent constructor.
To get the Class instance representing the activity we want to start, we use a little reflection, which will probably be familiar to you if you’ve worked with Java. Reflection allows us to programmatically inspect, instantiate, and call classes at runtime. The static method Class.forName() takes a string containing the fully qualified name of a class for which we want to create a Class instance. All of the test activities we’ll implement later will be contained in the com.badlogic.androidgames package. Concatenating the package name with the class name we fetched from the tests array will give us the fully qualified name of the activity class we want to start. We pass that name to Class.forName() and get a nice Class instance that we can pass to the Intent constructor.
Once the Intent instance is constructed, we can start it with a call to the startActivity() method. This method is also defined in the Context interface. Because our activity implements that interface, we just call its implementation of that method. And that’s it!
So how will our application behave? First, the starter activity will be displayed. Each time we touch an item on the list, the corresponding activity will be started. The starter activity will be paused and will go into the background. The new activity will be created by the intent we send out and will replace the starter activity on the screen. When we press the back button on the Android device, the activity is destroyed and the starter activity is resumed, taking back the screen.
Creating the Test Activities
When we create a new test activity, we have to perform the following steps:
- Create the corresponding Java class in the com.badlogic.androidgames package and implement its logic.
- Add an entry for the activity in the manifest file, using whatever attributes it needs (that is, android:configChanges or android:screenOrientation). Note that we won’t specify an <intent-filter> element, as we’ll start the activity programmatically.
- Add the activity’s class name to the tests array of the AndroidBasicsStarter class.
As long as we stick to this procedure, everything else will be taken care of by the logic we implemented in the AndroidBasicsStarter class. The new activity will automatically show up in the list, and it can be started by a simple touch.
One thing you might wonder is whether the test activity that gets started on a touch is running in its own process and VM. It is not. An application composed of activities has something called an activity stack. Every time we start a new activity, it gets pushed onto that stack. When we close the new activity, the last activity that got pushed onto the stack will get popped and resumed, becoming the new active activity on the screen.
This also has some other implications. First, all of the activities of the application (those on the stack that are paused and the one that is active) share the same VM. They also share the same memory heap. That can be a blessing and a curse. If you have static fields in your activities, they will get memory on the heap as soon as they are started. Being static fields, they will survive the destruction of the activity and the subsequent garbage collection of the activity instance. This can lead to some bad memory leaks if you carelessly use static fields. Think twice before using a static field.
As stated a couple of times already, we’ll only ever have a single activity in our actual games. The preceding activity starter is an exception to this rule to make our lives a little easier. But don’t worry; we’ll have plenty of opportunities to get into trouble even with a single activity.
Note This is as deep as we’ll get into Android UI programming. From here on, we’ll always use a single View in an activity to output things and to receive input. If you want to learn about things like layouts, view groups, and all the bells and whistles that the Android UI library offers, we suggest you check out Grant Allen’s book, Beginning Android 4 (Apress, 2011), or the excellent developer guide on the Android Developers site.
The first thing we have to figure out when programming for Android is how an activity behaves. On Android, this is called the activity life cycle. It describes the states and transitions between those states through which an activity can live. Let’s start by discussing the theory behind this.
In Theory
An activity can be in one of three states:
- Running: In this state, it is the top-level activity that takes up the screen and directly interacts with the user.
- Paused: This happens when the activity is still visible on the screen but partially obscured by either a transparent activity or a dialog, or if the device screen is locked. A paused activity can be killed by the Android system at any point in time (for example, due to low memory). Note that the activity instance itself is still alive and kicking in the VM heap and waiting to be brought back to a running state.
- Stopped: This happens when the activity is completely obscured by another activity and thus is no longer visible on the screen. Our AndroidBasicsStarter activity will be in this state if we start one of the test activities, for example. It also happens when a user presses the home button to go to the home screen temporarily. The system can again decide to kill the activity completely and remove it from memory if memory gets low.
In both the paused and stopped states, the Android system can decide to kill the activity at any point in time. It can do so either politely, by first informing the activity by calling its finished() method, or impolitely, by silently killing the activity’s process.
The activity can be brought back to a running state from a paused or stopped state. Note again that when an activity is resumed from a paused or stopped state, it is still the same Java instance in memory, so all the state and member variables are the same as before the activity was paused or stopped.
An activity has some protected methods that we can override to get information about state changes:
- Activity.onCreate(): This is called when our activity is started up for the first time. Here, we set up all the UI components and hook into the input system. This method will get called only once in the life cycle of our activity.
- Activity.onRestart(): This is called when the activity is resumed from a stopped state. It is preceded by a call to onStop().
- Activity.onStart(): This is called after onCreate() or when the activity is resumed from a stopped state. In the latter case, it is preceded by a call to onRestart().
- Activity.onResume(): This is called after onStart() or when the activity is resumed from a paused state (for example, when the screen is unlocked).
- Activity.onPause(): This is called when the activity enters the paused state. It might be the last notification we receive, as the Android system might decide to kill our application silently. We should save all states we want to persist in this method!
- Activity.onStop(): This is called when the activity enters the stopped state. It is preceded by a call to onPause(). This means that an activity is stopped before it is paused. As with onPause(), it might be the last notification we get before the Android system silently kills the activity. We could also save persistent state here. However, the system might decide not to call this method and just kill the activity. As onPause() will always be called before onStop() and before the activity is silently killed, we’d rather save all our stuff in the onPause() method.
- Activity.onDestroy(): This is called at the end of the activity life cycle when the activity is irrevocably destroyed. It’s the last time we can persist any information we’d like to recover the next time our activity is created anew. Note that this method actually might never be called if the activity was destroyed silently after a call to onPause() or onStop() by the system.
Figure 4-3 illustrates the activity life cycle and the method call order.
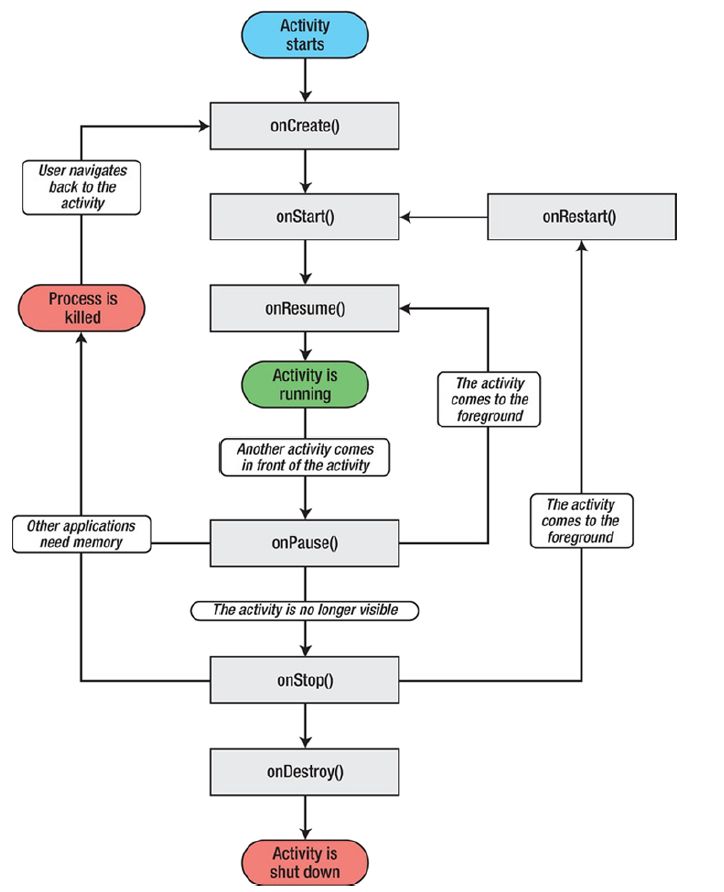
Figure 4-3. The mighty, confusing activity life cycle
Here are the three big lessons we should take away from this:
- Before our activity enters the running state, the onResume() method is always called, whether or not we resume from a stopped state or from a paused state. We can thus safely ignore the onRestart() and onStart() methods. We don’t care whether we resumed from a stopped state or a paused state. For our games, we only need to know that we are now actually running, and the onResume() method signals that to us.
- The activity can be destroyed silently after onPause(). We should never assume that either onStop() or onDestroy() gets called. We also know that onPause() will always be called before onStop(). We can therefore safely ignore the onStop() and onDestroy() methods and just override onPause(). In this method, we have to make sure that all the states we want to persist, like high scores and level progress, get written to external storage, such as an SD card. After onPause(), all bets are off, and we won’t know whether our activity will ever get the chance to run again.
- We know that onDestroy() might never be called if the system decides to kill the activity after onPause() or onStop(). However, sometimes we’d like to know whether the activity is actually going to be killed. So how do we do that if onDestroy() is not going to get called? The Activity class has a method called Activity.isFinishing() that we can call at any time to check whether our activity is going to get killed. We are at least guaranteed that the onPause() method is called before the activity is killed. All we need to do is call this isFinishing() method inside the onPause() method to decide whether the activity is going to die after the onPause() call.
This makes life a lot easier. We only override the onCreate(), onResume(), and onPause() methods.
- In onCreate(), we set up our window and UI component to which we render and from which we receive input.
- In onResume(), we (re)start our main loop thread (discussed in Chapter 3).
- In onPause(), we simply pause our main loop thread, and if Activity.isFinishing() returns true, we also save to disk any state we want to persist.
Many people struggle with the activity life cycle, but if we follow these simple rules, our game will be capable of handling pausing, resuming, and cleaning up.
In Practice
Let’s write our first test example that demonstrates the activity life cycle. We’ll want to have some sort of output that displays which state changes have happened so far. We’ll do this in two ways:
- The sole UI component that the activity will display is a TextView. As its name suggests, it displays text, and we’ve already used it implicitly for displaying each entry in our starter activity. Each time we enter a new state, we will append a string to the TextView, which will display all the state changes that have happened so far.
- We won’t be able to display the destruction event of our activity in the TextView because it will vanish from the screen too fast, so we will also output all state changes to LogCat. We do this with the Log class, which provides a couple of static methods with which to append messages to LogCat.
Remember what we need to do to add a test activity to our test application. First, we define it in the manifest file in the form of an <activity> element, which is a child of the <application> element:
<activity android:label="Life Cycle Test"
          android:name=".LifeCycleTest"
          android:configChanges="keyboard|keyboardHidden|orientation" />
Next we add a new Java class called LifeCycleTest to our com.badlogic.androidgames package. Finally, we add the class name to the tests member of the AndroidBasicsStarter class we defined earlier. (Of course, we already have that in there from when we wrote the class for demonstration purposes.)
We’ll have to repeat all of these steps for any test activity that we create in the following sections. For brevity, we won’t mention these steps again. Also note that we didn’t specify an orientation for the LifeCycleTest activity. In this example, we can be in either landscape mode or portrait mode, depending on the device orientation. We did this so that you can see the effect of an orientation change on the life cycle (none, due to how we set the configChanges attribute). Listing 4-2 shows the code of the entire activity.
Listing 4-2. LifeCycleTest.java, Demonstrating the Activity Life Cycle
package com.badlogic.androidgames;

import android.app.Activity;
import android.os.Bundle;
import android.util.Log;
import android.widget.TextView;

public class LifeCycleTest extends Activity {
   StringBuilder builder = new StringBuilder();
   TextView textView;

   private void log(String text) {
       Log.d("LifeCycleTest", text);
       builder.append(text);
       builder.append('
'),
       textView.setText(builder.toString());
   }

   @Override
   public void onCreate(Bundle savedInstanceState) {
      super .onCreate(savedInstanceState);
      textView = new TextView(this );
      textView.setText(builder.toString());
        setContentView(textView);
        log("created");
   }

   @Override
   protected void onResume() {
      super .onResume();
      log("resumed");
   }

   @Override
   protected void onPause() {
      super .onPause();
      log("paused");

      if (isFinishing()) {
            log("finishing");
      }
   }
}
Let’s go through this code really quickly. The class derives from Activity—not a big surprise. We define two members: a StringBuilder, which will hold all the messages we have produced so far, and the TextView, which we use to display those messages directly in the Activity.
Next, we define a little private helper method that will log text to LogCat, append it to our StringBuilder, and update the TextView text. For the LogCat output, we use the static Log.d() method, which takes a tag as the first argument and the actual message as the second argument.
In the onCreate() method, we call the superclass method first, as always. We create the TextView and set it as the content view of our activity. It will fill the complete space of the activity. Finally, we log the message created to LogCat and update the TextView text with our previously defined helper method log().
Next, we override the onResume() method of the activity. As with any activity methods that we override, we first call the superclass method. All we do is call log() again with resumed as the argument.
The overridden onPause() method looks much like the onResume() method. We log the message as “paused” first. We also want to know whether the activity is going to be destroyed after the onPause() method call, so we check the Activity.isFinishing() method. If it returns true, we log the finishing event as well. Of course, we won’t be able to see the updated TextView text because the activity will be destroyed before the change is displayed on the screen. Thus, we also output everything to LogCat, as discussed earlier.
Run the application, and play around with this test activity a little. Here’s a sequence of actions you could execute:
- Start up the test activity from the starter activity.
- Lock the screen.
- Unlock the screen.
- Press the home button (which will take you back to the home screen).
- On the home screen, on older Android versions (prior to version 3), hold the home button until you are presented with the currently running applications. On Android versions 3+, touch the Running Apps button. Select the Android Basics Starter app to resume (which will bring the test activity back onscreen).
- Press the back button (which will take you back to the starter activity).
If your system didn’t decide to kill the activity silently at any point when it was paused, you will see the output in Figure 4-4 (of course, only if you haven’t pressed the back button yet).

Figure 4-4. Running the LifeCycleTest activity
On startup, onCreate() is called, followed by onResume(). When we lock the screen, onPause() is called. When we unlock the screen, onResume() is called. When we press the home button, onPause() is called. Going back to the activity will call onResume() again. The same messages are, of course, shown in LogCat, which you can observe in Eclipse in the LogCat view. Figure 4-5 shows what we wrote to LogCat while executing the preceding sequence of actions (plus pressing the back button).

Figure 4-5. The LogCat output of LifeCycleTest
Pressing the back button again invokes the onPause() method. As it also destroys the activity, the if-statement in onPause() also gets triggered, informing us that this is the last we’ll see of that activity.
That is the activity life cycle, demystified and simplified for our game programming needs. We now can easily handle any pause and resume events, and we are guaranteed to be notified when the activity is destroyed.
As discussed in previous chapters, we can get information from many different input devices on Android. In this section, we’ll discuss three of the most relevant input devices on Android and how to work with them: the touchscreen, the keyboard, the accelerometer and the compass.
Getting (Multi-)Touch Events
The touchscreen is probably the most important way to get input from the user. Until Android version 2.0, the API only supported processing single-finger touch events. Multitouch was introduced in Android 2.0 (SDK version 5). The multitouch event reporting was tagged onto the single-touch API, with some mixed results in usability. We’ll first investigate handling single-touch events, which are available on all Android versions.
Processing Single-Touch Events
When we processed taps on a button in Chapter 2, we saw that listener interfaces are the way Android reports events to us. Touch events are no different. Touch events are passed to an OnTouchListener interface implementation that we register with a View. The OnTouchListener interface has only a single method:
public abstract boolean onTouch (View v, MotionEvent event)
The first argument is the View to which the touch events get dispatched. The second argument is what we’ll dissect to get the touch event.
An OnTouchListener can be registered with any View implementation via the View.setOnTouchListener() method. The OnTouchListener will be called before the MotionEvent is dispatched to the View itself. We can signal to the View in our implementation of the onTouch() method that we have already processed the event by returning true from the method. If we return false, the View itself will process the event.
The MotionEvent instance has three methods that are relevant to us:
- MotionEvent.getX() and MotionEvent.getY(): These methods report the x and y coordinates of the touch event relative to the View. The coordinate system is defined with the origin in the top left of the view, with the x axis pointing to the right and the y axis pointing downward. The coordinates are given in pixels. Note that the methods return floats, and thus the coordinates have subpixel accuracy.
- MotionEvent.getAction(): This method returns the type of the touch event. It is an integer that takes on one of the values MotionEvent.ACTION_DOWN, MotionEvent.ACTION_MOVE, MotionEvent.ACTION_CANCEL, or MotionEvent.ACTION_UP.
Sounds simple, and it really is. The MotionEvent.ACTION_DOWN event happens when the finger touches the screen. When the finger moves, events with type MotionEvent.ACTION_MOVE are fired. Note that you will always get MotionEvent.ACTION_MOVE events, as you can’t hold your finger still enough to avoid them. The touch sensor will recognize the slightest change. When the finger is lifted up again, the MotionEvent.ACTION_UP event is reported. MotionEvent.ACTION_CANCEL events are a bit of a mystery. The documentation says they will be fired when the current gesture is canceled. We have never seen that event in real life yet. However, we’ll still process it and pretend it is a MotionEvent.ACTION_UP event when we start implementing our first game.
Let’s write a simple test activity to see how this works in code. The activity should display the current position of the finger on the screen as well as the event type. Listing 4-3 shows what we came up with.
Listing 4-3. SingleTouchTest.java; Testing Single-Touch Handling
package com.badlogic.androidgames;

import android.app.Activity;
import android.os.Bundle;
import android.util.Log;
import android.view.MotionEvent;
import android.view.View;
import android.view.View.OnTouchListener;
import android.widget.TextView;

public class SingleTouchTest extends Activity implements OnTouchListener {
   StringBuilder builder = new StringBuilder();
   TextView textView;

   public void onCreate(Bundle savedInstanceState) {
       super .onCreate(savedInstanceState);
       textView = new TextView(this );
       textView.setText("Touch and drag (one finger only)!");
       textView.setOnTouchListener(this );
       setContentView(textView);
   }

   public boolean onTouch(View v, MotionEvent event) {
      builder.setLength(0);
      switch (event.getAction()) {
      case MotionEvent.ACTION_DOWN:
          builder.append("down, ");
          break ;
      case MotionEvent.ACTION_MOVE:
          builder.append("move, ");
          break ;
      case MotionEvent.ACTION_CANCEL:
          builder.append("cancel", ");
          break ;
      case MotionEvent.ACTION_UP:
          builder.append("up, ");
          break ;
      }
      builder.append(event.getX());
      builder.append(", ");
      builder.append(event.getY());
      String text = builder.toString();
      Log.d("TouchTest", text);
      textView.setText(text);
      return true ;
   }
}
We let our activity implement the OnTouchListener interface. We also have two members: one for the TextView, and a StringBuilder we’ll use to construct our event strings.
The onCreate() method is pretty self-explanatory. The only novelty is the call to TextView.setOnTouchListener(), where we register our activity with the TextView so that it receives MotionEvents.
What’s left is the onTouch() method implementation itself. We ignore the view argument, as we know that it must be the TextView. All we are interested in is getting the touch event type, appending a string identifying it to our StringBuilder, appending the touch coordinates, and updating the TextView text. That’s it. We also log the event to LogCat so that we can see the order in which the events happen, as the TextView will only show the last event that we processed (we clear the StringBuilder every time onTouch() is called).
One subtle detail in the onTouch() method is the return statement, where we return true. Usually, we’d stick to the listener concept and return false in order not to interfere with the event-dispatching process. If we do this in our example, we won’t get any events other than the MotionEvent.ACTION_DOWN event. So, we tell the TextView that we just consumed the event. That behavior might differ between different View implementations. Luckily, we’ll only need three other views in the rest of this book, and those will happily let us consume any event we want.
If we fire up that application on the emulator or a connected device, we can see how the TextView will always display the last event type and position reported to the onTouch() method. Additionally, you can see the same messages in LogCat.
We did not fix the orientation of the activity in the manifest file. If you rotate your device so that the activity is in landscape mode, the coordinate system changes, of course. Figure 4-6 shows the activity in portrait mode (left) and landscape mode (right). In both cases, we tried to touch the middle of the View. Note how the x and y coordinates seem to get swapped. The figure also shows the x and y axes in both cases (the yellow lines), along with the point on the screen that we roughly touched (the green circle). In both cases, the origin is in the upper-left corner of the TextView, with the x axis pointing to the right and the y axis pointing downward.

Figure 4-6. Touching the screen in portrait and landscape modes
Depending on the orientation, our maximum x and y values change, of course. The preceding images were taken on a Nexus One running Android 2.2 (Froyo), which has a screen resolution of 480×800 pixels in portrait mode (800×480 in landscape mode). Since the touch coordinates are given relative to the View, and since the view doesn’t fill the complete screen, our maximum y value will be smaller than the resolution height. We’ll see later how we can enable full-screen mode so that the title bar and notification bar don’t get in our way.
Sadly, there are a few issues with touch events on older Android versions and first-generation devices:
- Touch event flood: The driver will report as many touch events as possible when a finger is down on the touchscreen—on some devices, hundreds per second. We can fix this issue by putting a Thread.sleep(16) call into our onTouch() method, which will put to sleep for 16 ms the UI thread on which those events are dispatched. With this, we’ll get 60 events per second at most, which is more than enough to have a responsive game. This is only a problem on devices with Android version 1.5. If you don’t target that Android version, ignore this advice.
- Touching the screen eatsthe CPU: Even if we sleep in our onTouch() method, the system has to process the events in the kernel as reported by the driver. On old devices, such as the Hero or G1, this can use up to 50 percent of the CPU, which leaves a lot less processing power for our main loop thread. As a consequence, our perfectly fine frame rate will drop considerably, sometimes to the point where the game becomes unplayable. On second-generation devices, the problem is a lot less pronounced and can usually be ignored. Sadly, there’s no solution for this on older devices.
Processing Multitouch Events
Warning: Major pain ahead! The multitouch API has been tagged onto the MotionEvent class, which originally handled only single touches. This makes for some major confusion when trying to decode multitouch events. Let’s try to make some sense of it.
Note The multitouch API apparently is also confusing for the Android engineers that created it. It received a major overhaul in SDK version 8 (Android 2.2) with new methods, new constants, and even renamed constants. These changes should make working with multitouch a little bit easier. However, they are only available from SDK version 8 onward. To support all multitouch-capable Android versions (2.0+), we have to use the API of SDK version 5.
Handling multitouch events is very similar to handling single-touch events. We still implement the same OnTouchListener interface we implemented for single-touch events. We also get a MotionEvent instance from which to read the data. We also process the event types we processed before, like MotionEvent.ACTION_UP, plus a couple of new ones that aren’t too big of a deal.
Pointer IDs and Indices
The differences between handling multitouch events and handling single-touch events start when we want to access the coordinates of a touch event. MotionEvent.getX() and MotionEvent.getY() return the coordinates of a single finger on the screen. When we process multitouch events, we use overloaded variants of these methods that take a pointer index. This might look as follows:
event.getX(pointerIndex);
event.getY(pointerIndex);
Now, one would expect that pointerIndex directly corresponds to one of the fingers touching the screen (for example, the first finger that touched has pointerIndex 0, the next finger that touched has pointerIndex 1, and so forth). Unfortunately, this is not the case.
The pointerIndex is an index into internal arrays of the MotionEvent that holds the coordinates of the event for a specific finger that is touching the screen. The real identifier of a finger on the screen is called the pointer identifier. A pointer identifier is an arbitrary number that uniquely identifies one instance of a pointer touching the screen. There’s a separate method called MotionEvent.getPointerIdentifier(int pointerIndex) that returns the pointer identifier based on a pointer index. A pointer identifier will stay the same for a single finger as long as it touches the screen. This is not necessarily true for the pointer index. It’s important to understand the distinction between the two and understand that you can’t rely on the first touch to be index 0, ID 0, because on some devices, notably the first version of the Xperia Play, the pointer ID would always increment to 15 and then start over at 0, rather than reuse the lowest available number for an ID.
Let’s start by examining how we can get to the pointer index of an event. We’ll ignore the event type for now.
int pointerIndex = (event.getAction() & MotionEvent.ACTION_POINTER_ID_MASK) >> MotionEvent.ACTION_POINTER_ID_SHIFT;
You probably have the same thoughts that we had when we first implemented this. Before we lose all faith in humanity, let’s try to decipher what’s happening here. We fetch the event type from the MotionEvent via MotionEvent.getAction(). Good, we’ve done that before. Next we perform a bitwise AND operation using the integer we get from the MotionEvent.getAction() method and a constant called MotionEvent.ACTION_POINTER_ID_MASK. Now the fun begins.
That constant has a value of 0xff00, so we essentially make all bits 0, other than bits 8 to 15, which hold the pointer index of the event. The lower 8 bits of the integer returned by event.getAction() hold the value of the event type, such as MotionEvent.ACTION_DOWN and its siblings. We essentially throw away the event type by this bitwise operation. The shift should make a bit more sense now. We shift by MotionEvent.ACTION_POINTER_ID_SHIFT, which has a value of 8, so we basically move bits 8 through 15 to bits 0 through 7, arriving at the actual pointer index of the event. With this, we can then get the coordinates of the event, as well as the pointer identifier.
Notice that our magic constants are called XXX_POINTER_ID_XXX instead of XXX_POINTER_INDEX_XXX (which would make more sense, as we actually want to extract the pointer index, not the pointer identifier). Well, the Android engineers must have been confused as well. In SDK version 8, they deprecated those constants and introduced new constants called XXX_POINTER_INDEX_XXX, which have the exact same values as the deprecated ones. In order for legacy applications that are written against SDK version 5 to continue working on newer Android versions, the old constants are still made available.
So we now know how to get that mysterious pointer index that we can use to query for the coordinates and the pointer identifier of the event.
The Action Mask and More Event Types
Next, we have to get the pure event type minus the additional pointer index that is encoded in the integer returned by MotionEvent.getAction(). We just need to mask out the pointer index:
int action = event.getAction() & MotionEvent.ACTION_MASK;
OK, that was easy. Sadly, you’ll only understand it if you know what that pointer index is, and that it is actually encoded in the action.
What’s left is to decode the event type as we did before. We already said that there are a few new event types, so let’s go through them:
- MotionEvent.ACTION_POINTER_DOWN: This event happens for any additional finger that touches the screen after the first finger touches. The first finger still produces a MotionEvent.ACTION_DOWN event.
- MotionEvent.ACTION_POINTER_UP: This is analogous to the previous action. This gets fired when a finger is lifted up from the screen and more than one finger is touching the screen. The last finger on the screen to be lifted will produce a MotionEvent.ACTION_UP event. This finger doesn’t necessarily have to be the first finger that touched the screen.
Luckily, we can just pretend that those two new event types are the same as the old MotionEvent.ACTION_UP and MotionEvent.ACTION_DOWN events.
The last difference is the fact that a single MotionEvent can have data for multiple events. Yes, you read that right. For this to happen, the merged events have to have the same type. In reality, this will only happen for the MotionEvent.ACTION_MOVE event, so we only have to deal with this fact when processing said event type. To check how many events are contained in a single MotionEvent, we use the MotionEvent.getPointerCount() method, which tells us the number of fingers that have coordinates in the MotionEvent. We then can fetch the pointer identifier and coordinates for the pointer indices 0 to MotionEvent.getPointerCount() – 1 via the MotionEvent.getX(), MotionEvent.getY(), and MotionEvent.getPointerId() methods.
In Practice
Let’s write an example for this fine API. We want to keep track of ten fingers at most (there’s no device yet that can track more, so we are on the safe side here). The Android device will usually assign sequential pointer indices as we add more fingers to the screen, but it’s not always guaranteed, so we rely on the pointer index for our arrays and will simply display which ID is assigned to the touch point. We keep track of each pointer’s coordinates and touch state (touching or not), and output this information to the screen via a TextView. Let’s call our test activity MultiTouchTest. Listing 4-4 shows the complete code.
Listing 4-4. MultiTouchTest.java; Testing the Multitouch API
package com.badlogic.androidgames;

import android.app.Activity;
import android.os.Bundle;
import android.view.MotionEvent;
import android.view.View;
import android.view.View.OnTouchListener;
import android.widget.TextView;

@TargetApi (5)
public class MultiTouchTest extends Activity implements OnTouchListener {
   StringBuilder builder = new StringBuilder();
   TextView textView;
   float [] x = new float [10];
   float [] y = new float [10];
   boolean [] touched = new boolean [10];
   int [] id = new int [10];

   private void updateTextView() {
      builder.setLength(0);
      for (int i = 0; i < 10; i++) {
          builder.append(touched[i]);
          builder.append(", ");
          builder.append(id[i]);
          builder.append(", ");
          builder.append(x[i]);
          builder.append(", ");
          builder.append(y[i]);
          builder.append("
");
        }
        textView.setText(builder.toString());
    }

    public void onCreate(Bundle savedInstanceState) {
       super .onCreate(savedInstanceState);
       textView = new TextView(this );
       textView.setText("Touch and drag (multiple fingers supported)!");
       textView.setOnTouchListener(this );
       setContentView(textView);
       for (int i = 0; i < 10; i++) {
           id[i] = -1;
       }
       updateTextView();
    }

    public boolean onTouch(View v, MotionEvent event) {
       int action = event.getAction() & MotionEvent.ACTION_MASK;
       int pointerIndex = (event.getAction() & MotionEvent.ACTION_POINTER_ID_MASK) >> MotionEvent.ACTION_POINTER_ID_SHIFT;
       int pointerCount = event.getPointerCount();
       for (int i = 0; i < 10; i++) {
             if (i >= pointerCount) {
                 touched[i] = false ;
                 id[i] = -1;
                 continue ;
             }
             if (event.getAction() != MotionEvent.ACTION_MOVE&& i != pointerIndex) {
                 // if it's an up/down/cancel/out event, mask the id to see if we should process it for this touch point
                 continue ;
             }
             int pointerId = event.getPointerId(i);
             switch (action) {

             case MotionEvent.ACTION_DOWN:
             case MotionEvent.ACTION_POINTER_DOWN:
                 touched[i] = true ;
                 id[i] = pointerId;
                 x[i] = (int ) event.getX(i);
                 y[i] = (int ) event.getY(i);
                 break ;
             case MotionEvent.ACTION_UP:
             case MotionEvent.ACTION_POINTER_UP:
     case MotionEvent.ACTION_OUTSIDE:
             case MotionEvent.ACTION_CANCEL:
                 touched[i] = false ;
                 id[i] = -1;
                 x[i] = (int ) event.getX(i);
                 y[i] = (int ) event.getY(i);
                 break ;

             case MotionEvent.ACTION_MOVE:
                 touched[i] = true ;
                 id[i] = pointerId;
                 x[i] = (int ) event.getX(i);
                 y[i] = (int ) event.getY(i);
                 break ;
             }
         }
         updateTextView();
         return true ;
     }
}
Note the TargetApi annotation at the top of the class definition. This is necessary as we access APIs that are not part of the minimum SDK we specified when creating the project (Android 1.5). Every time we use APIs that are not part of that minimum SDK, we need to put that annotation on top of the class using those APIs!
We implement the OnTouchListener interface as before. To keep track of the coordinates and touch state of the ten fingers, we add three new member arrays that will hold that information for us. The arrays x and y hold the coordinates for each pointer ID, and the array touched stores whether the finger with that pointer ID is down.
Next we took the freedom to create a little helper method that will output the current state of the fingers to the TextView. The method simply iterates through all the ten finger states and concatenates them via a StringBuilder. The final text is set to the TextView.
The onCreate() method sets up our activity and registers it as an OnTouchListener with the TextView. We already know that part by heart.
Now for the scary part: the onTouch() method.
We start off by getting the event type by masking the integer returned by event.getAction(). Next, we extract the pointer index and fetch the corresponding pointer identifier from the MotionEvent, as discussed earlier.
The heart of the onTouch() method is that big nasty switch statement, which we already used in a reduced form to process single-touch events. We group all the events into three categories on a high level:
- A touch-down event happened (MotionEvent.ACTION_DOWN or MotionEvent.ACTION_PONTER_DOWN): We set the touch state for the pointer identifier to true, and we also save the current coordinates of that pointer.
- A touch-up event happened (MotionEvent.ACTION_UP, MotionEvent.ACTION_POINTER_UP, or MotionEvent.CANCEL): We set the touch state to false for that pointer identifier and save its last known coordinates.
- One or more fingerswere dragged across thescreen (MotionEvent.ACTION_MOVE): We check how many events are contained in the MotionEvent and then update the coordinates for the pointer indices 0 to MotionEvent.getPointerCount()-1. For each event, we fetch the corresponding pointer ID and update the coordinates.
Once the event is processed, we update the TextView via a call to the updateView() method we defined earlier. Finally, we return true, indicating that we processed the touch event.
Figure 4-7 shows the output of the activity produced by touching five fingers on a Samsung Galaxy Nexus and dragging them around a little.

Figure 4-7. Fun with multitouch
We can observe a few things when we run this example:
- If we start it on a device or emulator with an Android version lower than 2.0, we get a nasty exception because we’ve used an API that is not available on those earlier versions. We can work around this by determining the Android version the application is running, using the single-touch code on devices with Android 1.5 and 1.6, and using the multitouch code on devices with Android 2.0 or newer. We’ll return to this topic in the next chapter.
- There’s no multitouch on the emulator. The API is there if we create an emulator running Android version 2.0 or higher, but we only have a single mouse. Even if we had two mice, it wouldn’t make a difference.
- Touch two fingers down, lift the first one, and touch it down again. The second finger will keep its pointer ID after the first finger is lifted. When the first finger is touched down for the second time, it gets a new pointer ID, which is usually 0 but can be any integer. Any new finger that touches the screen will get a new pointer ID that could be anything that’s not currently used by another active touch. That’s a rule to remember.
- If you try this on a Nexus One, a Droid, or a newer, low-budget smartphone, you will notice some strange behavior when you cross two fingers on one axis. This is due to the fact that the screens of those devices do not fully support the tracking of individual fingers. It’s a big problem, but we can work around it somewhat by designing our UIs with some care. We’ll have another look at the issue in a later chapter. The phrase to keep in mind is: don’t cross the streams!
And that’s how multitouch processing works on Android. It is a pain, but once you untangle all the terminology and come to peace with the bit twiddling, you will feel much more comfortable with the implementation and will be handling all those touch points like a pro.
Note We’re sorry if this made your head explode. This section was rather heavy duty. Sadly, the official documentation for the API is extremely lacking, and most people “learn” the API by simply hacking away at it. We suggest you play around with the preceding code example until you fully grasp what’s going on within it.
Processing Key Events
After the insanity of the last section, you deserve something dead simple. Welcome to processing key events.
To catch key events, we implement another listener interface, called OnKeyListener. It has a single method, called onKey(), with the following signature:
public boolean onKey(View view, int keyCode, KeyEvent event)
The View specifies the view that received the key event, the keyCode argument is one of the constants defined in the KeyEvent class, and the final argument is the key event itself, which has some additional information.
What is a key code? Each key on the (onscreen) keyboard and each of the system keys has a unique number assigned to it. These key codes are defined in the KeyEvent class as static public final integers. One such key code is KeyCode.KEYCODE_A, which is the code for the A key. This has nothing to do with the character that is generated in a text field when a key is pressed. It really just identifies the key itself.
The KeyEvent class is similar to the MotionEvent class. It has two methods that are relevant for us:
- KeyEvent.getAction(): This returns KeyEvent.ACTION_DOWN, KeyEvent.ACTION_UP, and KeyEvent.ACTION_MULTIPLE. For our purposes, we can ignore the last key event type. The other two will be sent when a key is either pressed or released.
- KeyEvent.getUnicodeChar(): This returns the Unicode character the key would produce in a text field. Say we hold down the Shift key and press the A key. This would be reported as an event with a key code of KeyEvent.KEYCODE_A, but with a Unicode character A. We can use this method if we want to do text input ourselves.
To receive keyboard events, a View must have the focus. This can be forced with the following method calls:
View.setFocusableInTouchMode(true);
View.requestFocus();
The first method will guarantee that the View can be focused. The second method requests that the specific View gets the focus.
Let’s implement a simple test activity to see how this works in combination. We want to get key events and display the last one we received in a TextView. The information we’ll display is the key event type, along with the key code and the Unicode character, if one would be produced. Note that some keys do not produce a Unicode character on their own, but only in combination with other characters. Listing 4-5 demonstrates how we can achieve all of this in a small number of code lines.
Listing 4-5. KeyTest.Java; Testing the Key Event API
package com.badlogic.androidgames;

import android.app.Activity;
import android.os.Bundle;
import android.util.Log;
import android.view.KeyEvent;
import android.view.View;
import android.view.View.OnKeyListener;
import android.widget.TextView;

public class KeyTest extends Activity implements OnKeyListener {
   StringBuilder builder = new StringBuilder();
   TextView textView;

   public void onCreate(Bundle savedInstanceState) {
      super .onCreate(savedInstanceState);
      textView = new TextView(this );
      textView.setText("Press keys (if you have some)!");
      textView.setOnKeyListener(this );
      textView.setFocusableInTouchMode(true );
      textView.requestFocus();
      setContentView(textView);
   }

    public boolean onKey(View view, int keyCode, KeyEvent event) {
       builder.setLength(0);
       switch (event.getAction()) {
       case KeyEvent.ACTION_DOWN:
           builder.append("down, ");
           break ;
       case KeyEvent.ACTION_UP:
           builder.append("up, ");
           break ;
       }
       builder.append(event.getKeyCode());
       builder.append(", ");
       builder.append((char ) event.getUnicodeChar());
       String text = builder.toString();
       Log.d("KeyTest", text);
       textView.setText(text);

       return event.getKeyCode() != KeyEvent.KEYCODE_BACK;
   }
}
We start off by declaring that the activity implements the OnKeyListener interface. Next, we define two members with which we are already familiar: a StringBuilder to construct the text to be displayed and a TextView to display the text.
In the onCreate() method, we make sure the TextView has the focus so it can receive key events. We also register the activity as the OnKeyListener via the TextView.setOnKeyListener() method.
The onKey() method is also pretty straightforward. We process the two event types in the switch statement, appending a proper string to the StringBuilder. Next, we append the key code as well as the Unicode character from the KeyEvent itself and output the contents of the StringBuffer instance to LogCat as well as the TextView.
The last if statement is interesting: if the Back key is pressed, we return false from the onKey() method, making the TextView process the event. Otherwise, we return true. Why differentiate here?
If we were to return true in the case of the Back key, we’d mess with the activity life cycle a little. The activity would not be closed, as we decided to consume the Back key ourselves. Of course, there are scenarios where we’d actually want to catch the Back key so that our activity does not get closed. However, it is strongly advised not to do this unless absolutely necessary.
Figure 4-8 illustrates the output of the activity while holding down the Shift and A keys on the keyboard of a Droid.

Figure 4-8. Pressing the Shift and A keys simultaneously
There are a couple of things to note here:
- When you look at the LogCat output, notice that we can easily process simultaneous key events. Holding down multiple keys is not a problem.
- Pressing the D-pad and rolling the trackball are both reported as key events.
- As with touch events, key events can eat up considerable CPU resources on old Android versions and first-generation devices. However, they will not produce a flood of events.
That was pretty relaxing compared to the previous section, wasn’t it?
Note The key-processing API is a bit more complex than what we have shown here. However, for our game programming projects, the information contained here is more than sufficient. If you need something a bit more complex, refer to the official documentation on the Android Developers site.
Reading the Accelerometer State
A very interesting input option for games is the accelerometer. All Android devices are required to contain a three-axis accelerometer. We talked about accelerometers a little bit in Chapter 3. Generally, we’ll only poll the state of the accelerometer.
So how do we get that accelerometer information? You guessed correctly—by registering a listener. The interface we need to implement is called SensorEventListener, which has two methods:
public void onSensorChanged(SensorEvent event);
public void onAccuracyChanged(Sensor sensor, int accuracy);
The first method is called when a new accelerometer event arrives. The second method is called when the accuracy of the accelerometer changes. We can safely ignore the second method for our purposes.
So where do we register our SensorEventListener? For this, we have to do a little bit of work. First, we need to check whether there actually is an accelerometer installed in the device. Now, we just told you that all Android devices must contain an accelerometer. This is still true, but it might change in the future. We therefore want to make 100 percent sure that that input method is available to us.
The first thing we need to do is get an instance of the SensorManager. That guy will tell us whether an accelerometer is installed, and it is also where we register our listener. To get the SensorManager, we use a method of the Context interface:
SensorManager manager = (SensorManager)context.getSystemService(Context.SENSOR_SERVICE);
The SensorManager is a system service that is provided by the Android system. Android is composed of multiple system services, each serving different pieces of system information to anyone who asks nicely.
Once we have the SensorManager, we can check whether the accelerometer is available:
boolean hasAccel = manager.getSensorList(Sensor.TYPE_ACCELEROMETER).size() > 0;
With this bit of code, we poll the SensorManager for all the installed sensors that have the type accelerometer. While this implies that a device can have multiple accelerometers, in reality this will only ever return one accelerometer sensor.
If an accelerometer is installed, we can fetch it from the SensorManager and register the SensorEventListener with it as follows:
Sensor sensor = manager.getSensorList(Sensor.TYPE_ACCELEROMETER).get(0);
boolean success = manager.registerListener(listener, sensor, SensorManager.SENSOR_DELAY_GAME);
The argument SensorManager.SENSOR_DELAY_GAME specifies how often the listener should be updated with the latest state of the accelerometer. This is a special constant that is specifically designed for games, so we happily use that. Notice that the SensorManager.registerListener() method returns a Boolean, indicating whether the registration process worked or not. That means we have to check the Boolean afterward to make sure we’ll actually get any events from the sensor.
Once we have registered the listener, we’ll receive SensorEvents in the SensorEventListener.onSensorChanged() method. The method name implies that it is only called when the sensor state has changed. This is a little bit confusing, since the accelerometer state is changed constantly. When we register the listener, we actually specify the desired frequency with which we want to receive our sensor state updates.
So how do we process the SensorEvent? That’s rather easy. The SensorEvent has a public float array member called SensorEvent.values that holds the current acceleration values of each of the three axes of the accelerometer. SensorEvent.values[0] holds the value of the x axis, SensorEvent.values[1] holds the value of the y axis, and SensorEvent.values[2] holds the value of the z axis. We discussed what is meant by these values in Chapter 3, so if you have forgotten that, go and check out the “Input” section again.
With this information, we can write a simple test activity. All we want to do is output the accelerometer values for each accelerometer axis in a TextView. Listing 4-6 shows how to do this.
Listing 4-6. AccelerometerTest.java; Testing the Accelerometer API
package com.badlogic.androidgames;

import android.app.Activity;
import android.content.Context;
import android.hardware.Sensor;
import android.hardware.SensorEvent;
import android.hardware.SensorEventListener;
import android.hardware.SensorManager;
import android.os.Bundle;
import android.widget.TextView;

public class AccelerometerTest extends Activity implements SensorEventListener {
   TextView textView;
   StringBuilder builder = new StringBuilder();

   @Override
   public void onCreate(Bundle savedInstanceState) {
      super .onCreate(savedInstanceState);
      textView = new TextView(this );
      setContentView(textView);

      SensorManager manager = (SensorManager) getSystemService(Context.SENSOR_SERVICE);
      if (manager.getSensorList(Sensor.TYPE_ACCELEROMETER).size() == 0) {
          textView.setText("No accelerometer installed");
      }else {
          Sensor accelerometer = manager.getSensorList(
                  Sensor.TYPE_ACCELEROMETER).get(0);
          if (!manager.registerListener(this , accelerometer,
                  SensorManager.SENSOR_DELAY_GAME)) {
              textView.setText("Couldn't register sensor listener");
          }
      }
   }

   public void onSensorChanged(SensorEvent event) {
      builder.setLength(0);
      builder.append("x: ");
      builder.append(event.values[0]);
      builder.append(", y: ");
      builder.append(event.values[1]);
      builder.append(", z: ");
      builder.append(event.values[2]);
      textView.setText(builder.toString());
   }

   public void onAccuracyChanged(Sensor sensor, int accuracy) {
      // nothing to do here
   }
}
We start by checking whether an accelerometer sensor is available. If it is, we fetch it from the SensorManager and try to register our activity, which implements the SensorEventListener interface. If any of this fails, we set the TextView to display a proper error message.
The onSensorChanged() method simply reads the axis values from the SensorEvent that are passed to it and updates the TextView text accordingly.
The onAccuracyChanged() method is there so that we fully implement the SensorEventListener interface. It serves no real other purpose.
Figure 4-9 shows what values the axes take on in portrait and landscape modes when the device is held perpendicular to the ground.

Figure 4-9. Accelerometer axes values in portrait mode (left) and landscape mode (right) when the device is held perpendicular to the ground
One thing that’s a gotcha for Android accelerometer handling is the fact that the accelerometer values are relative to the default orientation of the device. This means that if your game is run only in landscape, a device where the default orientation is portrait will have values 90 degrees different from those of a device where the default orientation is landscape! This is the case on tablets, for example. So how does one cope with this? Use this handy-dandy code snippet and you should be good to go:
int screenRotation;
public void onResume() {
        WindowManager windowMgr = (WindowManager)activity.getSystemService(Activity.WINDOW_SERVICE);
                // getOrientation() is deprecated in Android 8 but is the same as getRotation(), which is the rotation from the natural orientation of the device
        screenRotation = windowMgr.getDefaultDisplay().getOrientation();
}
static final int ACCELEROMETER_AXIS_SWAP[][] = {
    {1, -1, 0, 1}, // ROTATION_0
    {-1, -1, 1, 0}, // ROTATION_90
    {-1, 1, 0, 1}, // ROTATION_180
    {1, 1, 1, 0}}; // ROTATION_270
public void onSensorChanged(SensorEvent event) {
    final int [] as =ACCELEROMETER_AXIS_SWAP[screenRotation];
    float screenX = (float )as[0] * event.values[as[2]];
    float screenY = (float )as[1] * event.values[as[3]];
    float screenZ = event.values[2];
    // use screenX, screenY, and screenZ as your accelerometer values now!
}
Here are a few closing comments on accelerometers:
- As you can see in the screenshot on the right in Figure 4-9, the accelerometer values might sometimes go over their specified range. This is due to small inaccuracies in the sensor, so you have to adjust for that if you need those values to be as exact as possible.
- The accelerometer axes always get reported in the same order, no matter the orientation of your activity.
- It is the responsibility of the application developer to rotate the accelerometer values based on the natural orientation of the device.
Reading the Compass State
Reading sensors other than the accelerometer, such as the compass, is very similar. In fact, it is so similar that you can simply replace all instances of Sensor.TYPE_ACCELEROMETER in Listing 4-6 with Sensor.TYPE_ORIENTATION and rerun the test to use our accelerometer test code as a compass test!
You will now see that your x, y, and z values are doing something very different. If you hold the device flat with the screen up and parallel to the ground, x will read the number of degrees for a compass heading and y and z should be near 0. Now tilt the device around and see how those numbers change. The x should still be the primary heading (azimuth), but y and z should show you the pitch and roll of the device, respectively. Because the constant for TYPE_ORIENTATION was deprecated, you can also receive the same compass data from a call to SensorManager.getOrientation(float[] R, float[] values), where R is a rotation matrix (see SensorManager.getRotationMatrix()) and values holds the three return values, this time in radians.
With this, we have discussed all of the input processing-related classes of the Android API that we’ll need for game development.
Note As the name implies, the SensorManager class grants you access to other sensors as well. This includes the compass and light sensors. If you want to be creative, you could come up with a game idea that uses these sensors. Processing their events is done in a similar way to how we processed the data of the accelerometer. The documentation at the Android Developers site will give you more information.
Android offers us a couple of ways to read and write files. In this section, we’ll check out assets, how to access the external storage, mostly implemented as an SD card, and shared preferences, which act like a persistent hash map. Let’s start with assets.
Reading Assets
In Chapter 2, we had a brief look at all the folders of an Android project. We identified the assets/ and res/ folders as the ones where we can put files that should get distributed with our application. When we discussed the manifest file, we stated that we’re not going to use the res/ folder, as it implies restrictions on how we structure our file set. The assets/ directory is the place to put all our files, in whatever folder hierarchy we want.
The files in the assets/ folder are exposed via a class called AssetManager. We can obtain a reference to that manager for our application as follows:
AssetManager assetManager = context.getAssets();
We already saw the Context interface; it is implemented by the Activity class. In real life, we’d fetch the AssetManager from our activity.
Once we have the AssetManager, we can start opening files like crazy:
InputStream inputStream = assetManager.open("dir/dir2/filename.txt");
This method will return a plain-old Java InputStream, which we can use to read in any sort of file. The only argument to the AssetManager.open() method is the filename relative to the asset directory. In the preceding example, we have two directories in the assets/ folder, where the second one (dir2/) is a child of the first one (dir/). In our Eclipse project, the file would be located in assets/dir/dir2/.
Let’s write a simple test activity that examines this functionality. We want to load a text file named myawesometext.txt from a subdirectory of the assets/ directory called texts. The content of the text file will be displayed in a TextView. Listing 4-7 shows the source for this awe-inspiring activity.
Listing 4-7. AssetsTest.java, Demonstrating How to Read Asset Files
package com.badlogic.androidgames;

import java.io.ByteArrayOutputStream;
import java.io.IOException;
import java.io.InputStream;

import android.app.Activity;
import android.content.res.AssetManager;
import android.os.Bundle;
import android.widget.TextView;

public class AssetsTest extends Activity {
   @Override
   public void onCreate(Bundle savedInstanceState) {
      super .onCreate(savedInstanceState);
      TextView textView = new TextView(this );
      setContentView(textView);

      AssetManager assetManager = getAssets();
      InputStream inputStream = null ;
      try {
          inputStream = assetManager.open("texts/myawesometext.txt");
          String text = loadTextFile(inputStream);
          textView.setText(text);
      }catch (IOException e) {
          textView.setText("Couldn't load file");
      }finally {
          if (inputStream != null )
              try {
                  inputStream.close();
              }catch (IOException e) {
                  textView.setText("Couldn't close file");
              }
      }
   }

    public String loadTextFile(InputStream inputStream)throws IOException {
       ByteArrayOutputStream byteStream = new ByteArrayOutputStream();
       byte [] bytes = new byte [4096];
       int len = 0;
       while ((len = inputStream.read(bytes)) > 0)
          byteStream.write(bytes, 0, len);
       return new String(byteStream.toByteArray(), "UTF8");
   }
}
We see no big surprises here, other than finding that loading simple text from an InputStream is rather verbose in Java. We wrote a little method called loadTextFile() that will squeeze all the bytes out of the InputStream and return the bytes in the form of a string. We assume that the text file is encoded as UTF-8. The rest is just catching and handling various exceptions. Figure 4-10 shows the output of this little activity.

Figure 4-10. The text output of AssetsTest
You should take away the following from this section:
- Loading a text file from an InputStream in Java is a mess! Usually, we’d do that with something like Apache IOUtils. We’ll leave that for you as an exercise to perform on your own.
- We can only read assets, not write them.
- We could easily modify the loadTextFile() method to load binary data instead. We would just need to return the byte array instead of the string.
Accessing the External Storage
While assets are superb for shipping all our images and sounds with our application, there are times when we need to be able to persist some information and reload it later on. A common example would be high scores.
Android offers many different ways of doing this, such as using local shared preferences of an application, using a small SQLite database, and so on. All of these options have one thing in common: they don’t handle large binary files all that gracefully. Why would we need that anyway? While we can tell Android to install our application on the external storage device, and thus not waste memory in internal storage, this will only work on Android version 2.2 and above. For earlier versions, all our application data would get installed in internal storage. In theory, we could only include the code of our application in the APK file and download all the asset files from a server to the SD card the first time our application is started. Many of the high-profile games on Android do this.
There are also other scenarios where we’d want to have access to the SD card (which is pretty much synonymous with the term external storage on all currently available devices). We could allow our users to create their own levels with an in-game editor. We’d need to store these levels somewhere, and the SD card is perfect for just that purpose.
So, now that we’ve convinced you not to use the fancy mechanisms Android offers to store application preferences, let’s have a look at how to read and write files on the SD card.
The first thing we have to do is request permission to access the external storage. This is done in the manifest file with the <uses-permission> element discussed earlier in this chapter.
Next we have to check whether there is actually an external storage device available on the Android device of the user. For example, if you create an Android Virtual Device (AVD), you have the option of not having it simulate an SD card, so you couldn’t write to it in your application. Another reason for failing to get access to the SD card could be that the external storage device is currently in use by something else (for example, the user may be exploring it via USB on a desktop PC). So, here’s how we get the state of the external storage:
String state = Environment.getExternalStorageState();
Hmm, we get a string. The Environment class defines a couple of constants. One of these is called Environment.MEDIA_MOUNTED. It is also a string. If the string returned by the preceding method equals this constant, we have full read/write access to the external storage. Note that you really have to use the equals() method to compare the two strings; reference equality won’t work in every case.
Once we have determined that we can actually access the external storage, we need to get its root directory name. If we then want to access a specific file, we need to specify it relative to this directory. To get that root directory, we use another Environment static method:
File externalDir = Environment.getExternalStorageDirectory();
From here on, we can use the standard Java I/O classes to read and write files.
Let’s write a quick example that writes a file to the SD card, reads the file back in, displays its content in a TextView, and then deletes the file from the SD card again. Listing 4-8 shows the source code for this.
Listing 4-8. The ExternalStorageTest Activity
package com.badlogic.androidgames;

import java.io.BufferedReader;
import java.io.BufferedWriter;
import java.io.File;
import java.io.FileReader;
import java.io.FileWriter;
import java.io.IOException;

import android.app.Activity;
import android.os.Bundle;
import android.os.Environment;
import android.widget.TextView;

public class ExternalStorageTest extends Activity {
   @Override
   public void onCreate(Bundle savedInstanceState) {
      super .onCreate(savedInstanceState);
      TextView textView = new TextView(this );
      setContentView(textView);

      String state = Environment.getExternalStorageState();
      if (!state.equals(Environment.MEDIA_MOUNTED)) {
          textView.setText("No external storage mounted");
      }else {
          File externalDir = Environment.getExternalStorageDirectory();
          File textFile = new File(externalDir.getAbsolutePath()
                  + File.separator+ "text.txt");
          try {
              writeTextFile(textFile, "This is a test. Roger");
              String text = readTextFile(textFile);
              textView.setText(text);
              if (!textFile.delete()) {
                  textView.setText("Couldn't remove temporary file");
              }
          }catch (IOException e) {
              textView.setText("Something went wrong! " + e.getMessage());
           }
       }
   }

   private void writeTextFile(File file, String text)throws IOException {
      BufferedWriter writer = new BufferedWriter(new FileWriter(file));
      writer.write(text);
      writer.close();
   }

   private String readTextFile(File file)throws IOException {
      BufferedReader reader = new BufferedReader(new FileReader(file));
      StringBuilder text = new StringBuilder();
      String line;
      while ((line = reader.readLine()) != null ) {
          text.append(line);
          text.append("
");
      }
      reader.close();
      return text.toString();
   }
}
First, we check whether the SD card is actually mounted. If not, we bail out early. Next, we get the external storage directory and construct a new File instance that points to the file we are going to create in the next statement. The writeTextFile() method uses standard Java I/O classes to do its magic. If the file doesn’t exist yet, this method will create it; otherwise, it will overwrite an already existing file. After we successfully dump our test text to the file on the external storage device, we read it in again and set it as the text of the TextView. As a final step, we delete the file from external storage again. All of this is done with standard safety measures in place that will report if something goes wrong by outputting an error message to the TextView. Figure 4-11 shows the output of the activity.

Figure 4-11. Roger!
Here are the lessons to take away from this section:
- Don’t mess with any files that don’t belong to you. Your users will be angry if you delete the photos of their last holiday.
- Always check whether the external storage device is mounted.
- Do not mess with any of the files on the external storage device!
Because it is very easy to delete all the files on the external storage device, you might think twice before you install your next app from Google Play that requests permissions to the SD card. The app has full control over your files once it’s installed.
Shared Preferences
Android provides a simple API for storing key-value pairs for your application, called SharedPreferences. The SharedPreferences API is not unlike the standard Java Properties API. An activity can have a default SharedPreferences instance or it can use as many different SharedPreferences instance as required. Here are the typical ways to get an instance of SharedPreferences from an activity:
SharedPreferences prefs = PreferenceManager.getDefaultSharedPreferences(this );
or:
SharedPreferences prefs = getPreferences(Context.MODE_PRIVATE);
The first method gives a common SharedPreferences that will be shared for that context (Activity, in our case). The second method does the same, but it lets you choose the privacy of the shared preferences. The options are Context.MODE_PRIVATE, which is the default, Context.MODE_WORLD_READABLE, and Context.MODE_WORLD_WRITEABLE. Using anything other than Context.MODE_PRIVATE is more advanced, and it isn’t necessary for something like saving game settings.
To use the shared preferences, you first need to get the editor. This is done via
Editor editor = prefs.edit()
Now we can insert some values:
editor.putString("key1", "banana");
editor.putInt("key2", 5);
And finally, when we want to save, we just add
editor.commit();
Ready to read back? It’s exactly as one would expect:
String value1 = prefs.getString("key1", null);
int value2 = prefs.getInt("key2", 0);
In our example, value1 would be "banana" and value2 would be 5. The second parameter to the “get” calls of SharedPreferences are default values. These will be used if the key isn’t found in the preferences. For example, if "key1" was never set, then value1 will be null after the getString call. SharedPreferences are so simple that we don’t really need any test code to demonstrate. Just remember always to commit those edits!
Android offers a couple of easy-to-use APIs for playing back sound effects and music files—just perfect for our game programming needs. Let’s have a look at those APIs.
Setting the Volume Controls
If you have an Android device, you will have noticed that when you press the volume up and down buttons, you control different volume settings depending on the application you are currently using. In a call, you control the volume of the incoming voice stream. In a YouTube application, you control the volume of the video’s audio. On the home screen, you control the volume of the system sounds, such as the ringer or an arriving instant message.
Android has different audio streams for different purposes. When we play back audio in our game, we use classes that output sound effects and music to a specific stream called the music stream. Before we think about playing back sound effects or music, we first have to make sure that the volume buttons will control the correct audio stream. For this, we use another method of the Context interface:
context.setVolumeControlStream(AudioManager.STREAM_MUSIC);
As always, the Context implementation of our choice will be our activity. After this call, the volume buttons will control the music stream to which we’ll later output our sound effects and music. We need to call this method only once in our activity life cycle. The Activity.onCreate() method is the best place to do this.
Writing an example that only contains a single line of code is a bit of overkill. Thus, we’ll refrain from doing that at this point. Just remember to use this method in all the activities that output sound.
Playing Sound Effects
In Chapter 3, we discussed the difference between streaming music and playing back sound effects. The latter are stored in memory and usually last no longer than a few seconds. Android provides us with a class called SoundPool that makes playing back sound effects really easy.
We can simply instantiate new SoundPool instances as follows:
SoundPool soundPool = new SoundPool(20, AudioManager.STREAM_MUSIC, 0);
The first parameter defines the maximum number of sound effects we can play simultaneously. This does not mean that we can’t have more sound effects loaded; it only restricts how many sound effects can be played concurrently. The second parameter defines the audio stream where the SoundPool will output the audio. We chose the music stream where we have set the volume controls as well. The final parameter is currently unused and should default to 0.
To load a sound effect from an audio file into heap memory, we can use the SoundPool.load() method. We store all our files in the assets/ directory, so we need to use the overloaded SoundPool.load() method, which takes an AssetFileDescriptor. How do we get that AssetFileDescriptor? Easy—via the AssetManager that we worked with before. Here’s how we’d load an OGG file called explosion.ogg from the assets/ directory via the SoundPool:
AssetFileDescriptor descriptor = assetManager.openFd("explosion.ogg");
int explosionId = soundPool.load(descriptor, 1);
Getting the AssetFileDescriptor is straightforward via the AssetManager.openFd() method. Loading the sound effect via the SoundPool is just as easy. The first argument of the SoundPool.load() method is our AssetFileDescriptor, and the second argument specifies the priority of the sound effect. This is currently not used, and should be set to 1 for future compatibility.
The SoundPool.load() method returns an integer, which serves as a handle to the loaded sound effect. When we want to play the sound effect, we specify this handle so that the SoundPool knows what effect to play.
Playing the sound effect is again very easy:
soundPool.play(explosionId, 1.0f, 1.0f, 0, 0, 1);
The first argument is the handle we received from the SoundPool.load() method. The next two parameters specify the volume to be used for the left and right channels. These values should be in the range between 0 (silent) and 1 (ears explode).
Next come two arguments that we’ll rarely use. The first one is the priority, which is currently unused and should be set to 0. The other argument specifies how often the sound effect should be looped. Looping sound effects is not recommended, so you should generally use 0 here. The final argument is the playback rate. Setting it to something higher than 1 will allow the sound effect to be played back faster than it was recorded, while setting it to something lower than 1 will result in a slower playback.
When we no longer need a sound effect and want to free some memory, we can use the SoundPool.unload() method:
soundPool.unload(explosionId);
We simply pass in the handle we received from the SoundPool.load() method for that sound effect, and it will be unloaded from memory.
Generally, we’ll have a single SoundPool instance in our game, which we’ll use to load, play, and unload sound effects as needed. When we are done with all of our audio output and no longer need the SoundPool, we should always call the SoundPool.release() method, which will release all resources normally used up by the SoundPool. After the release, you can no longer use the SoundPool, of course. Also, all sound effects loaded by that SoundPool will be gone.
Let’s write a simple test activity that will play back an explosion sound effect each time we tap the screen. We already know everything we need to know to implement this, so Listing 4-9 shouldn’t hold any big surprises.
Listing 4-9. SoundPoolTest.java; Playing Back Sound Effects
package com.badlogic.androidgames;

import java.io.IOException;

import android.app.Activity;
import android.content.res.AssetFileDescriptor;
import android.content.res.AssetManager;
import android.media.AudioManager;
import android.media.SoundPool;
import android.os.Bundle;
import android.view.MotionEvent;
import android.view.View;
import android.view.View.OnTouchListener;
import android.widget.TextView;

public class SoundPoolTest extends Activity implements OnTouchListener {
    SoundPool soundPool;
    int explosionId = -1;

    @Override
    public void onCreate(Bundle savedInstanceState) {
        super .onCreate(savedInstanceState);
        TextView textView = new TextView(this );
        textView.setOnTouchListener(this );
        setContentView(textView);

        setVolumeControlStream(AudioManager.STREAM_MUSIC);
        soundPool = new SoundPool(20, AudioManager.STREAM_MUSIC, 0);

        try {
            AssetManager assetManager = getAssets();
            AssetFileDescriptor descriptor = assetManager
                    .openFd("explosion.ogg");
            explosionId = soundPool.load(descriptor, 1);
        }catch (IOException e) {
            textView.setText("Couldn't load sound effect from asset, "
                    + e.getMessage());
        }
    }

    public boolean onTouch(View v, MotionEvent event) {
        if (event.getAction() == MotionEvent.ACTION_UP) {
            if (explosionId != -1) {
                soundPool.play(explosionId, 1, 1, 0, 0, 1);
            }
        }
        return true ;
    }
}
We start off by deriving our class from Activity and letting it implement the OnTouchListener interface so that we can later process taps on the screen. Our class has two members: the SoundPool, and the handle to the sound effect we are going to load and play back. We set that to –1 initially, indicating that the sound effect has not yet been loaded.
In the onCreate() method, we do what we’ve done a couple of times before: create a TextView, register the activity as an OnTouchListener, and set the TextView as the content view.
The next line sets the volume controls to control the music stream, as discussed before. We then create the SoundPool, and configure it so it can play 20 concurrent effects at once. That should suffice for the majority of games.
Finally, we get an AssetFileDescriptor for the explosion.ogg file we put in the assets/ directory from the AssetManager. To load the sound, we simply pass that descriptor to the SoundPool.load() method and store the returned handle. The SoundPool.load() method throws an exception in case something goes wrong while loading, in which case we catch that and display an error message.
In the onTouch() method, we simply check whether a finger went up, which indicates that the screen was tapped. If that’s the case and the explosion sound effect was loaded successfully (indicated by the handle not being –1), we simply play back that sound effect.
When you execute this little activity, simply touch the screen to make the world explode. If you touch the screen in rapid succession, you’ll notice that the sound effect is played multiple times in an overlapping manner. It would be pretty hard to exceed the 20 playbacks maximum that we configured into the SoundPool. However, if that happened, one of the currently playing sounds would just be stopped to make room for the newly requested playback.
Notice that we didn’t unload the sound or release the SoundPool in the preceding example. This is for brevity. Usually you’d release the SoundPool in the onPause() method when the activity is going to be destroyed. Just remember always to release or unload anything you no longer need.
While the SoundPool class is very easy to use, there are a couple of caveats you should remember:
- The SoundPool.load() method executes the actual loading asynchronously. This means that you have to wait briefly before you call the SoundPool.play() method with that sound effect, as the loading might not be finished yet. Sadly, there’s no way to check when the sound effect is done loading. That’s only possible with the SDK version 8 of SoundPool, and we want to support all Android versions. Usually it’s not a big deal, since you will most likely load other assets as well before the sound effect is played for the first time.
- SoundPool is known to have problems with MP3 files and long sound files, where long is defined as “longer than 5 to 6 seconds.” Both problems are undocumented, so there are no strict rules for deciding whether your sound effect will be troublesome or not. As a general rule, we’d suggest sticking to OGG audio files instead of MP3s, and trying for the lowest possible sampling rate and duration you can get away with before the audio quality becomes poor.
Note As with any API we discuss, there’s more functionality in SoundPool. We briefly told you that you can loop sound effects. For this, you get an ID from the SoundPool.play() method that you can use to pause or stop a looped sound effect. Check out the SoundPool documentation on the Android Developers site if you need that functionality.
Streaming Music
Small sound effects fit into the limited heap memory an Android application gets from the operating system. Larger audio files containing longer music pieces don’t fit. For this reason, we need to stream the music to the audio hardware, which means that we only read in a small chunk at a time, enough to decode it to raw PCM data and throw that at the audio chip.
That sounds intimidating. Luckily, there’s the MediaPlayer class, which handles all that business for us. All we need to do is point it at the audio file and tell it to play it back.
Instantiating the MediaPlayer class is this simple:
MediaPlayer mediaPlayer = new MediaPlayer();
Next we need to tell the MediaPlayer what file to play back. That’s again done via an AssetFileDescriptor:
AssetFileDescriptor descriptor = assetManager.openFd("music.ogg");
mediaPlayer.setDataSource(descriptor.getFileDescriptor(), descriptor.getStartOffset(), descriptor.getLength());
There’s a little bit more going on here than in the SoundPool case. The MediaPlayer.setDataSource() method does not directly take an AssetFileDescriptor. Instead, it wants a FileDescriptor, which we get via the AssetFileDescriptor.getFileDescriptor() method. Additionally, we have to specify the offset and the length of the audio file. Why the offset? Assets are all stored in a single file in reality. For the MediaPlayer to get to the start of the file, we have to provide it with the offset of the file within the containing asset file.
Before we can start playing back the music file, we have to call one more method that prepares the MediaPlayer for playback:
mediaPlayer.prepare();
This will actually open the file and check whether it can be read and played back by the MediaPlayer instance. From here on, we are free to play the audio file, pause it, stop it, set it to be looped, and change the volume.
To start the playback, we simply call the following method:
mediaPlayer.start();
Note that this method can only be called after the MediaPlayer.prepare() method has been called successfully (you’ll notice if it throws a runtime exception).
We can pause the playback after having started it with a call to the pause() method:
mediaPlayer.pause();
Calling this method is again only valid if we have successfully prepared the MediaPlayer and started playback already. To resume a paused MediaPlayer, we can call the MediaPlayer.start() method again without any preparation.
To stop the playback, we call the following method:
mediaPlayer.stop();
Note that when we want to start a stopped MediaPlayer, we first have to call the MediaPlayer.prepare() method again.
We can set the MediaPlayer to loop the playback with the following method:
mediaPlayer.setLooping(true);
To adjust the volume of the music playback, we can use this method:
mediaPlayer.setVolume(1, 1);
This will set the volume of the left and right channels. The documentation does not specify within what range these two arguments have to be. From experimentation, the valid range seems to be between 0 and 1.
Finally, we need a way to check whether the playback has finished. We can do this in two ways. For one, we can register an OnCompletionListener with the MediaPlayer that will be called when the playback has finished:
mediaPlayer.setOnCompletionListener(listener);
If we want to poll for the state of the MediaPlayer, we can use the following method instead:
boolean isPlaying = mediaPlayer.isPlaying();
Note that if the MediaPlayer is set to loop, none of the preceding methods will indicate that the MediaPlayer has stopped.
Finally, if we are done with that MediaPlayer instance, we make sure that all the resources it takes up are released by calling the following method:
mediaPlayer.release();
It’s considered good practice always to do this before throwing away the instance.
In case we didn’t set the MediaPlayer for looping and the playback has finished, we can restart the MediaPlayer by calling the MediaPlayer.prepare() and MediaPlayer.start() methods again.
Most of these methods work asynchronously, so even if you called MediaPlayer.stop(), the MediaPlayer.isPlaying() method might return for a short period after that. It’s usually nothing we worry about. In most games, we set the MediaPlayer to be looped and then stop it when the need arises (for example, when we switch to a different screen where we want other music to be played).
Let’s write a small test activity where we play back a sound file from the assets/ directory in looping mode. This sound effect will be paused and resumed according to the activity life cycle—when our activity gets paused, so should the music, and when the activity is resumed, the music playback should pick up from where it left off. Listing 4-10 shows how that’s done.
Listing 4-10. MediaPlayerTest.java; Playing Back Audio Streams
package com.badlogic.androidgames;

import java.io.IOException;

import android.app.Activity;
import android.content.res.AssetFileDescriptor;
import android.content.res.AssetManager;
import android.media.AudioManager;
import android.media.MediaPlayer;
import android.os.Bundle;
import android.widget.TextView;

public class MediaPlayerTest extends Activity {
    MediaPlayer mediaPlayer;

    @Override
    public void onCreate(Bundle savedInstanceState) {
        super .onCreate(savedInstanceState);
        TextView textView = new TextView(this );
        setContentView(textView);

        setVolumeControlStream(AudioManager.STREAM_MUSIC);
        mediaPlayer = new MediaPlayer();
        try {
            AssetManager assetManager = getAssets();
            AssetFileDescriptor descriptor = assetManager.openFd("music.ogg");
            mediaPlayer.setDataSource(descriptor.getFileDescriptor(),
                    descriptor.getStartOffset(), descriptor.getLength());
            mediaPlayer.prepare();
            mediaPlayer.setLooping(true );
        }catch (IOException e) {
            textView.setText("Couldn't load music file, " + e.getMessage());
            mediaPlayer = null ;
        }
    }

    @Override
    protected void onResume() {
        super .onResume();
        if (mediaPlayer != null ) {
            mediaPlayer.start();
        }
    }

    protected void onPause() {
        super .onPause();
        if (mediaPlayer != null ) {
            mediaPlayer.pause();
            if (isFinishing()) {
                mediaPlayer.stop();
                mediaPlayer.release();
            }
        }
    }
}
We keep a reference to the MediaPlayer in the form of a member of our activity. In the onCreate() method, we simply create a TextView for outputting any error messages, as always.
Before we start playing around with the MediaPlayer, we make sure that the volume controls actually control the music stream. Having that set up, we instantiate the MediaPlayer. We fetch the AssetFileDescriptor from the AssetManager for a file called music.ogg located in the assets/ directory, and set it as the data source of the MediaPlayer. All that’s left to do is to prepare the MediaPlayer instance and set it to loop the stream. In case anything goes wrong, we set the MediaPlayer member to null so we can later determine whether loading was successful. Additionally, we output some error text to the TextView.
In the onResume() method, we simply start the MediaPlayer (if creating it was successful). The onResume() method is the perfect place to do this because it is called after onCreate() and after onPause(). In the first case, it will start the playback for the first time; in the second case, it will simply resume the paused MediaPlayer.
The onResume() method pauses the MediaPlayer. If the activity is going to be killed, we stop the MediaPlayer and then release all of its resources.
If you play around with this, make sure you also test out how it reacts to pausing and resuming the activity, by either locking the screen or temporarily switching to the home screen. When resumed, the MediaPlayer will pick up from where it left off when it was paused.
Here are a couple of things to remember:
- The methods MediaPlayer.start(), MediaPlayer.pause(), and MediaPlayer.resume() can only be called in certain states, as just discussed. Never try to call them when you haven’t yet prepared the MediaPlayer. Call MediaPlayer.start() only after preparing the MediaPlayer or when you want to resume it after you’ve explicitly paused it via a call to MediaPlayer.pause().
- MediaPlayer instances are pretty heavyweight. Having many of them instanced will take up a considerable amount of resources. We should always try to have only one for music playback. Sound effects are better handled with the SoundPool class.
- Remember to set the volume controls to handle the music stream, or else your players won’t be able to adjust the volume of your game.
We are almost done with this chapter, but one big topic still lies ahead of us: 2D graphics.
Basic Graphics Programming
Android offers us two big APIs for drawing to the screen. One is mainly used for simple 2D graphics programming, and the other is used for hardware-accelerated 3D graphics programming. This and the next chapter will focus on 2D graphics programming with the Canvas API, which is a nice wrapper around the Skia library and suitable for modestly complex 2D graphics. Starting from chapter 7 we’ll look into rendering 2D and 3D graphisc with OpenGL. Before we get to that, we first need to talk about two things: wake locks and going full-screen.
Using Wake Locks
If you leave the tests we wrote so far alone for a few seconds, the screen of your phone will dim. Only if you touch the screen or hit a button will the screen go back to its full brightness. To keep our screen awake at all times, we can use a wake lock.
The first thing we need to do is to add a proper <uses-permission> tag in the manifest file with the name android.permission.WAKE_LOCK. This will allow us to use the WakeLock class.
We can get a WakeLock instance from the PowerManager like this:
PowerManager powerManager = (PowerManager)context.getSystemService(Context.POWER_SERVICE);
WakeLock wakeLock = powerManager.newWakeLock(PowerManager.FULL_WAKE_LOCK, "My Lock");
Like all other system services, we acquire the PowerManager from a Context instance. The PowerManager.newWakeLock() method takes two arguments: the type of the lock and a tag we can freely define. There are a couple of different wake lock types; for our purposes, the PowerManager.FULL_WAKE_LOCK type is the correct one. It will make sure that the screen will stay on, the CPU will work at full speed, and the keyboard will stay enabled.
To enable the wake lock, we have to call its acquire() method:
wakeLock.acquire();
The phone will be kept awake from this point on, no matter how much time passes without user interaction. When our application is paused or destroyed, we have to disable or release the wake lock again:
wakeLock.release();
Usually, we instantiate the WakeLock instance on the Activity.onCreate() method, call WakeLock.acquire() in the Activity.onResume() method, and call the WakeLock.release() method in the Activity.onPause() method. This way, we guarantee that our application still performs well in the case of being paused or resumed. Since there are only four lines of code to add, we’re not going to write a full-fledged example. Instead, we suggest you simply add the code to the full-screen example of the next section and observe the effects.
Going Full-Screen
Before we dive head first into drawing our first shapes with the Android APIs, let’s fix something else. Up until this point, all of our activities have shown their title bars. The notification bar was visible as well. We’d like to immerse our players a little bit more by getting rid of those. We can do that with two simple calls:
requestWindowFeature(Window.FEATURE_NO_TITLE);
getWindow().setFlags(WindowManager.LayoutParams.FLAG_FULLSCREEN, WindowManager.LayoutParams.FLAG_FULLSCREEN);
The first call gets rid of the activity’s title bar. To make the activity go full-screen and thus eliminate the notification bar as well, we call the second method. Note that we have to call these methods before we set the content view of our activity.
Listing 4-11 shows a very simple test activity that demonstrates how to go full-screen.
Listing 4-11. FullScreenTest.java; Making Our Activity Go Full-Screen
package com.badlogic.androidgames;

import android.os.Bundle;
import android.view.Window;
import android.view.WindowManager;

public class FullScreenTest extends SingleTouchTest {

    @Override
    public void onCreate(Bundle savedInstanceState) {
        requestWindowFeature(Window.FEATURE_NO_TITLE);
        getWindow().setFlags(WindowManager.LayoutParams.FLAG_FULLSCREEN,
                WindowManager.LayoutParams.FLAG_FULLSCREEN);
        super .onCreate(savedInstanceState);
    }
}
What’s happening here? We simply derive from the TouchTest class we created earlier and override the onCreate() method. In the onCreate() method, we enable full-screen mode and then call the onCreate() method of the superclass (in this case, the TouchTest activity), which will set up all the rest of the activity. Note again that we have to call those two methods before we set the content view. Hence, the superclass onCreate() method is called after we execute these two methods.
We also fixed the orientation of the activity to portrait mode in the manifest file. You didn’t forget to add <activity> elements in the manifest file for each test we wrote, right? From now on, we’ll always fix it to either portrait mode or landscape mode, since we don’t want a changing coordinate system all the time.
By deriving from TouchTest, we have a fully working example that we can now use to explore the coordinate system in which we are going to draw. The activity will show you the coordinates where you touch the screen, as in the old TouchTest example. The difference this time is that we are full-screen, which means that the maximum coordinates of our touch events are equal to the screen resolution (minus one in each dimension, as we start at [0,0]). For a Nexus One, the coordinate system would span the coordinates (0,0) to (479,799) in portrait mode (for a total of 480×800 pixels).
While it may seem that the screen is redrawn continuously, it actually is not. Remember from our TouchTest class that we update the TextView every time a touch event is processed. This, in turn, makes the TextView redraw itself. If we don’t touch the screen, the TextView will not redraw itself. For a game, we need to be able to redraw the screen as often as possible, preferably within our main loop thread. We’ll start off easy, and begin with continuous rendering in the UI thread.
Continuous Rendering in the UI Thread
All we’ve done up until now is set the text of a TextView when needed. The actual rendering has been performed by the TextView itself. Let’s create our own custom View whose sole purpose is to let us draw stuff to the screen. We also want it to redraw itself as often as possible, and we want a simple way to perform our own drawing in that mysterious redraw method.
Although this may sound complicated, in reality Android makes it really easy for us to create such a thing. All we have to do is create a class that derives from the View class, and override a method called View.onDraw(). This method is called by the Android system every time it needs our View to redraw itself. Here’s what that could look like:
class RenderView extends View {
    public RenderView(Context context) {
        super (context);
    }

    protected void onDraw(Canvas canvas) {
        // to be implemented
    }
}
Not exactly rocket science, is it? We get an instance of a class called Canvas passed to the onDraw() method. This will be our workhorse in the following sections. It lets us draw shapes and bitmaps to either another bitmap or a View (or a Surface, which we’ll talk about in a bit).
We can use this RenderView as we’d use a TextView. We just set it as the content view of our activity and hook up any input listeners we need. However, it’s not all that useful yet, for two reasons: it doesn’t actually draw anything, and even if it were able to draw something, it would only do so when the activity needed to be redrawn (that is, when it is created or resumed, or when a dialog that overlaps it becomes invisible). How can we make it redraw itself?
Easy, like this:
protected void onDraw(Canvas canvas) {
    // all drawing goes here
    invalidate();
}
The call to the View.invalidate() method at the end of onDraw() will tell the Android system to redraw the RenderView as soon as it finds time to do that again. All of this still happens on the UI thread, which is a bit of a lazy horse. However, we actually have continuous rendering with the onDraw() method, albeit relatively slow continuous rendering. We’ll fix that later; for now, it suffices for our needs.
So, let’s get back to the mysterious Canvas class. It is a pretty powerful class that wraps a custom low-level graphics library called Skia, specifically tailored to perform 2D rendering on the CPU. The Canvas class provides us with many drawing methods for various shapes, bitmaps, and even text.
Where do the draw methods draw to? That depends. A Canvas can render to a Bitmap instance; Bitmap is another class provided by the Android’s 2D API, which we’ll look into later in this chapter. In this case, it is drawing to the area on the screen that the View is taking up. Of course, this is an insane oversimplification. Under the hood, it will not draw directly to the screen, but rather to some sort of bitmap that the system will later use in combination with the bitmaps of all other Views of the activity to composite the final output image. That image will then be handed over to the GPU, which will display it on the screen through another set of mysterious paths.
We don’t really need to care about the details. From our perspective, our View seems to stretch over the whole screen, so it may as well be drawing to the framebuffer of the system. For the rest of this discussion, we’ll pretend that we directly draw to the framebuffer, with the system doing all the nifty things like vertical retrace and double-buffering for us.
The onDraw() method will be called as often as the system permits. For us, it is very similar to the body of our theoretical game main loop. If we were to implement a game with this method, we’d place all our game logic into this method. We won’t do that for various reasons, performance being one of them.
So let’s do something interesting. Every time you get access to a new drawing API, write a little test that checks if the screen is really redrawn frequently. It’s sort of a poor man’s light show. All you need to do in each call to the redraw method is to fill the screen with a new random color. That way you only need to find the method of that API that allows you to fill the screen, without needing to know a lot about the nitty-gritty details. Let’s write such a test with our own custom RenderView implementation.
The method of the Canvas to fill its rendering target with a specific color is called Canvas.drawRGB():
Canvas.drawRGB(int r, int g, int b);
The r, g, and b arguments each stand for one component of the color that we will use to fill the “screen.” Each of them has to be in the range 0 to 255, so we actually specify a color in the RGB888 format here. If you don’t remember the details regarding colors, take a look at the “Encoding Colors Digitally” section of Chapter 3 again, as we’ll be using that info throughout the rest of this chapter.
Listing 4-12 shows the code for our little light show.
Listing 4-12. The RenderViewTest Activity
package com.badlogic.androidgames;

import java.util.Random;

import android.app.Activity;
import android.content.Context;
import android.graphics.Canvas;
import android.os.Bundle;
import android.view.View;
import android.view.Window;
import android.view.WindowManager;

public class RenderViewTest extends Activity {
    class RenderView extends View {
        Random rand = new Random();

        public RenderView(Context context) {
            super (context);
        }

        protected void onDraw(Canvas canvas) {
            canvas.drawRGB(rand.nextInt(256), rand.nextInt(256),
                    rand.nextInt(256));
            invalidate();
        }
    }

    @Override
    public void onCreate(Bundle savedInstanceState) {
        super .onCreate(savedInstanceState);
        requestWindowFeature(Window.FEATURE_NO_TITLE);
        getWindow().setFlags(WindowManager.LayoutParams.FLAG_FULLSCREEN,
                WindowManager.LayoutParams.FLAG_FULLSCREEN);
        setContentView(new RenderView(this ));
    }
}
For our first graphics demo, this is pretty concise. We define the RenderView class as an inner class of the RenderViewTest activity. The RenderView class derives from the View class, as discussed earlier, and has a mandatory constructor as well as the overridden onDraw() method. It also has an instance of the Random class as a member; we’ll use that to generate our random colors.
The onDraw() method is dead simple. We first tell the Canvas to fill the whole view with a random color. For each color component, we simply specify a random number between 0 and 255 (Random.nextInt() is exclusive). After that, we tell the system that we want the onDraw() method to be called again as soon as possible.
The onCreate() method of the activity enables full-screen mode and sets an instance of our RenderView class as the content view. To keep the example short, we’re leaving out the wake lock for now.
Taking a screenshot of this example is a little bit pointless. All it does is fill the screen with a random color as fast as the system allows on the UI thread. It’s nothing to write home about. Let’s do something more interesting instead: draw some shapes.
Note The preceding method of continuous rendering works, but we strongly recommend not using it! We should do as little work on the UI thread as possible. In a minute, we’ll use a separate thread to discuss how to do it properly, where later on we can also implement our game logic.
Getting the Screen Resolution (and Coordinate Systems)
In Chapter 2, we talked a lot about the framebuffer and its properties. Remember that a framebuffer holds the colors of the pixels that get displayed on the screen. The number of pixels available to us is defined by the screen resolution, which is given by its width and height in pixels.
Now, with our custom View implementation, we don’t actually render directly to the framebuffer. However, since our View spans the complete screen, we can pretend it does. In order to know where we can render our game elements, we need to know how many pixels there are on the x axis and y axis, or the width and height of the screen.
The Canvas class has two methods that provide us with that information:
int width = canvas.getWidth();
int height = canvas.getHeight();
This returns the width and height in pixels of the target to which the Canvas renders. Note that, depending on the orientation of our activity, the width might be smaller or larger than the height. An HTC Thunderbolt, for example, has a resolution of 480×800 pixels in portrait mode, so the Canvas.getWidth() method would return 480 and the Canvas.getHeight() method would return 800. In landscape mode, the two values are simply swapped: Canvas.getWidth() would return 800 and Canvas.getHeight() would return 480.
The second piece of information we need to know is the organization of the coordinate system to which we render. First of all, only integer pixel coordinates make sense (there is a concept called subpixels, but we will ignore it). We also already know that the origin of that coordinate system at (0,0) is always at the top-left corner of the display, in both portrait mode and landscape mode. The positive x axis is always pointing to the right, and the y axis is always pointing downward. Figure 4-12 shows a hypothetical screen with a resolution of 48×32 pixels, in landscape mode.
Figure 4-12. The coordinate system of a 48×32-pixel-wide screen
Note how the origin of the coordinate system in Figure 4-12 coincides with the top-left pixel of the screen. The bottom-left pixel of the screen is thus not at (48,32) as we’d expect, but at (47,31). In general, (width – 1, height – 1) is always the position of the bottom-right pixel of the screen.
Figure 4-12 shows a hypothetical screen coordinate system in landscape mode. By now you should be able to imagine how the coordinate system would look in portrait mode.
All of the drawing methods of Canvas operate within this type of coordinate system. Usually, we can address many more pixels than we can in our 48×32-pixel example (e.g., 800×480). That said, let’s finally draw some pixels, lines, circles, and rectangles.
Note You may have noticed that different devices can have different screen resolutions. We’ll look into that problem in the next chapter. For now, let’s just concentrate on finally getting something on the screen ourselves.
Drawing Simple Shapes
Deep into Chapter 4, and we are finally on our way to drawing our first pixel. We’ll quickly go over some of the drawing methods provided to us by the Canvas class.
Drawing Pixels
The first thing we want to tackle is how to draw a single pixel. That’s done with the following method:
Canvas.drawPoint(float x, float y, Paint paint);
Two things to notice immediately are that the coordinates of the pixel are specified with floats, and that Canvas doesn’t let us specify the color directly, but instead wants an instance of the Paint class from us.
Don’t get confused by the fact that we specify coordinates as floats. Canvas has some very advanced functionality that allows us to render to noninteger coordinates, and that’s where this is coming from. We won’t need that functionality just yet, though; we’ll come back to it in the next chapter.
The Paint class holds style and color information to be used for drawing shapes, text, and bitmaps. For drawing shapes, we are interested in only two things: the color the paint holds and the style. Since a pixel doesn’t really have a style, let’s concentrate on the color first. Here’s how we instantiate the Paint class and set the color:
Paint paint = new Paint();
paint.setARGB(alpha, red, green, blue);
Instantiating the Paint class is pretty painless. The Paint.setARGB() method should also be easy to decipher. The arguments each represent one of the color components of the color, in the range from 0 to 255. We therefore specify an ARGB8888 color here.
Alternatively, we can use the following method to set the color of a Paint instance:
Paint.setColor(0xff00ff00);
We pass a 32-bit integer to this method. It again encodes an ARGB8888 color; in this case, it’s the color green with alpha set to full opacity. The Color class defines some static constants that encode some standard colors, such as Color.RED, Color.YELLOW, and so on. You can use these if you don’t want to specify a hexadecimal value yourself.
Drawing Lines
To draw a line, we can use the following Canvas method:
Canvas.drawLine(float startX, float startY, float stopX, float stopY, Paint paint);
The first two arguments specify the coordinates of the starting point of the line, the next two arguments specify the coordinates of the endpoint of the line, and the last argument specifies a Paint instance. The line that gets drawn will be one pixel thick. If we want the line to be thicker, we can specify its thickness in pixels by setting the stroke width of the Paint instance:
Paint.setStrokeWidth(float widthInPixels);
Drawing Rectangles
We can also draw rectangles with the following Canvas method:
Canvas.drawRect(float topleftX, float topleftY, float bottomRightX, float bottomRightY, Paint paint);
The first two arguments specify the coordinates of the top-left corner of the rectangle, the next two arguments specify the coordinates of the bottom-left corner of the rectangle, and the Paint specifies the color and style of the rectangle. So what style can we have and how do we set it?
To set the style of a Paint instance, we call the following method:
Paint.setStyle(Style style);
Style is an enumeration that has the values Style.FILL, Style.STROKE, and Style.FILL_AND_STROKE. If we specify Style.FILL, the rectangle will be filled with the color of the Paint. If we specify Style.STROKE, only the outline of the rectangle will be drawn, again with the color and stroke width of the Paint. If Style.FILL_AND_STROKE is set, the rectangle will be filled, and the outline will be drawn with the given color and stroke width.
Drawing Circles
More fun can be had by drawing circles, either filled or stroked (or both):
Canvas.drawCircle(float centerX, float centerY, float radius, Paint paint);
The first two arguments specify the coordinates of the center of the circle, the next argument specifies the radius in pixels, and the last argument is again a Paint instance. As with the Canvas.drawRectangle() method, the color and style of the Paint will be used to draw the circle.
Blending
One last thing of importance is that all of these drawing methods will perform alpha blending. Just specify the alpha of the color as something other than 255 (0xff), and your pixels, lines, rectangles, and circles will be translucent.
Putting It All Together
Let’s write a quick test activity that demonstrates the preceding methods. This time, we want you to analyze the code in Listing 4-13 first. Figure out where on a 480×800 screen in portrait mode the different shapes will be drawn. When doing graphics programming, it is of utmost importance to imagine how the drawing commands you issue will behave. It takes some practice, but it really pays off.
Listing 4-13. ShapeTest.java; Drawing Shapes Like Crazy
package com.badlogic.androidgames;

import android.app.Activity;
import android.content.Context;
import android.graphics.Canvas;
import android.graphics.Color;
import android.graphics.Paint;
import android.graphics.Paint.Style;
import android.os.Bundle;
import android.view.View;
import android.view.Window;
import android.view.WindowManager;

public class ShapeTest extends Activity {
    class RenderView extends View {
        Paint paint;
        public RenderView(Context context) {
            super (context);
            paint = new Paint();
        }
        protected void onDraw(Canvas canvas) {
            canvas.drawRGB(255, 255, 255);
            paint.setColor(Color.RED);
            canvas.drawLine(0, 0, canvas.getWidth()-1, canvas.getHeight()-1, paint);
            paint.setStyle(Style.STROKE);
            paint.setColor(0xff00ff00);
            canvas.drawCircle(canvas.getWidth() / 2, canvas.getHeight() / 2, 40, paint);
            paint.setStyle(Style.FILL);
            paint.setColor(0x770000ff);
            canvas.drawRect(100, 100, 200, 200, paint);
            invalidate();
        }
    }
    @Override
    public void onCreate(Bundle savedInstanceState) {
        super .onCreate(savedInstanceState);
        requestWindowFeature(Window.FEATURE_NO_TITLE);
        getWindow().setFlags(WindowManager.LayoutParams.FLAG_FULLSCREEN,
                             WindowManager.LayoutParams.FLAG_FULLSCREEN);
        setContentView(new RenderView(this ));
    }
}
Did you create that mental image already? Then let’s analyze the RenderView.onDraw() method quickly. The rest is the same as in the last example.
We start off by filling the screen with the color white. Next we draw a line from the origin to the bottom-right pixel of the screen. We use a paint that has its color set to red, so the line will be red.
Next, we modify the paint slightly and set its style to Style.STROKE, its color to green, and its alpha to 255. The circle is drawn in the center of the screen with a radius of 40 pixels using the Paint we just modified. Only the outline of the circle will be drawn, due to the Paint’s style.
Finally, we modify the Paint again. We set its style to Style.FILL and the color to full blue. Notice that we set the alpha to 0x77 this time, which equals 119 in decimal. This means that the shape we draw with the next call will be roughly 50 percent translucent.
Figure 4-13 shows the output of the test activity on 480×800 and 320×480 screens in portrait mode (the black border was added afterward).
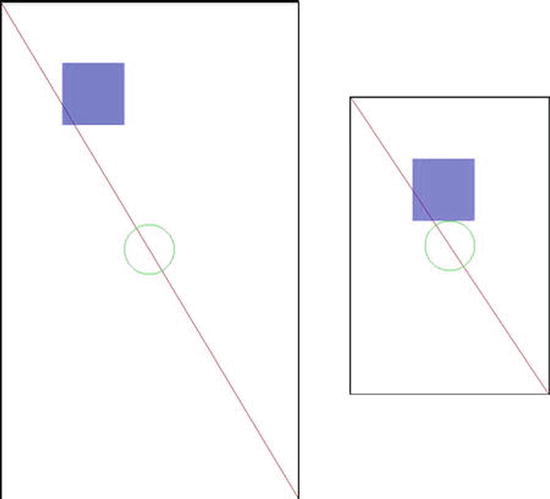
Figure 4-13. The ShapeTest output on a 480×800 screen (left) and a 320×480 screen (right)
Oh my, what happened here? That’s what we get for rendering with absolute coordinates and sizes on different screen resolutions. The only thing that is constant in both images is the red line, which simply draws from the top-left corner to the bottom-right corner. This is done in a screen resolution–independent manner.
The rectangle is positioned at (100,100). Depending on the screen resolution, the distance to the screen center will differ. The size of the rectangle is 100×100 pixels. On the bigger screen, it takes up far less relative space than on the smaller screen.
The circle’s position is again screen resolution independent, but its radius is not. Therefore, it again takes up more relative space on the smaller screen than on the bigger one.
We already see that handling different screen resolutions might be a bit of a problem. It gets even worse when we factor in different physical screen sizes. However, we’ll try to solve that issue in the next chapter. Just keep in mind that screen resolution and physical size matter.
Note The Canvas and Paint classes offer a lot more than what we just talked about. In fact, all of the standard Android Views draw themselves with this API, so you can image that there’s more behind it. As always, check out the Android Developers site for more information.
While making a game with basic shapes such as lines or circles is a possibility, it’s not exactly sexy. We want an awesome artist to create sprites and backgrounds and all that jazz for us, which we can then load from PNG or JPEG files. Doing this on Android is extremely easy.
Loading and Examining Bitmaps
The Bitmap class will become our best friend. We load a bitmap from a file by using the BitmapFactory singleton. As we store our images in the form of assets, let’s see how we can load an image from the assets/ directory:
InputStream inputStream = assetManager.open("bob.png");
Bitmap bitmap = BitmapFactory.decodeStream(inputStream);
The Bitmap class itself has a couple of methods that are of interest to us. First, we want to get to know a Bitmap instance’s width and height in pixels:
int width = bitmap.getWidth();
int height = bitmap.getHeight();
The next thing we might want to know is the color format of the Bitmap instance:
Bitmap.Config config = bitmap.getConfig();
Bitmap.Config is an enumeration with the following values:
- Config.ALPHA_8
- Config.ARGB_4444
- Config.ARGB_8888
- Config.RGB_565
From Chapter 3, you should know what these values mean. If not, we strongly suggest that you read the “Encoding Colors Digitally” section of Chapter 3 again.
Interestingly, there’s no RGB888 color format. PNG only supports ARGB8888, RGB888, and palletized colors. What color format would be used to load an RGB888 PNG? BitmapConfig.RGB_565 is the answer. This happens automatically for any RGB888 PNG we load via the BitmapFactory. The reason for this is that the actual framebuffer of most Android devices works with that color format. It would be a waste of memory to load an image with a higher bit depth per pixel, as the pixels would need to be converted to RGB565 anyway for final rendering.
So why is there the Config.ARGB_8888 configuration then? Because image composition can be done on the CPU prior to drawing the final image to the framebuffer. In the case of the alpha component, we also have a lot more bit depth than with Config.ARGB_4444, which might be necessary for some high-quality image processing.
An ARGB8888 PNG image would be loaded to a Bitmap with a Config.ARGB_8888 configuration. The other two color formats are barely used. We can, however, tell the BitmapFactory to try to load an image with a specific color format, even if its original format is different.
InputStream inputStream = assetManager.open("bob.png");
BitmapFactory.Options options = new BitmapFactory.Options();
options.inPreferredConfig = Bitmap.Config.ARGB_4444;
Bitmap bitmap = BitmapFactory.decodeStream(inputStream, null , options);
We use the overloaded BitmapFactory.decodeStream() method to pass a hint in the form of an instance of the BitmapFactory.Options class to the image decoder. We can specify the desired color format of the Bitmap instance via the BitmapFactory.Options.inPreferredConfig member, as shown previously. In this hypothetical example, the bob.png file would be an ARGB8888 PNG, and we want the BitmapFactory to load it and convert it to an ARGB4444 bitmap. The BitmapFactory can ignore the hint, though.
This will free all the memory used by that Bitmap instance. Of course, you can no longer use the bitmap for rendering after a call to this method.
You can also create an empty Bitmap with the following static method:
Bitmap bitmap = Bitmap.createBitmap(int width, int height, Bitmap.Config config);
This might come in handy if you want to do custom image compositing yourself on the fly. The Canvas class also works on bitmaps:
Canvas canvas = new Canvas(bitmap);
You can then modify your bitmaps in the same way you modify the contents of a View.
Disposing of Bitmaps
The BitmapFactory can help us reduce our memory footprint when we load images. Bitmaps take up a lot of memory, as discussed in Chapter 3. Reducing the bits per pixel by using a smaller color format helps, but ultimately we will run out of memory if we keep on loading bitmap after bitmap. We should therefore always dispose of any Bitmap instance that we no longer need via the following method:
Bitmap.recycle();
Drawing Bitmaps
Once we have loaded our bitmaps, we can draw them via the Canvas. The easiest method to do this looks as follows:
Canvas.drawBitmap(Bitmap bitmap, float topLeftX, float topLeftY, Paint paint);
The first argument should be obvious. The arguments topLeftX and topLeftY specify the coordinates on the screen where the top-left corner of the bitmap will be placed. The last argument can be null. We could specify some very advanced drawing parameters with the Paint, but we don’t really need those.
There’s another method that will come in handy, as well:
Canvas.drawBitmap(Bitmap bitmap, Rect src, Rect dst, Paint paint);
This method is super-awesome. It allows us to specify a portion of the Bitmap to draw via the second parameter. The Rect class holds the top-left and bottom-right corner coordinates of a rectangle. When we specify a portion of the Bitmap via the src, we do it in the Bitmap’s coordinate system. If we specify null, the complete Bitmap will be used.
The third parameter defines where to draw the portion of the Bitmap, again in the form of a Rect instance. This time, the corner coordinates are given in the coordinate system of the target of the Canvas, though (either a View or another Bitmap). The big surprise is that the two rectangles do not have to be the same size. If we specify the destination rectangle to be smaller in size than the source rectangle, then the Canvas will automatically scale for us. The same is true if we specify a larger destination rectangle, of course. We’ll usually set the last parameter to null again. Note, however, that this scaling operation is very expensive. We should only use it when absolutely necessary.
So, you might wonder: If we have Bitmap instances with different color formats, do we need to convert them to some kind of standard format before we can draw them via a Canvas? The answer is no. The Canvas will do this for us automatically. Of course, it will be a bit faster if we use color formats that are equal to the native framebuffer format. Usually we just ignore this.
Blending is also enabled by default, so if our images contain an alpha component per pixel, it is actually interpreted.
Putting It All Together
With all of this information, we can finally load and render some Bobs. Listing 4-14 shows the source of the BitmapTest activity that we wrote for demonstration purposes.
Listing 4-14. The BitmapTest Activity
package com.badlogic.androidgames;

import java.io.IOException;
import java.io.InputStream;

import android.app.Activity;
import android.content.Context;
import android.content.res.AssetManager;
import android.graphics.Bitmap;
import android.graphics.BitmapFactory;
import android.graphics.Canvas;
import android.graphics.Rect;
import android.os.Bundle;
import android.util.Log;
import android.view.View;
import android.view.Window;
import android.view.WindowManager;

public class BitmapTest extends Activity {
    class RenderView extends View {
        Bitmap bob565;
        Bitmap bob4444;
        Rect dst = new Rect();
        public RenderView(Context context) {
            super (context);

            try {
                AssetManager assetManager = context.getAssets();
                InputStream inputStream = assetManager.open("bobrgb888.png");
                bob565 = BitmapFactory.decodeStream(inputStream);
                inputStream.close();
                Log.d("BitmapText",
                        "bobrgb888.png format: " + bob565.getConfig());

                inputStream = assetManager.open("bobargb8888.png");
                BitmapFactory.Options options = new BitmapFactory.Options();
                options.inPreferredConfig = Bitmap.Config.ARGB_4444;
                bob4444 = BitmapFactory
                        .decodeStream(inputStream, null , options);
                inputStream.close();
                Log.d("BitmapText",
                        "bobargb8888.png format: " + bob4444.getConfig());

            }catch (IOException e) {
                // silently ignored, bad coder monkey, baaad!
            }finally {
                // we should really close our input streams here.
            }
        }

        protected void onDraw(Canvas canvas) {
            canvas.drawRGB(0, 0, 0);
            dst.set(50, 50, 350, 350);
            canvas.drawBitmap(bob565, null , dst, null );
            canvas.drawBitmap(bob4444, 100, 100, null );
            invalidate();
        }
    }

    @Override
    public void onCreate(Bundle savedInstanceState) {
        super .onCreate(savedInstanceState);
        requestWindowFeature(Window.FEATURE_NO_TITLE);
        getWindow().setFlags(WindowManager.LayoutParams.FLAG_FULLSCREEN,
                WindowManager.LayoutParams.FLAG_FULLSCREEN);
        setContentView(new RenderView(this ));
    }
}
The onCreate() method of our activity is old hat, so let’s move on to our custom View. It has two Bitmap members, one storing an image of Bob (introduced in Chapter 3) in RGB565 format, and another storing an image of Bob in ARGB4444 format. We also have a Rect member, where we store the destination rectangle for rendering.
In the constructor of the RenderView class, we first load Bob into the bob565 member of the View. Note that the image is loaded from an RGB888 PNG file, and that the BitmapFactory will automatically convert this to an RGB565 image. To prove this, we also output the Bitmap.Config of the Bitmap to LogCat. The RGB888 version of Bob has an opaque white background, so no blending needs to be performed.
Next we load Bob from an ARGB8888 PNG file stored in the assets/ directory. To save some memory, we also tell the BitmapFactory to convert this image of Bob to an ARGB4444 bitmap. The factory may not obey this request (for unknown reasons). To see whether it was nice to us, we output the Bitmap.Config file of this Bitmap to LogCat as well.
The onDraw() method is puny. All we do is fill the screen with black, draw bob565 scaled to 250×250 pixels (from his original size of 160×183 pixels), and draw bob4444 on top of bob565, unscaled but blended (which is done automagically by the Canvas). Figure 4-14 shows the two Bobs in all their glory.

Figure 4-14. Two Bobs on top of each other (at 480×800-pixel resolution)
LogCat reports that bob565 indeed has the color format Config.RGB_565, and that bob4444 was converted to Config.ARGB_4444. The BitmapFactory did not fail us!
Here are some things you should take away from this section:
- Use the minimum color format that you can get away with, to conserve memory. This might, however, come at the price of less visual quality and slightly reduced rendering speed.
- Unless absolutely necessary, refrain from drawing bitmaps scaled. If you know their scaled size, prescale them offline or during loading time.
- Always make sure you call the Bitmap.recycle() method if you no longer need a Bitmap. Otherwise you’ll get some memory leaks or run low on memory.
Using LogCat all this time for text output is a bit tedious. Let’s see how we can render text via the Canvas.
Note As with other classes, there’s more to Bitmap than what we could describe in this brief section. We covered the bare minimum we need to write Mr. Nom. If you want more information, check out the documentation on the Android Developers site.
While the text we’ll output in the Mr. Nom game will be drawn by hand, it doesn’t hurt to know how to draw text via TrueType fonts. Let’s start by loading a custom TrueType font file from the assets/ directory.
Loading Fonts
The Android API provides us with a class called Typeface that encapsulates a TrueType font. It provides a simple static method to load such a font file from the assets/ directory:
Typeface font = Typeface.createFromAsset(context.getAssets(), "font.ttf");
Interestingly enough, this method does not throw any kind of exception if the font file can’t be loaded. Instead, a RuntimeException is thrown. Why no explicit exception is thrown for this method is a bit of a mystery.
Drawing Text with a Font
Once we have our font, we set it as the Typeface of a Paint instance:
paint.setTypeFace(font);
Via the Paint instance, we also specify the size at which we want to render the font:
paint.setTextSize(30);
The documentation of this method is again a little sparse. It doesn’t tell us whether the text size is given in points or pixels. We just assume the latter.
Finally, we can draw text with this font via the following Canvas method:
canvas.drawText("This is a test!", 100, 100, paint);
The first parameter is the text to draw. The next two parameters are the coordinates where the text should be drawn to. The last argument is familiar: it’s the Paint instance that specifies the color, font, and size of the text to be drawn. By setting the color of the Paint, you also set the color of the text to be drawn.
Text Alignment and Boundaries
Now, you might wonder how the coordinates of the preceding method relate to the rectangle that the text string fills. Do they specify the top-left corner of the rectangle in which the text is contained? The answer is a bit more complicated. The Paint instance has an attribute called the align setting. It can be set via this method of the Paint class:
Paint.setTextAlign(Paint.Align align);
The Paint.Align enumeration has three values: Paint.Align.LEFT, Paint.Align.CENTER, and Paint.Align.RIGHT. Depending on what alignment is set, the coordinates passed to the Canvas.drawText() method are interpreted as either the top-left corner of the rectangle, the top-center pixel of the rectangle, or the top-right corner of the rectangle. The standard alignment is Paint.Align.LEFT.
Sometimes it’s also useful to know the bounds of a specific string in pixels. For this, the Paint class offers the following method:
Paint.getTextBounds(String text, int start, int end, Rect bounds);
The first argument is the string for which we want to get the bounds. The second and third arguments specify the start character and the end character within the string that should be measured. The end argument is exclusive. The final argument, bounds, is a Rect instance we allocate ourselves and pass into the method. The method will write the width and height of the bounding rectangle into the Rect.right and Rect.bottom fields. For convenience, we can call Rect.width() and Rect.height() to get the same values.
Note that all of these methods work on a single line of text only. If we want to render multiple lines, we have to do the layout ourselves.
Putting It All Together
Enough talk: let’s do some more coding. Listing 4-15 shows text rendering in action.
Listing 4-15. The FontTest Activity
package com.badlogic.androidgames;

import android.app.Activity;
import android.content.Context;
import android.graphics.Canvas;
import android.graphics.Color;
import android.graphics.Paint;
import android.graphics.Rect;
import android.graphics.Typeface;
import android.os.Bundle;
import android.view.View;
import android.view.Window;
import android.view.WindowManager;

public class FontTest extends Activity {
    class RenderView extends View {
        Paint paint;
        Typeface font;
        Rect bounds = new Rect();

        public RenderView(Context context) {
            super (context);
            paint = new Paint();
            font = Typeface.createFromAsset(context.getAssets(), "font.ttf");
        }

        protected void onDraw(Canvas canvas) {
            canvas.drawRGB(0, 0, 0);
            paint.setColor(Color.YELLOW);
            paint.setTypeface(font);
            paint.setTextSize(28);
            paint.setTextAlign(Paint.Align.CENTER);
            canvas.drawText("This is a test!", canvas.getWidth() / 2, 100,
                    paint);

            String text = "This is another test o_O";
            paint.setColor(Color.WHITE);
            paint.setTextSize(18);
            paint.setTextAlign(Paint.Align.LEFT);
            paint.getTextBounds(text, 0, text.length(), bounds);
            canvas.drawText(text, canvas.getWidth() - bounds.width(), 140,
                    paint);
            invalidate();
        }
    }

    @Override
    public void onCreate(Bundle savedInstanceState) {
        super .onCreate(savedInstanceState);
        requestWindowFeature(Window.FEATURE_NO_TITLE);
        getWindow().setFlags(WindowManager.LayoutParams.FLAG_FULLSCREEN,
                WindowManager.LayoutParams.FLAG_FULLSCREEN);
        setContentView(new RenderView(this ));
    }
}
We won’t discuss the onCreate() method of the activity, since we’ve seen it before.
Our RenderView implementation has three members: a Paint, a Typeface, and a Rect, where we’ll store the bounds of a text string later on.
In the constructor, we create a new Paint instance and load a font from the file font.ttf in the assets/ directory.
In the onDraw() method, we clear the screen with black, set the Paint to the color yellow, set the font and its size, and specify the text alignment to be used when interpreting the coordinates in the call to Canvas.drawText(). The actual drawing call renders the string This is a test!, centered horizontally at coordinate 100 on the y axis.
For the second text-rendering call, we do something else: we want the text to be right-aligned with the right edge of the screen. We could do this by using Paint.Align.RIGHT and an x coordinate of Canvas.getWidth() – 1. Instead, we do it the hard way by using the bounds of the string to practice very basic text layout a little. We also change the color and the size of the font for rendering. Figure 4-15 shows the output of this activity.

Figure 4-15. Fun with text (480×800-pixel resolution)
Another mystery of the Typeface class is that it does not explicitly allow us to release all its resources. We have to rely on the garbage collector to do the dirty work for us.
Note We only scratched the surface of text rendering here. If you want to know more . . . well, by now you know where to look.
Continuous Rendering with SurfaceView
This is the section where we become real men and women. It involves threading, and all the pain that is associated with it. We’ll get through it alive. We promise!
Motivation
When we first tried to do continuous rendering, we did it the wrong way. Hogging the UI thread is unacceptable; we need a solution that does all the dirty work in a separate thread. Enter SurfaceView.
As the name gives away, the SurfaceView class is a View that handles a Surface, another class of the Android API. What is a Surface? It’s an abstraction of a raw buffer that is used by the screen compositor for rendering that specific View. The screen compositor is the mastermind behind all rendering on Android, and it is ultimately responsible for pushing all pixels to the GPU. The Surface can be hardware accelerated in some cases. We don’t care much about that fact, though. All we need to know is that it is a more direct way to render things to the screen.
Our goal is it to perform our rendering in a separate thread so that we do not hog the UI thread, which is busy with other things. The SurfaceView class provides us with a way to render to it from a thread other than the UI thread.
SurfaceHolder and Locking
In order to render to a SurfaceView from a different thread than the UI thread, we need to acquire an instance of the SurfaceHolder class, like this:
SurfaceHolder holder = surfaceView.getHolder();
The SurfaceHolder is a wrapper around the Surface, and does some bookkeeping for us. It provides us with two methods:
Canvas SurfaceHolder.lockCanvas();
SurfaceHolder.unlockAndPost(Canvas canvas);
The first method locks the Surface for rendering and returns a nice Canvas instance we can use. The second method unlocks the Surface again and makes sure that what we’ve drawn via the Canvas gets displayed on the screen. We will use these two methods in our rendering thread to acquire the Canvas, render with it, and finally make the image we just rendered visible on the screen. The Canvas we have to pass to the SurfaceHolder.unlockAndPost() method must be the one we received from the SurfaceHolder.lockCanvas() method.
The Surface is not immediately created when the SurfaceView is instantiated. Instead, it is created asynchronously. The surface will be destroyed each time the activity is paused, and it will be re-created when the activity is resumed.
Surface Creation and Validity
We cannot acquire the Canvas from the SurfaceHolder as long as the Surface is not yet valid. However, we can check whether the Surface has been created or not via the following statement:
boolean isCreated = surfaceHolder.getSurface().isValid();
If this method returns true, we can safely lock the surface and draw to it via the Canvas we receive. We have to make absolutely sure that we unlock the Surface again after a call to SurfaceHolder.lockCanvas(), or else our activity might lock up the phone!
Putting It All Together
So how do we integrate all of this with a separate rendering thread as well as with the activity life cycle? The best way to figure this out is to look at some actual code. Listing 4-16 shows a complete example that performs the rendering in a separate thread on a SurfaceView.
Listing 4-16. The SurfaceViewTest Activity
package com.badlogic.androidgames;

import android.app.Activity;
import android.content.Context;
import android.graphics.Canvas;
import android.os.Bundle;
import android.view.SurfaceHolder;
import android.view.SurfaceView;
import android.view.Window;
import android.view.WindowManager;

public class SurfaceViewTest extends Activity {
    FastRenderView renderView;
    public void onCreate(Bundle savedInstanceState) {
        super .onCreate(savedInstanceState);
        requestWindowFeature(Window.FEATURE_NO_TITLE);
        getWindow().setFlags(WindowManager.LayoutParams.FLAG_FULLSCREEN,
                             WindowManager.LayoutParams.FLAG_FULLSCREEN);
        renderView = new FastRenderView(this );
        setContentView(renderView);
    }
    protected void onResume() {
        super .onResume();
        renderView.resume();
    }
    protected void onPause() {
        super .onPause();
        renderView.pause();
    }
    class FastRenderView extends SurfaceViewimplements Runnable {
        Thread renderThread = null ;
        SurfaceHolder holder;
        volatile boolean running = false ;
        public FastRenderView(Context context) {
            super (context);
            holder = getHolder();
        }

        public void resume() {
            running = true ;
            renderThread = new Thread(this );
            renderThread.start();
        }
        public void run() {
            while (running) {
                if (!holder.getSurface().isValid())
                    continue ;
                Canvas canvas = holder.lockCanvas();
                canvas.drawRGB(255, 0, 0);
                holder.unlockCanvasAndPost(canvas);
            }
        }

        public void pause() {
            running = false ;
            while (true ) {
                try {
                    renderThread.join();
                    return ;
                }catch (InterruptedException e) {
                    // retry
                }
            }
        }
    }
}
This doesn’t look all that intimidating, does it? Our activity holds a FastRenderView instance as a member. This is a custom SurfaceView subclass that will handle all the thread business and surface locking for us. To the activity, it looks like a plain-old View.
In the onCreate() method, we enable full-screen mode, create the FastRenderView instance, and set it as the content view of the activity.
We also override the onResume() method this time. In this method, we will start our rendering thread indirectly by calling the FastRenderView.resume() method, which does all the magic internally. This means that the thread will get started when the activity is initially created (because onCreate() is always followed by a call to onResume()). It will also get restarted when the activity is resumed from a paused state.
This, of course, implies that we have to stop the thread somewhere; otherwise, we’d create a new thread every time onResume() was called. That’s where onPause() comes in. It calls the FastRenderView.pause() method, which will completely stop the thread. The method will not return before the thread is completely stopped.
So let’s look at the core class of this example: FastRenderView. It’s similar to the RenderView classes we implemented in the last couple of examples in that it derives from another View class. In this case, we directly derive it from the SurfaceView class. It also implements the Runnable interface so that we can pass it to the rendering thread in order for it to run the render thread logic.
The FastRenderView class has three members. The renderThread member is simply a reference to the Thread instance that will be responsible for executing our rendering thread logic. The holder member is a reference to the SurfaceHolder instance that we get from the SurfaceView superclass from which we derive. Finally, the running member is a simple Boolean flag we will use to signal the rendering thread that it should stop execution. The volatile modifier has a special meaning that we’ll get to in a minute.
All we do in the constructor is call the superclass constructor and store the reference to the SurfaceHolder in the holder member.
Next comes the FastRenderView.resume() method. It is responsible for starting up the rendering thread. Notice that we create a new Thread each time this method is called. This is in line with what we discussed when we talked about the activity’s onResume() and onPause() methods. We also set the running flag to true. You’ll see how that’s used in the rendering thread in a bit. The final piece to take away is that we set the FastRenderView instance itself as the Runnable of the thread. This will execute the next method of the FastRenderView in that new thread.
The FastRenderView.run() method is the workhorse of our custom View class. Its body is executed in the rendering thread. As you can see, it’s merely composed of a loop that will stop executing as soon as the running flag is set to false. When that happens, the thread will also be stopped and will die. Inside the while loop, we first check to ensure that the Surface is valid. If it is, we lock it, render to it, and unlock it again, as discussed earlier. In this example, we simply fill the Surface with the color red.
The FastRenderView.pause() method looks a little strange. First we set the running flag to false. If you look up a little, you will see that the while loop in the FastRenderView.run() method will eventually terminate due to this, and hence stop the rendering thread. In the next couple of lines, we simply wait for the thread to die completely, by invoking Thread.join(). This method will wait for the thread to die, but might throw an InterruptedException before the thread actually dies. Since we have to make absolutely sure that the thread is dead before we return from that method, we perform the join in an endless loop until it is successful.
Let’s come back to the volatile modifier of the running flag. Why do we need it? The reason is delicate: the compiler might decide to reorder the statements in the FastRenderView.pause() method if it recognizes that there are no dependencies between the first line in that method and the while block. It is allowed to do this if it thinks it will make the code execute faster. However, we depend on the order of execution that we specified in that method. Imagine if the running flag were set after we tried to join the thread. We’d go into an endless loop, as the thread would never terminate.
The volatile modifier prevents this from happening. Any statements where this member is referenced will be executed in order. This saves us from a nasty Heisenberg—a bug that comes and goes without the ability to be reproduced consistently.
There’s one more thing that you might think will cause this code to explode. What if the surface is destroyed between the calls to SurfaceHolder.getSurface().isValid() and SurfaceHolder.lock()? Well, we are lucky—this can never happen. To understand why, we have to take a step back and see how the life cycle of the Surface works.
We know that the Surface is created asynchronously. It is likely that our rendering thread will execute before the Surface is valid. We safeguard against this by not locking the Surface unless it is valid. That covers the surface creation case.
The reason the rendering thread code does not explode from the Surface being destroyed, between the validity check and the locking, has to do with the point in time at which the Surface gets destroyed. The Surface is always destroyed after we return from the activity’s onPause() method. Since we wait for the thread to die in that method via the call to FastRenderView.pause(), the rendering thread will no longer be alive when the Surface is actually destroyed. Sexy, isn’t it? But it’s also confusing.
We now perform our continuous rendering the correct way. We no longer hog the UI thread, but instead use a separate rendering thread. We made it respect the activity life cycle as well, so that it does not run in the background, eating the battery while the activity is paused. The whole world is a happy place again. Of course, we’ll need to synchronize the processing of input events in the UI thread with our rendering thread. But that will turn out to be really easy, which you’ll see in the next chapter, when we implement our game framework based on all the information you digested in this chapter.
Hardware-Accelerated Rendering with Canvas
Android 3.0 (Honeycomb) added a remarkable feature in the form of the ability to enable GPU hardware acceleration for standard 2D canvas draw calls. The value of this feature varies by application and device, as some devices will actually perform better doing 2D draws on the CPU and others will benefit from the GPU. Under the hood, the hardware acceleration analyzes the draw calls and converts them into OpenGL. For example, if we specify that a line should be drawn from 0,0 to 100,100, then the hardware acceleration will put together a special line-draw call using OpenGL and draw this to a hardware buffer that later gets composited to the screen.
Enabling this hardware acceleration is as simple as adding the following into your AndroidManifest.xml under the <application /> tag:
android:hardwareAccelerated="true"
Make sure to test your game with the acceleration turned on and off on a variety of devices, to determine if it’s right for you. In the future, it may be fine to have it always on, but as with anything, we recommend that you take the approach of testing and determining this for yourself . Of course, there are more configuration options that let you set the hardware acceleration for a specific application, activity, window, or view, but since we’re doing games, we only plan on having one of each, so setting it globally via application would make the most sense.
The developer of this feature of Android, Romain Guy, has a very detailed blog article about the dos and don’ts of hardware acceleration and some general guidelines to getting decent performance using it. The blog entry’s URL is http://android-developers.blogspot.com/2011/03/android-30-hardware-acceleration.html
Best Practices
Android (or rather Dalvik) has some strange performance characteristics at times. In this section we’ll present to you some of the most important best practices that you should follow to make your games as smooth as silk.
- The garbage collector is your biggest enemy. Once it obtains CPU time for doing its dirty work, it will stop the world for up to 600 ms. That’s half a second that your game will not update or render. The user will complain. Avoid object creation as much as possible, especially in your inner loops.
- Objects can get created in some not-so-obvious places that you’ll want to avoid. Don’t use iterators, as they create new objects. Don’t use any of the standard Set or Map collection classes, as they create new objects on each insertion; instead, use the SparseArray class provided by the Android API. Use StringBuffers instead of concatenating strings with the + operator. This will create a new StringBuffer each time. And for the love of all that’s good in this world, don’t use boxed primitives!
- Method calls have a larger associated cost in Dalvik than in other VMs. Use static methods if you can, as those perform best. Static methods are generally regarded as evil, much like static variables, as they promote bad design, so try to keep your design as clean as possible. Perhaps you should avoid getters and setters as well. Direct field access is about three times faster than method invocations without the JIT compiler, and about seven times faster with the JIT compiler. Nevertheless, think of your design before removing all your getters and setters.
- Floating-point operations are implemented in software on older devices and Dalvik versions without a JIT compiler (anything before Android version 2.2). Old-school game developers would immediately fall back to fixed-point math. Don’t do that either, since integer divisions are slow as well. Most of the time, you can get away with floats, and newer devices sport Floating Point Units (FPUs), which speed things up quite a bit once the JIT compiler kicks in.
- Try to cram frequently accessed values into local variables inside a method. Accessing local variables is faster than accessing members or calling getters.
Of course, you need to be careful about many other things. We’ll sprinkle the rest of the book with some performance hints when the context calls for it. If you follow the preceding recommendations, you should be on the safe side. Just don’t let the garbage collector win!
Summary
This chapter covered everything you need to know in order to write a decent little 2D game for Android. We looked at how easy it is to set up a new game project with some defaults. We discussed the mysterious activity life cycle and how to live with it. We battled with touch (and more importantly, multitouch) events, processed key events, and checked the orientation of our device via the accelerometer. We explored how to read and write files. Outputting audio on Android turns out to be child’s play, and apart from the threading issues with the SurfaceView, drawing stuff to the screen isn’t that hard either. Mr. Nom can now become a reality—a terrible, hungry reality!